Deploy Mule Applications to Runtime Fabric
You deploy Mule applications to Mule runtime servers on Anypoint Runtime Fabric.
Applications deployed to a production environment must be deployed to an instance of Runtime Fabric that is separate from non-production applications.
After deploying an application you can test the inbound traffic for deployed applications.
Deploy a Mule Application to Runtime Fabric
The full deployment process includes these steps:
-
Select the application and deployment target
-
Configure the deployment target
-
Configure a Public Endpoint for the Application (for Self-Managed Kubernetes) (Runtime Fabric on Self-Managed Kubernetes only)
-
Specify the network configuration for the application (Runtime Fabric on VMs/Bare Metal only)
-
Set up replication
-
(Optional) Enable TLSv1 and TLSv1.1
-
Configure application properties
-
Deploy the application
Prerequisites
Before deploying an application to Anypoint Runtime Fabric, perform the following:
-
Install and configure Anypoint Runtime Fabric. Refer to the installation instructions for Runtime Fabric on VMs / Bare Metal or Runtime Fabric on Self-Managed Kubernetes for more information.
-
Ensure that Runtime Fabric is associated with an environment. Refer to Associating Business Groups and Environments to Anypoint Runtime Fabric
-
Determine the resource allocation requirements for your application. Refer to Determine Application Resource Allocation on Runtime Fabric for more information.
-
Check if you require the Exchange Contributors permission to deploy applications to Runtime Fabric.
-
To deploy an application to a specific domain (endpoint), ensure that you have set up domains (endpoints) in your environment. Refer to Configure Ingress For Runtime Fabric on Self-Managed Kubernetes or Enable Inbound Traffic on Anypoint Runtime Fabric (VM / Baremetal)
Select the Application and Deployment Target
-
Sign into Anypoint Platform.
-
Navigate to Runtime Manager, and select Applications.
-
Click Deploy application.
-
Provide a name for your application in the Application Name field.
The name can contain only lowercase alphanumeric characters, hyphens, and underscores.
-
Click Choose File to select the application to deploy, and then select one of the following options:
-
Import file from Exchange: Select a Mule application stored in Anypoint Exchange.
-
Upload file: Select a Mule application file from your filesystem.
-
-
From the Deployment Target drop-down list, select the name of your Runtime Fabric.
-
Select the Mule runtime engine version from the Runtime Version drop-down list.
The Deployment Target, Ingress, Properties, Logs, and JVM tabs are displayed. Use these tabs to enter additional configuration information for your application.
Configure a Public Endpoint for the Application for Self-Managed Kubernetes
Use the following steps to configure a public endpoint for an application deployed to Runtime Fabric for Self-Managed Kubernetes.
Available domains and paths for an application come from the ingress resource template configured by your Runtime Fabric administrator. Refer to Use Custom Ingress Resource Templates in Runtime Fabric on Self-Managed Kubernetes for more information.
| If you do not select a domain, the application is deployed to an empty domain. |
-
Select Ingress.
-
From the Host drop-down list, select a host for the application.
-
If the hostname uses a wildcard, add a subdomain in the Subdomain field.
The Subdomain field is only available if the hostname uses a wildcard.
-
In the Path field, add a URL path to the application’s endpoint:
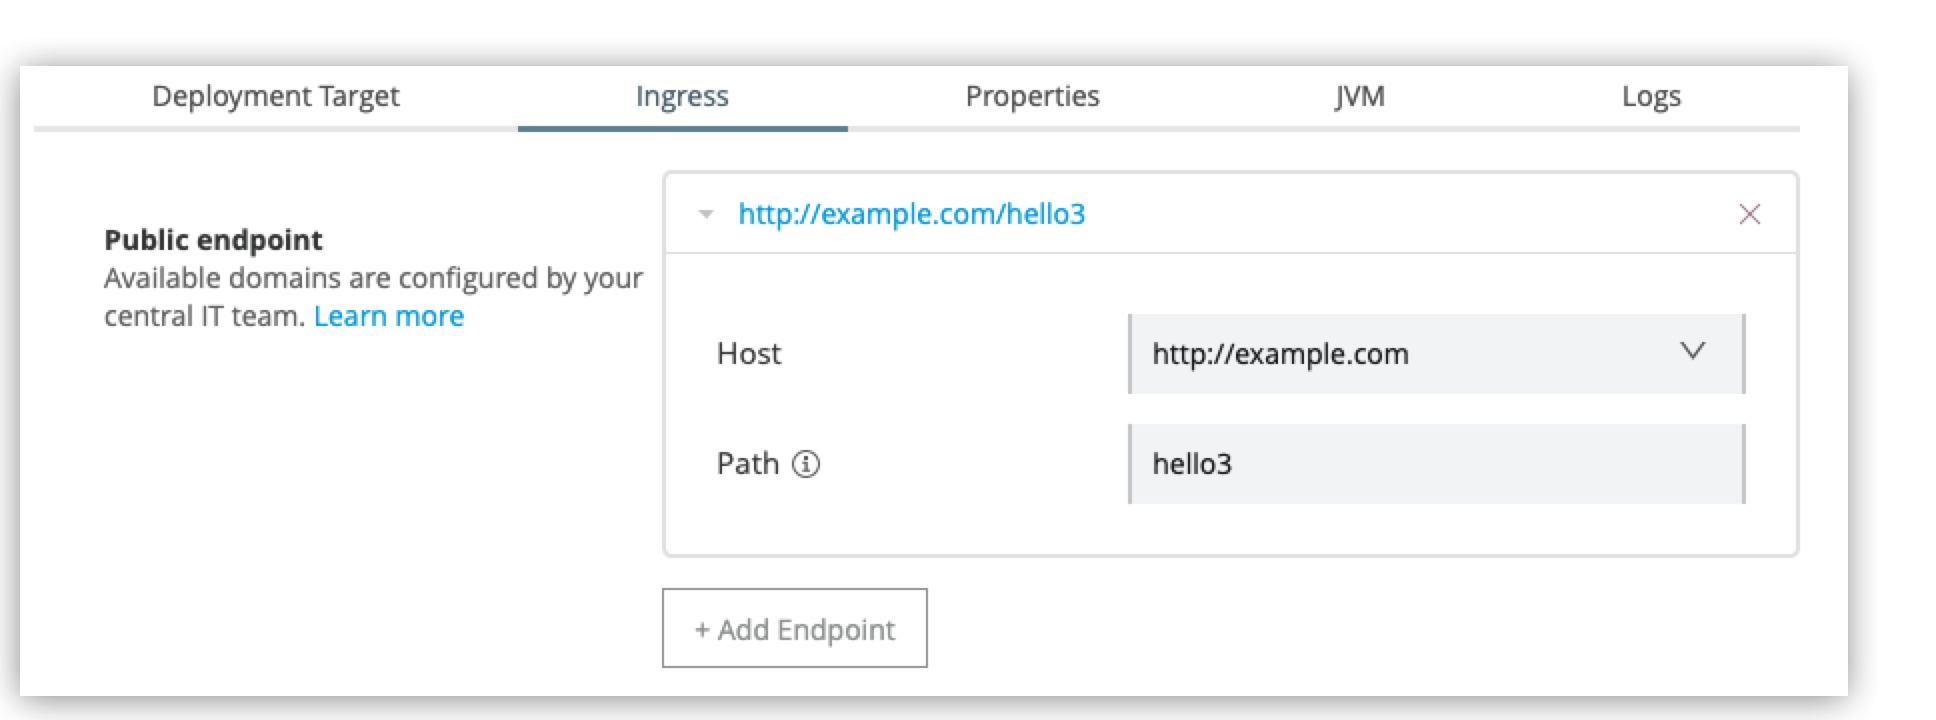
-
To preview the endpoint, click the generated preview link.
-
To add additional endpoints, click + Add Endpoint.
Configure a Public Endpoint for the Application for VMs/Bare Metal
Use the following steps to configure a public endpoint and network configuration for an application deployed to Runtime Fabric for VMs/Bare Metal.
You must first enable inbound traffic manually. Ensure your application is configured to accept connections on port 8081.
To access a Runtime Fabric instance using more than one FQDN, add additional DNS entries in the subjectAltName certificate property. If a certificate has multiple DNS entries specified in the subjectAltName property, the available URLs are displayed in the Public endpoint section. Each deployed application can only be addressed using a single FQDN.
|
-
Select Ingress.
Ingress is automatically enabled for new application deployments.
-
If you want to keep ingress enabled, from the Domain drop-down list, choose the appropriate domain.
Or, to enable inbound traffic for an existing application, choose the appropriate domain.
-
To disable inbound traffic for a new application or an existing application, clear the domain selection.
To clear the selection, highlight the domain name and press Delete.
-
Optionally, enable or disable the following:
-
Last-Mile security: TLS termination and decryption for the forwarded HTTPS connections occurs in the application. This option requires that the Mule application include an SSL certificate and also requires more CPU resources.
-
Forward SSL session: Enables SSL forwarding during a session.
SSL forwarding is mostly used with client authentication. See Enable Client Authentication. SSL forwarding forwards client certificate details in HTTP request headers so they are available to the application. These fields can identify an authenticated client and allow an application to determine and use the identity.
The following headers are available:
Header Name Value x-ssl-client-verify
SUCCESS/FAIL
x-ssl-issuer
the client certificate issuer.
x-ssl-client-serial
the client certificate serial number.
x-ssl-client-dn
the contents of the client certificate DN field.
-
Set Up Replication and Storage
After you configure an application’s endpoints, set up replication to configure the number of application instances to deploy.
A minimum of two replicas is required for high availability.
You set up object to storage to enable data persistence across Mule application replicas and restarts. This option is only available on Mule runtime engine version 4.2.1 or later. If this option is unavailable, contact your IT administrator. Refer to Persistence Gateway for more information.
-
Select the Deployment Target tab.
This tab displays the name and type of the deployment target previously selected.
-
Select the number of replicas, or instances, of the application to deploy.
-
To enable Mule clustering across each replica of the application, enable Run in Runtime Clustering Mode.
-
To enforce the deployment of replicas across different nodes, select Enforce deploying replicas across nodes.
If there is an insufficient number of worker nodes or resources available on the worker nodes needed to deploy each replica, some replicas in the deployment remain in Pending status. The deployment status will transition to Running after all replicas are deployed on different worker nodes.
-
To enable data persistence, select Use Persistent Object Storage.
-
Specify the number of Cores and amount of Memory to allocate to each replica of the application by adjusting the sliders to the appropriate values.
If needed, review determine resource allocation for applications deployed to Runtime Fabric.
(Optional) Enable TLS v1 and TLS v1.1
Starting with the August 3, 2021 patch releases, Mule runtime disables TLS v1 and TLS v1.1 by default for all runtime versions. When you deploy an application to Runtime Fabric, you can enable TLS v1 or TLS v1.1 using JVM args.
-
Click the JVM tab.
-
In the Java Virtual Machine arguments field, add one of the following arguments:
-
Enable TLSv1.0 and TLSv1.1:
-Drtf.allow.TLSv1.0+ -
Enable TLSv1.1:
-Drtf.allow.TLSv1.1
-
Configure Application Properties
Use Runtime Manager to configure any application property values, such as specifying the environment or setting passwords and usernames.
Runtime Fabric resolves the property at runtime without exposing the sensitive information.
-
Click the Properties tab.
-
Click Table view.
-
In the New Key field, add a property to protect.
-
In the New Value field, add a value.
-
Add additional properties as needed.
Deploy the Application
Now you’re ready to deploy the application.
-
To deploy the application, click Deploy Application.
If the Deploy Application button is disabled, ensure that you have uploaded a valid Mule application file. Also ensure that the Mule runtime engine version you selected is the same as the version used by your application.
Result: Runtime Manager displays a status message confirming the application deployment. After the deployment starts, you’ll be directed to the applications list page where you can view the deployment status.
For newly deployed applications, the status initially displays as Starting. The status updates to Started if the application is successful. Monitor the application status to ensure that it starts successfully.
Verify Inbound Traffic for Deployed Applications
To test inbound traffic for deployed applications, you can send a request using the controller IP address along with a host header set to the domain. The host header depends on the structure of the application URL.
-
Determine which endpoint exposes the application. The Application url field on the Manage application page in Runtime Manager contains this information.
-
Run the following cURL command for verification:
curl -Lvk -XGET {application-path-from-runtime-manager} --resolve {hostname}:443:{ip-address-of-controller}In the following example,
{application-path-from-runtime-manager}is set tohttps://newapp.example-rtf.dev, and192.168.64.14is the IP address of a controller machine in your cluster.curl -Lvk https://newapp.example-rtf.dev/ --resolve newapp.example-rtf.dev:443:192.168.64.14
Configure Continuous Deployment
To set up a workflow for on-premises application deployment on Runtime Fabric, refer to Workflow for On-Premises Runtime Fabric.
Common Issues
When deploying applications, you may encounter the following issues:
-
If your application remains in the Starting status for several minutes, this may be due to specifying a lower amount of resources. It’s common for applications to take several minutes to start up when selecting 0.3 cores or lower.
-
If the application encounters an error during startup, the deployment will stop and the status updates to Failed. An error message preview is displayed when clicking on the application and viewing the right sidebar. To view the entire message, click on the Manage Application button.
-
If you are using Runtime Fabric on VMs/Bare Metal, view the application logs in Ops Center or your third party logging provider to see additional details.
-
An error message indicating
insufficient resourcesis returned when Runtime Fabric doesn’t have the CPU cores or memory available for the deployment. When selecting multiple replicas, it’s important to know that the cores and memory specified applies to each replica. -
If a re-deployment to an existing running application fails, the previous application remains running and active. This behavior enables zero-downtime application re-deployments. Runtime Manager will report the details and status of the failed deployment to help resolve the failure.