Salesforce Composite Connector
Anypoint Connector for Salesforce Composite (Salesforce Composite Connector) provides you a way to integrate with Salesforce Composite API Salesforce Composite API. The connector exposes convenient methods for preparing sub-requests, execute them in one batch and parse the results. Also it offers the possibility of creating SObject Trees through an operation separate from the batch ones, called "createSobjectTree". It provides DataSense on both preparation of sub-requests and parsing response of their execution and on the creation of the SObject Trees.
Read through this User Guide to understand how to set up and configure a basic integration flow using the connector. Read through the Technical Reference to understand how the connector operations tie in with the Salesforce Composite API calls. You will also find demo applications here that illustrate how to use the connector operations.
Release Notes: Salesforce Composite Connector Release Notes.
Before You Begin
This document assumes you are familiar with Mule, Anypoint Connectors, and Anypoint Studio Essentials To increase your familiarity with Studio, consider completing one or more Anypoint Studio Tutorials. Further, this page assumes that you have a basic understanding of Mule flows and Mule Global Elements.
Requirements
To use the Salesforce Composite connector, you need:
-
You must have a regular Salesforce account. For more information see Salesforce Rest API and Salesforce Composite API Developer’s Guide.
-
To have downloaded and installed Anypoint Studio Community edition on your computer.
Installing and Configuring
Installing
You can install a connector in Anypoint Studio using the instructions in To Import an Asset from Exchange.
Using the Connector in a New Project
To use the Salesforce Composite connector in a Mule application project:
-
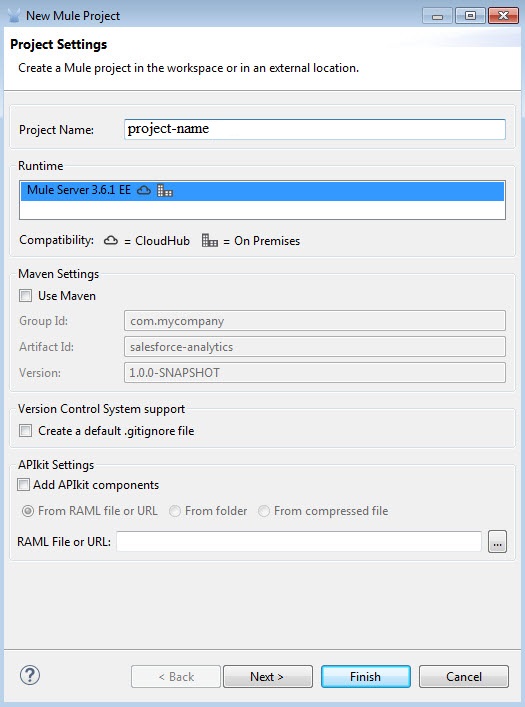
In Studio, select File > New > Mule Project.

-
Enter a name for your new project and leave the remaining options with their default values.
-
If you plan to use Git, select Create a default .gitignore file for the project with default .gitignore settings for Studio Projects, and then click Next.
-
Click Finish to create the project.
Configuring the Global Element
To use the Salesforce Composite connector in your Mule application, you must configure a global Salesforce Composite element that can be used by all the Salesforce Composite connectors in the application (read more about global elements).
Connector Authentication
To access the data in a Salesforce Composite instance, the connector uses "OAuth 2.0 Username-Password" flow. For more on how to obtain an access token with this method from Salesforce see: OAuth 2.0 Username-Password. Below are the steps for configuring global element using it:
-
Click the Global Elements tab at the base of the canvas.
-
On the Global Mule Configuration Elements screen, click Create.
-
In the Choose Global Type wizard, filter by "salesforce composite", expand Connector Configuration, and then select "Salesforce Composite: Configuration".

-
Click Ok
-
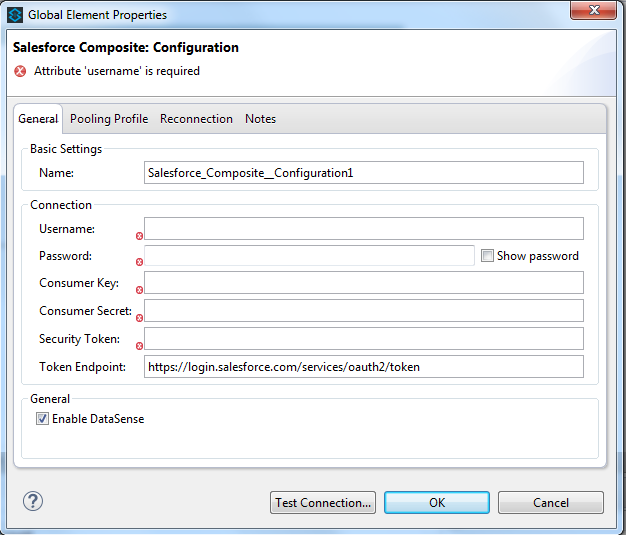
Enter the global element properties:
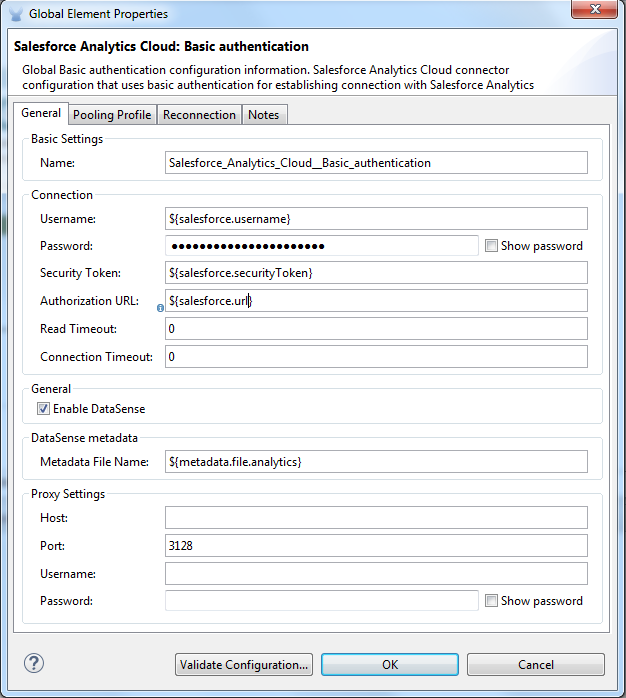
In the image above, the placeholder values refer to a configuration file placed in the src folder of your project (Learn how to configure properties). You can either hardcode your credentials into the global configuration properties, or reference a configuration file that contains these values. For simpler maintenance and better re-usability of your project, Mule recommends that you use a configuration file. Keeping these values in a separate file is useful if you need to deploy to different environments, such as production, development, and QA, where your access credentials differ. See Deploying to Multiple Environments for instructions on how to manage this. Field Description Name
Enter a name for this connector to reference it later.
Username
Enter a Salesforce username.
Password
Enter the corresponding password.
Consumer Key
Enter the consumer key for your connected app from Salesforce.
Consumer Secret
Enter the consumer secret for your connected app from Salesforce.
Security token
Enter the Security Token for the username.
Token endpoint
Enter the URL to server providing the token. For more info see: Understanding OAuth Endpoints.
Using the Connector
You can use the Salesforce Composite connector as an outbound connector in your flow to push data into Salesforce system by taking advantage of composite resource which is part of Salesforce REST Api. To use it as an outbound connector, simply place the connector in your flow at any point after an inbound endpoint.
Use cases
The purpose of this connector is to let you take advantage of composite resource of Salesforce REST API. It comes to you with operations that have DataSense support in order to give you the best user experience in preparing sub-requests that are going to be executed in one batch and also for parsing the responses that come from Salesforce. You have one operation for each resource supported by composite for preparing the sub-request that Salesforce Composite API expects, named "Pre <name_of_resource>", with the purpose of giving an easy way to create that sub-request and one operation for each resource with the purpose of giving an easy way to parse the response of its correlated sub-request, named "Post <name_of_resource>". You also have an operation responsible to send a list of sub-request to Salesforce and return a list of responses.
Another operation that this connector has available is "createSobjectTree" which creates one or more sObject trees with root records of the specified type (Salesforce SObject Tree documentation).
Adding the Salesforce Composite Connector to a Flow
-
Create a new Mule project in Anypoint Studio.
-
Drag the Salesforce Composite connector onto the canvas, then select it to open the properties editor.
-
Configure the connector’s parameters:
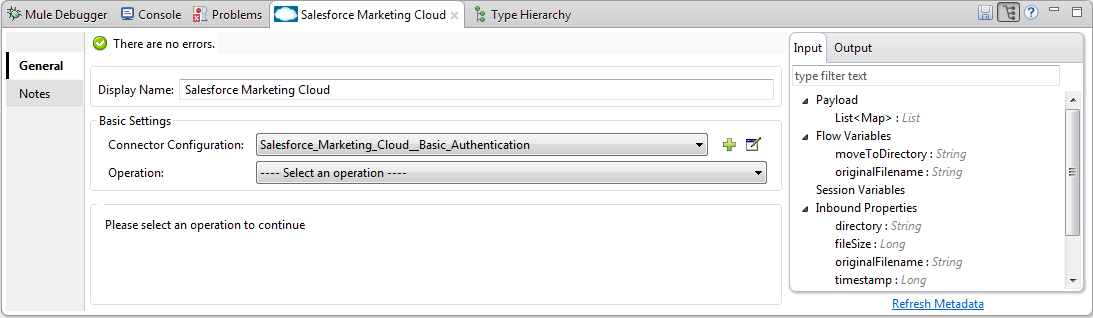
Field Description Display Name
Enter a unique label for the connector in your application.
Connector Configuration
Select a global element from the drop-drown that you have created under Configuring the Salesforce Composite Global Element section.
Operation
Select an operation for the connector to perform.
-
Click the blank space on the canvas and save your configurations.
Example Use Cases
Example Use Case 1
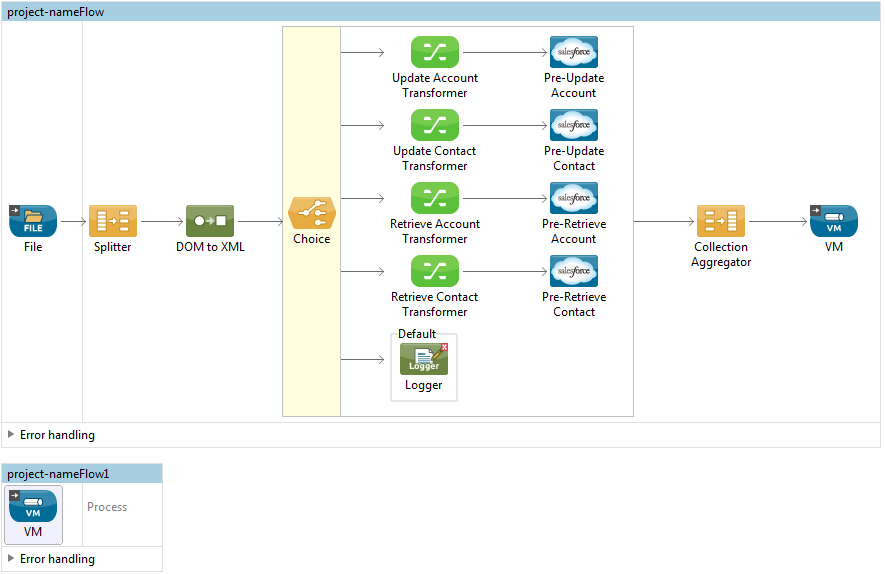
In this use case it is described how to use the connector for preparing four sub-requests, execute them in one batch and parse the responses. The sub-requests that we are going to execute are update an account, update a contact, retrieve the updated account and contact, respectively. The input data that we need in order to create sub-requests will be read from a file and the results of execution are going to be also logged into a file. So lets get to work.
Create a new Mule Project by clicking on File > New > Mule Project. In the new project dialog box, the only thing you are required to enter is the name of the project. Click on Finish.
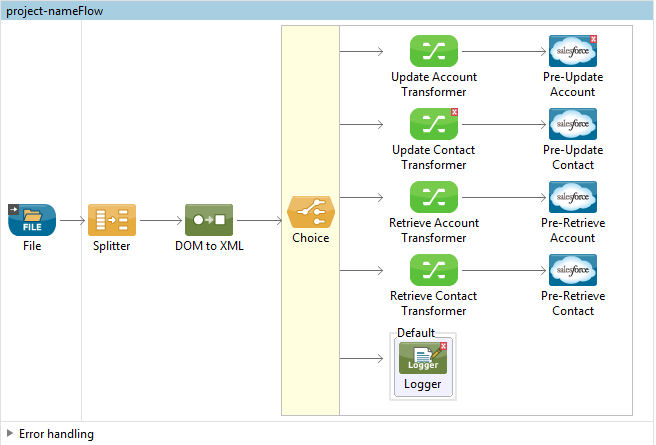
Now lets create the flow. Navigate through the project’s structure and double-click on src/main/app/project-name.xml and follow the steps below:
-
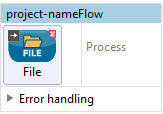
Go to palette and search for "File".
-
Drag and drop the "File" element on canvas. This element is going to read the file where we put input data needed for creating sub-requests.
-
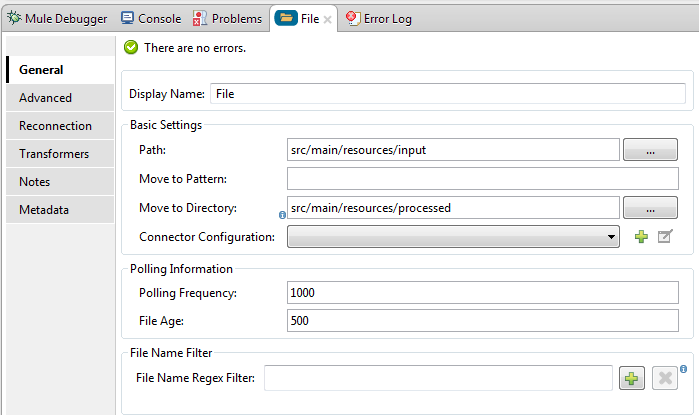
Double click on file element and set its properties as below:
-
"Path" to "src/main/resources/input"
-
"Move to Directory" to "src/main/resources/processed"
-
-
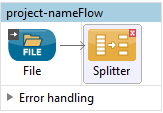
Go to palette, search for "Splitter" and drag and drop it on canvas after "File". This element is used for splitting input data into items each being used as input for operations responsible of preparing sub-requests. We will provide input data in XML format so will use xpath3 as a split expression.
-
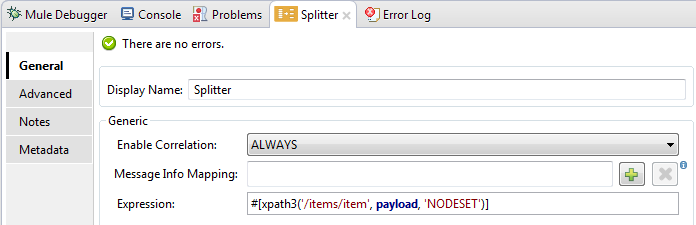
Double click on "Splitter" and set its properties as below:
-
"Enable Correlation" select "ALWAYS".
-
"Expression" to "#[xpath3('/items/item', payload, 'NODESET')]"
-
-
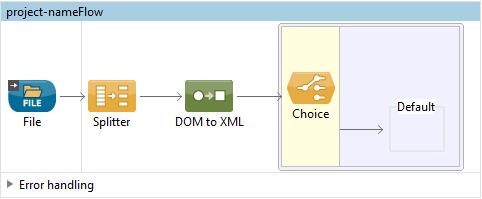
Go to palette, search for "DOM to XML" and drag and drop it on flow after "Splitter". We need this element because the result of splitter is a DOM object and the next component operates on strings in XML format.
-
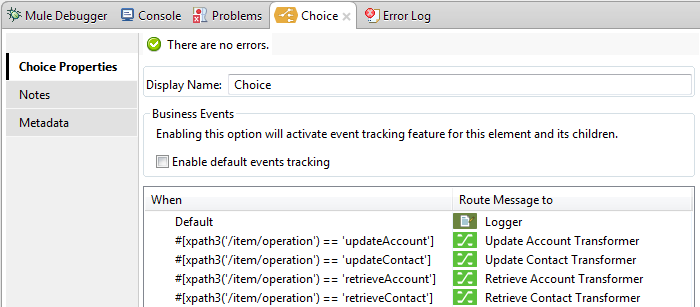
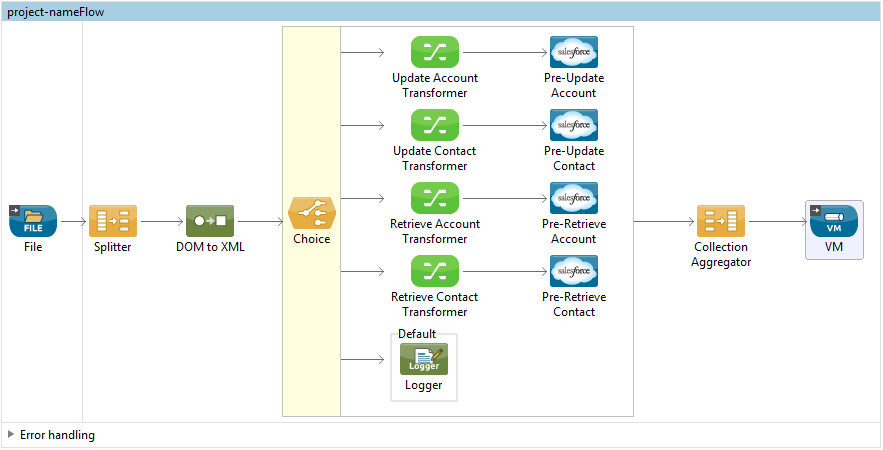
Go to palette, search for "Choice" and drag and drop it on flow after "DOM to XML". This element will route the input data item to its correlating "Composite" element based on its operation.
-
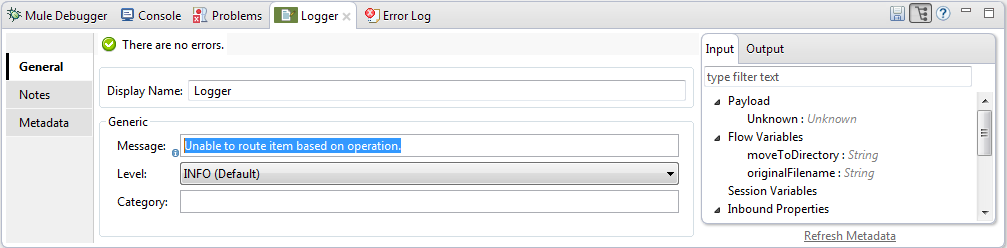
Go to palette, search for "Logger" and drag it inside "Default" section of "Choice".
-
Double click on logger and set its properties as below:
-
"Message" to "Unable to route item based on operation."
-
-
Go to palette, search for "Transform Message" and drag inside the choice four of them one below the other.
-
Go to palette, search for "Salesforce Composite" and drag one after each "Transform Message" from previous step.
-
Right click on first "Transform Message" and rename it to "Update Account Transformer"
-
Right click on first "Salesforce Composite" and rename it to "Pre-Update Account"
-
Right click on second "Transform Message" and rename it to "Update Contact Transformer"
-
Right click on second "Salesforce Composite" and rename it to "Pre-Update Contact"
-
Right click on third "Transform Message" and rename it to "Retrieve Account Transformer"
-
Right click on third "Salesforce Composite" and rename it to "Pre-Retrieve Account"
-
Right click on fourth "Transform Message" and rename it to "Retrieve Contact Transformer"
-
Right click on fourth "Salesforce Composite" and rename it to "Pre-Retrieve Contact"
-
Double click on "Choice" and set its properties as below:
-
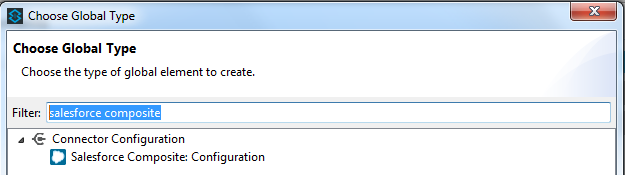
From the bottom of the canvas switch to "Global Elements" tab and click on "Create". You are going to create global configuration for "Salesforce Composite".
-
In the search bar write "Salesforce Composite" and double click on "Salesforce Composite: Configuration" under "Connector Configuration".
-
Fill all the fields as explained under Configuring the Salesforce Composite Global Element
-
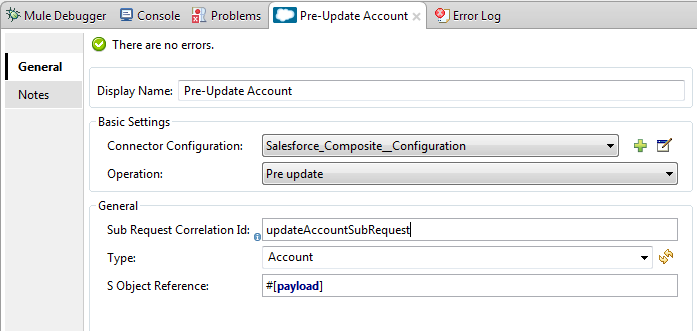
Double click on "Pre-Update Account" and set its properties as below. This is going to create the sub-request in format expected by Salesforce for updating an account.
-
Select from "Connector configuration" drop down "Salesforce_Composite__Configuration" or the name that you have set while configuring the global element.
-
Select from "Operation" drop down "Pre update"
-
Select from "Type" drop down "Account"
-
"Sub Request Correlation Id" to "updateAccountSubRequest". This id is going to be used to correlate the response with its parser.
-
-
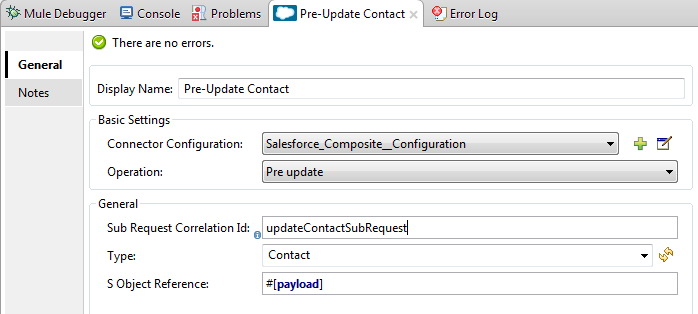
Double click on "Pre-Update Contact" and set its properties as below. This is going to create the sub-request in format expected by Salesforce for updating a contact.
-
Select from "Connector configuration" drop down "Salesforce_Composite__Configuration" or the name that you have set while configuring the global element.
-
Select from "Operation" drop down "Pre update"
-
Select from "Type" drop down "Contact"
-
"Sub Request Correlation Id" to "updateContactSubRequest". This id is going to be used to correlate the response with its parser.
-
-
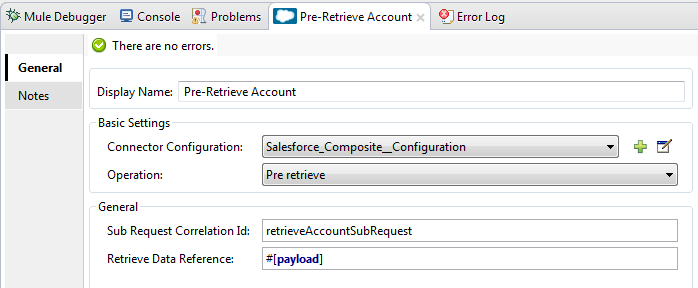
Double click on "Pre-Retrieve Account" and set its properties as below. This is going to create the sub-request in format expected by Salesforce for retrieving an account.
-
Select from "Connector configuration" drop down "Salesforce_Composite__Configuration" or the name that you have set while configuring the global element.
-
Select from "Operation" drop down "Pre retrieve"
-
"Sub Request Correlation Id" to "retrieveAccountSubRequest". This id is going to be used to correlate the response with its parser.
-
-
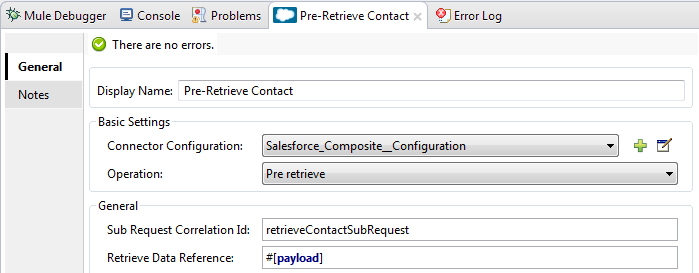
Double click "Pre-Retrieve Contact" and set its properties as below. This is going to create the sub-request in format expected by Salesforce for retrieving a contact.
-
Select from "Connector configuration" drop down "Salesforce_Composite__Configuration" or the name that you have set while configuring the global element.
-
Select from "Operation" drop down "Pre retrieve"
-
"Sub Request Correlation Id" to "retrieveContactSubRequest". This id is going to be used to correlate the response with its parser.
-
-
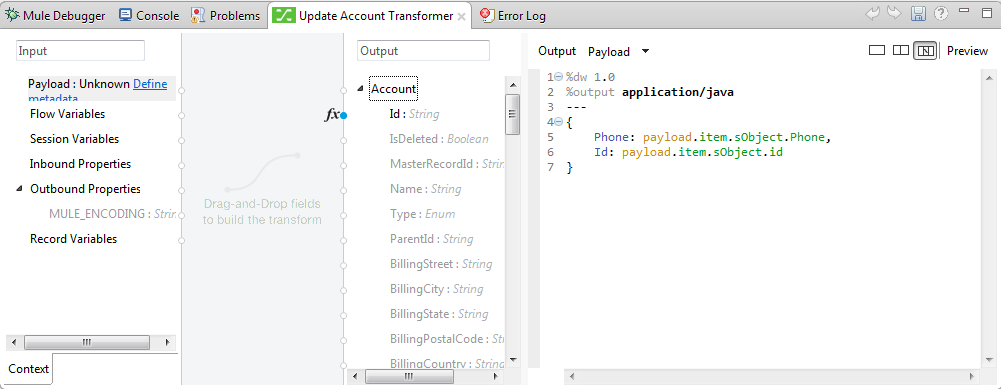
Double click "Update Account Transformer" and set its properties as below. This is going to map input data to expected data by operation that is preparing account update sub-request.
-
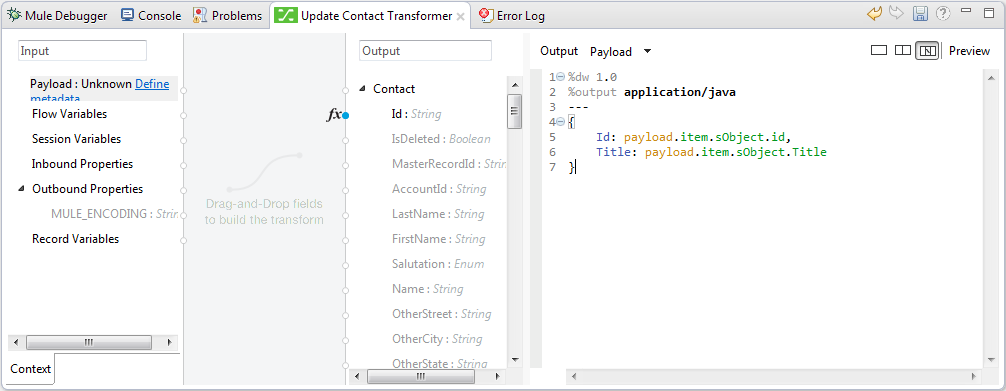
Double click "Update Contact Transformer" and set its properties as below. This is going to map input data to expected data by operation that is preparing contact update sub-request.
-
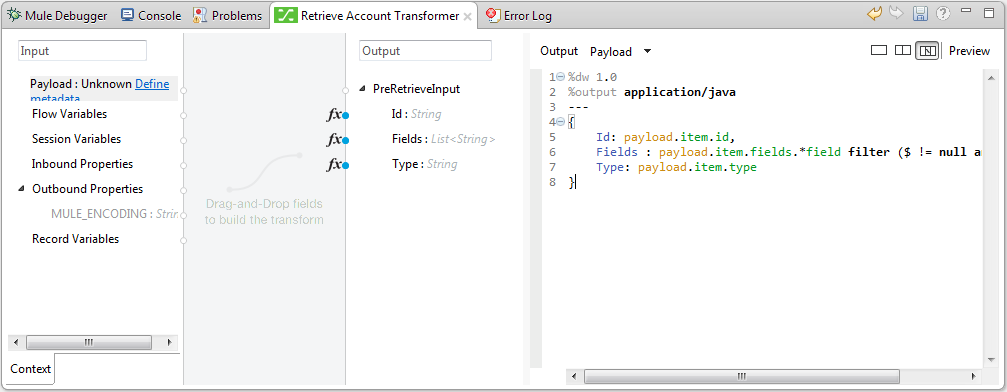
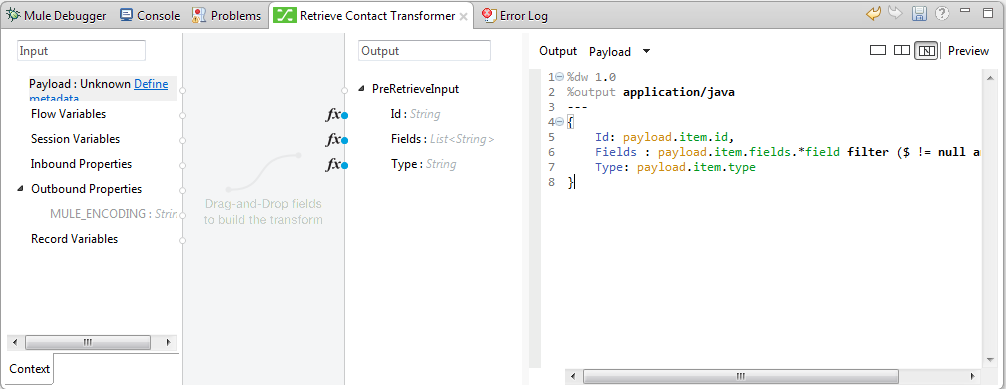
Double click "Retrieve Account Transformer" and set its properties as below. This is going to map input data to expected data by operation that is preparing account retrieve sub-request.
-
Double click "Retrieve Contact Transformer" and set its properties as below. This is going to map input data to expected data by operation that is preparing contact retrieve sub-request.
-
Go to palette, search for "Collection Aggregator" and drag and drop it after "Choice". This is aggregating all the formatted sub-requests in a collection.
-
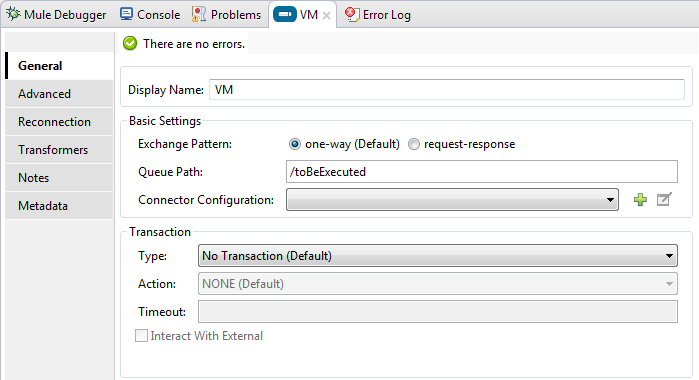
Go to palette, search for "VM" and drag and drop it after "Collection Aggregator". It is used to pass the collection of sub-requests to the next flow.
-
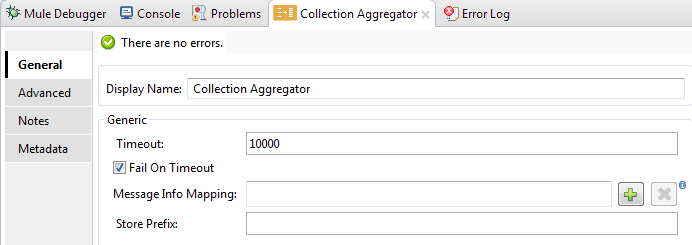
Double click "Collection Aggregator" and set its properties as below:
-
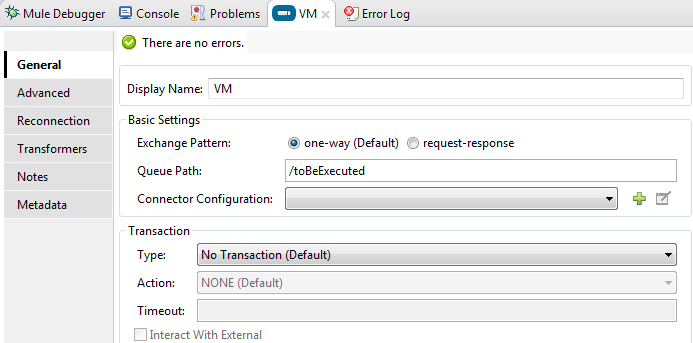
Double click "VM" and set its properties as below:
-
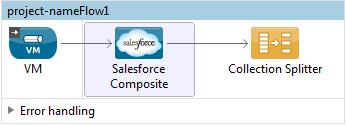
Go to palette, search for "VM" and drag and drop it in a new flow. This is used to get the collection of sub-requests from the precious flow.
-
Double click previously created "VM" and set its properties as below:
-
Go to palette, search for "Salesforce Composite" and drag and drop it after "VM". It is used to send the collection of sub-requests to Salesforce server and retrieve the collection of results.
-
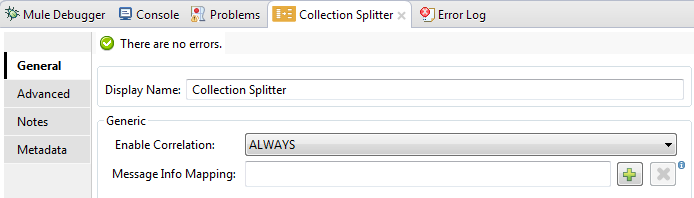
Go to palette, search for "Collection splitter" and drag and drop it after "Salesforce Composite". It is used to split the collection of results in individual messages for each result.
-
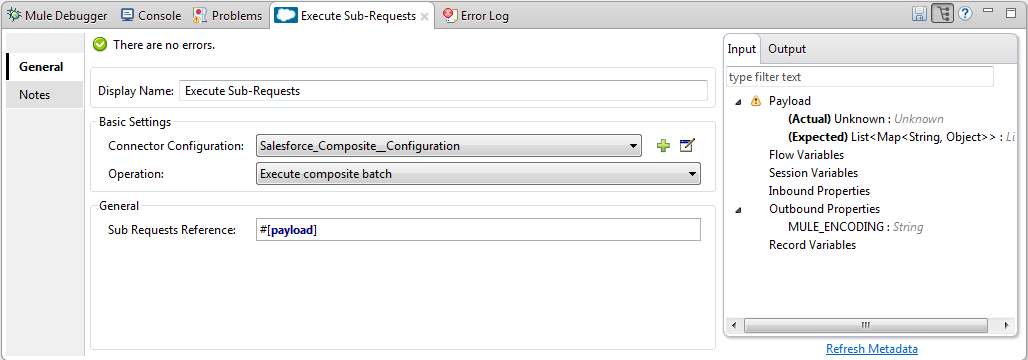
Double click "Salesforce Composite" and set its properties as below:
-
Double click "Collection Splitter" and set its properties as below:
-
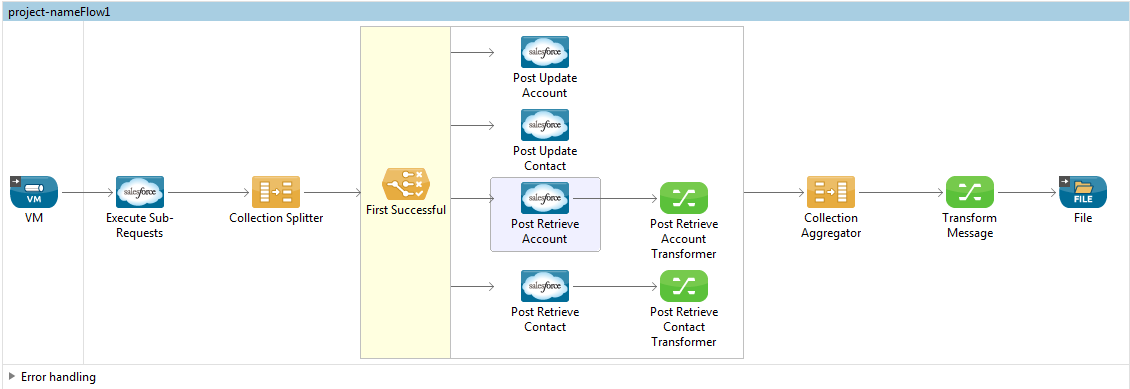
Go to palette, search for "First Successful" and drag and drop it after "Collection Splitter". It is used to route the result message to each connector from inside it until the message is successfully processed by one of them.
-
Go to palette, search for "Salesforce Composite" and drag and drop four of them inside "First Successful". Each connector is used to handle one result message.
-
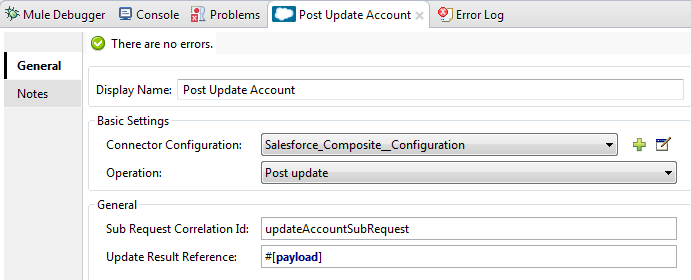
Double Click first "Salesforce Composite" and set its properties as below. It is responsible for parsing result of account update. This is decided based on its "Sub Request Correlation Id".
-
"Display Name" to "Post Update Account"
-
Select from "Connector configuration" drop down "Salesforce_Composite__Configuration" or the name that you have set while configuring the global element.
-
Select from "Operation" drop down "Post update"
-
"Sub Request Correlation Id" to "updateAccountSubRequest". This id is the one that you have set on "Pre Update Account" element.
-
-
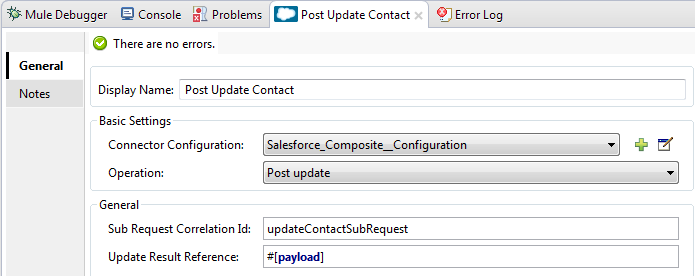
Double Click second "Salesforce Composite" and set its properties as below. It is responsible for parsing result of contact update. This is decided based on its "Sub Request Correlation Id".
-
"Display Name" to "Post Update Contact"
-
Select from "Connector configuration" drop down "Salesforce_Composite__Configuration" or the name that you have set while configuring the global element.
-
Select from "Operation" drop down "Post update"
-
"Sub Request Correlation Id" to "updateContactSubRequest". This id is the one that you have set on "Pre Update Contact" element.
-
-
Double Click third "Salesforce Composite" and set its properties as below. It is responsible for parsing result of account retrieval. This is decided based on its "Sub Request Correlation Id".
-
"Display Name" to "Post Retrieve Account"
-
Select from "Connector configuration" drop down "Salesforce_Composite__Configuration" or the name that you have set while configuring the global element.
-
Select from "Operation" drop down "Post retrieve"
-
"Sub Request Correlation Id" to "retrieveAccountSubRequest". This id is the one that you have set on "Pre Retrieve Account" element.

-
-
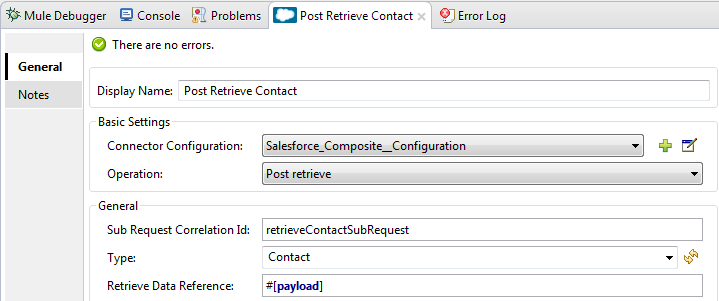
Double Click fourth "Salesforce Composite" and set its properties as below. It is responsible for parsing result of contact retrieval. This is decided based on its "Sub Request Correlation Id".
-
"Display Name" to "Post Retrieve Contact"
-
Select from "Connector configuration" drop down "Salesforce_Composite__Configuration" or the name that you have set while configuring the global element.
-
Select from "Operation" drop down "Post retrieve"
-
"Sub Request Correlation Id" to "retrieveContactSubRequest". This id is the one that you have set on "Pre Retrieve Contact" element.
-
-
After "Post Retrieve Account" drag and drop a "Transform Message". It is responsible for mapping the result of account retrieval to what data you need, in our case we pass it further as it is.
-
After "Post Retrieve Contact" drag and drop a "Transform Message". It is responsible for mapping the result of contact retrieval to what data you need, in our case we pass it further as it is.

-
Right click first "Transform Message" and rename it to "Post Retrieve Account Transformer"
-
Right click second "Transform Message" and rename it to "Post Retrieve Contact Transformer"
-
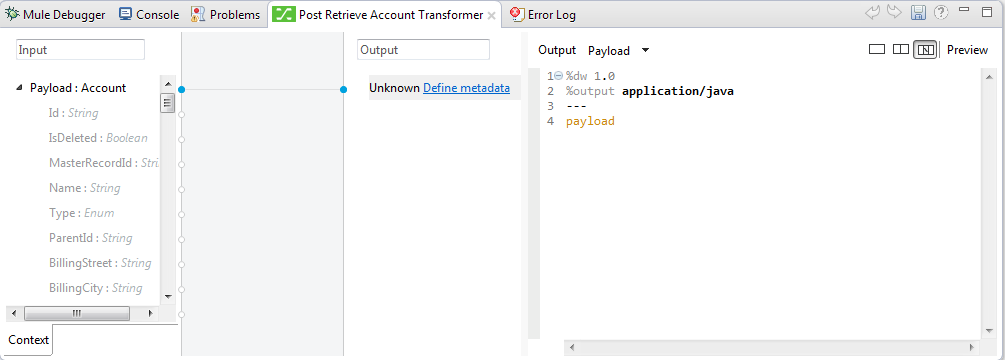
Double click "Post Retrieve Account Transformer" and set its properties as below:
-
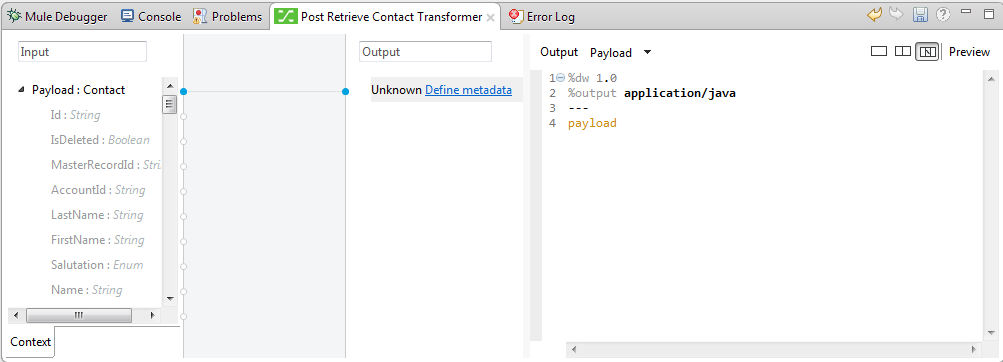
Double click on "Post Retrieve Contact Transformer" and set its properties as below:
-
Go to palette, search for "Collection Aggregator" and drag and drop it after "First Successful". It is collection all the result messages formatted based on the user’s need.
-
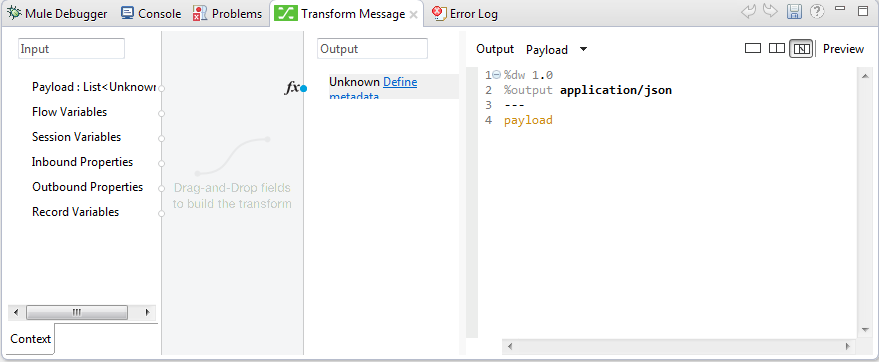
Go to palette, search for "Transform Message" and drag and drop it after "Collection Aggregator". It is converting the collected list of results into json format.
-
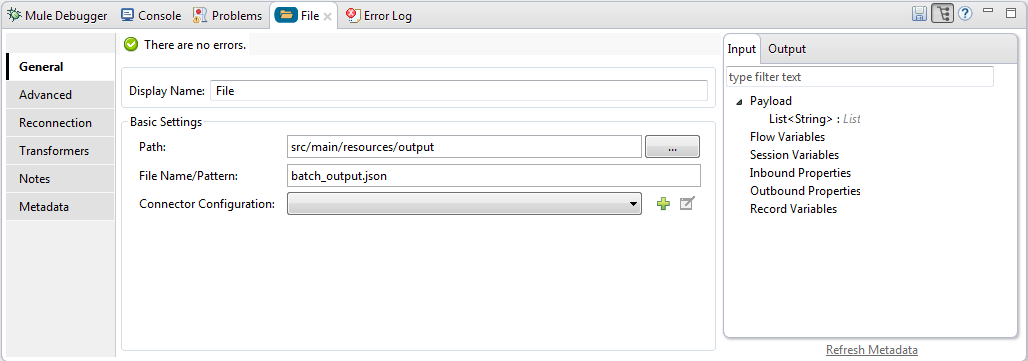
Go to palette, search for "File" and drag and drop it after "Transform Message". It is writing the result json to a file.
-
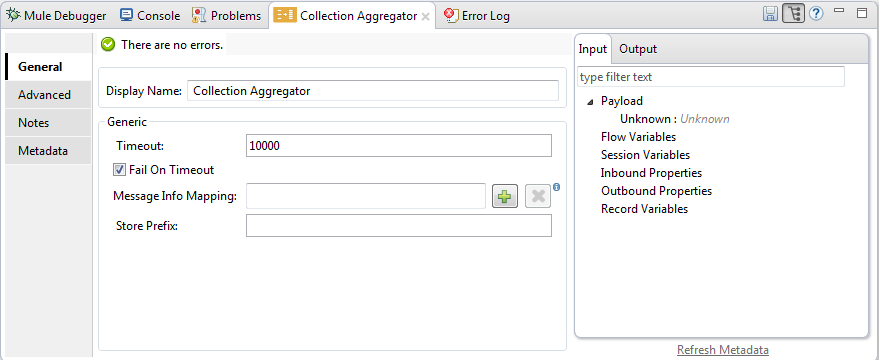
Double click "Collection Aggregator" and set its properties as below:
-
Double click "Transform Message" and set its properties as below:
-
Double click "File" and set its properties as below:
-
We are almost done. The flow is ready and the only thing still left is to prepare input file and run the flow.
-
Copy the following test file called items.xml into /src/main/resources/input
<?xml version='1.0' encoding='windows-1252'?> <items> <item> <operation>updateAccount</operation> <sObject> <id><!--Account id to be updated --></id> <Phone>123123</Phone> </sObject> </item> <item> <operation>updateContact</operation> <sObject> <id><!--Contact id to be updated --></id> <Title>NewTitle</Title> </sObject> </item> <item> <operation>retrieveAccount</operation> <id><!--Account id to be retrieved --></id> <fields> <field>Id</field> <field>Name</field> <field>Phone</field> </fields> <type>Account</type> </item> <item> <operation>retrieveContact</operation> <id><!--Contact id to be retrieved --></id> <fields> <field>Id</field> <field>Name</field> <field>Title</field> </fields> <type>Contact</type> </item> </items> -
Replace "<!--Account id to be updated -->" with an account’s id from your organization. This is the account that the application is going to update.
-
Replace "<!--Contact id to be updated -->" with an contact’s id from your organization. This is the contact that the application is going to update.
-
Replace "<!--Account id to be retrieved -->" with an account’s id from your organization. This is the account that the application is going to retrieve.
-
Replace "<!--Contact id to be retrieved -->" with an contact’s id from your organization. This is the contact that the application is going to retrieve.
-
Run the application.
-
Wait for the application to execute. It should take around 10 seconds. You know that the processing was finished when you see this message in console: "Writing file to: <path_to_app>\project-name\src\main\resources\output\batch_output.json".
-
Open /src/main/resources/batch_output.json and see the result of processing in json format.
Example Use Case 2
-
Add the sfdc-composite namespace to the mule element as follows:
xmlns:sfdc-composite="http://www.mulesoft.org/schema/mule/sfdc-composite" -
Add the location of the composite schema referred to by the "sfdc-composite" namespace:
http://www.mulesoft.org/schema/mule/sfdc-composite http://www.mulesoft.org/schema/mule/sfdc-composite/current/mule-sfdc-composite.xsd -
Add the data-weave namespace as follows:
xmlns:dw="http://www.mulesoft.org/schema/mule/ee/dw"
-
Add location of DataWeave schema referred by "dw" namespace with the following value:
http://www.mulesoft.org/schema/mule/ee/dw http://www.mulesoft.org/schema/mule/ee/dw/current/dw.xsd -
Add the context namespace as follows:
xmlns:context="http://www.springframework.org/schema/context"
-
Add location of contact schema referred by "context" namespace with the following value:
http://www.springframework.org/schema/context http://www.springframework.org/schema/context/spring-context-current.xsd -
Add the file namespace as follows:
xmlns:file="http://www.mulesoft.org/schema/mule/file"
-
Add location of file schema referred by "file" namespace with the following value:
http://www.mulesoft.org/schema/mule/file http://www.mulesoft.org/schema/mule/file/current/mule-file.xsd -
Add the vm namespace as follows:
xmlns:vm="http://www.mulesoft.org/schema/mule/vm"
-
Add location of the VM schema referred by "vm" namespace with the following value:
http://www.mulesoft.org/schema/mule/vm http://www.mulesoft.org/schema/mule/vm/current/mule-vm.xsd -
Add a context:property-placeholder element to your project, then configure its attributes as follows:
<context:property-placeholder location="mule-app.properties"/> -
Add a sfdc-composite:config element to your project, then configure its attributes as follows:
<sfdc-composite:config name="Salesforce_Composite__Configuration" username="${config.username}" password="${config.password}" consumerKey="${config.consumerKey}" consumerSecret="${config.consumerSecret}" securityToken="${config.securityToken}" tokenEndpoint="${config.tokenEndpoint}" doc:name="Salesforce Composite: Configuration"/> -
Add an empty flow element to your project as follows:
<flow name="project-nameFlow"> </flow> -
Within the flow element add a "file:inbound-endpoint" element as follows:
<file:inbound-endpoint path="src/main/resources/input" moveToDirectory="src/main/resources/processed" responseTimeout="10000" doc:name="File"/> -
Within the flow element add a "splitter" element after file as follows:
<splitter enableCorrelation="ALWAYS" expression="#[xpath3('/items/item', payload, 'NODESET')]" doc:name="Splitter"/> -
Within the flow element add a "mulexml:dom-to-xml-transformer" element after splitter as follows:
<mulexml:dom-to-xml-transformer doc:name="DOM to XML"/> -
Within the flow element add an empty "choice" element after dom-to-xml transformer as follows:
<choice doc:name="Choice"> <otherwise> </otherwise> </choice> -
Within the otherwise tag of choice element add a "logger" as follows:
<logger message="Unable to route item based on operation." level="INFO" doc:name="Logger"/> -
Within the choice element add an empty "when" as follows:
<when expression="#[xpath3('/item/operation') == 'updateAccount']"> </when> -
Within the "when" tag add a "dw:transform-message" as follows:
<dw:transform-message doc:name="Update Account Transformer"> <dw:set-payload> <![CDATA[ %dw 1.0 %output application/java --- { Phone: payload.item.sObject.Phone, Id: payload.item.sObject.id } ]]> </dw:set-payload> </dw:transform-message> -
Within the "when" tag add a "sfdc-composite:pre-update" after "dw:transform-message" as follows:
<sfdc-composite:pre-update config-ref="Salesforce_Composite__Configuration" subRequestCorrelationId="updateAccountSubRequest" type="Account" doc:name="Pre-Update Account"/> -
Within the choice element add another empty "when" as follows:
<when expression="#[xpath3('/item/operation') == 'updateContact']"> </when> -
Within the "when" tag add a "dw:transform-message" as follows:
<dw:transform-message doc:name="Update Contact Transformer"> <dw:set-payload> <![CDATA[ %dw 1.0 %output application/java --- { Id: payload.item.sObject.id, Title: payload.item.sObject.Title } ]]> </dw:set-payload> </dw:transform-message> -
Within the "when" tag add a "sfdc-composite:pre-update" after "dw:transform-message" as follows:
<sfdc-composite:pre-update config-ref="Salesforce_Composite__Configuration" subRequestCorrelationId="updateContactSubRequest" type="Contact" doc:name="Pre-Update Contact"/> -
Within the choice element add another empty "when" as follows:
<when expression="#[xpath3('/item/operation') == 'retrieveAccount']"> </when> -
Within the "when" tag add a "dw:transform-message" as follows:
<dw:transform-message doc:name="Retrieve Account Transformer"> <dw:set-payload> <![CDATA[%dw 1.0 %output application/java --- { Id: payload.item.id, Fields : payload.item.fields.*field filter ($ != null and $ != ''), Type: payload.item.type } ]]> </dw:set-payload> </dw:transform-message> -
Within the "when" tag add a "sfdc-composite:pre-retrieve" after "dw:transform-message" as follows:
<sfdc-composite:pre-retrieve config-ref="Salesforce_Composite__Configuration" doc:name="Pre-Retrieve Account" subRequestCorrelationId="retrieveAccountSubRequest"/> -
Within the choice element add another empty "when" as follows:
<when expression="#[xpath3('/item/operation') == 'retrieveContact']"> </when> -
Within the "when" tag add a "dw:transform-message" as follows:
<dw:transform-message doc:name="Retrieve Contact Transformer"> <dw:set-payload> <![CDATA[%dw 1.0 %output application/java --- { Id: payload.item.id, Fields : payload.item.fields.*field filter ($ != null and $ != ''), Type: payload.item.type } ]]> </dw:set-payload> </dw:transform-message> -
Within the "when" tag add a "sfdc-composite:pre-retrieve" after "dw:transform-message" as follows:
<sfdc-composite:pre-retrieve config-ref="Salesforce_Composite__Configuration" doc:name="Pre-Retrieve Contact" subRequestCorrelationId="retrieveContactSubRequest"/> -
Within the flow element add a "collection-aggregator" element after "choice" as follows:
<collection-aggregator timeout="10000" failOnTimeout="true" doc:name="Collection Aggregator"/> -
Within the flow element add a "vm:outbound-endpoint" element after "collection-aggregator" as follows:
<vm:outbound-endpoint exchange-pattern="one-way" path="/toBeExecuted" doc:name="VM"/> -
Add another empty flow element to your project as follows:
<flow name="project-nameFlow1"> </flow> -
Within the flow element add a "vm:inbound-endpoint" element as follows:
<vm:inbound-endpoint exchange-pattern="one-way" path="/toBeExecuted" doc:name="VM"/> -
Within the flow element add a "sfdc-composite:execute-composite-batch" element after "vm:inbound-endpoint" as follows:
<sfdc-composite:execute-composite-batch config-ref="Salesforce_Composite__Configuration" doc:name="Execute Sub-Requests"/> -
Within the flow element add a "collection-splitter" element after "sfdc-composite:execute-composite-batch" as follows:
<collection-splitter enableCorrelation="ALWAYS" doc:name="Collection Splitter"/> -
Within the flow element add an empty "first-successful" element after "collection-splitter" as follows:
<first-successful doc:name="First Successful"> </first-successful> -
Within the "first-successful" element add a "sfdc-composite:post-update" element as follows:
<sfdc-composite:post-update config-ref="Salesforce_Composite__Configuration" subRequestCorrelationId="updateAccountSubRequest" doc:name="Post Update Account"/> -
Within the "first-successful" element add a "sfdc-composite:post-update" element as follows:
<sfdc-composite:post-update config-ref="Salesforce_Composite__Configuration" subRequestCorrelationId="updateContactSubRequest" doc:name="Post Update Contact"/> -
Within the "first-successful" element add an empty "processor-chain" element as follows:
<processor-chain> </processor-chain> -
Within the "processor-chain" element add a "sfdc-composite:post-retrieve" element as follows:
<sfdc-composite:post-retrieve config-ref="Salesforce_Composite__Configuration" subRequestCorrelationId="retrieveAccountSubRequest" type="Account" doc:name="Salesforce Composite"/> -
Within the "processor-chain" element add a "dw:transform-message" element as follows:
<dw:transform-message doc:name="Post Retrieve Account Transformer"> <dw:set-payload> <![CDATA[ %dw 1.0 %output application/java --- payload ]]> </dw:set-payload> </dw:transform-message> -
Within the "first-successful" element add another empty "processor-chain" element as follows:
<processor-chain> </processor-chain> -
Within the "processor-chain" element add a "sfdc-composite:post-retrieve" element as follows:
<sfdc-composite:post-retrieve config-ref="Salesforce_Composite__Configuration" subRequestCorrelationId="retrieveContactSubRequest" type="Contact" doc:name="Salesforce Composite"/> -
Within the "processor-chain" element add a "dw:transform-message" element as follows:
<dw:transform-message doc:name="Post Retrieve Contact Transformer"> <dw:set-payload> <![CDATA[ %dw 1.0 %output application/java --- payload ]]> </dw:set-payload> </dw:transform-message> -
Within the flow element add a "collection-aggregator" element after "first-successful" as follows:
<collection-aggregator timeout="10000" failOnTimeout="true" doc:name="Collection Aggregator"/> -
Within the flow element add a "dw:transform-message" element after "collection-aggregator" as follows:
<dw:transform-message doc:name="Transform Message"> <dw:set-payload> <![CDATA[ %dw 1.0 %output application/json --- payload ]]> </dw:set-payload> </dw:transform-message> -
Within the flow element add a "file:outbound-endpoint" element after "dw:transform-message" as follows:
<file:outbound-endpoint path="src/main/resources/output" outputPattern="batch_output.json" responseTimeout="10000" doc:name="File"/> -
In the end the XML file should look like this:
<?xml version="1.0" encoding="UTF-8"?>

<mule xmlns:vm="http://www.mulesoft.org/schema/mule/vm"
	xmlns:context="http://www.springframework.org/schema/context"
	xmlns:file="http://www.mulesoft.org/schema/mule/file"
	xmlns:dw="http://www.mulesoft.org/schema/mule/ee/dw"
	xmlns:mulexml="http://www.mulesoft.org/schema/mule/xml"
	xmlns:sfdc-composite="http://www.mulesoft.org/schema/mule/sfdc-composite"
	xmlns:tracking="http://www.mulesoft.org/schema/mule/ee/tracking"
	xmlns="http://www.mulesoft.org/schema/mule/core"
	xmlns:doc="http://www.mulesoft.org/schema/mule/documentation"
	xmlns:spring="http://www.springframework.org/schema/beans"
	xmlns:xsi="http://www.w3.org/2001/XMLSchema-instance"
	xsi:schemaLocation="http://www.springframework.org/schema/beans
	http://www.springframework.org/schema/beans/spring-beans-current.xsd
http://www.mulesoft.org/schema/mule/core
http://www.mulesoft.org/schema/mule/core/current/mule.xsd
http://www.mulesoft.org/schema/mule/file
http://www.mulesoft.org/schema/mule/file/current/mule-file.xsd
http://www.mulesoft.org/schema/mule/xml
http://www.mulesoft.org/schema/mule/xml/current/mule-xml.xsd
http://www.mulesoft.org/schema/mule/ee/dw
http://www.mulesoft.org/schema/mule/ee/dw/current/dw.xsd
http://www.mulesoft.org/schema/mule/sfdc-composite
http://www.mulesoft.org/schema/mule/sfdc-composite/current/mule-sfdc-composite.xsd
http://www.mulesoft.org/schema/mule/ee/tracking
http://www.mulesoft.org/schema/mule/ee/tracking/current/mule-tracking-ee.xsd
http://www.springframework.org/schema/context
http://www.springframework.org/schema/context/spring-context-current.xsd
http://www.mulesoft.org/schema/mule/vm
http://www.mulesoft.org/schema/mule/vm/current/mule-vm.xsd">
    <sfdc-composite:config name="Salesforce_Composite__Configuration"
    username="${config.username}" password="${config.password}"
    consumerKey="${config.consumerKey}" consumerSecret="${config.consumerSecret}"
    securityToken="${config.securityToken}" tokenEndpoint="${config.tokenEndpoint}"
    doc:name="Salesforce Composite: Configuration"/>
    <context:property-placeholder location="mule-app.properties"/>
    <flow name="project-nameFlow">
        <file:inbound-endpoint path="src/main/resources/input"
        moveToDirectory="src/main/resources/processed"
        responseTimeout="10000" doc:name="File"/>
        <splitter enableCorrelation="ALWAYS"
        expression="#[xpath3('/items/item', payload, 'NODESET')]" doc:name="Splitter"/>
        <mulexml:dom-to-xml-transformer doc:name="DOM to XML"/>
        <choice doc:name="Choice">
            <when expression="#[xpath3('/item/operation') == 'updateAccount']">
                <dw:transform-message doc:name="Update Account Transformer">
                    <dw:set-payload><![CDATA[%dw 1.0
%output application/java
---
{
	Phone: payload.item.sObject.Phone,
	Id: payload.item.sObject.id
}]]></dw:set-payload>
                </dw:transform-message>
                <sfdc-composite:pre-update config-ref="Salesforce_Composite__Configuration"
                subRequestCorrelationId="updateAccountSubRequest" type="Account"
                doc:name="Pre-Update Account"/>
            </when>
            <when expression="#[xpath3('/item/operation') == 'updateContact']">
                <dw:transform-message doc:name="Update Contact Transformer">
                    <dw:set-payload><![CDATA[%dw 1.0
%output application/java
---
{
	Id: payload.item.sObject.id,
	Title: payload.item.sObject.Title
}]]></dw:set-payload>
                </dw:transform-message>
                <sfdc-composite:pre-update config-ref="Salesforce_Composite__Configuration"
                 subRequestCorrelationId="updateContactSubRequest" type="Contact"
                 doc:name="Pre-Update Contact"/>
            </when>
            <when expression="#[xpath3('/item/operation') == 'retrieveAccount']">
                <dw:transform-message doc:name="Retrieve Account Transformer">
                    <dw:set-payload><![CDATA[%dw 1.0
%output application/java
---
{
	Id: payload.item.id,
	Fields : payload.item.fields.*field filter ($ != null and $ != ''),
	Type: payload.item.type
}]]></dw:set-payload>
                </dw:transform-message>
                <sfdc-composite:pre-retrieve config-ref="Salesforce_Composite__Configuration"
                 doc:name="Pre-Retrieve Account"
                 subRequestCorrelationId="retrieveAccountSubRequest"/>
            </when>
            <when expression="#[xpath3('/item/operation') == 'retrieveContact']">
                <dw:transform-message doc:name="Retrieve Contact Transformer">
                    <dw:set-payload><![CDATA[%dw 1.0
%output application/java
---
{
	Id: payload.item.id,
	Fields : payload.item.fields.*field filter ($ != null and $ != ''),
	Type: payload.item.type
}]]></dw:set-payload>
                </dw:transform-message>
                <sfdc-composite:pre-retrieve
                config-ref="Salesforce_Composite__Configuration"
                doc:name="Pre-Retrieve Contact"
                subRequestCorrelationId="retrieveContactSubRequest"/>
            </when>
            <otherwise>
                <logger message="Unable to route item based on operation."
                level="INFO" doc:name="Logger"/>
            </otherwise>
        </choice>
        <collection-aggregator timeout="10000" failOnTimeout="true"
        doc:name="Collection Aggregator"/>
        <vm:outbound-endpoint exchange-pattern="one-way" path="/toBeExecuted" doc:name="VM"/>
    </flow>
    <flow name="project-nameFlow1">
        <vm:inbound-endpoint exchange-pattern="one-way" path="/toBeExecuted" doc:name="VM"/>
        <sfdc-composite:execute-composite-batch
        config-ref="Salesforce_Composite__Configuration" doc:name="Execute Sub-Requests"/>
        <collection-splitter enableCorrelation="ALWAYS" doc:name="Collection Splitter"/>
        <first-successful doc:name="First Successful">
            <sfdc-composite:post-update config-ref="Salesforce_Composite__Configuration"
            subRequestCorrelationId="updateAccountSubRequest" doc:name="Post Update Account"/>
            <sfdc-composite:post-update config-ref="Salesforce_Composite__Configuration"
            subRequestCorrelationId="updateContactSubRequest" doc:name="Post Update Contact"/>
            <processor-chain>
                <sfdc-composite:post-retrieve
                config-ref="Salesforce_Composite__Configuration"
                subRequestCorrelationId="retrieveAccountSubRequest" type="Account"
                doc:name="Salesforce Composite"/>
                <dw:transform-message doc:name="Post Retrieve Account Transformer">
                    <dw:set-payload><![CDATA[%dw 1.0
%output application/java
---
payload]]></dw:set-payload>
                </dw:transform-message>
            </processor-chain>
            <processor-chain>
                <sfdc-composite:post-retrieve
                config-ref="Salesforce_Composite__Configuration"
                subRequestCorrelationId="retrieveContactSubRequest" type="Contact"
                doc:name="Salesforce Composite"/>
                <dw:transform-message doc:name="Post Retrieve Contact Transformer">
                    <dw:set-payload><![CDATA[%dw 1.0
%output application/java
---
payload]]></dw:set-payload>
                </dw:transform-message>
            </processor-chain>
        </first-successful>
        <collection-aggregator timeout="10000" failOnTimeout="true"
        doc:name="Collection Aggregator"/>
        <dw:transform-message doc:name="Transform Message">
            <dw:set-payload><![CDATA[%dw 1.0
%output application/json
---
payload]]></dw:set-payload>
        </dw:transform-message>
        <file:outbound-endpoint path="src/main/resources/output"
        outputPattern="batch_output.json" responseTimeout="10000" doc:name="File"/>
    </flow>
</mule>
Example Use Case 3
In this use case it is described how to use the connector for creating SObject Trees.
-
First we need to add an HTTP endpoint and configure it.
-
Then we need to add the Salesforce Composite connector to the flow after the HTTP endpoint.
-
The next step would be to create a configuration for the connector as in the previous use cases (see steps 22 and 23 from Example Use Case 1).
-
After creating the configuration, we need to validate the credentials through the "Test Connection…" button.
-
Now that we know the credentials are ok and we can connect to Salesforce, we will choose the Operation that we want to execute, in this case: "Create sobject tree".
-
Two parameters should appear under the General section: "SObject Root Type" and "SObject Tree".
-
The "SObject Root Type" parameter represents the Sobject type of the root of the trees that will be created. When a value is chosen (for example "Account"), DataSense will bring the input and output metadata based on the chosen root type. The metadata tree has a depth of 5 levels, since that is the current limitation from Salesforce.
-
The "SObject Tree" parameter will take as input a reference to a Map containing the Sobject Trees to be created. For more details you can check this SObject Tree Input example from Salesforce.
-
To create the Map containing the tree, a Transform Message component can be used, to map the information from any format to the format expected by the operation.
-
The output of the operation will contain the Salesforce Id, and the reference Id of the objects create successfully along with a flag called "hasErrors" that gives the status of the whole request ("false" if the entire tree was created successfully and "true" if the creation of any of the objects has failed).
-
An example flow follows:
<?xml version="1.0" encoding="UTF-8"?> <mule xmlns:json="http://www.mulesoft.org/schema/mule/json" xmlns:tracking="http://www.mulesoft.org/schema/mule/ee/tracking" xmlns:dw="http://www.mulesoft.org/schema/mule/ee/dw" xmlns:metadata="http://www.mulesoft.org/schema/mule/metadata" xmlns:http="http://www.mulesoft.org/schema/mule/http" xmlns:sfdc-composite="http://www.mulesoft.org/schema/mule/sfdc-composite" xmlns="http://www.mulesoft.org/schema/mule/core" xmlns:doc="http://www.mulesoft.org/schema/mule/documentation" xmlns:spring="http://www.springframework.org/schema/beans" xmlns:xsi="http://www.w3.org/2001/XMLSchema-instance" xsi:schemaLocation="http://www.springframework.org/schema/beans http://www.springframework.org/schema/beans/spring-beans-current.xsd http://www.mulesoft.org/schema/mule/core http://www.mulesoft.org/schema/mule/core/current/mule.xsd http://www.mulesoft.org/schema/mule/http http://www.mulesoft.org/schema/mule/http/current/mule-http.xsd http://www.mulesoft.org/schema/mule/sfdc-composite http://www.mulesoft.org/schema/mule/sfdc-composite/current/mule-sfdc-composite.xsd http://www.mulesoft.org/schema/mule/ee/dw http://www.mulesoft.org/schema/mule/ee/dw/current/dw.xsd http://www.mulesoft.org/schema/mule/ee/tracking http://www.mulesoft.org/schema/mule/ee/tracking/current/mule-tracking-ee.xsd http://www.mulesoft.org/schema/mule/json http://www.mulesoft.org/schema/mule/json/current/mule-json.xsd"> <http:listener-config name="HTTP_Listener_Configuration" host="0.0.0.0" port="8081" doc:name="HTTP Listener Configuration"/> <sfdc-composite:config name="Salesforce_Composite__Configuration" username="${config.username}" password="${config.password}" consumerKey="${config.consumerKey}" consumerSecret="${config.consumerSecret}" securityToken="${config.securityToken}" tokenEndpoint="${config.tokenEndpoint}" doc:name="Salesforce Composite: Configuration"/> <flow name="salesforce-composite-create-sobject-trees"> <http:listener config-ref="HTTP_Listener_Configuration" path="/create-trees" doc:name="HTTP"/> <dw:transform-message doc:name="Transform Message"> <dw:set-payload><![CDATA[%dw 1.0 %output application/java --- payload.sObjectTrees.records map ((record , indexOfRecord) -> { attributes: { type: record.attributes.type, referenceId: record.attributes.referenceId }, Name: record.Name, Phone: record.Phone, Website: record.Website, NumberOfEmployees: record.NumberOfEmployees as :number, ( ChildAccounts: { records: record.ChildAccounts.records map ((record01 , indexOfRecord01) -> { attributes: { type: record01.attributes.type, referenceId: record01.attributes.referenceId }, Name: record01.Name, Phone: record01.Phone, Website: record01.Website, NumberOfEmployees: record01.NumberOfEmployees as :number }) } ) when (record.ChildAccounts != null), Contacts: { records: record.Contacts.records map ((record01 , indexOfRecord01) -> { attributes: { type: record01.attributes.type, referenceId: record01.attributes.referenceId }, LastName: record01.LastName, Email: record01.Email, Title: record01.Title }) } })]]></dw:set-payload> </dw:transform-message> <logger message="The input data is: #[payload]" level="INFO" doc:name="Log the payload after it is transformed into a Map"/> <sfdc-composite:create-sobject-tree config-ref="Salesforce_Composite__Configuration" type="Account" doc:name="Composite Create SObject Tree"/> <logger message="The result is: #[payload]" level="INFO" doc:name="Log the result received from Salesforce"/> <dw:transform-message doc:name="Transform the response from Salesforce to JSON"> <dw:set-payload><![CDATA[%dw 1.0 %output application/json --- { "hasErrors" : payload.hasErrors, "results" : payload.results }]]></dw:set-payload> </dw:transform-message> </flow> </mule> -
DataWeave was used in the previous example to map the trees taken from a JSON to the Map that the operation is expecting.
-
For a practical example you can check the "salesforce-composite-sobject-tree-demo" from Technical Reference.
See Also
-
Learn about the Data Weave transformer, the most efficient way to assign mappings to data.
-
Learn about the Choice
-
Learn about the Splitter
-
Read more about Anypoint Connectors.