Iteratively Design and Implement an API Specification
 Desktop IDE
Scaffold a REST API specification into an implementation project within your IDE, and sync changes to the specification with the interface without first publishing to Anypoint Exchange. For example, after adding a new endpoint to your API specification, you can re-scaffold the change into the interface to add a flow for that endpoint to the interface’s configuration XML file.
The interface XML is automatically created in a Mule project during the scaffolding process. You define an API in a specification file within an API Design project.
Iterative API design and implementation within the IDE takes place in a multi-root workspace in VS Code. To map project folders for your API specification and implementation projects into a multi-root workspace, VS Code uses a file with the extension .code-workspace. For your projects to work properly, this file must not reside within either project folder. In addition, Anypoint Code Builder permits only one pair of iterative design and implementation project folders per multi-root workspace. The procedures for creating the specification and implementation projects are designed to meet these requirements. For information in the VS Code documentation, see Multi-root Workspaces.
| The procedures are currently written for the desktop IDE only. |
Before You Begin
-
Set up your MuleSoft environment. See Getting Started with Anypoint Code Builder for more information.
-
Have some familiarity with business groups.
When you publish your API spec to Exchange from Anypoint Code Builder, the IDE requests the name of the business group.
Create an API Specification
-
In the desktop IDE, open a new window in VS Code by pressing Cmd+Shift+n (Mac) or Ctrl+Shift+n (Windows).
This step helps prevent the possibility of creating an API specification in a multi-root workspace that already contains iterative design and implementation projects and ensures that the command required in the next procedure, Scaffold the Local REST API Specification into an Interface, is available.
-
In the activity bar of the desktop IDE, click the
 (Anypoint Code Builder) icon to open Anypoint Code Builder.
 -
Start an API specification by clicking the quick action Design an API.
Alternatively, open the Command Palette by pressing Ctrl+Shift+p (Mac) or Cmd+Shift+p (Windows), and provide this command:
MuleSoft: Design an API -
If prompted, sign in to Anypoint Platform, and follow all the prompts to reopen the IDE.
-
Complete the API Specification form:
Field Name Field Value Project Name
Retrieve Users API
Alternatively, provide a similar name of your choice. The name must be unique. The name of the project and specification file is based on the name you provide.Project Location
Your home directory or another directory you create (see Adding Folders to Your Home Directory).
API Type
REST API
Anypoint Code Builder supports the REST API type for iterative design.API Specification Language
RAML 1.0
Anypoint Code Builder supports OAS (JSON), OAS (YAML), and RAML. -
Click Create Project.
This process creates a project that contains your API specification within your workspace.
-
Open your API specification file,
retrieve-users-api.raml. -
To track the progress of internal processing, open the Output panel to the Mule DX Server. To see scaffolding errors only, select Mule DX Server: Scaffolding from the list.
Show me how
-
Press Cmd+Shift+u (Mac) or Ctrl+Shift+u (Windows) to open the Output panel.
-
Select Mule DX Server from the dropdown list in the panel. To see scaffolding errors only, select Mule DX Server: Scaffolding from the list.
For more guidance, see Viewing Logs and Errors.
-
-
In the editor for your API specification, add this example to
retrieve-users-api.raml:#%RAML 1.0 title: Retrieve Users API version: 1.0.development /users: get: description: Retrieve a list of all the users responses: 200: body: application/json: example: | [{ "id": 1, "name": "Leanne Graham", "username": "Bret", "email": "Sincere@april.biz", "address": { "street": "Kulas Light", "suite": "Apt. 556", "city": "Gwenborough", "zipcode": "92998-3874", "geo": { "lat": "-37.3159", "lng": "81.1496" } }, "phone": "1-770-736-8031 x56442", "website": "hildegard.org", "company": { "name": "Romaguera-Crona", "catchPhrase": "Multi-layered client-server neural-net", "bs": "harness real-time e-markets" } }] -
Proceed to Scaffold the Local REST API Specification into an Interface.
Scaffold the Local REST API Specification into an Interface
Scaffold your local REST API specification into a local implementation project. The scaffolding process creates a configuration XML for your implementation.
Local projects reside in the Anypoint Code Builder IDE, whether the projects are in your desktop IDE or in the cloud IDE associated with your user account in Anypoint Platform.
To scaffold your local API specification:
-
With
retrieve-users-api.ramlopen in your IDE, prepare to scaffold the specification into a Mule project:-
Click the
 (Implement this local API) icon in the activity bar:
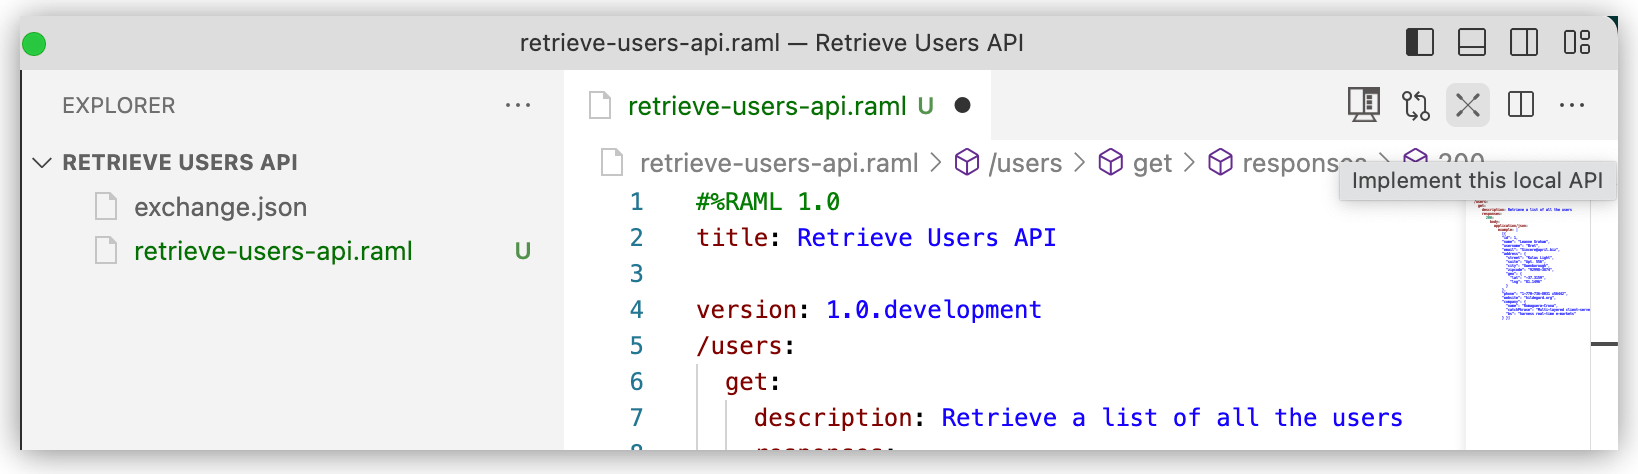
Alternatively, open the Command Palette by pressing Cmd+Shift+p (Mac) or Ctrl+Shift+p (Windows), and provide this command:
MuleSoft: Implement this Local APIDo not select the command
MuleSoft: Implement an API Specification, which is for implementing a specification that is published on Anypoint Exchange and not for implementing a local API specification. -
Click OK when the UI displays the message We’ll create a workspace to keep your API specification and Mule project in sync.
At the prompt to save a file with the extension .code-workspacefor a multi-root workspace, do not save this file within your API specification project folder. Proceed to the next step, instead. -
Navigate up to the parent folder you created for your workspace, and save the
.code-workspacefile. -
Make sure that your Mule DX Server output is available for tracking the progress of internal processes in the Output panel. To see scaffolding errors only, select Mule DX Server: Scaffolding from the list.
The UI displays a message: Implementing local API implementation, please wait.
As you monitor output, wait for the field with placeholder text
Mule project nameto appear in the UI, for example:
-
-
Start the scaffolding process by entering a name for your Mule implementation project, such as
retrieve-users-implementation:
-
When prompted, click Select target folder.
The target folder is the project folder where you created your API specification.
The UI provides updates while the scaffolding process takes place:
-
Executing scaffolding operation, please wait
-
Scaffolding process ended. You can now start iterating over your local API and implementation project
-
-
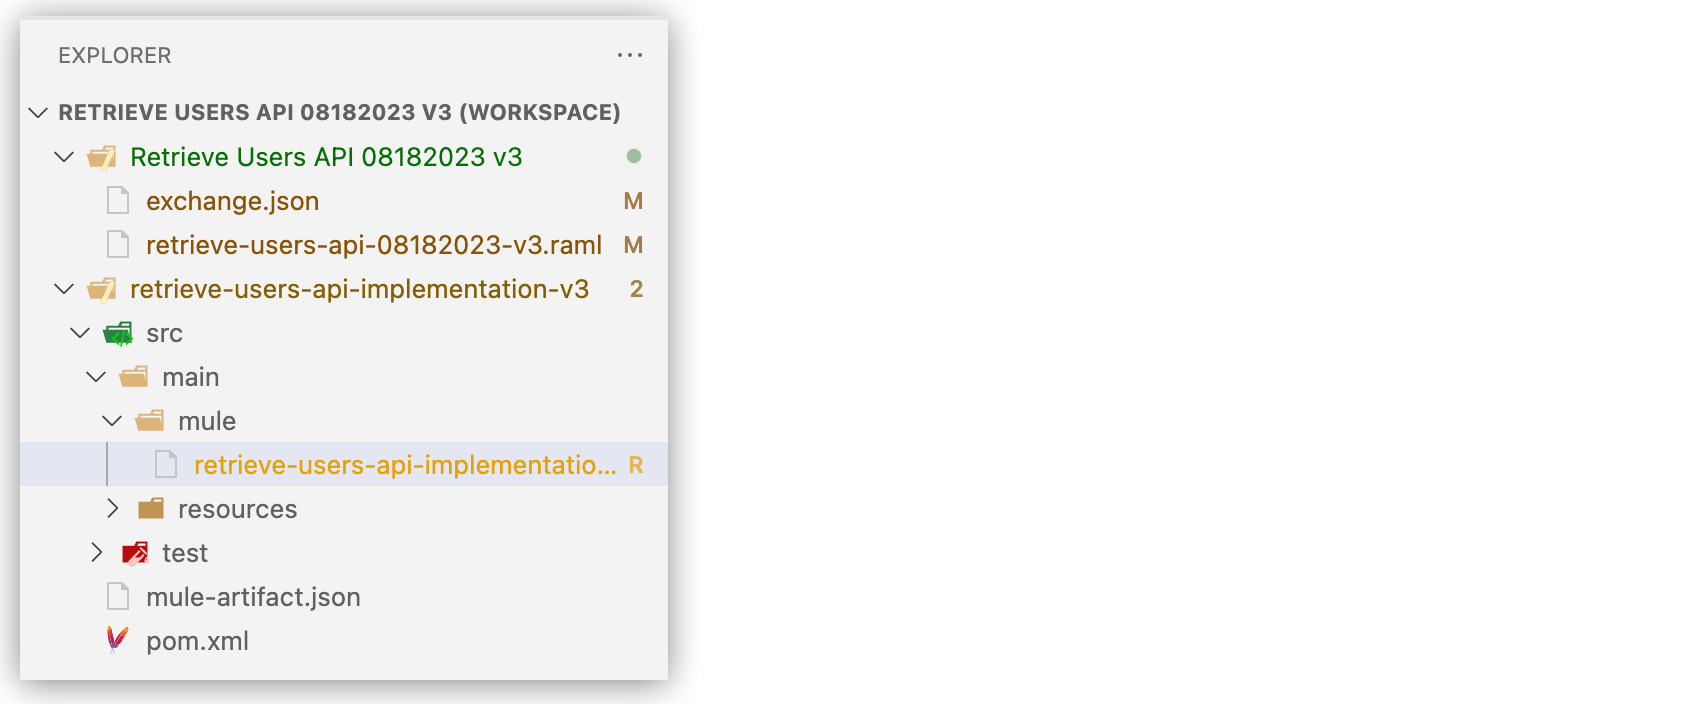
From your multi-root workspace in the Explorer, the IDE opens the scaffolded specification in your new Mule project.
The configuration XML file for the implementation (
retrieve-users-implementation.xml) is located in an implementation project directory similar to this one:retrieve-users-implementation/src/main/mule/retrieve-users-implementation.xml-
The canvas for this Mule project contains a Router component and several error handlers. APIkit automatically creates these components during the scaffolding process.
-
In the implementation XML, the flow
<flow name="get:\users:retrieve-users-api-config">contains an<ee:transform/>element with your example:<flow name="get:\users:retrieve-users-api-config"> <ee:transform doc:name="Transform Message"> <ee:message> <ee:set-payload><![CDATA[%dw 2.0 output application/json --- [ { id: 1, name: "Leanne Graham", username: "Bret", email: "Sincere@april.biz", address: { street: "Kulas Light", suite: "Apt. 556", city: "Gwenborough", zipcode: "92998-3874", geo: { lat: "-37.3159", lng: "81.1496" } }, phone: "1-770-736-8031 x56442", website: "hildegard.org", company: { name: "Romaguera-Crona", catchPhrase: "Multi-layered client-server neural-net", bs: "harness real-time e-markets" } } ]]]></ee:set-payload> </ee:message> </ee:transform> </flow>
-
-
Proceed to Update the API Specification and Re-scaffold the Implementation XML.
Update the API Specification and Re-scaffold the Implementation XML
Add an endpoint to your specification file and re-scaffold:
-
In the Explorer, navigate to the specification file
retrieve-users-api.ramlin the Retrieve Users API directory. -
Append the following
/userbyidendpoint configuration to your RAML file:#%RAML 1.0 title: Retrieve User version: 1.0.development /users: get: description: Retrieve a list of all the users responses: 200: body: application/json: example: | [{ "id": 1, "name": "Leanne Graham", "username": "Bret", "email": "Sincere@april.biz", "address": { "street": "Kulas Light", "suite": "Apt. 556", "city": "Gwenborough", "zipcode": "92998-3874", "geo": { "lat": "-37.3159", "lng": "81.1496" } }, "phone": "1-770-736-8031 x56442", "website": "hildegard.org", "company": { "name": "Romaguera-Crona", "catchPhrase": "Multi-layered client-server neural-net", "bs": "harness real-time e-markets" } }] /userbyid: get: description: Get information about a particular user queryParameters: id: description: Specify the id of the user you want to retrieve type: integer required: false example: 3 responses: 200: body: application/json: example: | [{ "id": 3, "name": "Clementine Bauch", "username": "Samantha", "email": "Nathan@yesenia.net", "address": { "street": "Douglas Extension", "suite": "Suite 847", "city": "McKenziehaven", "zipcode": "59590-4157", "geo": { "lat": "-68.6102", "lng": "-47.0653" } }, "phone": "1-463-123-4447", "website": "ramiro.info", "company": { "name": "Romaguera-Jacobson", "catchPhrase": "Face to face bifurcated interface", "bs": "e-enable strategic applications" } }] -
Re-scaffold the API specification to update your Mule project:
-
Open the Command Palette by pressing Cmd+Shift+p (Mac) or Ctrl+Shift+p (Windows), and provide this command:
MuleSoft: Re-scaffold this local APIThis command is available only for API specifications that have not been published to Anypoint Exchange. If you publish the spec to Exchange, re-scaffolding is no longer available for that asset. -
After receiving a message that your project has been rescaffolded successfully, navigate to your implementation XML file, and notice the new flow (
<flow name="get:\users\userbyid:design-an-api-config"/>) for theuserbyidendpoint:... <flow name="get:\users\userbyid:retrieve-users-api-config"> <ee:transform doc:name="Transform Message"> <ee:message> <ee:set-payload><![CDATA[%dw 2.0 output application/json --- [ { id: 3, name: "Clementine Bauch", username: "Samantha", email: "Nathan@yesenia.net", address: { street: "Douglas Extension", suite: "Suite 847", city: "McKenziehaven", zipcode: "59590-4157", geo: { lat: "-68.6102", lng: "-47.0653" } }, phone: "1-463-123-4447", website: "ramiro.info", company: { name: "Romaguera-Jacobson", catchPhrase: "Face to face bifurcated interface", bs: "e-enable strategic applications" } } ]]]></ee:set-payload> </ee:message> </ee:transform> </flow>
-
-
Proceed to Publish the API Specification to Exchange.
Publish the API Specification to Exchange
Publish the API specification to Anypoint Exchange to make the specification discoverable by your team members.
-
Open the Command Palette.
Show me how
-
Use the keyboard shortcuts:
-
Mac: Cmd+Shift+p
-
Windows: Ctrl+Shift+p
-
-
In the desktop IDE, select View > Command Palette.
-
In the cloud IDE, click the
 (menu) icon, and select View > Command Palette.
-
-
Provide this command:
MuleSoft: Publish API Project to Exchange -
If prompted, click Allow, and follow the prompts to sign in to Anypoint Platform.
-
In Select a Business Group, find and select your business group for the project.
For more information, see Before You Begin.
-
Type a project name: Retrieve Users API.

-
Confirm the artifact ID: Retrieve-Users-API.
-
Confirm the asset version: 1.0.0.
-
Confirm the API version: v1.
The status bar provides progress-related messages before the IDE updates your Mule project POM file to point to
v1.0.0of your API specification:-
Publishing API Specification to Exchange
-
Project has been successfully published to Exchange
-
The specification is now available on Anypoint Exchange for team members in your business group to scaffold into their projects and implement. See Scaffold the API Specification from Exchange.
Scaffold the API Specification from Exchange
Team members in your business group can import your API specification from Exchange:
-
Open a new VS Code instance.
-
Import version 1.0.0 of your API from MuleSoft VCS:
-
Open the Command Palette.
Show me how
-
Use the keyboard shortcuts:
-
Mac: Cmd+Shift+p
-
Windows: Ctrl+Shift+p
-
-
In the desktop IDE, select View > Command Palette.
-
In the cloud IDE, click the
(menu) icon, and select View > Command Palette.
-
-
Provide this command:
MuleSoft: Implement an API Specification -
In the Implement an API Specification tab that opens:
-
Provide a new name for the implementation.
-
Select or create a new project location.
-
Find your API specification on Anypoint Exchange, and click Add to insert the API name into the field.
-
-
Click Create Project to start scaffolding the specification into a new implementation.
-
-
Implement the scaffolded specification in your IDE.
Close a Multi-Root Workspace
Close a multi-root workspace with the command Workspaces: Close Workspace.
After closing, you can reopen a synchronized project from the workspace that you create when implementing the API.
Open a Multi-Root Workspace
Open a multi-root workspace from the .code-workspace file, such as Retrieve Users API.code-workspace, for the projects in the workspace.
-
Open VS Code.
-
Open the Command Palette.
Show me how
-
Use the keyboard shortcuts:
-
Mac: Cmd+Shift+p
-
Windows: Ctrl+Shift+p
-
-
In the desktop IDE, select View > Command Palette.
-
In the cloud IDE, click the
(menu) icon, and select View > Command Palette.
-
-
Provide this command:
File: Open Workspace from File... -
Navigate to and double-click the
.code-workspacefile for projects in the workspace.The projects open in the Explorer view, and the heading for the multi-root-workspace appends a (WORKSPACE) identifier, for example: