@RequiresEntitlement(name="connector-name", provider="prov-name")
public class LicensedConnector {
...javaMuleSoft Certified Connector License Management
| DevKit is compatible only with Studio 6 and Mule 3. To build Mule 4 connectors, see the Mule SDK documentation. |
Introduction
With DevKit 3.9.0, MuleSoft Certified Connector partners/developers, referred to here also as "partners", can manage their connector’s license natively with DevKit before the connector is packaged for release, ensuring only the partner’s paid customers are using the connector.
Partners that have built a MuleSoft Certified Connector can give potential customers the chance to build a Mule application with their connector and test it on the Mule ESB bundled with Anypoint Studio. However, upon deploying the Mule application with the connector, customers are prompted for the partner’s generated key ensuring they possess a valid license from the partner.
Why to Use This Licensing Mechanism
Using a MuleSoft-generated key ensures only the MuleSoft partner’s paid customers have complete access to the paid version of the connector. Users who would like to test out the connector before purchasing it would be able to experiment with the connector in design in Anypoint Studio and run their application in Studio’s embedded Mule runtime.
Obtaining a Key and Keystore for Your Connector
Before submitting the developed connector to MuleSoft for certification, the prospective certified connector partner must complete these steps:
-
Include the following information for MuleSoft to use before generating a partner key and keystore.
-
Company Name (also known as "Provider Name"), Contact Email, Contact Message, Connector Name
-
-
Request the key and keystore from MuleSoft which are:
-
The public
.keyfile that you store in the connector -
The
.jkskeystore is for you as the partner to generate licenses with.
-
Adjusting the Connector Code and Storing the Public Key
After obtaining the key and keystore:
-
The partner adjusts the connector project code by applying the
@RequiresEntitlementannotation, and entering values for all requested attributes.-
namemust be the name of the connector -
the
providerattribute must be the part before the.keysuffix. For example, if MuleSoft generated a vendor key “prov-name.key”, then the partner puts “prov-name” as the provider.
-
-
Put the MuleSoft-provided
.keyfile undersrc/main/resourcesorsrc/main/resources/licensein the connector’s project directory.
Sample Partner Connector
You can download and import this sample connector in Studio to see how the license management annotations are configured in the connector code, understanding that and where the customer .key license file should live in the connector directory. (src/main/resources).
Producing a License File
MuleSoft partners use the .jks file, and the license generation plugin to generate a license to send to the connector customer.
From the command line, where "vendor.keystore" should be replaced with the path to your jks file, execute the command in the same directory where the .jks file is:
mvn org.mule.tools.devkit:mule-devkit-license:license -Dvendor.keystore=betaprovider-license-demo.jks
Optionally, you may specify the expiration date of the license by appending -Ddays.to.expire=<days-until-this-license-expires> to the above command. To add the customer’s name to the license, append -Dclient=<client-name>.
|
If the license is successfully created, the output is similar to this:
[INFO] Scanning for projects...
[NOTE]
[INFO] ------------------------------------------------------------------------
[INFO] Building Maven Stub Project (No POM) 1
[INFO] ------------------------------------------------------------------------
[NOTE]
[INFO] --- mule-devkit-license:license (default-cli) @ standalone-pom ---
* Enter the name of the client whom will receive this license: Bob
* Enter the name of the provider of the Entitlement as it appears in the @RequiresEntitlement annotation: betaprovider
* Enter the name of the Entitlement as it appears in the @RequiresEntitlement annotation: lic-demo
* Enter the name of the Connector as it appears in the @Connector "name" attribute: license-demo
* Enter keystore password:
[INFO] ------------------------------------------------------------------------
[INFO] BUILD SUCCESS
[INFO] ------------------------------------------------------------------------
[INFO] Total time: 18.151s
[INFO] Finished at: Thu Dec 10 09:34:41 ART 2015
[INFO] Final Memory: 6M/287M
[NOTE]
Developing a Mule Application with a Licensed Connector
For the customer to validate their working connector license, they must make their license (.lic file) available through either the Mule application or the Mule server, accordingly.
License File in the Mule Application
Once the customer has already bought a license for the connector, the .lic file provided to the customer by the partner/vendor can be placed either:
-
under
src/main/resourcesin the application (developed in Studio) or, -
under
app/classesif the application has already been unpacked and deployed on the server.
License File in the Mule Server
Instead of storing the license in the application, it can be placed in the conf/ folder of the Mule server.
| Storing the license in the Mule server is the recommended approach if multiple applications require the same license. |
Deploying Application with Licensed Connector
To test the experience of the application developer using a partner connector based on 1) whether they have properly obtained and stored their license and 2) where they try to deploy their application, follow these steps:
-
Download the zipped sample connector project
-
From the File menu, select Import to import the .zip file into the workspace.
-
From the Project menu, click Clean to build the connector.
-
Right-click the connector project in Package Explorer, and click Install or Update to install the connector in Studio.
-
Import either a sample application with an unlicensed connector or a sample application with a licensed connector.
| In application design in Studio, running the application without the necessary connector license does not produce any error or exception. |
Trying to deploy this sample Mule application to Mule ESB On-Prem without a valid connector license causes an exception, and is logged like this:
Exception…
Caused by: org.mule.devkit.3.9.0.internal.lic.exception.InvalidLicenseException: License with name [license-demo.lic] not found as resource. License was not provided or its name is not the expected
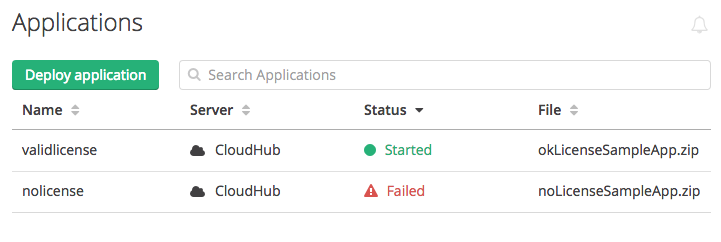
Attempting to deploy the Mule application using the unlicensed connector to CloudHub fails with a status indicator:

See Also
-
Review the section on Packaging Your Connector For Release


