Windows Gateway Services Configuration Guide
Anypoint Windows Gateway Services provides connectivity to proprietary functionality on the Windows platform, and is used by the following connectors:
Before You Begin
-
Java Cryptography Extensionsmust be installed on the server where Mule is installed. The JCE package is required to allow the Connector to use HTTPS to communicate securely. You can install JCE for your Java version from the Oracle website: -
To enable TLS 1.2 on servers that run Windows Server 2008 R2, you must create the
DisabledByDefaultentry in the appropriate subkey (Client, Server) and set it to0. The entry does not appear in the registry and it is set to1by default. TLS/SSL Settings
-
Windows 2008 Server, Windows 2008 R2 Server, or Windows 2012 Server, and .NET Framework 4.5 or later are required for installation.
Installing the Windows Gateway Services
To install Windows Gateway Services:
-
Unzip the software distribution.
-
Double-click the
Anypoint-Windows-Gateway-Service.exefile. -
Click Options to change the installation location, or click Install to start the installation.
-
To use MSMQ Connector with the Gateway Services, copy the Authentication Token that is displayed for later use when you configure the connection in Anypoint Studio, otherwise skip this step.
-
After you copy the token, click Install.
After the installation completes, the installer gives you the option to view the
readme.txtfile with additional instructions.
-
-
Click Finish to exit.
-
The installation creates the Anypoint Windows Gateway service, which the installer starts.
To view the running service in Windows 7, when the Control Panel View by option is set to Small icons, select Control Panel > Administrative Tools > Services. The service appears as Anypoint Gateway.
Configuring the Anypoint Gateway
The default installation location for the Windows Gateway Service is c:\Program Files(x86)\Anypoint Gateway for Windows. This folder contains the Mule.SelfHost.exe executable and the Mule.SelfHost.exe.config configuration file.
| If the configuration file doesn’t appear in the folder, in Windows 7, when the Control Panel View by option is set to Small icons, select Control Panel > Folder Options > View > Show hidden files, folders, and drives. |
The executable starts a new web server at port 9333 (default), which only accepts secure connections using HTTPS. You can change the port number where the Gateway listens in the following places within the Mule.SelfHost.exe.config configuration file:
<appSettings>
<!-- Configure the service to listen on the following address. -->
<add key="OwinHostAddress" value="https://+:9333/"/>
...
</appSettings>
...
<system.serviceModel>
<services>
<service behaviorConfiguration="routing"
name="System.ServiceModel.Routing.RoutingService">
<host>
<baseAddresses>
<add baseAddress="https://*:9333/router"/>
</baseAddresses>
...
</system.serviceModel>xmlThis web server uses a self-signed SSL certificate, which is auto-generated during installation. The certificate is in the Personal folder of the Local Computer certificate store:

Because the Windows service relies on http.sys for self-hosting the web server, changes in the port number or SSL certificate require reconfiguring Windows. The Register-SslCert.ps1 PowerShell script in the installation directory handles this task. If the port or certificate changes, run the following command from a PowerShell console:
Register-SslCert.ps1 <certificate-thumbprint> <windows-account> <port>
-
<certificate-thumbprint>: The thumbprint of the SSL certificate. It must be stored in the Personal Folder of the Local Store Account. -
<windows-account>: Windows User or Group that receives permissions to register the port. The account impersonating the Windows service or console application must be part of this group. -
<port>: HTTP port (9333 is the default) you set in the configuration file.
Example:
Register-SslCert.ps1 a495cbf8c4af496f1ef81efb224c8097d039f922 everyone 9333
MSMQ Connector Settings
Security Considerations
For the MSMQ connector running in the Mule Runtime, the service first authenticates the call by inspecting the HTTP Authorization header as specified in RFC 2616.
The authentication is done through this unique security token used by the MSMQ connector. This token is included on every HTTP request to the Gateway using the Mule scheme. The following example shows how MSMQ leverages the Gateway to connect to a specific queue sending the security token as specified in this section:
GET: https://localhost:9333/msmq?count=50 Authorization: mule 3nGdw7W+G1fSO2YBEHDmpo4N1Tg= Mule-Msmq-Queue-Name: .\private$\out Mule-Api-Version: 1.0text
The authorization token should match on the connector and the Gateway configuration file. The following configuration setting shows how the token is set within the Gateway configuration file Mule.SelfHost.exe.config :
<appSettings>
<!-- Token that must be sent by the Mule connector's client in the Authorization header when accessing the Rest Api. -->
<add key="mule-auth-token" value="3nGdw7W+G1fSO2YBEHDmpo4N1Tg="/>
</appSettings>xmlWhen you configure the connector running in the Mule Runtime, set the authorization token value using the Gateway Access Token configuration setting (accessToken attribute at the connector’s XML configuration).
Note: The installer for the Windows Gateway service automatically generates a cryptographically secure token for use by callers upon first install. This token is displayed and placed upon the clipboard during installation for easy copying into a Mule application.
Impersonating a Windows User Through Custom HTTP Headers
Users executing the call on behalf of a Gateway-served connector authenticate through two custom HTTP headers, mule-impersonate-username and mule-impersonate-password.
These two headers represent the Windows credentials of an existing user in the Active Directory forest where the Windows Gateway service is running, or a local account on the machine hosting the service. When these HTTP headers are included in an HTTP Request, the Windows Gateway service authenticates and impersonates this user before executing the operation required by the connector. This provides the ability to configure the correct access control list permissions using Windows credentials.
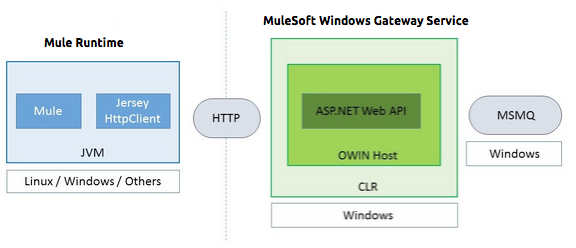
MSMQ Connector and Gateway Interaction
The following diagram shows the interaction of the MSMQ connector with the Gateway, along with the main components used:
MSMQ Configuration Settings
In the following table you can find the configuration settings that are only related to the MSMQ connector:
| Property | Usage |
|---|---|
invalid-queue-name |
The queue name where unreadable messages are moved. |
transaction-timeout |
The timeout for processing messages after they are retrieved by the connector. When the cleanup task finds a message with an expired timeout, it moves the message to the main queue to be so that it’s available again. For details, check the two-phase commit section of the connector’s user guide. |
invalid-message-timeout |
The timeout for invalid messages for when the payload of a message is parsed with an incorrect formatter. |
cleanup-delay |
The delay time for the cleanup task to start looking for expired messages after they are retrieved for processing. For details, check the two-phase commit section of the connector’s user guide. |
cleanup-username |
(Optional) The user to impersonate when running the cleanup task. If you choose to leave this setting empty, then the user account running the service will be used. |
cleanup-password |
(Optional) The password for the user to impersonate when running the cleanup task. |
Impersonating a Windows User From a Remote Queue
When your queue is marked to require authentication, you can impersonate the caller user as specified in the configuration settings. Additionally, if you work with a remote queue, the connector has a particular header to override this behavior.
Work with Remote Queues
If the Anypoint Gateway service runs on one machine and must access a remote queue on another machine, you must do one of these options (based on your environment configuration):
-
Verify machine grouping
-
Ensure that both machines belong to the same workgroup.
-
If anonymous access isn’t enabled, grant full access to the
Anonymoususer on the remote queue. -
Verify that the
GEToperation works successfully under these updated anonymous access settings.
-
-
Grant domain membership and permissions
-
Ensure that both machines are members of the same domain.
-
Add the machine running the Anypoint Gateway service to the permission settings of the remote queue. Grant full access to this machine on the remote queue.
-
Verify that the
GEToperation works successfully under these domain and permission settings.
-
Load Balanced Configuration
Windows Gateway Services supports running in a load-balanced configuration to allow for fault tolerance. When running multiple Gateway Services instances, each member must be configured to perform MSMQ background jobs at a non-overlapping interval.
MSMQ background job processing is by default performed every 10 minutes starting at zero minutes past the hour. To prevent multiple gateway instances simultaneously attempting to perform cleanup on the queues when running in a load-balanced configuration, a setting called cleanup-delay must be specified on each gateway instance. The recommended value to use for this on each machine is (10 / instanceCount) * (instanceNumber - 1) where instanceNumber is an integer value 1..n.
For example, a cluster of two machines would use a cleanup-delay of 0 on machine 1 and 5 on machine 2. A cluster of three machines would use a cleanup-delay of 0 on machine 1, 3 on machine 2, and 6 on machine 3. Synchronize the clocks for the machines in your cluster by NTP or an equivalent mechanism to ensure this offset is applied correctly.
The cleanup-delay setting is in the Mule.SelfHost.config file:
<appSettings>
<!-- MSMQ: Delay in minutes to launch the cleanup process for sub-queues -->
<add key="cleanup-delay" value="0"/>
</appSettings>xmlNote: When running in a load-balanced configuration, the Gateway Services must configured to run as 'Administrator' when the nodes involved (MSMQ, gateways) are under a WORKGROUP but not joined to a DOMAIN. When joined to the same DOMAIN the permissions for each of the nodes and objects involved (queues) should be correctly set by the domain’s administrator.
Troubleshooting Windows Gateway Services
Windows Gateway Services leverages the built-in .NET tracing system. Tracing messages are sent through switches to listeners, which are tied to a specific storage medium. The listeners for the trace source used by the connector are available in the configuration file:
<sharedListeners>
<add name="console" type="System.Diagnostics.ConsoleTraceListener" />
<add name="file" type="System.Diagnostics.TextWriterTraceListener" initializeData="mule.gateway.log" />
<add name="etw" type="System.Diagnostics.Eventing.EventProviderTraceListener, System.Core, Version=4.0.0.0, Culture=neutral, PublicKeyToken=b77a5c561934e089" initializeData="{47EA5BF3-802B-4351-9EED-7A96485323AC}" />
</sharedListeners>
<sources>
<source name="mule.gateway">
<listeners>
<clear />
<add name="console" />
<add name="etw"/>
</listeners>
</source>
</sources>xmlThe previous example configures three listeners for the output console, for files, and for Event Tracing for Windows (ETW). The trace source for the connector mule.gateway is configured to output the traces to the console and ETW only.
Changing the Tracing Level
Windows Gateway Services is configured to log Information events. This is configured in the <switches> element. If you want to log everything, use the Verbose level by changing it in the configuration element.
Configure the tracing levels at the <switch> level in the configuration file:
<switches>
<add name="mule.gateway" value="Information" />
</switches>xmlOther possible levels are:
-
Error: Output error handling messages
-
Warning: Output warnings and error handling messages
-
Information: Output informational messages, warnings, and error handling messages
-
Off: Disable tracing
To trace or debug the routing service within the Windows Gateway Services, there is a setting to enable to get more details about the error that was generated while connecting to the routing service. To get this information at the tracing listeners, enable it using the includeExceptionDetailInFaults attribute in the serviceDebug element. To do this, set its value to true:
<serviceBehaviors>
<behavior name="routing">
...
<serviceDebug includeExceptionDetailInFaults="true" />
</behavior>
</serviceBehaviors>xmlThis setting extends the error message returned by the service and adds an internal stack trace of the cause, which in some scenarios may help you understand what the issue or problem is.
Enabling Console Tracing From the Command Line
A useful way to troubleshoot issues is to enable the console listener (by default it is enabled, but if not then you should add it to the listeners section), and run the Windows Gateway Services from the command line.
Within the console, you can see real-time information being traced, like requests, responses, and some warnings or errors. These are useful to see if the connector is reaching the Gateway properly, or other possible causes that could be generating a fault.
-
To enable the console listener, in case it is not, add it to the
listenerscollection:<sources> <source name="mule.gateway"> <listeners> <clear /> <add name="console" /> ... </listeners> </source> </sources>xml -
To run from the command line, stop the Anypoint Gateway service.
-
Go to the folder where Anypoint Gateway service is installed, which by default is
c:\Program Files(x86)\Anypoint Gateway for Windows. -
Run the Mule.SelfHost.exe application. This starts running a console and displays tracing events within it in real time.
-
When you are finished troubleshooting, close this console and restart the windows service.
Enabling Event Tracing for Windows
Event Tracing for Windows (ETW) is a very efficient built-in publish and subscribe mechanism for doing event tracing at the kernel level. There is little overhead in using this feature compared to other traditional tracing solutions that rely on I/O for storing the traces in persistence storage such as files or databases. As a built-in mechanism in Windows, many of the operating systems services and components use this feature as well. For that reason, not only can you troubleshoot the application but also many of the OS components involved in the same execution.
In ETW, there are applications publishing events in queues (or providers) and other applications consuming events from those queues in real-time through ETW sessions. When an event is published in a provider, it goes nowhere unless there is a session collecting events on that queue. (The events are not persisted).
The tracing system in .NET includes a trace listener for ETW, EventProviderTraceListener, which you can configure with a session identifier, which ETW uses to collect traces:
<sharedListeners>
<add name="etw"type="System.Diagnostics.Eventing.EventProviderTraceListener, System.Core, Version=4.0.0.0, Culture=neutral, PublicKeyToken=b77a5c561934e089" initializeData="{47EA5BF3-802B-4351-9EED-7A96485323AC}"/>
</sharedListeners>xmlIn the example, the session is associated with this identifier:
{47EA5BF3-802B-4351-9EED-7A96485323AC}
Collecting Session Traces
-
Open a Windows console and run this command to start a new session:
logman start mysession -p {47EA5BF3-802B-4351-9EED-7A96485323AC} -o etwtrace.etl -ets -
Run this command to stop the session:
logman stop mysession -ets
This generates the
etwtrace.etlfile with the tracing session data. -
Run this command to generate a human readable file:
tracerpt etwtrace.etl
This command transfers useful information into the dumpfile.xml text file. For more information, see Tracerpt.
See Also
-
Windows Gateway Service leverages the following technologies and frameworks:
ASP.NET Web API exposes an HTTP web API that sends and receives raw messages.
OWIN
provides the HTTP layer. Open Web Interface for .NET (OWIN) is an open specification for decoupling applications from web server functionality, which provides a layer for making all the HTTP concerns independent of the hosting platform.Katana provides the OWIN Microsoft implementation, which handles self and IIS hosting for OWIN applications.