Using Anypoint Code Builder to Configure a Connector
To use Anypoint Code Builder to configure a connector:
-
Create a basic integration project in Anypoint Code Builder.
-
Add connectors and other components to your Mule application to process your business logic.
Before You Begin
Before creating an integration project, you must:
-
Set up and access the Anypoint Code Builder web or desktop IDE.
-
Have credentials to access the connector’s API.
To use connectors, you must be familiar with:
-
The connector’s API
-
Anypoint Connectors
-
Mule runtime engine (Mule)
After you complete the prerequisites, you are ready to create an app and configure the connector by using Anypoint Code Builder.
Create a New Integration Project
-
In the activity bar of the IDE, click the
 (Anypoint Code Builder) icon.
 -
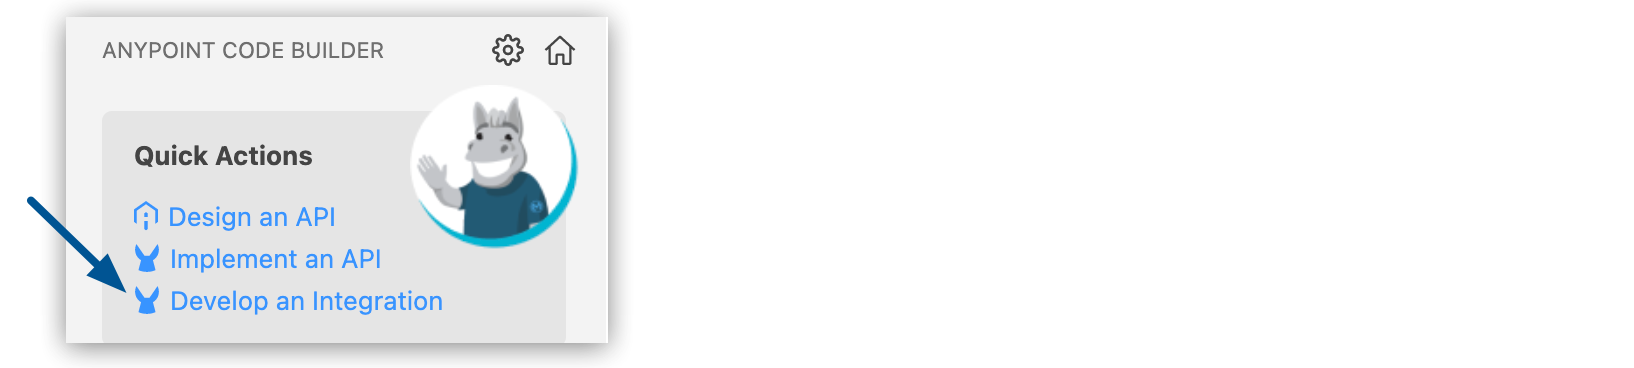
From Quick Actions, click Develop an Integration:
-
Complete the Develop an Integration form.
Attribute Value Project Name
Unique name for your project.
This name is used as the title and name of the integration project file. For example, if the project name is "Salesforce Integration," the project file name is
salesforce-integration.Project Location
Your home directory or another directory you create. Click Browse to select a different directory for the integration project.
Don’t create the project within another project directory.
-
Click Create Project.
Add the Connector to Your Integration Project
Anypoint Connectors provide operations for retrieving, modifying, and sending data to and from systems.
In addition to the built-in connectors that Anypoint Code Builder provides, you can download many other connectors from Anypoint Exchange.
To import a connector from Exchange and add it to your configuration:
-
In the Explorer view, open the configuration XML file for your project, such as
my-project-name.xml. -
Click the
 (Show Mule graphical mode) icon in the activity bar to open the canvas UI if it doesn’t open automatically.
 -
Add the connector the same way you added other components from the canvas UI:
-
In the canvas UI, click the
 (Add component) icon.
 -
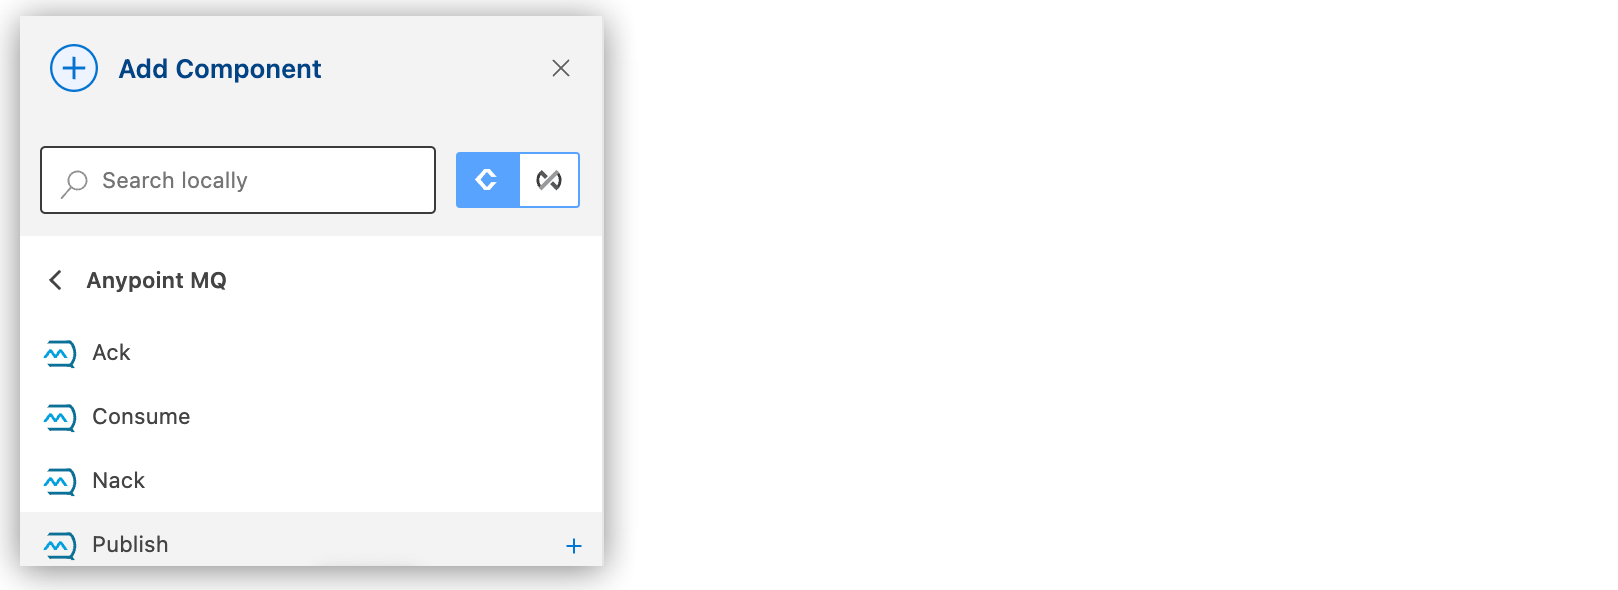
In the Add Component panel, click Connectors.
-
Click the connector name and then click the operation to add, such as Publish:
If the connector isn’t available locally, click the
 (Search in Exchange) toggle:
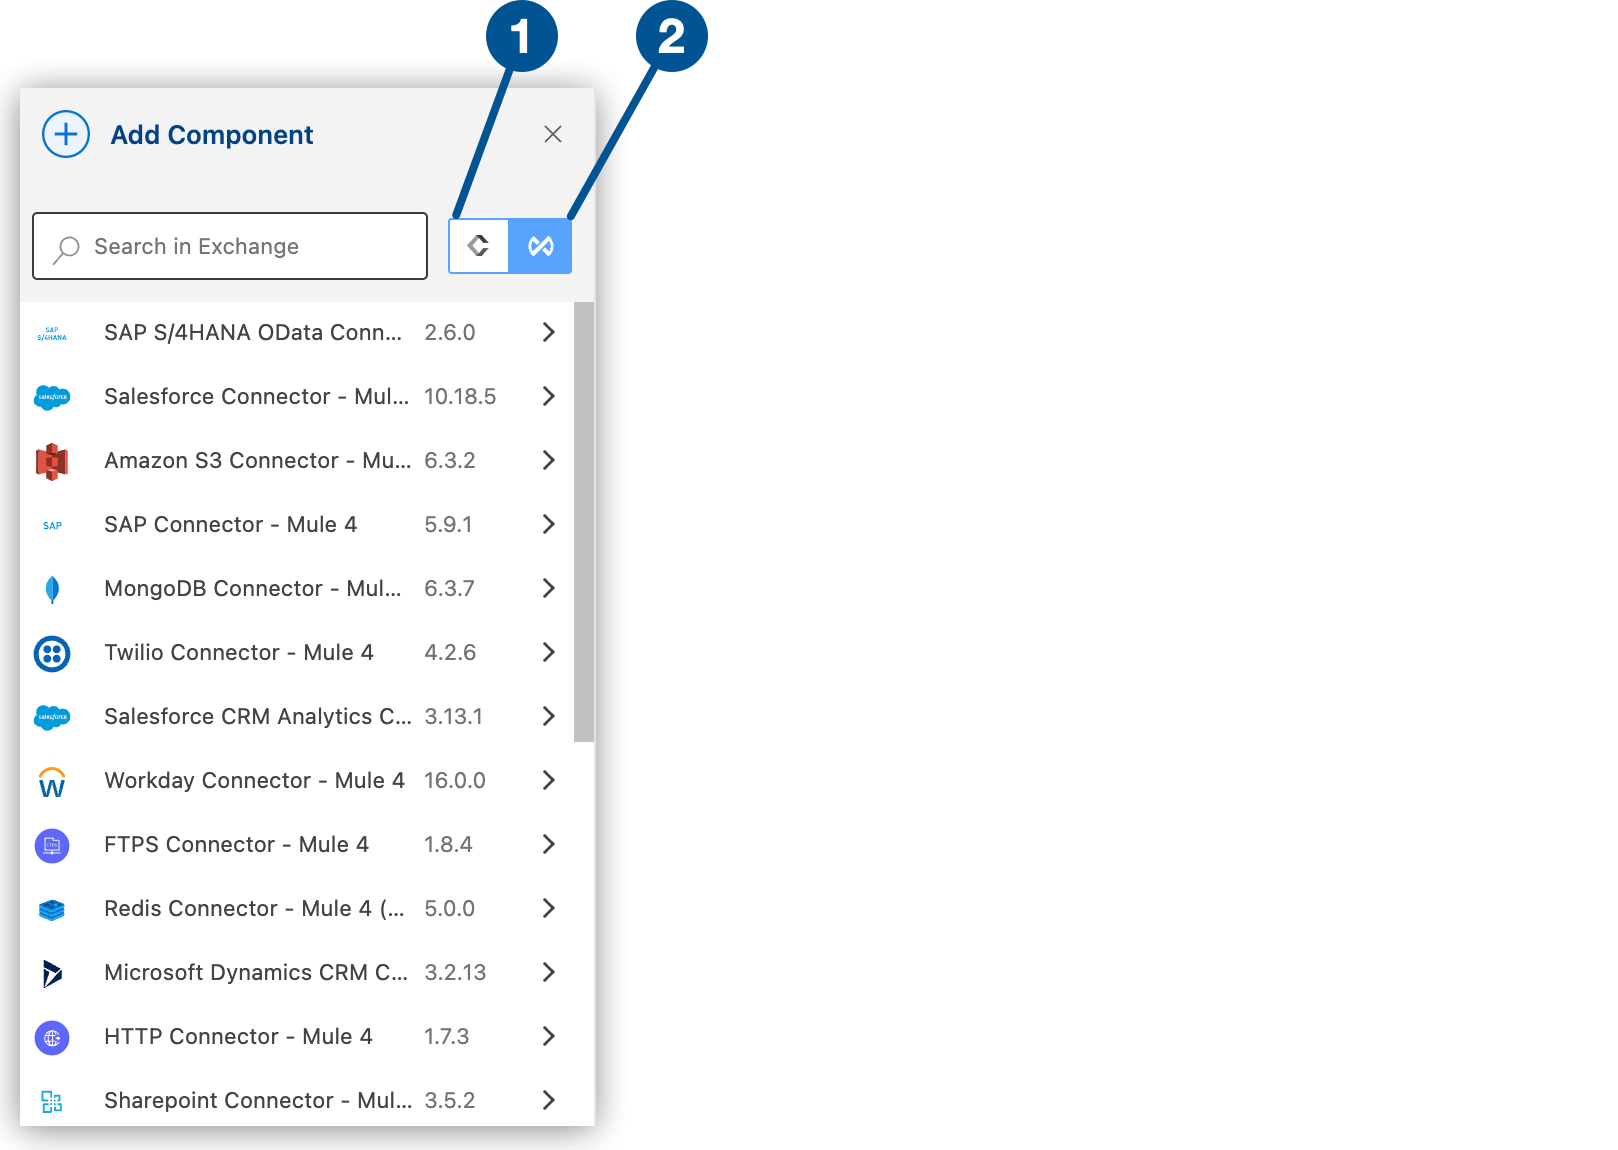
1 Search locally 2 Search in Exchange -
Select the connector to add to your project.
-
Select the operation from the Add Component panel.
-
Adding a connector to an integration project does not make that connector available to other projects in your Anypoint Code Builder workspace.
Creating a Configuration File
A configuration file is a YAML file that references other configurations and specifies values for your connector’s properties. Define the configuration properties based on the environment that you are deploying your application to.
-
In the Explorer view, right-click the resources folder (
src/main/resources) and select New File. -
Name the file
config.yaml. -
Populate your file with the connection properties required to connect to your connector. The following shows examples of Salesforce, Gmail, and Slack connection properties:
salesforce: username: "yourUserName" password: "yourPassword" token: "yourToken" email: host: "smtp.gmail.com" username: "yourGmailEmail" password: "yourEmailAppPassword" slack: token: "yourSlackToken" -
Navigate to your project XML, add a new line before the
</mule>tag, typeconfiguration, and select mule:configurationProperties: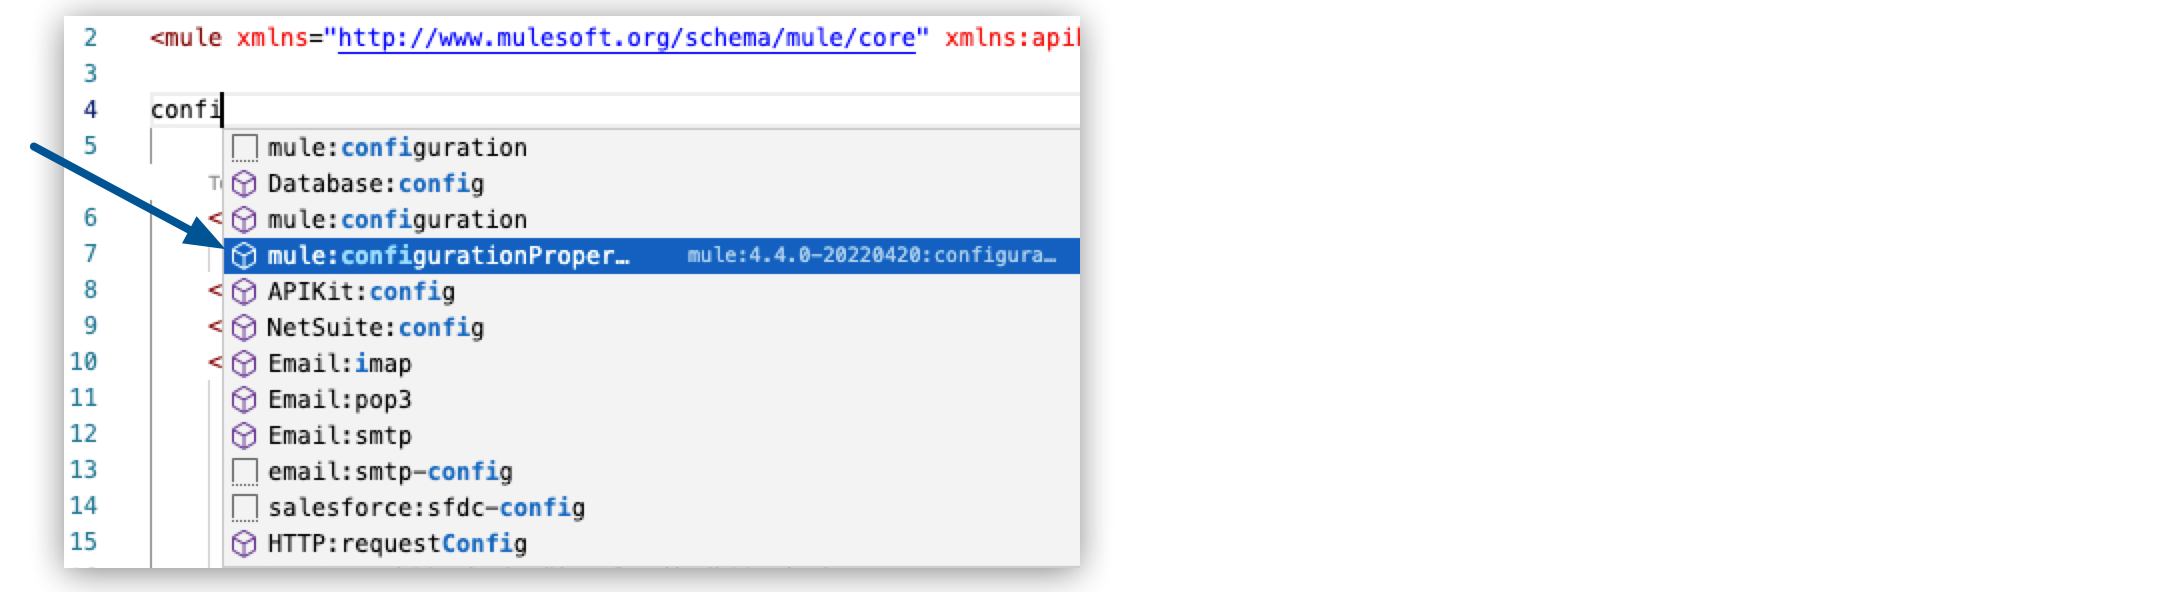
-
Scroll through the attributes and set the value of
filetoconfig.yaml:<configuration-properties file="config.yaml" doc:name="Configuration properties" />
Salesforce Connector Configuration Example
Use the values in your config.yaml file to connect Salesforce Connector to your Salesforce environment:
-
In your project XML file, create a new line after the
<configuration-properties/>element, typesalesforce, and select salesforce:sfdc-config. -
Set the name field to
Salesforce-Config. -
Create a new line, type
basic, and select Salesforce:Basic. -
Configure the
usernameandpasswordproperties to use your configuration file values:<salesforce:basic-connection username="${salesforce.username}" password="${salesforce.password}" securityToken="${salesforce.token}" />When you move your cursor over the
${salesforce.username}and${salesforce.password}elements, Anypoint Code Builder shows the values from the configuration file. -
Click Test Connection for the
<salesforce:sfdc-config/>element to verify your connection to Salesforce:
Anypoint Code Builder returns a Connection is valid message.
If you get an error, check the error message to troubleshoot further. For more information, see Troubleshooting Anypoint Code Builder.
Configuring a Trigger for the Flow
A trigger (source) starts the flow when specified conditions are met. If a connector has its own associated sources, you can use a connector-specific trigger to initiate the flow. Each connector trigger has a unique configuration.
Configuring HTTP Listener
To use HTTP Listener as a trigger for the flow:
-
Click the Listener component on the canvas.
-
(Optional) Click the edit icon to change the name of the Listener component.
-
(Optional) If you created a configuration file for the connector, select it.
-
In the General tab, in the Path field, enter the relative path for the path set in the HTTP configuration element. See Configure Paths.
-
Select the Advanced tab to configure the following attributes:
Attribute Description Required Allowed methods
To allow all HTTP methods (default), do not define this attribute. To restrict specific methods, specify the allowed HTTP methods in a comma-separated format, for example,
POST,GET.No
Response streaming mode
Whether to use streaming when the response is sent. When HTTP Connector manages response bodies, the connector considers the type of data to send and uses chunked encoding when the body size isn’t clear. This causes streams with no size information. To control this behavior, select any of these options:
-
AUTO (default)
UsesContent-Lengthencoding if a size is defined for the body, otherwise usesTransfer-Encoding: chunked. -
ALWAYS
UsesTransfer-Encoding: chunkedregardless of any size data present. -
NEVER
UsesContent-Lengthencoding, consuming streams if necessary to determine the data size.
No
Output MIME type
MIME type of the payload that this component outputs.
No
Parameters
Appends a key-value pair for a reader property to the value of the Output MIME attribute. Multiple key-value pairs are allowed.
No
Output encoding
Encoding of the payload that this component outputs.
No
Streaming Strategy
-
Non-repeatable stream
For more information about configuring the streaming strategy, see Configuring the Streaming Strategy in XML.
No
Primary node only
If selected, executes the Listener trigger on the primary node only when the app is running in a cluster.
No
Redelivery policy
Configures the redelivery policy for executing requests that generate errors. You can add a redelivery policy to any source in a flow. For more information about configuring the redelivery policy, see Redelivery Policy.
No
Reconnection strategy
When an operation in a Mule application fails to connect to an external server, the default behavior is for the operation to fail immediately and return a connectivity error. You can modify the default behavior by configuring the reconnection strategy for the operation. See Reconnect, Reconnect Forever, and Configuring the Reconnection Strategy in XML.
No
Response
Attributes that contain the metadata associated with the body (or payload) of the message. For more information, see HTTP Response Attributes.
No
Error Response
If selected, the HTTP error response returns a status code for the error.
No
Body
Body of the error message.
No
Headers
Headers to include in the error message. Each header attribute is a key-value pair separated by an equal sign (=), for example:
Headers=[
      date=Sun, 20 Jan 2019 19:13:51 GMT
      content-type=text/html;
      charset=UTF-8
      transfer-encoding=chunked
      connection=keep-alive
      set-cookie=__cfduid=d03462713a0b2c57c8d2ad3bf311287041548011631;
      expires=Mon, 20-Jan-20 19:13:51 GMT;
      path=/;
      domain=.typicode.com;
      HttpOnly
      x-powered-by=Express
      vary=Origin, Accept-Encoding
      access-control-allow-credentials=true
      cache-control=public, max-age=14400
      last-modified=Tue, 15 Jan 2019 18:17:15 GMT
      via=1.1 vegur
      cf-cache-status=HIT
      expires=Sun, 20 Jan 2019 23:13:51 GMT
      expect-ct=max-age=604800,
      report-uri="https://report-uri.cloudflare.com/cdn-cgi/beacon/expect-ct"
      server=cloudflare
      cf-ray=49c3dc570c2f281c-SJC
   ]
No
Status code
Status code of the error response, for example,
Status Code=500.No
Reason phrase
Reason for the error, for example,
Gateway TimeoutorInternal Server Error.No
-
For details about the Listener configuration attributes, see Listener Configuration.
Configuring Scheduler
The Scheduler sets a scheduling strategy at a fixed frequency or an interval based on a cron expression.
When adding a Scheduler to your Mule application, consider these points:
-
Schedulers use the same timezone as the machine on which Mule is running. However, if an application is running in CloudHub, the Scheduler conforms to the UTC timezone, regardless of the geographic region in which the application is running.
To set a different time zone for the Scheduler, see
timeZonein the cron scheduling strategy attributes. -
The
disallowConcurrentExecutionproperty enables you to prevent the Scheduler from triggering the execution of the flow while a previously-triggered execution is running. -
If back-pressure occurs because no resources are available at the time of the scheduled trigger, Mule skips that execution.
-
In a Mule runtime engine cluster or multi-worker CloudHub deployment, the Scheduler executes only on the primary node (that is, only in one Mule instance).
<scheduler doc:name="Scheduler" doc:id="snswxf" >
  <scheduling-strategy/>
</scheduler>
Scheduler (<scheduler/>) attributes are configurable through the UI and XML.
| Attribute Name | Attribute XML | Description |
|---|---|---|
Scheduler (default) |
|
Editable name for the component to display in the canvas. |
N/A |
|
Automatically generated identifier for the component. |
Disallow concurrent execution |
|
When this attribute is set to |
Scheduling strategy (<scheduling-strategy/>) is a child element of Scheduler.
| Child Element | Description |
|---|---|
|
Accepts a |
Fixed Frequency Attributes
Scheduler accepts a fixed frequency (<fixed-frequency/>) element that accepts these attributes:
| Attribute Name | Attribute XML | Description |
|---|---|---|
N/A |
|
The frequency at which the Scheduler triggers the flow given the |
N/A |
|
The amount of time to delay execution of the Scheduler for the first time after the application starts. This property uses the same |
N/A |
|
One of the following time units for the values of |
See the fixed frequency examples.
Cron Attributes
For more complex scheduling, configure a cron expression in the <cron/> element.
| Attribute Name | Attribute XML | Description |
|---|---|---|
N/A |
|
A cron expression for triggering the Scheduler. There is no default cron expression. For guidance with expressions, see Cron Expressions. Example: |
N/A |
|
Time zone passed as a system property, or in a machine’s operating system. Java time zone values are supported. Avoid Java abbreviations, such as |
See the cron examples.
Fixed Frequency Examples
In the following example, the Scheduler executes every fifteen seconds:
<flow name="ex-fixed-frequency-flow" >
  <scheduler doc:name="Scheduler">
    <scheduling-strategy>
      <fixed-frequency frequency="15" timeUnit="SECONDS" />
    </scheduling-strategy>
  </scheduler>
  <!-- One or more processors here. -->
</flow>
In the following example, the Scheduler skips its execution if the flow takes longer to complete than the fixed frequency of 10 milliseconds:
<flow name="scheduler-disallowConcurrentExecution-ex" >
  <scheduler doc:name="Scheduler" disallowConcurrentExecution="true" >
    <scheduling-strategy>
      <fixed-frequency frequency="10" timeUnit="MILLISECONDS"/>
    </scheduling-strategy>
  </scheduler>
  <!-- processors here -->
</flow>
Each time a Scheduler skips its execution, Mule logs an Execution skipped message, for example (edited for readability):
INFO  2022-11-09 15:15:43,082 ...
...scheduler.DefaultSchedulerMessageSource:
Flow 'scheduler-disallowConcurrentExecution-ex' is already running and
'disallowConcurrentExecution' is set to 'true'. Execution skipped.

INFO  2022-11-09 15:15:43,083 ...
...scheduler.DefaultSchedulerMessageSource:
Flow 'scheduler-disallowConcurrentExecution-ex' is already running and
'disallowConcurrentExecution' is set to 'true'. Execution skipped.
The following example shows a fixed-frequency scheduling strategy that executes the Scheduler every 10 seconds after an initial 10 second delay:
<scheduler doc:name="Scheduler" >
  <scheduling-strategy >
    <fixed-frequency frequency="10" timeUnit="SECONDS" startDelay="10"/>
  </scheduling-strategy>
</scheduler>
Cron Examples
The following example uses a cron expression to trigger the generation of a Mule message in a new execution of the flow every fifteen seconds:
<flow name="ex-cron-expression-flow" >
  <scheduler doc:name="Scheduler" >
    <scheduling-strategy >
      <cron expression='0/15 * * * * ? '/>
    </scheduling-strategy>
  </scheduler>
  <!-- One or more processors here. -->
</flow>
The following example uses a cron expression to trigger the flow at 12:00 every day in the America/Los_Angeles time zone.
<flow name="componentsFlow">
  <scheduler>
    <scheduling-strategy>
      <cron expression="0 0 12 * * ?" timeZone="America/Los_Angeles"/>
    </scheduling-strategy>
  </scheduler>
  <logger message="my message"/>
</flow>
Cron Expressions
Cron is a widely used standard for describing time and date information. The Cron Expression (<cron expression /> scheduling strategy (<scheduling-strategy >) is useful for triggering a flow at intervals not available through the Fixed Frequency scheduling strategy.
The Scheduler keeps track of every second and creates a Mule event when the Quartz Cron expression matches your time-date setting. You can trigger the event just once or at regular intervals.
A date-time expression consists of six required settings and can include the optional year setting. Specify the settings in the following order:
-
Seconds (
0-59) -
Minutes (
0-59) -
Hours (
0-23) -
Day of month (
1-31) -
Month (
1-12orJAN-DEC) -
Day of the week (
1-7orSUN-SAT) -
Year (empty or a 4-digit year between
1970-2099, for example,2019)
The Scheduler supports Quartz Cron expressions. Here are a few examples:
| Expression | Behavior |
|---|---|
|
Run every 2 seconds of the day, every day. |
|
Run at 10:15 a.m., every day. |
|
Run at 10:15 a.m., every day during the year 2019. |
|
Run every minute starting at 2pm and ending at 2:59pm, every day. |
|
Run every 5 minutes starting at 2pm and ending at 2:55pm, every day |
|
Run the first second of the first minute of the first hour, on the first and seventh day, every month. |
The Scheduler component also supports Quartz Scheduler special characters:
-
*: All values. -
?: No specific value. -
-: Range of values, for example,1-3. -
,: Additional values, for example,1,7. -
/: Incremental values, for example,1/7. -
L: Last day of the week or month, or last specific day of the month (such as6Lfor the last Saturday of the month). -
W: Weekday, which is valid in the month and day-of-the-week fields. -
#: "nth" day of the month. For example,#3is the third day of the month.
This example logs the message "hello" every second:
<flow name="cronFlow" >
  <scheduler doc:name="Scheduler" >
    <scheduling-strategy >
      <cron expression="* * * * * ?" />
    </scheduling-strategy>
  </scheduler>
  <logger level="INFO" doc:name="Logger" message='"hello"'/>
</flow>
Note that there are many free online tools that can help you build Cron expressions.
Using a Connector-Specific Trigger
If a connector has associated triggers, you can use a connector-specific trigger to initiate the flow. Each connector trigger has a unique configuration.
For example, you can configure one of these triggers to use with Salesforce Connector:
-
On Deleted Object
Initiates your app when a Salesforce user deletes an object. Possible object types are
Contact,Lead,Account,Contracts,Opportunity, or the name of a custom object. -
On Modified Object
Initiates your app when a Salesforce user modifies an object. Possible object types are
Contact,Lead,Account,Contracts,Opportunity, or the name of a custom object. -
On New Object
Initiates your app when a Salesforce user creates a new object. Possible object types are
Contact,Lead,Account,Contracts,Opportunity, or the name of a custom object. -
Replay channel listener
Subscribes to a streaming channel. This source provides channel-related notification settings for new events and events stored by Salesforce within the 24-hour retention period. Events that occur in the specified channel source trigger the flow.
-
Replay topic listener
Subscribes to a topic. This source provides topic-related notification settings for new events and events stored by Salesforce within the 24-hour retention period. Events that occur on records in the specified topic trigger the flow.
-
Subscribe channel listener
Subscribes to a streaming channel. This source provides channel-related notification settings for new events that occur after you subscribe.
-
Subscribe topic listener
Subscribes to a topic. This source provides topic-related notification settings for new events that occur after you subscribe.
| A channel or topic must be published to Salesforce before a subscription to the channel can be created. |
For example, to configure the On New Object source:
-
Add the On New Object component to the canvas.
-
Click the On New Object component on the canvas.
-
In the General tab, select the configuration file to use, and configure the following attributes:
Attribute Description Required Object type
Salesforce object type.
Yes
Triggers query
Query that filters the trigger results, for example,
Name='Filter'.No
Since
Date in the
YYYY-MM-DD hh:mm:ssformat, for example,2017-03-17 16:30:40. If this field is empty, this source retrieves the selected objects from the time the Mule app started.No
Scheduling strategy
Triggers the flow’s execution based on a time-based condition. See Configuring Scheduler.
Yes
-
Select the Advanced tab to configure the following attributes:
Attribute Description Required Primary node only
Executes the On New Object trigger only on the primary node when the app is running in a cluster if selected.
No
Redelivery policy
For more information, see Redelivery Policy
No
Read timeout
How long the consumer waits for a response before it times out.
No
Time unit
Time unit for the Read timeout attribute. Enumeration, one of:
-
NANOSECONDS
-
MICROSECONDS
-
MILLISECONDS
-
SECONDS
-
MINUTES
-
HOURS
-
DAYS
No
Reconnection strategy
See Reconnect and Reconnect Forever, and Configuring the Reconnection Strategy in XML.
No
-
Configure the Component Attributes
After you add components to your integration project, configure the attributes in the component UI, or configure the attributes directly in the XML code editor.
Connector XML tags start with a namespace followed by an operation, following the syntax namespace:operation, such as <db:select/> for a Select operation in Anypoint Connector for Database (Database Connector).
Configuring a Connector in XML
Although you can manually code a Mule app in XML, it is more efficient to use Anypoint Code Builder:
-
If you manually code a Mule runtime engine (Mule) app in XML from the Anypoint Code Builder XML editor, you can access the connector from your app by adding reference statements to both your XML Mule flow and the Apache Maven
pom.xmlfile. -
If you add the connector in Anypoint Code Builder, Studio automatically populates the XML code with the connector’s namespace and schema location and it also adds a dependency to the
pom.xmlfile.
This example shows how the namespace statements are placed in the <mule> XML block:
<mule xmlns:{lc-connector-name}="http://www.mulesoft.org/schema/mule/{lc-connector-name}"
	xmlns:ee="http://www.mulesoft.org/schema/mule/ee/core"
	xmlns:http="http://www.mulesoft.org/schema/mule/http"
	xmlns:file="http://www.mulesoft.org/schema/mule/file"
	xmlns="http://www.mulesoft.org/schema/mule/core"
	xmlns:doc="http://www.mulesoft.org/schema/mule/documentation"
	xmlns:xsi="http://www.w3.org/2001/XMLSchema-instance"
	xsi:schemaLocation="http://www.mulesoft.org/schema/mule/core
	http://www.mulesoft.org/schema/mule/core/current/mule.xsd
	http://www.mulesoft.org/schema/mule/file
	http://www.mulesoft.org/schema/mule/file/current/mule-file.xsd
	http://www.mulesoft.org/schema/mule/http
	http://www.mulesoft.org/schema/mule/http/current/mule-http.xsd
	http://www.mulesoft.org/schema/mule/ee/core
	http://www.mulesoft.org/schema/mule/ee/core/current/mule-ee.xsd
	http://www.mulesoft.org/schema/mule/{lc-connector-name}
	http://www.mulesoft.org/schema/mule/{lc-connector-name}/current/mule-{lc-connector-name}.xsd">
The Apache Maven pom.xml file generated by Anypoint Code Builder contains dependencies for a Mule app. If you code a Mule app manually, include this XML snippet in your pom.xml file to enable access to this connector:
<dependency>
  <groupId>{group-id-exchange}</groupId>
  <artifactId>{artifact-id-exchange}</artifactId>
  <version>x.x.x</version>
  <classifier>mule-plugin</classifier>
</dependency>
Replace x.x.x with the version that corresponds to the connector you are using.
To obtain the most up-to-date pom.xml file information:
-
Go to Anypoint Exchange.
-
In Exchange, click Login and supply your Anypoint Platform username and password.
-
In Exchange, search for the connector.
-
Select the connector.
-
Click Dependency Snippets.
Configuring the Streaming Strategy in XML
You can configure how Mule handles streams with streaming strategies.
File-Stored Repeatable Stream
The following is an XML example of reading a file that is configured with a 1 MB buffer:
<file:read path="bigFile.json">
  <repeatable-file-store-stream
    inMemorySize="1"
    bufferUnit="MB"/>
</file:read>
If you consistently process a file that’s no larger than 10 KB, you can save memory by reducing the inMemorySize attribute:
<file:read path="smallFile.json">
  <repeatable-file-store-stream
    inMemorySize="10"
    bufferUnit="KB"/>
 </file:read>
In-Memory Repeatable Stream
The following XML example shows an in-memory repeatable stream with a 512 KB initial size, which grows at a rate of 256 KB and allows up to 2000 KB (2 MB) of content in memory:
<file:read path="exampleFile.json">
  <repeatable-in-memory-stream
    initialBufferSize="512"
    bufferSizeIncrement="256"
    maxInMemorySize="2000"
    bufferUnit="KB"/>
</file:read>
Configuring the Reconnection Strategy in XML
The following is an XML example of a standard reconnection strategy setting the count of reconnection attempts before failing to 5 and setting failsDeployment to true, which causes the application deployment to fail if the connection test fails. Because a frequency is not specified, the retry interval is the default of every 2000 ms:
<db:config name="Database_Config" doc:name="Database Config" doc:id="79ae8d0f-e0af-4901-961d-b80befbf3f86" >
	<db:data-source-connection >
		<reconnection failsDeployment="true" >
           <reconnect count="5"/>
        </reconnection>
	</db:data-source-connection>
</db:config>
The following is an XML example of a reconnect forever strategy where the connector attempts to reconnect every 4000 ms for as long as the application runs:
<db:config name="Database_Config1" doc:name="Database Config" doc:id="c0aaf1dd-ab6e-49ee-9e4d-8b5799945cc9">
    <db:data-source-connection>
        <reconnection failsDeployment="true">
            <reconnection>
                <reconnect-forever frequency="4000"/>
            </reconnection>
        </reconnection>
    </db:data-source-connection>
</db:config>