Defining and Securing Properties for a Mule Application
 Cloud IDE
 Desktop IDE
Define configuration properties to secure and customize your Mule application configuration for different deployment environments.
-
Encrypt sensitive values used in your Mule application.
-
Define and use variables instead of literal strings when setting values in the configuration XML.
-
Configure a variable for selecting different property files for a specific deployment environment, such as development, sandbox, or production.
For a guided, conversational approach to setting up secure properties, use MuleSoft Vibes. For additional information, see Working with Secure Properties Using MuleSoft Vibes.
Configuration Properties and Encryption
Before following step-by-step procedures for encrypting properties or deploying applications that use them, learn the basics:
Encryption with the MuleSoft Secure Properties Tool
To encrypt sensitive data, use the MuleSoft tool for your Java version.
-
For Java 8 and 11, use secure-properties-tool.jar
-
For Java 17, use secure-properties-tool-j17.jar
The tool accepts the following algorithms:
-
AES
-
Blowfish
-
DES
-
DESede
-
RC2
-
RCA
The tool accepts the following ciphers:
-
CBC (default)
-
CFB
-
ECB
-
OFB
For step-by-step instructions on encrypting properties in a Mule application, see Encrypt Sensitive Values.
Configuration Properties Files
Connectors and components in the Mule configuration XML accept variables for sensitive and non-sensitive data. The variables are defined in a .yaml or Spring-formatted .properties file that you create and store in the src/main/resources directory of the project for your Mule application, for example:
| Unencrypted Values for All Keys | Encrypted Values of uname and pw Keys |
|---|---|
|
|
You can create separate properties files for your unencrypted and encrypted properties, for example, in a YAML file:
Unencrypted Values of workingDir and host Keys |
Encrypted Values of uname and pw Keys |
|---|---|
dev.properties.yaml content: |
dev.secure.yaml content: |
In a Spring-formatted .properties file, the same configurations are:
Unencrypted Values of workingDir and host Keys |
Encrypted Values of uname and pw Keys |
|---|---|
dev.properties content: |
dev.secure.properties content: |
For step-by-step instructions, see Encrypt Sensitive Values.
To provide property settings for different environments, such as production and development environments, create separate properties files for your environments. For instructions, see Provide Settings for Different Environments.
References to Properties and Property Files in the Configuration XML
Reference property files and use property values in the configuration XML:
-
If your properties file does not contain any encrypted properties:
-
Use this syntax to reference the property value:
${property-key} -
Use this global element to reference the file:
<configuration-properties/>For example, assuming that the
port: "8081"property is in the properties fileports.yaml, use${port}as the value of theportattribute in<http:listener-config/>:<configuration-properties file="ports.yaml"/> <http:listener-config name="HTTP_Listener_config" > <http:listener-connection host="0.0.0.0" port="${port}" /> </http:listener-config> <flow name="flow" > <http:listener doc:name="Listener" config-ref="HTTP_Listener_config" path="/trigger"/> </flow>
-
-
If your properties file contains any encrypted properties:
-
Use this syntax to reference the property value:
${secure::property-key} -
Use this global element to reference the file:
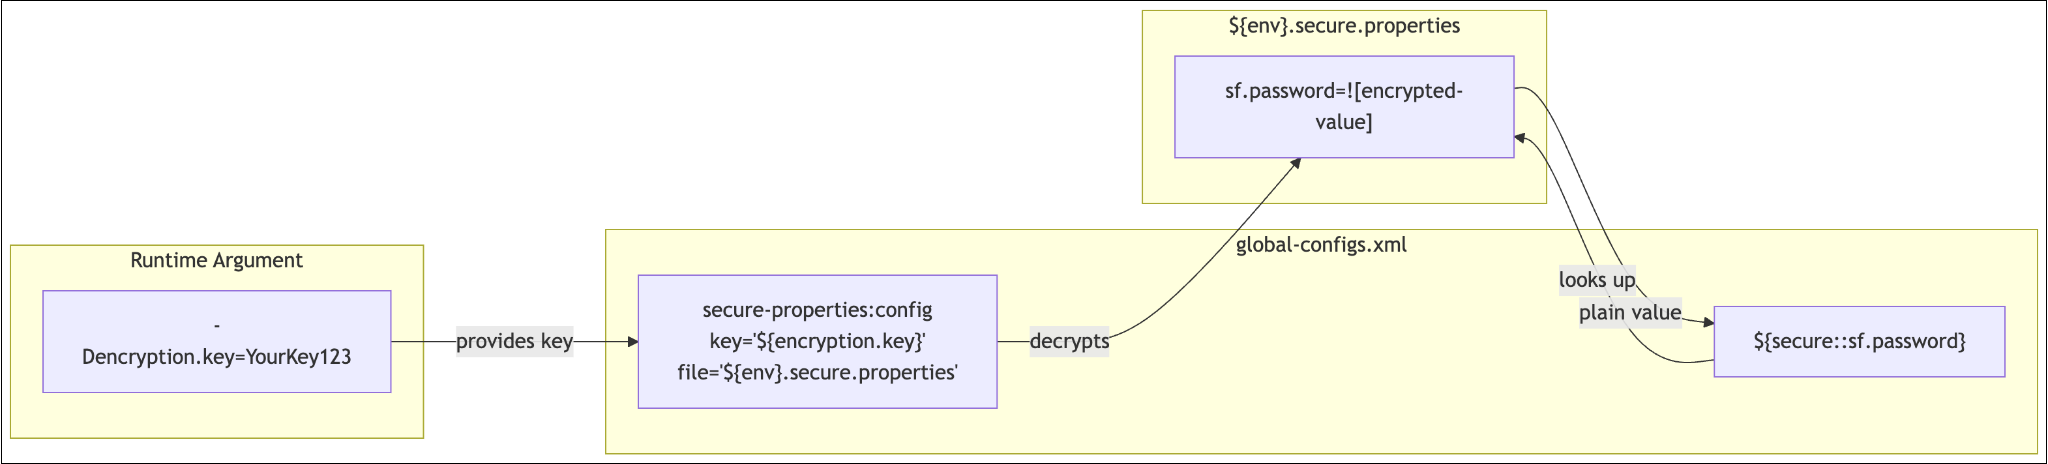
<secure-properties:config/>This FTP example references
dev.secure.yamlwith<secure-properties:config/>, and uses thesecure::prefix to reference all properties in that properties file:<secure-properties:config name="Secure_Properties_Config" doc:name="Secure Properties Config" doc:id="acegik" file="dev.secure.yaml" key="${encryption.key}" > <secure-properties:encrypt algorithm="Blowfish" /> </secure-properties:config> <ftp:config name="FTP_Config" doc:name="FTP Config" doc:id="abcdefg" > <ftp:connection workingDir="${secure::ftp.workingDir}" host="${secure::ftp.host}" port="21" username="${secure::ftp.uname}" password="${secure::ftp.pw}" /> </ftp:config> <flow> ... </flow>For step-by-step instructions with encrypted values, see Use Encrypted Properties.
-
Encrypt Sensitive Values
Use the Secure Properties Tool to encrypt sensitive data that you add to properties files for your Mule application.
dev.secure.yaml in the project workspace of a Mule application: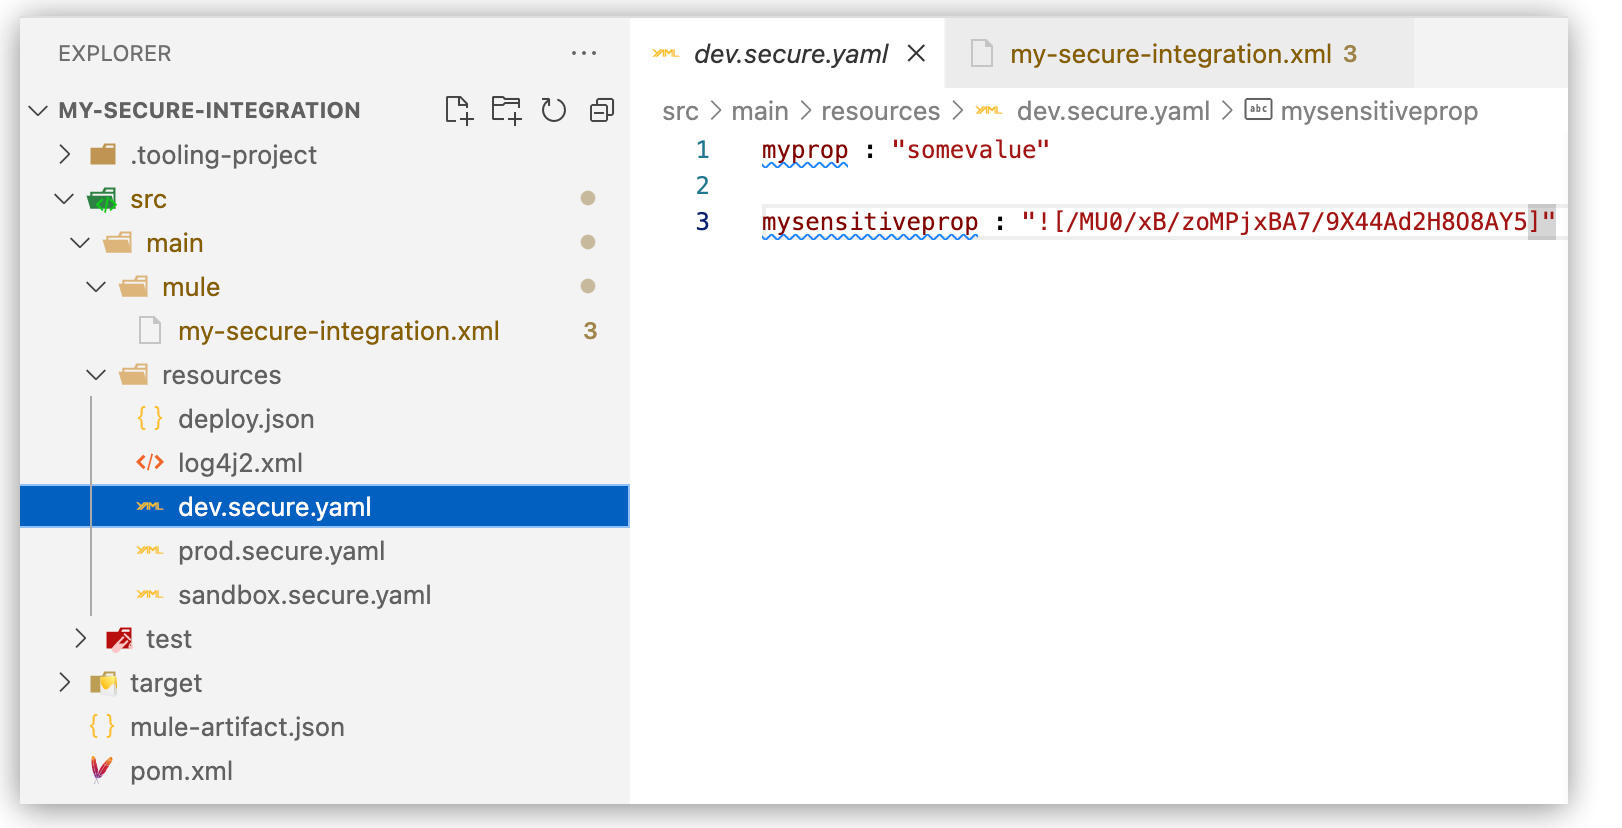
-
Create a properties file with unencrypted properties:
-
Open the
src/main/resourcesdirectory of your project. -
Create a YAML file with a name like
dev.secure.yamlorlocal.secure.yamlthat configures properties as key-value pairs, for example:myprop : "somevalue" mysensitiveprop : "mysensitivevalue"For more guidance, see Configuration Properties Files.
-
-
Encrypt sensitive properties:
-
Download the Secure Properties Tool, an executable JAR file for encrypting properties.
-
From the command line, run the Secure Properties Tool on the values you intend to secure.
Example that encrypts"mysensitivevalue"using Blowfish andmy-key-valuefor an encryption key password:$ java -cp secure-properties-tool.jar com.mulesoft.tools.SecurePropertiesTool \ string \ encrypt \ Blowfish \ CBC \ my-key-value \ "mysensitivevalue"Encrypted Output:/MU0/xB/zoMPjxBA7/9X44Ad2H8O8AY5Store your encryption key value (password) in a secure location. You’ll need your key value later, when you deploy your application. To verify an encrypted value, decrypt it using the same tool with the decryptcommand instead ofencrypt:$ java -cp secure-properties-tool.jar com.mulesoft.tools.SecurePropertiesTool \ string \ decrypt \ Blowfish \ CBC \ my-key-value \ "/MU0/xB/zoMPjxBA7/9X44Ad2H8O8AY5"
-
-
In your properties file, add each encrypted property value within
![]brackets.Example that replaces the unencrypted value"mysensitivevalue"with the encrypted value"![/MU0/xB/zoMPjxBA7/9X44Ad2H8O8AY5]":myprop : "somevalue" mysensitiveprop : "![/MU0/xB/zoMPjxBA7/9X44Ad2H8O8AY5]"For more guidance, see Configuration Properties Files.
Use Encrypted Properties
Add encrypted properties to components in a Mule application. Reference a properties file with <secure-properties/>, and run a local deployment that decrypts your properties.
For reference, the examples shown in the steps in this procedure are based on these configuration examples:
Configuration XML (my-secure-integration.xml)
<?xml version="1.0" encoding="UTF-8"?>
<mule xmlns="http://www.mulesoft.org/schema/mule/core" xmlns:doc="http://www.mulesoft.org/schema/mule/documentation"
xmlns:ee="http://www.mulesoft.org/schema/mule/ee/core"
xmlns:http="http://www.mulesoft.org/schema/mule/http"
xmlns:xsi="http://www.w3.org/2001/XMLSchema-instance"
xmlns:secure-properties="http://www.mulesoft.org/schema/mule/secure-properties"
xsi:schemaLocation="http://www.mulesoft.org/schema/mule/core http://www.mulesoft.org/schema/mule/core/current/mule.xsd
http://www.mulesoft.org/schema/mule/ee/core http://www.mulesoft.org/schema/mule/ee/core/current/mule-ee.xsd
http://www.mulesoft.org/schema/mule/http http://www.mulesoft.org/schema/mule/http/current/mule-http.xsd
http://www.mulesoft.org/schema/mule/secure-properties http://www.mulesoft.org/schema/mule/secure-properties/current/mule-secure-properties.xsd">
<secure-properties:config name="Secure_Properties_Config" doc:name="Secure Properties Config" doc:id="utlnst" file="${env}.secure.yaml" key="${encryption.key}" >
<secure-properties:encrypt algorithm="Blowfish" />
</secure-properties:config>
<flow name="my-secure-data-flow" >
<scheduler doc:name="Scheduler" doc:id="adstdc" >
<scheduling-strategy>
<fixed-frequency frequency="15" timeUnit="SECONDS" />
</scheduling-strategy>
</scheduler>
<set-payload value="${secure::myprop}" doc:name="Set payload" doc:id="izdtkc" />
<logger doc:name="Logger" doc:id="ljjcpz" level="WARN" message="#[payload]" category="INSECURE PROPERTY EXAMPLE" />
<set-payload value="${secure::mysensitiveprop}" doc:name="Set payload" doc:id="abcdef" />
<logger doc:name="Logger" doc:id="ghijkl" level="WARN" message="#[payload]" category="SECURE PROPERTY EXAMPLE" />
</flow>
</mule>Properties file (dev.secure.yaml)
The configuration XML uses these properties.
myprop : "somevalue"
mysensitiveprop : "![/MU0/xB/zoMPjxBA7/9X44Ad2H8O8AY5]"POM file (pom.xml)
The POM file includes dependencies for the components in the configuration XML.
<?xml version="1.0" encoding="UTF-8" standalone="no"?>
<project xmlns="http://maven.apache.org/POM/4.0.0" xmlns:xsi="http://www.w3.org/2001/XMLSchema-instance" xsi:schemaLocation="http://maven.apache.org/POM/4.0.0 http://maven.apache.org/maven-v4_0_0.xsd">
    <modelVersion>4.0.0</modelVersion>

    <groupId>com.mycompany</groupId>
    <artifactId>my-secure-integration</artifactId>
    <version>1.0.0-SNAPSHOT</version>
    <packaging>mule-application</packaging>

    <name>my-secure-integration</name>

    <properties>
        <project.build.sourceEncoding>UTF-8</project.build.sourceEncoding>
        <project.reporting.outputEncoding>UTF-8</project.reporting.outputEncoding>
        <mule.maven.plugin.version>3.3.5</mule.maven.plugin.version>
    </properties>

    <build>
        <plugins>
            <plugin>
                <groupId>org.apache.maven.plugins</groupId>
                <artifactId>maven-clean-plugin</artifactId>
                <version>3.1.0</version>
            </plugin>
            <plugin>
                <groupId>org.mule.tools.maven</groupId>
                <artifactId>mule-maven-plugin</artifactId>
                <version>${mule.maven.plugin.version}</version>
                <extensions>true</extensions>
                <configuration/>
            </plugin>
        </plugins>
    </build>
    <repositories>
        <repository>
            <id>anypoint-exchange-v2</id>
            <name>Anypoint Exchange</name>
            <url>https://maven.anypoint.mulesoft.com/api/v2/maven</url>
            <layout>default</layout>
        </repository>
        <repository>
            <id>mulesoft-releases</id>
            <name>MuleSoft Releases Repository</name>
            <url>https://repository.mulesoft.org/releases/</url>
            <layout>default</layout>
        </repository>
    </repositories>
    <pluginRepositories>
        <pluginRepository>
            <id>mulesoft-releases</id>
            <name>mulesoft release repository</name>
            <layout>default</layout>
            <url>https://repository.mulesoft.org/releases/</url>
            <snapshots>
                <enabled>false</enabled>
            </snapshots>
        </pluginRepository>
    </pluginRepositories>
    <dependencies>
        <dependency>
            <groupId>com.mulesoft.services</groupId>
            <artifactId>mule-service-weave-ee</artifactId>
            <version>2.4.0-20221212</version>
            <scope>runtime</scope>
        </dependency>
        <dependency>
            <groupId>com.mulesoft.modules</groupId>
            <artifactId>mule-secure-configuration-property-module</artifactId>
            <version>1.2.5</version>
            <classifier>mule-plugin</classifier>
        </dependency>
    </dependencies>
</project>
To use an encrypted value in a Mule application:
-
Before the
<flow/>element in the configuration XML, add the following Secure Configuration Properties configuration (<secure-properties:config/>):<secure-properties:config name="Secure_Properties_Config" doc:name="Secure Properties Config" doc:id="ukvpll" file="${env}.secure.yaml" key="${encryption.key}" > <secure-properties:encrypt algorithm="Blowfish" /> </secure-properties:config> <flow name="my-secure-data-flow" > ... -
Optionally change the
algorithmattribute to select another algorithm:
-
Configure the element with values for the
file,key, andalgorithmattributes, for example:<secure-properties:config name="Secure_Properties_Config" doc:name="Secure Properties Config" doc:id="ddzpxf" file="dev.secure.yaml" key="${encryption.key}" > <secure-properties:encrypt algorithm="Blowfish" /> </secure-properties:config>-
file: Name of your properties fileIf you want to use the variable
${env}in your filename configuration, see Provide Settings for Different Environments for the procedure. -
name: A name of your choice for the encryption key (defaults to${encryption.key})This name serves as the key for the encryption value (password) used to encrypt your secure properties with the Secure Properties Tool.
-
algorithm: Algorithm you used to encrypt your secure properties (defaults to Blowfish in the previous example). Other algorithms are available.
-
-
In the connector or component XML, add the key of an encrypted property as the value of an XML attribute, for example:
<set-payload
  value="${secure::mysensitiveprop}"
  doc:name="Set payload" doc:id="abcdef" />
Notice the
secure::prefix to the key.
Edit Secure Properties Configuration via Global Elements
Instead of manually editing your project’s XML, you can configure secure properties through Global Elements.
To edit the secure properties configuration:
-
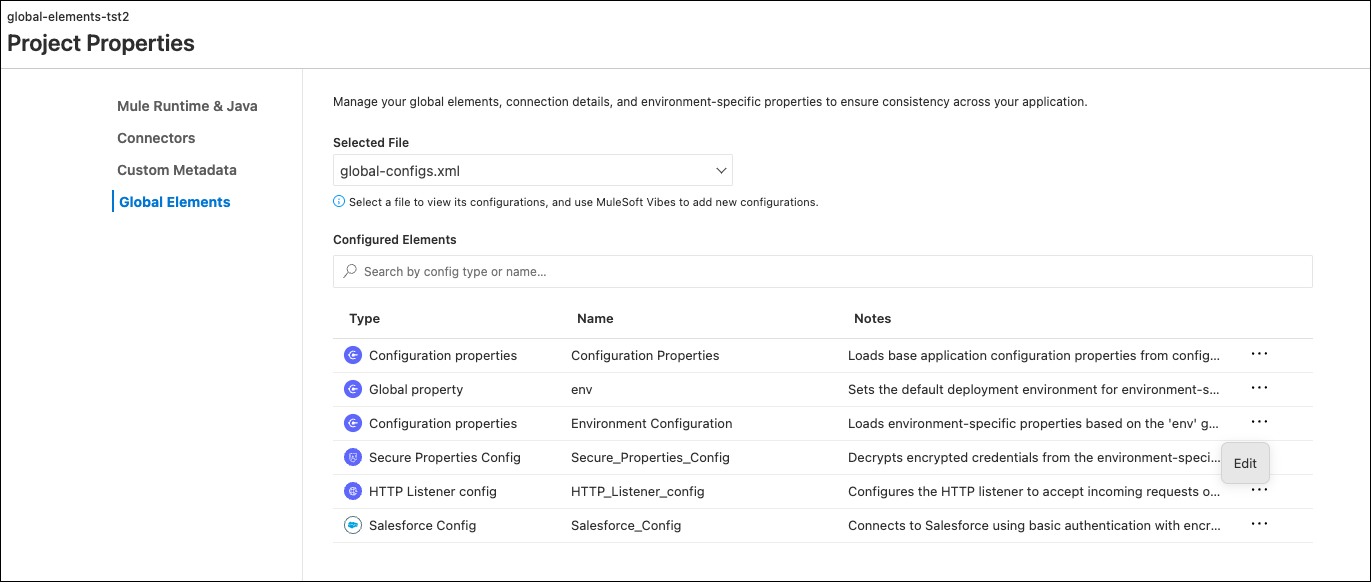
Open Project Properties > Global Elements.
-
Select global-configs.xml from the Selected File dropdown.
-
Find Secure Properties Config in the list.
-
Click the … menu (three dots) next to the configuration name.
-
Click Edit.
The editor opens and you can modify these fields.
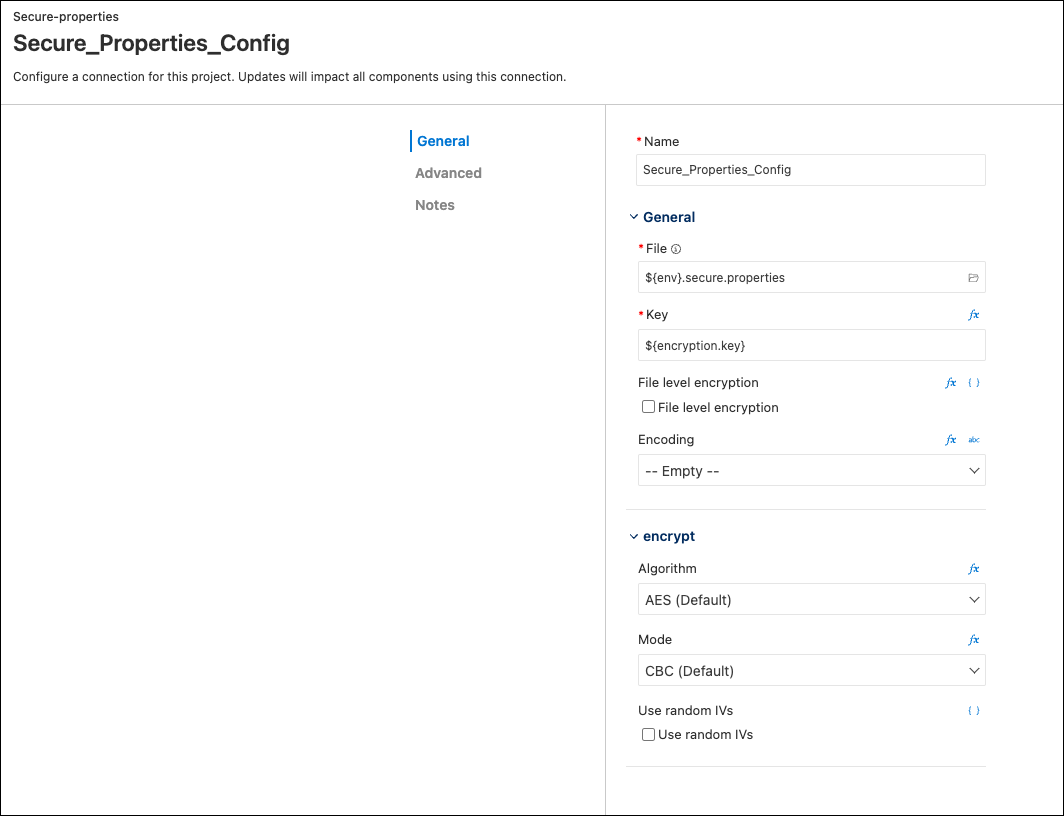
| Field | Example Value | What It Controls |
|---|---|---|
Name |
Secure_Properties_Config |
Element name referenced internally |
File |
$site.secure.properties |
Which encrypted file to load (resolves per environment) |
Key |
${encryption.key} |
The decryption key placeholder (resolved from system property) |
Algorithm |
AES |
Encryption algorithm (AES, Blowfish, DES, DESede, RC2) |
Mode |
CBC |
Cipher mode (CBC, CFB, ECB, OFB) |
Changes you make in the editor automatically update the XML in global-configs.xml.
The editor manages the configuration element. To change the actual encrypted values in .secure.properties files, use the secure-properties-tool JAR, edit the file directly, or ask MuleSoft Vibes to re-encrypt values. See Working with Secure Properties Using MuleSoft Vibes.
Test Encrypted Properties in Your IDE
If your application uses encrypted properties, add arguments for the encryption key and value to the runtime command in your IDE. Adding these arguments to the setting enables the runtime to decrypt properties used in your application so that it deploys successfully to the local runtime in your IDE.
The setting avoids an error that causes the deployment to fail when you use Run and Debug in your IDE:
Couldn't find configuration property value for key ${encryption.key}
from properties provider environment properties provider
-
Provide a local key-value pair for your encryption key name and its value through the UI:
-
Navigate to Manage (gear icon) > Settings, and find Runtime: Default Arguments on the Settings page.
-
In the Runtime: Default Arguments field, append the key-value pair for your encryption key to the end of the configuration, for example:
-M-Dencryption.key=my-key-valueIn the example,
-M-Dis the required prefix,encryption.keyis the default name of the encryption key, andmy-key-valueis the value used to encrypt the properties through the Secure Properties Tool. -
If you are using a variable such as
${env}in${env}.secure.yamlto identify the properties file in<secure-properties:config/>, append a value for${env}to the Runtime: Default Arguments field.For example, for a file
dev.secure.yamlthat contains properties for the development environment within the IDE:-M-Denv=dev
-
-
Deploy the application locally within the IDE by pressing Cmd+shift+p (Mac) or Ctrl+shift+p (Windows), and entering View: Show Run and Debug, then clicking Run and Debug.
A successful deployment produces the following message in the OUTPUT tab of the output panel:
**********************************************************************
*              - - + DOMAIN + - -               * - - + STATUS + - - *
**********************************************************************
* default                                       * DEPLOYED           *
**********************************************************************
For information about the output panel, see Viewing Logs and Errors.
If the application does not deploy successfully, check the console for the error and troubleshoot.
-
If you intend to deploy your application to CloudHub or CloudHub 2.0, proceed to Deploy to CloudHub and CloudHub 2.0 with Sensitive Values Hidden.
This procedure shows how to hide the encryption key value in Runtime Manager.
Deploy to CloudHub and CloudHub 2.0 with Sensitive Values Hidden
When you deploy an application that you build with Anypoint Code Builder to CloudHub or CloudHub 2.0, hide the value of your encryption key to prevent Runtime Manager UI from displaying the value (see Manage Properties for Applications on CloudHub).
Runtime Manager serves as the management console for CloudHub and CloudHub 2.0 deployments. The encryption key value serves as the password for encryption and decryption.
This procedure configures the name of your encryption key but not its value in mule-artifact.json. For security, never configure the value of your encryption key in this or any other file that is packaged within a deployed project.
|
Before you begin:
-
Run and test encrypted properties used by your Mule application in your IDE. See Configuration Properties Files for guidance.
-
If you are using the cloud IDE, ensure that you have the required permission: Anypoint Code Builder Developer. See Configuring Permissions.
To hide sensitive values from the Runtime Manager UI when you deploy to CloudHub or CloudHub 2.0:
-
In the
mule-artifact.jsonfile for your application, provide the name of the encryption key (encryption.keyby default) that you provided in the global<secure-properties:config/>element within your configuration XML, for example:{ "minMuleVersion": "4.8", "javaSpecificationVersions": [ "17" ], "secureProperties": ["encryption.key", "other.value.to.hide"] }The name (not the value) of your encryption key goes into a comma-separated
securePropertiesarray. Later in this procedure, when you deploy your application to CloudHub, the IDE prompts you to provide the value of the encryption key that you provided through the Secure Configuration Tool when encrypting your sensitive properties. -
Deploy your application to CloudHub or CloudHub 2.0 by pressing Cmd+shift+p (Mac) or Ctrl+shift+p (Windows) and providing this command:
MuleSoft: Deploy to CloudHubAlternatively, click the Deploy to CloudHub (rocket) icon when your configuration XML file is open, for example:

-
When prompted, enter the same value you used to encrypt your secure properties.
If you do not enter the same value, the application is able to upload to CloudHub or CloudHub 2.0, but the deployment fails because the encryption key value does not work.
-
Select the Sandbox environment for your deployment.
Other environments are not supported, and attempts to deploy to the Design environment fail with a
500error code. While the deployment is in progress, the IDE provides the status of the process and prompts you to open the application in Runtime Manager when the deployment completes.If you receive an error message that says the application
was not successfully deployed to "Sandbox" in CloudHub, you can open Runtime Manager to check the logs and correct some issues. -
Click Open in Runtime Manager to open the management options for the application in Runtime Manager.
-
Check the deployment in Runtime Manager to ensure that the encryption key is hidden by navigating to Settings > Properties for your application.
-
In the Applications screen for the SANDBOX environment, check the Status field for your application:
-
If the status is Started, the deployment is successful, and the application is running.
-
If the status is Deploy failed, click the name of your application, and navigate to Logs to discover the cause of the failure.
If the encryption key value is wrong, the error is
org.mule.encryption.exception.MuleEncryptionException: Could not encrypt or decrypt the data.To fix this error:
-
Navigate to Settings > Properties for your application in Runtime Manager and provide the correct value for your encryption key in the field for the encryption key.
-
Click Apply Changes.
Runtime Manager applies your changes and attempts to deploy your application.
-
-
For more information, see Anypoint Runtime Manager. For information about CloudHub, see CloudHub Overview. For information about CloudHub 2.0, see CloudHub 2.0 Overview
Provide Settings for Different Environments
Hosts, ports, directories, and other settings in the configuration XML often differ depending on the target environment for your deployment, such as the development, sandbox, or production environment. For example, on your desktop, the host name is typically localhost, the port something like 8081, and the directory is a path on your local machine rather than a path to an external host.
When developing your application in the IDE, create separate properties files for each of the target environments that require different settings, and provide the appropriate settings in each file.
Typical filenames follow patterns like these:
-
dev.properties.yamlordev.secure.yamlfor your development environment in the IDE -
sandbox.properties.yamlorsandbox.secure.yamlfor a pre-production environment -
prod.properties.yamlorprod.secure.yamlfor the production environment
Consistent filename patterns enable you to use a ${env} variable in your configuration XML for the prefix to the filename, for example, ${env}.properties.yaml or ${env}.secure.yaml. This pattern enables you to switch to the file that contains settings for the environment in which your application runs. You can include encrypted and unencrypted property values in the files.
To configure and use the env variable as a prefix to a filename:
-
Using a consistent filename pattern, create properties files for each environment that requires different settings.
-
If you are using the
<secure-properties/>or another element that points to your properties file, provide a prefix, such as${env}, to the file name.Notice the value of the
fileattribute in this example:<secure-properties:config name="Secure_Properties_Config" doc:name="Secure Properties Config" doc:id="acegik" file="${env}.secure.yaml" key="${encryption.key}" > <secure-properties:encrypt algorithm="Blowfish" /> </secure-properties:config> -
Before deploying to CloudHub or CloudHub 2.0, ensure that the application deploys locally your IDE:
-
In the IDE, press Cmd+shift+p (Mac) or Ctrl+shift+p (Windows), and provide this command:
Open 'launch.json' -
In
launch.json, append the value of theenvvariable to use when running the application from the IDE.Notice the setting
-M-Denv=devin thislaunch.jsonexample. For more information about launch configurations and alternative methods for passing properties, see Pass Runtime Properties and Arguments to Mule Applications.{ "version": "0.2.0", "configurations": [ { "type": "mule-xml-debugger", "request": "launch", "name": "Debug Mule Application", "mule.project": "${workspaceFolder}", "mule.home": "${config:mule.homeDirectory}", "mule.runtime.args": "${config:mule.runtime.defaultArguments} -M-Denv=dev" } ] }-M-Denv=devsets theenvvariable todevas a Mule runtime argument ("mule.runtime.args"). -
If your application defines encrypted properties in your properties file, configure the Runtime: Default Arguments command in the IDE with the encryption key and value so that the local deployment to your IDE can decrypt the properties when the application runs.
Do not configure
launch.jsonwith sensitive property values. See Test Encrypted Properties in Your IDE for guidance with the recommended configuration.
-
-
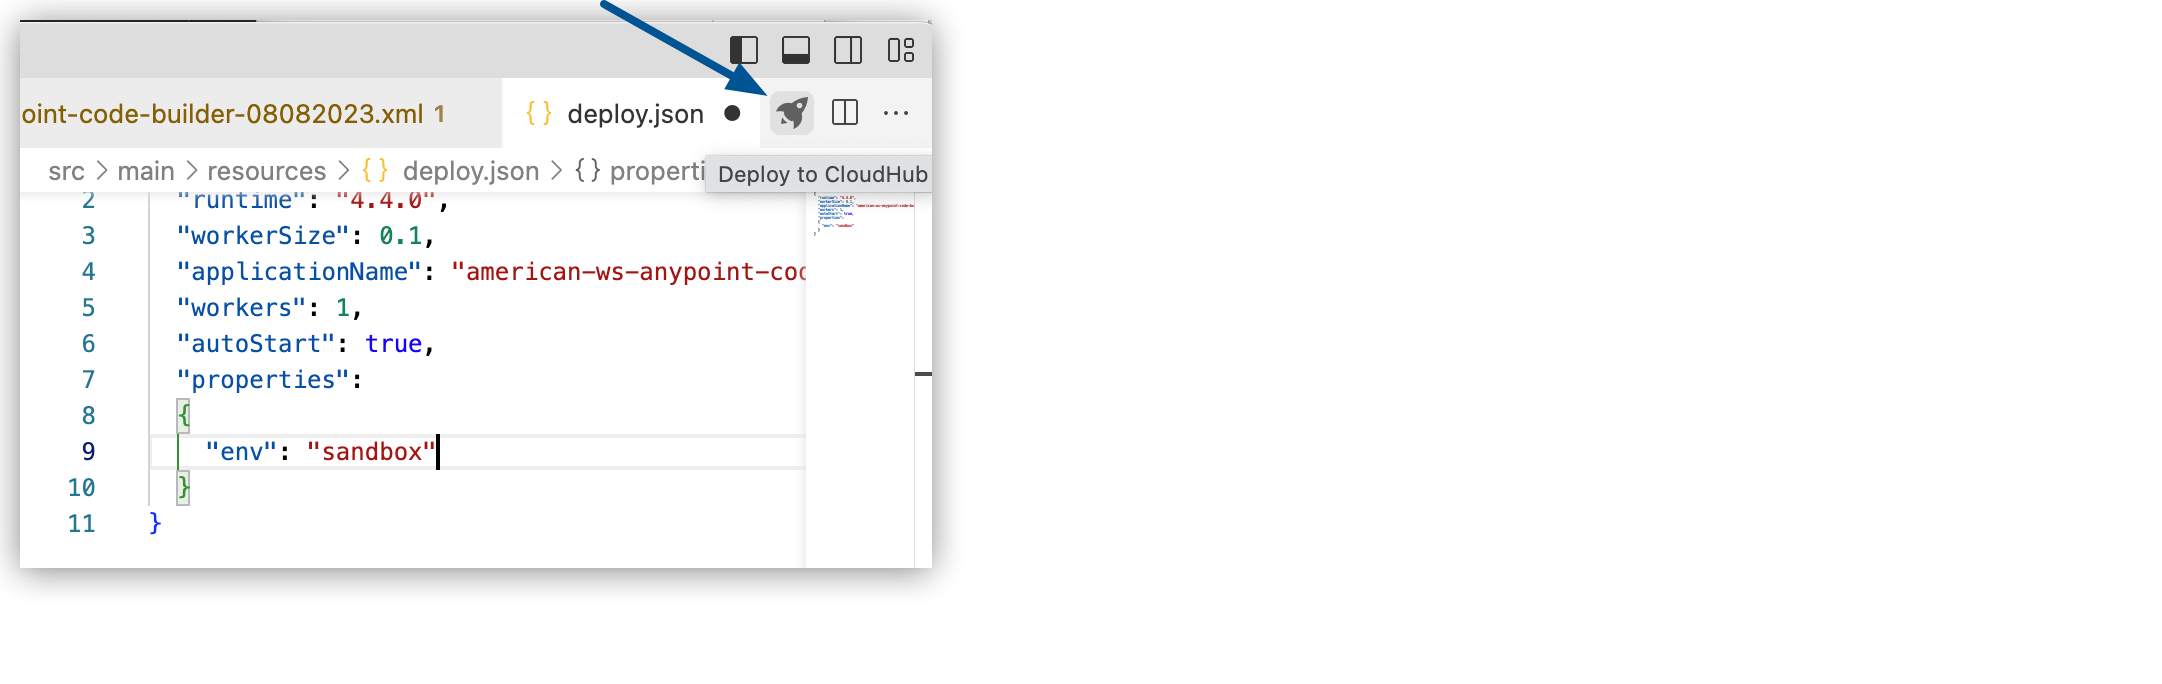
Launch the
deploy.jsonfile for your application by pressing Cmd+shift+p (Mac) or Ctrl+shift+p (Windows) and providing this command:MuleSoft: Deploy to CloudHubAlternatively, click the Deploy to CloudHub (rocket) icon when your configuration XML file is open, for example:
-
Before opting to deploy, edit
deploy.jsonto specify the correct prefix to your properties file, for example:{ "runtime": "4.4.0", "workerSize": 0.1, "applicationName": "my-secure-int2-duke", "workers": 1, "autoStart": true, "properties": (1) { "env": "sandbox" (2) } }
| 1 | Add the "properties" key. |
| 2 | Add an object that specifies the value of the ${env} prefix to your properties file, such as sandbox. |
-
If prompted, enter the same value you used to encrypt your secure properties.
-
Select the Sandbox environment for your deployment.
-
Once the deployment is complete, click Open in Runtime Manager to open the management options for the application in Runtime Manager.
-
To check for properties such as your
envsetting or a hidden value to your encryption key, click Settings > Properties for your application.You can create properties or change the value of existing properties, for example, to fix some deployment errors.
Quick Reference
Use this table for quick access to common secure properties tasks and commands:
| Task | Command / Location |
|---|---|
Encrypt a value |
|
Decrypt a value |
|
Reference encrypted property in XML |
|
Reference non-encrypted property in XML |
|
Secure properties config element |
|
Pass encryption key locally |
Add |
Pass encryption key in CloudHub |
Add to Properties tab in Runtime Manager: |
Switch environment |
Pass |
Hide encryption key in CloudHub |
Add encryption key name to |