Testing Projects with MUnit
 Cloud IDE
 Desktop IDE
Create, run, and modify MUnit tests for your implementation and integration projects in Anypoint Code Builder. Import projects that contain MUnit test files.
MUnit is a MuleSoft unit testing framework for creating and running unit tests on a Mule application, as described in MUnit Overview.
With MUnit, create MUnit tests and MUnit test suites. An MUnit test is an individual test case, defined by the <munit:test> element, which includes specific validations and assertions to test the functionality of a Mule application. An MUnit test suite is a container for multiple MUnit tests. It organizes tests in an XML file typically found in the /src/test/munit directory.
Anypoint Code Builder provides a Testing panel from which you can run tests. In the Explorer, test suites are also located within the project directory /src/test/munit. The IDE also shows a canvas for creating and maintaining MUnit test suits, a Testing Results panel with the status of tests, and logs that identify the status of tests.
Anypoint Code Builder - MUnit Extension, part of the Anypoint Extension Pack, supports MUnit functionality in Anypoint Code Builder. For information about extensions, see Anypoint Extension Pack.
Before You Begin
Understand the fundamentals of MUnit. Refer to the MUnit documentation for an overview and guidance with test configurations:
Create MUnit Tests and Test Suites
Configure MUnit tests and test suites directly from a flow or by using the canvas or code editor.
Create an MUnit Test Suite
Create an MUnit test suite in your project from the Explorer.
-
Open your project to
/src/test/munitin the Explorer. -
Create a suite file in the
munitfolder:-
Right-click the
munitfolder and select New MUnit Test Suite File. -
Provide a name for your suite, such as
my-suite.xml.A canvas shows with a link to build a new test with scope and flow structure options.
The new suite file includes the XML declaration (
<?xml>),<mule/>and<mule-config>elements. For example:<?xml version="1.0" encoding="UTF-8"?> <mule xmlns:xsi="http://www.w3.org/2001/XMLSchema-instance" xmlns:munit="http://www.mulesoft.org/schema/mule/munit" xmlns:munit-tools="http://www.mulesoft.org/schema/mule/munit-tools" xmlns="http://www.mulesoft.org/schema/mule/core" xmlns:doc="http://www.mulesoft.org/schema/mule/documentation" xsi:schemaLocation="http://www.mulesoft.org/schema/mule/core http://www.mulesoft.org/schema/mule/core/current/mule.xsd http://www.mulesoft.org/schema/mule/munit http://www.mulesoft.org/schema/mule/munit/current/mule-munit.xsd http://www.mulesoft.org/schema/mule/munit-tools http://www.mulesoft.org/schema/mule/munit-tools/current/mule-munit-tools.xsd"> <munit:config name="my-suite.xml" /> </mule>
-
-
Select a component from the canvas to customize your test:
-
With the Behavior components, such as 'munit:before-test', 'munit:after-test', etc., you can set the conditions for the test.
-
With the Execution components, the '<flow-ref>' or inline flow definition within the '<munit:execution>' block, you can specify the actions or processes to test.
-
With the Validation components, such as 'munit:assert-that', you can check the output or state of the application after the execution phase to ensure it matches the expected results so you can confirm the application behaves as intended.
See MUnit Event Processors for more information.
-
-
Continue to Create an MUnit Test.
| Anypoint Code Builder requires MUnit 3.4.0 or later to create MUnit test suites from the canvas. |
Create an MUnit Test
Create an MUnit test in a new or existing test suite. Start an MUnit test by right-clicking the flow component, or by using the canvas or code editor. For guidance with your test configuration, refer to the MUnit documentation described in the prerequisites.
Create a Test from a Flow
Generate the basic structure for an MUnit test designed to test a specific flow within your Mule application.
-
Open your Mule project.
-
In the canvas, right-click on the
flowcomponent. -
Select Create Test.
-
Anypoint Code Builder creates a new MUnit test suite file in your project
/src/test/munitfolder with the test structure targeting the selected flow.
Create a Test from the Canvas
-
Open an MUnit test suite file in the
src/test/munit/folder. -
Click Add, and then select Test scope.
-
In the panel that appears, select Test.
-
The IDE creates an empty test in the currently open test suite.
Create a Test from the Code Editor
-
Open the test suite XML in the code editor.
For guidance, see Open MUnit Tests.
-
In the code editor, press Ctrl+Space to display available options, and type
munit. For example: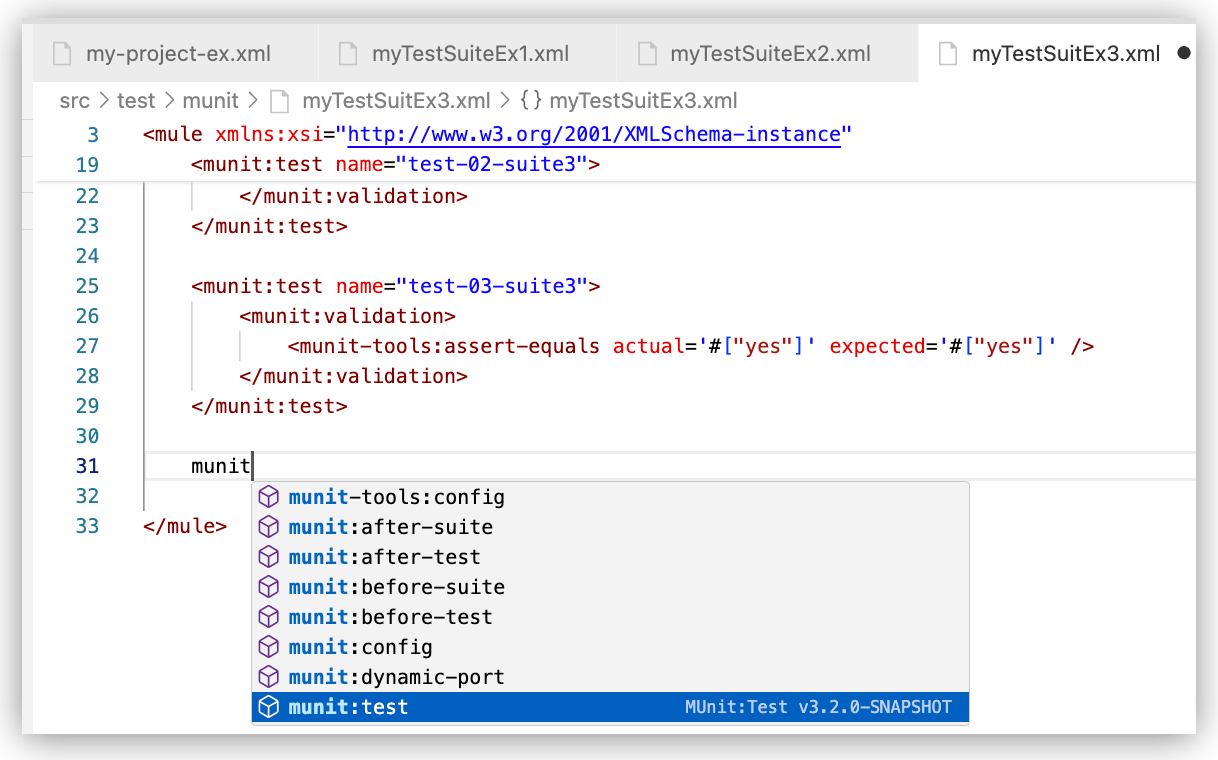
-
Select
munit:testand insert the test element in your suite. For example:<munit:test name="name" > </munit:test> -
Provide a name and other XML elements to create the test.
For example, on any line within XML similar to these examples:
<munit:test name="test-01-suite1">
  <munit:validation>
    <munit-tools:assert-equals actual='#["that"]' expected='#["this"]' />
  </munit:validation>
</munit:test>
To find more examples, see MUnit Examples.
-
Run your test from the Test panel.
For guidance, see Run MUnit Tests.
Open MUnit Tests
Open the test suite XML from the Testing panel or the Explorer.
After the February 2025 release, the IDE shows a canvas with the test components, or provides a link to build a new test.
| Anypoint Code Builder requires MUnit 3.4.0 or later to create MUnit test suites from the canvas. |
-
Testing panel - Open the Testing panel from the activity bar in the IDE:
-
Open a project that contains an MUnit test suite.
-
Click
 (Testing) to open the Testing panel.
 -
Click or hover the suite or test name, and click
 (Go to test) or highlighted
  (Go to test) to open the XML file that contains the test.
Clicking the test name also opens to the XML file.
-
-
Explorer - From the Explorer, locate MUnit test suite files in the project directory:
-
Open a project that contains an MUnit test suite.
-
In the activity bar, click (
 ) (Explorer).
 -
Go to
src/main/test/munit. -
Click a test suite XML file to view the tests in the suite.
-
Run MUnit Tests
Run MUnit tests using any of these options:
If you run a test, a test build executes, and the Terminal displays the progress of the test. If all tests execute successfully, the build succeeds. Otherwise, the build fails.
The IDE displays the results of the tests in the Testing panel, the Terminal, and the Test Results panels. Time-stamped logs are also available from the Test Results panel. You can clear the results at any time.
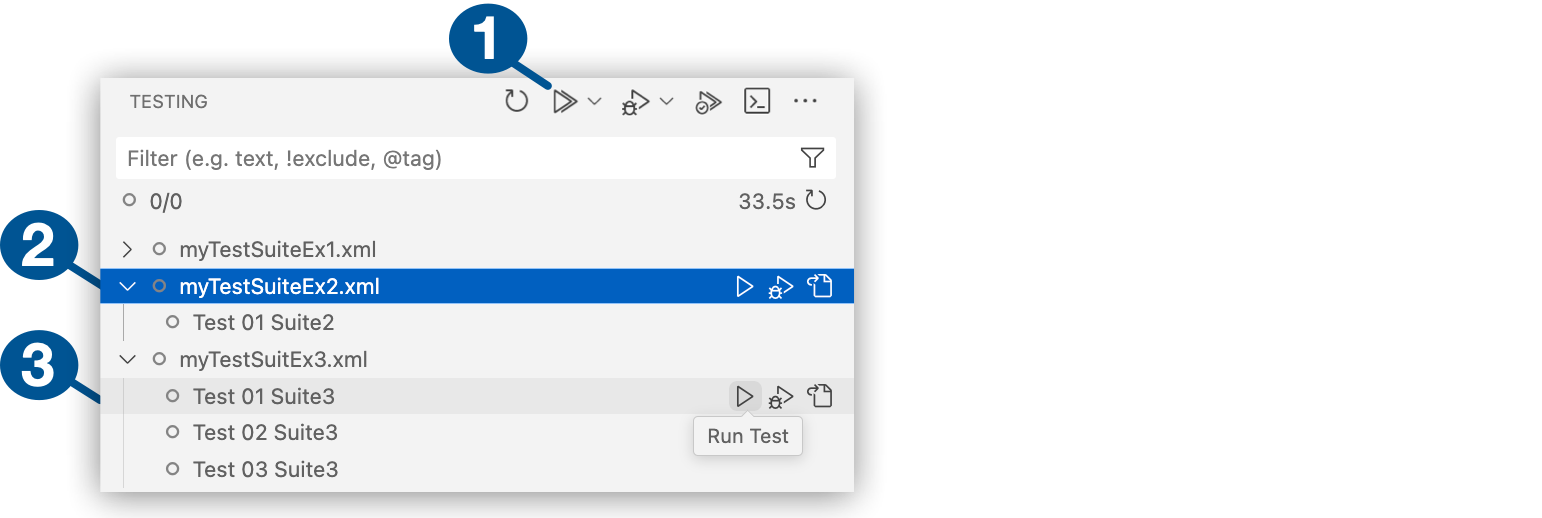
Run Tests from the Testing Panel
Run all tests, all tests in a suite, or a single test from the Testing panel. The Testing panel lists all MUnit test suites in the project.
To run tests:
-
Open a project that contains an MUnit test suite.
To check for test suites, see Open MUnit Tests.
-
From the activity bar, click
(Testing) to open the Testing panel.If the icon isn’t present, try right-clicking within the activity bar and selecting Testing to display the icon.
-
Run tests from the Testing panel at any of three levels:
Run tests with or without debugging features. If your XML contains breakpoints and you opt to debug, test execution stops at your breakpoints. For information about debugging, see Run MUnit Tests in Debug Mode.
1 All suites: to run all tests in all suites, click the Run Tests, Debug Tests, or Run Tests with Coverage icon. You can select the same options from the right-click menu. 2 Suite: to run all tests in a single suite, hover over, or click the suite, and then click the Run Test, Debug Test, or Run Test with Coverage icon. You can select the same options from the right-click menu. 3 Test: to run a single test, hover over, or click a test in a test suite, and then click the Run Test, Debug Test, or Run Test with Coverage icon. You can select the same options from the right-click menu.
-
Monitor the test and review test results:
-
Testing panel and XML:
The following example displays a running test.

After the test runs, the panel and XML show the result.
-
Terminal:
The following example provides the progress of a test that runs and fails.
================================================================================
=== Running suite: myTestSuiteEx3.xml                                         ===
================================================================================


++++++++++++++++++++++++++++++++++++++++++++++++++++++++++++++++++++++++++++++++
+ Running test: test-03-suite3                                                 +
++++++++++++++++++++++++++++++++++++++++++++++++++++++++++++++++++++++++++++++++


++++++++++++++++++++++++++++++++++++++++++++++++++++++++++++++++++++++++++++++++
java.lang.AssertionError:  at file: [myTestSuiteEx3.xml], line: [27]
Expected: "this" as String {encoding: "UTF-8", mediaType: "application/java; charset=UTF-8", mimeType: "application/java", class: "java.lang.String", contentLength: 4}
     but: "that" as String {encoding: "UTF-8", mediaType: "application/java; charset=UTF-8", mimeType: "application/java", class: "java.lang.String", contentLength: 4} at (root)
        at org.hamcrest.MatcherAssert.assertThat(MatcherAssert.java:20)

++++++++++++++++++++++++++++++++++++++++++++++++++++++++++++++++++++++++++++++++
[INFO] ===============================================================================
[INFO] MUnit Run Summary - Product: MULE_EE, Version: 4.6.0
[INFO] ===============================================================================
[INFO]  >> myTestSuiteEx3.xml test result: Tests: 1, Errors: 0, Failures: 1, Skipped: 0
[INFO]   --- test-03-suite3 <<< FAILED
[INFO]
[INFO] ===============================================================================
[INFO]  > Tests:        1
[INFO]  > Errors:       0
[INFO]  > Failures:     1
[INFO]  > Skipped:      0
[INFO] ===============================================================================
[INFO] ------------------------------------------------------------------------
[INFO] BUILD FAILURE
[INFO] ------------------------------------------------------------------------
[INFO] Total time:  03:10 min
[INFO] Finished at: 2024-04-29T08:49:39-07:00
[INFO] ------------------------------------------------------------------------
-
-
If the test results indicate any failures, go to Fix Test Errors.
To clear test results, see Clear Test Results.
Run Tests from the Canvas
Run a test, with or without coverage. Add a test scope to test specific parts of your Mule application or flow structure to define the execution context.

Run Tests from the MUnit Configuration XML File
Run tests with or without debugging features. If your XML contains breakpoints and you opt to debug, test execution stops at your breakpoints. For information about debugging, see Run MUnit Tests in Debug Mode.
To run tests from the test suite XML:
-
From the Testing panel, open a test suite XML file in your project.
For guidance with opening from the Testing panel, see Open MUnit Tests.
-
Run a single test or all tests in the test suite XML file:

-
To run a single test in the test suite XML:
-
Place your cursor on a line that contains the XML for a test (
munit:test).For example, on any line within XML similar to this example:
<munit:test name="test-02-suite1"> <munit:validation> <munit-tools:assert-equals actual='#["that"]' expected='#["this"]' /> </munit:validation> </munit:test> -
Right-click, and select an option:
-
Run Test at Cursor
-
Debug Test at Cursor
-
Run Test at Cursor with Coverage
If you don’t see these menu items, be sure to open the XML file from
or highlighted (*Go to test*) in the *Testing* panel.
-
-
-
To run all tests in the test suite XML:
-
Place your cursor in the XML file.
-
Right-click, and select an option:
-
Run Tests in Current File
-
Debug Tests in Current File
-
Run Tests with Coverage in Current File
If you don’t see these menu items, be sure to open the XML file from
or highlighted (*Go to test*) in the *Testing* panel.
-
-
-
-
Check the status of the running test in the Testing, Terminal, and Testing Results panels. See the example.
To clear test results, see Clear Test Results.
Run Tests with an MUnit Launch Configuration
Run MUnit tests from the Run and Debug panel with an MUnit launch configuration.
Create and run an MUnit launch configuration:
-
Open the Run and Debug panel.
Show me how
-
Click the
 (Run and Debug) icon in the activity bar.
 -
Use the keyboard shortcuts:
-
Mac: Cmd+Shift+d
-
Windows: Ctrl+Shift+d
-
-
In the desktop IDE, select View > Run.
-
In the cloud IDE, click the
 (menu) icon, and select View > Run.
-
-
Add a launch configuration to
launch.json:-
Click
 (gear icon) to open the launch.json tab.
The default configuration looks something like this:
{ "version": "0.2.0", "configurations": [ { "type": "mule-xml-debugger", "request": "launch", "name": "Debug Mule Application", "mule.project": "${workspaceFolder}", "mule.runtime.args": "${config:mule.runtime.defaultArguments}" } ] } -
In the
launch.jsonfile, add a comma after the first object in the array, and append the MUnit launch configuration by pressing Ctrl+Space to open the auto-complete menu and selecting MUnit Debug Launch. For example: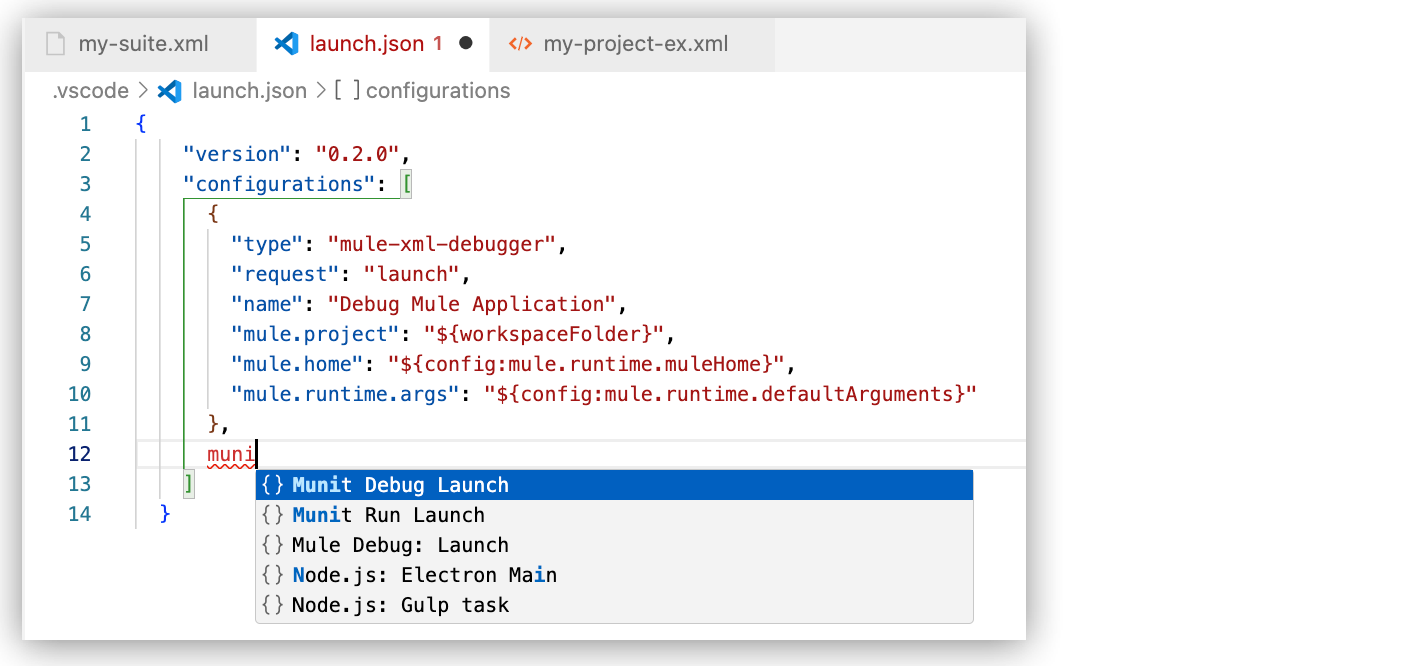
This action adds a new JSON object named
Munit Debug Teststo the file. For example:{ "version": "0.2.0", "configurations": [ { "type": "mule-xml-debugger", (1) "request": "launch", "name": "Debug Mule Application", "mule.project": "${workspaceFolder}", "mule.runtime.args": "${config:mule.runtime.defaultArguments}" }, { "type": "munit-xml-debugger", (2) "request": "launch", "name": "Munit Run Tests", "mule.project": "${workspaceFolder}", "munit.runtime.args": "${config:munit.runtime.defaultArguments}", "munit.runtime.debugger.version": "${config:munit.runtime.debugger.version}", "munit.debug": "false" } ] }1 Launcher for the standard debugger, named Debug Mule Application.2 Launcher for the MUnit debugger, named Munit Run Tests.
-
-
Save the configuration to
launch.json. -
Run MUnit tests from the MUnit Debug Tests launch configuration:
-
In the Run and Debug panel, select MUnit Debug Tests from the launch menu. For example:

-
Execute MUnit Debug Tests by clicking
 (launch) in the Run an Debug panel.
-
-
Verify that the MUnit tests run. See the example.
Run MUnit Tests in Debug Mode
Run your test in debug mode after adding breakpoints to the XML for your tests or Mule application. When Mule reaches the breakpoint, you can review variables in the Run and Debug panel.
-
Open a project that contains an MUnit test suite.
-
Add breakpoints to the XML for the Mule application or test suites.
For guidance with breakpoints, the Mule event, DataWeave in the Watch panel and Debug Console, conditional breakpoints, and exception breakpoints, see Debugging Mule Applications.
-
Run your test with a debugging command using one of the following options:
-
From the Testing panel, click
 (Debug test) at any level (all tests, all tests in a suite, or a single test).
For more guidance, see Run Tests from the Testing Panel.
-
From the suite XML, use the right-click menu to run the test.
For more guidance, see Run Tests from the MUnit Configuration XML File.
-
From a launch configuration in the Run and Debug panel.
For guidance, see Run Tests with an MUnit Launch Configuration.
-
-
When the build process reaches a breakpoint, click
(Run and Debug) from the activity bar to review variables, including the Mule event variables and test parameters. For example: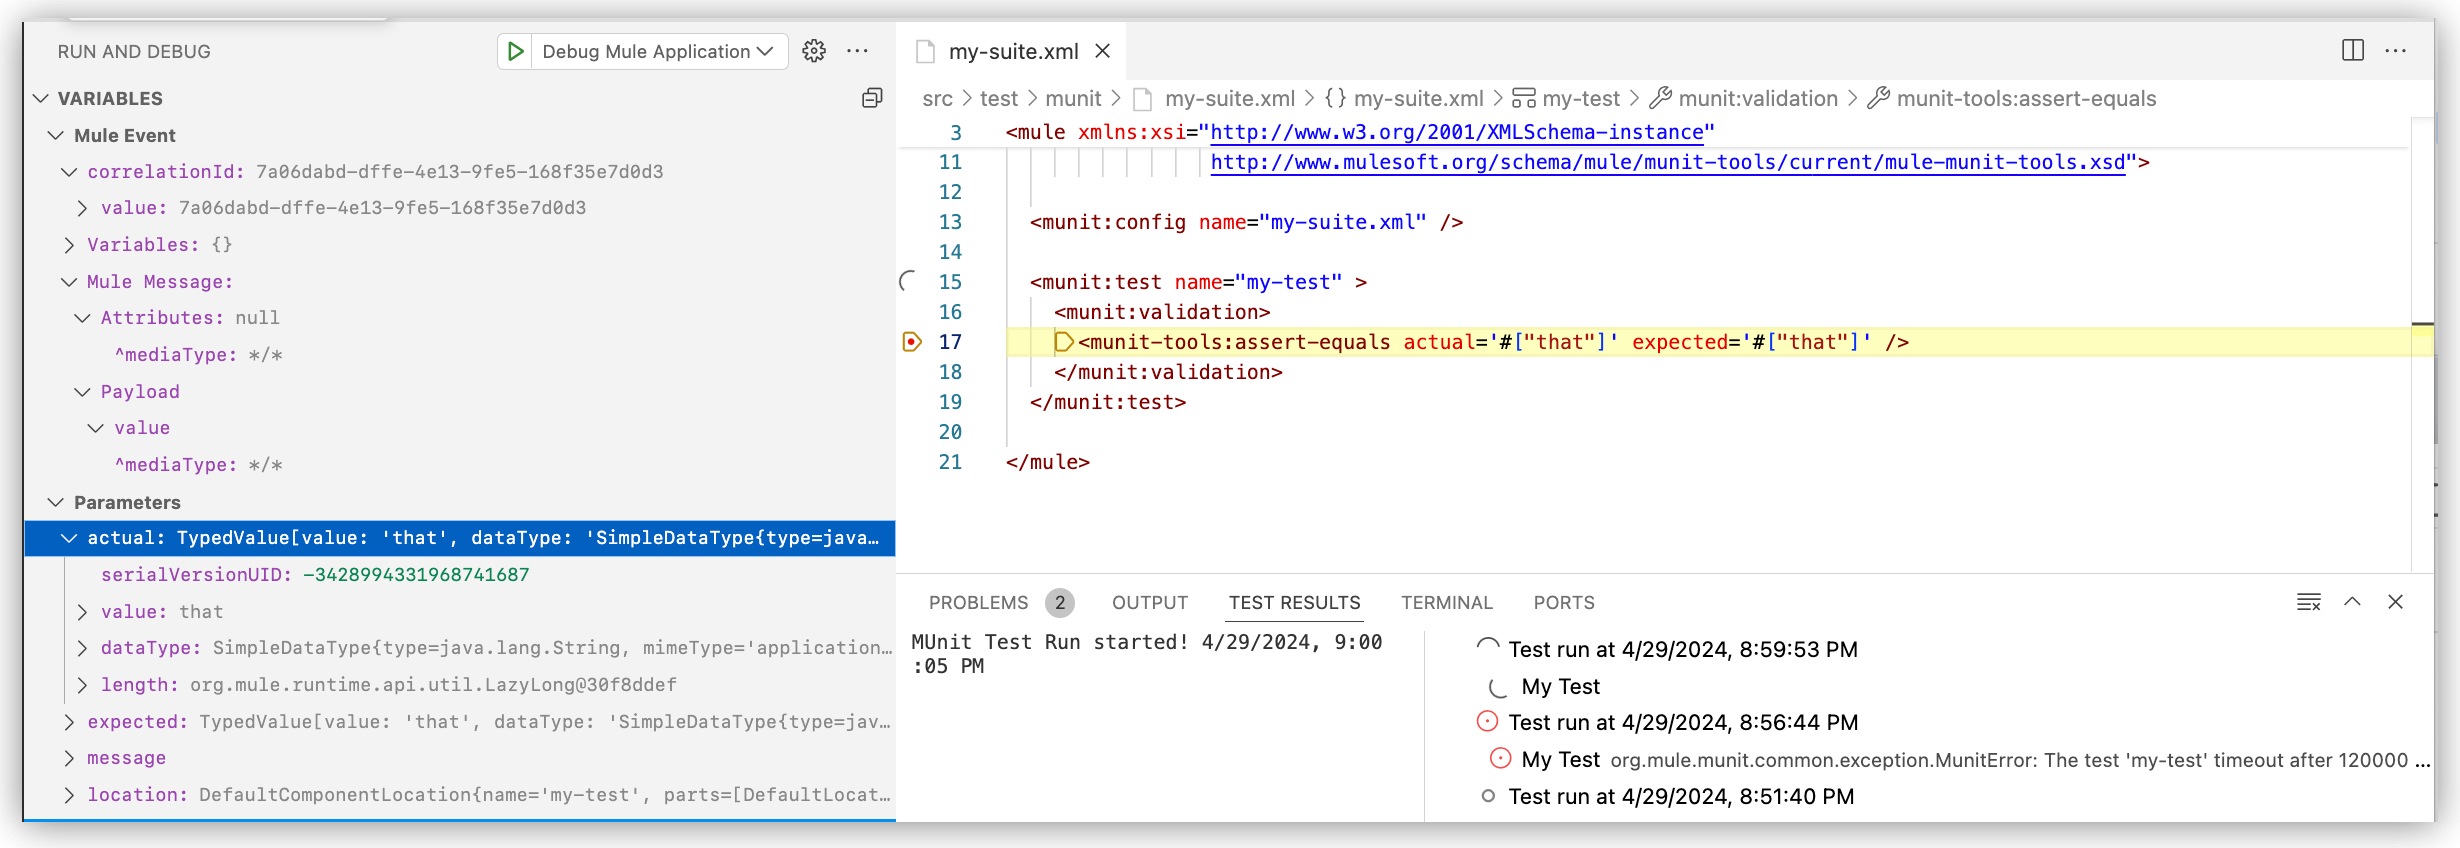
-
Examine the data, and address any issues.
By default, running tests fail after a timeout period. If a debugging session reaches a breakpoint in a test, the test and the build fail at timeout. See Test TimeOut Attribute.
Run MUnit Tests with Coverage
Run your test with coverage to measure how much of a Mule application your set of MUnit tests executes.
-
Open a project that contains an MUnit test suite.
-
Run your test with coverage using one of the following options:
-
From the canvas, click Run Test and Run Test with Coverage.
The Testing panel shows the test coverage results. For more guidance, see Run Tests from the Canvas.
-
From the Testing panel, click Run Test with Coverage at any level (all tests, all tests in a suite, or a single test).
For more guidance, see Run Tests from the Testing Panel.
-
From the suite XML, right-click and select an option to run the test.
For more guidance, see Run Tests from the MUnit Configuration XML File.
-
-
After the test suite runs, view coverage results using one of the following options:
-
In the activity bar, click
(Testing) to open the Testing panel. The Test Coverage panel shows coverage for directories and files: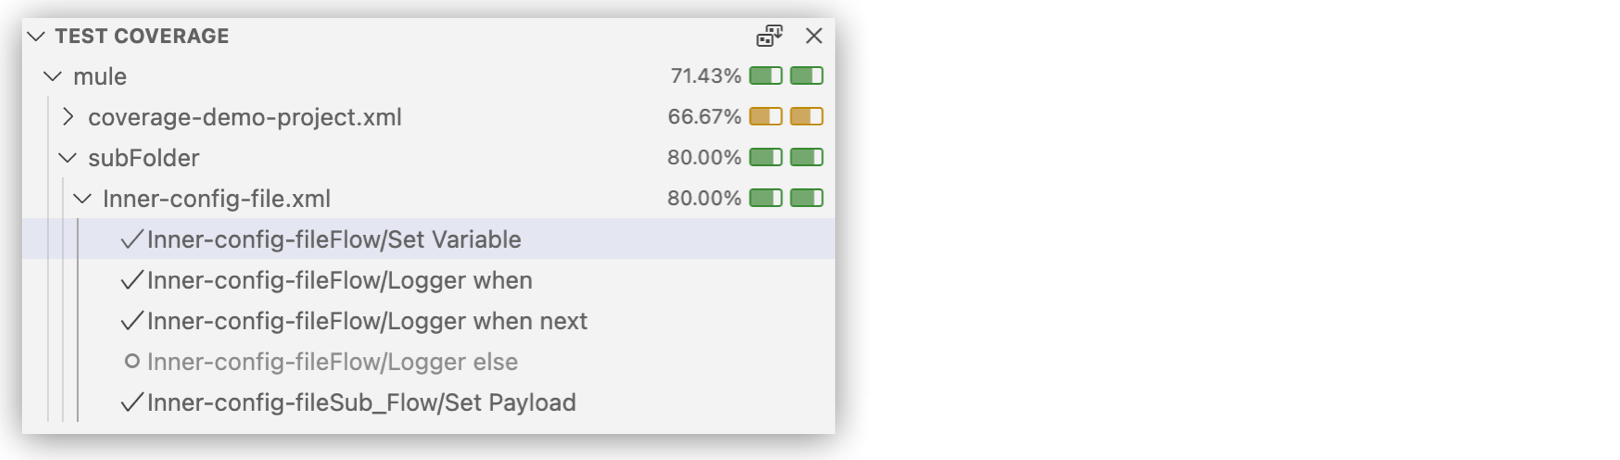
-
In the activity bar, click (
) (Explorer). The IDE shows Coverage for directories and files.
-
Numeric and graphic percentages both show the percentage of event processors executed by the MUnit test.
Fix Test Errors
After running a test, fix any errors.
-
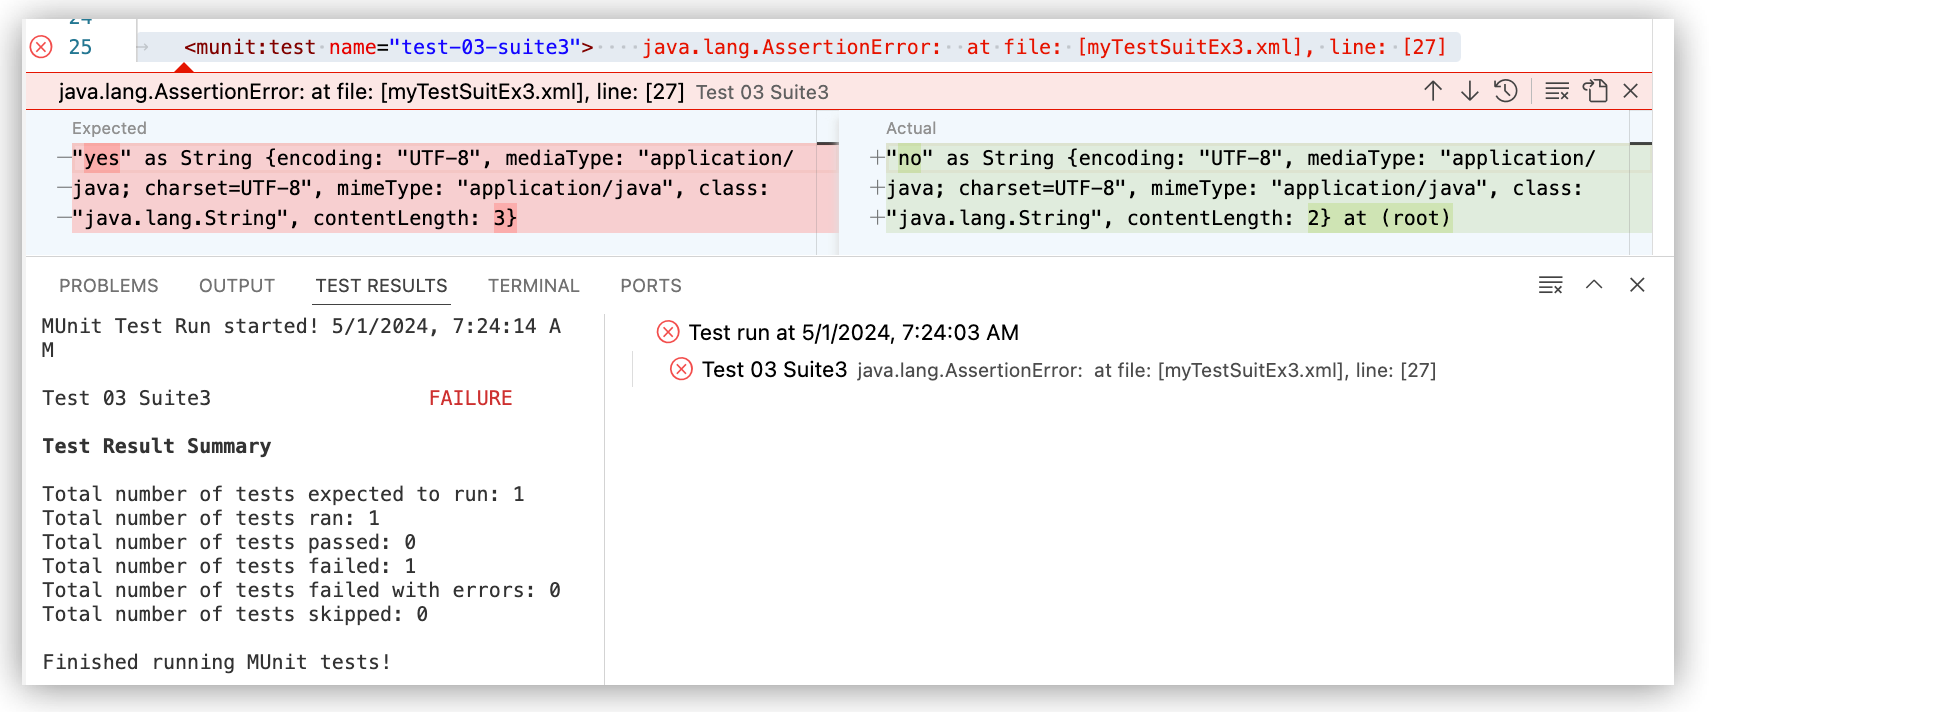
Review test errors in the XML by clicking the name of the failing test from the Testing panel.
The error in the XML example identifies the error
java.lang.AssertionError.-
Expected result (highlighted in red):
"yes" as String {encoding: "UTF-8", mediaType: "application/java; charset=UTF-8", mimeType: "application/java", class: "java.lang.String", contentLength: 3} -
Actual result (highlighted in green):
"no" as String {encoding: "UTF-8", mediaType: "application/java;
                charset=UTF-8", mimeType: "application/java",
                class: "java.lang.String", contentLength: 2} at (root)
You can also review the test results in the Test Results panel by clicking the failing test in the test logs. For example:
-
-
Fix the error:
-
After reviewing the error, click the x icon to close the error message in the XML. For example:

-
Edit the XML to produce the expected output.
For example, the failing test case in the example must return
"yes"instead of"no".
-
-
After fixing the error, rerun the test to ensure that the fix works:
-
To rerun the test from the XML, click
 (Test failure) for the test.
 -
To rerun the test from the Testing panel, click
 (Run test).
 -
To rerun the test from the Testing Results panel, open the panel, click the name of the failing test in the test logs, and click
(Run test) from the test logs.
-
For guidance with MUnit XML configurations, see MUnit Test Structure Fundamentals and MUnit Event Processors.
Troubleshoot Runtime Class Errors
If running a test fails with an error similar to NoClassDefFoundError: org/apache/commons/io/output/ByteArrayOutputStream, check your project and runtime setup before changing test logic.
-
Verify compatibility among Mule runtime, MUnit dependencies, and the Anypoint Code Builder extensions that you are using.
-
Confirm the versions that your project declares in
pom.xml. -
If needed, align dependency and plugin versions with the versions recommended in MUnit Overview.
-
-
Clean and rebuild the project, and then rerun the test.
-
From the terminal, run
mvn clean testto confirm whether the issue reproduces outside the IDE test runner.
-
-
Review dependency declarations in
pom.xmlfor conflicts in test dependencies, including direct overrides forcommons-io. -
If the error persists, isolate the issue in a new minimal project and compare the project dependencies and plugin versions.
-
Capture the full terminal stack trace and contact support if the runtime class error continues after version and dependency checks.
To clear test results, see Clear Test Results.
Import a Project that Contains MUnit Tests
Mule projects created in Anypoint Studio and Anypoint Code Builder for your integrations or implementations can include MUnit tests.
-
To import and open the project into Anypoint Code Builder, see Importing Projects into the IDE.
-
To export a project from Anypoint Studio before importing to Anypoint Code Builder, use one of the procedures in Export Projects From Studio.
-
To start an integration that imports an example or template that contains MUnit tests from Anypoint Exchange, see Create an Integration Project.
Instead of starting with an empty project when creating the integration project, click Template or Example Project so that you can import the asset that contains tests into your project.
Clear Test Results
After testing, you can clear test results from the Testing panel and the logs if you no longer need them.
-
From the Testing panel, click the Views and More Actions (…) menu, and select Clear All Results.
-
From the Test Results panel, click
 (Clear All Results). For example:
Targeting Specific Processors and Attributes in Your Test
Add these processors to your MUnit test to focus on individual components of your Mule flow:
| Processor | Description |
|---|---|
|
Create a mock of an event processor in your flow to simulate the behavior of the event processor without executing it. |
|
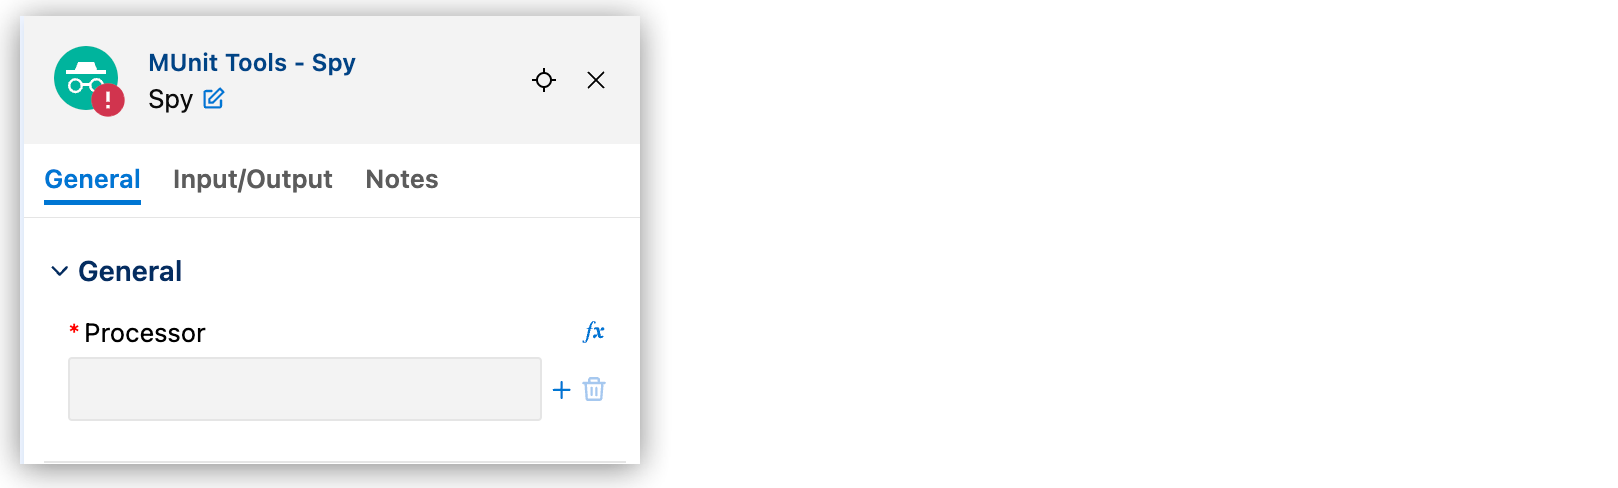
Observe what happens before and after a specific event processor in your flow is executed, without altering its behavior. |
Setting Up Processors
-
On your test suite, click +.
-
Search for a processor designed to observe your flow (see Targeting Specific Processors and Attributes in Your Test).
-
Select the type of processor to be observed by clicking on the + icon.
-
Select the components and attributes of the processor to observe.
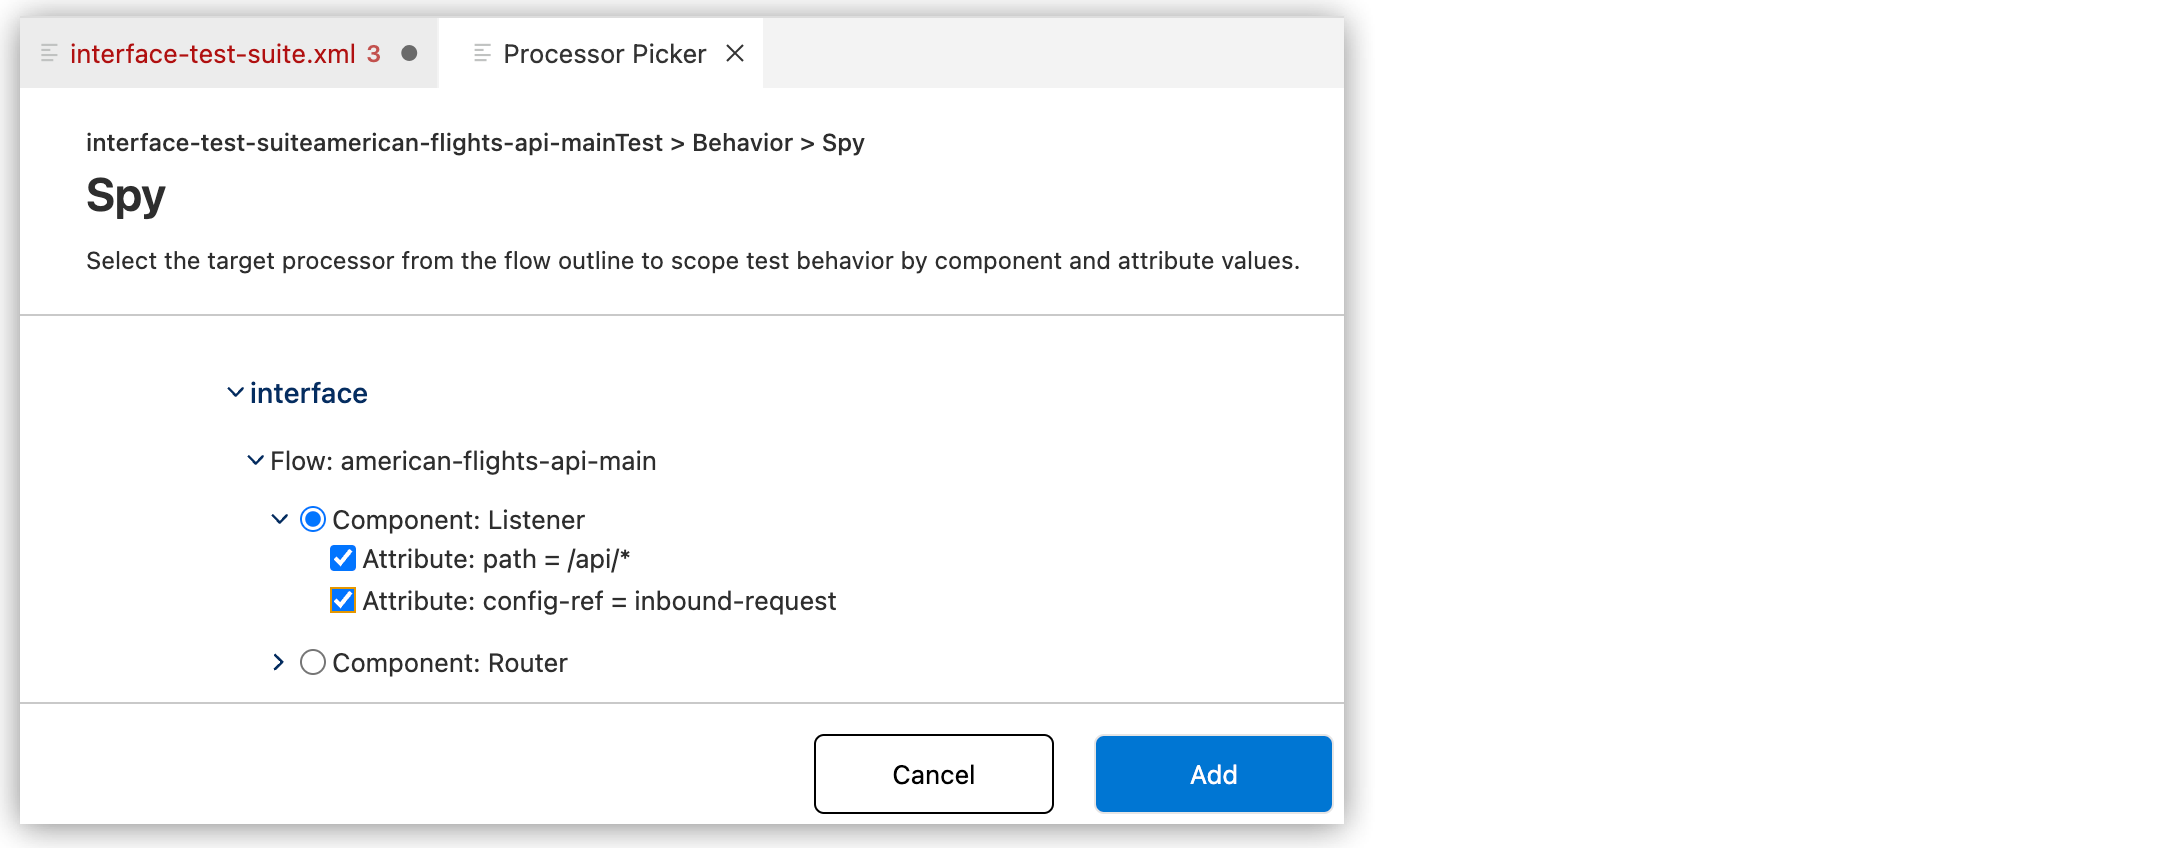
-
Click Add to add the processor to your test suite.
The processor shows in the code editor and the canvas.
When selecting the processor and its attributes, consider these aspects:
-
The configuration for one processor applies to all processors of the same type in your flow.
-
The attributes of all processors of the same type are listed.
MUnit Examples
The MUnit documentation provides several examples. See MUnit Cookbook.
The following MUnit test example validates if the payload is the string "Example":
<munit:test name="my-test" doc:id="e536ea1f" description="Test Example">
  <munit:execution >
  	<flow-ref doc:name="Reference to Main Flow" doc:id="058d41ef" name="mainFlow"/>
  </munit:execution>
  <munit:validation >
  	<munit-tools:assert-equals actual="#[payload]" expected="Example"
                               message="The payload is expected to be 'Example'."/>
  </munit:validation>
</munit:test>
For information about munit:execution, munit:validation, and other MUnit testing elements, see MUnit Test Structure Fundamentals and MUnit Event Processors.