Implementing AsyncAPI Specifications
 Cloud IDE
 Desktop IDE
Anypoint Code Builder supports the implementation of AsyncAPI 2.6 and 2.0 specifications in projects running on Mule runtime version 4.6 or later. When creating an implementation project, Anypoint Code Builder imports and scaffolds an AsyncAPI specification hosted on Anypoint Exchange into an implementation project that you can develop further according to your business needs.
Async APIs rely on message brokers to send and receive messages between different services or components in a decoupled manner. The services can send and receive messages without knowing the specific details of the recipient or sender, thus enabling asynchronous communication. For communicating with the recipient and sender, the message brokers use specific protocols. See Supported Message Brokers in APIkit for AsyncAPI Module Reference.
Before You Begin
-
If you don’t yet have access to Anypoint Code Builder, follow the procedures in Getting Started with Anypoint Code Builder.
-
Review important information about the scaffolding process for AsyncAPI specifications in Scaffolding Fundamentals.
-
You must have access to a supported AsyncAPI specification that is hosted on Anypoint Exchange:
If your AsyncAPI specification isn’t published to Exchange, see Creating and Importing AsyncAPI Specifications.
Scaffolding Fundamentals
Before you implement an AsyncAPI specification with Anypoint Code Builder, it’s important to understand the scaffolding process at a high level.
When scaffolding an AsyncAPI specification into a Mule project (implementation or integration), Anypoint Code Builder:
-
Introspects the AsyncAPI specification
-
Considers one specification at a time
-
Treats the imported specification as a modification of an existing specification and evaluates it for rescaffolding
-
Creates a new Mule project with a separate flow for each publish operation in the specification
-
Generates an empty XML file with the name of your Mule project if the AsyncAPI spec doesn’t include a publish operation
-
Produces the configuration properties file
dev-properties.propertiesfile in thesrc/main/resourcesdirectory of your Mule project -
Makes the APIkit for AsyncAPI Module (AsyncAPI Module) available for use in the project
The module provides the following operations:
-
Subscribe (
<apikit-asyncapi:publish/>): AsyncAPI subscribe operations in the specification are available for configuration as AsyncAPI Publish operations. See the implemented example in Example: Scaffolded Flows. -
Message Listener (
<apikit-asyncapi:message-listener/>): AsyncAPI publish operations in the specification are configurable as Message Listener operations. The system publishes messages to a channel, and the Mule application listens for these messages. See examples in Example: Scaffolded Flows.The scaffolder transforms each publish operation into a Message Listener operation allowing the Mule application to read from the specified channel and process the published messages.
-
-
Generates a
global-configs.xmlfile with connection configurations for Message Listener and Publish operations in the AsyncAPI Module and for any connectors that module depends on
Errors can occur during the scaffolding process:
-
If no channels are defined in the specification
-
For unsupported message broker protocols
For supported protocols, see Supported Message Brokers in APIkit for AsyncAPI Module Reference.
Anypoint Code Builder supports scaffolding these schema fragment files if they’re referenced from API specs:
| Avro | JSON | RAML | |
|---|---|---|---|
AsyncAPI |
Yes |
Yes |
No |
GraphQL |
No |
No |
Yes |
OData |
No |
No |
Yes |
REST |
No |
Yes |
Yes |
SOAP |
No |
No |
Yes |
If you add a fragment that isn’t supported, the scaffolder doesn’t add these fragments as project dependencies when you import the spec from Exchange. However, you can scaffold schemas that are specified inline within the spec.
Scaffold an AsyncAPI Specification into a Mule Project
You can scaffold an AsyncAPI specification into a new or existing Mule project:
-
To scaffold an AsyncAPI specification into a new implementation project, follow the procedure in Scaffold an AsyncAPI Specification into a New Project.
-
To scaffold or re-scaffold an AsyncAPI specification into an existing Mule project (implementation or integration), see Scaffold or Re-Scaffold an AsyncAPI Specification into an Existing Project. Re-scaffolding can be useful when the specification version is updated to introduce a new operation or server. If the specification contains a new server, the scaffolder adds a new configuration for it to the Mule project.
When re-scaffolding, the scaffolder acts on new combinations of channel, server, and publish and subscribe operations groupings in the specification and doesn’t re-scaffold combinations that aren’t new.
Scaffold an AsyncAPI Specification into a New Project
Create an implementation project from an AsyncAPI specification that is hosted on Anypoint Exchange. When creating the project, Anypoint Code Builder scaffolds the specification into an interface that you can implement as a Mule app.
-
Meet the prerequisites in Before You Begin.
-
In the activity bar of the IDE, click the
 (Anypoint Code Builder) icon.
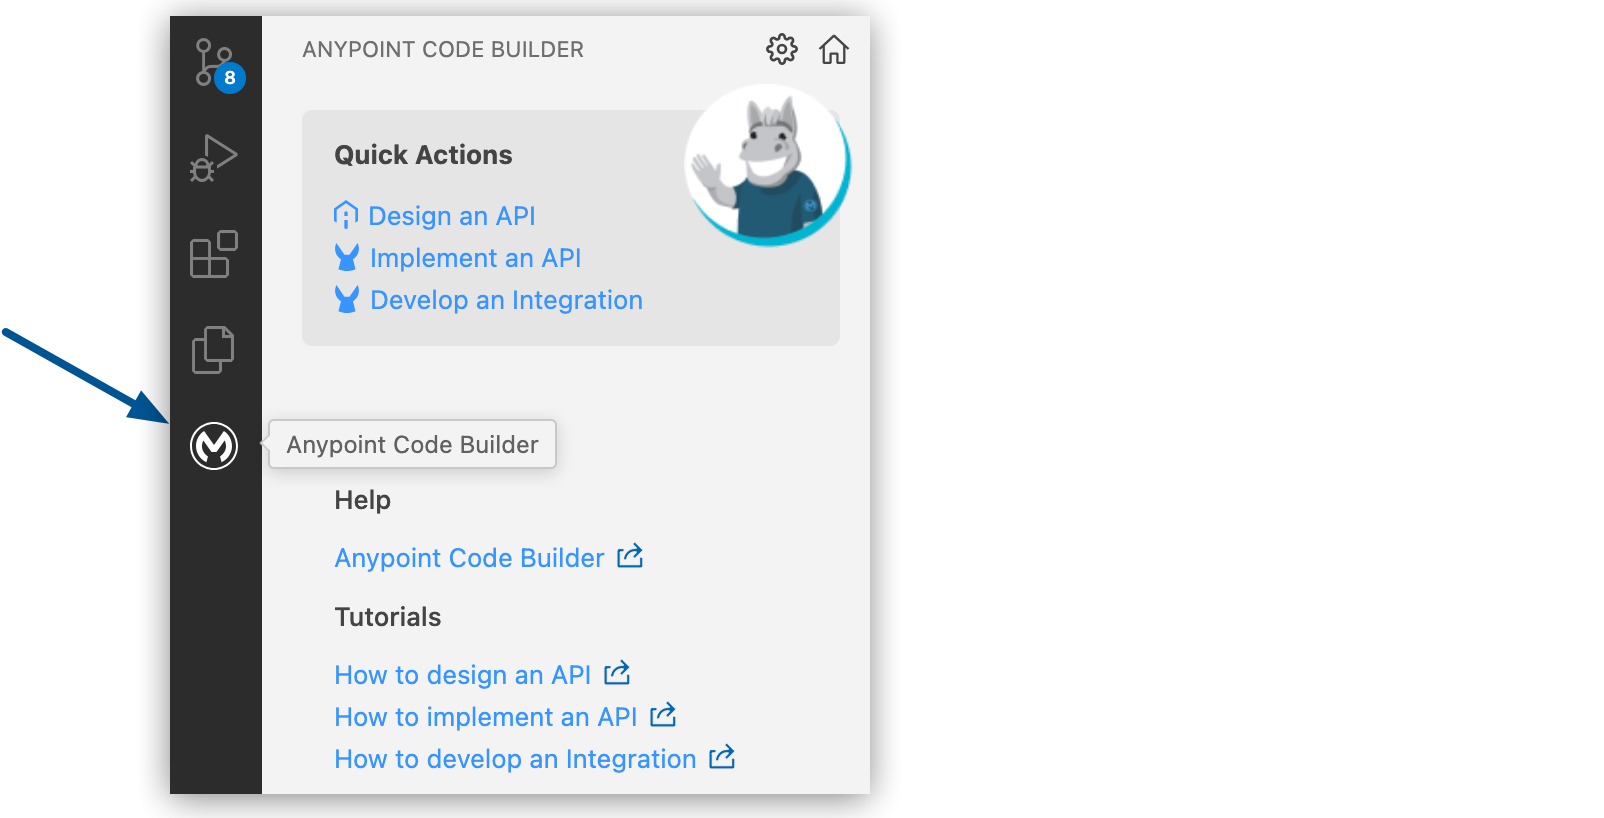
-
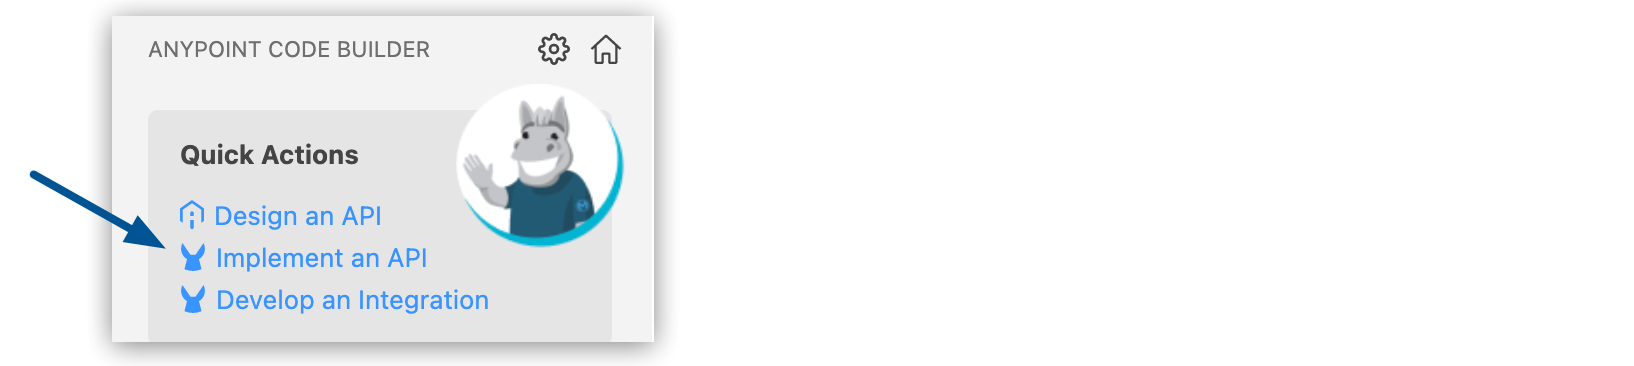
From Create, click Implement an API:
-
Complete the Implement an API Specification form:
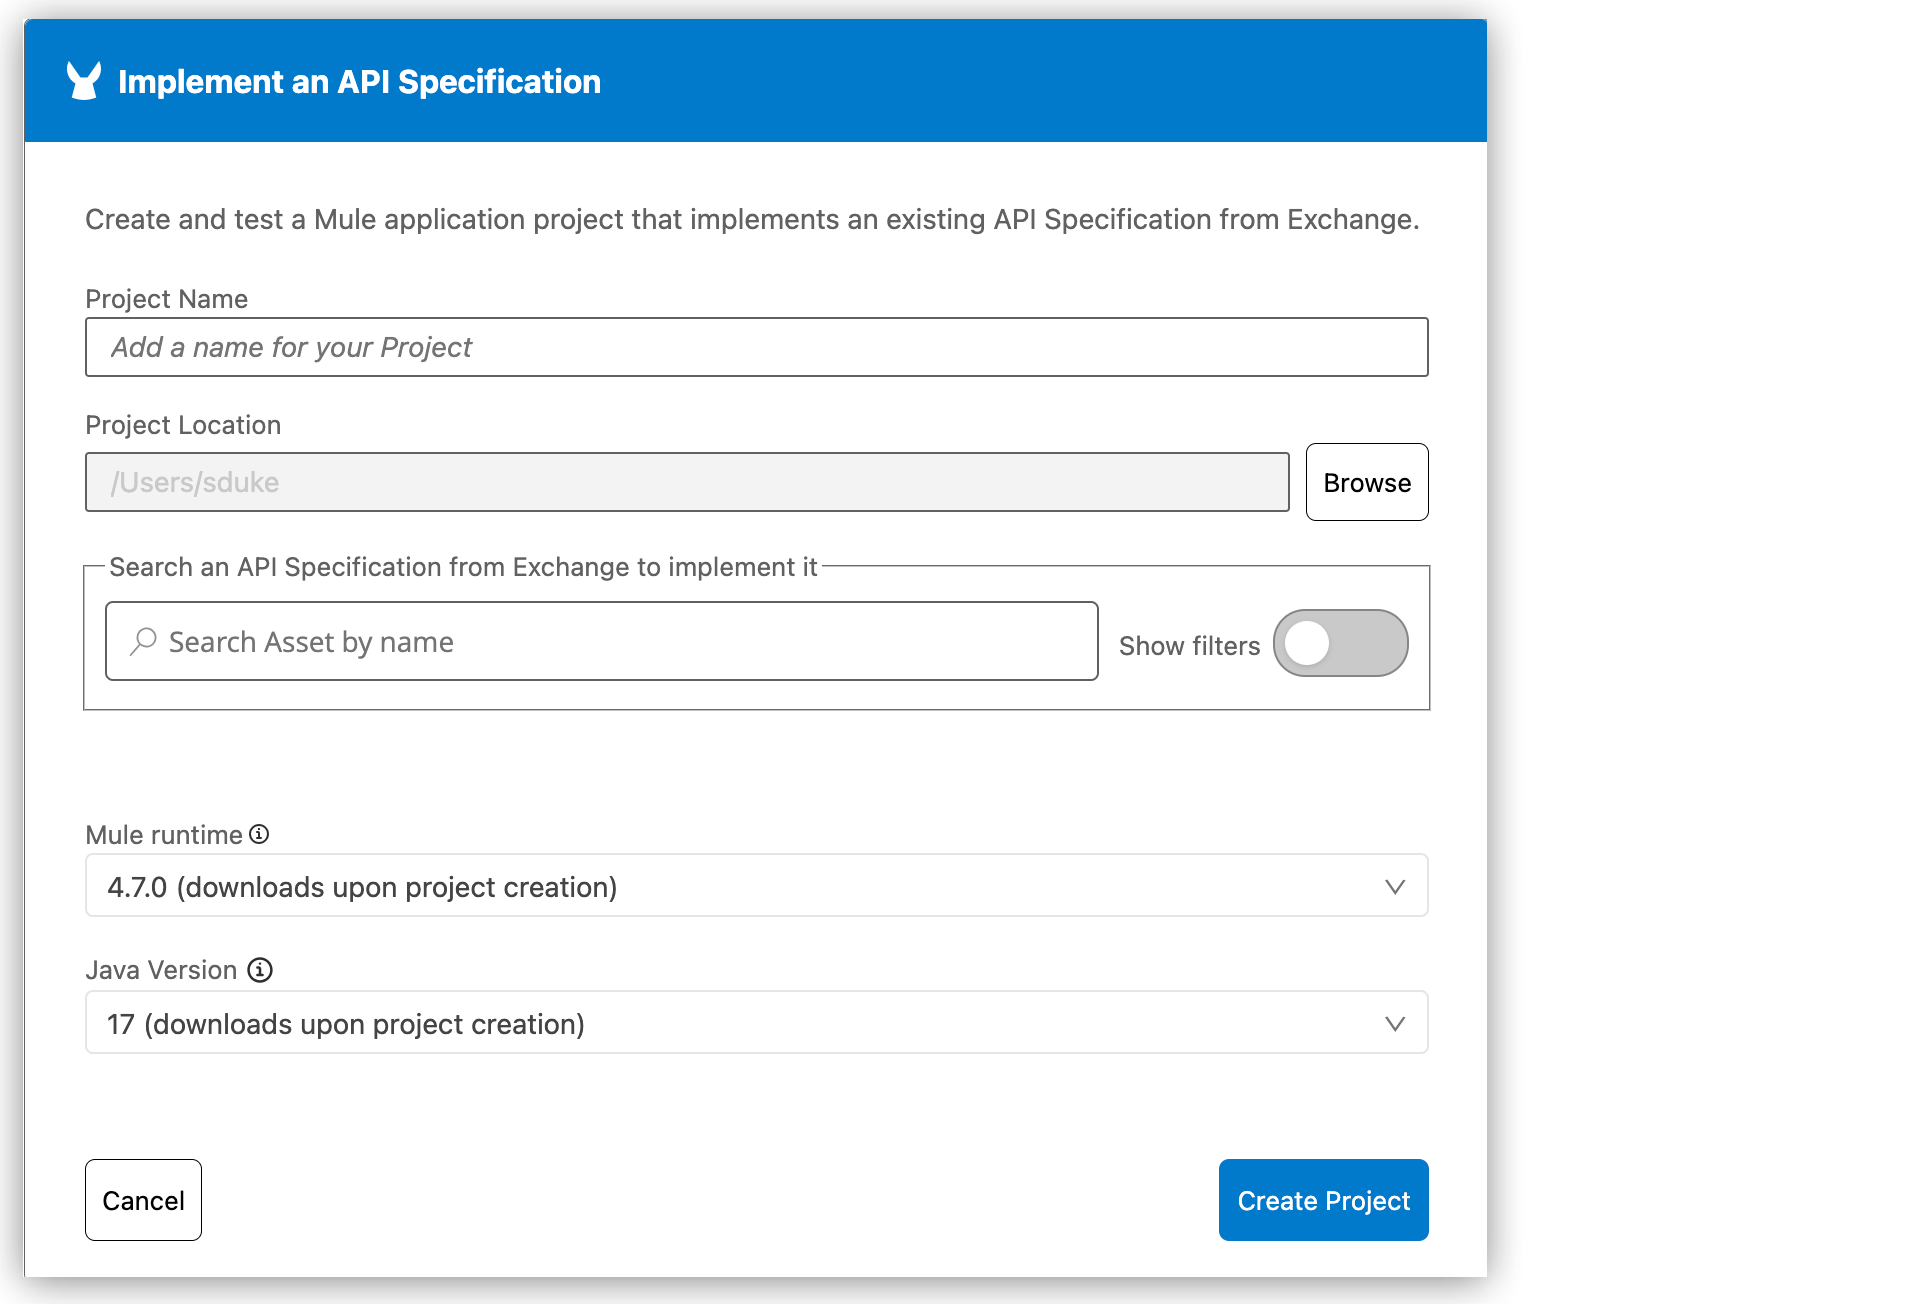
Field Name Field Value Project Name
Unique name for your project.
This name is used as the title and name of the project file. For example, if the project name is My Project, the project file name is
my-project.Project Location
Your home directory or another directory you create.
Don’t create the project within another project directory.
Search an API Specification from Exchange
Name of the specification in Exchange. Search results can include OAS, RAML, AsyncAPI, and GraphQL specifications. Activate Show filters to narrow your search results. See Filtering Search Results for more information. To implement a gRPC API spec, see Implementing a gRPC API Specification with Anypoint Code Builder.
Mule runtime
Mule runtime version to use for your project.
Java Version
Java version to use for Mule.
You can select from locally available Mule runtime and Java versions. The dropdown shows only the Mule runtime versions that are installed on your local disk, including bundled Mule runtime versions that are available immediately after installation. The IDE saves your version settings to the project’s
mule-artifact.jsonfile. Bundled Mule runtime versions enable instant project opening and design. To install additional Mule runtime versions, use theMuleSoft: Install Runtimecommand. -
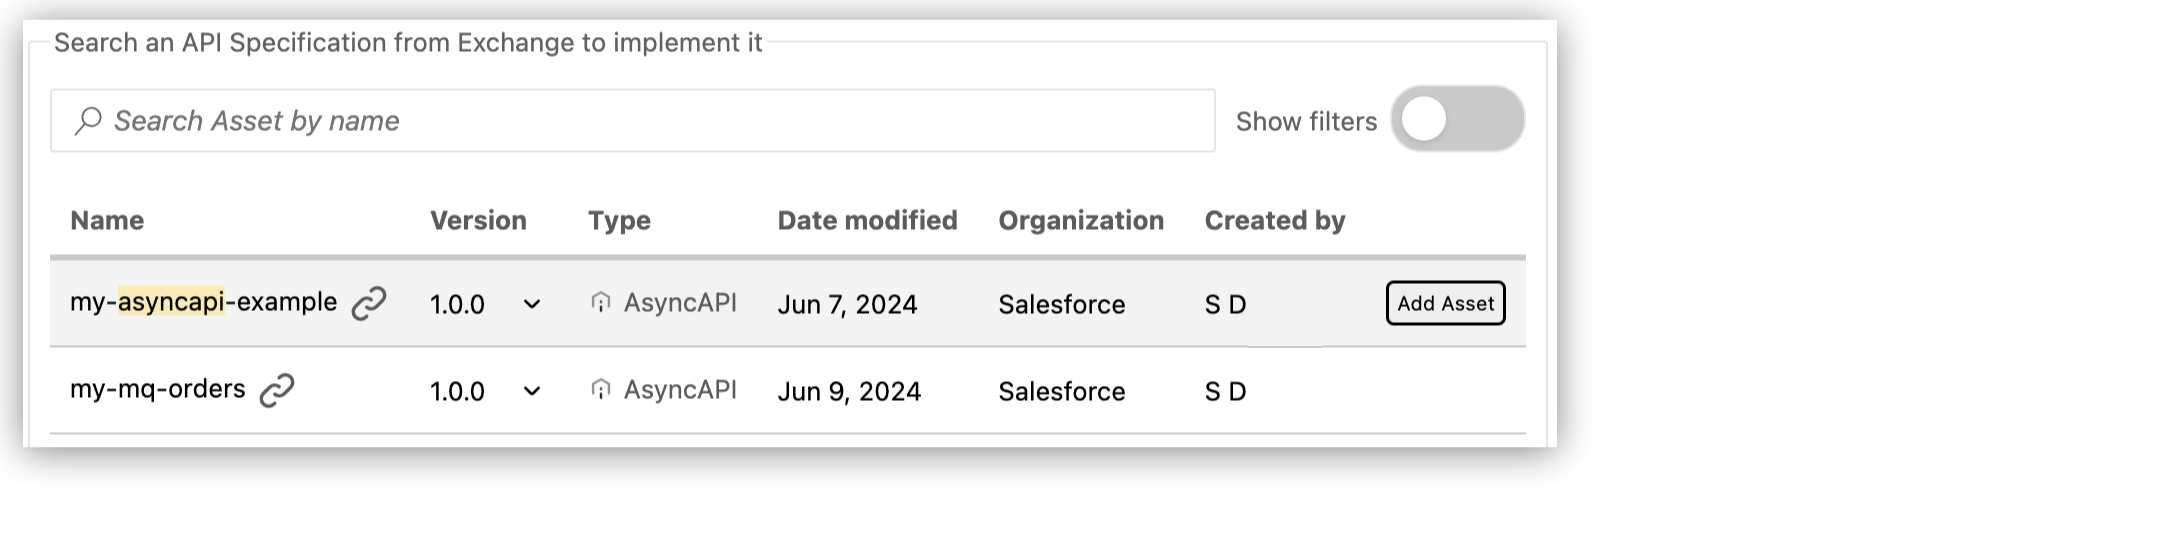
Search for an API spec on Exchange:
-
Start typing the name of an API spec.
-
Press Enter to display a list of search results.
-
Click Add Asset to add the selected API spec:
Only supported versions of the AsyncAPI specifications in Exchange are available for scaffolding. Unsupported versions don’t appear in the search results.
-
-
Click Create Project.
When you create the project, Anypoint Code Builder:
-
Scaffolds your API specification into the new Mule project that opens to a configuration XML file with scaffolded flows (
flows.xml), for example: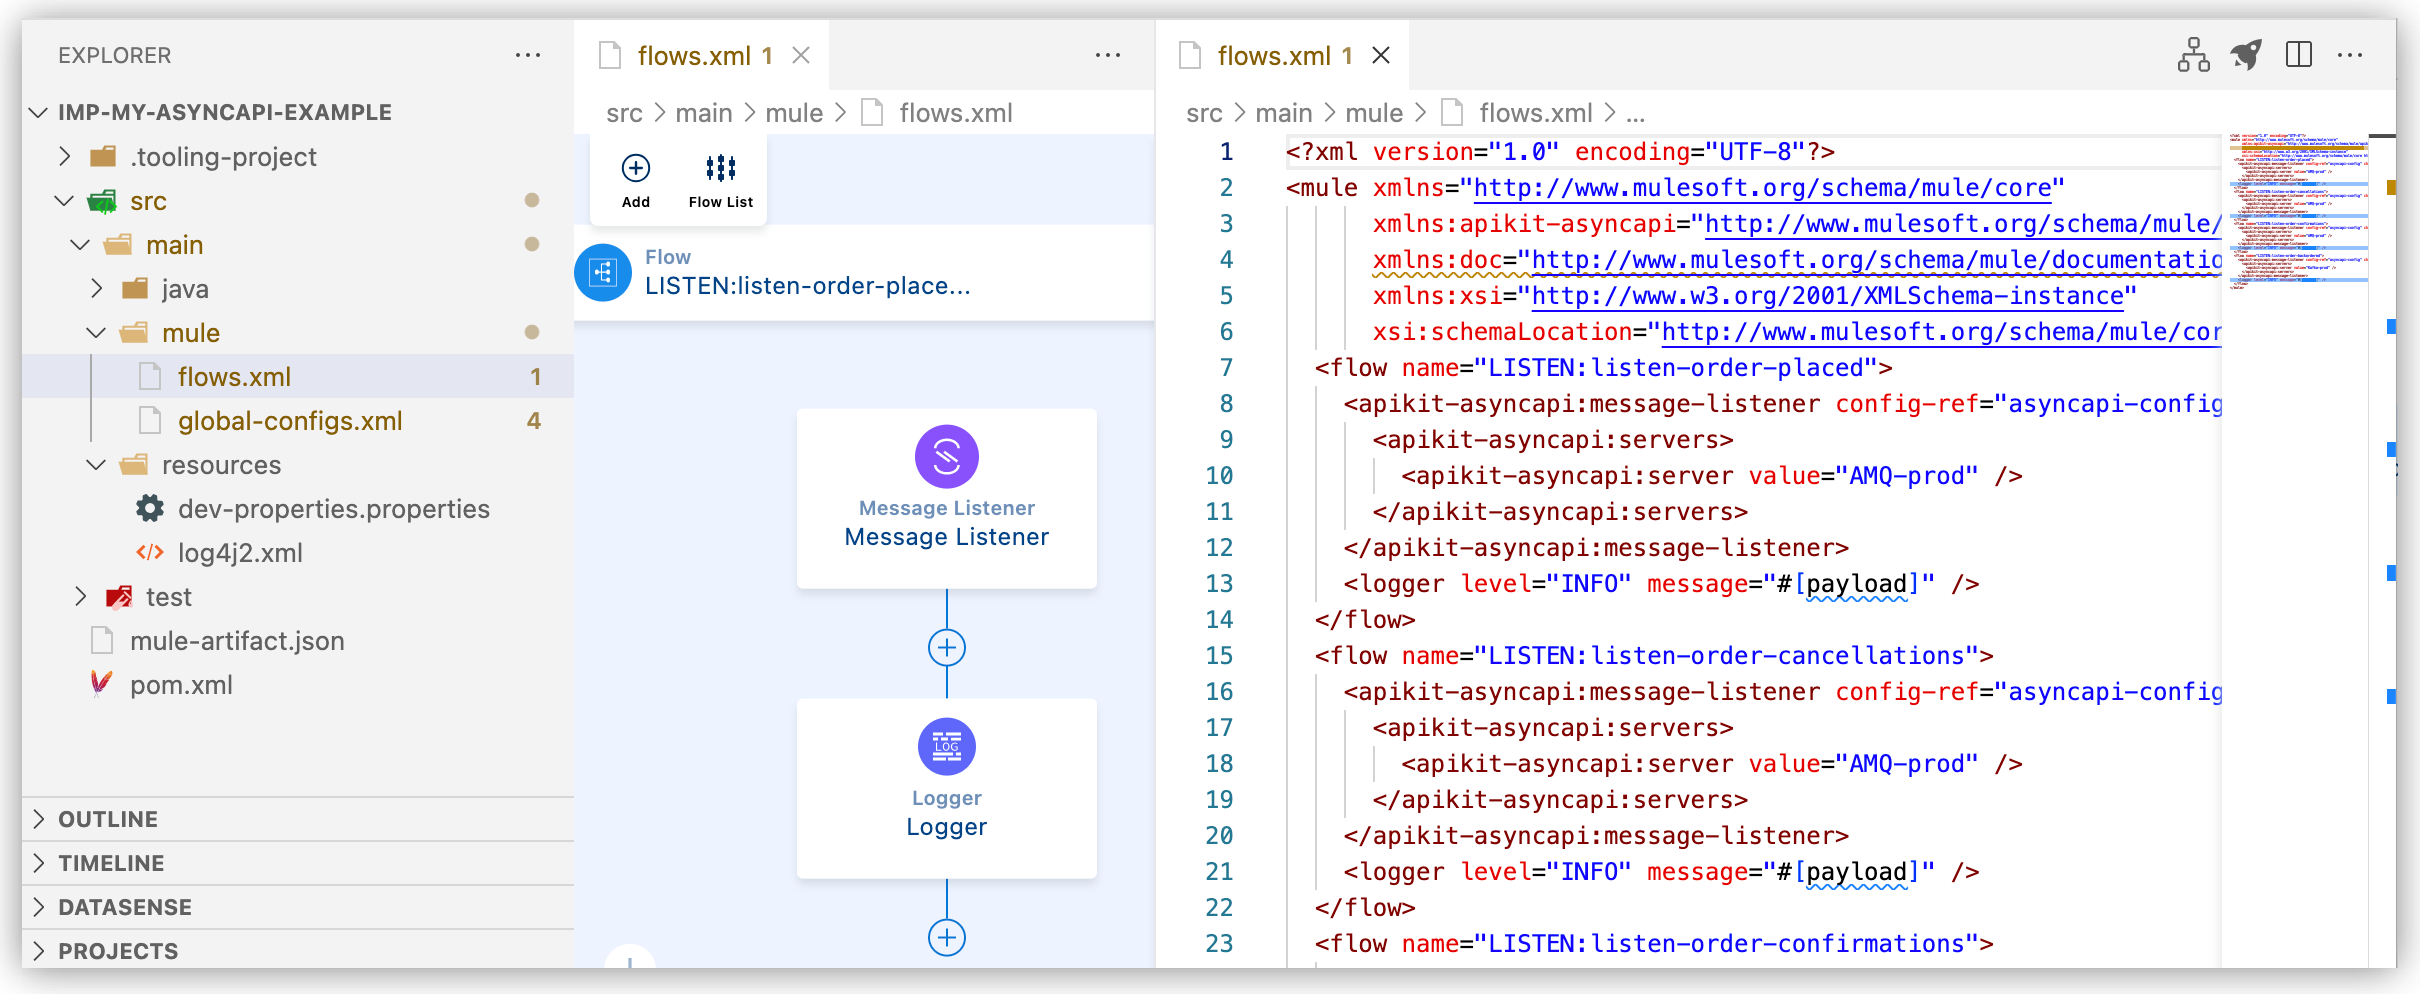
The configuration XML file includes the interface for your implementation project, with flows that contain Message Listener (
<apikit-asyncapi:message-listener/>) configurations for eachpublishoperation in the specification. -
Adds the API specification as a dependency in your project’s
pom.xmlfile, for example:<dependency> <groupId>e21dd38b-8231-45bf-aaa7-abde2072d538</groupId> <artifactId>my-asyncapi-example</artifactId> <version>1.0.0</version> <classifier>evented-api</classifier> <type>zip</type> </dependency> -
Adds the Mule and Java versions to the project’s
mule-artifact.jsonfile, for example:{ "minMuleVersion": "4.7.0", "javaSpecificationVersions": [ "17" ] }
-
-
Provide business logic to implement this interface within the Mule app:
Define your business logic by configuring connector operations and processing components, as needed for your use cases. Provide configuration property values to the
dev-properties.propertiesfile. Optionally, create and configure additional flows or subflows for your processing requirements.To find guidance on configuring components, debugging, performing unit testing on your application, and other tasks, see Developing Integrations. For information about connectors and processors for configuring your business logic, see Anypoint Code Builder Components and Commands Reference.
For an example of an AsyncAPI specification, the scaffolded interface, and business logic for processing some orders within a Mule application, see Examples.
Scaffold or Re-Scaffold an AsyncAPI Specification into an Existing Project
Scaffold or re-scaffold an AsyncAPI specification from Exchange into an existing project in Anypoint Code Builder. Before re-scaffolding, review the important note about which new configurations are scaffolded into your project.
-
Meet the prerequisites in Before You Begin.
Use of AsyncAPI features in the IDE requires enablement by an Anypoint Platform organization administrator.
-
In Anypoint Code Builder, open your project.
-
Open the Command Palette.
Show me how
-
Use the keyboard shortcuts:
-
Mac: Cmd+Shift+p
-
Windows: Ctrl+Shift+p
-
-
In the desktop IDE, select View > Command Palette.
-
In the cloud IDE, click the
 (menu) icon, and select View > Command Palette.
-
-
Provide this command:
MuleSoft: Import Asset from Exchange -
Select AsyncAPI from the list of assets.
-
If prompted, log in to Anypoint Platform, allowing the extension to sign in and open an external web site and to open Visual Studio Code.
-
Type the full name or partially matching name of your specification, for example:
My AsyncAPI Spec
-
Wait for the IDE to load a list of matches to the name, and then select your AsyncAPI specification.
Only supported versions of the AsyncAPI specifications in Exchange are available for scaffolding. Unsupported versions don’t appear in the search results.
-
When prompted for a version, select the version of the API to import, such as
1.0.0or2.0.0. -
Select Yes when prompted to scaffold the API dependency.
When the scaffolding process is complete, the IDE opens to a configuration XML file that contains the scaffolded flows (
flows.xml). If you re-scaffolded the specification, see the important note about which new configurations are scaffolded into your project. -
Provide business logic to implement this interface within the Mule app:
Define your business logic by configuring connector operations and processing components, as needed for your use cases. Provide configuration property values to the
dev-properties.propertiesfile. Optionally, create and configure additional flows or subflows for your processing requirements.To find guidance on configuring components, debugging, performing unit testing on your application, and other tasks, see Developing Integrations. For information about connectors and processors for configuring your business logic, see Anypoint Code Builder Components and Commands Reference.
For an example of an AsyncAPI specification, the scaffolded interface, and business logic for processing some orders within a Mule application, see Examples.
Deploy an Implementation
Deploy the implementation to CloudHub and CloudHub 2.0 or to another host. You can deploy to CloudHub or CloudHub 2.0 from Anypoint Code Builder. For other deployment options, see Deployment Options.
Examples
The examples describe an API specification and implementation for processing orders and sending order status notifications by email and Slack.
-
Example: AsyncAPI 2.6 Specification
The AsyncAPI specification defines an order processing API that uses Anypoint MQ and Kafka protocols.
-
The scaffolder generates a
flow.xmlfile with a flow for each publish operation in the AsyncAPI specification (for re-scaffolding behavior, see Scaffold an AsyncAPI Specification into a Mule Project). The example describes the generated flows and configures components that provide order-processing logic to some of the flows. -
Example: Connection Configurations
The scaffolder generates a
global-configs.xmlfile that contains connection configurations for the Message Listener and Publish operations in the flow and for connectors, such as Anypoint Connector for Apache Kafka (Apache Kafka Connector) and Anypoint Connector for Anypoint MQ (Anypoint MQ Connector) . The example describes the contents of the file and adds connection configurations for the Email and Slack connector operations. -
Example: Configuration Properties File
The scaffolder generates a
dev-properties.propertiesfile in thesrc/main/resourcesdirectory of your Mule project. The example describes the generated file and adds configuration properties used in the email and Slack notifications to the file. -
The subflow (
<sub-flow/>) innotifications.xmluses Anypoint Connector for Email (Email Connector) and Anypoint Connector for Slack (Slack Connector) to implement the business logic for sending order confirmation messages by email and Slack.
Example: AsyncAPI 2.6 Specification
The following example defines an API specification that uses Anypoint MQ and Kafka protocols. The specification defines channels for orders (new, confirmed, and cancelled orders) that use Anypoint MQ, and it defines a channel that uses Kafka for backorders (items that aren’t in stock). Each channel includes a publish and subscribe operation. The server settings in the specification define message brokers that determine the connectors to use (indirectly) when publishing events or subscribing to events through operations in the AsyncAPI module.
asyncapi: '2.6.0'
info:
  title: Async-AMQ-Kafka-Orders
  version: '1.0.0'
  description: Orders API
  license:
    name: Anypoint MQ
    url: https://license.com
  contact:
    name: Max Muley
    email: max@salesforce.com
    url: http://www.salesforce.com
defaultContentType: application/json
tags:
  - name: Orders API
    description: API for orders
servers:
  AMQ-prod: (1)
    url: https:://your_MQ_server_URL_here
    protocol: anypointmq
    protocolVersion: v1
    description: Anypoint MQ broker
  Kafka-prod: (2)
    url: localhost:9092
    protocol: kafka
    description: kafka broker
channels:
  order-placed:  (3)
    description: new orders channel
    servers:
      - AMQ-prod
    publish:
      operationId: listen-order-placed
      description: listen for new order events
      summary: Order Placed Event
      message:
        $ref: '#/components/messages/OrderPlaced'
    subscribe:
      operationId: publish-order-placed
      description: publish new order events
      summary: Order Placed Event
      message:
        $ref: '#/components/messages/OrderPlaced'
  order-cancelled:
    description: orders cancelled channel
    servers:
      - AMQ-prod
    publish:
      operationId: listen-order-cancellations
      description: listen for order cancellation events
      summary: Order Cancelled Event
      message:
        $ref: '#/components/messages/OrderCancelled'
    subscribe:
      operationId: publish-order-cancellations
      description: publish order cancellation events
      summary: Order Cancelled Event
      message:
        $ref: '#/components/messages/OrderCancelled'
  order-confirmed:
    description: orders confirmed channel
    servers:
      - AMQ-prod
    publish:
      operationId: listen-order-confirmations
      description: listen for order confirmation events
      summary: Order Confirmed Event
      message:
        $ref: '#/components/messages/OrderConfirmed'
    subscribe:
      operationId: publish-order-confirmations
      description: publish order confirmation events
      summary: Order Confirmed Event
      message:
        $ref: '#/components/messages/OrderConfirmed'
  order-backordered: (4)
    servers:
      - Kafka-prod
    description: orders backordered channel
    publish:
      operationId: listen-order-backordered
      description: listen for backorder events
      summary: Backorder Event
      message:
        $ref: '#/components/messages/BackOrder'
    subscribe:
      operationId: publish-order-backordered
      description: publish backorder events
      summary: Backorder Event
      message:
        $ref: '#/components/messages/BackOrder'
components:  (5)
  messages:
    OrderPlaced:
      payload:
        type: object
        properties:
          orderId:
            type: string
          customerName:
            type: string
          email:
            type: string
          items:
            type: array
            items:
              type: object
              properties:
                productId:
                  type: string
                productName:
                  type: string
                quantity:
                  type: integer
                price:
                  type: number
    OrderConfirmed:
      payload:
        type: object
        properties:
          orderId:
            type: string
          email:
            type: string
    OrderCancelled:
      payload:
        type: object
        properties:
          orderId:
            type: string
          email:
            type: string
          reason:
            type: string
    BackOrder:
      payload:
        type: object
        properties:
          orderId:
            type: string
          email:
type: string| 1 | AMQ-prod configures an Anypoint MQ broker.
You can discover the URL for an MQ broker from the region that you select when creating the queue. See the copy button in Create a Queue, and see Configuring Client Apps. |
| 2 | Kafka-prod configures a locally hosted Kafka broker. |
| 3 | order-placed configures an Anypoint MQ channel for publishing (listening for) and subscribing to (publishing) orders. Similarly configured channels are order-cancelled and order-confirmed. |
| 4 | order-backordered configures a Kafka channel for publishing (listening for) and subscribing to (publishing) backorders. |
| 5 | components defines the structure of messages for the different types of orders, which include OrderPlaced, OrderCancelled, OrderConfirmed, and BackOrder. |
Example: Scaffolded Flows
When scaffolding the specification into an implementation project, Anypoint Code Builder creates a flow (<flow/>) for each publish operation and transforms the publish operation into a Message Listener source from the AsyncAPI module for APIkit (<apikit-asyncapi:message-listener/>). Each flow also includes a Logger component. For more information about the module, see APIkit for AsyncAPI Module Reference.
The scaffolder generates a flow.xml file from the specification. The scaffolder generates the following XML from the AsyncAPI specification example:
<?xml version="1.0" encoding="UTF-8"?>
<mule xmlns="http://www.mulesoft.org/schema/mule/core"
      xmlns:apikit-asyncapi="http://www.mulesoft.org/schema/mule/apikit-asyncapi"
      xmlns:doc="http://www.mulesoft.org/schema/mule/documentation"
      xmlns:xsi="http://www.w3.org/2001/XMLSchema-instance"
      xsi:schemaLocation="http://www.mulesoft.org/schema/mule/core http://www.mulesoft.org/schema/mule/core/current/mule.xsd http://www.mulesoft.org/schema/mule/apikit-asyncapi http://www.mulesoft.org/schema/mule/apikit-asyncapi/current/mule-apikit-asyncapi.xsd http://www.mulesoft.org/schema/mule/kafka http://www.mulesoft.org/schema/mule/kafka/current/mule-kafka.xsd http://www.mulesoft.org/schema/mule/anypoint-mq http://www.mulesoft.org/schema/mule/anypoint-mq/current/mule-anypoint-mq.xsd">
  <flow name="LISTEN:listen-order-placed">
    <apikit-asyncapi:message-listener config-ref="asyncapi-config" channelName="order-placed">
      <apikit-asyncapi:servers>
        <apikit-asyncapi:server value="AMQ-prod" />(1)
      </apikit-asyncapi:servers>
    </apikit-asyncapi:message-listener>
    <logger level="INFO" message="#[payload]" />
  </flow>
  <flow name="LISTEN:listen-order-cancellations">
    <apikit-asyncapi:message-listener config-ref="asyncapi-config" channelName="order-cancelled">
      <apikit-asyncapi:servers>
        <apikit-asyncapi:server value="AMQ-prod" />
      </apikit-asyncapi:servers>
    </apikit-asyncapi:message-listener>
    <logger level="INFO" message="#[payload]" />
  </flow>
  <flow name="LISTEN:listen-order-confirmations">
    <apikit-asyncapi:message-listener config-ref="asyncapi-config" channelName="order-confirmed">
      <apikit-asyncapi:servers>
        <apikit-asyncapi:server value="AMQ-prod" />
      </apikit-asyncapi:servers>
    </apikit-asyncapi:message-listener>
    <logger level="INFO" message="#[payload]" />
  </flow>
  <flow name="LISTEN:listen-order-backordered">
    <apikit-asyncapi:message-listener config-ref="asyncapi-config" channelName="order-backordered">
      <apikit-asyncapi:servers>
        <apikit-asyncapi:server value="Kafka-prod" />(2)
      </apikit-asyncapi:servers>
    </apikit-asyncapi:message-listener>
    <logger level="INFO" message="#[payload]" />
  </flow>
</mule>| 1 | AMQ-prod in <apikit-asyncapi:server value="AMQ-prod" /> identifies an Anypoint MQ server connection. For more information, see Example: Connection Configurations. |
| 2 | Kafka-prod in <apikit-asyncapi:server value="Kafka-prod" /> identifies a Kafka server connection. For more information, see Example: Connection Configurations. |
The following example adds business logic to the scaffolded flows:
-
LISTEN:listen-order-placedlistens for orders and, when triggered, uses a DataWeave expression to check for sufficient inventory. If enough items exist in the inventory, the flow configures a Publish operation to publish order data to theorder-confirmedchannel, which triggers theLISTEN:listen-order-confirmationsflow. If not, the flow adds a Publish operation to publish order data to aorder-backorderedchannel, which triggers theLISTEN:listen-order-backorderedflow. -
LISTEN:listen-order-confirmationslistens for order confirmations and, when triggered, sends order information to thenotification-flowsubflow, which sends confirmation notices through Slack and email (see Example: Notification Subflow).
<mule xmlns="http://www.mulesoft.org/schema/mule/core"
xmlns:apikit-asyncapi="http://www.mulesoft.org/schema/mule/apikit-asyncapi" xmlns:doc="http://www.mulesoft.org/schema/mule/documentation"
xmlns:ee="http://www.mulesoft.org/schema/mule/ee/core"
xmlns:http="http://www.mulesoft.org/schema/mule/http"
xmlns:xsi="http://www.w3.org/2001/XMLSchema-instance"
xsi:schemaLocation="http://www.mulesoft.org/schema/mule/core http://www.mulesoft.org/schema/mule/core/current/mule.xsd http://www.mulesoft.org/schema/mule/apikit-asyncapi http://www.mulesoft.org/schema/mule/apikit-asyncapi/current/mule-apikit-asyncapi.xsd http://www.mulesoft.org/schema/mule/kafka http://www.mulesoft.org/schema/mule/kafka/current/mule-kafka.xsd http://www.mulesoft.org/schema/mule/anypoint-mq http://www.mulesoft.org/schema/mule/anypoint-mq/current/mule-anypoint-mq.xsd  http://www.mulesoft.org/schema/mule/http http://www.mulesoft.org/schema/mule/http/current/mule-http.xsd  http://www.mulesoft.org/schema/mule/ee/core http://www.mulesoft.org/schema/mule/ee/core/current/mule-ee.xsd">
  <flow name="LISTEN:listen-order-placed">(1)
    <apikit-asyncapi:message-listener channelName="order-placed" config-ref="asyncapi-config" doc:name="Listen for new orders">
      <apikit-asyncapi:servers>
        <apikit-asyncapi:server value="AMQ-prod"></apikit-asyncapi:server>
      </apikit-asyncapi:servers>
    </apikit-asyncapi:message-listener>
    <logger level="INFO" message="#[payload]"></logger>
    <http:request config-ref="HTTP_Request_config" doc:id="nscwew"
    doc:name="check inventory" target="inventory" url="https://anypoint.mulesoft.com/mocking/api/v1/links/3a7158be-3edb-40d9-a776-71614fe490e9/inventory?ProductID=12345"></http:request>
    <choice doc:id="e61a19-cfc986" doc:name="If in stock">(2)
      <when doc:id="43efa6-eb5afe" doc:name="in stock" expression="#[vars.inventory.stockDetails.availableStock > payload.items.quantity[0]]">
        <http:request config-ref="HTTP_Request_config" doc:id="aa26a8-7a1ec5" doc:name="CreateOrder" target="status" url="https://anypoint.mulesoft.com/mocking/api/v1/links/d0d179d9-8a69-4227-ade1-626f1754404d/order"></http:request>
        <ee:transform doc:id="9c714a-117d59" doc:name="Prepare confirmation message">
          <ee:message>
            <ee:set-payload doc:id="166d40-4bf0b6" doc:name="Set payload">
              <![CDATA[%dw 2.0
                output application/json
                ---
                {
                  orderId : payload.orderId,
                  email : payload.email,
                }]]>
            </ee:set-payload>
          </ee:message>
        </ee:transform>
        <apikit-asyncapi:publish channelName="order-confirmed" config-ref="asyncapi-config" doc:id="oigqfw" doc:name="Order confirmation notification" serverName="AMQ-prod">
        </apikit-asyncapi:publish>
      </when>
      <otherwise doc:name="out of stock">
        <ee:transform doc:id="90dd99-c160de" doc:name="Prepare notification message">
          <ee:message>
            <ee:set-payload doc:id="f5aced-23fcf9" doc:name="Set payload">
              <![CDATA[%dw 2.0
            output application/json
            ---
            {
              orderId : payload.orderId,
              email : payload.email,
            }]]>
            </ee:set-payload>
          </ee:message>
        </ee:transform>
        <apikit-asyncapi:publish channelName="order-backordered" config-ref="asyncapi-config" doc:id="lsmcyo" doc:name="Out of stock notification" serverName="Kafka-prod"></apikit-asyncapi:publish>
      </otherwise>
    </choice>
  </flow>
  <flow name="LISTEN:listen-order-confirmations">(3)
    <apikit-asyncapi:message-listener channelName="order-confirmed" config-ref="asyncapi-config" doc:name="listen for order confirmation">
      <apikit-asyncapi:servers>
        <apikit-asyncapi:server value="AMQ-prod"></apikit-asyncapi:server>
      </apikit-asyncapi:servers>
    </apikit-asyncapi:message-listener>
    <logger level="INFO" message="#[payload]"></logger>
    <set-payload doc:id="28ace0-983314" doc:name="Set Payload"
                  value="#[
                    { 'orderId': payload.orderId,
                      'email': payload.email,
                      'subject': 'Order: ' ++ payload.orderId as String ++ ' is confirmed',
                      'emailmessage': 'We are pleased to let you know that your order: ' ++ payload.orderId as String ++ ' is confirmed. \nThank you for shopping with us.\n\nThrone of Games Corporation',
                      'slackmessage': ':mega: Please note that the order with OrderId ' ++ payload.orderId as String ++ ' has been confirmed.'
                    }
                  ]">
    </set-payload>
    <flow-ref name="notification-flow"></flow-ref>
  </flow>
  <flow name="LISTEN:listen-order-cancellations">
    <apikit-asyncapi:message-listener channelName="order-cancelled" config-ref="asyncapi-config">
      <apikit-asyncapi:servers>
        <apikit-asyncapi:server value="AMQ-prod"></apikit-asyncapi:server>
      </apikit-asyncapi:servers>
    </apikit-asyncapi:message-listener>
    <logger level="INFO" message="#[payload]"></logger>
  </flow>
  <flow name="LISTEN:listen-order-backordered">(4)
    <apikit-asyncapi:message-listener channelName="order-backordered" config-ref="asyncapi-config">
      <apikit-asyncapi:servers>
        <apikit-asyncapi:server value="Kafka-prod"></apikit-asyncapi:server>
      </apikit-asyncapi:servers>
    </apikit-asyncapi:message-listener>
    <logger level="INFO" message="#[payload]"></logger>
  </flow>
  <flow name="new-orders">
        <http:listener path="neworder" config-ref="HTTP_Listener_config" doc:name="listen for new orders" doc:id="nghrkl" allowedMethods="POST"/>
        <logger doc:name="Logger" doc:id="adydcs" />
  </flow>
</mule>| 1 | After the Message Listener in flow LISTEN:listen-order-placed is triggered by an order, an HTTP request operation (<http:request/>) requests and stores inventory data in the target variable inventory. |
| 2 | The Choice component (<choice/>) checks the availableStock value in the target variable (vars.inventory.stockDetails.availableStock) against a quantity value from the order payload (payload.items.quantity[0]). The quantity value comes from an OrderPlaced message that triggers the flow.
If sufficient stock is available, a Set Payload component ( |
| 3 | The Message Listener in flow LISTEN:listen-order-confirmations listens for activity on the Anypoint MQ channel order-confirmed. When triggered, the flow configures its <set-payload/> component to create an order confirmation message. The Flow Reference (<flow-ref/>) sends this message for processing within the notification-flow subflow. |
| 4 | The flow LISTEN:listen-order-backordered is triggered by LISTEN:listen-order-placed when inventory is insufficient. |
Example: Connection Configurations
The scaffolding process generates global-configs.xml for server connection configurations defined in the specification.
The connection configuration for the AsyncAPI module within <apikit-asyncapi:config/> references the connection configurations for Kafka and Anypoint MQ connectors. The scaffolding process adds the connectors to the project based on the server and channel configurations in the AsyncAPI specification.
-
In flows, Publish operations (
<apikit-asyncapi:publish/>) use the connection configurations when publishing to specified channel and server combinations. The flows publish to Kafka and Anypoint MQ channels onKafka-prodorAMQ-prodservers. -
In flows, Message Listener operations (
<apikit-asyncapi:message-listener/>) are automatically configured to listen on a specific channel based on a servervaluesetting (Kafka-prodorAMQ-prod). This value matches one of theserverKeysettings in the AsyncAPI connection configuration (<apikit-asyncapi:config/>).
<?xml version="1.0" encoding="UTF-8"?>
<mule xmlns="http://www.mulesoft.org/schema/mule/core"
      xmlns:anypoint-mq="http://www.mulesoft.org/schema/mule/anypoint-mq"
      xmlns:apikit-asyncapi="http://www.mulesoft.org/schema/mule/apikit-asyncapi"
      xmlns:doc="http://www.mulesoft.org/schema/mule/documentation"
      xmlns:kafka="http://www.mulesoft.org/schema/mule/kafka"
      xmlns:xsi="http://www.w3.org/2001/XMLSchema-instance"
      xsi:schemaLocation="http://www.mulesoft.org/schema/mule/core http://www.mulesoft.org/schema/mule/core/current/mule.xsd http://www.mulesoft.org/schema/mule/apikit-asyncapi http://www.mulesoft.org/schema/mule/apikit-asyncapi/current/mule-apikit-asyncapi.xsd http://www.mulesoft.org/schema/mule/kafka http://www.mulesoft.org/schema/mule/kafka/current/mule-kafka.xsd http://www.mulesoft.org/schema/mule/anypoint-mq http://www.mulesoft.org/schema/mule/anypoint-mq/current/mule-anypoint-mq.xsd">
  <kafka:producer-config name="Apache_Kafka_Producer_configuration_Kafka-prod">
    <kafka:producer-plaintext-connection>
      <kafka:bootstrap-servers>
        <kafka:bootstrap-server value="localhost:9092" />
      </kafka:bootstrap-servers>
    </kafka:producer-plaintext-connection>
  </kafka:producer-config>
  <kafka:consumer-config name="Apache_Kafka_Consumer_configuration_Kafka-prod">
    <kafka:consumer-plaintext-connection>
      <kafka:bootstrap-servers>
        <kafka:bootstrap-server value="localhost:9092" />
      </kafka:bootstrap-servers>
      <kafka:topic-patterns>
        <kafka:topic-pattern value="order-backordered" />
      </kafka:topic-patterns>
    </kafka:consumer-plaintext-connection>
  </kafka:consumer-config>
  <anypoint-mq:config name="Anypoint_MQ_configuration_AMQ-prod">
    <anypoint-mq:connection clientId="${anypointmq.server.AMQ-prod.clientAppId}" clientSecret="${anypointmq.server.AMQ-prod.clientSecret}" url="https://mq-us-east-1.stgx.anypoint.mulesoft.com/api/v1/organizations/8dbc2756-83d6-4a1c-91c4-6eafbe7d7ae0/environments/49cbf562-fed4-4b42-bce9-98fe8f7bcf60" />
  </anypoint-mq:config>
  <configuration-properties file="${env}-properties.properties" />
  <global-property name="env" value="dev" />
  <apikit-asyncapi:config name="asyncapi-config" apiDefinition="${api.path}">
    <apikit-asyncapi:kafka-configs>
      <apikit-asyncapi:kafka-config serverKey="Kafka-prod" producerConfigRef="Apache_Kafka_Producer_configuration_Kafka-prod" consumerConfigRef="Apache_Kafka_Consumer_configuration_Kafka-prod" />
    </apikit-asyncapi:kafka-configs>
    <apikit-asyncapi:anypoint-mq-configs>
      <apikit-asyncapi:anypoint-mq-config serverKey="AMQ-prod" configRef="Anypoint_MQ_configuration_AMQ-prod" />
    </apikit-asyncapi:anypoint-mq-configs>
  </apikit-asyncapi:config>
</mule>
When adding business logic to your scaffolded project, you can add other connection configurations to global-configs.xml, including any connector operations you add to your flows or subflows in the application. The following example adds connection configurations for HTTP, Email, and Slack connector operations. You can define configuration properties for these, such as ${email.password} in a properties file.
<!-- additional connection configuration examples -->
  <http:request-config name="HTTP_Request_config" basePath="path" > (1)
    <http:request-connection protocol="HTTP" host="example.com" />
  </http:request-config>

  <http:listener-config name="HTTP_Listener_config" > (2)
    <http:listener-connection host="0.0.0.0" port="8081" />
  </http:listener-config>

  <email:smtp-config name="Email_SMTP"> (3)
    <email:smtps-connection host="smtp.gmail.com" password="${email.password}" user="${email.username}">
      <tls:context>
        <tls:trust-store insecure="true"></tls:trust-store>
      </tls:context>
    </email:smtps-connection>
  </email:smtp-config>

  <slack:config name="Slack_Config"> (4)
    <slack:token-connection token="${slack.token}" />
</slack:config>| 1 | HTTP Request connection configuration example |
| 2 | HTTP Listener connection configuration example |
| 3 | Email SMTP connection configuration example |
| 4 | Slack connection configuration example |
Example: Configuration Properties File
Anypoint Code Builder generates a dev-properties.properties file in the src/main/resources directory of your implementation project.
The specification example defines server settings for an Anypoint MQ broker. To listen for and publish messages to an Anypoint MQ queue, you must supply a clientAppId and clientSecret for an MQ client app. The associated api-path setting is generated automatically during the scaffolding process.
#Fri Jun 07 09:32:50 PDT 2024
anypointmq.server.AMQ-prod.clientAppId=
anypointmq.server.AMQ-prod.clientSecret=
api.path=resource\:\:e21dd38b-8231-45bf-aaa7-abde2072d538\:my-asyncapi-example\:1.0.0\:evented-api\:zip\:anypointmq-kafka-orders-demo-final.yaml
You can add additional properties to this file. The email and slack examples are for Email and Slack connector operations in the notifications subflow.
#Fri Jun 07 17:05:33 PDT 2024
anypointmq.server.AMQ-prod.clientAppId=my_client_app_id_here
anypointmq.server.AMQ-prod.clientSecret=my_client_app_secret_here
slack.token=my_slack_token_here
email.host=smtp.gmail.com
email.username=me@gmail.com
email.password=my_gmail_password_here
api.path=resource\:\:8dbc2756-83d6-4a1c-91c4-6eafbe7d7ae0\:async-amq-kafka-orders\:1.0.2\:evented-api\:zip\:anypointmq-kafka-orders-demo-compliant.yaml
For help with configuration properties, including secure properties for passwords and other sensitive data, see Defining and Securing Properties for a Mule Application.
Example: Notification Subflow
The subflow (<sub-flow/>) in notifications.xml implements the business logic for sending order confirmation messages by email and Slack. This file isn’t generated by the scaffolder.
When triggered by the Flow Reference component (<flow-ref/>) in the LISTEN:listen-order-confirmations flow, the notifications subflow sends order confirmation messages.
<?xml version="1.0" encoding="UTF-8"?>
<mule xmlns="http://www.mulesoft.org/schema/mule/core" xmlns:doc="http://www.mulesoft.org/schema/mule/documentation"
  xmlns:xsi="http://www.w3.org/2001/XMLSchema-instance"
	xmlns:slack="http://www.mulesoft.org/schema/mule/slack"
	xmlns:email="http://www.mulesoft.org/schema/mule/email"
	xmlns:ee="http://www.mulesoft.org/schema/mule/ee/core"
  xsi:schemaLocation="http://www.mulesoft.org/schema/mule/core http://www.mulesoft.org/schema/mule/core/current/mule.xsd
	http://www.mulesoft.org/schema/mule/slack http://www.mulesoft.org/schema/mule/slack/current/mule-slack.xsd
	http://www.mulesoft.org/schema/mule/email http://www.mulesoft.org/schema/mule/email/current/mule-email.xsd
	http://www.mulesoft.org/schema/mule/ee/core http://www.mulesoft.org/schema/mule/ee/core/current/mule-ee.xsd">
  <sub-flow name="notification-flow">
        <logger doc:name="Logger" doc:id="pdclup" />
        <ee:transform doc:name="extract variables" doc:id="14b208-1ae908">(1)
          <ee:variables>
            <ee:set-variable variableName="emailmsg">
                <![CDATA[%dw 2.0 output application/java --- payload.emailmessage]]>
            </ee:set-variable>
            <ee:set-variable variableName="slackmsg">
                <![CDATA[%dw 2.0 output application/java --- payload.slackmessage]]>
            </ee:set-variable>
            <ee:set-variable variableName="email">
                <![CDATA[%dw 2.0 output application/java --- payload.email]]>
            </ee:set-variable>
            <ee:set-variable variableName="subject">
                <![CDATA[%dw 2.0 output application/java --- payload.subject]]>
            </ee:set-variable>
            </ee:variables>
        </ee:transform>
      <slack:post-message channel="order-status" config-ref="Slack_Config" doc:id="305e92-9dc173" doc:name="Send order notification to slack">(2)
        <slack:message>
          <![CDATA[#[vars.slackmsg]]]>
        </slack:message>
      </slack:post-message>
      <email:send config-ref="Email_SMTP" doc:id="7dd748-b67d3d" doc:name="Send notification email" fromAddress="#[vars.email]" subject="#[vars.subject]">(3)
        <email:to-addresses>
          <email:to-address value="#[vars.email]"></email:to-address>
        </email:to-addresses>
        <email:body contentType="text/plain">
          <email:content>
            <![CDATA[#[vars.emailmsg]]]>
          </email:content>
        </email:body>
      </email:send>
      <logger doc:id="hyxybs" doc:name="Logger"></logger>
    </sub-flow>
</mule>
| 1 | Transforms payload output from the LISTEN:listen-order-confirmations flow into Mule variables that capture confirmation message data |
| 2 | Posts the Slack confirmation message by using the <slack:post-message/>`* operation from Slack Connector |
| 3 | Emails the confirmation message by using the <email:send/> operation from Email Connector |