Configuring and Using Queues
A queue is a temporary storage area for a message. You can create queues, FIFO queues, and dead-letter queues in Anypoint Platform. You can also send and receive messages from a queue in Anypoint Studio.
Using Anypoint MQ, you can create two types of queues:
-
Standard queue
These queues don’t guarantee a specific message order. Standard queues are the best fit for applications in which messages must be delivered quickly.
Anypoint MQ supports up to 120,000 in-flight messages per standard queue.
Standard queues provide "at least once" message-delivery reliability. Due to the highly distributed architecture, Anypoint MQ occasionally delivers messages more than once.
You can enable failover for standard queues. For information, see Configuring Cross-Region Failover for Standard Queues.
-
FIFO (first in, first out) queue
These queues ensure that your messages arrive in order. FIFO queues are the best fit for applications requiring strict message ordering and exactly-once delivery, but in which message delivery speed is of less importance. See FIFO Queues.
Anypoint MQ supports 10 in-flight messages per message group in a FIFO queue. Anypoint MQ doesn’t limit the number of message groups in a FIFO queue.
FIFO queues provide "exactly once" message-delivery reliability. Anypoint MQ delivers each message to only one consumer.
You can assign either standard or FIFO queue type as a dead-letter queue (DLQ). See Dead Letter Queues.
Standard queues can be bound to a message exchange, enabling you to send messages to multiple queues.
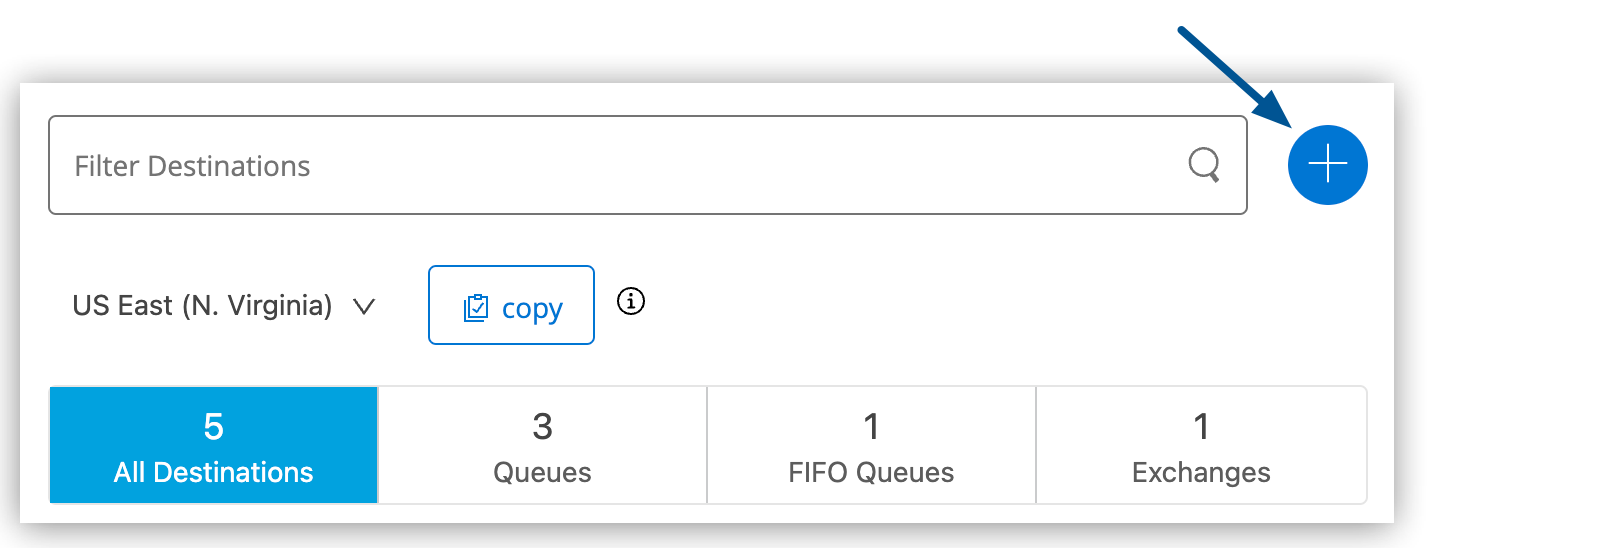
You can filter queues by type in the Destinations page:

Before You Begin
Before using Anypoint MQ, you must create an environment and give users Anypoint MQ access permissions. See Setting Up the Environment and Access Permissions.
Create a Queue
To create a standard queue or FIFO queue:
-
Sign in to Anypoint Platform and click MQ in the navigation menu.
-
Click Destinations.
-
Click the Add icon to display the menu:
-
Select Queue or FIFO Queue.
For Exchange, see Sending Messages to Multiple Queues Using Message Exchanges.
-
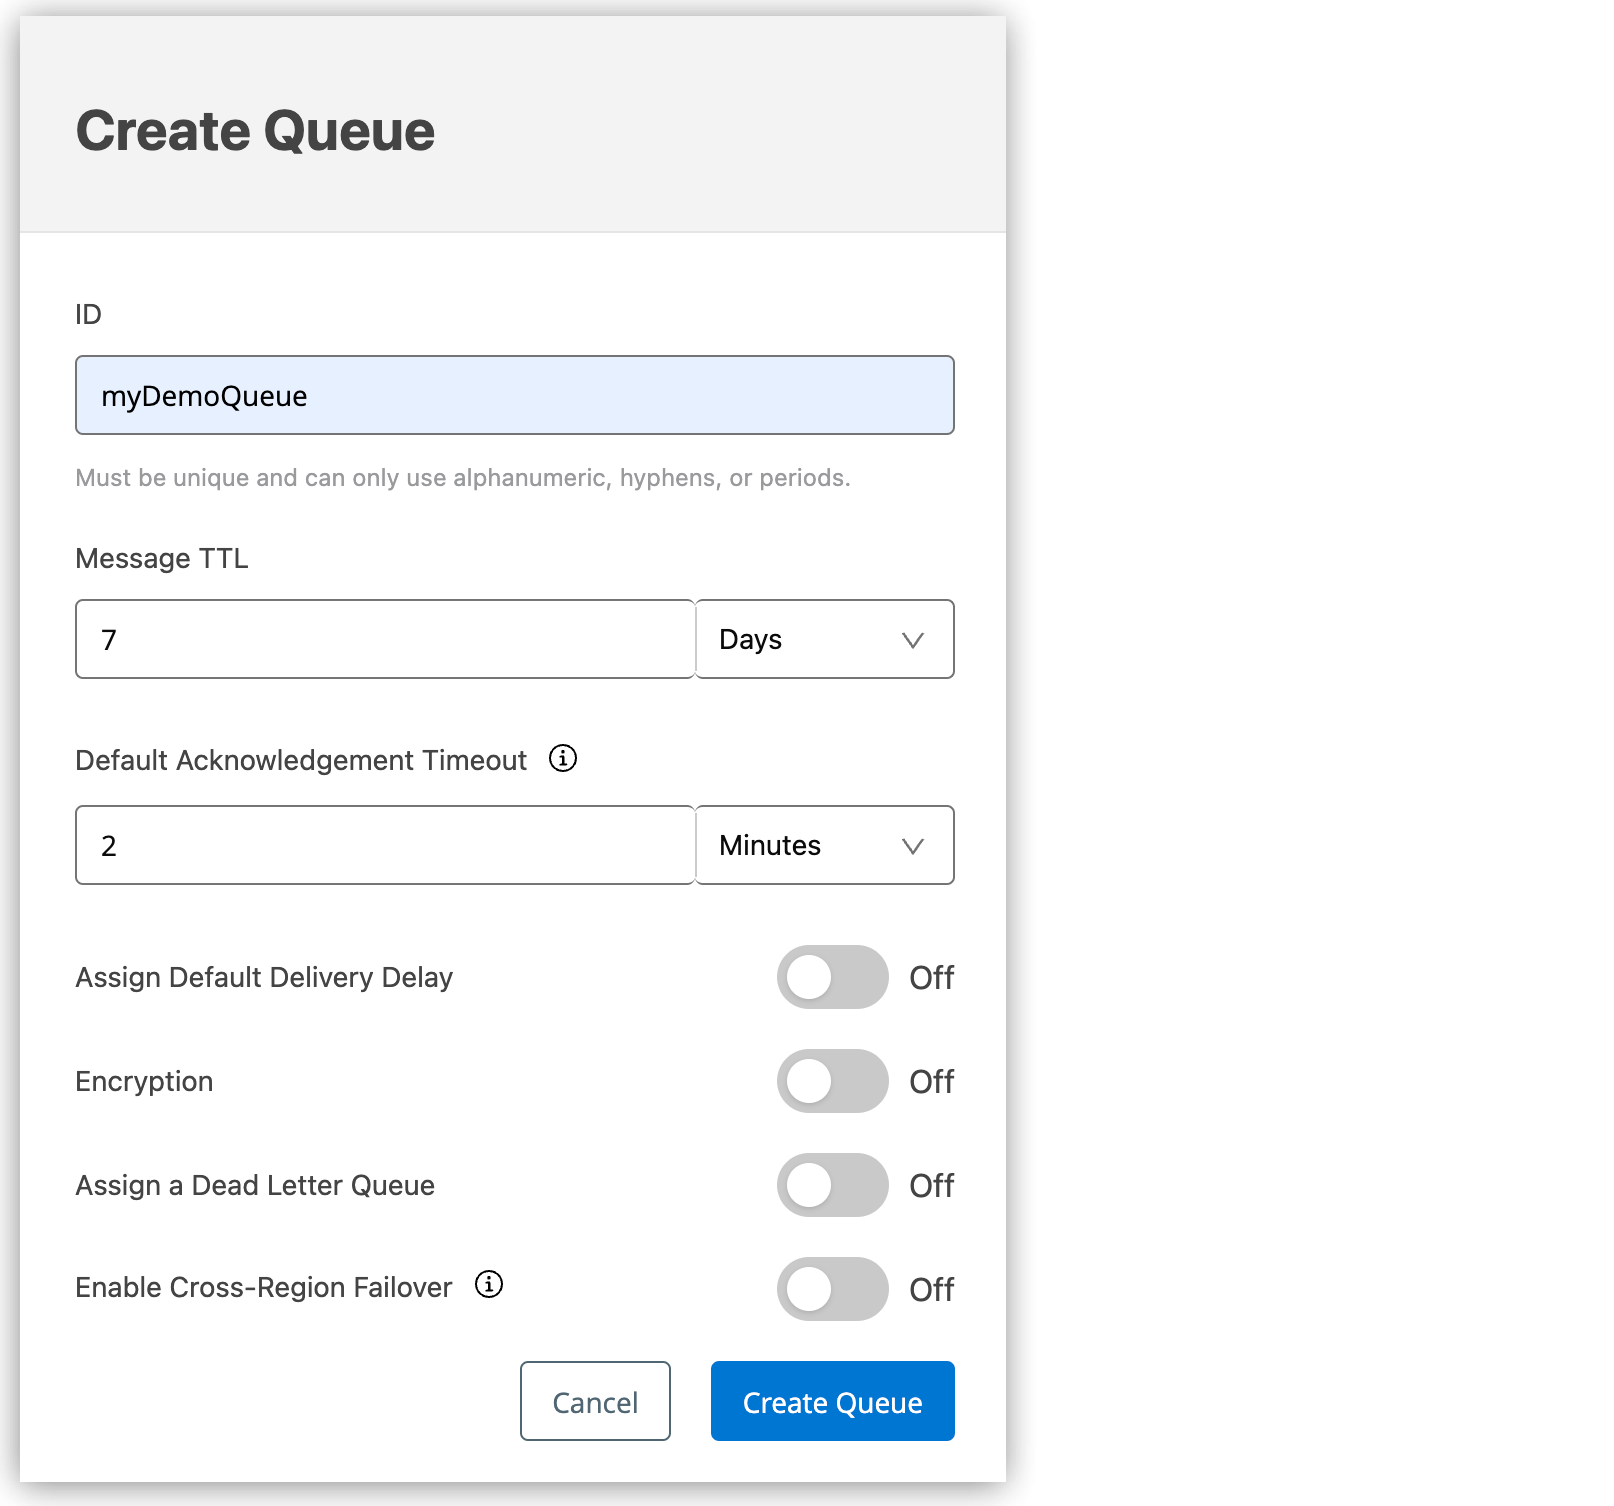
Complete the fields in Create Queue or Create FIFO Queue:
-
ID specifies the queue name.
Queue names can contain up to 127 alphanumeric (a-z, A-Z, 0-9) and punctuation (. -) characters. They can’t contain spaces or other characters.
-
Message TTL (time-to-live) specifies how long unprocessed messages persist before being deleted.
The maximum TTL for a message is two weeks.
If you change the message TTL for a queue, the new TTL value applies to any messages in the queue and all new messages added to the queue.
-
Default Acknowledgment Timeout specifies how long a message waits before being put back into the queue in the event of server failure when the message is not acknowledged.
The lock makes the message unavailable to other apps while locked, but does not block other messages from being read.
The maximum acknowledgement timeout is 12 hours.
For FIFO queues, set the timeout to a smaller value to prevent unacknowledged messages from blocking delivery of other messages in the queue. -
Assign Default Delivery Delay specifies how long to delay delivery for messages sent to the queue.
The minimum delivery delay for a message is 0 seconds. The maximum is 15 minutes. When you send a message, you can override the default delivery delay. See Delay Queue.
-
Encryption encrypts all messages in the queue.
See Encrypted Queue.
Use encrypted queues for enhanced security.
-
Assign a Dead Letter Queue assigns the DLQ.
The DLQ is a previously created queue to which to send undeliverable messages. See Dead Letter Queues.
-
Enable Cross-Region Failover creates a fallback queue in the fallback region. See Configuring Cross-Region Failover for Standard Queues.
-
-
Click Create Queue.
Anypoint MQ creates the queue in the Destinations page and displays the queue information in the details pane:
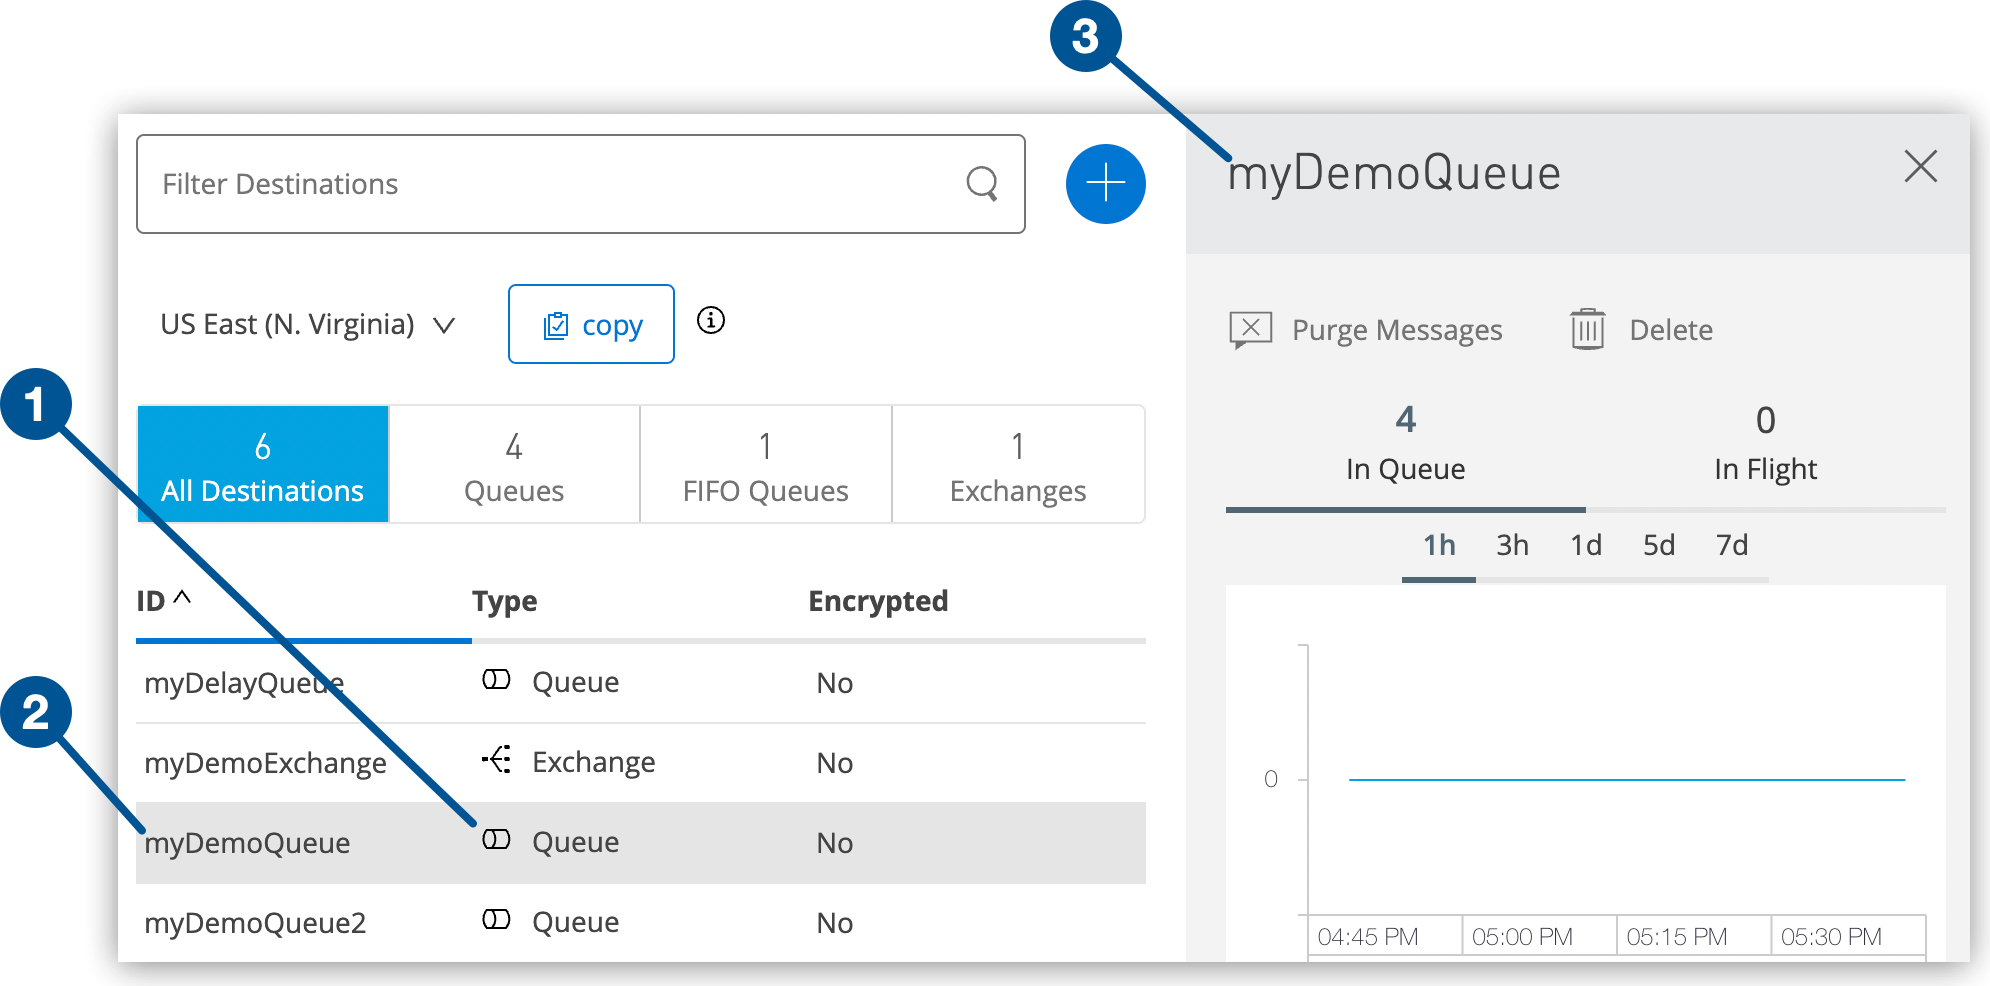
1 Queue type displays the queue details pane. 2 Queue ID displays the Queue Settings page. 3 Queue details label displays the Queue Settings page.
Send a Message to a Queue
Message content can be text, CSV (comma-separated values), or JSON. The maximum size of a message is 10 MB.
If the payload contains any format except text (such as CSV, HTML, JSON, and XML), Anypoint MQ converts it to a string before sending, which increases the payload size.
This conversion might result in the payload exceeding the maximum payload size of 10 MB and causing a Payload too large error.
To send a text message to a queue:
-
Select Anypoint Platform > MQ > Destinations.
-
Click the queue ID.
-
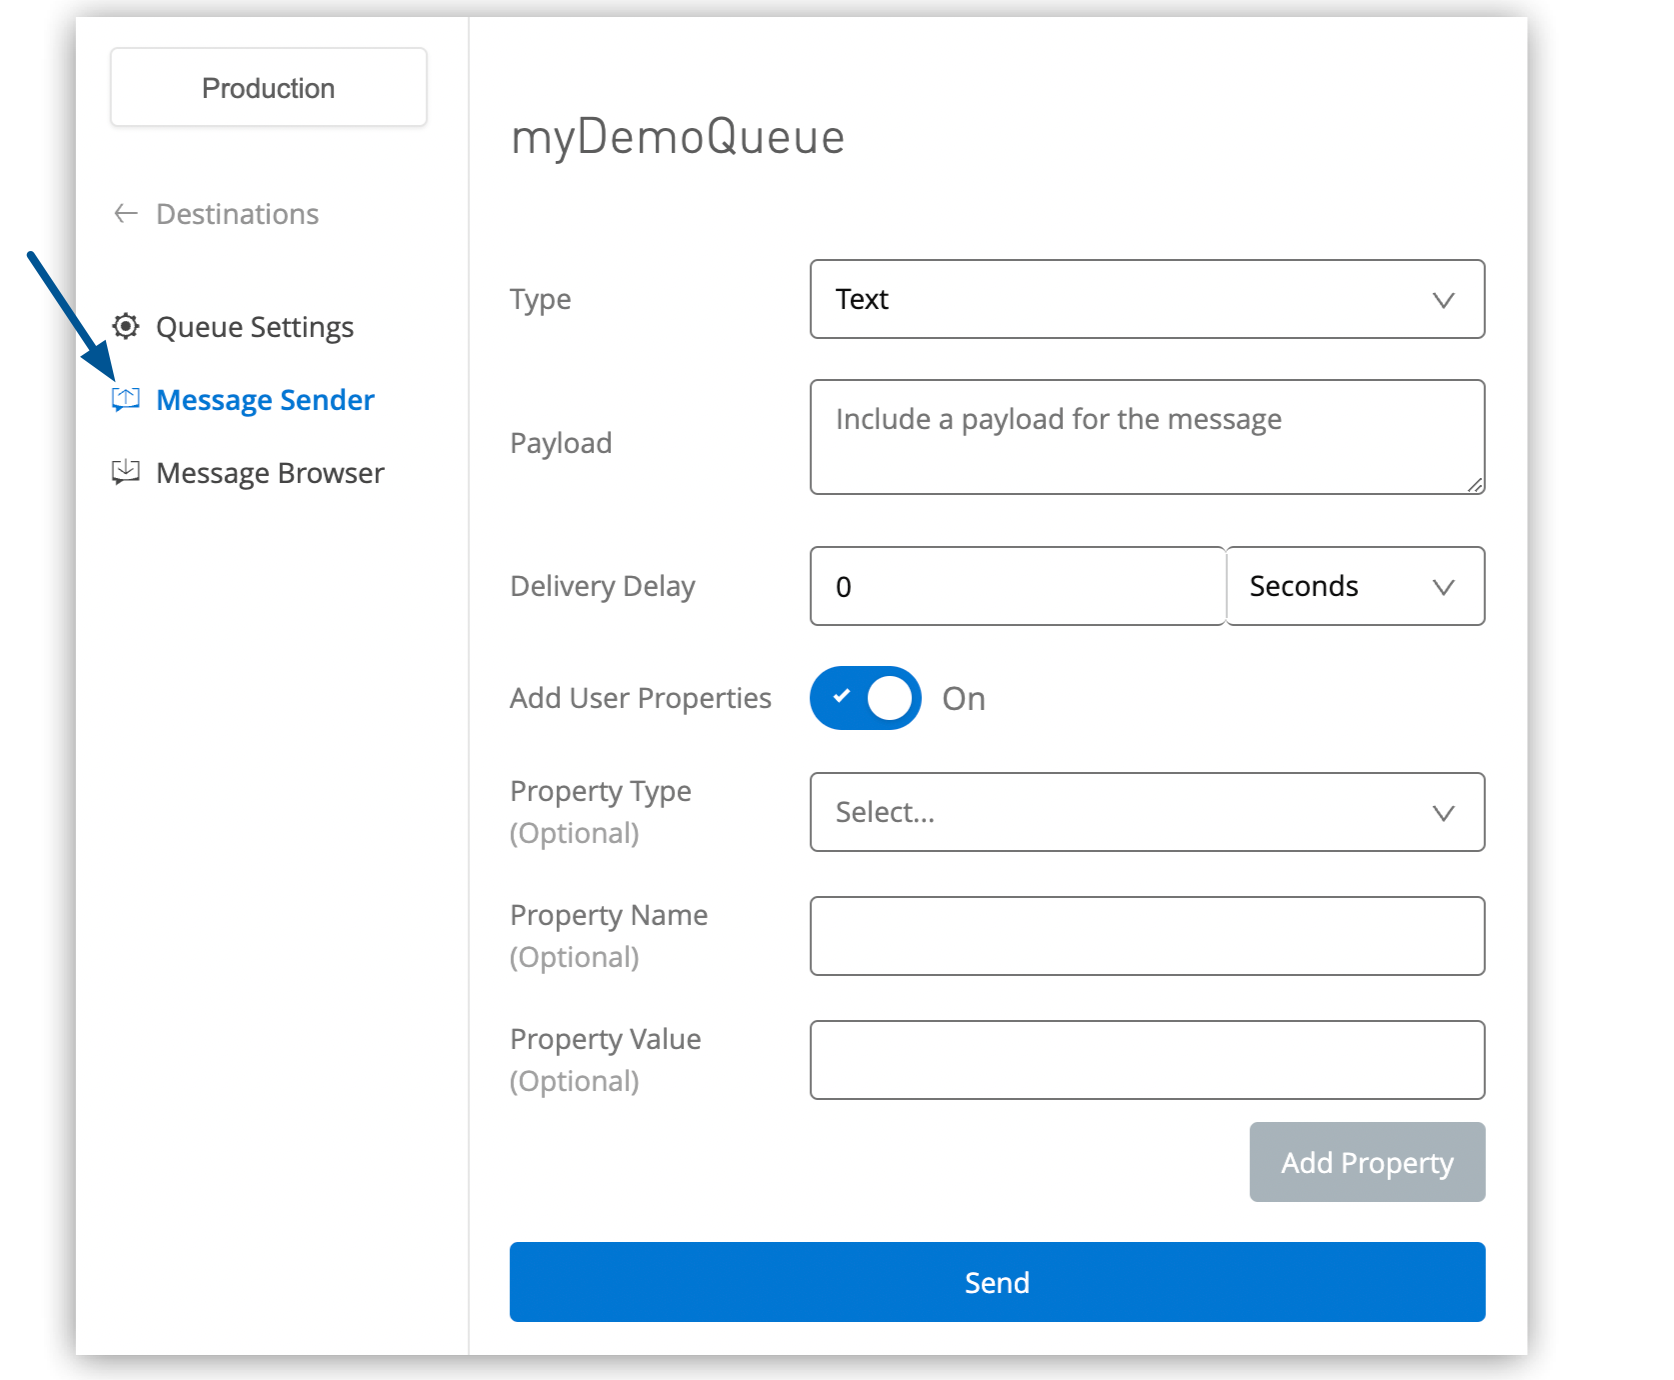
Click the Message Sender navigation menu:
-
Type is Text, CSV, or JSON.
See also Send a CSV Message to a Queue and Send a JSON Message to a Queue.
-
Payload contains the message payload text, such as
Hello Mules!. -
Delivery Delay (standard queue only) indicates the time to delay the message delivery (optional).
If you specified Assign Default Delivery Delay on the standard queue, you see the default delivery delay. You can override that value for this message or set a delivery delay for a message in a queue without delivery delay.
Delayed delivery is not supported for individual messages in a FIFO queue.
-
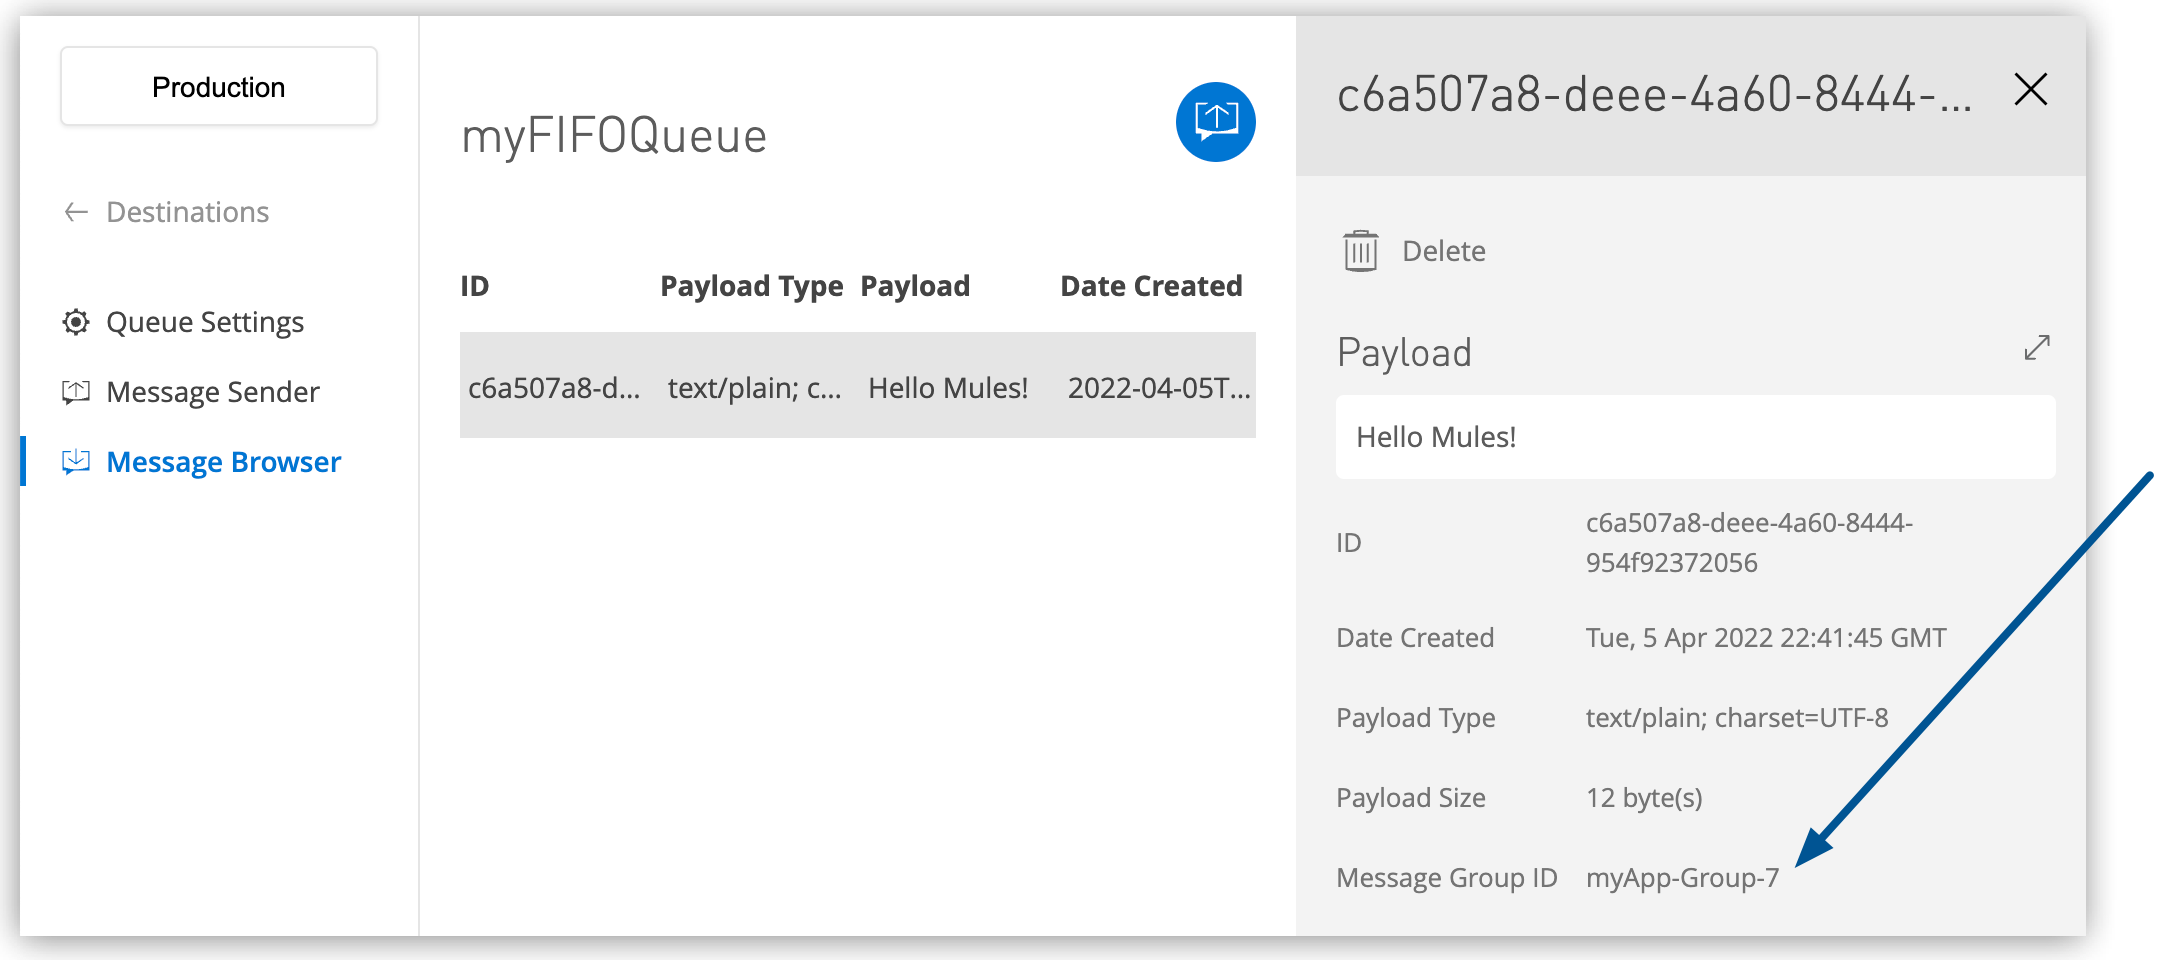
Message Group ID (FIFO queue only) specifies the group to which the message belongs.
To preserve message order for an app, you might want to create a message group for each application to send messages:
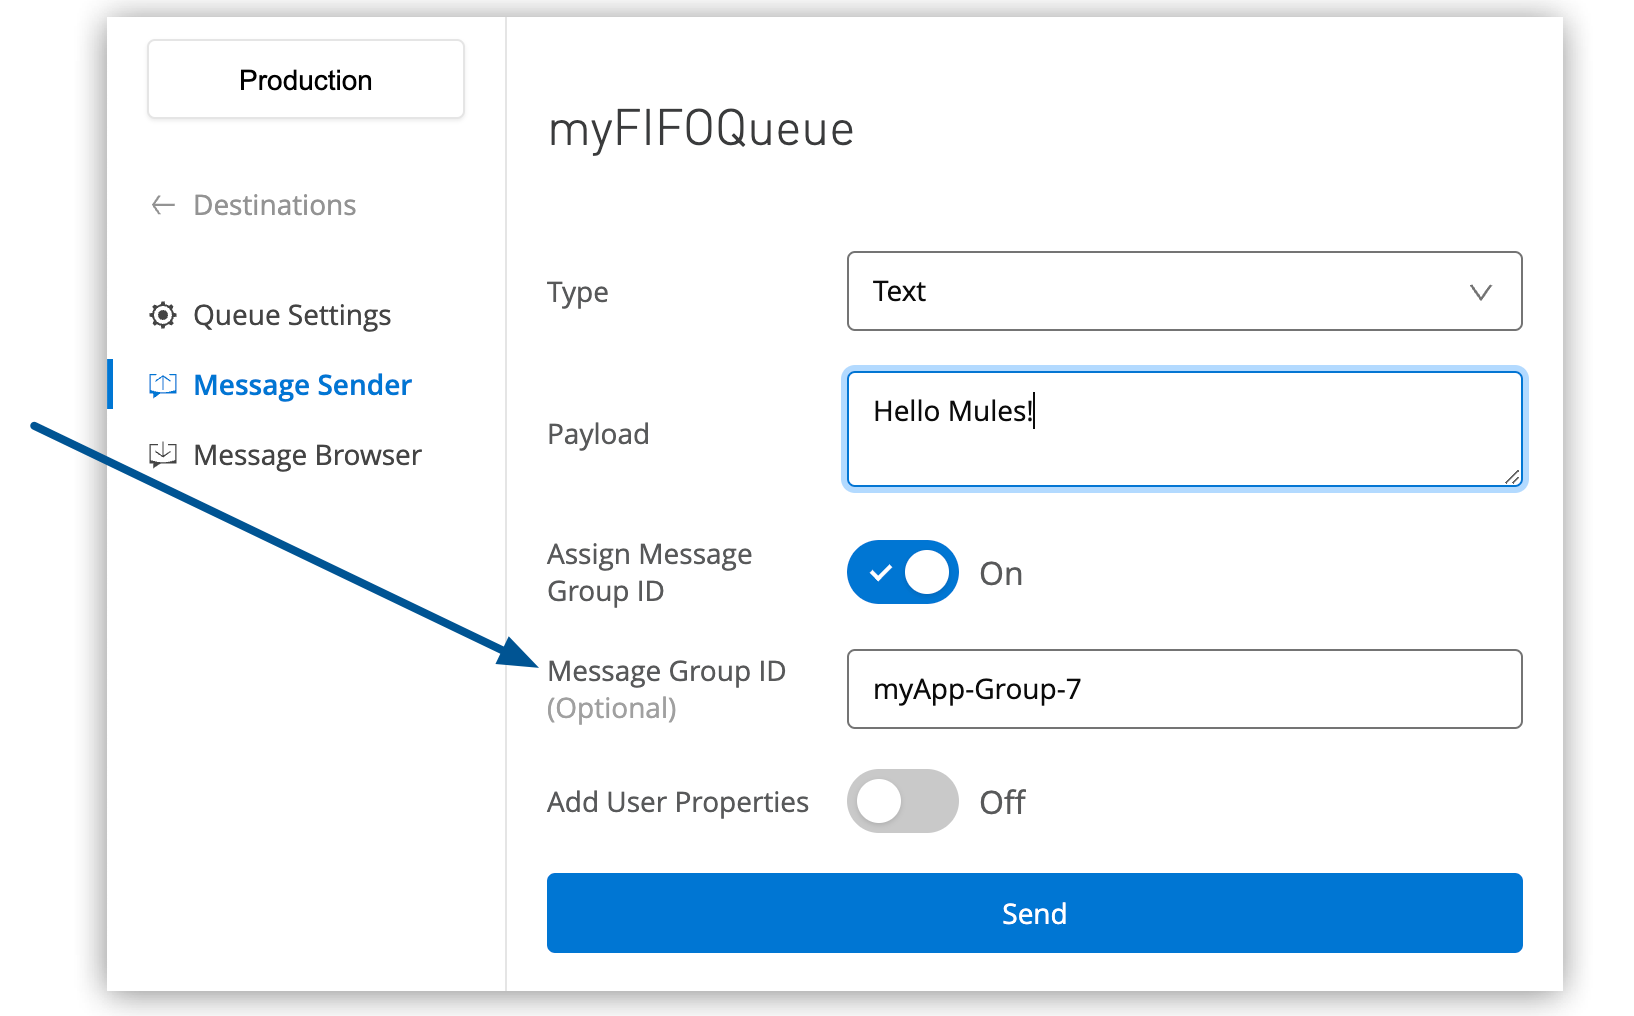
Message group IDs can contain up to 128 alphanumeric (a-z, A-Z, 0-9) and punctuation (! " # $ % & ' ( ) * + , - . / : ; < = > ? @ [ ] \ ^ _ ` { } \| ~) characters.
-
Add User Properties configures user properties to send with the message.
Toggle Add User Properties, specify the property name-value pairs to send, and click Add Property:
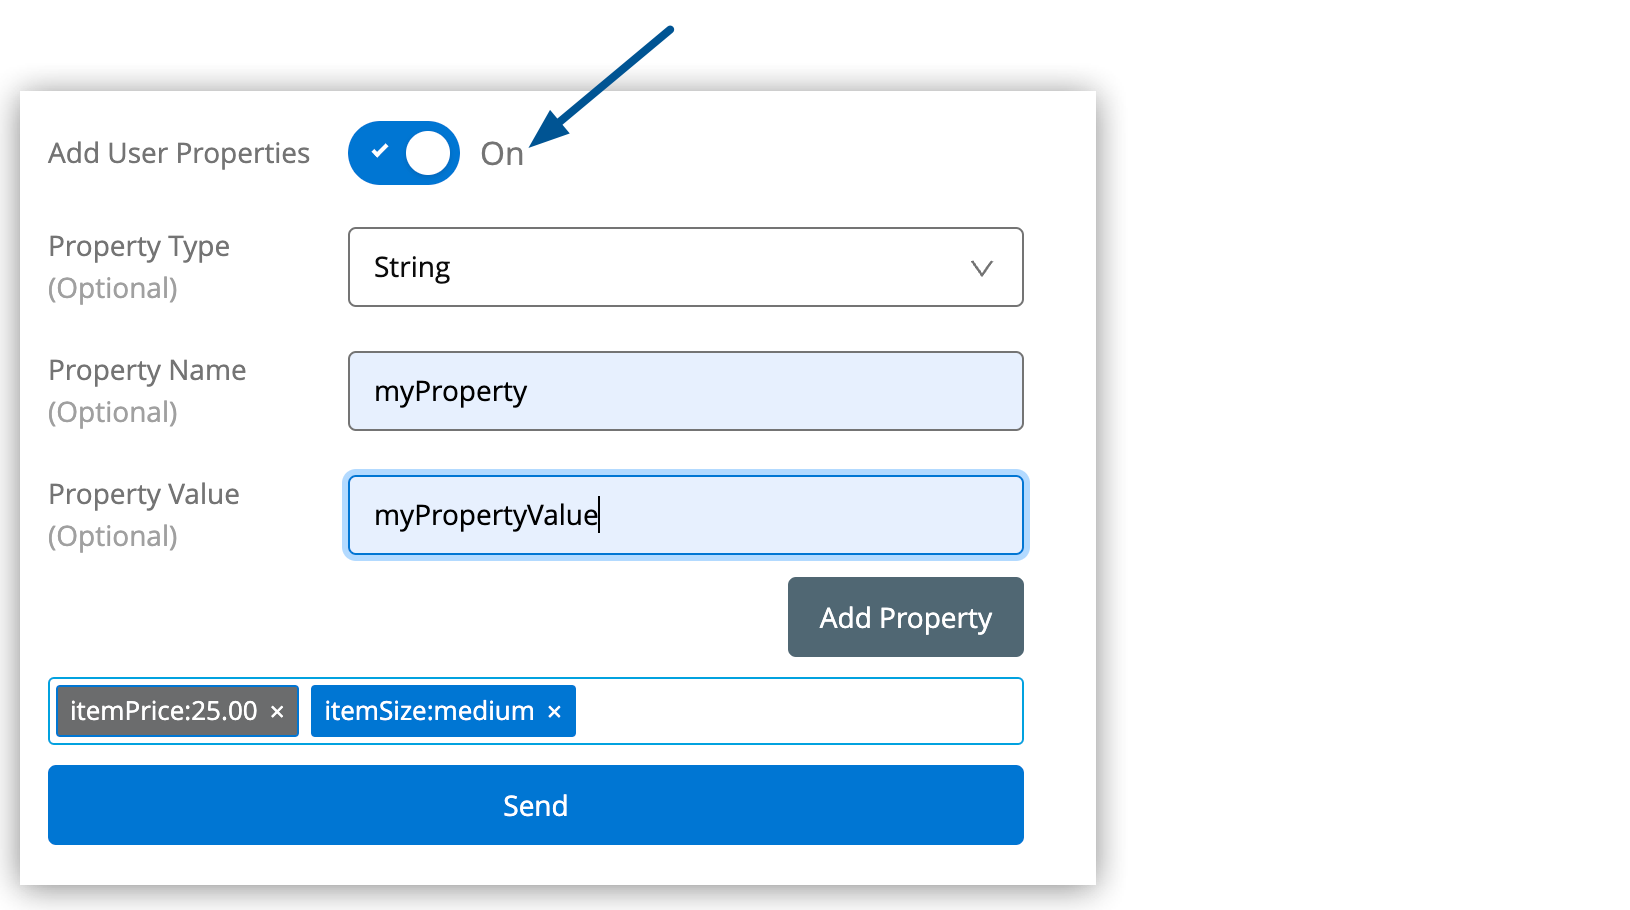
The Message Sender page shows added string properties in blue and number properties in gray.
-
-
Click Send.
View the Number of Messages in a Queue
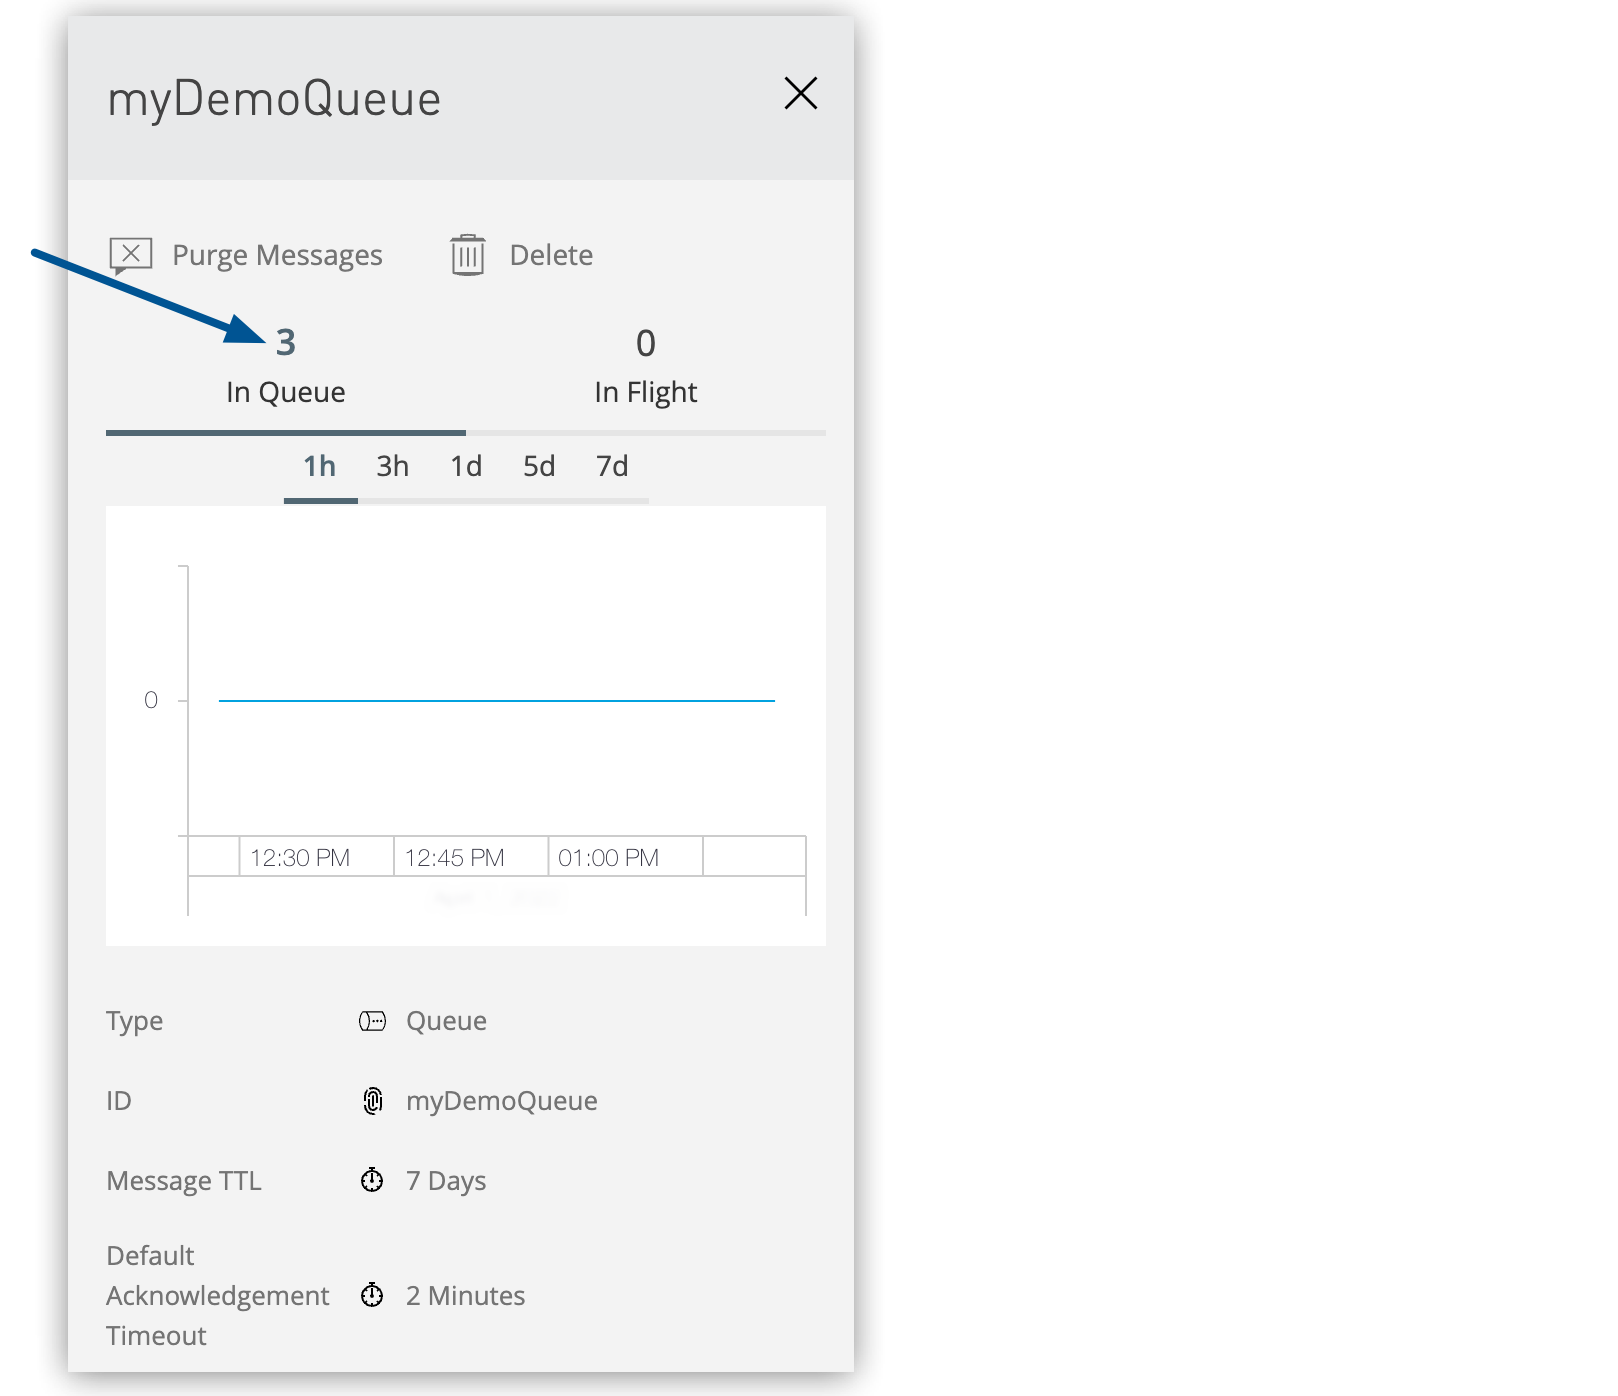
You can verify that a message arrived in the queue by viewing the number of messages in the queue from the Destinations page.
To see the number the messages in the queue:
-
Select Anypoint Platform > MQ > Destinations.
-
Click the queue type to display its details, including the number of messages in the queue:
Get a Message from a Queue
You can verify that a message arrived by retrieving it from the queue.
To get a message from a queue:
-
Select Anypoint Platform > MQ > Destinations.
-
Click the queue ID.
-
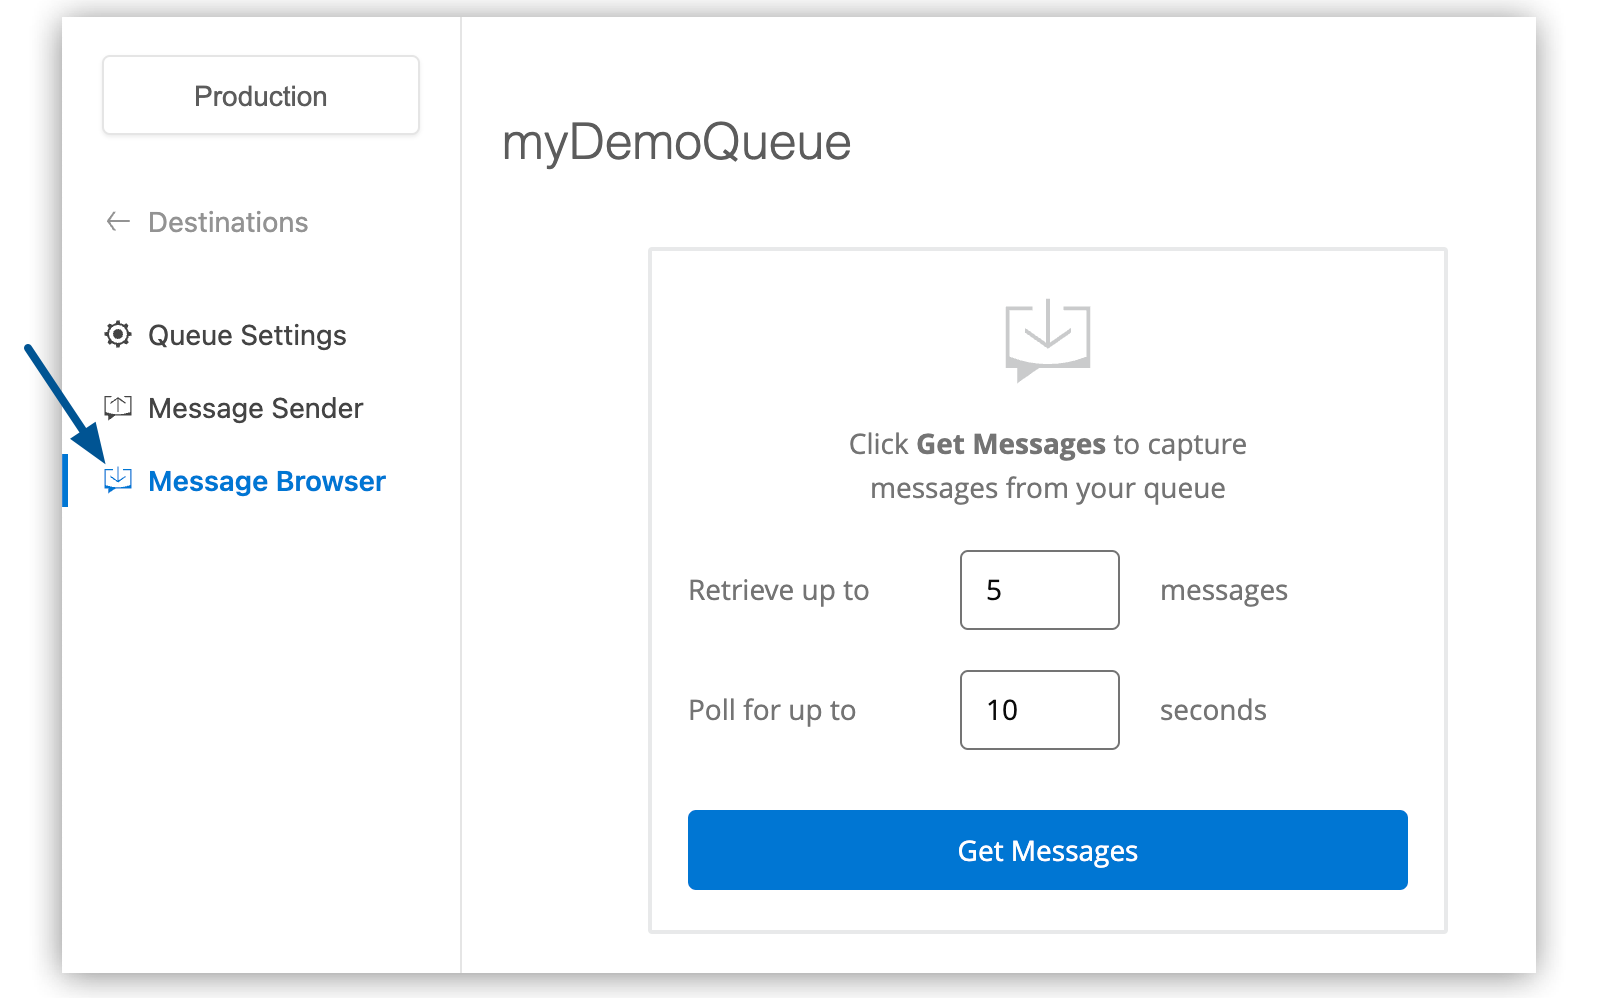
Click the Message Browser navigation menu:
-
Specify the number of messages (1-500) to retrieve and the time to poll (1-3600 seconds).
The specified number is the minimum number of messages to retrieve.
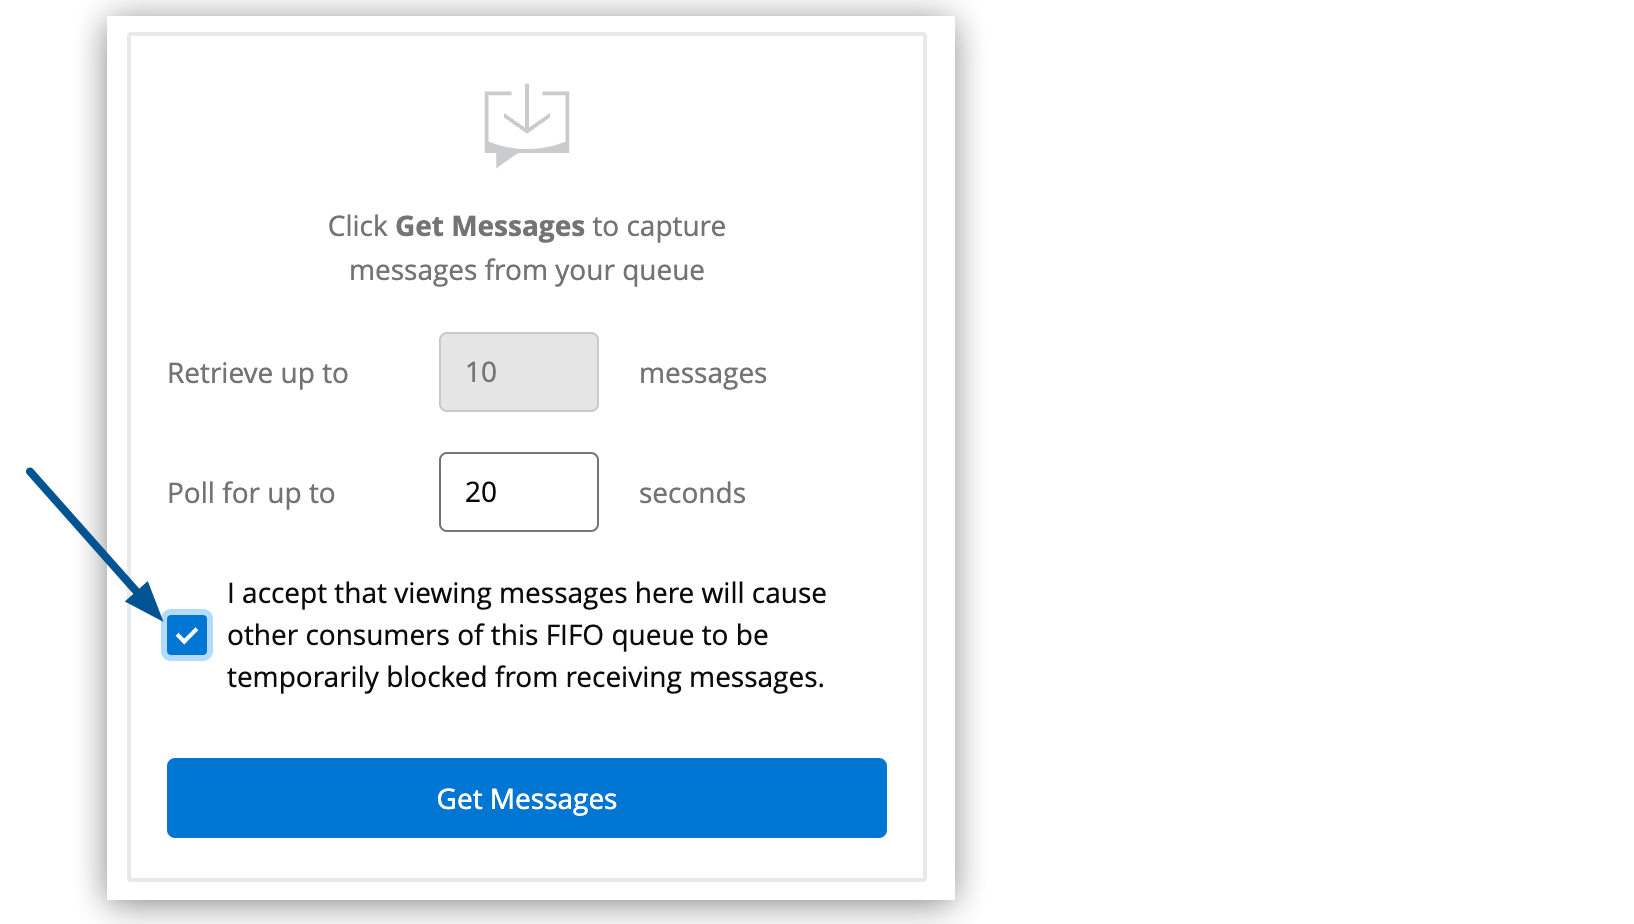
For a FIFO queue, the Message Browser UI limits the number of messages you can retrieve to 10.
-
If you are retrieving messages from a FIFO queue, select the checkbox to acknowledge that viewing messages through the browser might cause other consumers of the queue to be blocked from accessing messages in the queue:
-
Click Get Messages.
-
Click the message row to view the message payload in the details pane:
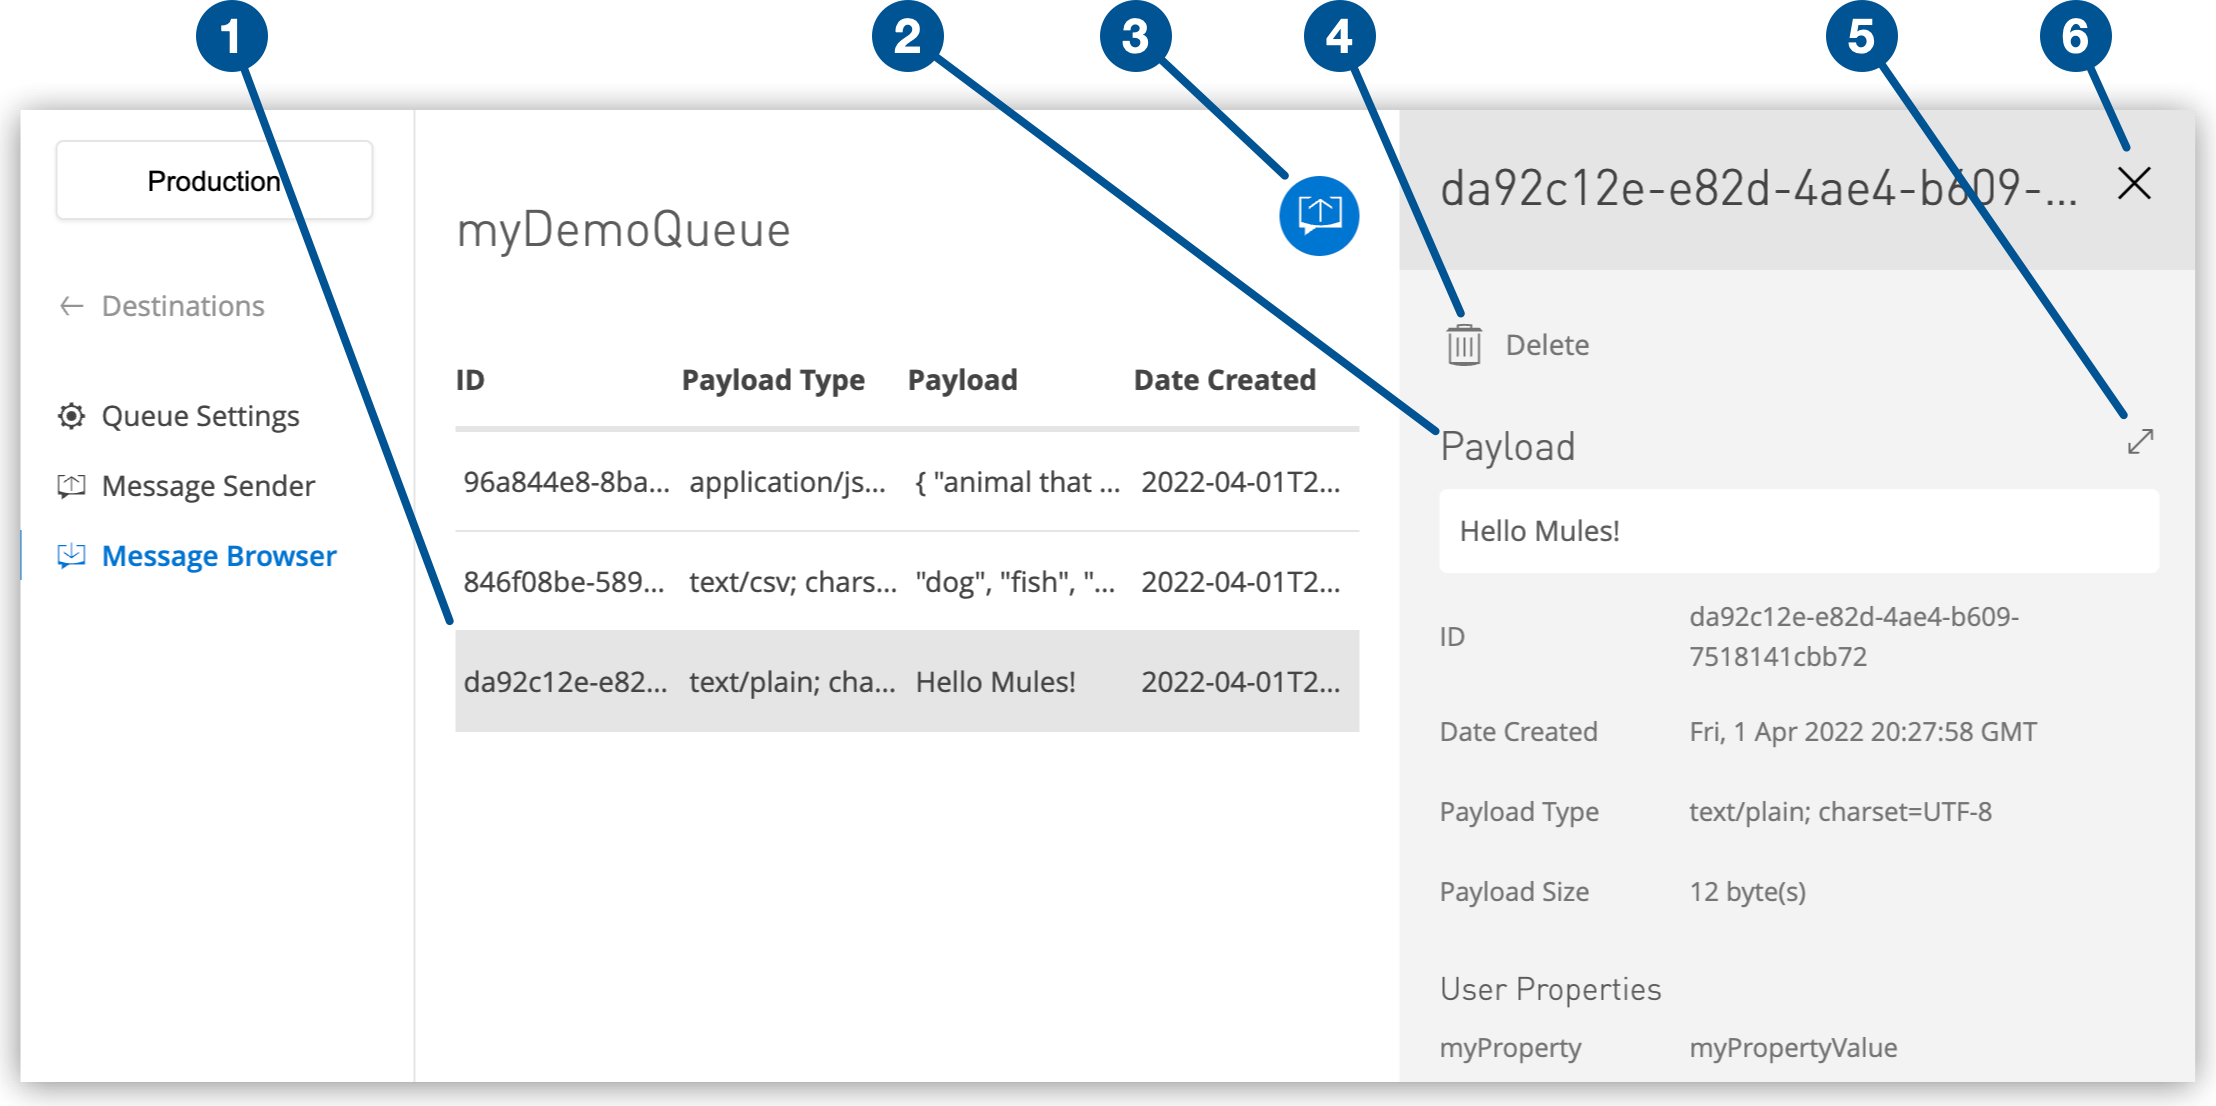
1 Selected message. 2 Message payload in the details pane. 3 Return Messages icon returns all messages to the queue (for example, to enable other applications to read the messages). Returning messages to the queue is a not-acknowledgment operation (NACK). The messages aren’t altered. However, the TTL value you set when you created the queue determines how long the message is available before Anypoint MQ deletes it.
If you leave the Message Browser page, messages automatically return to the queue.
4 Delete icon. Deleting a message is an acknowledgment operation (ACK). For information about how Anypoint MQ processes ACK messages, see ACK and NACK Operations.
5 Full Screen icon displays the message payload in a separate window. 6 Close icon closes the details pane.
+
If the Message Browser displays Message can’t be deleted when you delete a message, the message time-to-live (TTL) has expired.
+
| Payloads larger than one MB don’t appear in the Message Browser. You can retrieve them with the Anypoint Broker API. See Retrieve a Message. |
+ If user properties are configured in the Message Sender page or as part of the Publish operation in Anypoint MQ Connector, they appear in the details pane for the message:
+ image::mq-msg-browser-user-props.png["Message Browser details pane showing user properties"]
Send a CSV Message to a Queue
To send a CSV message to a queue:
-
Select Anypoint Platform > MQ > Destinations.
-
Click the queue ID.
-
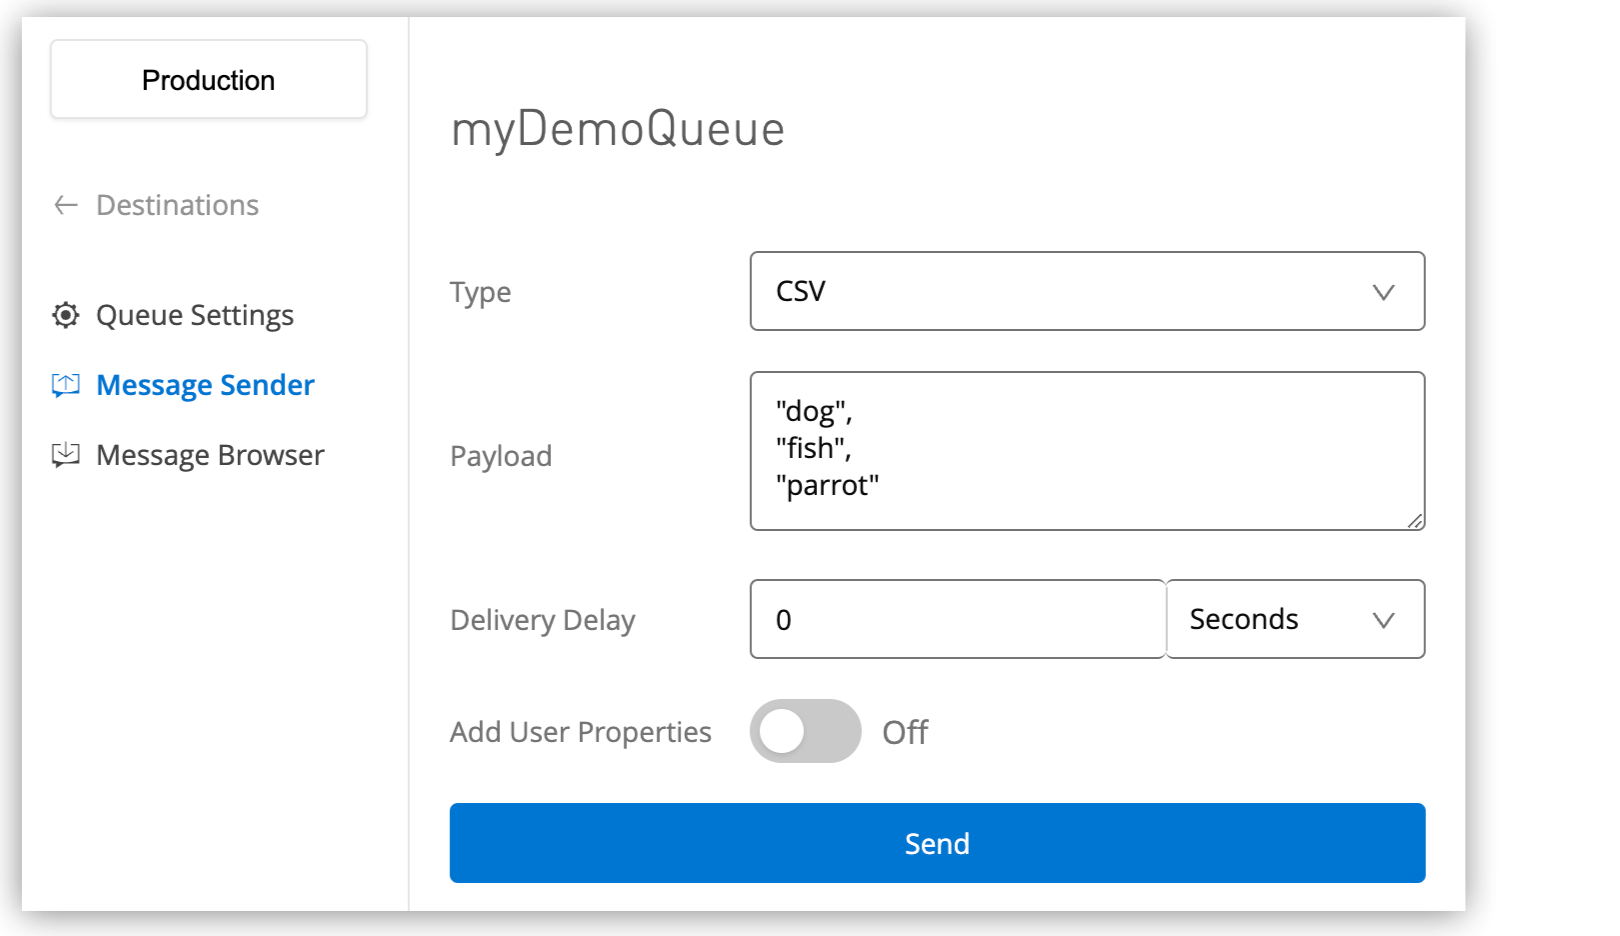
Click the Message Sender navigation menu:
-
Set the Type to CSV.
-
In the Payload field, enter this text:
"dog",
"fish",
"parrot"
For Delivery Delay (standard queue only) and Message Group ID (FIFO queue only), see Send a Message to a Queue.
-
Click Send.
-
Click Message Browser, and then click Get Messages.
-
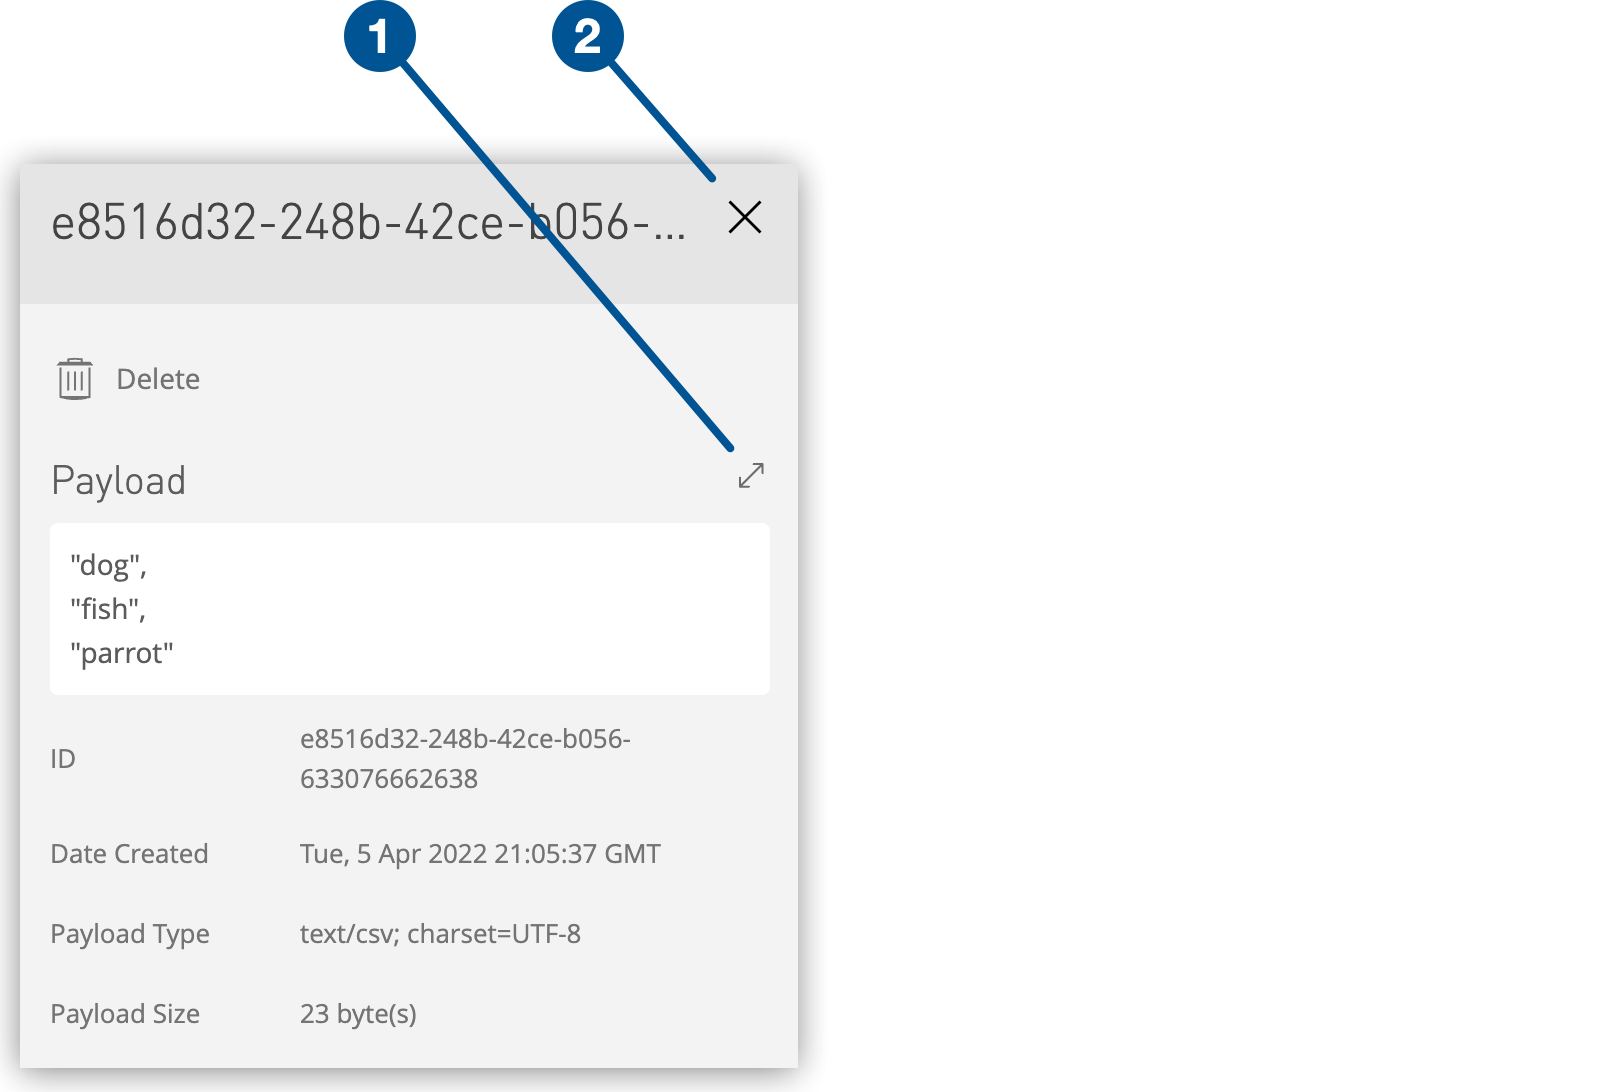
Click the message row to view the message payload in the details pane:
Payloads larger than one MB don’t appear in the Message Browser. You can retrieve them with the Anypoint Broker API. See Retrieve a Message.
Send a JSON Message to a Queue
To send a JSON message to a queue:
-
Select Anypoint Platform > MQ > Destinations.
-
Click the queue ID.
-
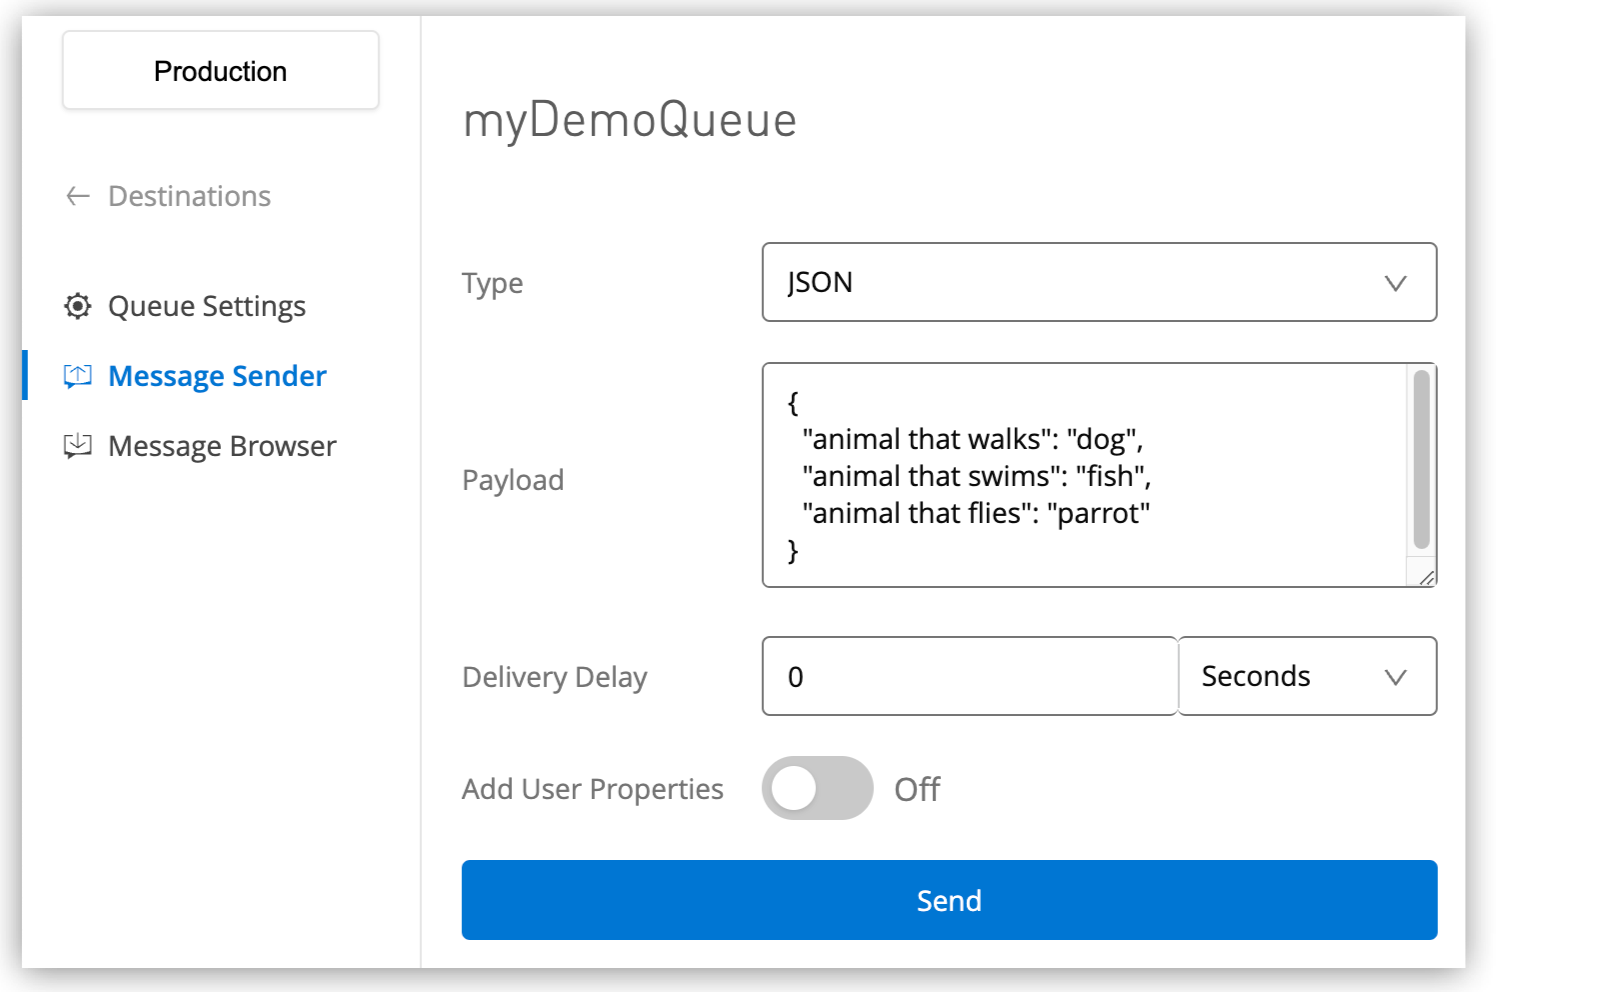
Click the Message Sender navigation menu:
-
Set the Type to JSON.
-
In the Payload field, enter this text:
{
  "animal that walks": "dog",
  "animal that swims": "fish",
  "animal that flies": "parrot"
}
For Delivery Delay (standard queue only) and Message Group ID (FIFO queue only), see Send a Message to a Queue.
-
Click Send.
-
Click Message Browser, and then click Get Messages.
-
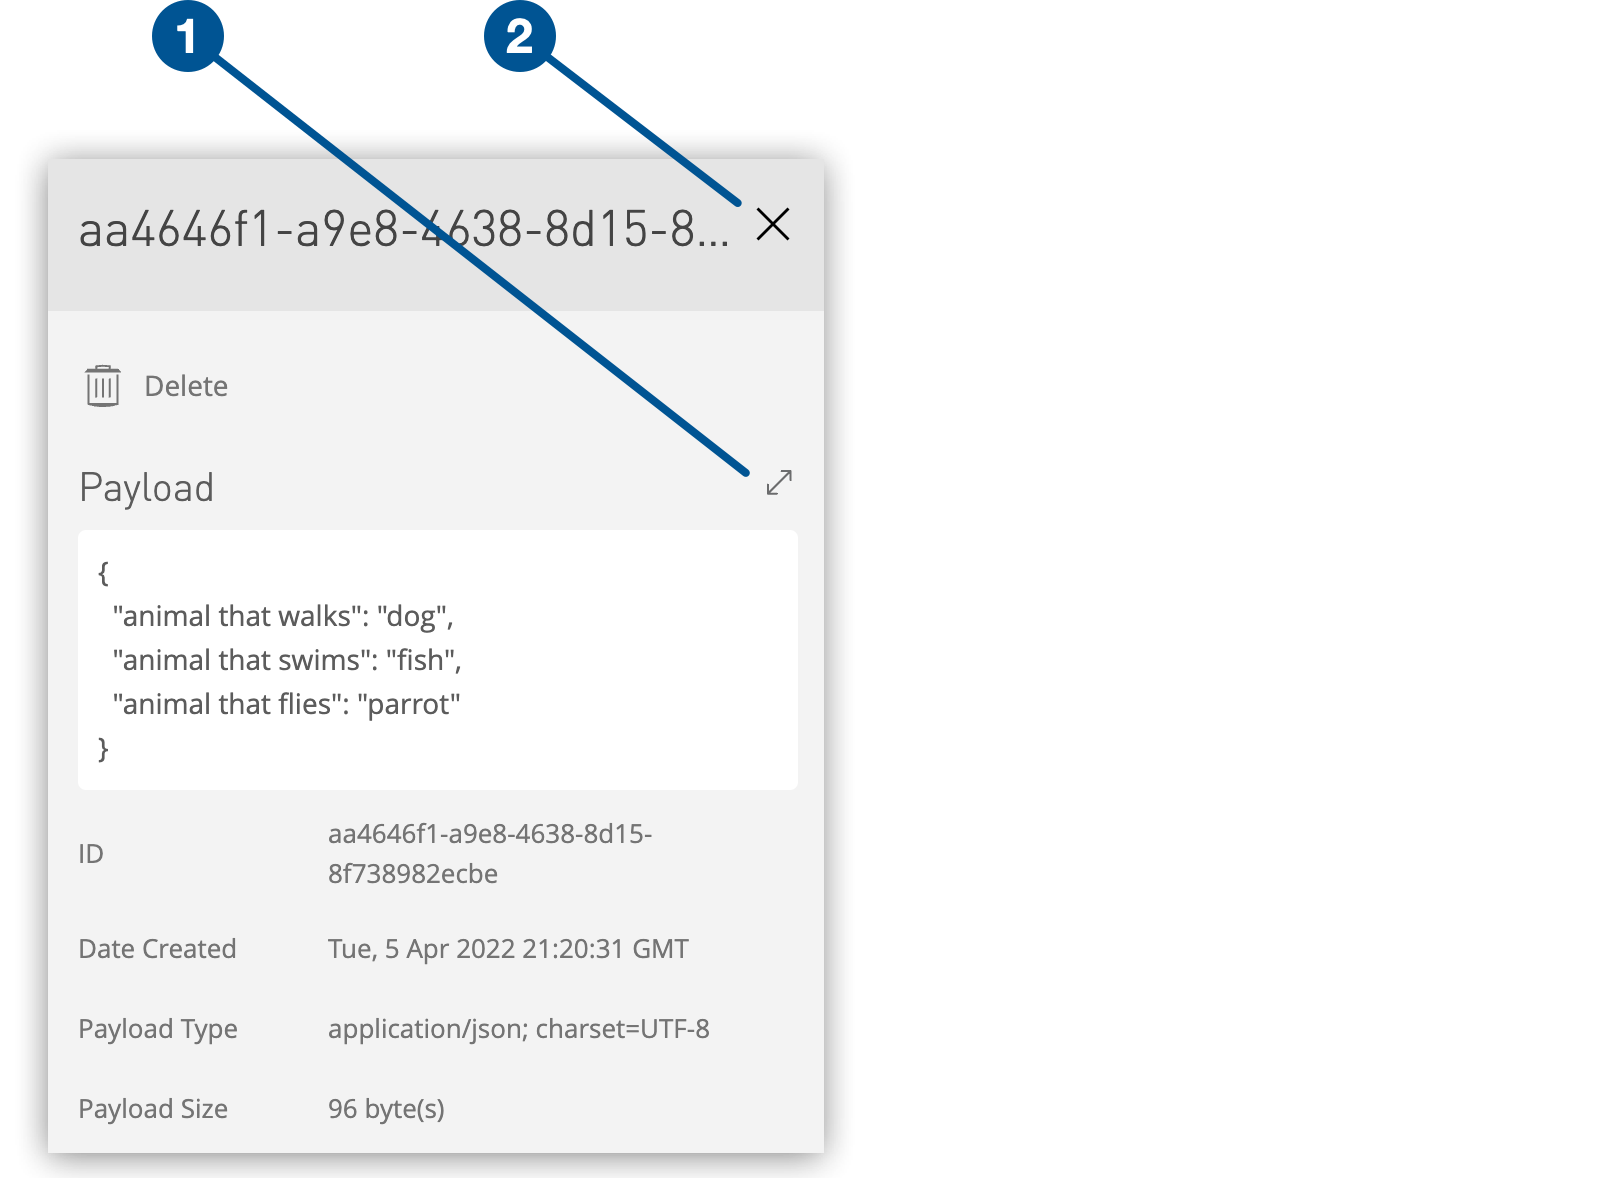
Click the message row to view the message payload in the details pane:
Payloads larger than one MB don’t appear in the Message Browser. You can retrieve them with the Anypoint Broker API. See Retrieve a Message.
Purge Messages from a Queue
To purge all the messages in the queue:
-
Select Anypoint Platform > MQ > Destinations.
-
Click the queue type to display its details.
-
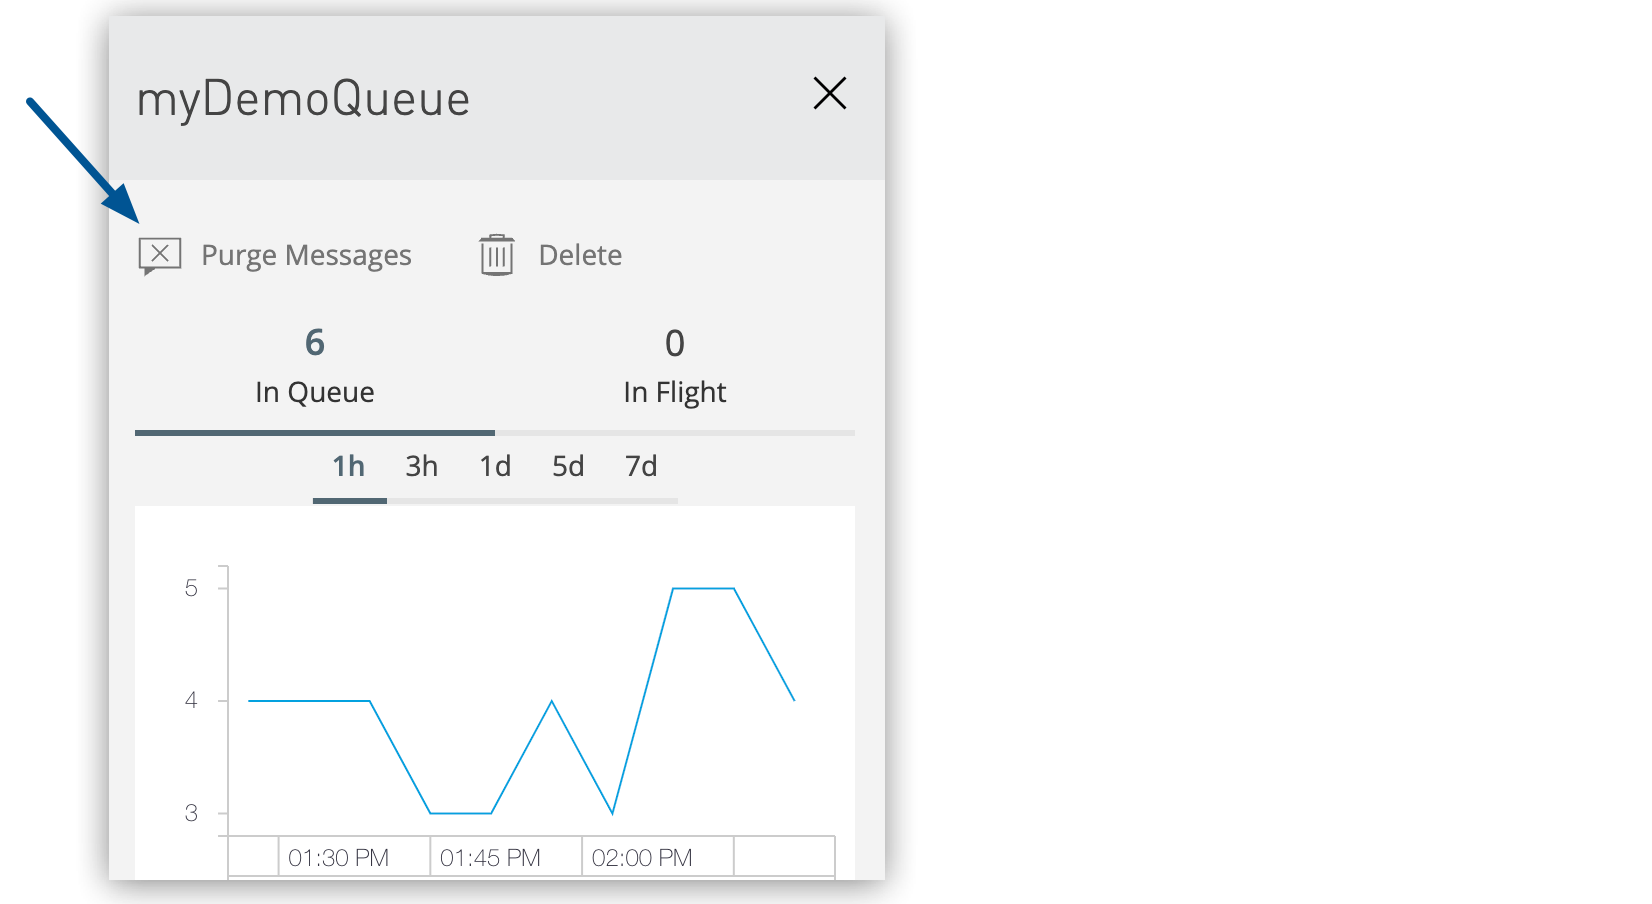
Click the Purge Messages icon in the details pane:
-
In the Purge Messages confirmation box, select the checkbox and click Delete Messages to verify that you want to purge all messages in the queue.
Change Settings for a Queue
Changing any setting for an existing queue affects only new messages. The new value doesn’t apply to messages that are already in the queue.
-
Select Anypoint Platform > MQ > Destinations.
-
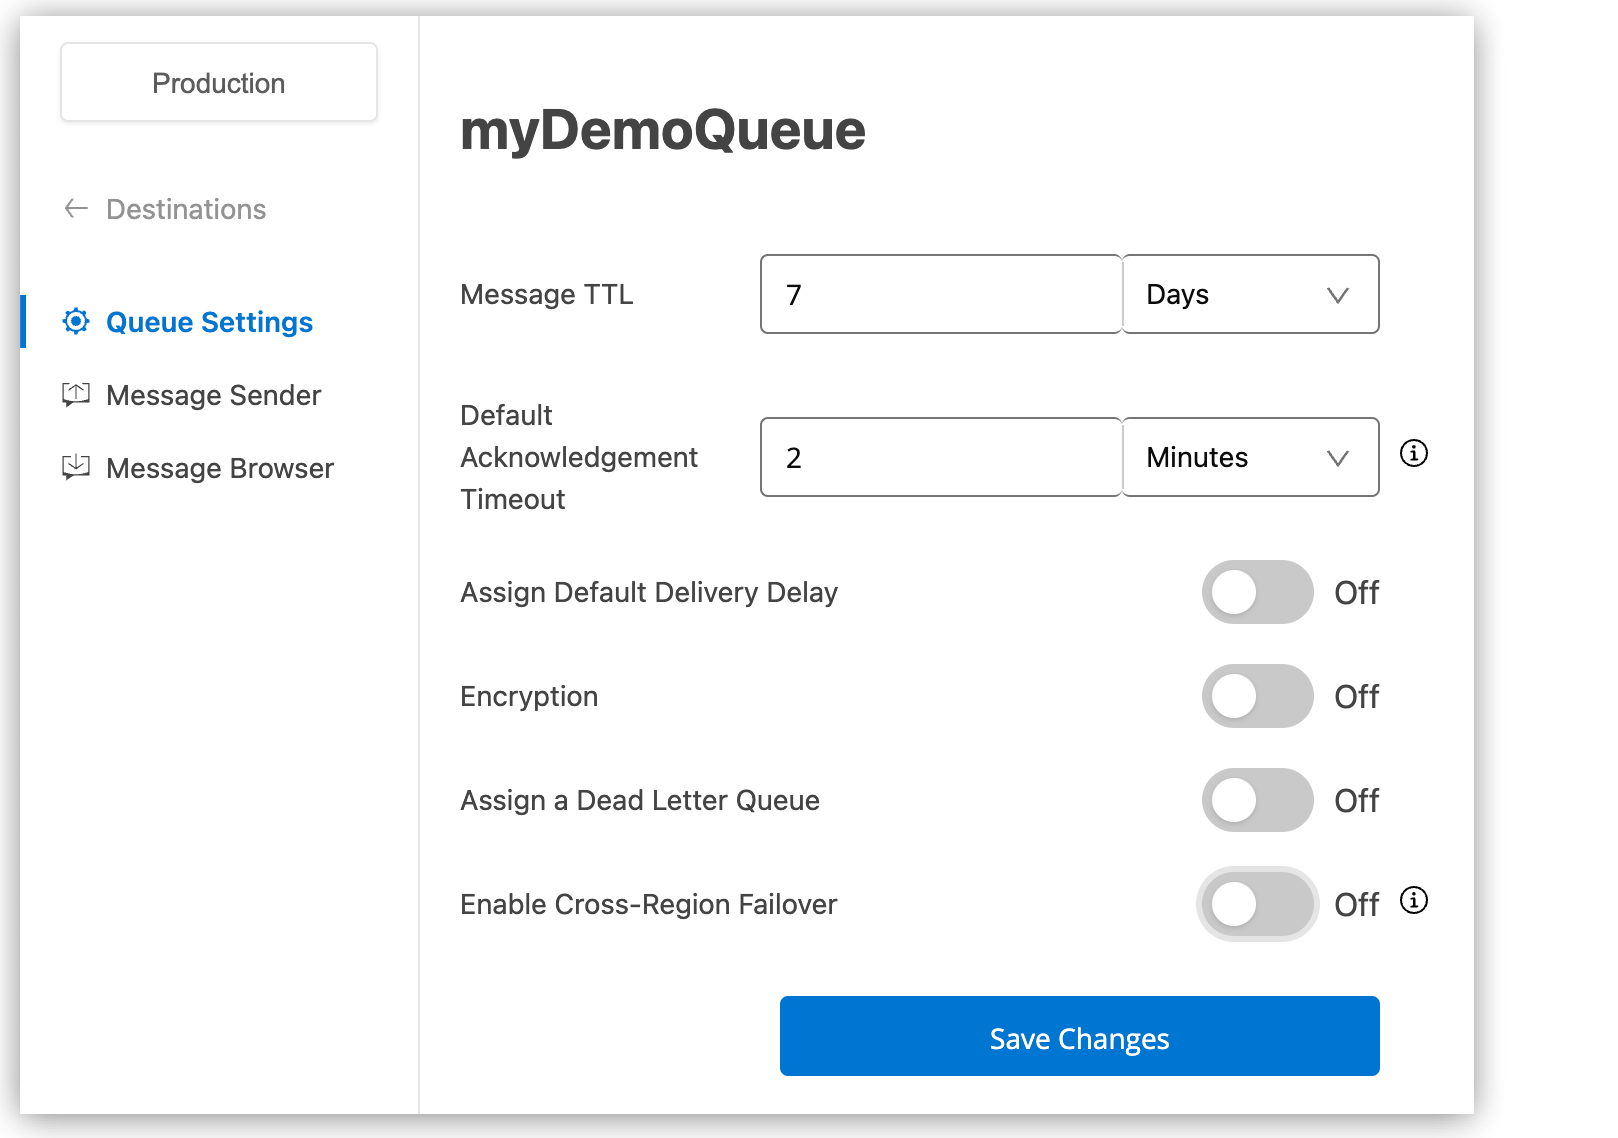
Click the queue ID to display the Queue Settings page:
-
Change the queue settings and click Save Changes.
Delete a Queue
If a queue is no longer needed, you can delete it. Any in-flight messages in the deleted queue are lost. You can’t recover a deleted queue. You can’t delete fallback queues.
To delete a queue:
-
Select Anypoint Platform > MQ > Destinations.
-
Click the queue type to display its details.
-
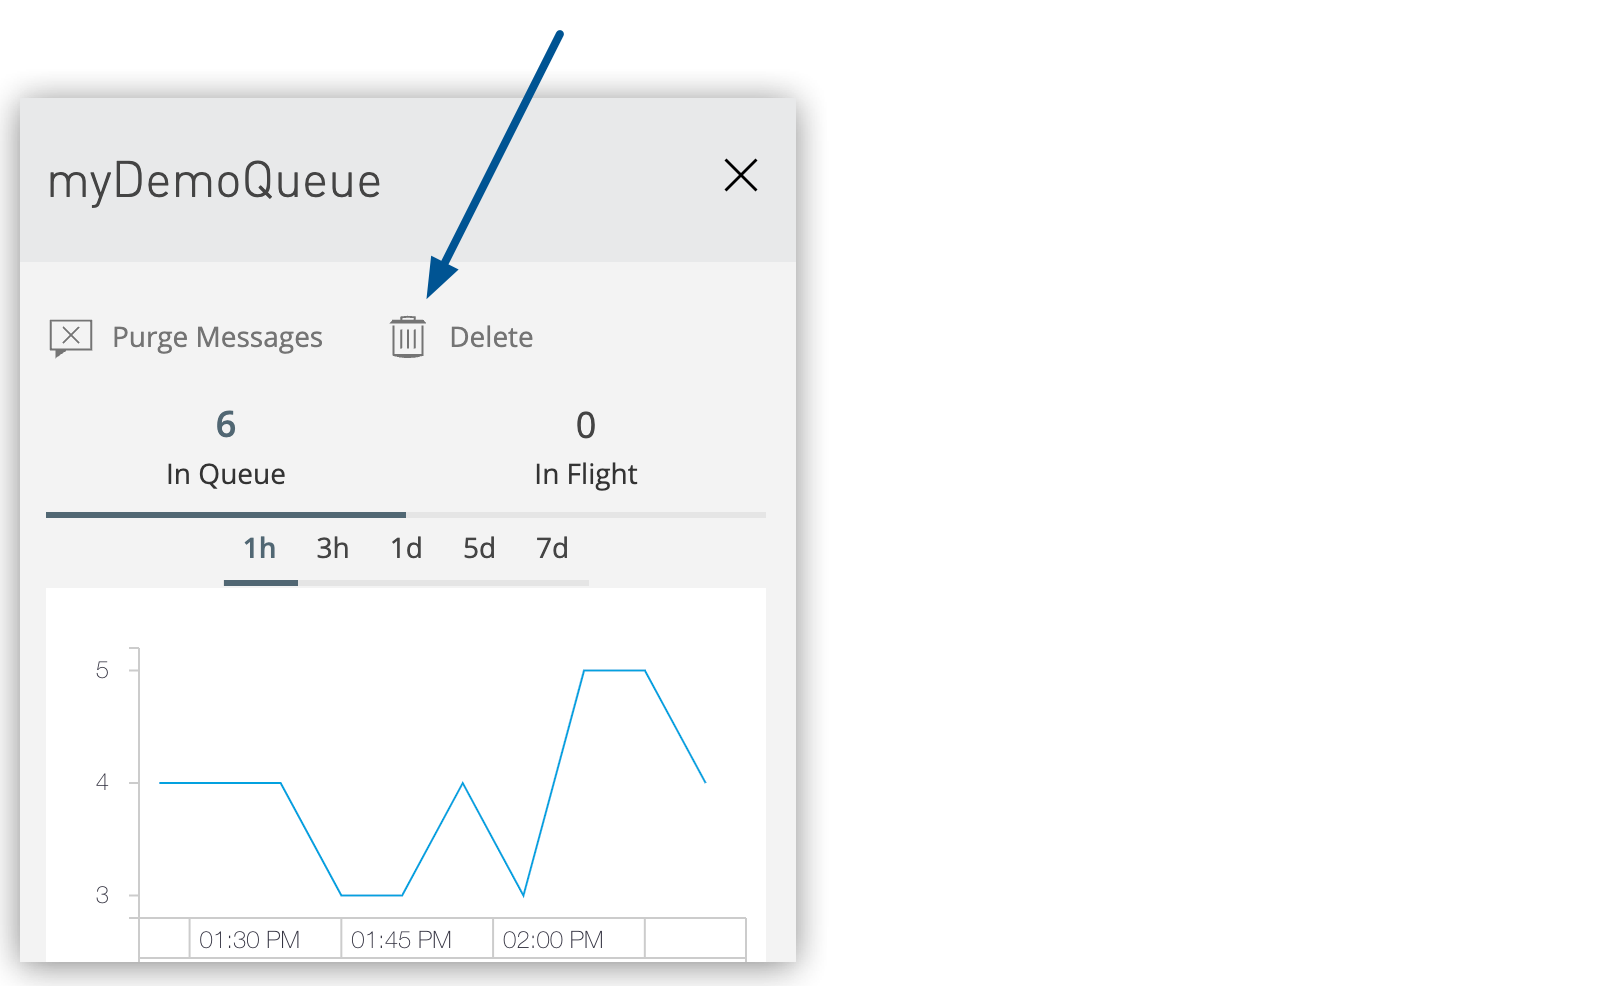
Click the Delete icon in the details pane:
-
In the Delete Queue confirmation box, select the checkbox and click Delete Queue to verify that you want to delete the queue.
The time it takes to delete or purge a queue is approximately one minute. During this time, the status of the affected queue can’t be updated.
FIFO Queues
For applications where the order of messages must be strictly preserved and enforced, Anypoint MQ provides first in, first out (FIFO) processing to enable message ordering. With FIFO queues, Anypoint MQ ensures that the order in which messages are placed in a queue is the same order messages are retrieved.
- Benefits
-
FIFO queues:
-
Support delivery delay on all messages in the FIFO queue.
If you change the delivery delay setting for a FIFO queue, Anypoint MQ applies the change retroactively to all messages in the queue.
Anypoint MQ doesn’t support delayed delivery for individual messages in a FIFO queue.
-
Support multiple message groups.
-
Provide encryption.
Encrypting a FIFO queue does not affect the order or the contents of messages consumed.
-
Can be assigned a dead-letter queue (DLQ). However, Anypoint MQ can’t guarantee strict message ordering in this case.
For information about using a DLQ with a FIFO queue, see Dead-Letter Queues and FIFO Queues.
-
- Limitations
-
-
FIFO queues are limited to 300 TPS (transactions per second).
However, if you batch ten messages per read and write operation (maximum) using the API, FIFO queues can support up to 3,000 messages per second.
Failed requests count against TPS.
-
You can’t bind FIFO queues to a message exchange.
-
In some configurations when using the IMMEDIATE acknowledgment mode in the Subscriber operation, FIFO queues don’t process messages in order.
-
Before using
prefetchmode with FIFO queues, see FIFO Queues and Prefetch Mode.
-
To create a FIFO queue, see Create a Queue. To determine if a queue is FIFO or standard (non-FIFO), view its details.
For the regions in which Anypoint MQ and FIFO queues are available, see Anypoint MQ Regions.
For information about creating FIFO queues with the Admin API, see Create a FIFO Queue Using the Admin API.
FIFO Queues and Message Groups
Message groups enable multiple consumers to access messages in a FIFO queue. Only one consumer at a time can access messages in a message group. When a consumer is accessing a message group, other message groups in the FIFO queue are available to other consumers, reducing the chance that the FIFO queue is blocked.
Anypoint MQ doesn’t limit the number of message groups in a FIFO queue.
The FIFO queue processes messages in the message group one by one, in the order they were added. If the queue includes multiple message group IDs, it returns as many messages with the same message group ID as possible.
| FIFO queues do not support retrieving messages by message group ID. |
If a message doesn’t have an associated message group ID, the message is assigned to a default message group. If you require a single group of ordered messages, provide the same message group ID for messages sent to the FIFO queue.
Anypoint MQ preserves message order within the message group, but not across different message groups. In addition, Anypoint MQ doesn’t guarantee that messages are processed at the same speed across groups.
If multiple applications send messages associated with the same message group ID to a FIFO queue, Anypoint MQ stores the messages in the order they arrive. To preserve message order for an app, make sure that each app uses a specific message group ID to send messages.
Process Messages in Message Groups in Order
If a message in a message group is not acknowledged, it returns to the queue and Anypoint MQ continues processing the next message in the group. This behavior might not be desirable if a message in the group depends on a previous message.
To ensure that the FIFO queue processes the messages in order:
-
Set the value of
maxConcurrencyon the flow to1, which forces the flow to process requests individually. -
Set
subscriber-typetopolling, which controls message consumption. -
Set the value of
fetchSizeto1, which ensures that only one message is buffered.
...
<flow name="myFlow" doc:id="doc_ID" maxConcurrency="1">
  <anypoint-mq:subscriber doc:name="Subscriber" doc:id="doc_ID" config-ref="Anypoint_MQ_Config" destination="myQueue">
    <anypoint-mq:subscriber-type >
      <anypoint-mq:polling fetchSize="1" >
...
Use Message Groups to Process Messages in Parallel
Anypoint MQ automatically processes messages from different message groups in parallel, maintaining the relative order of messages in the message groups.
To process messages in message groups in parallel,
and preserve the order of messages within the groups,
configure multiple Subscriber flows in the app,
each with the value of maxConcurrency set to 1.
Assign a Message Group ID to a Message
To assign a message group ID to a message:
-
In the Message Sender page, specify the message group to which the message belongs:

FIFO Exactly-Once Delivery
For applications in which messages must be processed exactly once, such as those used in transactional use cases, FIFO queues ensure exactly-once message delivery.
FIFO queues provide message deduplication. If multiple messages are sent to a FIFO queue containing the same message ID, the first message to arrive is kept as the valid message. Subsequent messages within the deduplication interval of five minutes are considered duplicates and are discarded. For example, after the queue sees that a message with ID 12345 arrives in the queue, for the next five minutes, the FIFO queue discards any messages with the ID 12345.
When building applications in Anypoint Studio that require exactly-once delivery, you can either:
-
Set the message ID in the publisher settings in the Anypoint MQ connector.
-
Let Anypoint MQ autogenerate a unique message ID for each message sent to a queue (default).
Dead Letter Queues
Anypoint MQ enables you to ensure that messages that aren’t delivered are sent to a queue known as the dead-letter queue (DLQ). You can then analyze the messages sent to the DLQ to determine why those messages were not delivered.
A DLQ is essentially the same as any other queue except that it receives only undelivered messages. You can specify the time-to-live (TTL) value, encryption, and delivery delay when you create the queue.
You must have at least two queues for one of them to be assigned as a DLQ. Both queues must be:
-
The same type (standard or FIFO)
-
In the same geographical region
-
In the same environment and owned by the same Anypoint Platform account.
Dead-Letter Queues and FIFO Queues
You can assign a DLQ to a FIFO queue as long as the DLQ is also a FIFO queue.
However, if you use a DLQ with a FIFO queue, Anypoint MQ can’t guarantee that messages in a message group are processed in order. When a message is sent to a DLQ, it is no longer in the FIFO queue. Anypoint MQ processes subsequent messages and doesn’t preserve the message order.
Therefore, if an application requires the order of messages to be strictly preserved and enforced, don’t assign a DLQ to a FIFO queue.
Dead-Letter Queues and Fallback Queues
Before you can enable failover on a standard queue that has a DLQ assigned, the DLQ must have failover enabled or previously had failover enabled. When you enable failover for a queue, Anypoint MQ creates the fallback queue, which persists even when failover is disabled. For more information, see Configuring Cross-Region Failover for Standard Queues.
Encryption
Undeliverable messages that are sent to the DLQ use the encryption set for the source queue, regardless of the DLQ encryption setting. Messages that are sent directly to the DLQ by a client use the encryption setting for the DLQ. If your organization’s policy is that all messages are encrypted, then you must set encryption for all queues.
Billing and Maximum Deliveries
If a message sent to the DLQ is a dead letter from another queue, the message is not charged against the billable API requests. However, if a client sends a message directly to a DLQ, that message is charged.
If a queue has a dead-letter queue assigned:
-
Viewing the messages in the source queue using the Anypoint MQ Message Browser counts against the number of maximum deliveries.
-
Viewing a message and returning it to the queue counts as a NACK operation and is considered an unsuccessful delivery attempt.
-
Deleting the message in the Message Browser prevents it from being counted against the maximum deliveries, but the message is lost.
Assign a DLQ to a Queue
You can assign any queue as a DLQ for another queue as long as it’s the same type and in the same region and environment.
-
Messages sent to a FIFO DLQ must originate from a FIFO queue.
-
Messages sent to a standard DLQ must originate from a standard queue.
See FIFO Queues.
To assign a DLQ to a queue:
-
Toggle Assign a Dead Letter Queue to On.
These additional fields appear:

-
Dead Letter Queue Name
Choose a previously created queue name from the drop-down list.
-
Delivery attempts before reroute
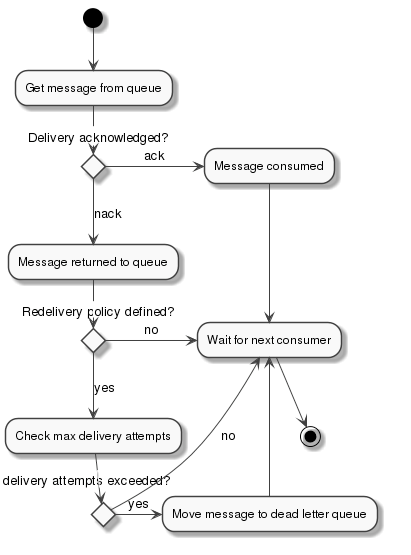
Optionally specify how many times Anypoint MQ attempts to deliver messages in the queue before rerouting the message to the configured DLQ. If not specified, the default value is 10 tries. This value ranges from 1 to 1000 attempts.
This property is not related to Max Redelivery Count in the Redelivery tab in Anypoint MQ Connector.
maxRedeliveryCountspecifies the maximum number of unsuccessful attempts to redeliver a message to the flow before raising aMULE:REDELIVERY_EXHAUSTEDexception and preventing the flow from processing the received data. You can configure your app to handle the exception by moving the message to a DLQ.For information about
maxRedeliveryCount, see Configure a Redelivery Policy.
-
Recover Messages from a DLQ
You can recover messages from the DLQ using the REST API to get the message from the queue and write the message to a new queue. See Anypoint MQ Admin API.
Determine Whether a Queue is a DLQ
You can see whether a queue is a DLQ by viewing its details:
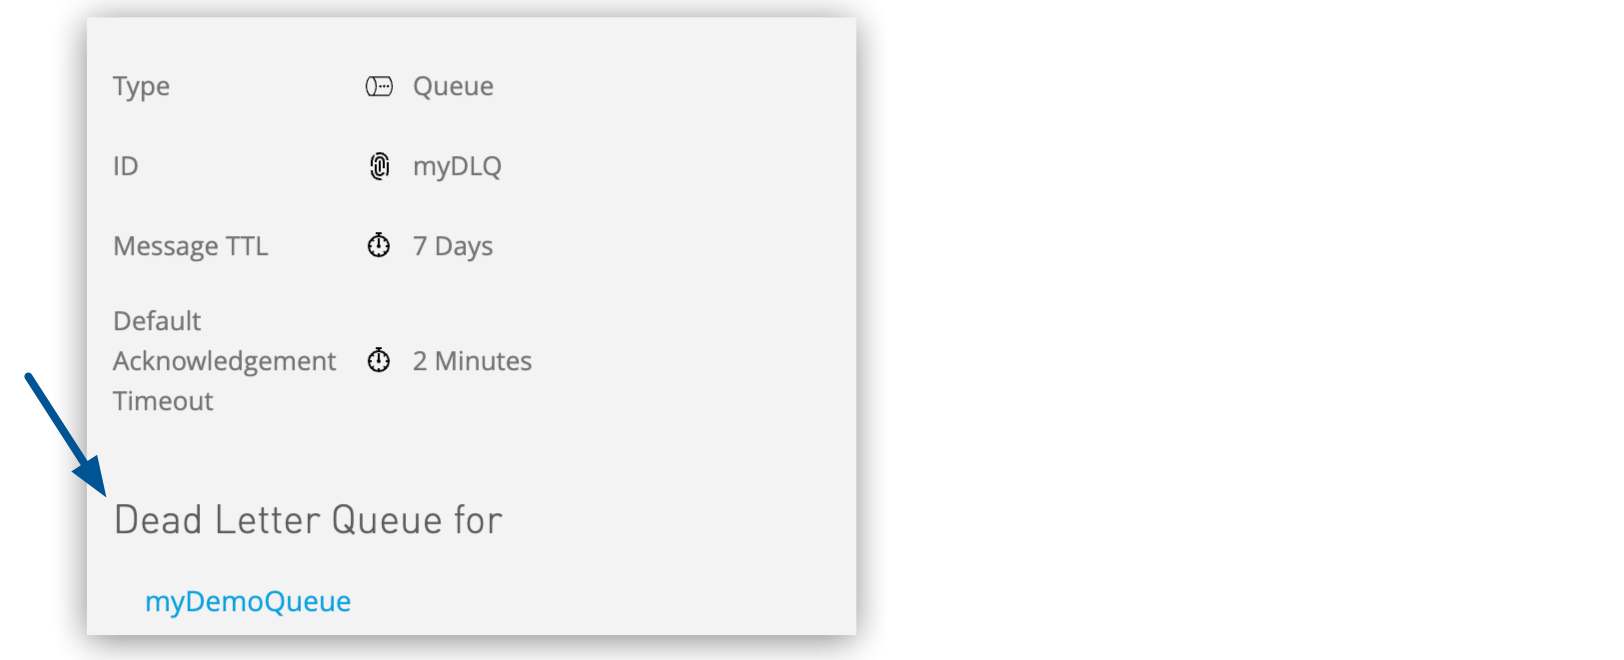
You can also view details of each queue from the REST Administration API, using the Get Queue REST endpoint.
{
 "encrypted": false,
 "type": "queue",
 "queueId": "my-dlq-1",
 "deadLetterSources": [
   "my-queue-4",
   "my-dls-1"
 ],
 "defaultTtl": 2000000,
 "defaultLockTtl": 2000000
}
If DLQ is set, the returned entities contain the deadLetterSources field.
For more information, see Anypoint MQ Admin API.
Fallback Queues
When you enable cross-region failover for a standard queue, Anypoint MQ automatically creates a fallback queue and assigns a non-configurable failover region to the queue.
The name of the fallback queue is the primary queue name with the _fb suffix.
For example, if the primary queue name is myDemoQueue, the fallback queue name is myDemoQueue_fb.
If the primary queue has an assigned dead-letter queue (DLQ), you must enable failover for the DLQ before enabling failover for the primary queue.
For information about cross-region failover and fallback queues, see Configuring Cross-Region Failover for Standard Queues.


