Anypoint MQ Overview
Anypoint MQ is a multi-tenant, cloud-based message queuing service for exchanging data asynchronously between your applications. The Anypoint MQ messaging broker enables applications to communicate by publishing a Mule message to a queue so that another app can consume the message.
Anypoint MQ is fully integrated with Anypoint Platform, offering access control, client management, and connectors. Integration with access management enables you to specify environments and business groups for role-based access control and support for connected apps.
Anypoint MQ supports hybrid use cases, IoT (Internet of Things) in which you collect data from different devices, and provides a REST API to use with device applications. You can also use Anypoint MQ with other app frameworks such as node.js to communicate with queues.
This spotlight video gives an overview of Anypoint MQ:
Anypoint MQ:
-
Provides fully hosted and managed queues and message exchanges in the cloud.
-
Supports large payloads, encryption, queuing, and publish/subscribe (pub/sub) paradigms.
-
Enables you to easily connect to non-Mule applications by using the REST API.
-
Provides Anypoint Studio access, which makes the process of leveraging your queues and message exchanges as simple as drag, drop, and configure.
Before You Begin Using Anypoint MQ
-
Make sure you have a paid Anypoint Platform package or subscription with the Anypoint MQ integration add-on.
Anypoint MQ isn’t available in the trial edition of Anypoint Platform.
To add Anypoint MQ to your package or subscription, contact your account team. After purchasing Anypoint MQ, wait one hour for Anypoint MQ to become available in Anypoint Platform.
For information about Anypoint Integration packages, see MuleSoft Anypoint Platform Pricing.
-
Set up your environment and permissions.
For information, see Setting Up the Environment and Access Permissions.
-
Review this overview for information about Anypoint MQ.
Anypoint MQ Features
Anypoint MQ includes these features:
- Queues and Message Exchanges
-
Send messages to queues and pull messages from queues. Use a message exchange to send messages to multiple standard or FIFO queues simultaneously or route messages to specific queues by using intelligent message routing rules.
For information, see:
- Management Console
-
Monitor queue statistics, purge queues, and see how many messages are in flight by using the management console.
- Anypoint MQ Connector
-
Send and receive messages from any Mule app, whether it’s deployed in CloudHub or used in a hybrid scenario and deployed on-premises.
For information, see Anypoint MQ Connectors.
- Usage Information
-
View the current and past months' usage, including the total number of messages and API requests. Organization administrators and owners access this information from the Access Management page.
For information, see Viewing Anypoint MQ Usage Data.
- REST API
-
Use the REST API to easily communicate with non-Mule applications.
For information, see Anypoint MQ REST APIs.
- Environments and Role-Based Access Control
-
Use Anypoint Platform access management to specify different environments for your queues, who can access each environment, and what they can do within each environment.
For information, see Setting Up the Environment and Access Permissions.
- Client Management
-
Use connected apps to authenticate with Anypoint Platform by using APIs.
Register each consumer registered as a connected app with a name, ID, and secret. The connected app uses the ID and secret to authenticate and get access to queues and message exchanges within a single environment. You can’t use connected apps across multiple environments or business groups.
For information, see Configuring Connected Apps.
- Large Payloads
-
Send large payloads of up to 10 MB.
If the payload contains any format except text (such as CSV, HTML, JSON, and XML), Anypoint MQ converts it to a string before sending, which increases the payload size. This conversion might result in the payload exceeding the maximum payload size of 10 MB and causing a
Payload too largeerror.
- Disaster Recovery
-
Ensure your messages are delivered even if services go down temporarily.
Within each region, Anypoint MQ services deploy to multiple availability zones (AZs) to provide high availability (HA). If service in one availability zone goes down, the Anypoint MQ service operates normally in that region. If all availability zones go down in a region, the Anypoint MQ service is unavailable in that region until at least one of the availability zones comes back up. Messages that were already in the Anypoint MQ system before service was interrupted are retained.
You can enable failover on standard queues, which creates a fallback queue in a fallback region. With failover enabled, if an app that uses Anypoint MQ Connector can’t contact the Anypoint MQ server in a region, the connector switches to the fallback queue to continue publishing and consuming messages. For information, see Configuring Cross-Region Failover for Standard Queues.
- Usage Statistics
-
View a usage statistics chart so that you can manage peak usage and subscription parameters. The chart provides current and past usage, including consumed data, API requests, and the total number of messages received.
For information, see Viewing Anypoint MQ Usage Data.
You can also use the Anypoint MQ Stats API to perform statistical analysis of queue performance.
For information, see Anypoint MQ Stats API.
You can’t use Anypoint MQ with CloudHub Insight or Anypoint Monitoring.
Queues and Message Exchanges
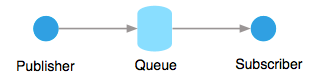
Message queues provide temporary storage that enables applications to communicate in a scalable and reliable way. Publishers can publish messages into queues, and subscribers can receive messages from queues.
To distribute messages to multiple queues and consumers, bind multiple queues to a message exchange. Messages sent to an exchange appear in all of its bound queues simultaneously:
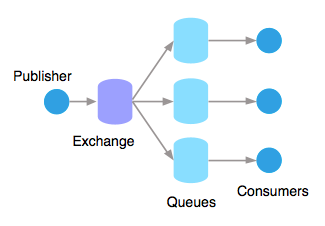
For example, if a publisher publishes changes in the weather and multiple apps must receive that data, use a message exchange to publish a single message to multiple queues for each app.
A binding is a relationship between the queue and message exchange that tells the message exchange where to send messages. By configuring intelligent message-routing rules on a binding, you can route messages to specific queues that are bound to the message exchange.
-
You can bind a queue to multiple message exchanges.
-
You can bind a maximum of 450 queues to a message exchange.
-
You can bind a maximum of 25 queues to an exchange with message routing rules defined. If an exchange has more than 25 queue bindings, you can’t use intelligent message routing.
In this example, an app running Salesforce customer relationship manager (CRM) uses Anypoint MQ to communicate with two applications that handle different databases:
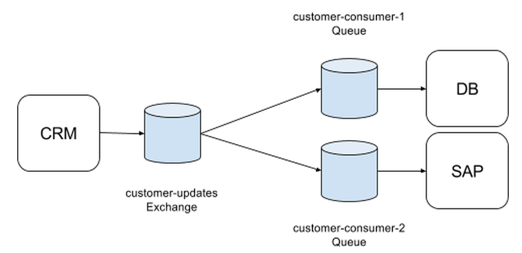
The Salesforce app sends a pub/sub message to an Anypoint MQ message exchange (customer-updates).
The two applications (customer-consumer-1 and customer-consumer-2) receive the message from
the message exchange and send it to their respective databases.
Benefits of Queues
Queues provide these benefits:
-
Horizontal scalability
By putting a message in a queue, the work to process that message can be distributed over multiple subscribers.
-
Reliability
Queues ensure that messages are always processed, even in the case of failure.
Anypoint MQ provides reliability with queues by using a lock and acknowledge mechanism. These features ensure that a message is always processed, even in the case of failure.
-
Decoupling
You can use a queue as a communication mechanism between different applications and devices, enabling them to have different development life cycles or maintenance windows without affecting other applications.
-
Aggregation
Multiple message producers can publish to a single queue, which enables easy consumption by consumers.
The message-consumption process is:
-
A consumer retrieves messages from a queue, which locks the messages and makes the messages invisible to all other consumers.
-
When retrieving, the consumer specifies a lock timeout. If the message is not processed within the specified window, Anypoint MQ makes the message visible to other consumers. If a failure occurs, such as a consumer node crash, another node can process the message. A locked message does not block other messages from being read.
-
If a consumer processes a message successfully, the client acknowledges the message, and Anypoint MQ removes the message from the queue.
-
If a consumer can’t process a message, the message proceeds with a negative acknowledgment and becomes visible in the queue again.
For information, see ACK and NACK Operations.
-
-
-
Unlimited messages in a queue
Anypoint MQ doesn’t limit the number of messages in a queue. The size of each message in a queue is limited to 10 MB.
-
Long polling
Messages are read through long polling. The server holds a request open until new data is available, and then Anypoint MQ delivers a batch of messages with a single read.
-
Billing and charging
Billing is based on the number of messages delivered to subscribers from queues, rather than the number of queues or message exchanges you create.
Anypoint MQ Features by Control Plane
| Anypoint MQ Feature | US Cloud and EU Cloud | Canada Cloud, Japan Cloud, India Cloud | MuleSoft Government Cloud |
|---|---|---|---|
Yes |
Yes |
Yes |
|
|
Yes |
No |
No |
Yes |
No |
Yes |
|
|
No |
Yes |
No |
Limitations by Control Plane
All Anypoint MQ features are supported on MuleSoft Government Cloud, Canada Cloud, Japan Cloud, and India Cloud with the following exceptions:
| Limitation | MuleSoft Government Cloud | Canada Cloud, Japan Cloud, India Cloud |
|---|---|---|
Not supported. When creating a queue, Encryption defaults to selected. |
Not supported. When creating a queue, Encryption defaults to enabled. |
|
Supported |
Not supported. Deploy apps to CloudHub 2.0 shared spaces or Anypoint Runtime Fabric. |
|
Not supported. Use connected apps instead. |
Not supported. Use connected apps instead. |
|
Not supported. Requires Anypoint MQ Connector 4.x for Mule 4. |
Not supported. Requires Anypoint MQ Connector 4.x for Mule 4. |
|
Not supported |
Not supported |
|
Usage Charts (Access Management) |
Supported |
Not available. Use Usage Reports instead. |
Anypoint MQ Stats API (Usage Metrics) |
For information about the regions where Anypoint MQ is available, see Anypoint MQ Regions.
For information about MuleSoft Government Cloud, see Government Cloud Overview.
For information about Anypoint Platform on other control planes, see Salesforce Hyperforce Overview.