Controlling Source Files
 Cloud IDE
 Desktop IDE
Use source control management (SCM) to store and share your design, integration, and implementation projects. A useful SCM provides change history of each file and a branching methodology to maintain project quality, full traceability, the ability to restore earlier versions of your files, and a way to recover source code if your Anypoint Code Builder environment is lost or removed.
GitHub and the Git command line interface (CLI) are widely used in the industry and supported by VS Code out-of-the-box, with minimal configuration, in the desktop and cloud IDE. The procedures on this page show how to set up and use GitHub for source control. VS Code extensions for other SCM systems are also available for you to set up and use. For information, see SCM Providers.
For more information, see Using Git source control in VS Code in the VS Code documentation. For detailed information about Git, see the Git documentation.
Before You Begin
Ensure that these prerequisites are in place:
-
A GitHub account
If you do not have an account, create one from the Join GitHub page on the GitHub site.
-
A Git installation on your computer
If Git is not installed on your computer, follow the Git installation instructions for your machine.
-
Access to Anypoint Code Builder from the desktop or cloud IDE
For setup and installation information, see Getting Started with Anypoint Code Builder, and be sure to meet all prerequisites.
-
A GitHub user name and email configuration (see Configure Your Git Username and Password)
Configure Your Git Username and Password
Check for and configure your username and email properties so that you can add, update, and retrieve your project files from a remote Git repo in GitHub.
-
Meet the prerequisites in Before You Begin.
-
From your IDE, open the Terminal window in the console:
-
In the desktop IDE, select View > Terminal.
-
In the cloud IDE, click the
 (menu) icon, and select Terminal > New Terminal.
 -
For either IDE: Press Ctrl and then press the backtick key (`).
-
-
From the Anypoint Code Builder terminal, check for any existing Git configuration by running this command:
git config --list-
If your GitHub
user.nameanduser.emailare not listed or if no data returns, configure the properties:-
Run this command to set your
user.name, replacingYourUserNamewith your GitHub username:git config –-global user.name "YourUserName" -
Run this command to set your
user.email, replacingyour@email.comwith your GitHub email address:git config –-global user.email "your@email.com"If two-factor authentication is enabled on your GitHub account and you are prompted for a password, enter your personal access token instead of your GitHub login password. For more information, see GitHub documentation Access GitHub with 2FA.
-
-
If your GitHub
user.nameanduser.emailare listed, you are ready to use Git to control your project files from the IDE. For guidance with common source control tasks in VS Code, see:
-
Set Up a Repository from the IDE
Set up a repo for your design, integration, or implementation project from the IDE. If your project is already set up to sync from the IDE with a repo in an SCM that you want to use, no additional setup is required. You can sync your changes without further setup. For an example, see Sync Project Changes with Your Repository.
To set up a remote GitHub repo from the IDE for your projects, the following scenarios are common:
-
Generate and Publish to a Repository in GitHub
If you have a project in Anypoint Code Builder but do not have a repo for that project, you can use the IDE to generate a repo in GitHub and publish your project files to that remote repo. The process also implicitly initializes a local repo in the IDE.
-
Initialize and Commit Project Files to a Local Repository
Initializing and committing your project files into a local repo in the IDE is a prerequisite to publishing and syncing files into a remote repo in GitHub.
-
Publish Project Files into an Empty Repository in GitHub
If you have an empty repo in GitHub, you can publish your project files to the repo from the IDE.
-
Publish Project Files to a Different Repository
If your project is already configured to sync with a remote repo, you can configure the IDE to publish your project files to a different repo. This feature is helpful, for example, if you want to use your own repo for an API spec project that you imported from MuleSoft VCS or if you created your design project from the IDE before the February 2024 release. Both types of projects automatically add a connection to a remote Git repo in MuleSoft VCS.
-
Clone a Project Repository into the IDE
If a design, implementation, or integration project is already stored in a repo on GitHub, you can clone it into the cloud or desktop IDE.
Generate and Publish to a Repository in GitHub
If you have a project in Anypoint Code Builder but do not have a repo for that project, you can use the IDE to generate a repo in GitHub and publish your project files to that remote repo. The process also implicitly initializes a local repo in the IDE. If you already have an empty repo in GitHub that you intend to use for a project in Anypoint Code Builder, see Publish Project Files into an Empty Repository in GitHub to add and publish to the repo from the IDE.
-
Meet the prerequisites in Before You Begin.
-
If your Mule project folder is closed, open the project at its root directory:
-
Open the Command Palette.
Show me how
-
Use the keyboard shortcuts:
-
Mac: Cmd+Shift+p
-
Windows: Ctrl+Shift+p
-
-
In the desktop IDE, select View > Command Palette.
-
In the cloud IDE, click the
(menu) icon, and select View > Command Palette.
-
-
Provide this command:
File: Open Folder... -
Navigate to and select the root folder for your project, for example:
-
Integration or Implementation Example
-
Design Project Example
Example of a root folder and subdirectories of an integration or implementation project in Anypoint Code Builder:
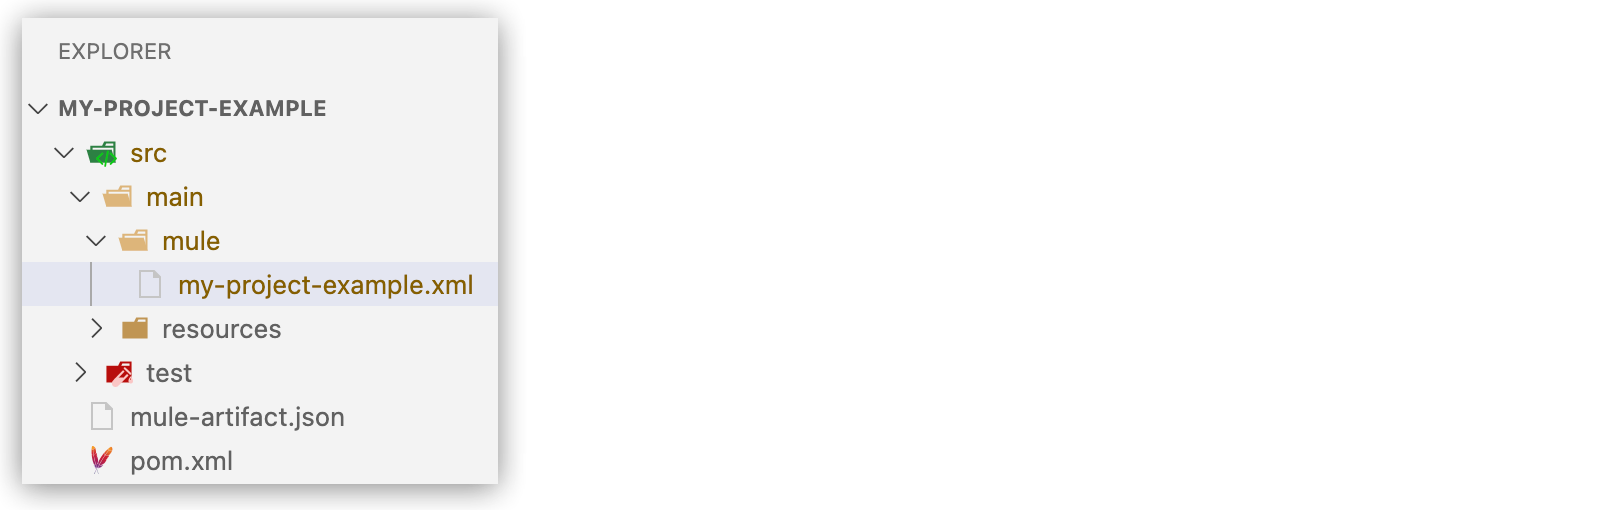
VS Code treats the root as a workspace, which enables the IDE to load the canvas properly.
Example of the root directory for an API design project in Anypoint Code Builder:

The root of a project is the top-level folder that Anypoint Code Builder generates when you create a project. Do not navigate to the project root’s parent or ancestor directory or to one of its child or descendant directories.
-
-
-
Open the Source Control panel.
Show me how
Click the
 (Source Control) icon in the activity bar or use the keyboard shortcuts:
-
Mac: Ctrl+Shift+g
-
Windows: Cmd+Shift+g
-
-
In the Source Control panel, click Publish to GitHub.
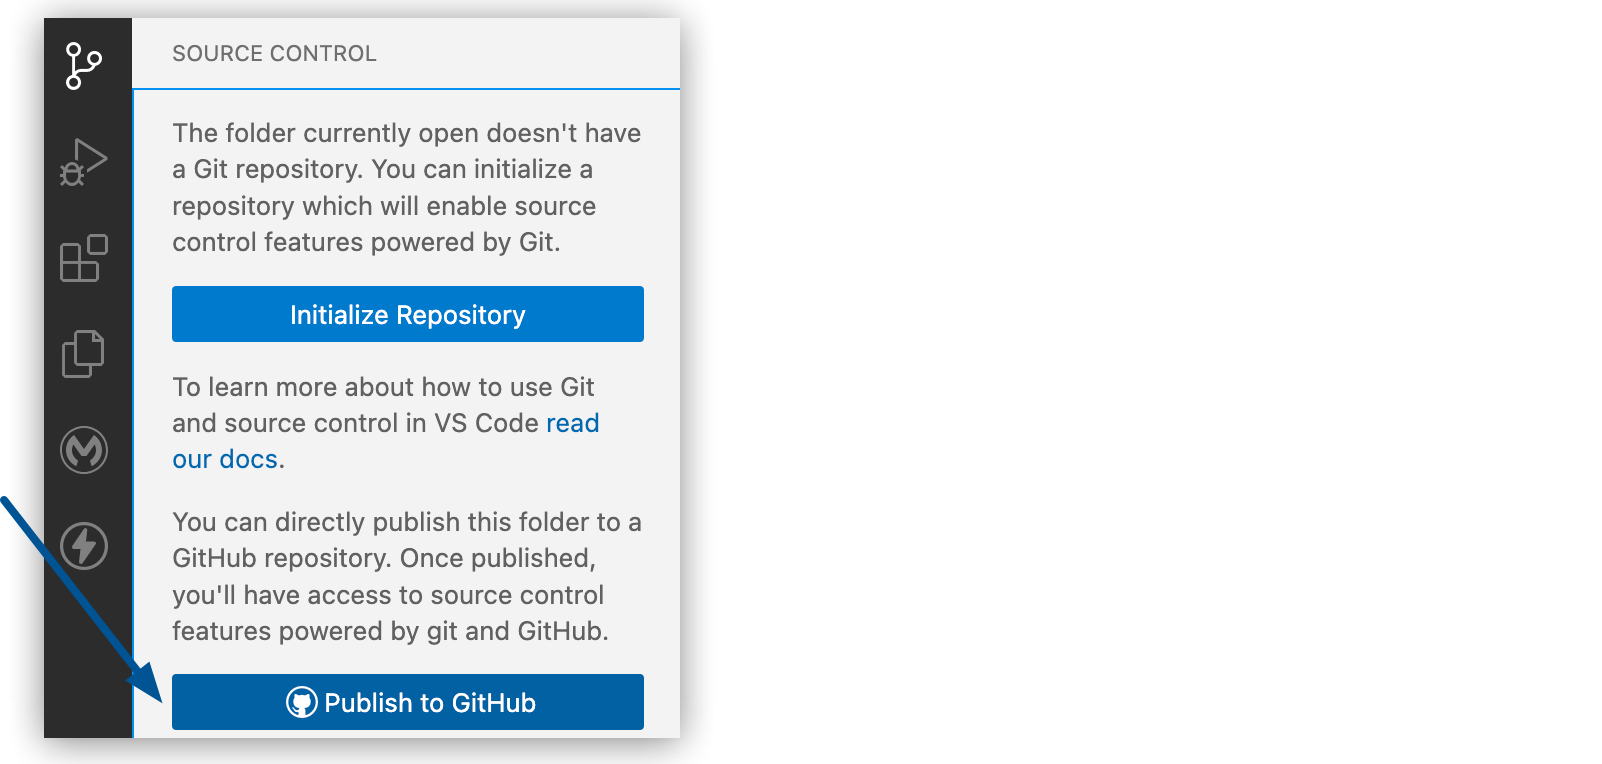
When no repo is associated with your project, the IDE provides options for initializing a local repo (Initialize Repository) on your IDE or directly publishing your project to a new remote repo in GitHub (Publish to GitHub). Publishing to GitHub also implicitly initializes your local repo for the project.
-
Provide a name for your repo in the field that opens, or use the default name that appears.
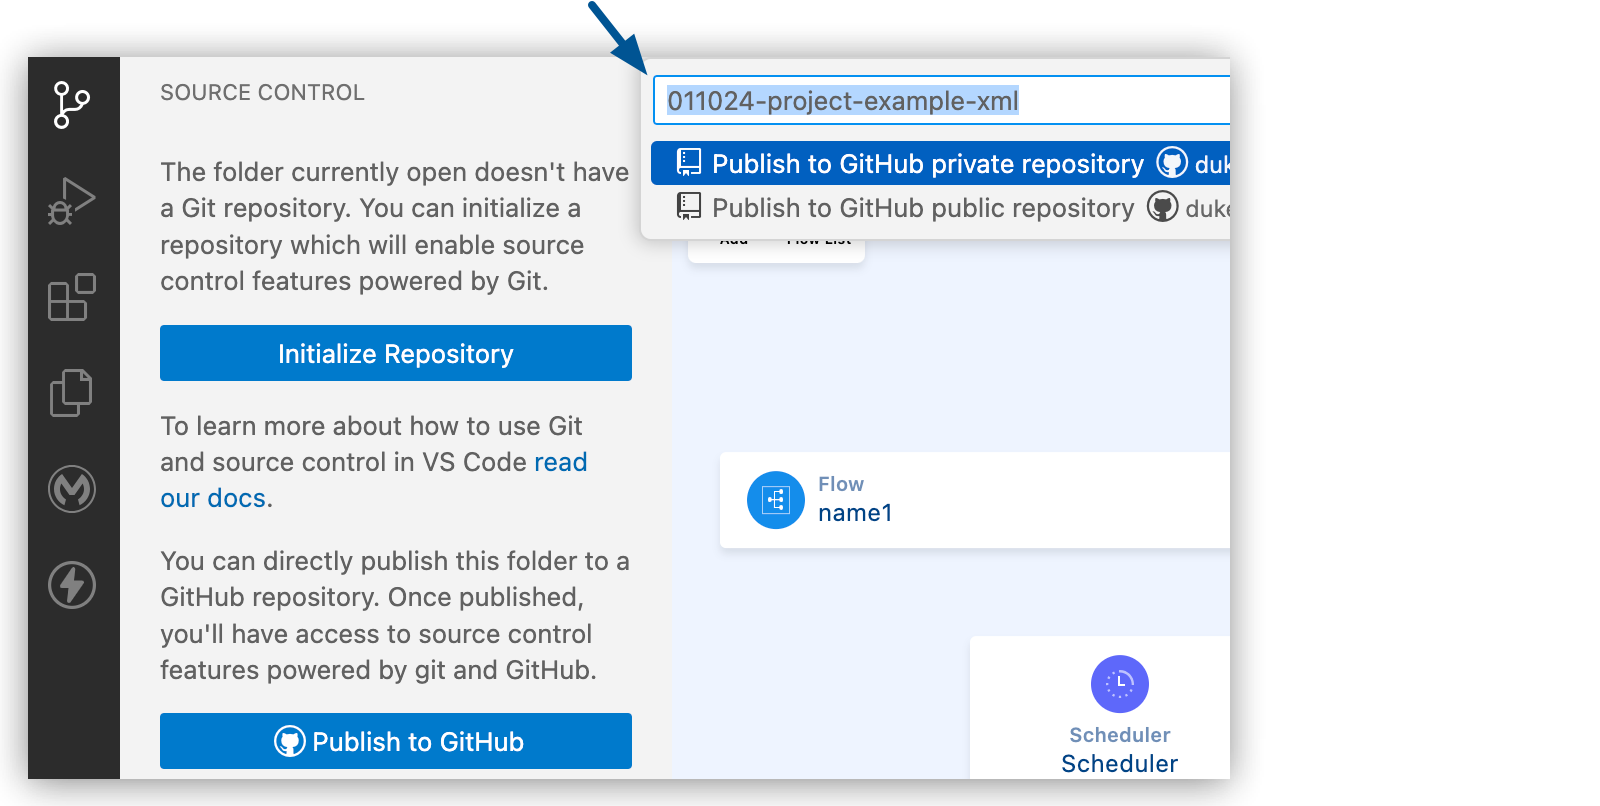
The default repo name matches the project name.
-
Select a repo type (private or public).
To protect data in your repo, select a private repo (Publish to GitHub private repo). This process commits and pushes your project files to your new repo.
-
If prompted, select the files to publish to the repo.
You can select all or a subset of the files of a design project, for example:

-
To view your project files in a GitHub repo, click Open on GitHub in the popup.

Alternatively, open GitHub from your browser and locate your new repo.
To sync changes to project files with your repo, see Sync Project Changes with Your Repository.
Initialize and Commit Project Files to a Local Repository
Initializing and committing your project files into a local repo in the IDE is a prerequisite to publishing and syncing files into a remote repo in GitHub.
-
Meet the prerequisites in Before You Begin.
-
If your Mule project folder is closed, open the project at its root directory:
-
Open the Command Palette.
Show me how
-
Use the keyboard shortcuts:
-
Mac: Cmd+Shift+p
-
Windows: Ctrl+Shift+p
-
-
In the desktop IDE, select View > Command Palette.
-
In the cloud IDE, click the
(menu) icon, and select View > Command Palette.
-
-
Provide this command:
File: Open Folder... -
Navigate to and select the root folder for your project, for example:
-
Integration or Implementation Example
-
Design Project Example
Example of a root folder and subdirectories of an integration or implementation project in Anypoint Code Builder:
VS Code treats the root as a workspace, which enables the IDE to load the canvas properly.
Example of the root directory for an API design project in Anypoint Code Builder:
The root of a project is the top-level folder that Anypoint Code Builder generates when you create a project. Do not navigate to the project root’s parent or ancestor directory or to one of its child or descendant directories.
-
-
-
Open the Source Control panel.
Show me how
Click the
(Source Control) icon in the activity bar or use the keyboard shortcuts:-
Mac: Ctrl+Shift+g
-
Windows: Cmd+Shift+g
-
-
From the Source Control panel for your project, initialize and commit your project files to a local repo in the IDE for your project:
-
In the Source Control panel, click Initialize Repository to generate a local repo for your project.
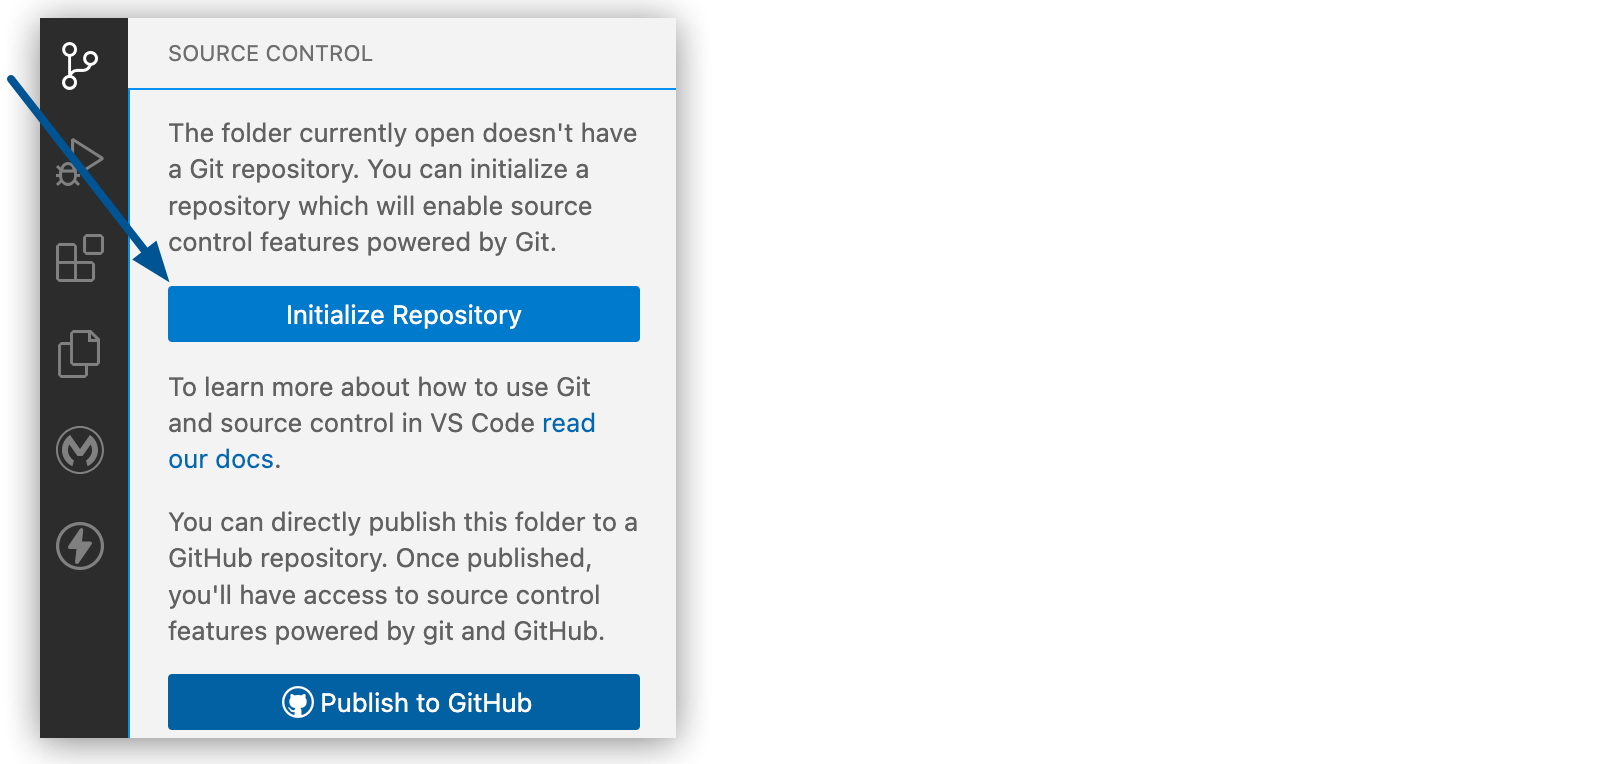
When no repo is associated with your project, the IDE provides options for initializing a local repo (Initialize Repository) for your project or directly publishing your project to a new remote repo in GitHub (Publish to GitHub).
-
Stage your files to your local repository by hovering over the Changes area (located after the Commit button) and clicking the
 (plus) icon.
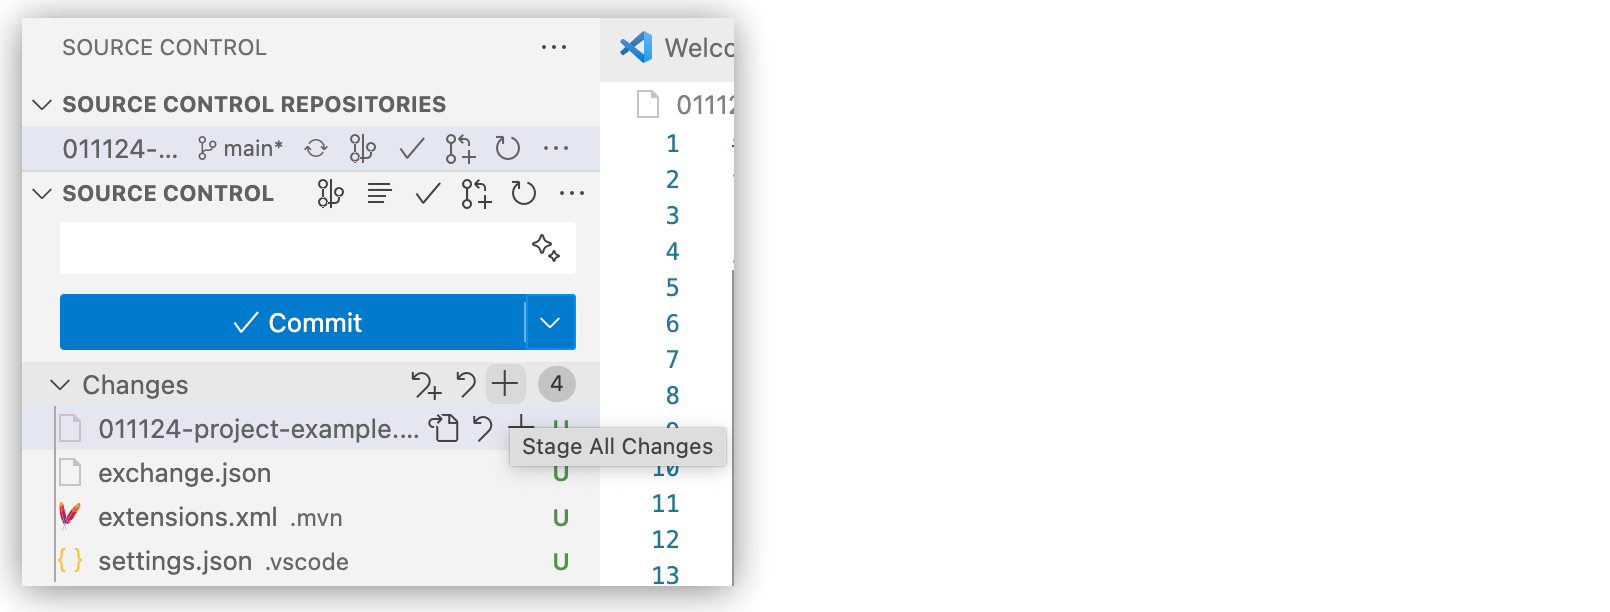
Alternatively, you can stage a single file by clicking the plus icon for that file.
Staged files move from the Changes area in the Source Control panel to the Staged Changes area. The UI uses the
git addcommand to add changes from your working directory to the staging area in your local Git repo. -
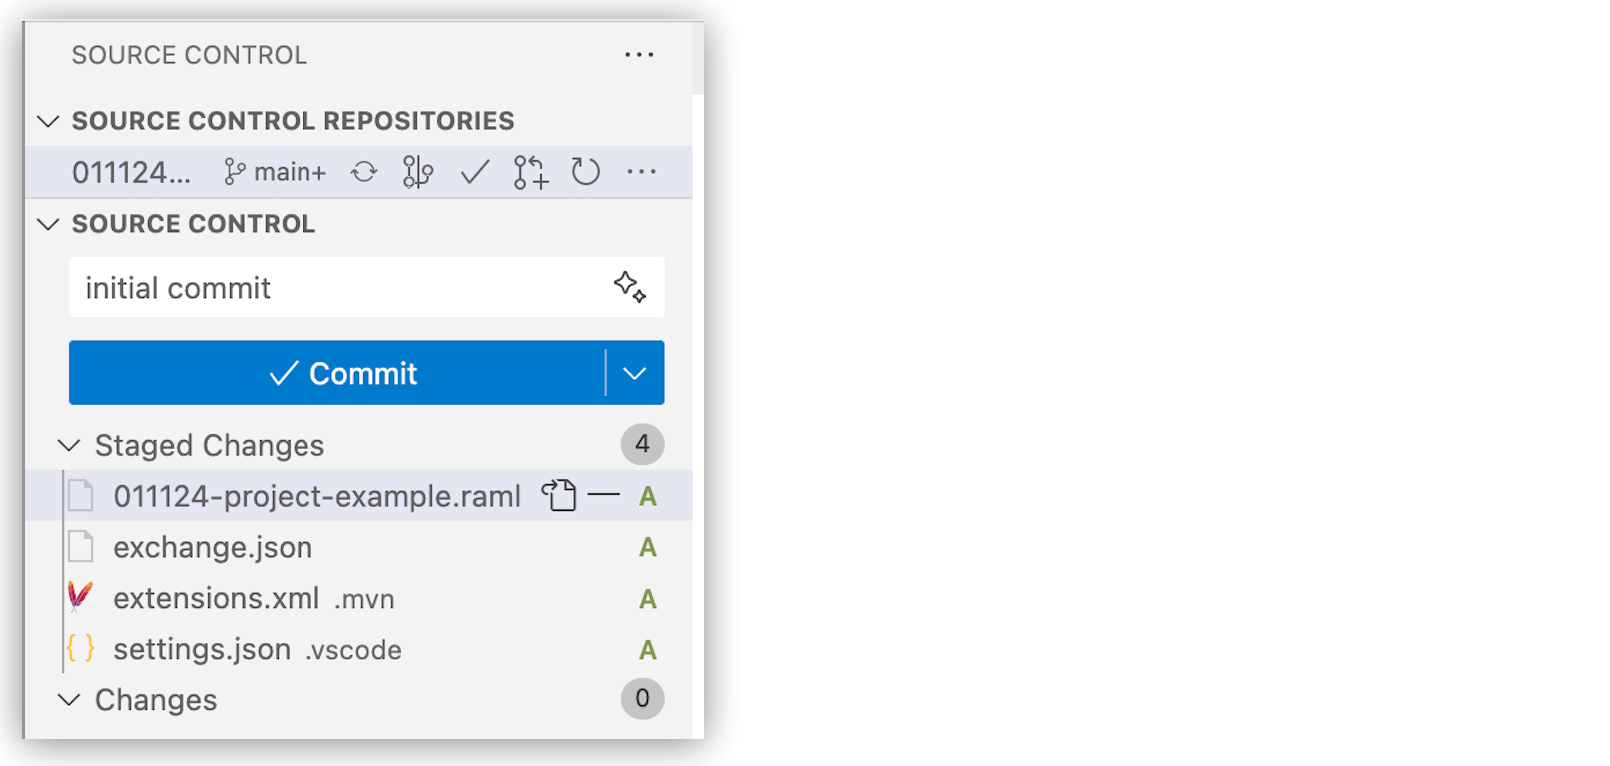
Provide your a commit message for the files, and then click Commit, for example:
-
-
To publish your files to a remote repository, you can:
-
Publish Project Files into an Empty Repository in GitHub
If you have an empty repo in GitHub, you can publish your project files to the repo from the IDE.
-
Publish Project Files to a Different Repository
If your project is already configured to sync with a remote repo, you can configure the IDE to publish your project files to a different repo.
-
Publish Project Files into an Empty Repository in GitHub
If you have an empty repo in GitHub, you can publish your project files to the repo from the IDE. This procedure assumes that the project files are ready to stage and publish to the repo.
-
Meet the prerequisites in Before You Begin.
-
If you have not yet initialized a local repo for your project in the IDE, see Initialize and Commit Project Files to a Local Repository.
-
Open the Command Palette.
Show me how
-
Use the keyboard shortcuts:
-
Mac: Cmd+Shift+p
-
Windows: Ctrl+Shift+p
-
-
In the desktop IDE, select View > Command Palette.
-
In the cloud IDE, click the
(menu) icon, and select View > Command Palette.
-
-
Configure a connection from the project in the IDE to your empty remote repo in GitHub:
-
Provide the following command to add the remote repo on GitHub:
Git: Add Remote... -
Select Add Remote from GitHub from the popup menu.

-
Provide the URL to your git repo, for example:

-
Provide a name for the remote in the IDE, for example:
my-acb-project-repo
The name for the repo in the IDE can match or differ from the repo name in GitHub.
-
-
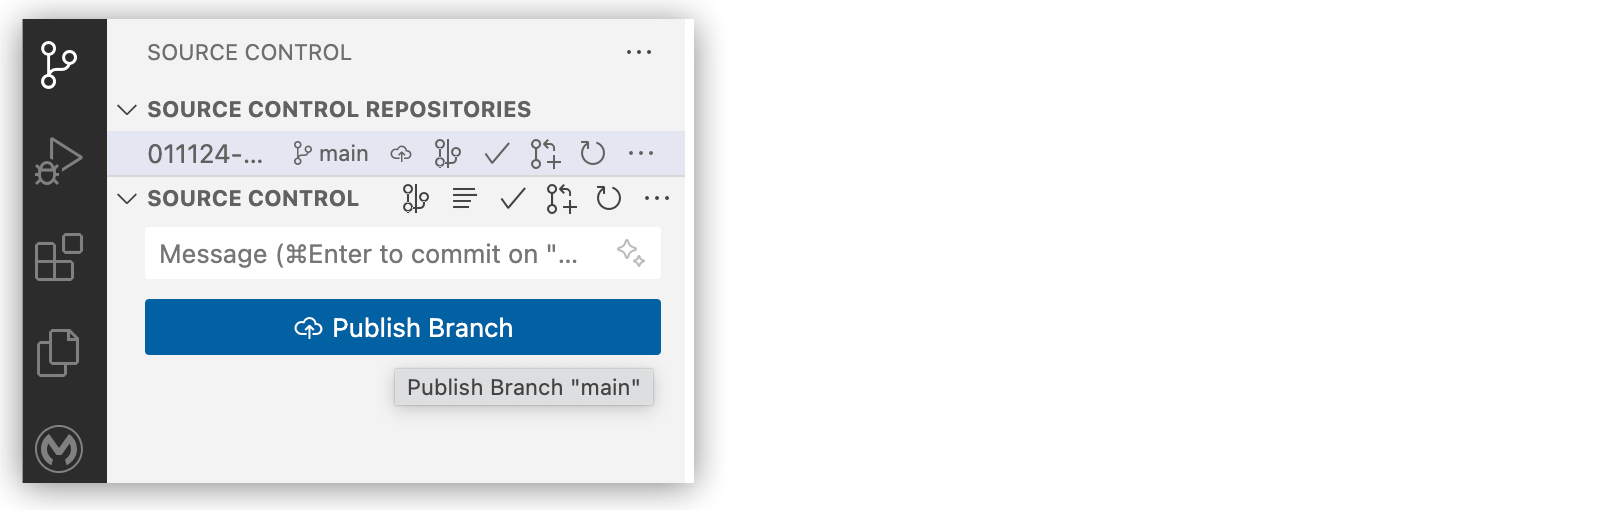
Click Publish Branch.
-
Open your repo in GitHub to review the published files, for example:

To sync changes to project files with your repo, see Sync Project Changes with Your Repository.
Publish Project Files to a Different Repository
If your project is already configured to sync with a remote repo, you can configure the IDE to publish your project files to a different repo. This feature is helpful, for example, if you want to use your own repo for an API spec project that you imported from MuleSoft VCS or if you created your design project from the IDE before the February 2024 release. Both types of projects automatically add a connection to a remote Git repo in MuleSoft VCS. For more information, see Source Control for API Design Projects.
If you are unsure whether your project is already connected to a remote repo, see Check for a Remote Repository URL.
This example assumes that you have an empty repo in GitHub. If you do not, you can create one from GitHub. For guidance, see Quickstart for repositories in the GitHub documentation.
-
Meet the prerequisites in Before You Begin.
-
If your Mule project folder is closed, open the project at its root directory:
-
Open the Command Palette.
Show me how
-
Use the keyboard shortcuts:
-
Mac: Cmd+Shift+p
-
Windows: Ctrl+Shift+p
-
-
In the desktop IDE, select View > Command Palette.
-
In the cloud IDE, click the
(menu) icon, and select View > Command Palette.
-
-
Provide this command:
File: Open Folder... -
Navigate to and select the root folder for your project, for example:
-
Integration or Implementation Example
-
Design Project Example
Example of a root folder and subdirectories of an integration or implementation project in Anypoint Code Builder:
VS Code treats the root as a workspace, which enables the IDE to load the canvas properly.
Example of the root directory for an API design project in Anypoint Code Builder:
The root of a project is the top-level folder that Anypoint Code Builder generates when you create a project. Do not navigate to the project root’s parent or ancestor directory or to one of its child or descendant directories.
-
-
-
Open the Source Control panel.
Show me how
Click the
 (Source Control) icon in the activity bar or use the keyboard shortcuts:
-
Mac: Ctrl+Shift+g
-
Windows: Cmd+Shift+g
-
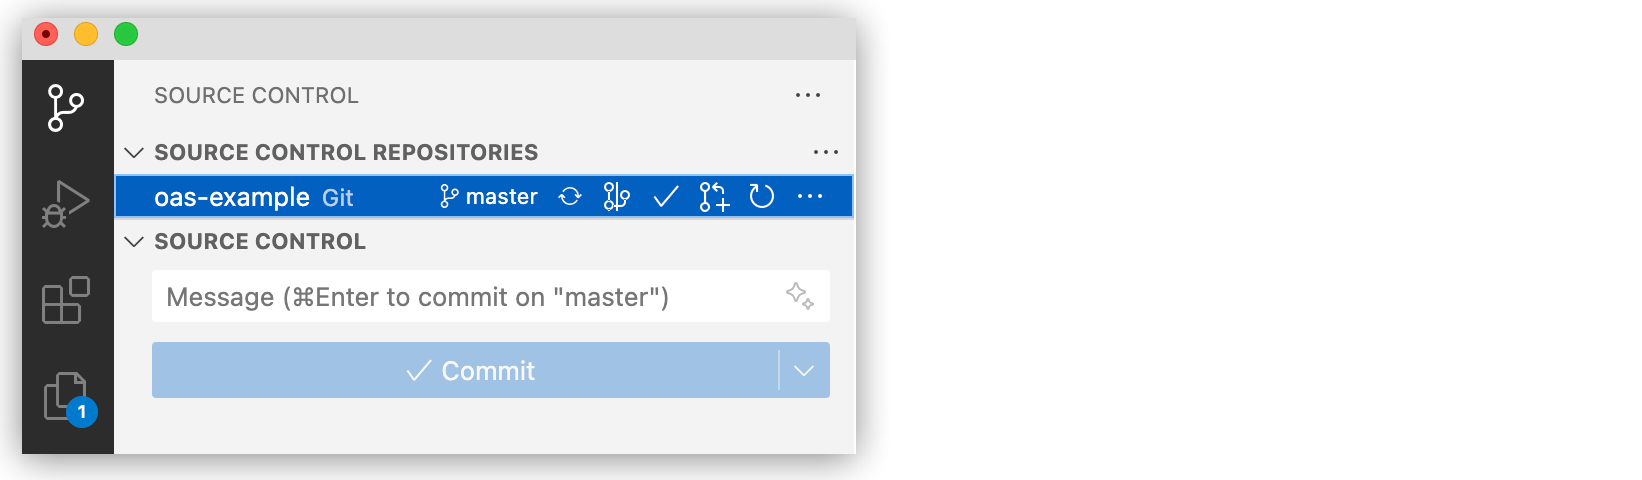
In the Source Control Panel, notice that there is a repo in the Source Control Repositories area of the panel, for example:
-
-
Open the Command Palette.
Show me how
-
Use the keyboard shortcuts:
-
Mac: Cmd+Shift+p
-
Windows: Ctrl+Shift+p
-
-
In the desktop IDE, select View > Command Palette.
-
In the cloud IDE, click the
(menu) icon, and select View > Command Palette.
-
-
Configure a connection from the project in the IDE to your repo in GitHub:
-
Provide the following command to add the remote repo on GitHub:
Git: Add Remote... -
Select Add Remote from GitHub from the popup menu.
-
Provide the URL to your git repo, for example:
https://github.com/me/my-extra-repo.git
-
Provide a name for the remote in the IDE, for example:
my-extra-repo
This name for the repo in the IDE can match or differ from the repo name in GitHub.
-
-
Publish your project to your extra remote repo:
-
In the command palette, provide the following command:
Git: Push to... -
Select Git: Push to… from the popup menu.

-
Select the extra remote repo that you added, for example:

-
-
Check for your project source files in your repo on GitHub, for example:
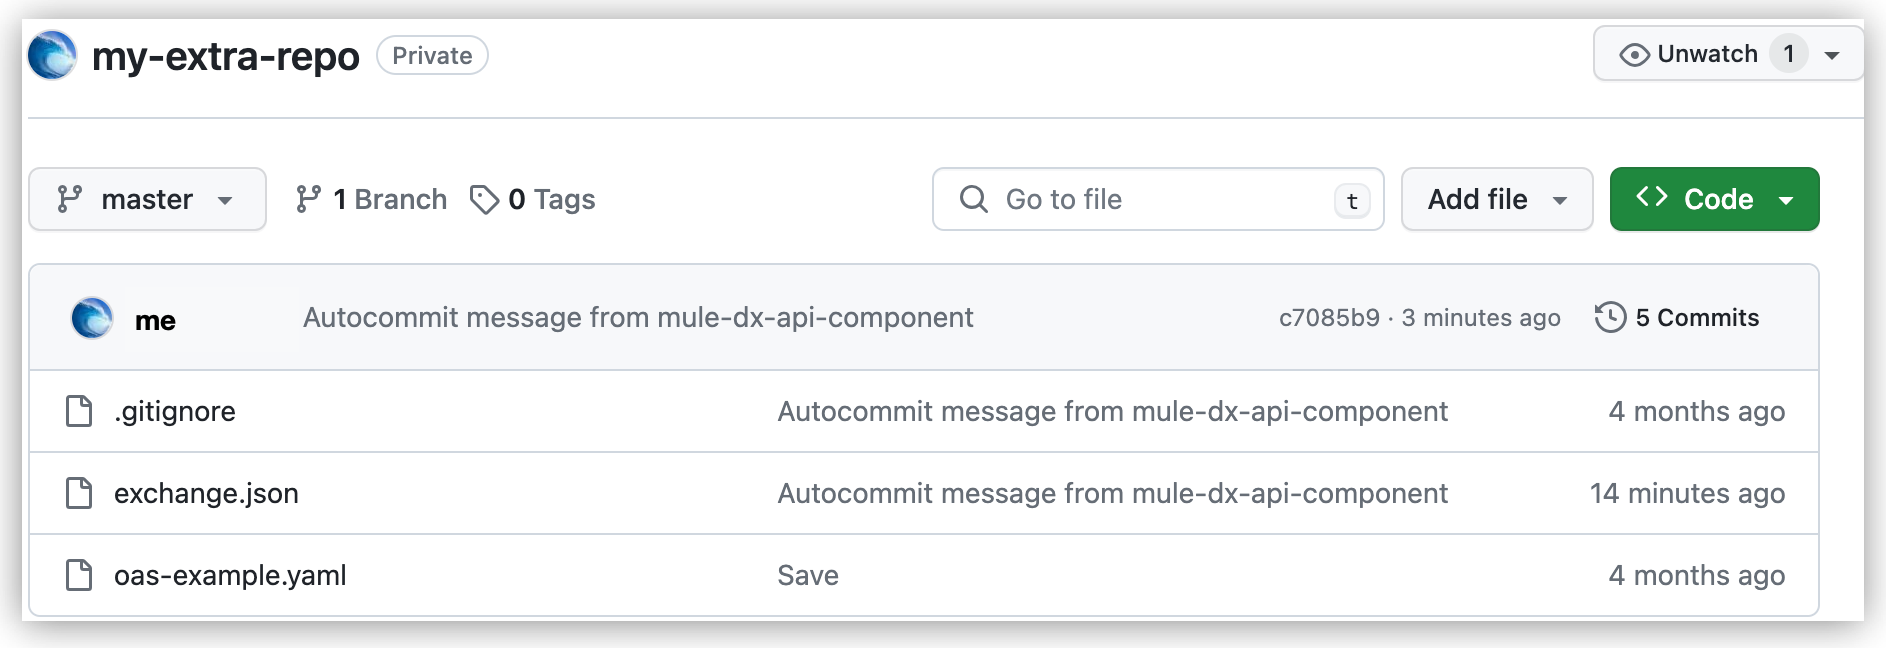
You can now clone this project repo in your IDE to easily modify and sync your changes from the IDE’s UI. See Clone a Project Repository into the IDE.
Sync Project Changes with Your Repository
After your project is connected and published to a remote repo in GitHub, you can use the IDE to sync your changes with that repo. If your repo is not set up yet, see Set Up a Repository from the IDE.
Use the IDE’s UI or its built-in terminal to sync your changes:
Sync Changes from the Source Control Panel
To sync changes to your files from your project’s Source Control panel in the IDE:
-
If your Mule project folder is closed, open the project at its root directory:
-
Open the Command Palette.
Show me how
-
Use the keyboard shortcuts:
-
Mac: Cmd+Shift+p
-
Windows: Ctrl+Shift+p
-
-
In the desktop IDE, select View > Command Palette.
-
In the cloud IDE, click the
(menu) icon, and select View > Command Palette.
-
-
Provide this command:
File: Open Folder... -
Navigate to and select the root folder for your project, for example:
-
Integration or Implementation Example
-
Design Project Example
Example of a root folder and subdirectories of an integration or implementation project in Anypoint Code Builder:
VS Code treats the root as a workspace, which enables the IDE to load the canvas properly.
Example of the root directory for an API design project in Anypoint Code Builder:
The root of a project is the top-level folder that Anypoint Code Builder generates when you create a project. Do not navigate to the project root’s parent or ancestor directory or to one of its child or descendant directories.
-
-
-
Open the Source Control panel.
Show me how
Click the
(Source Control) icon in the activity bar or use the keyboard shortcuts:-
Mac: Ctrl+Shift+g
-
Windows: Cmd+Shift+g
-
-
In the Source Control panel:
-
Stage your files to your local repository by hovering over the Changes area (located after the Commit button) and clicking the
(plus) icon.Alternatively, you can stage a single file by clicking the plus icon for that file.
Staged files move from the Changes area in the Source Control panel to the Staged Changes area. The UI uses the
git addcommand to add changes from your working directory to the staging area in your local Git repo. -
Provide your a commit message for the files, and then click Commit, for example:
-
Click Sync Changes to push your changes to your remote repo on GitHub.
-
-
Open the project in GitHub to check for the synced changes.
Sync Changes from the Command Terminal
To sync changes to your files from your project’s command terminal in the IDE:
-
If your Mule project folder is closed, open the project at its root directory:
-
Open the Command Palette.
Show me how
-
Use the keyboard shortcuts:
-
Mac: Cmd+Shift+p
-
Windows: Ctrl+Shift+p
-
-
In the desktop IDE, select View > Command Palette.
-
In the cloud IDE, click the
(menu) icon, and select View > Command Palette.
-
-
Provide this command:
File: Open Folder... -
Navigate to and select the root folder for your project, for example:
-
Integration or Implementation Example
-
Design Project Example
Example of a root folder and subdirectories of an integration or implementation project in Anypoint Code Builder:
VS Code treats the root as a workspace, which enables the IDE to load the canvas properly.
Example of the root directory for an API design project in Anypoint Code Builder:
The root of a project is the top-level folder that Anypoint Code Builder generates when you create a project. Do not navigate to the project root’s parent or ancestor directory or to one of its child or descendant directories.
-
-
-
From your IDE, open the Terminal window in the console:
-
In the desktop IDE, select View > Terminal.
-
In the cloud IDE, click the
(menu) icon, and select Terminal > New Terminal. -
For either IDE: Press Ctrl and then press the backtick key (`).
-
-
At the prompt, run Git commands to add new files to your repo and to stage, commit, and push changes to your remote repo on GitHub.
The following example uses
git statusto check the status of changes,git committo commit all changed files and add a commit message, andgit pushto merge the changes into the files on the remote repo.$ git status On branch main Your branch is up to date with '011124-test-api-remote/main'. Changes not staged for commit: (use "git add <file>..." to update what will be committed) (use "git restore <file>..." to discard changes in working directory) modified: 011124-test-api.raml no changes added to commit (use "git add" and/or "git commit -a") $ git commit -am 'my commit message' [main bccc296] another commit 1 file changed, 1 deletion(-) $ git push Enumerating objects: 5, done. Counting objects: 100% (5/5), done. Delta compression using up to 8 threads Compressing objects: 100% (3/3), done. Writing objects: 100% (3/3), 944 bytes | 944.00 KiB/s, done. Total 3 (delta 2), reused 0 (delta 0), pack-reused 0 remote: Resolving deltas: 100% (2/2), completed with 2 local objects. To https://github.com/me/my-repo.git e4156cc..bccc296 main -> main
For common Git commands, see About Git in the GitHub documentation, or find all commands in the Git command reference.
Clone a Project Repository into the IDE
If your design, implementation, or integration project is already stored in a repo on GitHub, you and your team members can clone it into Anypoint Code Builder desktop or cloud IDEs. Cloning is helpful for sharing your project with another IDE, for enabling you to edit source and sync changes from the IDE, and for retrieving a backup of a deleted project. For example, you can work on the same project in the desktop and cloud IDE if your project is stored in a repo to which you and your team have access.
-
From your IDE, open the Terminal window in the console:
-
In the desktop IDE, select View > Terminal.
-
In the cloud IDE, click the
(menu) icon, and select Terminal > New Terminal. -
For either IDE: Press Ctrl and then press the backtick key (`).
-
-
Open the Command Palette.
Show me how
-
Use the keyboard shortcuts:
-
Mac: Cmd+Shift+p
-
Windows: Ctrl+Shift+p
-
-
In the desktop IDE, select View > Command Palette.
-
In the cloud IDE, click the
(menu) icon, and select View > Command Palette.
-
-
Clone the repo into the Source Control panel for your project:
-
Provide the following command to add the remote repo on GitHub:
Git: Clone -
Provide the URL to your repo in GitHub, for example:
https://github.com/_owner_/_yourrepo_.gitReplace the URL in the example with the URL to your repo in GitHub. The owner and repo URL are unique to your GitHub site.
-
Navigate to a directory for your new repo, and click Select as repo Destination.
-
If prompted with the request Would you like to open the cloned repository?, click Open to open the project.
For cloned integration or implementation projects, you can navigate to
src→main→muleto find the config XML file or files.
-
To sync changes to project files with your repo, see Sync Project Changes with Your Repository.
Check for a Remote Repository URL
To determine whether a remote GitHub repo for your project is configured in the IDE, check for a URL to the repo:
-
If your Mule project folder is closed, open the project at its root directory:
-
Open the Command Palette.
Show me how
-
Use the keyboard shortcuts:
-
Mac: Cmd+Shift+p
-
Windows: Ctrl+Shift+p
-
-
In the desktop IDE, select View > Command Palette.
-
In the cloud IDE, click the
(menu) icon, and select View > Command Palette.
-
-
Provide this command:
File: Open Folder... -
Navigate to and select the root folder for your project, for example:
-
Integration or Implementation Example
-
Design Project Example
Example of a root folder and subdirectories of an integration or implementation project in Anypoint Code Builder:
VS Code treats the root as a workspace, which enables the IDE to load the canvas properly.
Example of the root directory for an API design project in Anypoint Code Builder:
The root of a project is the top-level folder that Anypoint Code Builder generates when you create a project. Do not navigate to the project root’s parent or ancestor directory or to one of its child or descendant directories.
-
-
-
From your IDE, open the Terminal window in the console:
-
In the desktop IDE, select View > Terminal.
-
In the cloud IDE, click the
(menu) icon, and select Terminal > New Terminal. -
For either IDE: Press Ctrl and then press the backtick key (`).
-
-
Provide the following command:
git remote -v-
If the project has one or more remote repo configurations, the command returns the URL for each remote, along with
pushandfetchinformation, for example:$ git remote -v origin https://github.com/me/my-project-repo.git (fetch) origin https://github.com/me/my-project-repo.git (push)
-
If no results return, a remote repo is not configured for the project.
-
If the error
fatal: not a git repo (or any of the parent directories): .gitreturns, a local repo is not initialized for the project.
-
For information about git remote command options, see git-remote reference in the GitHub documentation.
Remove a Remote Repository from Your Project
To remove a remote repo from your project workspace:
-
If your Mule project folder is closed, open the project at its root directory:
-
Open the Command Palette.
Show me how
-
Use the keyboard shortcuts:
-
Mac: Cmd+Shift+p
-
Windows: Ctrl+Shift+p
-
-
In the desktop IDE, select View > Command Palette.
-
In the cloud IDE, click the
(menu) icon, and select View > Command Palette.
-
-
Provide this command:
File: Open Folder... -
Navigate to and select the root folder for your project, for example:
-
Integration or Implementation Example
-
Design Project Example
Example of a root folder and subdirectories of an integration or implementation project in Anypoint Code Builder:
VS Code treats the root as a workspace, which enables the IDE to load the canvas properly.
Example of the root directory for an API design project in Anypoint Code Builder:
The root of a project is the top-level folder that Anypoint Code Builder generates when you create a project. Do not navigate to the project root’s parent or ancestor directory or to one of its child or descendant directories.
-
-
-
Open the Source Control panel.
Show me how
Click the
(Source Control) icon in the activity bar or use the keyboard shortcuts:-
Mac: Ctrl+Shift+g
-
Windows: Cmd+Shift+g
-
-
In the Source Control panel:
-
Provide the following Git command to add the remote repo on GitHub:
Git: Remove Remote... -
In the popup, select the remote repo that you want to remove.
In the IDE, your local Git repo remains because it was initialized before syncing with the remote.
-