Salesforce Einstein Analytics Connector
Support Category: Select
Anypoint Connector for Salesforce Analytics Cloud (Salesforce Analytics Cloud Connector) enables you to connect to the Salesforce Analytics Cloud application using the Salesforce External Data API![]() . The connector exposes convenient methods for creating and populating data sets into the Salesforce Analytics Cloud system. Load data into the Analytics Cloud from many different data sources whether they are on-premises or in the cloud. Go beyond
. The connector exposes convenient methods for creating and populating data sets into the Salesforce Analytics Cloud system. Load data into the Analytics Cloud from many different data sources whether they are on-premises or in the cloud. Go beyond .csv files with this connector.
Read through this User Guide to understand how to set up and configure a basic integration flow using the connector. Read through the Technical Reference![]() to understand how the connector operations tie in with the External Data API calls.
to understand how the connector operations tie in with the External Data API calls.
Release Notes: Salesforce Analytics Cloud Connector Release Notes.
Before You Begin
This document assumes you are familiar with Mule, Anypoint Connectors, and Anypoint Studio.
To use Salesforce Analytics Cloud Connector you must have a Salesforce account and necessary permissions for uploading data into Analytics Cloud. For more information see Analytics Cloud External Data API Developer’s Guide![]() .
.
Compatibility
| Application/Service | Version |
|---|---|
Mule Runtime |
3.5.0 and later |
External Data API |
43.0 |
Install the Connector
-
In Anypoint Studio, click the Exchange icon in the Studio taskbar.
-
Click Login in Anypoint Exchange.
-
Search for the connector and click Install.
-
Follow the prompts to install the connector.
Use the Connector
To use the Salesforce Analytics Cloud connector in a Mule application project:
-
In Studio, select File > New > Mule Project.
-
Enter a name for your new project and leave the remaining options with their default values.
-
If you plan to use Git, select Create a .gitignore file for the project with the default
.gitignoresettings for Studio Projects, and then click Next. -
Click Finish to create the project.
You can use Salesforce Analytics Cloud Connector as an outbound connector in your flow to push data into Salesforce Analytics Cloud system. To use it as an outbound connector, simply place the connector in your flow at any point after an inbound endpoint. Note that you can also use the Salesforce Analytics Cloud connector in a batch process to push data to Salesforce Analytics Cloud system in batches.
Configure a Global Element
-
Click the Global Elements tab at the base of the canvas.
-
On the Global Mule Configuration Elements screen, click Create.
-
In the Choose Global Type wizard, filter by
salesforce analytics, expand Connector Configuration, and select one of the four available configurations depending on your needs. See Connector Authentication.
-
Click Ok.
-
Enter the global element properties:
For all the configurations, the Proxy fields are:
Field Description Host
Host name of the proxy server. If this is not set then no proxy is used.
Port
The port number on which the proxy server runs.
Username
The username to log in to the server. If this is not set, then no authentication is used.
Password
The username to log in to the server.
Connector Authentication
To access the data in a Salesforce Analytics Cloud instance, you have the following possibilities in terms of authentication:
| Studio 6 Choice | Described Here |
|---|---|
Salesforce Analytics Cloud: Basic Authentication |
|
Salesforce Analytics Cloud: Salesforce Analytics Cloud (OAuth) |
|
Salesforce Analytics Cloud: OAuth 2.0 JWT Bearer |
|
Salesforce Analytics Cloud: OAuth 2.0 SAML Bearer |
Basic authentication is the easiest to implement. All you need to do is provide your credentials in a global configuration, then reference the global configuration in any Salesforce Analytics Cloud connector in your application. Basic authentication is generally recommended for internal applications.
Implementing OAuth 2.0-related authentication mechanisms, involves a few extra steps, but may be preferred if your service is exposed to external users, as it ensures better security. More technical information on these authentication mechanisms at the following links: Basic Auth![]() , OAuth 2.0 Web Flow
, OAuth 2.0 Web Flow![]() , OAuth 2.0 SAML Bearer
, OAuth 2.0 SAML Bearer![]() and OAuth 2.0 JWT Bearer
and OAuth 2.0 JWT Bearer![]() .
.
Basic Authentication

| In the image above, the placeholder values refer to a configuration file placed in the src folder of your project (Learn how to configure properties). You can either hardcode your credentials into the global configuration properties, or reference a configuration file that contains these values. For simpler maintenance and better reusability of your project, it is recommended that you use a configuration file. Keeping these values in a separate file is useful if you need to deploy to different environments, such as production, development, and QA, where your access credentials differ. See Deploying to Multiple Environments for instructions on how to manage this. |
| Field | Description |
|---|---|
Name |
Enter a name for this connector to reference it later. |
Username |
Enter a Salesforce Analytics Cloud username. |
Password |
Enter the corresponding password. |
Security token |
Enter the Security Token for the username. NOTE: Do not confuse the Security Token required in Basic Authentication with the one required in OAuth authentication. Here, the token refers to your user, not to your application, as it does in OAuth. |
Read timeout |
Specifies the amount of time, in milliseconds, that the consumer will wait for a response before it times out. Default value is 0 which means infinite. |
Connection timeout |
Specifies the amount of time, in milliseconds, that the consumer attempts to establish a connection before it times out. Default value is 0 which means infinite. |
Enable Data Sense |
When enabled, DataSense extracts metadata for Salesforce Analytics Cloud objects to automatically determine the data type and format that your application must deliver to, or can expect from Salesforce Analytics Cloud system. By enabling this functionality, Mule discovers the type of data you must send to, or receive from Salesforce Analytics. |
Metadata file name |
Enter the path for the file that contains the descriptions of the object structure of the row that is uploaded into Salesforce Analytics Cloud. This path has to be relative to the |
OAuth 2.0 Web Flow
On the General tab, configure the following fields:

| Field | Description |
|---|---|
Name |
Enter a name for this connector to reference it later. |
Consumer Key |
Enter the consumer key for your connected app from Salesforce. |
Consumer Secret |
Enter the consumer secret for your connected app from Salesforce. |
On No Token |
Select the action that the connector must take if it finds no access token. |
Read timeout |
Specifies the amount of time, in milliseconds, that the consumer waits for a response before it times out. Default value is 0 which means infinite. |
Connection timeout |
Specifies the amount of time, in milliseconds, that the consumer attempts to establish a connection before it times out. Default value is 0 which means infinite. |
Enable Data Sense |
When enabled, DataSense extracts metadata for Salesforce Analytics Cloud objects to automatically determine the data type and format that your application must deliver to, or can expect from Salesforce Analytics Cloud system. By enabling this functionality, Mule discovers the type of data you must send to, or receive from Salesforce Analytics. |
Metadata file name |
Enter the path for the file that contains the descriptions of the object structure of the row that is uploaded into the Salesforce Analytics Cloud system. This path has to be relative to the |
|
For more information on how to create connected apps see Creating a Connected App |
On the OAuth tab, configure the following fields:

| Field | Description |
|---|---|
Domain |
Enter the domain name to use as the callback endpoint. The domain name is not a full URL, but a domain name, IP address, or a hostname. |
Local Port |
Enter the local port to use for the callback endpoint. |
Remote Port |
Enter the remote port to use to build the callback URL. |
Path |
Enter the path to use for the callback endpoint. |
HTTP Connector Reference |
Enter the HTTP connector reference to use for the callback endpoint. |
Default Access Token Id |
Enter the Mule Expression to use as an access token. |
Object Store Reference |
Enter the name of the Object Store reference. |
OAuth 2.0 JWT Bearer

| Field | Description |
|---|---|
Consumer key |
Enter the consumer key for your connected app from Salesforce. |
Key store |
Enter the path to a Java key store file used to sign the JWT. The path should be relative to the |
Store password |
Enter the password for the above provided key store. |
Principal |
Enter the username of the user that you are going to take action of behalf of. |
Token endpoint |
Enter the URL to server providing the token. For more info see: Understanding OAuth Endpoints |
Read timeout |
Specifies the amount of time, in milliseconds, that the consumer will wait for a response before it times out. Default value is 0 which means infinite. |
Connection timeout |
Specifies the amount of time, in milliseconds, that the consumer attempts to establish a connection before it times out. Default value is 0 which means infinite. |
Enable Data Sense |
When enabled, DataSense extracts metadata for Salesforce Analytics Cloud objects to automatically determine the data type and format that your application must deliver to, or can expect from Salesforce Analytics Cloud system. By enabling this functionality, Mule discovers the type of data you must send to, or receive from Salesforce Analytics. |
Metadata file name |
Enter the path for the file that contains the descriptions of the object structure of the row that is uploaded into the Salesforce Analytics Cloud system. This path has to be relative to the |
OAuth 2.0 SAML Bearer
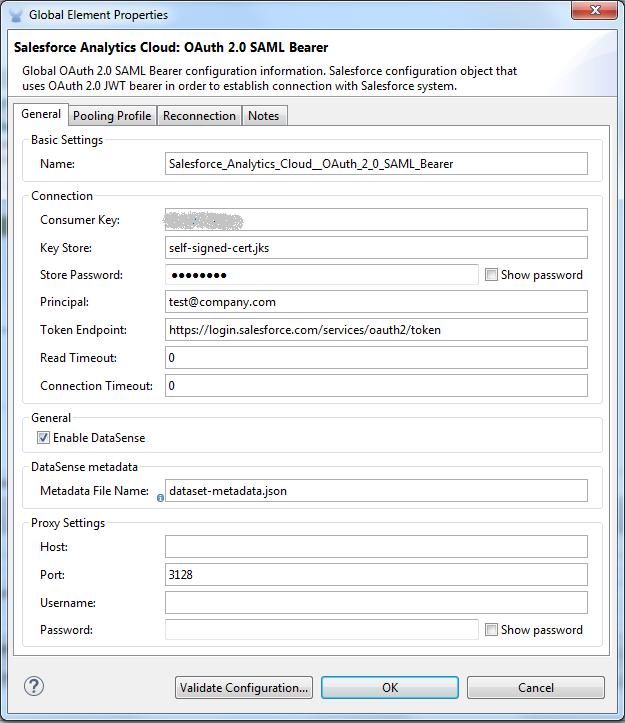
| Field | Description |
|---|---|
Consumer key |
Enter the consumer key for your connected app from Salesforce. |
Key store |
Enter the path to a Java key store file used to sign the JWT. The path should be relative to the src/main/resources folder. See Generate a Keystore File. |
Store password |
Enter the password for the above provided key store. |
Principal |
Enter the username of the user that you are going to take action of behalf of. |
Token endpoint |
Enter the URL to the server providing the token. For more info see: Understanding OAuth Endpoints |
Read timeout |
Specifies the amount of time, in milliseconds, that the consumer will wait for a response before it times out. Default value is 0 which means wait indefinitely. |
Connection timeout |
Specifies the amount of time, in milliseconds, that the consumer attempts to establish a connection before it times out. The default value is 0, which means wait indefinitely. |
Enable Data Sense |
When enabled, DataSense extracts metadata for Salesforce Analytics Cloud objects to automatically determine the data type and format that your application must deliver to, or can expect from Salesforce Analytics Cloud system. By enabling this functionality, Mule discovers the type of data you must send to, or receive from Salesforce Analytics. |
Metadata file name |
Enter the path for the file that contains the descriptions of the object structure of the row that is uploaded into the Salesforce Analytics Cloud system. This path has to be relative to the |
Generate a Keystore File
-
Go to your Mule workspace, and open the command prompt (for Windows) or Terminal (for Mac).
-
Type
keytool -genkeypair -alias salesforce-cert -keyalg RSA -keystore salesforce-cert.jksand press enter.Enter the following details:
-
Password for the key store.
-
Your first name and last name.
-
Your organization unit.
-
Name of your City, State, and the two letters code of your country.
-
-
The system generates a Java keystore file containing a private and public key pair in your workspace. You need to provide a file path for the keystore in your connector configuration.
-
Type
keytool -exportcert -alias salesforce-cert -file salesforce-cert.crt -keystore salesforce-cert.jksand press enter. -
The system now exports the public key from the keystore into the workspace. This is the public key that you need to enter in your Salesforce instance.
-
Make sure that you have both the key store (salesforce-cert.jks) and the public key (salesforce-cert.crt) files in your workspace.
Examples
The following are the common use cases for the Salesforce Analytics Cloud connector:
-
Create a data set in the Salesforce Analytics Cloud system, upload data into the data set from an input file, and trigger the system to start processing the data. Use this when dealing with smaller files, preferably less than 10 MB.
-
Create a data set in the Salesforce Analytics Cloud system, read the data from an input file and split it into batches, upload batches of data into the data set, and trigger the system to start processing the data. We recommend ingesting huge volumes of Data using this approach. Make sure that your batch commit size is less than or equal to 10 MB for optimal performance. The connector throws a warning if the batch commit size is greater than 10 MB.
In version 2.4.0 a retry mechanism was added to the following operations: Upload External Data, Upload External Data Into New Data Set And Start Processing and Create Data Set. The Number of retries parameter was added to each operation in the Advanced tab with a default value of 5.
|
Example 1: Add the Salesforce Analytics Cloud Connector to a Flow
-
Create a new Mule project in Anypoint Studio.
-
Drag the Salesforce Analytics Cloud connector onto the canvas, then select it to open the properties editor.
-
Configure the connector’s parameters:

Field Description Display Name
Enter a unique label for the connector in your application.
Connector Configuration
Select a global Salesforce Analytics connector element from the drop-drown.
Operation
Select an operation for the connector to perform.
-
Save your configuration.
Example 1: Configure with the Studio Visual Editor
Create a dataset and upload data into it by processing all the data in one big chunk.
Create a new Mule Project by clicking File > New > Mule Project. In the new project dialog box, the only thing you are required to enter is the name of the project. Click Finish.

Now let’s create the flow. Navigate through the project’s structure and double-click src/main/app/project-name.xml and follow the steps below:
-
On the right side of Studio search for File.

-
Drag the File element onto the canvas.
-
Search for Transform message and drag it after File.
-
Search for Salesforce Analytics Cloud and drag it after Transform Message.
-
After completing the previous steps you should see:

-
Let’s start configuring each element. Double-click the File element.

-
Click
…next to the Path field. -
Choose a folder with only the csv file that you want to upload. You can download our example file and save it into chosen folder.
-
Double-click Salesforce Analytics Cloud connector.
-
Click the plus sign next to the Connector configuration dropdown.

-
A pop-up appears asking for type of configuration. Choose Salesforce Analytics Cloud: Basic Authentication option and click OK.
-
A new pop-up appears asking for information required for basic authentication. For more info see the Installing and Configuring section
-
In the Connection section enter the credentials used to access the Salesforce instance.
-
In the DataSense metadata section for the Metadata file name field enter the filename that describes the data structure you are going to upload. The filename has to be relative to the src/main/resources directory of your Studio project. For the file provided a few steps earlier (CsvDemoTestData.csv) you can use the metadata file provided below but do not forget to copy it into the src/main/resources directory.
-
Click OK to return to the Salesforce Analytics Cloud tab.
-
From the Operation dropdown in the Basic Settings section choose Upload external data into new data set and start processing.
-
From the Operation dropdown in the DataSet info section choose OVERWRITE.
-
In the Description enter Test data set.
-
In the Label field under DataSet info enter Test data set.
-
In the Name field under DataSet info enter test_data_set.
-
Double-click the Transform message element and add the following mapping in the output section.
%dw 1.0 %output application/java --- payload map ((payload01 , indexOfPayload01) -> { (Id: (trim payload01.Id) as :number) when payload01.Id? and ((trim payload01.Id) != ''), (Country: trim payload01.Country) when payload01.Country? and ((trim payload01.Country) != ''), (City: trim payload01.City) when payload01.City? and ((trim payload01.City) != ''), (Year: (trim payload01.Year) as :number) when payload01.Year? and ((trim payload01.Year) != ''), (Distance: (trim payload01.Distance) as :number) when payload01.Distance? and ((trim payload01.Distance) != ''), (Currencies: ((trim payload01.Currencies) splitBy ";") as :array) when payload01.Currencies? and ((trim payload01.Currencies) != ''), (CreationDate: (trim payload01.CreationDate) as :date{format: "yyyy/MM/dd"}) when payload01.CreationDate? and ((trim payload01.CreationDate) != '') })xml -
It should look something like the following.

-
Now everything is set up and the application can be deployed.
It’s time to test the app. Run the app in Anypoint Studio (right-click the project name and click Run as > Mule Application). Monitor the studio console and check the Salesforce Wave Analytics UI to see if the data was uploaded.
Example 2: Configure with the Studio Visual Editor
Create a dataset and upload data into it by processing the data in several chunks.
When using the batch component tune it based on the amount of memory that you provide to the Mule server. Bear in mind that default threading profile uses 16 threads and each thread is loading data in chunks of 100 records until it reaches the "Commit size" set on "Batch Commit" component. You can minimize the memory used by decreasing the number of threads. Finally you have to be aware of the fact that "Salesforce Analytics Cloud Connector" is also using some memory internally and you should tune "Commit Size" in order to find a good balance but do not set it too low because this will make it inefficient.
Create a new Mule Project by clicking File > New > Mule Project. In the new project dialog box, the only thing you are required to enter is the name of the project. Click Finish.
Create the flow. Navigate through the project’s structure and double click src/main/app/project-name.xml and follow the steps below:
-
On the right side of Studio search for Batch.

-
Select Batch and drag it onto the canvas.

-
Similar to what was done in step 1, search for File.
-
Drag File into the Input section of the batch element created earlier.
-
Search for Message Enricher and drag it after File.
-
Search for Transform Message and drag it after Message Enricher.
-
Search for Salesforce Analytics Cloud and drag it into Message Enricher.
-
Search for Batch commit and drag it into the Batch step section of Batch.
-
Search for Salesforce Analytics Cloud and drag it into the Batch commit section of Batch step.
-
Drag another Salesforce Analytics Cloud connector into the On complete section of Batch.
-
After completing all the above steps you should see:
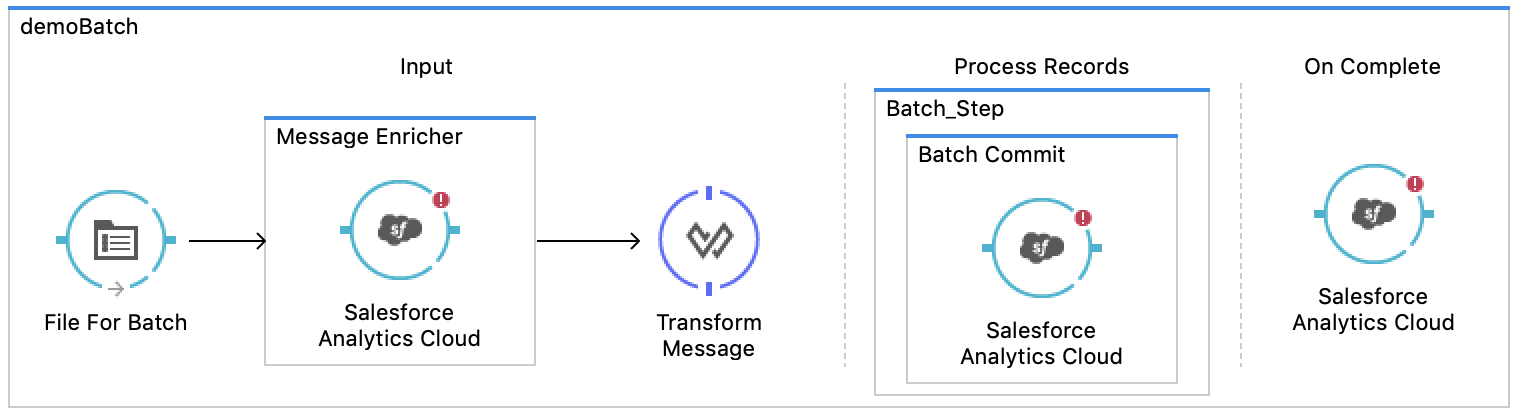
-
Configure each element. Double click the File element.
-
Click
…next to the Path field. -
Choose a folder with only the csv file that you want to upload. You can download our example file and save it into your chosen folder.
-
Double-click the Salesforce Analytics Cloud connector in the Message Enricher.
-
Click the plus sign next to the Connector configuration dropdown.
-
A pop-up asking for type of configuration appears. Choose the Salesforce Analytics Cloud: Basic Authentication option and click OK.
-
A new pop-up asks for information required for basic authentication. For more info see the Installing and Configuring section
-
In the Connection section enter the credentials used to access the Salesforce instance.
-
In the DataSense metadata section for the Metadata file name field enter the filename that describes the data structure you are going to upload. The filename has to be relative to the src/main/resources directory of your Studio project. For the file provided a few steps earlier (CsvDemoTestData.csv) you can use the metadata file provided below, but do not forget to copy it into the src/main/resources directory.
-
Click OK to return to the Salesforce Analytics Cloud tab.
-
From the Operation dropdown in the Basic Settings section choose Create data set.
-
From the Operation dropdown in the DataSet info section choose OVERWRITE.
-
In the Description field enter Test data set.
-
In the Label field under DataSet info enter Test data set.
-
In the Name field under DataSet info enter test_data_set.
-
Double-click Message Enricher and fill in the fields as below.

-
Double-click Batch commit from Batch step.
-
For Commit size enter the number of records you want to process in one step. (for example, 5000)
The application logs a warning message if the data provided for processing in one step exceeds the size of data accepted by Analytics Cloud System. The message looks like this: "The size of data provided for processing in one step exceeded the maximum size of one chunk allowed by Analytics Cloud System. To optimize the memory used you should decrease the size of data provided in one step.". If you see this message then you should tune the Commit Size by decreasing it until you do not see the message anymore. -
Double-click Salesforce Analytics Cloud from Batch commit.
-
From the Connector configuration dropdown choose Salesforce_Analytics_Cloud__Basic_authentication (only this option should be available).
-
Choose Upload external data as the operation.
-
Check the bottom corner on the right-hand side and wait for DataSense to fetch metadata.

-
For Data Set Id enter #[variable:dataSetId]
-
Double-click the Transform message element and add the following mapping in the output section.
%dw 1.0 %output application/java --- payload map ((payload01 , indexOfPayload01) -> { (Id: (trim payload01.Id) as :number) when payload01.Id? and ((trim payload01.Id) != ''), (Country: trim payload01.Country) when payload01.Country? and ((trim payload01.Country) != ''), (City: trim payload01.City) when payload01.City? and ((trim payload01.City) != ''), (Year: (trim payload01.Year) as :number) when payload01.Year? and ((trim payload01.Year) != ''), (Distance: (trim payload01.Distance) as :number) when payload01.Distance? and ((trim payload01.Distance) != ''), (Currencies: ((trim payload01.Currencies) splitBy ";") as :array) when payload01.Currencies? and ((trim payload01.Currencies) != ''), (CreationDate: (trim payload01.CreationDate) as :date{format: "yyyy/MM/dd"}) when payload01.CreationDate? and ((trim payload01.CreationDate) != '') })]xml -
It should look something like the following.

-
Double-click Salesforce Analytics Cloud from the On complete section of Batch.
-
From the Connector configuration dropdown select Salesforce_Analytics_Cloud__Basic_authentication (only this option should be available).
-
From the Operation dropdown select Start data processing.
-
In the Data Set ID field, enter
#[variable:dataSetId]. -
At this point, everything should be set up and the application can be deployed.
It is time to test the application. Run the application in Anypoint Studio (Right click the project name in Studio’s package explorer and select Run as > Mule Application). Monitor the studio console and check Salesforce Wave Analytics UI to see if the data was uploaded.
Example 2: Configure in the XML Editor
-
Add the sfdc-analytics namespace to the mule element as follows:
xmlns:sfdc-analytics="http://www.mulesoft.org/schema/mule/sfdc-analytics"text -
Add the location of the analytics schema referred to by the sfdc-analytics namespace:
http://www.mulesoft.org/schema/mule/sfdc-analytics http://www.mulesoft.org/schema/mule/sfdc-analytics/current/mule-sfdc-analytics.xsdtext -
Add the dw namespace as follows:
xmlns:dw="http://www.mulesoft.org/schema/mule/ee/dw"text -
Add location of dw schema referred by dw namespace with the following value:
http://www.mulesoft.org/schema/mule/ee/dw http://www.mulesoft.org/schema/mule/ee/dw/current/dw.xsdtext -
Add a context:property-placeholder element to your project, then configure its attributes as follows:
<context:property-placeholder location="mule-app.properties"/>xml -
Add a sfdc-analytics:config element to your project, then configure its attributes as follows:
<sfdc-analytics:config name="Salesforce_Analytics_Cloud__Basic_authentication" username="${salesforce.username}" password="${salesforce.password}" securityToken="${salesforce.securityToken}" metadataFileName="${metadata.file.analytics}" doc:name="Salesforce Analytics Cloud: Basic authentication" url="${salesforce.url}"/>xml -
Add an empty flow element to your project as follows:
<flow name="analytics_performanceFlow"> </flow>xml -
Within the flow element add a file:inbound-endpoint element as follows:
<file:inbound-endpoint path="path_to_folder_to_monitor" moveToDirectory="path_to_folder_where_to_move_processed_files" responseTimeout="10000" doc:name="File"> </file:inbound-endpoint>xml -
Within the flow element add a transform-message element as follows:
<dw:transform-message doc:name="Transform Message"> <dw:set-payload><![CDATA[%dw 1.0 %output application/java --- payload map ((payload01 , indexOfPayload01) -> { (Id: (trim payload01.Id) as :number) when payload01.Id? and ((trim payload01.Id) != ''), (Country: trim payload01.Country) when payload01.Country? and ((trim payload01.Country) != ''), (City: trim payload01.City) when payload01.City? and ((trim payload01.City) != ''), (Year: (trim payload01.Year) as :number) when payload01.Year? and ((trim payload01.Year) != ''), (Distance: (trim payload01.Distance) as :number) when payload01.Distance? and ((trim payload01.Distance) != ''), (Currencies: ((trim payload01.Currencies) splitBy ";") as :array) when payload01.Currencies? and ((trim payload01.Currencies) != ''), (CreationDate: (trim payload01.CreationDate) as :date{format: "yyyy/MM/dd"}) when payload01.CreationDate? and ((trim payload01.CreationDate) != '') })]]></dw:set-payload> </dw:transform-message>xml -
Within the flow element add a sfdc-analytics:upload-external-data-into-new-data-set-and-start-processing element as follows:
<sfdc-analytics:upload-external-data-into-new-data-set-and-start-processing config-ref="Salesforce_Analytics_Cloud__Basic_authentication1" type="recordId" operation="UPSERT" description="Test upload of 2500 records all in one step" label="records_2500_in_one_step" dataSetName="records_2500_in_one_step_with_app" edgemartContainer="TestContainer" notificationSent="ALWAYS" notificationEmail="name@email.com" doc:name="Salesforce Analytics Cloud"> <sfdc-analytics:payload ref="#[payload]"/> </sfdc-analytics:upload-external-data-into-new-data-set-and-start-processing>xml -
In the end the XML file should look like this:
<?xml version="1.0" encoding="UTF-8"?> <mule xmlns:sfdc-analytics="http://www.mulesoft.org/schema/mule/sfdc-analytics" xmlns:dw="http://www.mulesoft.org/schema/mule/ee/dw" xmlns:file="http://www.mulesoft.org/schema/mule/file" xmlns:context="http://www.springframework.org/schema/context" xmlns="http://www.mulesoft.org/schema/mule/core" xmlns:doc="http://www.mulesoft.org/schema/mule/documentation" xmlns:spring="http://www.springframework.org/schema/beans" xmlns:xsi="http://www.w3.org/2001/XMLSchema-instance" xsi:schemaLocation="http://www.mulesoft.org/schema/mule/file http://www.mulesoft.org/schema/mule/file/current/mule-file.xsd http://www.springframework.org/schema/context http://www.springframework.org/schema/context/spring-context-current.xsd http://www.springframework.org/schema/beans http://www.springframework.org/schema/beans/spring-beans-current.xsd http://www.mulesoft.org/schema/mule/core http://www.mulesoft.org/schema/mule/core/current/mule.xsd http://www.mulesoft.org/schema/mule/ee/dw http://www.mulesoft.org/schema/mule/ee/dw/current/dw.xsd http://www.mulesoft.org/schema/mule/sfdc-analytics http://www.mulesoft.org/schema/mule/sfdc-analytics/current/mule-sfdc-analytics.xsd"> <context:property-placeholder location="mule-app.properties"/> <sfdc-analytics:config name="Salesforce_Analytics_Cloud__Basic_authentication" username="${salesforce.username}" password="${salesforce.password}" securityToken="${salesforce.securityToken}" metadataFileName="${metadata.file.analytics}" doc:name="Salesforce Analytics Cloud: Basic authentication" url="${salesforce.url}"/> <file:connector name="File" autoDelete="true" streaming="true" validateConnections="true" doc:name="File"/> <flow name="analytics_performanceFlow"> <file:inbound-endpoint path="path_to_folder_to_monitor" moveToDirectory="path_to_folder_where_to_move_processed_files" responseTimeout="10000" doc:name="File"> </file:inbound-endpoint> <dw:transform-message doc:name="Transform Message"> <dw:set-payload><![CDATA[%dw 1.0 %output application/java --- payload map ((payload01 , indexOfPayload01) -> { (Country: trim payload01.Country) when payload01.Country? and ((trim payload01.Country) != ''), (City: trim payload01.City) when payload01.City? and ((trim payload01.City) != ''), (Year: (trim payload01.Year) as :number) when payload01.Year? and ((trim payload01.Year) != ''), (Distance: (trim payload01.Distance) as :number) when payload01.Distance? and ((trim payload01.Distance) != ''), (Currencies: ((trim payload01.Currencies) splitBy ";") as :array) when payload01.Currencies? and ((trim payload01.Currencies) != ''), (CreationDate: (trim payload01.CreationDate) as :date{format: "yyyy/MM/dd"}) when payload01.CreationDate? and ((trim payload01.CreationDate) != '') })]]></dw:set-payload> </dw:transform-message> <sfdc-analytics:upload-external-data-into-new-data-set-and-start-processing config-ref="Salesforce_Analytics_Cloud__Basic_authentication" type="metadata.json:RELATIVE" operation="UPSERT" description="Test upload of 2500 records all in one step" label="records_2500_in_one_step" dataSetName="records_2500_in_one_step_with_app" edgemartContainer="TestContainer" notificationSent="ALWAYS" notificationEmail="name@email.com" doc:name="Salesforce Analytics Cloud"> <sfdc-analytics:payload ref="#[payload]"/> </sfdc-analytics:upload-external-data-into-new-data-set-and-start-processing> </flow> </mule>xml
Example 2 Configure with the XML Editor
-
Create a dataset and upload data into it by processing the data in several chunks.
-
Add sfdc-analytics namespace to the Mule element as follows:
xmlns:sfdc-analytics="http://www.mulesoft.org/schema/mule/sfdc-analytics"text -
Add a location for the analytics schema referred to by the sfdc-analytics namespace with the following:
http://www.mulesoft.org/schema/mule/sfdc-analytics http://www.mulesoft.org/schema/mule/sfdc-analytics/current/mule-sfdc-analytics.xsdtext -
Add the DataWeave namespace:
xmlns:dw="http://www.mulesoft.org/schema/mule/ee/dw" -
Add the location of DataWeave schema referred by DataWeave namespace with the following value:
http://www.mulesoft.org/schema/mule/ee/dw http://www.mulesoft.org/schema/mule/ee/dw/current/dw.xsdtext -
Add a context:property-placeholder element to your project, then configure its attributes as follows:
<context:property-placeholder location="mule-app.properties"/>xml -
Add a sfdc-analytics:config element to your project, then configure its attributes as follows:
<sfdc-analytics:config name="Salesforce_Analytics_Cloud__Basic_authentication" username="${salesforce.username}" password="${salesforce.password}" securityToken="${salesforce.securityToken}" metadataFileName="${metadata.file.analytics}" doc:name="Salesforce Analytics Cloud: Basic authentication" url="${salesforce.url}"/>xml -
Add an empty batch:job element to your project as follows:
<batch:job name="demoBatch"> <batch:input> </batch:input> <batch:process-records> </batch:process-records> <batch:on-complete> </batch:on-complete> </batch:job>xml -
Add a file:inbound-endpoint element into batch:input of batch:job, then configure it as follows:
<file:inbound-endpoint path="path_to_folder_to_monitor" moveToDirectory="path_to_folder_where_to_move_processed_files" responseTimeout="10000" doc:name="File For Batch"> </file:inbound-endpoint>xml -
Add an empty enricher element into batch:input of batch:job, then configure it as follows:
<enricher source="#[payload]" target="#[variable:dataSetId]" doc:name="Message Enricher"> </enricher>xml -
Add a sfdc-analytics:create-data-set element into enricher, then configure it as follows:
<sfdc-analytics:create-data-set config-ref="Salesforce_Analytics_Cloud__Basic_authentication" operation="OVERWRITE" description="${batch.dataSetDescription}" label="${batch.dataSetLabel}" dataSetName="${batch.dataSetName}" edgemartContainer="${batch.dataSetEdgemartContainer}" notificationSent="ALWAYS" notificationEmail="name@email.com" doc:name="Salesforce Analytics Cloud"/>xml -
Add a transform-message element into batch:input of batch:job, then configure it as follows:
<dw:transform-message doc:name="Transform Message"> <dw:set-payload><![CDATA[%dw 1.0 %output application/java --- payload map ((payload01 , indexOfPayload01) -> { (Id: (trim payload01.Id) as :number) when payload01.Id? and ((trim payload01.Id) != ''), (Country: trim payload01.Country) when payload01.Country? and ((trim payload01.Country) != ''), (City: trim payload01.City) when payload01.City? and ((trim payload01.City) != ''), (Year: (trim payload01.Year) as :number) when payload01.Year? and ((trim payload01.Year) != ''), (Distance: (trim payload01.Distance) as :number) when payload01.Distance? and ((trim payload01.Distance) != ''), (Currencies: ((trim payload01.Currencies) splitBy ";") as :array) when payload01.Currencies? and ((trim payload01.Currencies) != ''), (CreationDate: (trim payload01.CreationDate) as :date{format: "yyyy/MM/dd"}) when payload01.CreationDate? and ((trim payload01.CreationDate) != '') })]]></dw:set-payload> </dw:transform-message>xml -
Add an empty batch:step element into batch:process-records of batch:job, then configure it as follows:
<batch:step name="Batch_Step"> </batch:step>xml -
Add an empty batch:commit element into batch:step of batch:process-records, then configure it as follows:
<batch:commit doc:name="Batch Commit" size="3000"> </batch:commit>xml -
Add an sfdc-analytics:upload-external-data element into batch:commit of batch:step of batch:process-records, then configure it as follows:
<sfdc-analytics:upload-external-data config-ref="Salesforce_Analytics_Cloud__Basic_authentication" type="recordId" dataSetId="#[variable:dataSetId]" doc:name="Salesforce Analytics Cloud"> <sfdc-analytics:payload ref="#[payload]"/> </sfdc-analytics:upload-external-data>xml -
Add an sfdc-analytics:start-data-processing element into batch:on-complete of batch:job, then configure it as follows:
<sfdc-analytics:start-data-processing config-ref="Salesforce_Analytics_Cloud__Basic_authentication" dataSetId="#[variable:dataSetId]" doc:name="Salesforce Analytics Cloud"/>xml -
In the end the XML file should look like this:
<?xml version="1.0" encoding="UTF-8"?> <mule xmlns:batch="http://www.mulesoft.org/schema/mule/batch" xmlns:sfdc-analytics="http://www.mulesoft.org/schema/mule/sfdc-analytics" xmlns:dw="http://www.mulesoft.org/schema/mule/ee/dw" xmlns:file="http://www.mulesoft.org/schema/mule/file" xmlns:context="http://www.springframework.org/schema/context" xmlns="http://www.mulesoft.org/schema/mule/core" xmlns:doc="http://www.mulesoft.org/schema/mule/documentation" xmlns:spring="http://www.springframework.org/schema/beans" xmlns:xsi="http://www.w3.org/2001/XMLSchema-instance" xsi:schemaLocation="http://www.mulesoft.org/schema/mule/batch http://www.mulesoft.org/schema/mule/batch/current/mule-batch.xsd http://www.mulesoft.org/schema/mule/file http://www.mulesoft.org/schema/mule/file/current/mule-file.xsd http://www.springframework.org/schema/context http://www.springframework.org/schema/context/spring-context-current.xsd http://www.springframework.org/schema/beans http://www.springframework.org/schema/beans/spring-beans-current.xsd http://www.mulesoft.org/schema/mule/core http://www.mulesoft.org/schema/mule/core/current/mule.xsd http://www.mulesoft.org/schema/mule/ee/dw http://www.mulesoft.org/schema/mule/ee/dw/current/dw.xsd http://www.mulesoft.org/schema/mule/sfdc-analytics http://www.mulesoft.org/schema/mule/sfdc-analytics/current/mule-sfdc-analytics.xsd"> <context:property-placeholder location="mule-app.properties"/> <sfdc-analytics:config name="Salesforce_Analytics_Cloud__Basic_authentication" username="${salesforce.username}" password="${salesforce.password}" securityToken="${salesforce.securityToken}" metadataFileName="${metadata.file.analytics}" doc:name="Salesforce Analytics Cloud: Basic authentication" url="${salesforce.url}"/> <file:connector name="File" autoDelete="true" streaming="true" validateConnections="true" doc:name="File"/> <batch:job name="demoBatch"> <batch:input> <file:inbound-endpoint path="path_to_folder_to_monitor" moveToDirectory="path_to_folder_where_to_move_processed_files" responseTimeout="10000" doc:name="File For Batch"> </file:inbound-endpoint> <enricher source="#[payload]" target="#[variable:dataSetId]" doc:name="Message Enricher"> <sfdc-analytics:create-data-set config-ref="Salesforce_Analytics_Cloud__Basic_authentication" operation="OVERWRITE" description="desc" label="lbl" dataSetName="dsTest" edgemartContainer="TestContainer" notificationSent="ALWAYS" notificationEmail="name@email.com" type="metadata.json:RELATIVE" doc:name="Salesforce Analytics Cloud"/> </enricher> <dw:transform-message doc:name="Transform Message"> <dw:set-payload><![CDATA[%dw 1.0 %output application/java --- payload map ((payload01 , indexOfPayload01) -> { (Id: (trim payload01.Id) as :number) when payload01.Id? and ((trim payload01.Id) != ''), (Country: trim payload01.Country) when payload01.Country? and ((trim payload01.Country) != ''), (City: trim payload01.City) when payload01.City? and ((trim payload01.City) != ''), (Year: (trim payload01.Year) as :number) when payload01.Year? and ((trim payload01.Year) != ''), (Distance: (trim payload01.Distance) as :number) when payload01.Distance? and ((trim payload01.Distance) != ''), (Currencies: ((trim payload01.Currencies) splitBy ";") as :array) when payload01.Currencies? and ((trim payload01.Currencies) != ''), (CreationDate: (trim payload01.CreationDate) as :date{format: "yyyy/MM/dd"}) when payload01.CreationDate? and ((trim payload01.CreationDate) != '') })]]></dw:set-payload> </dw:transform-message> </batch:input> <batch:process-records> <batch:step name="Batch_Step"> <batch:commit doc:name="Batch Commit" size="3000"> <sfdc-analytics:upload-external-data config-ref="Salesforce_Analytics_Cloud__Basic_authentication" type="metadata.json:RELATIVE" dataSetId="#[variable:dataSetId]" doc:name="Salesforce Analytics Cloud"> <sfdc-analytics:payload ref="#[payload]"/> </sfdc-analytics:upload-external-data> </batch:commit> </batch:step> </batch:process-records> <batch:on-complete> <sfdc-analytics:start-data-processing config-ref="Salesforce_Analytics_Cloud__Basic_authentication" dataSetId="#[variable:dataSetId]" doc:name="Salesforce Analytics Cloud"/> </batch:on-complete> </batch:job> </mule>xml
See Also
-
Learn about Batch Processing
-
Read more about Anypoint Connectors