Web Service Consumer Connector
When developing applications with Mule, users often need to consume a SOAP Web service to acquire data from an external source. In the best case scenario, you can use an existing Anypoint Connector in your Mule application to connect to a specific service provider, such as Zuora or Avalara. However, where no service-specific connector exists to facilitate the connection, the quickest, easiest way to consume a Web service from within a Mule application is to use the Web Service Consumer.
Using the information contained in a service’s WSDL, this connector enables you to configure a few details to establish the connection you need to consume a service from within your Mule application. Identify the location of the Web service’s WSDL file, then ask the Web Service Consumer to configure itself from the WSDL to get the host, port, and address.
Before this component existed in Studio, you may have configured an HTTP connector and SOAP Component in a Mule flow to be able to consume a Web service; now you can simply insert the Web Service Consumer connector into your flow, requiring less effort to configure.
The Web Service Consumer also offers extra functionality to help you build out your application:
-
With a DataWeave transformer, the Web Service Consumer makes use of DataSense functionality to acquire information about the expected format and structure of the input or output, so as to eliminate the guesswork in trying to figure out what to send to, and what to receive from, a SOAP Web service.
-
With a DataWeave transformer, you can visually map the input you receive (SOAP header or body) into another data format or structure for further processing.
-
Secure your Web service requests using the functionality embedded within the Web Service Consumer to add a username token to requests, and/or WS-Security timestamp.
For example, imagine you wish to build an application in which you need to gather information about the last price at which a stock traded. After accepting an end-user request, you need to consume an external SOAP Web service that checks for the most recent trade of a particular stock, and the price at which it sold, then returns a response. Such an application could make use of the Web Service Consumer to consume the stock quote information, and then use a DataWeave to map the results to a format that could be returned to the end-user. See first figure below; a second example follows below it.

The component formerly known as the SOAP Connector is now known as the CXF Component. It should not be confused with the Web Service Consumer.
Before You Begin
This document assumes that you are familiar with SOAP, WSDLs, DataWeave, Mule, Anypoint connectors, Anypoint Studio essentials, elements in a Mule flow, and global elements.
To Install this Connector
-
In Anypoint Studio, click the Exchange icon in the Studio taskbar.
-
Click Login in Anypoint Exchange.
-
Search for the connector and click Install.
-
Follow the prompts to install the connector.
When Studio has an update, a message displays in the lower right corner, which you can click to install the update.
Limitations
-
The Web Service Consumer interfaces only with SOAP Web services, not REST APIs.
-
Within Mule, the Web Services Consumer is available for use only in conjunction with the following connectors:
-
File
-
FTP
-
HTTP
-
HTTPS
-
JMS
-
SFTP
-
-
The Web Service Consumer cannot handle multipart SOAP requests. If a multipart SOAP request is submitted, this error occurs:
Operation Messages With More Than 1 Part Are Not Supported.The following is an example of the incorrect multipart use:
<soap:header message="sws:MyInput" part="header" use="literal"/> <soap:header message="sws:MyInput" part="header2" use="literal"/> <soap:body parts="body" use="literal"/>xmlTo solve this, modify the WSDL to remove the header parts and continue using the Web Service Consumer. Alternatively, you can use the CXF module to call the service.
Basic Usage of Web Service Consumer
To use a Web Service Consumer in your Mule application, you must carry out three tasks:
-
Add the WSDL file of the service you want to consume to your Mule project.
-
Add a Web Service Consumer element to your Mule flow.
-
Define the Operation to perform.
-
Add a Connector Configuration using the green plus sign you see in the properties window of the Web Service Consumer element you added to your flow.
-
In the Global Web Service Consumer element, specify the location of the web service’s WSDL, and apply any security settings that the service provider demands. To take advantage of the design-time power of the Web Service Consumer, consider using it in conjunction with DataWeave using the Transform Component.
For more information about DataWeave and DataSense:
-
DataSense: The Web service consumer is DataSense-compatible. DataSense uses information in the WSDL to automatically extract metadata about the data structure and format a SOAP Web service delivers or expects. When this functionality is enabled (in the global configuration of the Web Service Consumer element or by default in newer versions), the type of data that is sent or expected by the service is easily discoverable.
-
DataWeave transformer: When used in conjunction with a DataSense-enabled Web Service Consumer, DataWeave can automatically extract payload or header metadata from the service that you can map and transform through a visual interface. For example, if you configure a Web Service consumer in your application, then drag a DataWeave transformer after it, DataWeave uses the information that DataSense extracted to pre-populate the input values for mapping, so that you only need to confirm (or adjust) the selections, then proceed to mapping to your desired output. In other words, DataSense makes sure that DataWeave knows the data format and structure with which it must work so you don’t have to figure it out manually.
For more information on best design-time practices with DataSense and DataWeave, see the DataSense documentation.
To Use HTTP Requester to Obtain a WSDL from XML
In Mule 3.9 and later, you can use the useConnectorToRetrieveWsdl attribute in XML. This attribute uses the HTTP Requester provided by the Connector Configuration to obtain a WSDL. The WSDL Location must be at an HTTP or HTTPS URL location.
Example:
<ws:consumer-config name="Web_Service_Consumer"
service="TestService" port="TestPort" serviceAddress="http://fake.com/services/Test"
wsdlLocation="http://fake.com?Wsdl"
useConnectorToRetrieveWsdl="true" />xmlNamespace and Schema for XML
The following sections provide namespace and schema information.
When designing your application in Studio, when you drag the connector from the palette to the Anypoint Studio canvas, Studio automatically populates the XML code with the connector namespace and schema locations.
Namespace: xmlns:ws="http://www.mulesoft.org/schema/mule/ws"
Schema Location: http://www.mulesoft.org/schema/mule/ws/current/mule-ws.xsd
If you are manually coding the Mule application in Studio’s XML editor or other text editor, define the namespace and schema location in the header of your Configuration XML, inside the <mule> tag.
<mule xmlns:http="http://www.mulesoft.org/schema/mule/http" xmlns:successfactors="http://www.mulesoft.org/schema/mule/successfactors"
xmlns:ws="http://www.mulesoft.org/schema/mule/ws"
xmlns="http://www.mulesoft.org/schema/mule/core"
xmlns:doc="http://www.mulesoft.org/schema/mule/documentation"
xmlns:spring="http://www.springframework.org/schema/beans"
xmlns:xsi="http://www.w3.org/2001/XMLSchema-instance"
xsi:schemaLocation="http://www.springframework.org/schema/beans
http://www.springframework.org/schema/beans/spring-beans-current.xsd
http://www.mulesoft.org/schema/mule/core
http://www.mulesoft.org/schema/mule/core/current/mule.xsd
http://www.mulesoft.org/schema/mule/ws
http://www.mulesoft.org/schema/mule/ws/current/mule-ws.xsd
http://www.mulesoft.org/schema/mule/successfactors
http://www.mulesoft.org/schema/mule/successfactors/current/mule-successfactors.xsd
http://www.mulesoft.org/schema/mule/http
http://www.mulesoft.org/schema/mule/http/current/mule-http.xsd">xmlConfiguring the Web Service Consumer
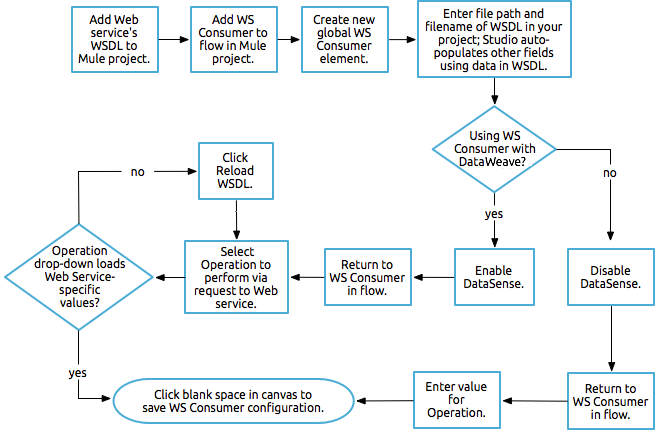
To prepare an application to use a Web Service as in one of the examples above, you must first add the Web service’s WSDL to your Mule project, then configure, at minimum, the required parameters for the Web Service Consumer element and a Global Web Service Consumer element. The diagram and section below describes how to address these requirements.
Configure WSC with the Studio Visual Editor
-
Begin by acquiring the WSDL file for the SOAP Web service you intend to consume, or identify the URL of the WSDL. You can also open a WSDL file from Anypoint Exchange by clicking the Exchange icon on the left of the Studio task bar.
-
If you are using a WSDL file, copy the file into the
src/main/resourcesfolder of your Studio project. (You can drag and drop the file to copy it to the folder.) If using a URL, there is no need to copy anything to your Studio project. -
Drag a Web Service Consumer connector into a flow in your application. Click the Web Service Consumer icon to open its Properties Editor, then change the default value of the Display Name of the connector, if you wish.
-
Define the Global Configuration of the connector by clicking the plus sign next to the Global Configuration field.
-
In the window that opens, enter a value in the WSDL Location field. Populate this field first.
To do this:
-
Click the link Search WSDL in Exchange to open the Anypoint Exchange and select a WSDL definition residing there.
-
Type the WSDL’s URL in the field.
-
Click the
…button to provide a filepath and filename of the WSDL file you copied into thesrc/main/resourcesfolder of your project.Upon filling out this field, you give Studio the opportunity to read the contents of the WSDL and automatically populate the remaining empty fields —
Service,Port, andAddress— using information contained in the WSDL file. Alternatively, you can manually populate these fields with the appropriate information about the Web service. If a Port value is not present, click the down arrow to choose a value.
-
-
If Enable DataSense box is available in your version of Web Service Consumer, confirm its box is checked, then click OK to save.
-
Notice that Studio auto-populates the following fields in the Properties Editor of the Web Service Consumer element in your flow:
-
Connector Configuration - With the name of the Global Web Service Consumer that you just created.
-
Operation - With the name of an operation that the Web service supports for its consumers. Click the down-arrow to choose an operation.
-
-
Define the Operation of the Web Service Consumer, if you wish (and if the SOAP Web service offers more than one operation), then save your configuration.

| As with the CXF component, you can optimize transmission of SOAP messages using the Message Transmission Optimization Mechanism (MTOM) by checking the MTOM Enabled box, or by defining an expression that triggers MTOM activation. See Using MTOM. |
Configure WSC with the XML Editor
To configure the connector:
-
Acquire a WSDL file for the SOAP Web service you intend to consume, or identify the URL of the WSDL.
-
If you are using a WSDL file, copy the file into the
src/main/resourcesfolder of your Studio project. (You can drag and drop the file to copy it to the folder.) If using a URL, there is no need to copy anything to your Studio project. -
Above all the flows in your application, add a global
ws:consumer-configelement to your application. Configure its attributes according to the code sample below to define how to connect to the Web service you intend to consume. For a full list of elements, attributes and default values, consult the Web Service Consumer Reference.<ws:consumer-config name="Web_Service_Consumer1" wsdlLocation="src/main/resources/sample_wsdl_2.txt" service="StockQuoteService" port="StockQuotePort" serviceAddress="http://example.com/stockquote" doc:name="Web Service Consumer"/>xml -
Add a
ws:consumerelement to a flow in your application.Configure its attributes according to the code sample below to define the global Web Service Consumer to reference, and the operation to perform with a request to the Web service. For a full list of elements, attributes and default values, see the Web Service Consumer Reference.
<ws:consumer doc:name="Web Service Consumer" config-ref="Web_Service_Consumer1" operation="GetLastTradePrice"/>xml
Web Service Consumer and DataWeave
As stated above, when used in conjunction with a DataSense-enabled Web Service Consumer, DataWeave automatically extracts the payload or header metadata that you can use to map and or transform to a different data format or structure through the DataWeave language. When you have a configured, DataSense-enabled Web Service Consumer in your flow, you can drop a DataWeave transformer next to it – preceding or following it – and DataWeave automatically extracts the information that DataSense collected from the WSDL about the expected format and structure of the message.
-
If DataWeave follows the fully-configured Web Service Consumer, DataWeave has access to its input values and you can use these as inputs to create your custom output.
-
If DataWeave precedes the fully-configured Web Service Consumer, DataWeave creates a scaffolding that produces an output that matches what the Web Service Consumer expects to receive (see below).
{
"item_amount": "????",
"payment": {
"currency": "????",
"installments": "????",
"payment-type": "????"
},
"product": {
"model": "????",
"price": "????"
},
"salesperson": "????",
"shop": "????"
}jsonTo take advantage of Web Service Consumer, DataSense, and DataWeave, configure these elements in the following order:
-
The Global Web Service Consumer element, with DataSense enabled.
-
The Web Service Consumer connector in a flow in your application, which references the Global Web Service Consumer connector.
-
The Transform Message (DataWeave transformer), dropped before or after the Web Service Consumer connector in your flow.
Adding Custom Headers
Create SOAP headers as outbound properties through the Property transformer.
Outbound properties that begin with a soap. prefix are treated as SOAP headers and ignored by the transport. All properties that aren’t named with a soap. prefix are treated as transport headers (by default, the WSC uses the HTTP transport).
|
Add Custom Headers with the Studio Visual Editor

Add Custom Headers with the XML Editor
<set-property propertyName="soap.myProperty" value="#[payload]" doc:name="Property"/>xml|
When configuring the header manually, the value you pass should have the structure of an XML element, and it shouldn’t be a plain pair of key and value. Using a set property element, for example, the value of the property must contain the enclosing XML tags, like so: The example above works, the one below doesn’t: |
Mapping SOAP Headers
With a Web Service Consumer, DataWeave offers the option of mapping and transforming a message’s payload, properties, or variables by picking different inputs.
-
Ensure you have configured a DataSense-enabled Web Service Consumer in your flow and set a DataWeave transformer to follow it. Click the DataWeave icon in the canvas to open its Properties Editor.
-
If the SOAP service returns a response with headers, the tree in the input section of the DataWeave transformer has multiple inbound properties in it. Each header enters the Mule flow as an inbound property. You can double click it to open this property in a different tab and provide test data.
-
In the transform’s input directives you can see how this input is being referenced, use this as part of the path when refering to one of the elements in the header.
|
With DataWeave, you can use multiple inputs in a single transform, so you can take information from both the SOAP body and the SOAP headers to produce your output. To produce multiple outputs, you must create separate transforms, but these can be hosted in a single DataWeave transformer on your flow. So in a single DataWeave transformer you could host a transform that populates the SOAP body and another that populates a SOAP header. |
Web Service Consumer and DataSense Explorer
Use the DataSense Explorer feature in Studio to gain design-time insight into the state of the message payload, properties, and variables as it moves through your flow. The DataSense Explorer is mostly useful in understanding the content of a message before it encounters a Web Service Consumer, and after it emerges from the connector so as to better understand the state of the data your application is working with.
The DataSense Explorer in the example below offers information about the Payload, Variables, Inbound Properties and Outbound Properties contained that comprise the message object at the moment the message encounters the Web Service Consumer. Use the In-Out toggle at the top of the DataSense Explorer to view metadata of message as it arrives at, or leaves the message processor.
Message State Before Web Service Consumer

Message State After Web Service Consumer

Proxy the Web Service Consumer
This section describes how to configure a proxy request to the SOAP service in a Mule application. Let’s start with this flow that grabs a country name as an HTTP parameter and stores it in a variable for the SOAP service request to a weather data service that displays all cities for which data for the country is given.

To proxy the request to the SOAP service, go to the Global Elements tab in Studio, create a new HTTP Request global element, and from the Proxy tab of the HTTP Request Configuration, enter the host and port details of the proxy.

Specify your newly created proxy configuration from the Reference tab of the global element for the Web Service Consumer.

The proxy configuration looks similar to this XML block in your Mule application:
<http:request-config name="HTTP_Request_Configuration" host="www.webservicex.com"
port="80" doc:name="HTTP Request Configuration">
<http:proxy host="my.example.proxy.com" port="8080"/>
</http:request-config>xmlThe example flow:
<?xml version="1.0" encoding="UTF-8"?>
<mule xmlns:dw="http://www.mulesoft.org/schema/mule/ee/dw"
xmlns:metadata="http://www.mulesoft.org/schema/mule/metadata"
xmlns:mulexml="http://www.mulesoft.org/schema/mule/xml"
xmlns:tracking="http://www.mulesoft.org/schema/mule/ee/tracking"
xmlns:ws="http://www.mulesoft.org/schema/mule/ws"
xmlns:http="http://www.mulesoft.org/schema/mule/http"
xmlns="http://www.mulesoft.org/schema/mule/core"
xmlns:doc="http://www.mulesoft.org/schema/mule/documentation"
xmlns:spring="http://www.springframework.org/schema/beans"
xmlns:xsi="http://www.w3.org/2001/XMLSchema-instance"
xsi:schemaLocation="http://www.springframework.org/schema/beans
http://www.springframework.org/schema/beans/spring-beans-current.xsd
http://www.mulesoft.org/schema/mule/core
http://www.mulesoft.org/schema/mule/core/current/mule.xsd
http://www.mulesoft.org/schema/mule/ws
http://www.mulesoft.org/schema/mule/ws/current/mule-ws.xsd
http://www.mulesoft.org/schema/mule/http
http://www.mulesoft.org/schema/mule/http/current/mule-http.xsd
http://www.mulesoft.org/schema/mule/ee/tracking
http://www.mulesoft.org/schema/mule/ee/tracking/current/mule-tracking-ee.xsd
http://www.mulesoft.org/schema/mule/ee/dw
http://www.mulesoft.org/schema/mule/ee/dw/current/dw.xsd
http://www.mulesoft.org/schema/mule/xml
http://www.mulesoft.org/schema/mule/xml/current/mule-xml.xsd">
<http:listener-config name="HTTP_Listener_Configuration" host="0.0.0.0"
port="8082" doc:name="HTTP Listener Configuration"/>
<ws:consumer-config name="Web_Service_Consumerweather"
wsdlLocation="http://www.webservicex.com/globalweather.asmx?WSDL"
service="GlobalWeather"
port="GlobalWeatherSoap"
serviceAddress="http://www.webservicex.com/globalweather.asmx"
doc:name="Web Service Consumer"/>
<http:request-config name="HTTP_Request_Configuration" host="www.webservicex.com"
port="80" doc:name="HTTP Request Configuration">
<http:proxy host="example.proxy.com" port="8080"/>
</http:request-config>
<flow name="soap-wsc-proxy">
<http:listener config-ref="HTTP_Listener_Configuration" path="/country" doc:name="HTTP"/>
<set-variable variableName="CountryName"
value="#[message.inboundProperties.'http.query.params'.CountryName]"
doc:name="Get Cities by Country"/>
<dw:transform-message doc:name="Transform Message">
<dw:set-payload><![CDATA[%dw 1.0
%output application/xml
%namespace ns0 http://www.webserviceX.NET
---
{
ns0#GetCitiesByCountry: {
ns0#CountryName: flowVars.CountryName as :string
}
}]]></dw:set-payload>
</dw:transform-message>
<ws:consumer config-ref="Web_Service_Consumerweather" doc:name="Web Service Consumer" operation="GetCitiesByCountry"/>
<logger level="INFO" doc:name="Logger"/>
</flow>
</mule>xmlSecurely Connecting to a SOAP Web Service
Depending upon the level of security employed by a SOAP Web service, you may need to correspondingly secure the requests your Web Service Consumer sends. Any calls you send to a Web service have to adhere to the Web service provider’s security requirements. To comply with this requirement, you can configure security settings on your Global Web Service Consumer connector.
The WSC allows you to:
-
Add an expiration to messages
-
Add username and password header to outgoing messages
-
Add a signature header to outgoing messages
-
Verify incoming messages for signature headers
-
Encrypt outgoing messages (at SOAP level)
-
Decrypt incoming messages (at SOAP level)
Securely Connect Using the Studio Visual Editor
To securely connect:
-
Within the Global Web Service Consumer element’s Global Element Properties panel, click the Security tab:

-
Based on the security requirements of the Web service provider, select to apply Username Token security, or a WS-Security Timestamp or both.
-
Enter values in the required fields.
For a full list of elements, attributes and default values, see the Web Service Consumer Reference.
-
Click OK to save your security settings.
Securely Connect Using the XML Editor
Add child elements to the global ws:consumer-config element you configured in your application. Configure the child elements' attributes according to the code sample below. For a full list of elements, attributes and default values, consult Web Service Consumer Reference.
...
<ws:consumer-config name="OrderWS" wsdlLocation="enterprise.wsdl.xml" service="OrderService" port="Soap" serviceAddress="https://login.orderservice.com/services/Soap/c/22.0" doc:name="Web Service Consumer">
<ws:security>
<ws:wss-username-token username="test" password="test" passwordType="DIGEST" addCreated="true" addNonce="true"/>
<ws:wss-timestamp expires="30000"/>
</ws:security>
</ws:consumer-config>
...xmlVerify the Response Timestamp
Not all web services provide a timestamp in their responses. You need to verify this with the security requirements of your Web Service Provider.
You can determine the freshness of the response’s security semantics to your WS request by instructing Mule to verify the response’s timestamp using the mule.ws.checkWssResponseTimestamp attribute:
-
You can set it when starting Mule passing the following argument:
-M-Dmule.ws.checkWssResponseTimestamp=true
-
Or you can set it as a wrapper configuration in your
${MULE_HOME}/conf/wrapper.conffile:wrapper.java.additional.<n>=-Dmule.ws.checkWssResponseTimestamp=true
| Learn more about passing JVM arguments to your Mule instance here. |
Using Basic Authentication and SSL
If the web service you’re connecting to requires basic authentication, you can easily provide your username and password as part of the URL when you reach out to it.
The URL should follow the structure below:
http://myUserName:myPassword@hostService
In the Web Service Consumer’s Global Element, add a reference to an http-request-config element.
By default, the WSC consumer runs over a default configuration for the HTTP Request Connector. If you need it to instead run over a configuration of the connector that uses HTTPS (or an HTTP configuration that is different from the default) follow the steps below:
-
Click the Global Elements tab, below the canvas and create a new Global Element.

-
For the Global Element type, select HTTP Request Configuration

-
Complete the required fields in the General tab (host and port)
-
Then select the TLS/SSL tab and configure the fields related to the HTTPS authentication, Default or Custom.
-
In your instance of the Web Service Consumer in your flow, click on the green plus sign next to Connector Configuration.

-
In the References tab, select your newly created HTTPS Global Element for the Connector Ref field.
Configure Authentication Using the Studio Visual Editor
To configure:
-
Enter the Web Service Consumer’s global configuration element.
-
Open the References tab.
-
Create a new reference by clicking the green plus sign.
Configure Authentication Using the XML Editor
<http:request-config host="localhost" port="${port}" name="customConfig">
<http:basic-authentication username="user" password="pass" />
</http:request-config>
<ws:consumer-config wsdlLocation="Test.wsdl" service="TestService" port="TestPort" serviceAddress="http://localhost:${port}/services/Test" connectorConfig="customConfig" name="globalConfig"/>xmlBy default, the WSC consumer runs over a default configuration for the HTTP Request Connector. If you need it to instead run over a configuration of the connector that uses HTTPS (or an HTTP configuration that is different from the default) follow the steps below:
-
Add an HTTP Connector global element in your project, configure it with the necessary security attributes
<http:request-config name="HTTP_Request_Configuration" host="example.com" port="8081" protocol="HTTPS" doc:name="HTTP_Request_Configuration"/> <tls:context> <tls:trust-store path="your_truststore_path" password="your_truststore_password"/> <tls:key-store path="your_keystore_path" password="your_keystore_path" keyPassword="your_keystore_keypass"/> </tls:context> </http:request-config>xml -
In your
ws:consumer-configelement, include aconnectorConfigattribute to reference to this HTTP connector configuration element:<ws:consumer-config name="Web_Service_Consumer" wsdlLocation="tshirt.wsdl.xml" service="TshirtService" port="TshirtServicePort" serviceAddress="http://tshirt-service.qa2.cloudhub.io/tshirt-service" connectorConfig="HTTP_Request_Configuration"/>xml
Referencing the Deprecated HTTP Transport
To set alternate HTTP settings, instead of referencing an instance the new HTTP Connector, you can reference an instance of the deprecated HTTP transport and accomplish the same. To add this reference, add a connector-ref attribute to the WSC configuration element. The connectorConfig and connector-ref attributes are mutually exclusive, and both optional.
If none of the two reference attributes are specified, a default instance of the new HTTP connector is used. For backwards compatibility, you can change this behavior and make an instance of the deprecated HTTP Transport the default configuration. There’s a global configuration property that has been added in Mule runtime 3.6, that allows you to change this default behavior:
<configuration>
<http:config useTransportForUris="true"/>
</configuration>xmlThe default value for this attribute is false. When setting this flag to true, Mule falls back to the deprecated HTTP transport to resolve URIs when no transport/connector is specified.
Complete Code Example
Visual Studio Editor View

XML View
<?xml version="1.0" encoding="UTF-8"?>
<mule xmlns:dw="http://www.mulesoft.org/schema/mule/ee/dw" xmlns:file="http://www.mulesoft.org/schema/mule/file" xmlns:tracking="http://www.mulesoft.org/schema/mule/ee/tracking" xmlns:ws="http://www.mulesoft.org/schema/mule/ws" xmlns:http="http://www.mulesoft.org/schema/mule/http" xmlns="http://www.mulesoft.org/schema/mule/core" xmlns:doc="http://www.mulesoft.org/schema/mule/documentation"
xmlns:spring="http://www.springframework.org/schema/beans"
xmlns:xsi="http://www.w3.org/2001/XMLSchema-instance"
xsi:schemaLocation="http://www.springframework.org/schema/beans http://www.springframework.org/schema/beans/spring-beans-current.xsd
http://www.mulesoft.org/schema/mule/core http://www.mulesoft.org/schema/mule/core/current/mule.xsd
http://www.mulesoft.org/schema/mule/http http://www.mulesoft.org/schema/mule/http/current/mule-http.xsd
http://www.mulesoft.org/schema/mule/ws http://www.mulesoft.org/schema/mule/ws/current/mule-ws.xsd
http://www.mulesoft.org/schema/mule/file http://www.mulesoft.org/schema/mule/file/current/mule-file.xsd
http://www.mulesoft.org/schema/mule/ee/tracking http://www.mulesoft.org/schema/mule/ee/tracking/current/mule-tracking-ee.xsd
http://www.mulesoft.org/schema/mule/ee/dw http://www.mulesoft.org/schema/mule/ee/dw/current/dw.xsd">
<ws:consumer-config name="Web_Service_Consumer" wsdlLocation="http://tshirt-service.cloudhub.io/?wsdl" service="TshirtServicePortTypeService" port="TshirtServicePortTypePort" serviceAddress="http://tshirt-service.cloudhub.io/" doc:name="Web Service Consumer"/>
<http:listener-config name="HTTP_Listener_Configuration" host="localhost" port="8081" doc:name="HTTP Listener Configuration"/>
<flow name="orderTshirt" >
<http:listener config-ref="HTTP_Listener_Configuration" path="orders" doc:name="HTTP">
<http:response-builder statusCode="200"/>
</http:listener>
<set-variable variableName="apiKey" value="#['abc12345']" doc:name="Set API Key"/>
<dw:transform-message doc:name="Transform Message">
<dw:input-variable doc:sample="string.dwl" variableName="apiKey"/>
<dw:set-payload><![CDATA[%dw 1.0
%output application/xml
%namespace ns0 http://mulesoft.org/tshirt-service
---
{
ns0#OrderTshirt: {
size: payload.size,
email: payload.email,
name: payload.name,
address1: payload.address1,
address2: payload.address2,
city: payload.city,
stateOrProvince: payload.state,
postalCode: payload.postal,
country: payload.country
}
}]]></dw:set-payload>
<dw:set-property propertyName="soap.header"><![CDATA[%dw 1.0
%output application/java
---
flowVars.apiKey]]></dw:set-property>
</dw:transform-message>
<ws:consumer config-ref="Web_Service_Consumer" operation="OrderTshirt" doc:name="Order Tshirt"/>
<dw:transform-message doc:name="Transform Message">
<dw:set-payload><![CDATA[%dw 1.0
%output application/json
---
payload]]></dw:set-payload>
</dw:transform-message>
</flow>
<flow name="listInventory" >
<http:listener config-ref="HTTP_Listener_Configuration" path="inventory" doc:name="HTTP">
<http:response-builder statusCode="200"/>
</http:listener>
<ws:consumer config-ref="Web_Service_Consumer" operation="ListInventory" doc:name="List Inventory"/>
<dw:transform-message doc:name="Transform Message">
<dw:set-payload><![CDATA[%dw 1.0
%output application/java
---
{
}]]></dw:set-payload>
</dw:transform-message>
</flow>
</mule>xmlSee Also
-
Learn more about how to use the DataWeave transformer.
-
Learn how to publish a REST API in Mule using APIkit.