Amazon S3 Studio Configuration
To configure a connector in Anypoint Studio:
-
Add the connector to your Studio project.
-
Configure an input source for the connector.
-
Configure the connector.
Add the Connector to Your Project
Anypoint Studio provides two ways to add the connector to your Studio project: from the Exchange button in the Studio taskbar or from the Mule Palette view.
Add the Connector Using Exchange
-
In Studio, create a Mule project.
-
Click the Exchange icon (X) in the upper-left of the Studio task bar.
-
In Exchange, click Login and supply your Anypoint Platform username and password.
-
In Exchange, search for "s3".
-
Select the connector and click Add to project.
-
Follow the prompts to install the connector.
Configure an Input Source
Configure an input source for Amazon S3 Connector, such as a connector operation, HTTP connector, or scheduler.
You can put the following operations for the connector in the Source area of the Studio canvas:
-
On Deleted Object Initiates access to your app when an Amazon S3 object is deleted.
-
On New Object Initiates access to your app when an Amazon S3 object is created.
Configure Amazon S3 Connector
To configure this connector:
-
To create a global element for the connector, click the Global Elements tab at the base of the canvas, and then click Create.
-
In the Choose Global Type window, expand Connector Configuration, and click Amazon S3 Configuration.
-
Click OK.
-
Select Amazon S3 Configuration (Configuration), and click Edit.
-
Specify the global element properties:
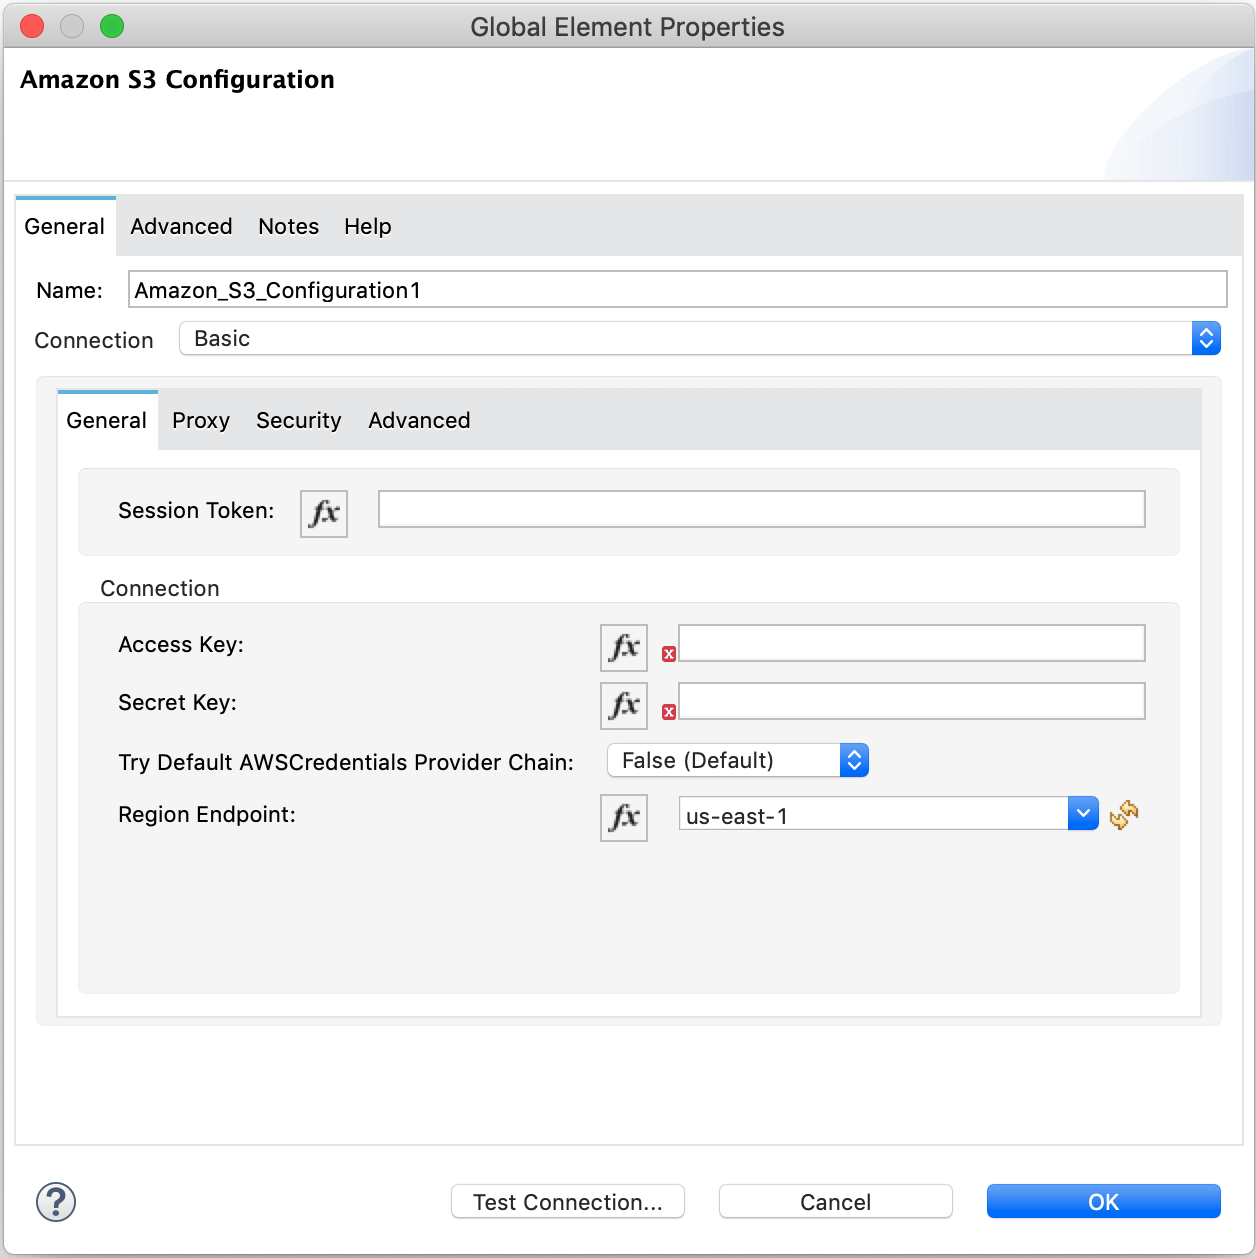
Parameter Description Name
Name used to reference the connector instance
Access Key
Alphanumeric text string that uniquely identifies the user who owns the AWS account
Secret Key
Key that plays the role of a password
Try Default AWS Credentials Provider Chain
Indicates whether to use temporary credentials
Region Endpoint
URL entry point for a web service
Session Token
The session token used to validate the temporary security credentials
You can either enter your credentials into the global configuration properties or reference a configuration placed in a file in the
srcfolder of your project file that contains these values. For simpler maintenance and better reuse of your project, use a configuration file. -
If you are:
-
If you are using the default Amazon S3 storage, leave the default entries for Proxy, Security, and Advanced tabs.
-
If you are connecting to different storage than the default AWS S3, specify its URL in the Advanced tab’s S3 Compatible Storage URL field.
-
Click Test Connection to confirm that the parameters of your global configuration are accurate and that Mule is able to successfully connect to your instance of Amazon S3.
Validating a connection with Test Connection requires that you have permission in AWS IAM to the action
s3:ListAllMyBuckets. If you don’t have this permission, the test fails. However, you can still use the connector and the operations to which you have access.Access to operations on Amazon S3 is further controlled through policies. It is not always possible to validate your credentials before the exact operation for which you have access completes. This can vary based on the bucket name and other parameters. For example, the test connection can fail if your credentials have a restricted policy.
-
Click OK to save the global connector configurations.
Next Step
After configuring the connector in Studio, see the Additional Configuration Information topic for more configuration steps.