Azure Data Lake Storage Connector Examples
The following Azure Data Lake Storage Connector examples show you how to:
These examples use variables for some field values. You can either:
-
Replace the variables with their values in the code.
-
Provide the values for each variable in a properties file and then refer to that file from the connector configuration.
For information about the benefits of using property placeholders and how to configure them, see Anypoint Connector Configuration.
Create an Azure Data Lake Storage file system
This example shows you how to create a file system in Azure Data Lake Storage, and includes these steps:
-
Optionally, copy and paste the XML for the flow in to the Configuration XML tab.
Set Up the App Flow
-
Create a new Mule project in Studio.
-
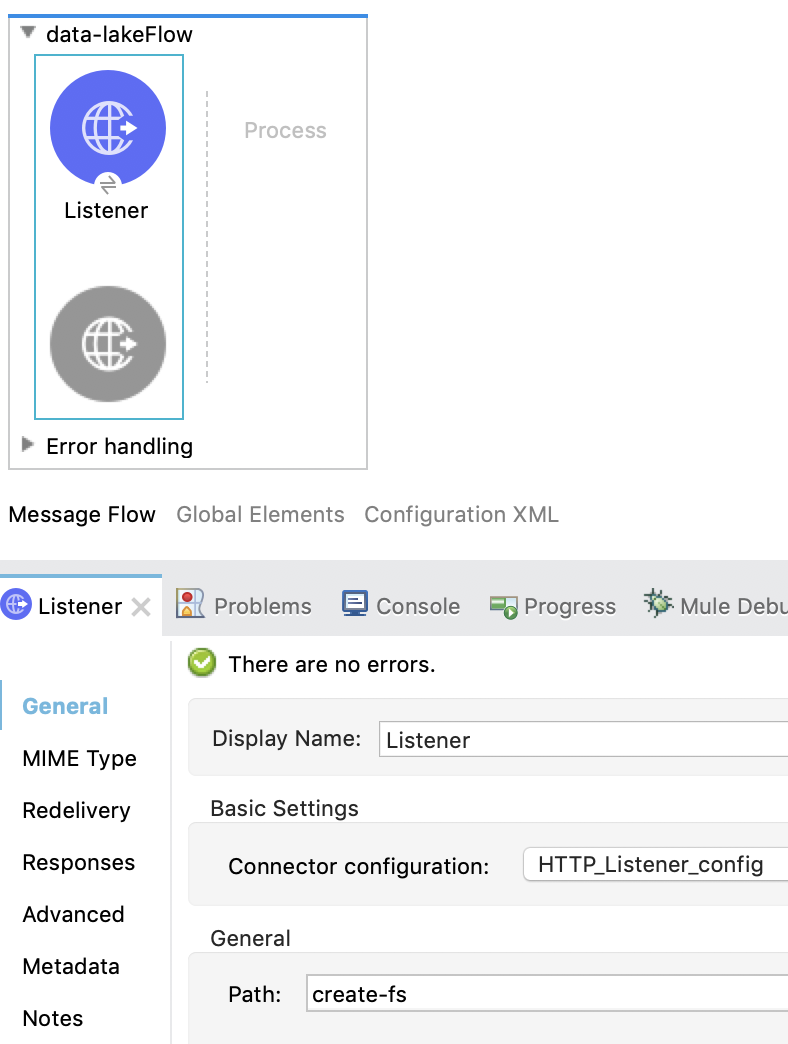
In the Mule Palette view, search for
httpand select the Listener operation. -
Drag the Listener operation onto the Studio canvas.
-
In the Listener configuration, click + next to the Connector configuration field to add a global element.
-
Accept the defaults and click OK.
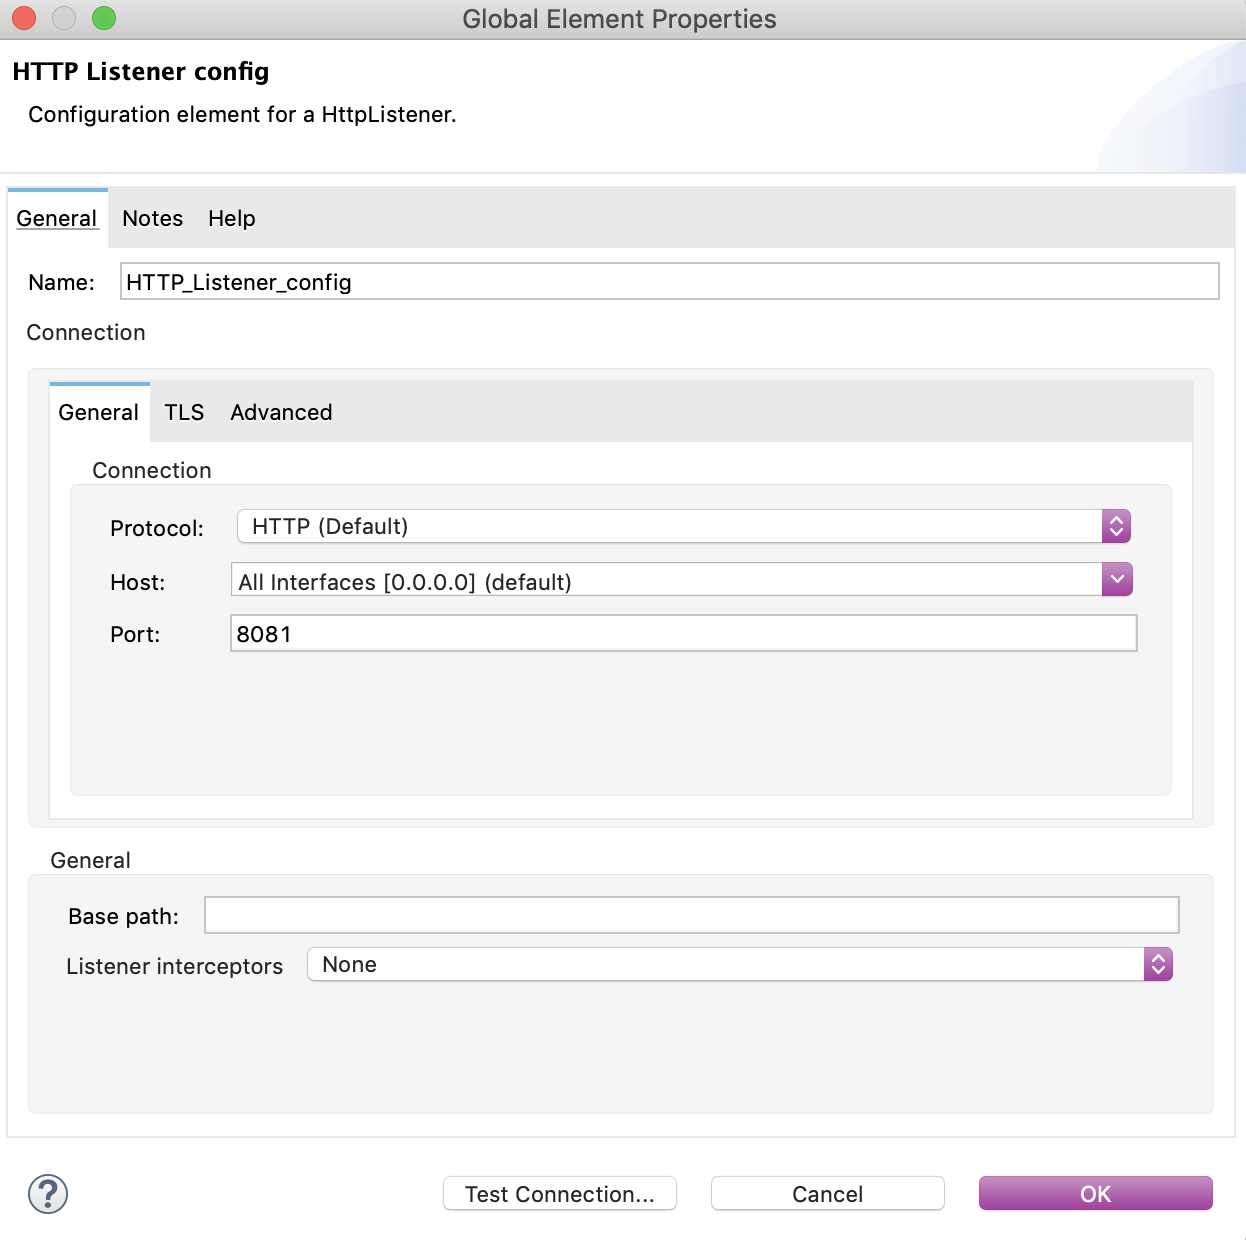
-
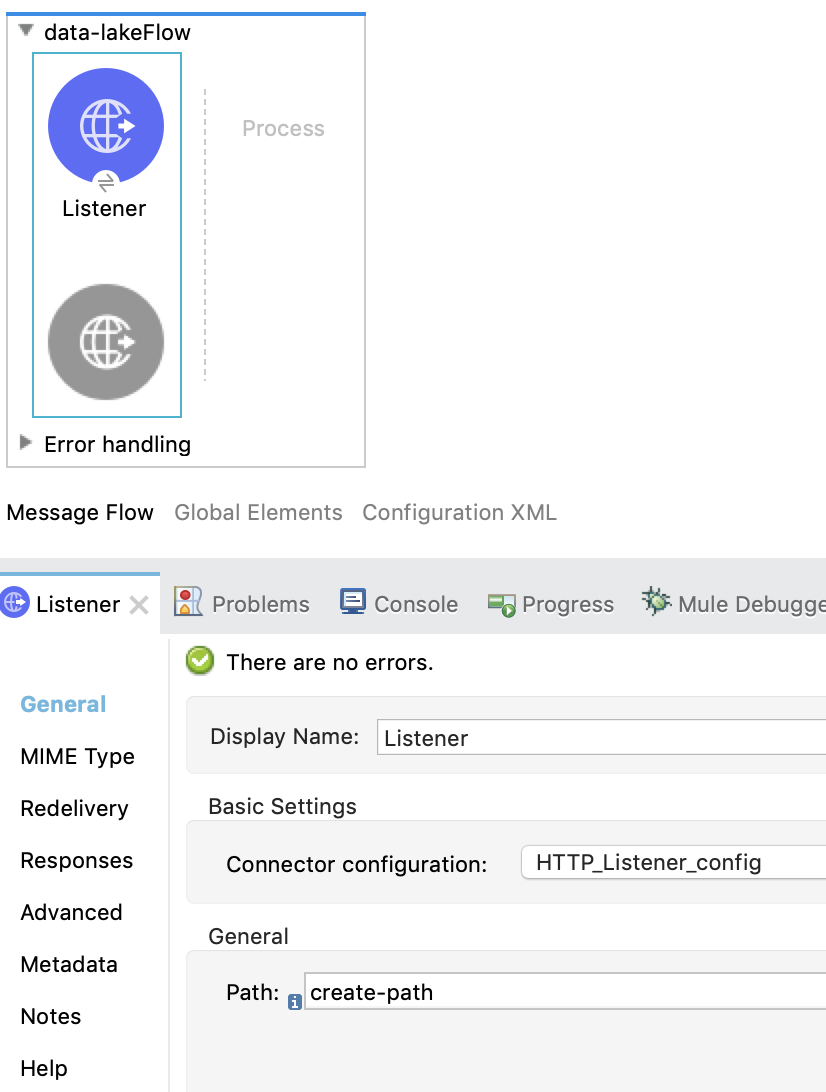
In the General properties tab, set the Path field to
create-fs:
Configure the Create File System Operation
-
In the Mule Palette view, search for
azureand select the Azure Data Lake Storage Connector > Create File System operation. -
Drag the Create File System operation from the Mule Palette onto the Listener flow.
-
In the configuration screen for the operation, click the plus sign (+) next to the Connector configuration field to access the global element configuration fields.
-
On the General tab, in Connection, select the authentication method to configure and enter all the required values:
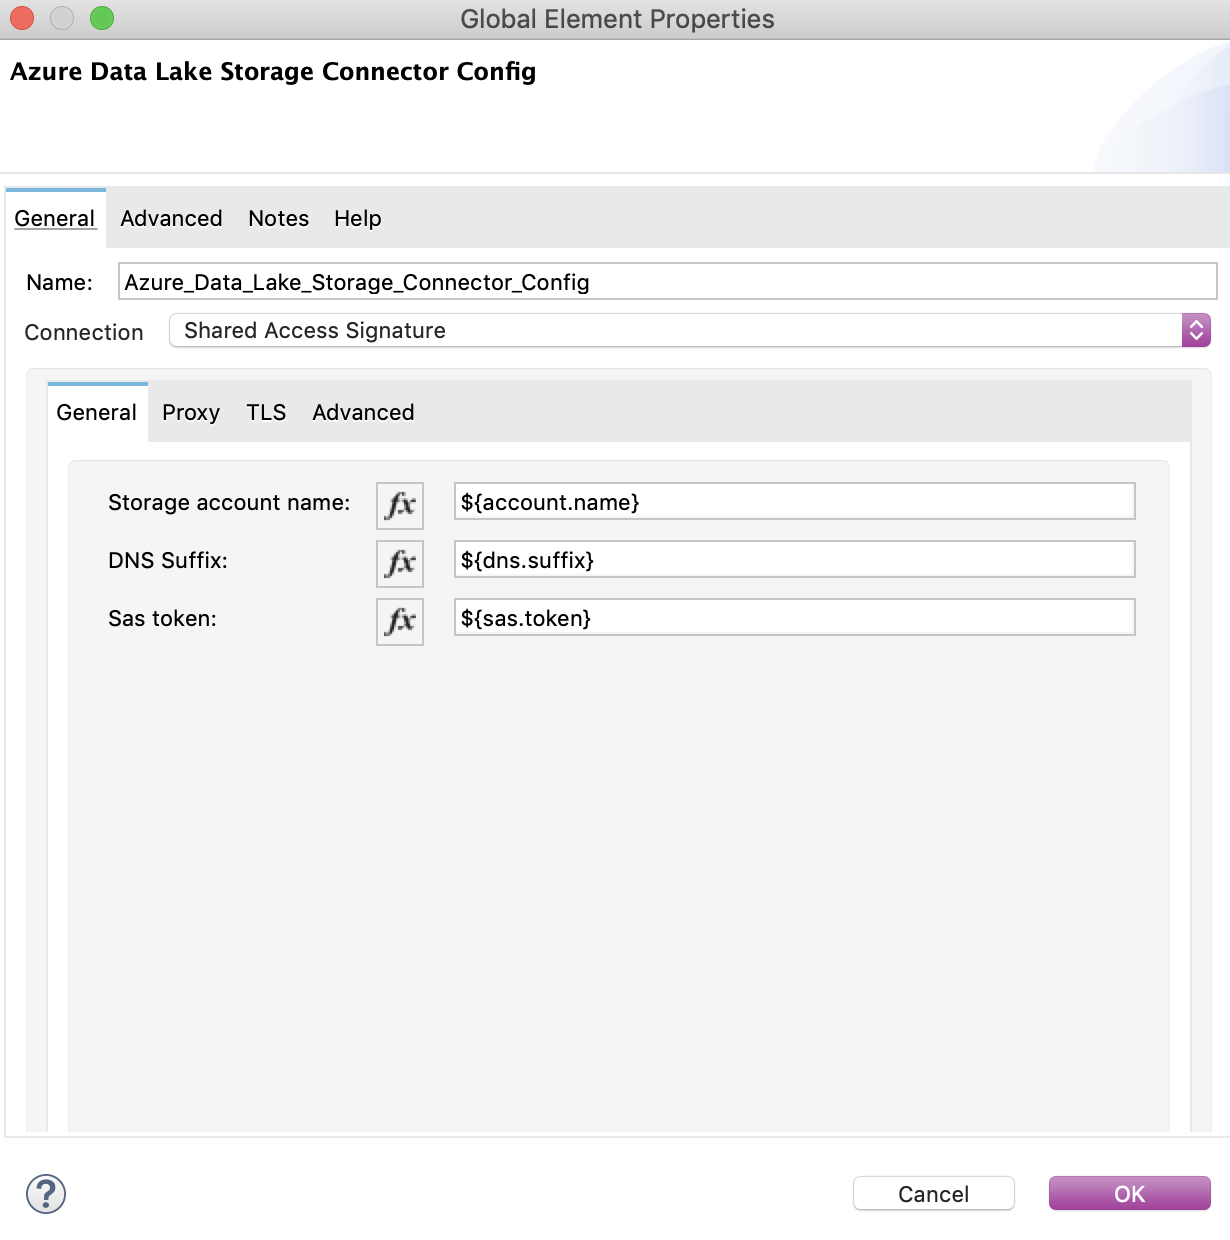
-
Click OK.
-
On the General properties tab, in the File System field, enter a name for the file system:
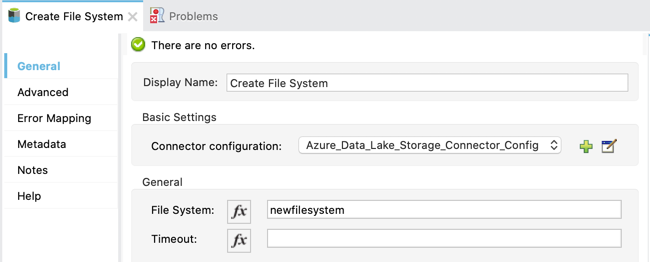
-
Save the project.
-
Open a browser and send a GET request to
localhost:8081/create-fsto test your app.
XML for Creating a File System
Paste this code into the Configuration XML tab of your flow to quickly load the flow for this example into your Mule app:
<?xml version="1.0" encoding="UTF-8"?>

<mule xmlns:http="http://www.mulesoft.org/schema/mule/http"
xmlns:azure-data-lake-storage="http://www.mulesoft.org/schema/mule/azure-data-lake-storage"
xmlns="http://www.mulesoft.org/schema/mule/core"
xmlns:doc="http://www.mulesoft.org/schema/mule/documentation"
xmlns:xsi="http://www.w3.org/2001/XMLSchema-instance"
xsi:schemaLocation="
http://www.mulesoft.org/schema/mule/http http://www.mulesoft.org/schema/mule/http/current/mule-http.xsd
http://www.mulesoft.org/schema/mule/core http://www.mulesoft.org/schema/mule/core/current/mule.xsd
http://www.mulesoft.org/schema/mule/azure-data-lake-storage http://www.mulesoft.org/schema/mule/azure-data-lake-storage/current/mule-azure-data-lake-storage.xsd">
<http:listener-config name="HTTP_Listener_config" doc:name="HTTP Listener config">
<http:listener-connection host="0.0.0.0" port="8081" />
</http:listener-config>
<azure-data-lake-storage:config name="Azure_Data_Lake_Storage_Connector_Config" doc:name="Azure Data Lake Storage Connector Config">
<azure-data-lake-storage:shared-access-signature-connection accountName="${account.name}" dnsSuffix="${dns.suffix}" sasToken="${sas.token}" />
</azure-data-lake-storage:config>
<flow name="create-file-system-flow">
<http:listener doc:name="Listener" config-ref="HTTP_Listener_config" path="create-fs"/>
<azure-data-lake-storage:create-file-system doc:name="Create File System" config-ref="Azure_Data_Lake_Storage_Connector_Config" filesystem="newfilesystem"/>
</flow>

</mule>
Create a Path
This example shows you how to create a path in Azure Data Lake Storage and includes the following steps:
-
Optionally, copy and paste the XML for the flow in to the Configuration XML tab.
Set Up the App Flow
Follow these steps to create and configure an HTTP Listener source to initiate the flow each time it receives a request on the configured host and port:
-
Create a new Mule project in Studio.
-
In the Mule Palette view, search for
httpand select the Listener operation: -
Drag the Listener operation onto the Studio canvas.
-
In the Listener configuration, click + next to the Connector configuration field to add a global element.
-
Accept the defaults and click OK.
-
In the General properties tab, set the Path field to
create-path:
Configure the Create Path operation
Follow these steps to create a file or directory on the provided Azure Data Lake Storage file system:
-
In the Mule Palette view, search for
azureand select the Create/Rename Path operation. -
Drag the Create/Rename Path operation from the Studio canvas onto the Listener flow.
-
In the Create/Rename Path configuration, click + next to the Connector Configuration field to add a connection configuration.
-
On the General tab, in Connection, select the authentication method to configure and enter all the required values:
-
Click OK.
-
In the File System field, enter the value for your target Azure Data Lake Storage file system.
If the file system does not exist, an error is thrown. -
In Path, enter your desired path name.
-
In Resource, enter either
fileordirectory: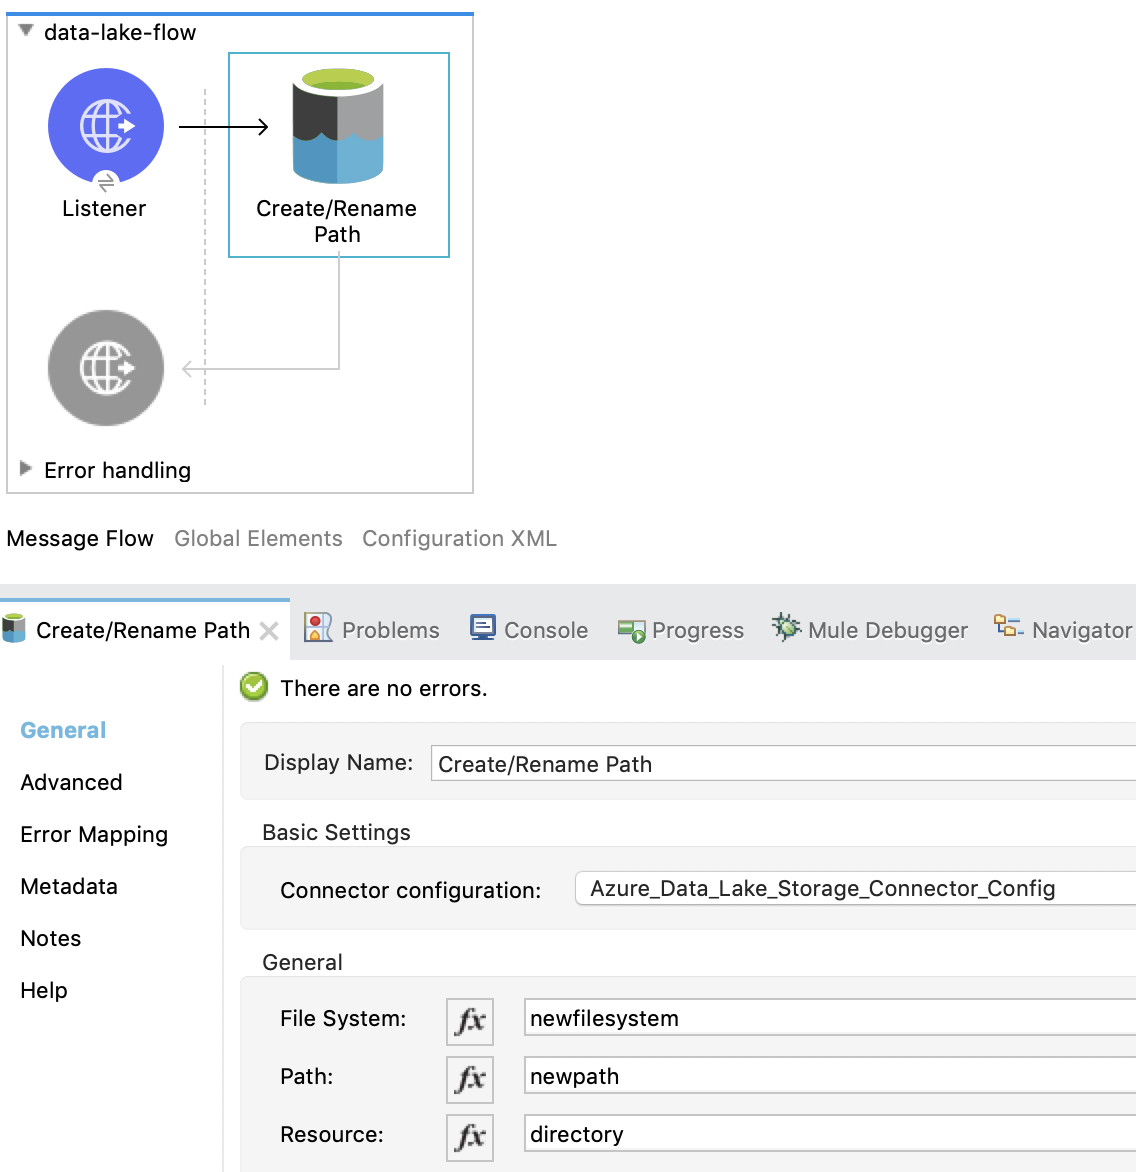
-
Save the project.
-
Test the app by sending a GET request to
localhost:8081/create-path.
XML for Creating a Path
Paste this code into the Configuration XML tab of your flow to quickly load the flow for this example into your Mule app:
<?xml version="1.0" encoding="UTF-8"?>

<mule xmlns:http="http://www.mulesoft.org/schema/mule/http"
	xmlns:azure-data-lake-storage="http://www.mulesoft.org/schema/mule/azure-data-lake-storage"
	xmlns="http://www.mulesoft.org/schema/mule/core"
	xmlns:doc="http://www.mulesoft.org/schema/mule/documentation"
	xmlns:xsi="http://www.w3.org/2001/XMLSchema-instance"
	xsi:schemaLocation="
		http://www.mulesoft.org/schema/mule/http http://www.mulesoft.org/schema/mule/http/current/mule-http.xsd
		http://www.mulesoft.org/schema/mule/core http://www.mulesoft.org/schema/mule/core/current/mule.xsd
		http://www.mulesoft.org/schema/mule/azure-data-lake-storage http://www.mulesoft.org/schema/mule/azure-data-lake-storage/current/mule-azure-data-lake-storage.xsd">
	<http:listener-config name="HTTP_Listener_config" doc:name="HTTP Listener config">
		<http:listener-connection host="0.0.0.0" port="8081" />
	</http:listener-config>
	<azure-data-lake-storage:config name="Azure_Data_Lake_Storage_Connector_Config" doc:name="Azure Data Lake Storage Connector Config">
		<azure-data-lake-storage:shared-access-signature-connection accountName="${account.name}" dnsSuffix="${dns.suffix}" sasToken="${sas.token}" />
	</azure-data-lake-storage:config>
	<flow name="create-path-flow">
		<http:listener doc:name="Listener" config-ref="HTTP_Listener_config" path="create-path"/>
		<azure-data-lake-storage:create-or-rename doc:name="Create/Rename Path" config-ref="Azure_Data_Lake_Storage_Connector_Config" fileSystem="newfilesystem" path="newpath" resource="directory"/>
	</flow>

</mule>
Configure Update Path Operations with Append and Flush
In this example, you configure two Update Path operations:
-
The first Update Path operation is configured with append to append contents to an existing file on the Azure Data Lake Storage file system.
To do this, you first set up the app flow, add the File Connector Read operation, configure the Set Variable component, then configure the Update Path operation with append. -
The second Update Path operation is then configured with flush to flush the contents of an existing file on the Azure Data Lake Storage file system.
Set Up the App Flow
Follow these steps to create and configure an HTTP Listener source to initiate the flow each time it receives a request on the configured host and port:
-
Create a new Mule project in Studio.
-
In the Mule Palette view, search for
httpand select the Listener operation: -
Drag the Listener operation onto the Studio canvas.
-
In the Listener configuration, click + next to the Connector configuration field to add a global element.
-
Accept the defaults and click OK.
-
In the General properties tab, set the Path field to
update-path:
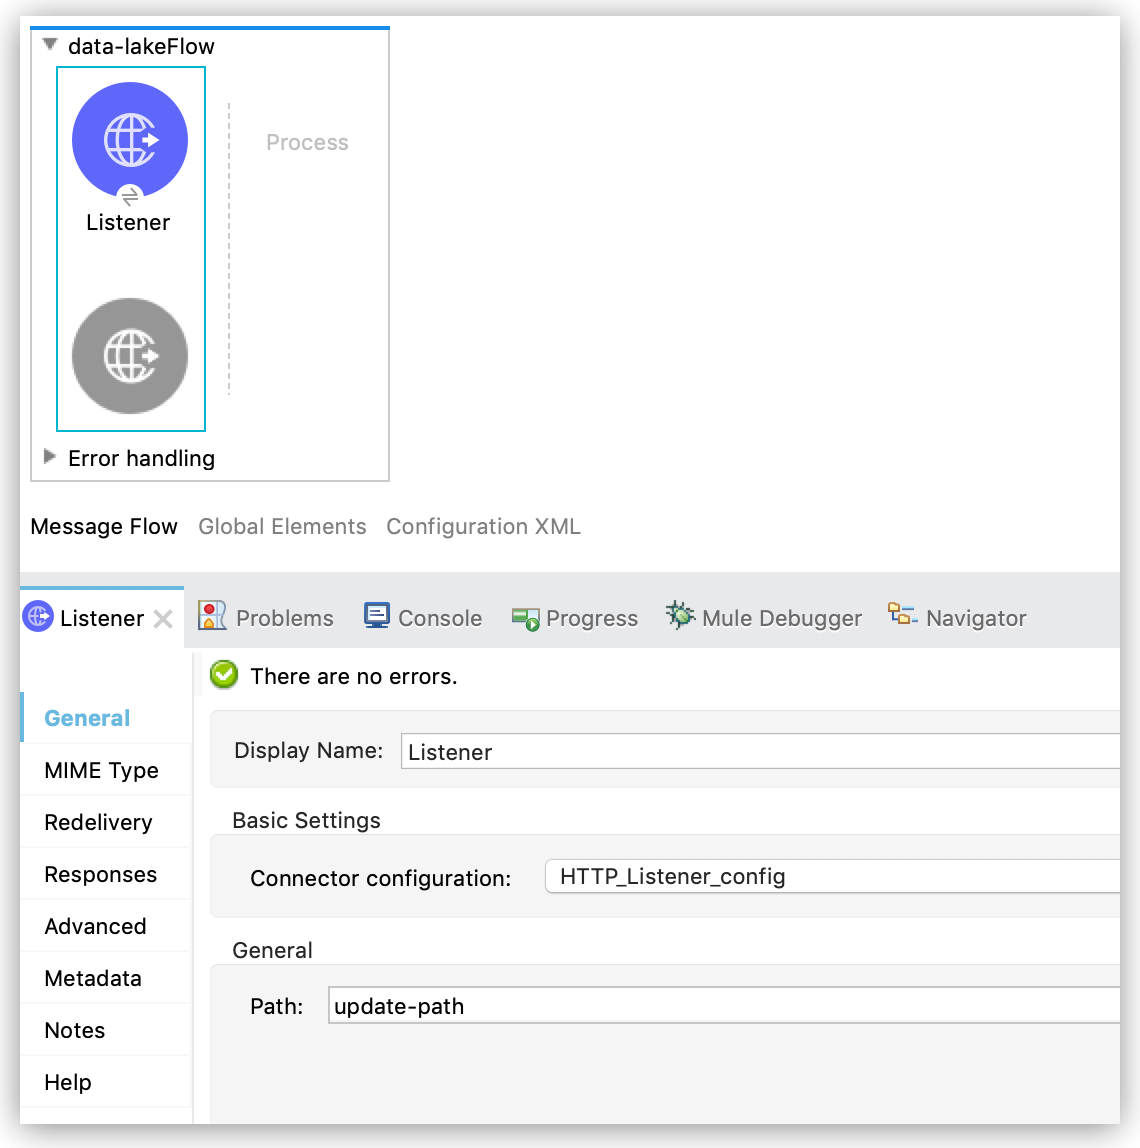
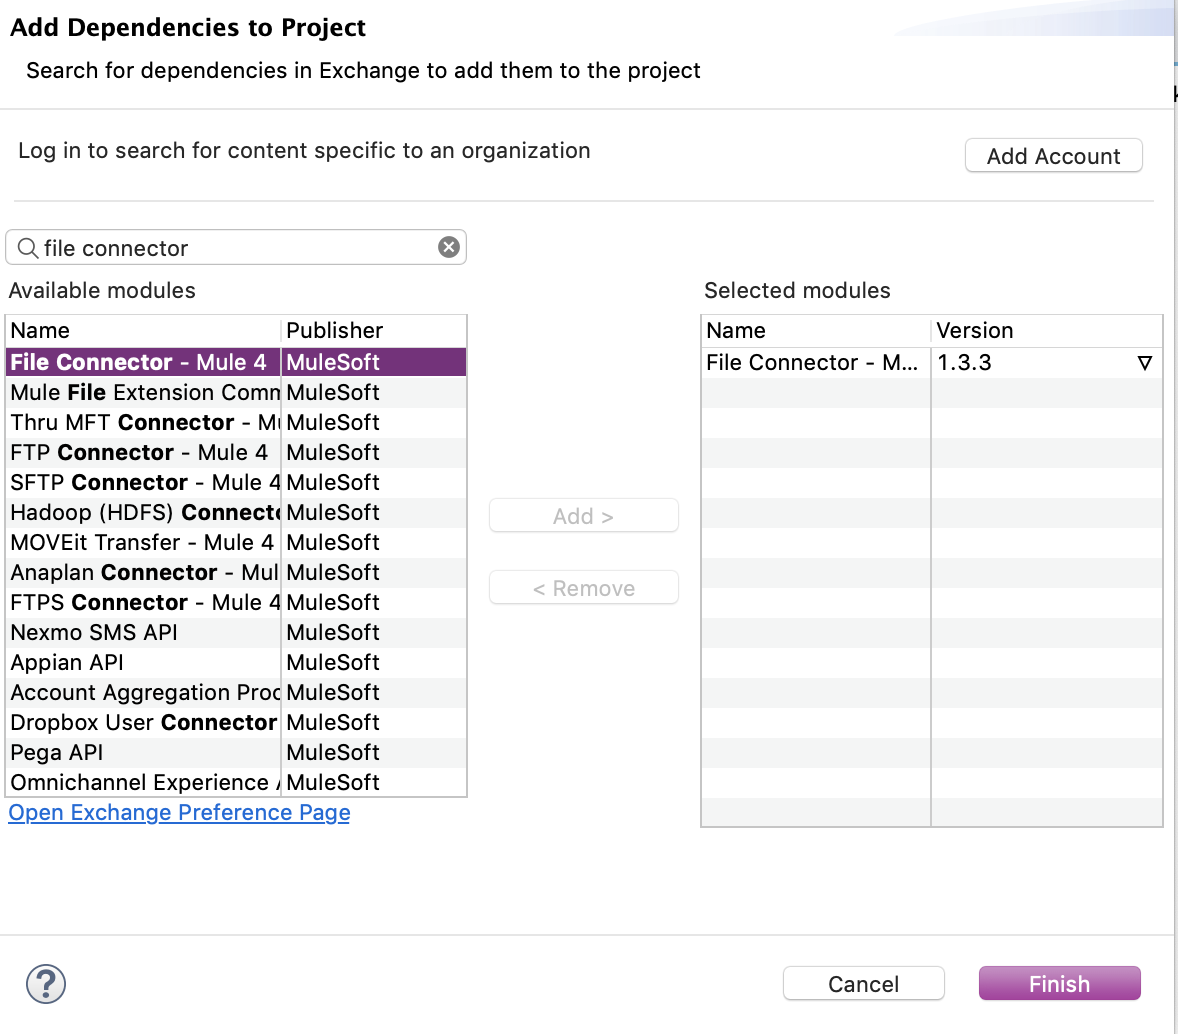
Add and Configure File Connector
Add File Connector to your project and configure the Read operation to read files on the Azure Data Lake Storage file system:
-
In the Mule Palette view, click (X) Search in Exchange.
-
In Add Modules to Project, type
file connectorin the search field. -
Click File Connector in Available modules.
-
Click Add.
-
Click Finish.
-
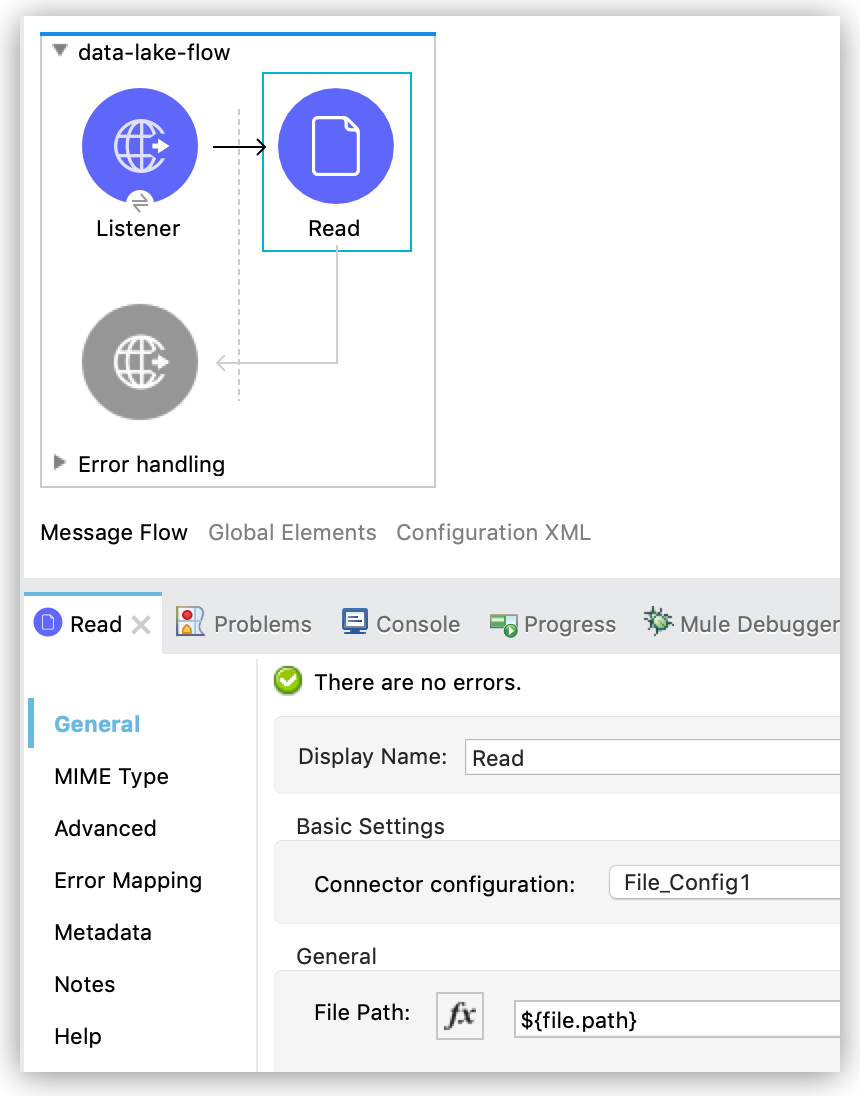
In the Mule Palette view, select File > Read and drag the Read operation onto the flow.
-
In General properties tab for the Read operation, click + next to the Connector Configuration field to add a connection configuration.
-
Enter the values and click OK.
-
In the General properties for the Read operation, enter the absolute path to the file upload in File Path:
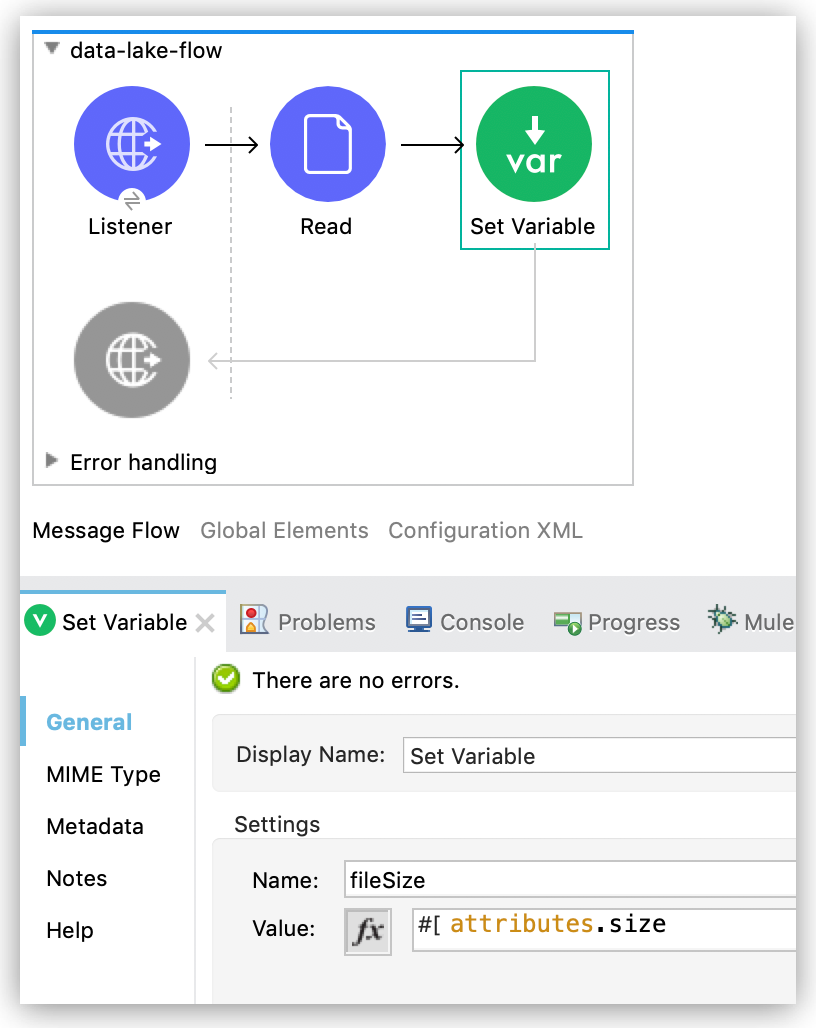
Configure the Set Variable Component
Configure a Set Variable component to store and use a variable later in the flow:
-
From the Mule Palette view, search for
set variableand drag Set Variable next to the Read operation on the Studio canvas. -
In the General properties tab, enter these values:
-
Name
fileSize -
Value
#[attributes.size]+ This saves the length of the file variable for the next operations.
-
Configure the Update Path Operation with Append
Configure the Update Path operation to add append so you can append contents to a file:
-
In the Mule Palette view, search for
azureand select the Azure Data Lake Storage Connector Update Path operation. -
Drag the Update Path operation from the Mule Palette view onto the Listener flow, next to the Set Variable component.
-
In the General configuration properties pane of Update Path, select the connection configuration for the operation.
-
In the General properties tab, enter the following values:
-
File System
Value for your target Azure Data Lake Storage file system -
Path
Value for your target path -
Action
append -
Position
0 -
Content Length
#[vars.fileSize] -
Content
payload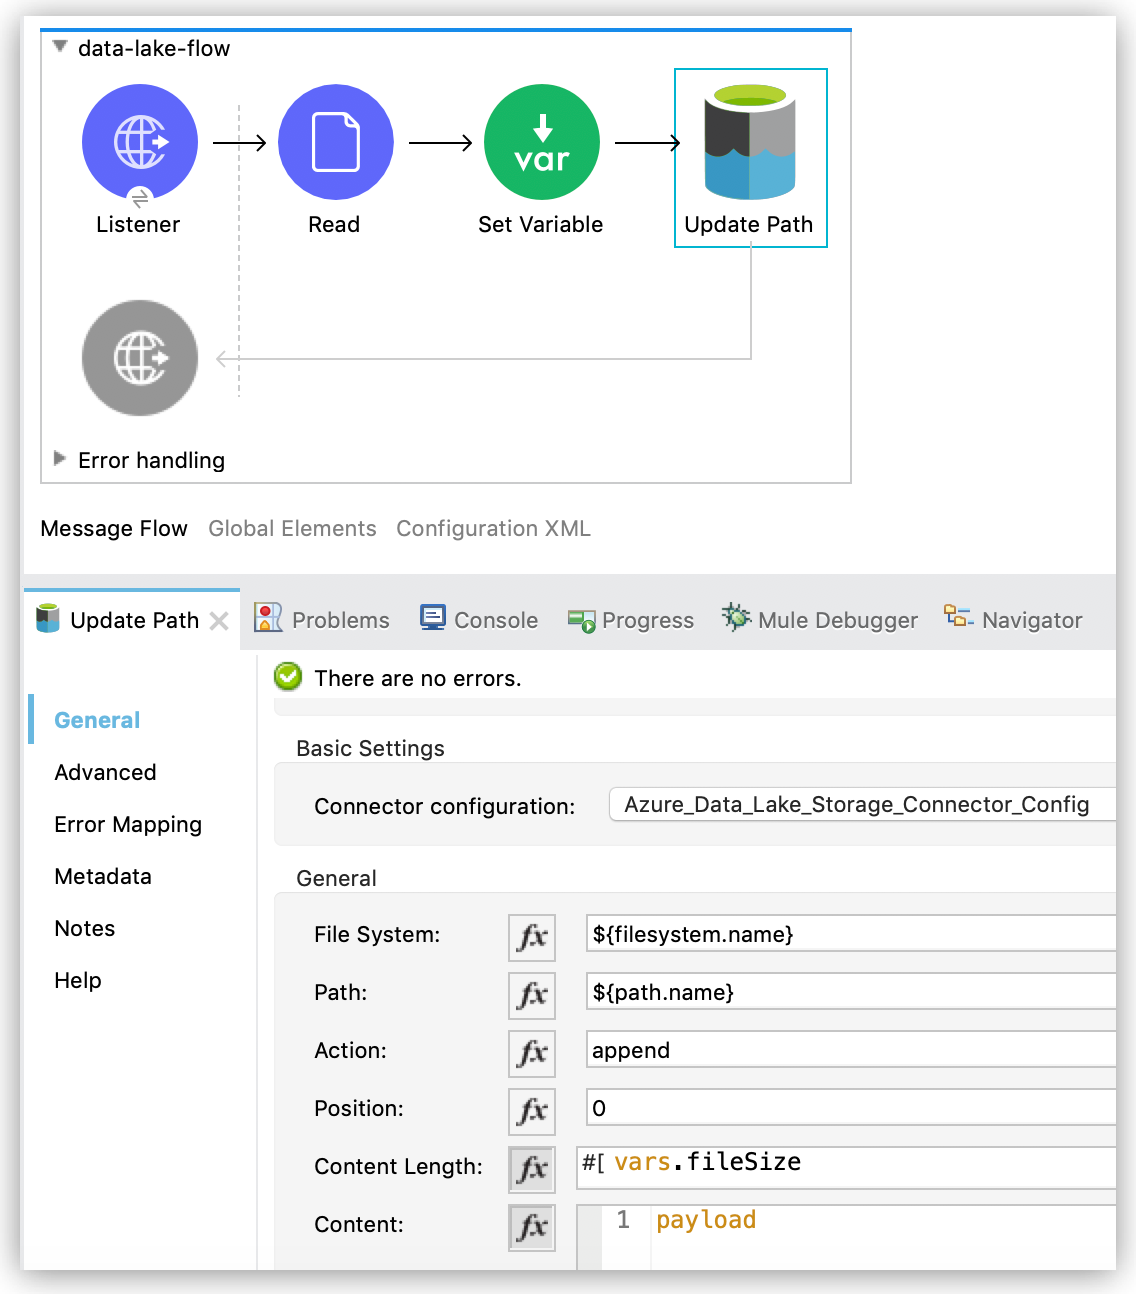
-
-
Save the project.
Configure the Update Path Operation with Flush
Configure the Update Path operation to add flush so you can flush the contents of a file:
-
In the Mule Palette view, search for
azureand select the Azure Data Lake Storage Connector Update Path operation. -
Drag the Update Path operation from the Studio canvas onto the Listener flow, next to the Update Path operation that you created in the step for append.
-
In the General configuration properties pane of Update Path, select the connection configuration for the operation.
-
In the General properties tab, enter the following values:
-
File System
Your target Azure Data Lake Storage file system -
Path
Your target path -
Action
flush -
Position
#[vars.fileSize] -
Content Length
0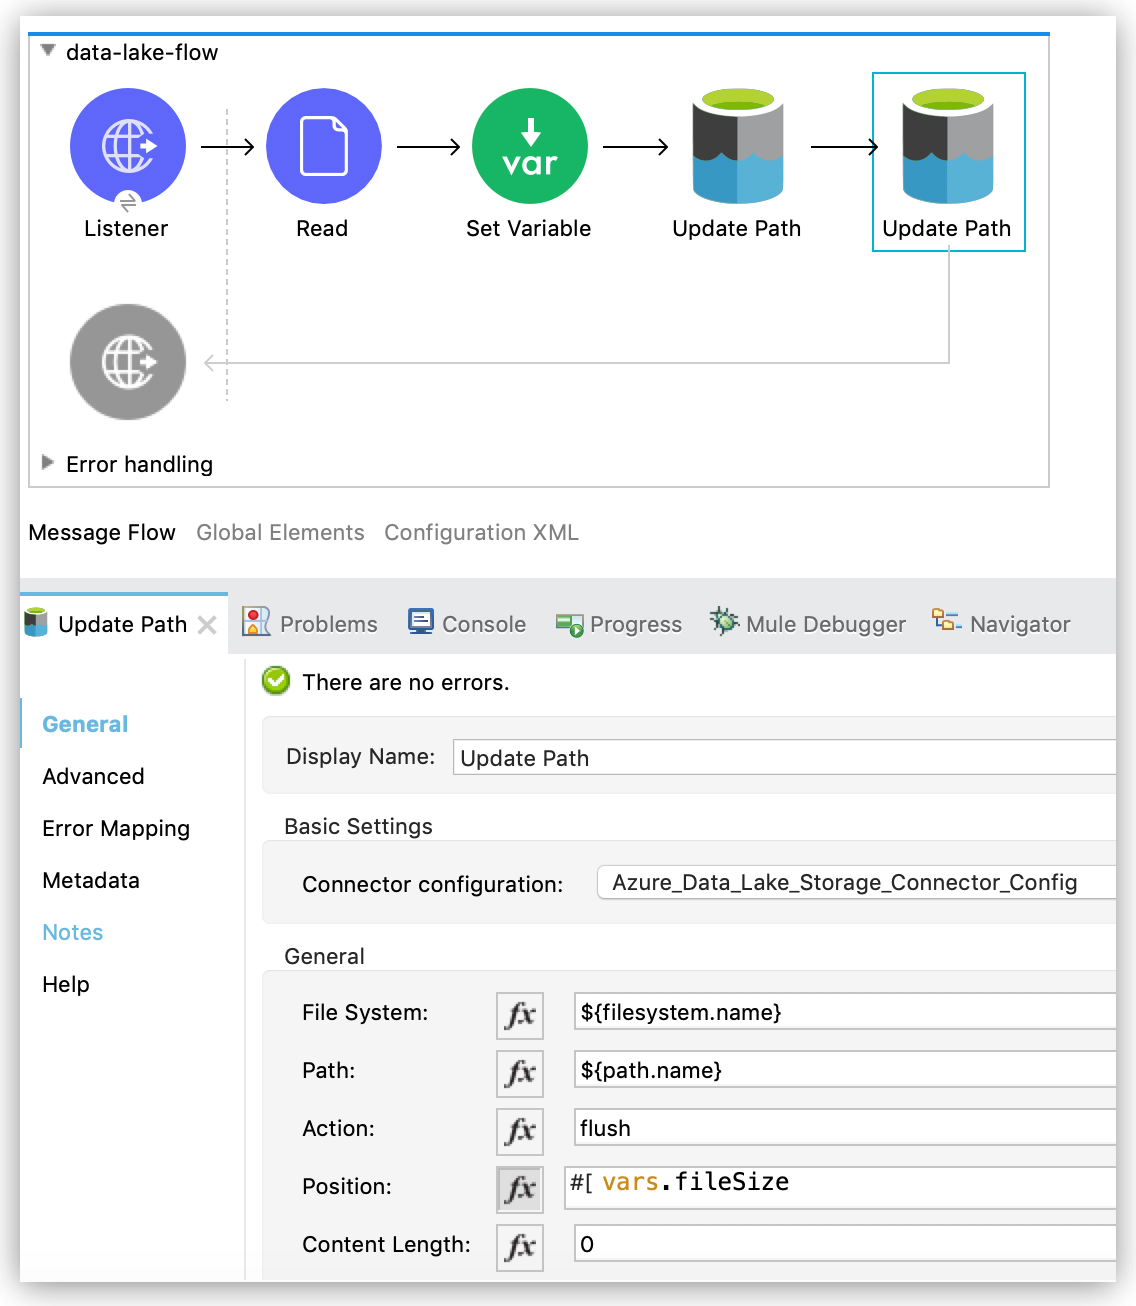
-
-
Save the project.
-
Open a browser and send a GET request to
localhost:8081/update-pathto test the app.
XML for Updating a Path
Paste this code into the Configuration XML tab of your flow to quickly load the flow for this example into your Mule app:
<?xml version="1.0" encoding="UTF-8"?>
<mule xmlns:file="http://www.mulesoft.org/schema/mule/file"
xmlns:http="http://www.mulesoft.org/schema/mule/http"
xmlns:azure-data-lake-storage="http://www.mulesoft.org/schema/mule/azure-data-lake-storage"
xmlns="http://www.mulesoft.org/schema/mule/core"
xmlns:doc="http://www.mulesoft.org/schema/mule/documentation"
xmlns:xsi="http://www.w3.org/2001/XMLSchema-instance" xsi:schemaLocation="
http://www.mulesoft.org/schema/mule/http http://www.mulesoft.org/schema/mule/http/current/mule-http.xsd
http://www.mulesoft.org/schema/mule/core http://www.mulesoft.org/schema/mule/core/current/mule.xsd
http://www.mulesoft.org/schema/mule/azure-data-lake-storage http://www.mulesoft.org/schema/mule/azure-data-lake-storage/current/mule-azure-data-lake-storage.xsd
http://www.mulesoft.org/schema/mule/file http://www.mulesoft.org/schema/mule/file/current/mule-file.xsd">
<http:listener-config name="HTTP_Listener_config" doc:name="HTTP Listener config">
<http:listener-connection host="0.0.0.0" port="8081" />
</http:listener-config>
<azure-data-lake-storage:config name="Azure_Data_Lake_Storage_Connector_Config" doc:name="Azure Data Lake Storage Connector Config">
<azure-data-lake-storage:shared-access-signature-connection accountName="${account.name}" dnsSuffix="${dns.suffix}" sasToken="${sas.token}" />
</azure-data-lake-storage:config>
<file:config name="File_Config" doc:name="File Config"/>
<flow name="create-path-flow">
<http:listener doc:name="Listener" config-ref="HTTP_Listener_config" path="update-path"/>
<file:read doc:name="Read" config-ref="File_Config" path="${file.path}"/>
<set-variable value="#[attributes.size]" doc:name="Set Variable" variableName="fileSize"/>
<azure-data-lake-storage:update-path doc:name="Update Path" config-ref="Azure_Data_Lake_Storage_Connector_Config" fileSystem="${filesystem.name}" path="${path.name}" action="append" position="0" contentLength="#[vars.fileSize]"/>
<azure-data-lake-storage:update-path doc:name="Update Path" config-ref="Azure_Data_Lake_Storage_Connector_Config" fileSystem="${filesystem.name}" path="${path.name}" action="flush" position="#[vars.fileSize]" contentLength="0"/>
</flow>
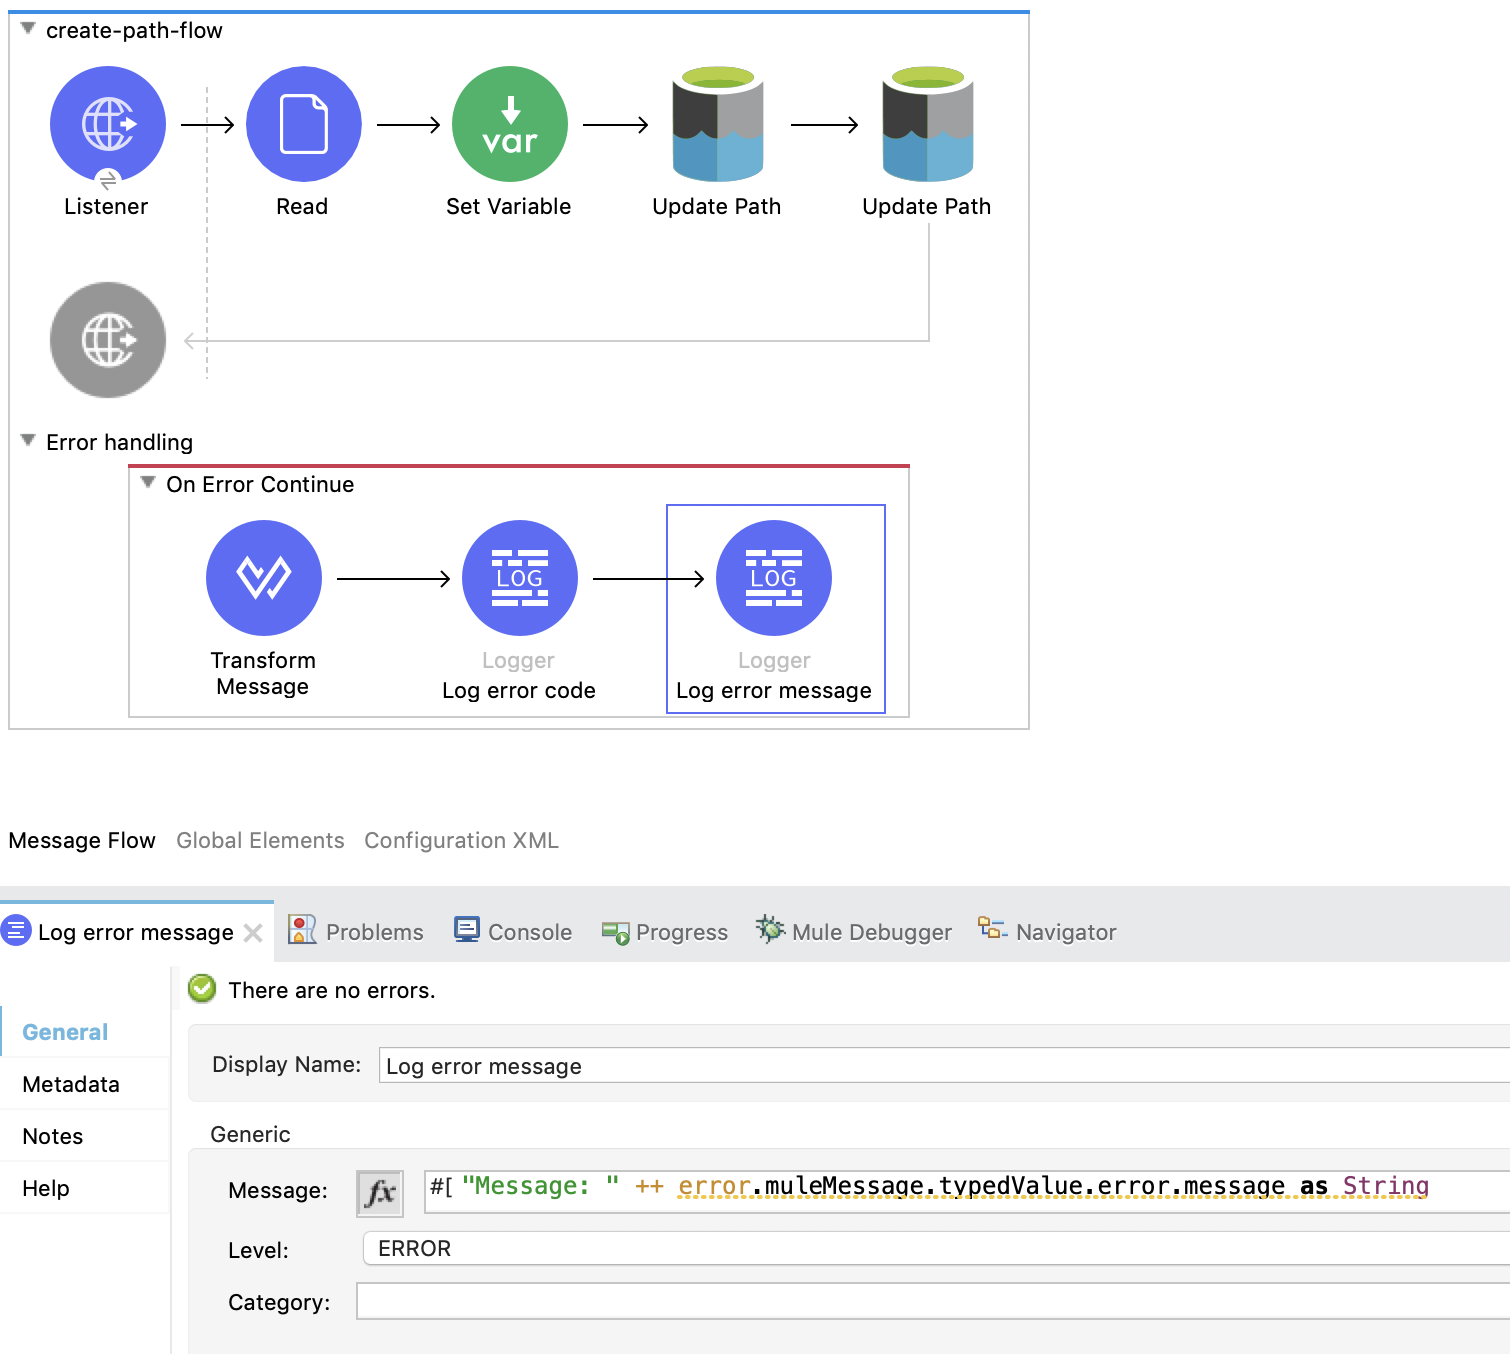
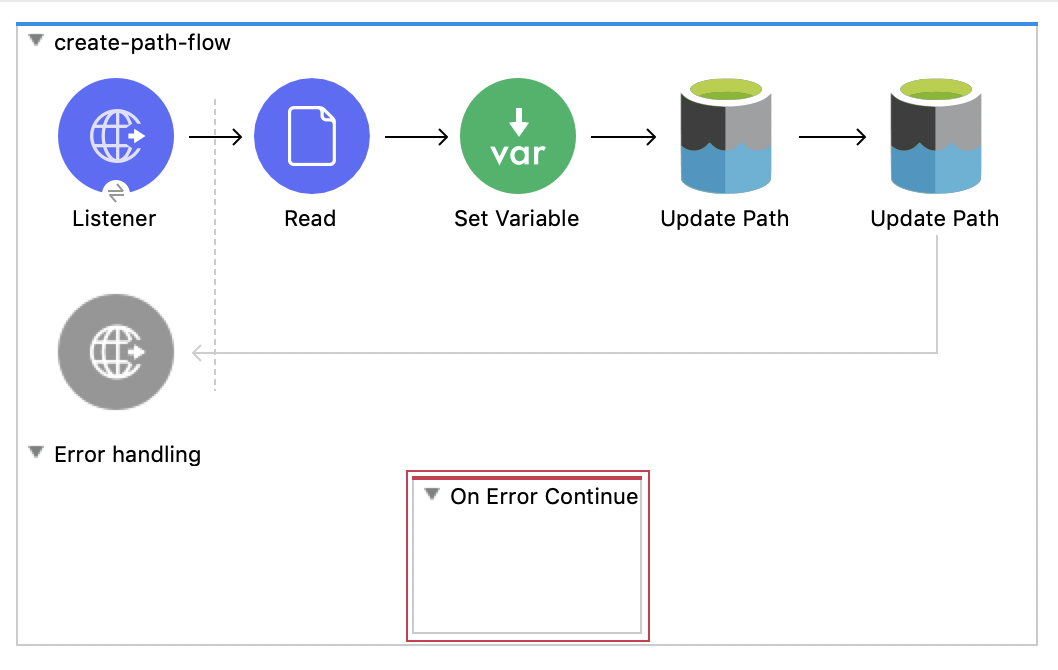
</mule>Implement Error Handling
This section shows you how to implement simple error handling on a flow that uses Azure Data Lake Storage Connector.
-
In any flow, from the Mule Palette view, select Core > On Error Continue and drag it to the Error Handling section of the flow:
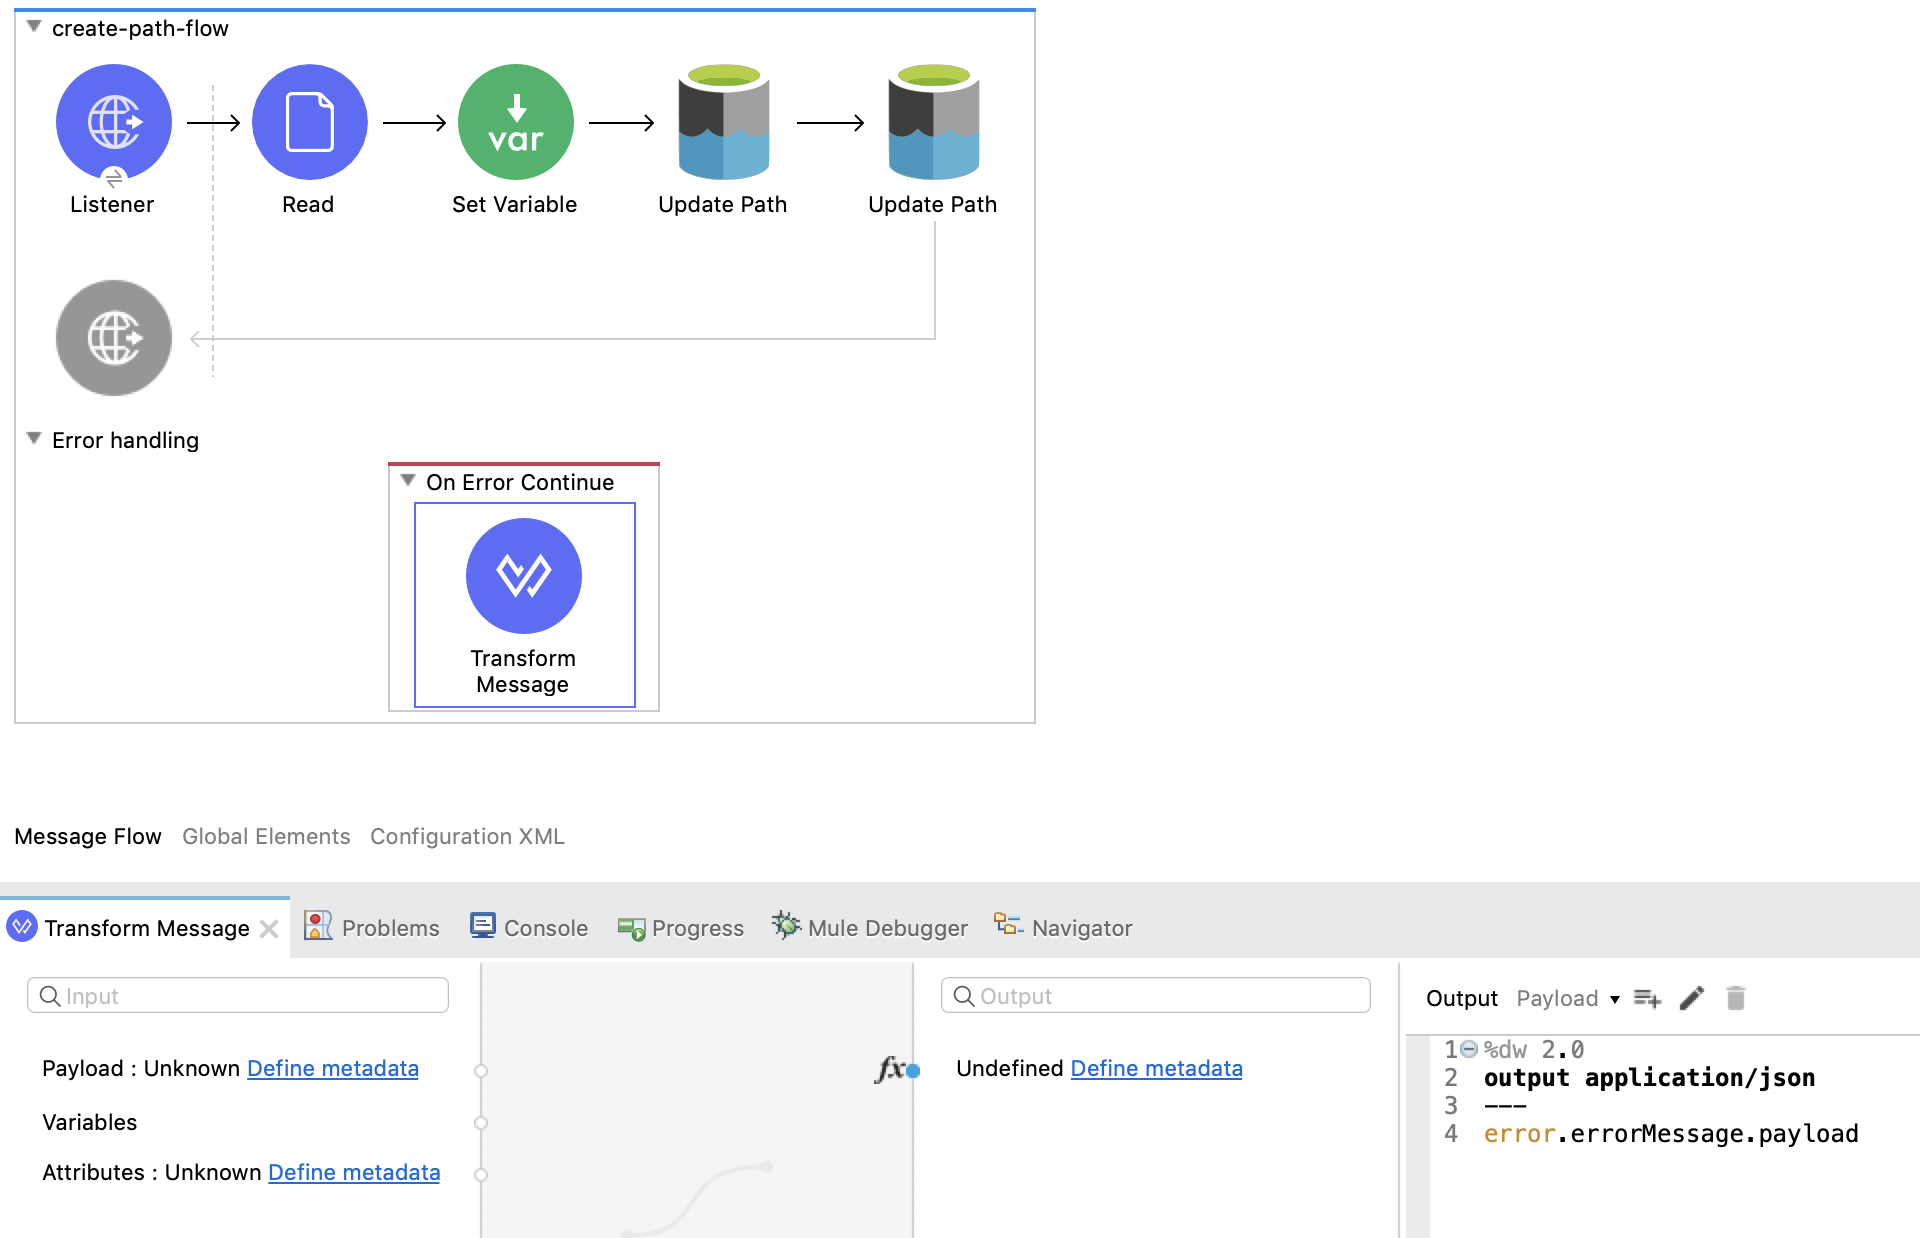
-
From the Mule Palette view, drag Core > Transform Message to the flow:
-
In the Mule Palette view, search for
loggerand drag the Logger component to the right of Transform Message. -
In the General properties tab for the Logger component, enter the following values:
 output application/json
 ---
 error.errorMessage.payload
To access the error code that comes from the Azure service, the expression is:
error.muleMessage.typedValue.error.code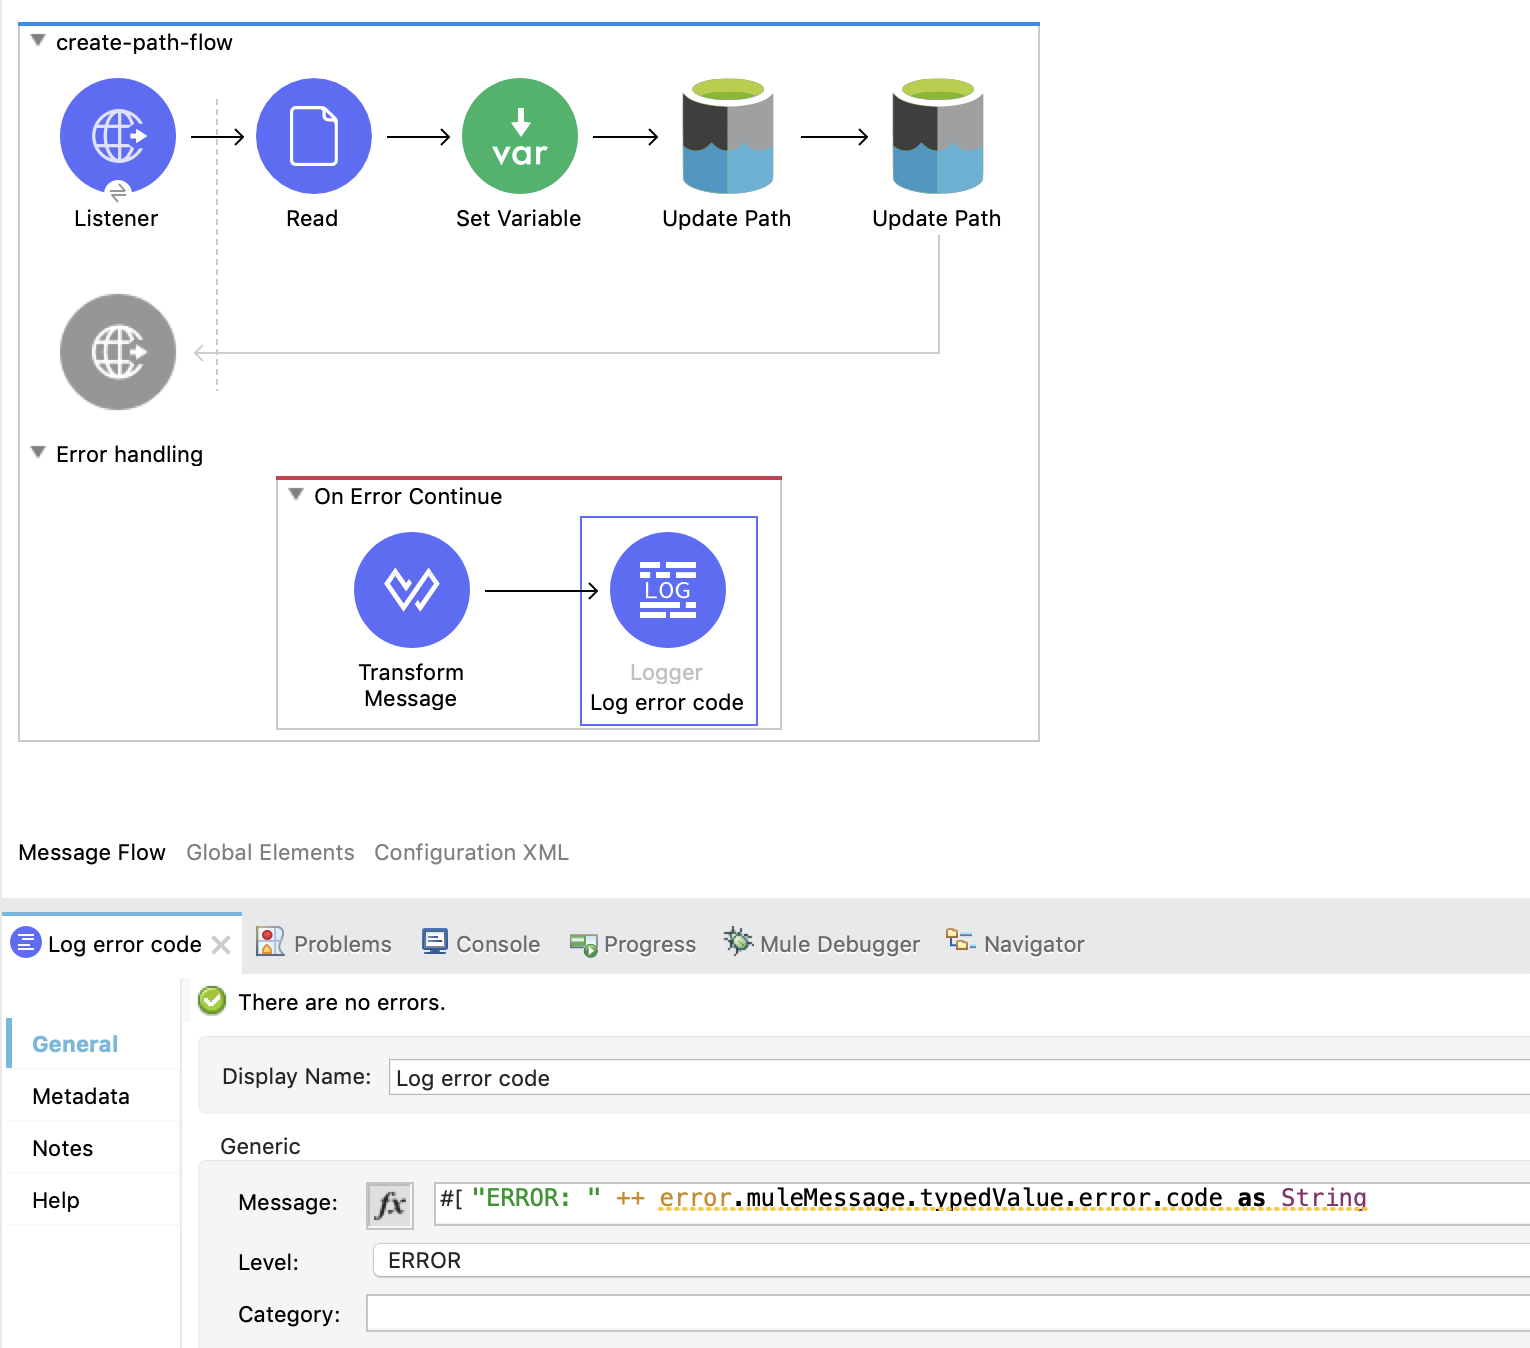
To access the error message, the expression is:
error.muleMessage.typedValue.error.message