Salesforce Commerce Cloud B2C Data Connector Examples
This example shows how to execute a search for assignments and get the search results.
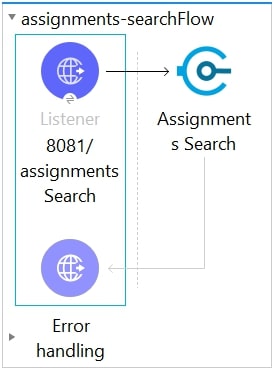
This image shows the assignment search example flow:
Configure the HTTP Listener Source
In Studio, create a new Mule project in which to add and configure the source for the connector:
-
In Studio, select File > New > Mule Project.
-
Enter a name for your Mule project and click Finish.
-
In the Mule Palette view, select HTTP > Listener.
-
Drag Listener to the Studio canvas.
-
On the Listener configuration screen, optionally change the value of the Display Name field.
-
Specify
/assignmentsSearchfor the Path field.
-
Click the plus sign (+) next to the Connector configuration field to configure a global element that can be used by all instances of the HTTP listener in the app.
-
On the General tab, enter
8081in Port. -
Click Test Connection.
-
Click OK.
-
-
Save the Mule project. .
Configure the Assignments Search Operation
-
From the Mule Palette view, select the Assignment Search operation from the palette and drag it on to the flow.
-
Navigate to
http://localhost:8081/assignmentsSearch, open Postman, and copy the required body for the Assignments Search operation: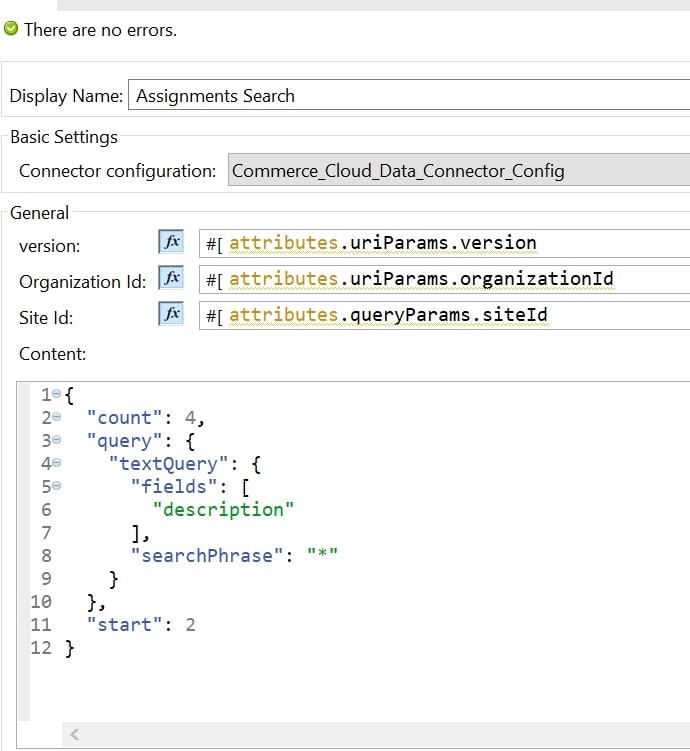
A sample Assignments Search operation payload is shown here:
{
"count": 4,
"query": {
"textQuery": {
"fields": [
"description"
],
"searchPhrase": "*"
}
},
"start": 2
}json-
Add the body you obtained in the previous step to the Content parameter.
-
Click the plus sign (+) next to the Connector configuration field to configure B2C Data Connector with the required values:

-
Click Test Connection.
-
Save the Mule project.
Run the Mule Application
Run the project as a Mule application:
-
In Package Explorer, right-click the project name and select Run As > Mule Application.
-
Navigate to
http://localhost:8081/assignmentsSearch, open Postman, and check the response.
You see the search data result in the output.
XML Example
Paste this code into the Configuration XML tab in Studio to quickly load the flow for this example into your Mule app:
<?xml version="1.0" encoding="UTF-8"?>
<mule xmlns:commerce-cloud-dataapi="http://www.mulesoft.org/schema/mule/commerce-cloud-dataapi" xmlns:http="http://www.mulesoft.org/schema/mule/http"
xmlns="http://www.mulesoft.org/schema/mule/core"
xmlns:doc="http://www.mulesoft.org/schema/mule/documentation" xmlns:xsi="http://www.w3.org/2001/XMLSchema-instance" xsi:schemaLocation="http://www.mulesoft.org/schema/mule/core http://www.mulesoft.org/schema/mule/core/current/mule.xsd
http://www.mulesoft.org/schema/mule/http http://www.mulesoft.org/schema/mule/http/current/mule-http.xsd
http://www.mulesoft.org/schema/mule/commerce-cloud-dataapi http://www.mulesoft.org/schema/mule/commerce-cloud-dataapi/current/mule-commerce-cloud-dataapi.xsd">
<flow name="assignments-searchFlow" >
<http:listener doc:name="8081/pricing/assignments/{version}/organizations/{organizationId}/assignments" config-ref="HTTP_Listener_config" path="/pricing/assignments/{version}/organizations/{organizationId}/assignments"/>
<commerce-cloud-dataapi:create-pricing-assignments-organizations-assignments-by-version-organization-id doc:name="Assignments Search"
config-ref="Commerce_Cloud_Data_Connector_Config" version="#[attributes.uriParams.version]" organizationId="#[attributes.uriParams.organizationId]" siteId="#[attributes.queryParams.siteId]">
<commerce-cloud-dataapi:content ><![CDATA[#[{
"count": 4,
"query": {
"textQuery": {
"fields": [
"description"
],
"searchPhrase": "*"
}
},
"start": 2
}]]]></commerce-cloud-dataapi:content>
</commerce-cloud-dataapi:create-pricing-assignments-organizations-assignments-by-version-organization-id>
</flow>
</mule>xmlAfter adding the code in the Configuration XML tab, you can see the flow in the *Message Flow* tab of the canvas.