Execute Bulk Operations Examples
Anypoint Connector for Database (Database Connector) supports the Bulk insert, Bulk update, and Bulk delete operations that enable you to manage data in bulk. This improves the performance compared to executing a single insert, update, or delete operation at various times.
These operations are similar to their single counterparts, except that instead of receiving input parameters as key-value pairs, the bulk operations expect a list of key-value pairs. Avoid unnecessary steps by doing a bulk operation:
-
Parse the query only once
-
Require only one database connection since a single statement is executed
-
Minimize network overhead
-
RDBMS can execute the bulk operation
While some statements in the bulk operation can be successfully executed, some can result in an error (for example, if the Bulk insert operation fails to insert 1 out of 100 rows, a single exception is thrown describing what went wrong). It will be up to the driver to either stop the execution immediately and ignore all the remaining operations, or continue to execute the remaining statements. In both cases, whenever an error occurs, examine the Mule app logs that provide details on what caused the failure.
The following example shows how to configure the operations in a Mule application that inserts, updates, and deletes customers and products data into a MySQL database. To accomplish this example, you must:
-
Run an SQL statement that creates two tables called
CUSTOMERSandPRODUCTS. -
Configure the SQL database connection.
-
Create the Mule app.
-
Run the application and then test it by using with curl commands.

Create the Table in the Database
Before configuring the SQL database connection and creating the Mule app, run the following SQL statement to create the tables called CUSTOMERS and PRODUCTS and insert 4 products into the table PRODUCTS:
CREATE DATABASE DEMO;

USE DEMO;

CREATE TABLE CUSTOMERS (
ID bigint AUTO_INCREMENT PRIMARY KEY,
NAME varchar(30) NOT NULL,
LAST_NAME varchar(30) NOT NULL
);

CREATE TABLE PRODUCTS (
ID bigint AUTO_INCREMENT PRIMARY KEY,
PRICE numeric(8, 2) NOT NULL,
ITEM varchar(30) NOT NULL
);

INSERT INTO PRODUCTS (PRICE, ITEM) values (50.0, 'shampoo');
INSERT INTO PRODUCTS (PRICE, ITEM) values (150.5, 'olive oil');
INSERT INTO PRODUCTS (PRICE, ITEM) values (11, 'coconut oil');
INSERT INTO PRODUCTS (PRICE, ITEM) values (133, 'wine');
Configure a MySQL Database Connection
After you create the table, go to Anypoint Studio to configure the MySQL database connection:
-
Create a new Mule project in Studio.
-
Navigate to the Global Elements view.
-
Click Create to open the Choose Global Type view.
-
In the Filter field, type
http, select HTTP Listener config, and click OK.
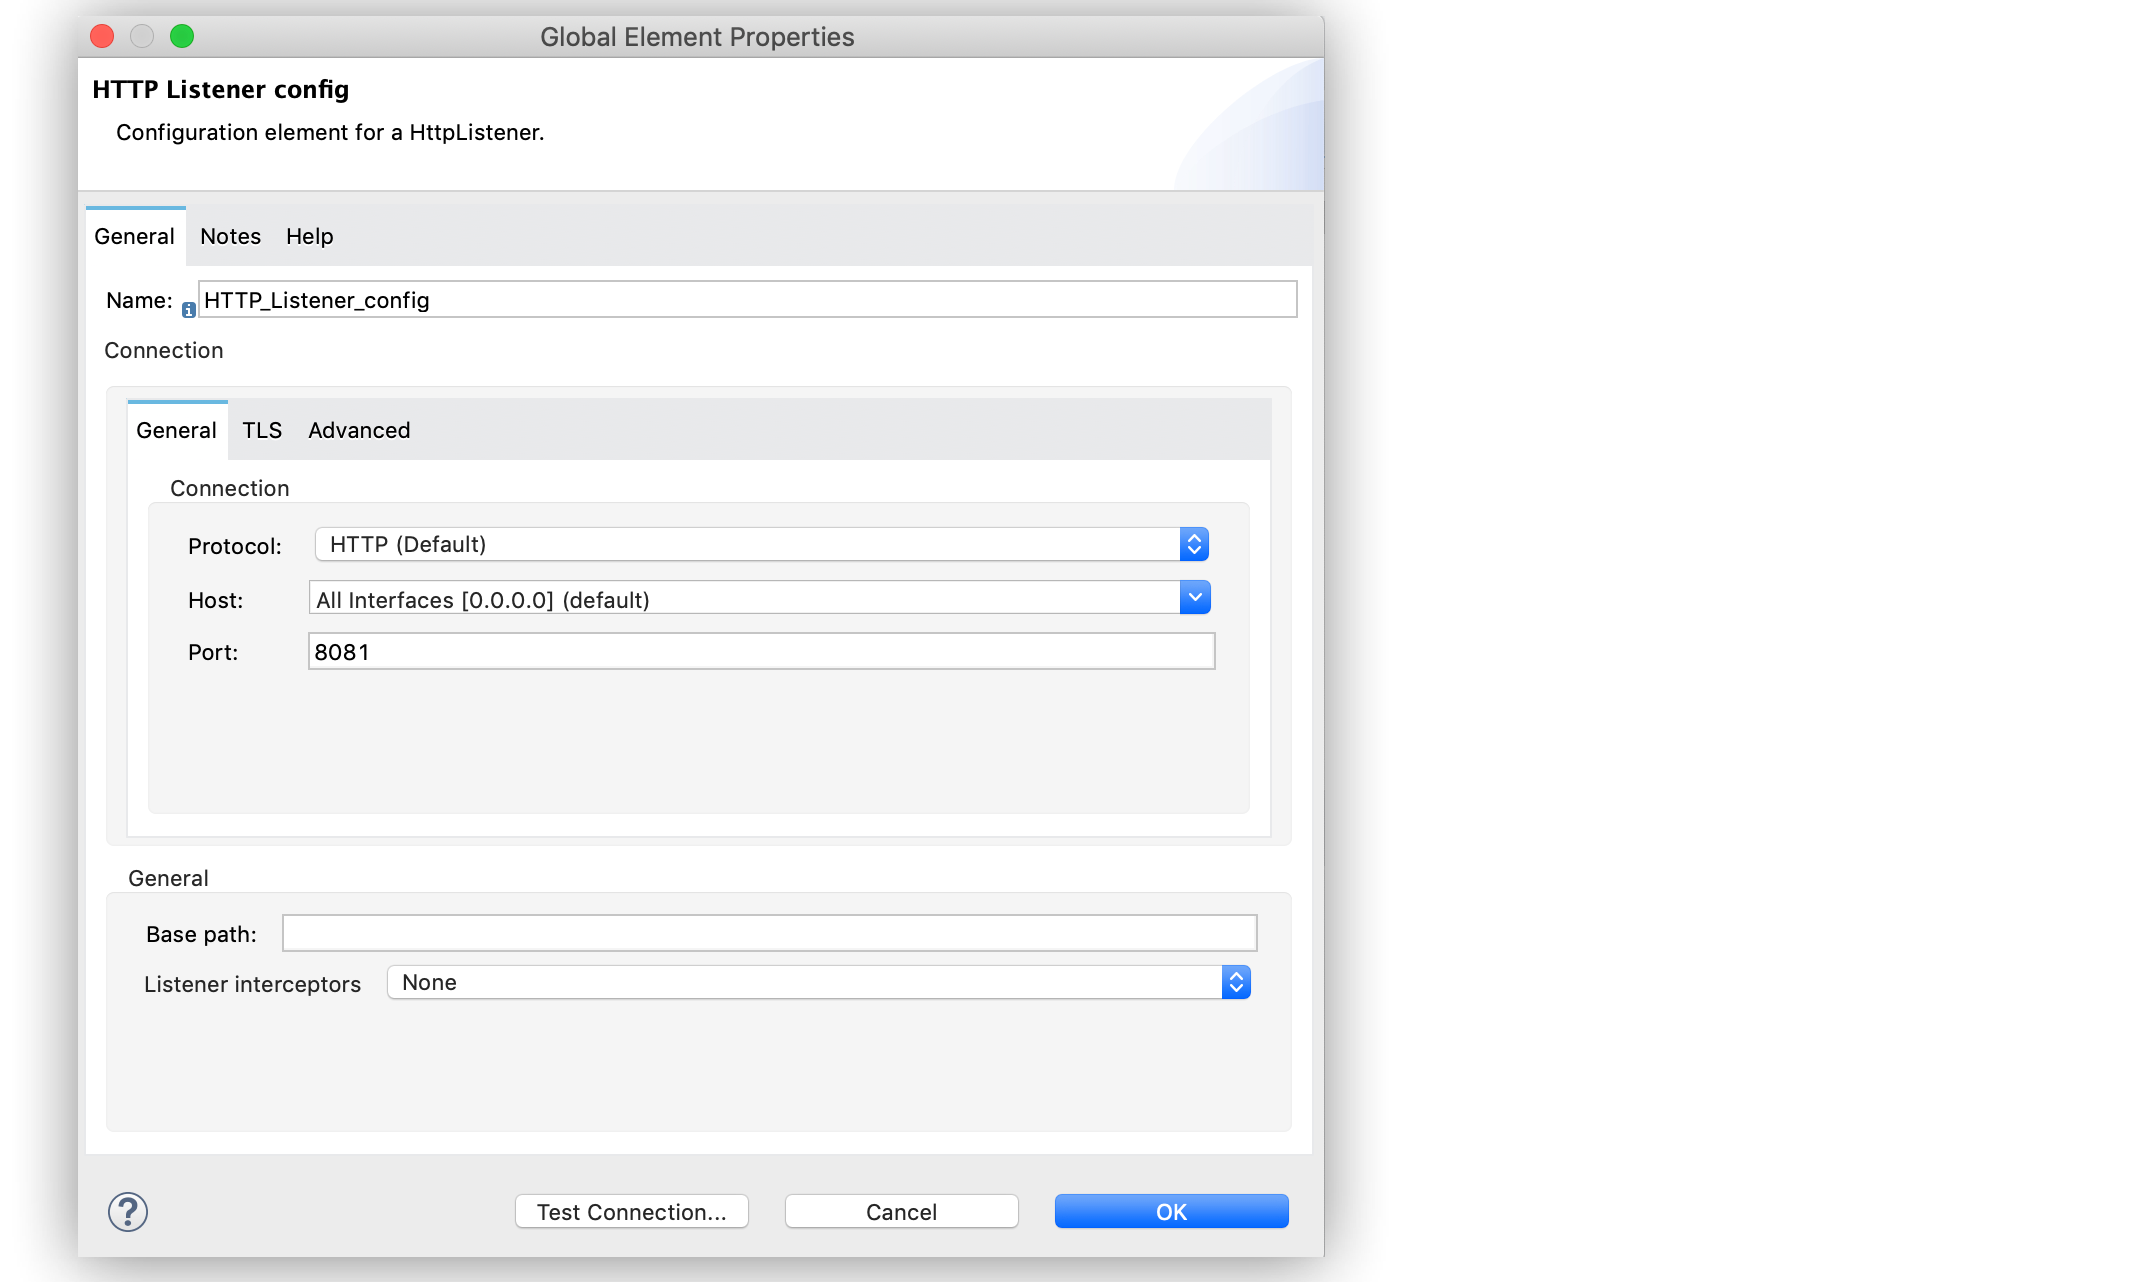
This configuration is for the HTTP Listener source that initiates the Mule application flow. -
In the HTTP Listener config window, complete the following fields:
-
Protocol:
HTTP (Default) -
Host:
All Interfaces [0.0.0.0] (default) -
Port:
8081
-
-
Click OK.
-
In the Global Elements view, click Create to open the Choose Global Type view.
-
In the Filter field, type
database, select Database Config, and click OK. -
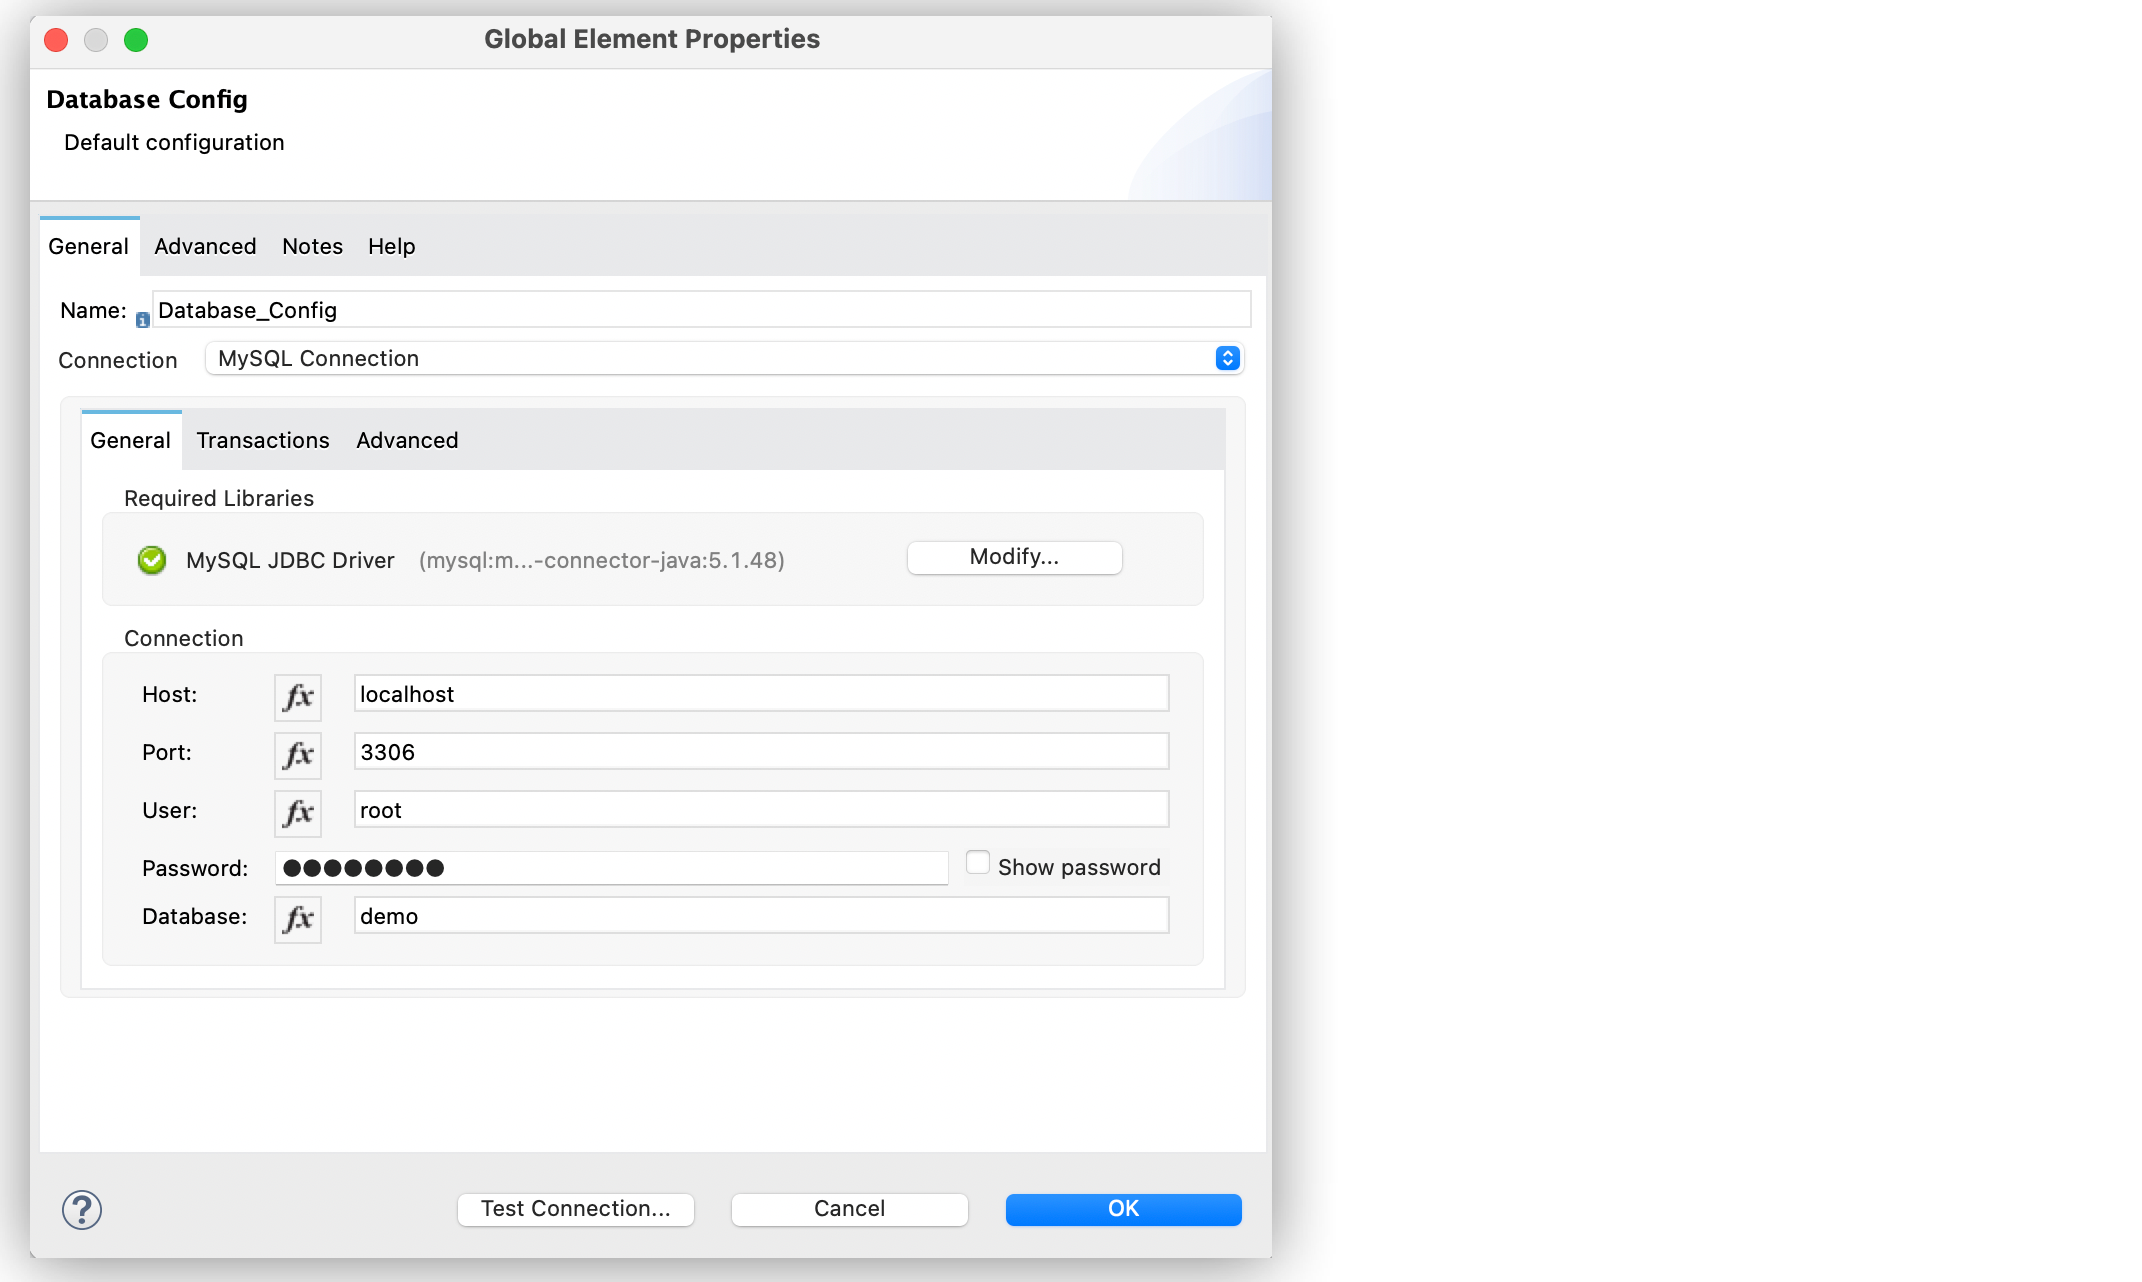
In the Database Config window, set Name to
dbConfig. -
In the Connection field, select MySQL Connection.
-
Click Configure to add the required MySQL JDBC driver and select one of:
-
Add recommended library
Install the recommended library. -
Use local file
Install the library using a local file. -
Add Maven dependency
Install a Maven dependency to add to the project.
-
-
In the Connection section, complete the following fields:
-
Host:
localhost -
Port:
3306 -
User:
root -
Password:
mulesoft -
Database:
demo
-
-
Click Test Connection to confirm that Mule can connect to the database.
-
Click OK.
The following screenshot shows the Database global element configuration:
Create the First Flow
The first flow inserts in bulk the customers' items into the CUSTOMERS table, follow these steps to create the flow:
-
In the Mule Palette view, select the HTTP Listener source and drag it onto the canvas.
The source initiates the flow by listening for incoming HTTP message attributes. -
In the Connector configuration field, select the
HTTP_Listener_configglobal configuration. -
Set Path to
/insert. -
Drag a Bulk insert operation to the right of the Listener source.
-
For Connector configuration, select
Database_Config. -
In Input Parameters, add the following expression:
[{'id': 2, 'name': 'George', 'lastName': 'Costanza'}, {'id': 3, 'name': 'Cosmo', 'lastName': 'Kramer'}] -
In SQL Query text, add the following:
INSERT INTO CUSTOMERS (NAME, LAST_NAME) values (:name, :lastName)
Create the Second Flow
The second flow updates in bulk the price of the products in the PRODUCTS table, follow these steps to create the flow:
-
In the Mule Palette view, select the HTTP Listener source and drag it below the first flow.
The source initiates the flow by listening for incoming HTTP message attributes. -
In the Connector configuration field, select the
HTTP_Listener_configglobal configuration. -
Set Path to
update. -
Drag a Set Payload component to the right of the Listener source.
-
In Value add the following expression:
[{ discountRate: 0.1, price: 50 }, { discountRate: 0.2, price: 150.5 }] -
Drag a Bulk update operation to the right of the Set Payload component.
-
For Connector configuration, select
Database_Config. -
In SQL Query text, add the following expression:
UPDATE PRODUCTS SET PRICE = PRICE * :discountRate WHERE PRICE = :price
Create the Third Flow
The third flow deletes in bulk products from the PRODUCTS table, follow these steps to create the flow:
-
In the Mule Palette view, select the HTTP Listener source and drag it below the first flow.
The source initiates the flow by listening for incoming HTTP message attributes. -
In the Connector configuration field, select the
HTTP_Listener_configglobal configuration. -
Set Path to
/delete. -
Drag a Set Payload component to the right of the Listener source.
-
In Value add the following expression:
[{ price: 11 }, { price: 133 }] -
Drag a Bulk delete operation to the right of the Set Payload component.
-
For Connector configuration, select
Database_Config. -
In SQL Query text, add the following expression:
DELETE FROM PRODUCTS WHERE PRICE = :price
Run and Test the Mule App
To run and test the Mule app:
-
Save the project in Studio.
-
Click Run > Run to deploy the app.
-
In your internet browser, test the app by running the following CURL commands:
curl http://localhost:8081/insert
curl http://localhost:8081/update
curl http://localhost:8081/delete
XML for Mule App Example
Paste this code into your Studio XML editor to quickly load the flow for this example into your Mule app:
<?xml version="1.0" encoding="UTF-8"?>

<mule xmlns:db="http://www.mulesoft.org/schema/mule/db" xmlns:http="http://www.mulesoft.org/schema/mule/http"
	xmlns="http://www.mulesoft.org/schema/mule/core"
	xmlns:doc="http://www.mulesoft.org/schema/mule/documentation" xmlns:xsi="http://www.w3.org/2001/XMLSchema-instance" xsi:schemaLocation="http://www.mulesoft.org/schema/mule/core http://www.mulesoft.org/schema/mule/core/current/mule.xsd
http://www.mulesoft.org/schema/mule/http http://www.mulesoft.org/schema/mule/http/current/mule-http.xsd
http://www.mulesoft.org/schema/mule/db http://www.mulesoft.org/schema/mule/db/current/mule-db.xsd">
	<db:config >
		<db:my-sql-connection host="localhost" port="3306" user="root" password="mulesoft" database="demo" />
	</db:config>
	<http:listener-config name="HTTP_Listener_config" >
		<http:listener-connection host="0.0.0.0" port="8081" />
	</http:listener-config>
	<flow name="dbcon-demoFlow">
		<http:listener config-ref="HTTP_Listener_config" path="/insert"/>
		<db:bulk-insert config-ref="Database_Config">
			<db:bulk-input-parameters ><![CDATA[#[[{'id': 2, 'name': 'George', 'lastName': 'Costanza'}, {'id': 3, 'name': 'Cosmo', 'lastName': 'Kramer'}]]]]></db:bulk-input-parameters>
			<db:sql ><![CDATA[INSERT INTO CUSTOMERS (NAME, LAST_NAME) values (:name, :lastName)]]></db:sql>
		</db:bulk-insert>
	</flow>
	<flow name="dbcon-demoFlow1" >
		<http:listener config-ref="HTTP_Listener_config" path="update"/>
		<set-payload value="#[[{
	discountRate: 0.1,
	price: 50
},
{
	discountRate: 0.2,
	price: 150.5
}]]" doc:name="Set Payload" />
		<db:bulk-update config-ref="Database_Config">
			<db:sql ><![CDATA[UPDATE PRODUCTS SET PRICE = PRICE * :discountRate WHERE PRICE = :price]]></db:sql>
		</db:bulk-update>
	</flow>
	<flow name="dbcon-demoFlow2" >
		<http:listener config-ref="HTTP_Listener_config" path="/delete"/>
		<set-payload value="#[[{
	price: 11
},
{
	price: 133
}]]" doc:name="Set Payload" />
		<db:bulk-delete doc:name="Bulk delete" config-ref="Database_Config">
			<db:sql ><![CDATA[DELETE FROM PRODUCTS WHERE PRICE = :price]]></db:sql>
		</db:bulk-delete>
	</flow>
</mule>