Configure a Database Connection
Anypoint Connector for Database (Database Connector) can connect to any database for which a JDBC driver is available. The following examples show how to connect to the most popular databases such as Derby, Microsoft SQL Server, MySQL, Oracle, and a generic database. Additionally, for advanced uses cases, there are examples showing how to connect to a global data source, configure a JDBC driver, configure connection pooling, and connect to an Oracle database with TNS, both in Anypoint Studio and the XML editor.
Configure a Data Source Reference Connection
Database Connector generates a JDBC data source by using the parameter values you provide when you configure the Generic Connection field. If you want to create your own data source and use it to connect to a database, configure the Data Source Reference Connection field.
The following example shows how to use Anypoint Studio to configure a data source reference connection to a Derby database:
-
In Studio, in the
src/main/resourcesfolder, create adatasource-config.xmlbean file to define a customenhydradata source that connects to a Derby database:datasource-config.xml File<bean id="jdbcDataSource" class="org.enhydra.jdbc.standard.StandardDataSource" destroy-method="shutdown"> <property name="driverName" value="org.apache.derby.jdbc.EmbeddedDriver"/> <property name="url" value="jdbc:derby:muleEmbeddedDB;create=true"/> </bean> -
Return to your Mule flow, go to the Global Elements view, and click Create to open the Choose Global Type window.
-
In the Filter field, type
spring, select Spring Config, and click OK. -
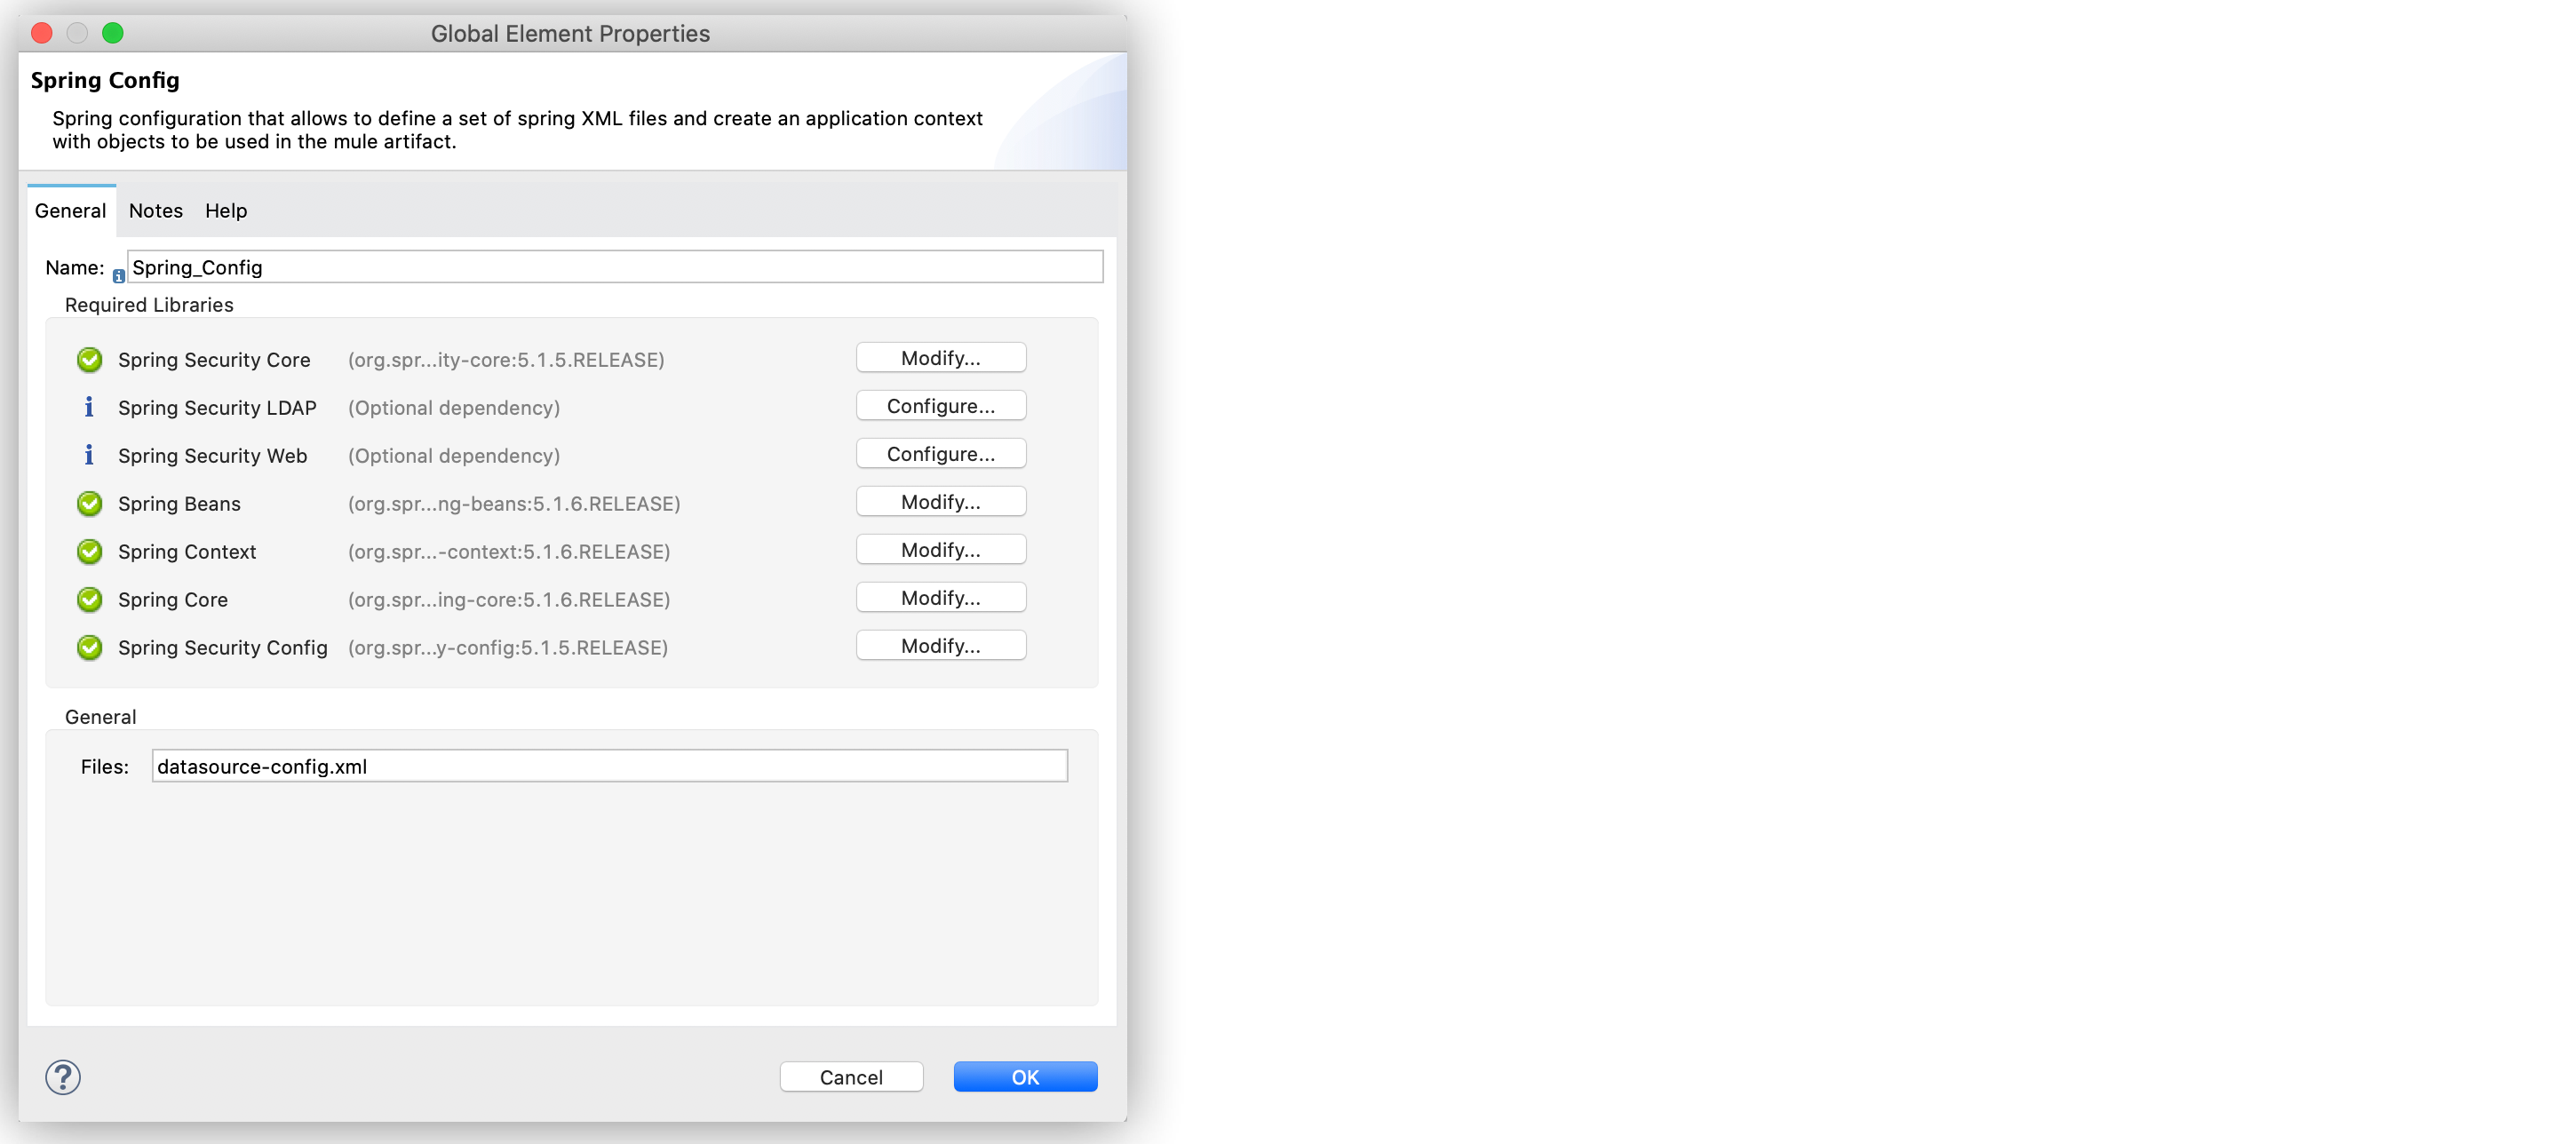
In the Spring Config window Files field, add
datasource-config.xmlto reference the spring configuration file with the Spring module. -
Click OK.
The following screenshoot shows the configuration:
-
In the Global Elements view, click Create to open the Choose Global Type window.
-
In the Filter field, type
database, select Database Config, and click OK. -
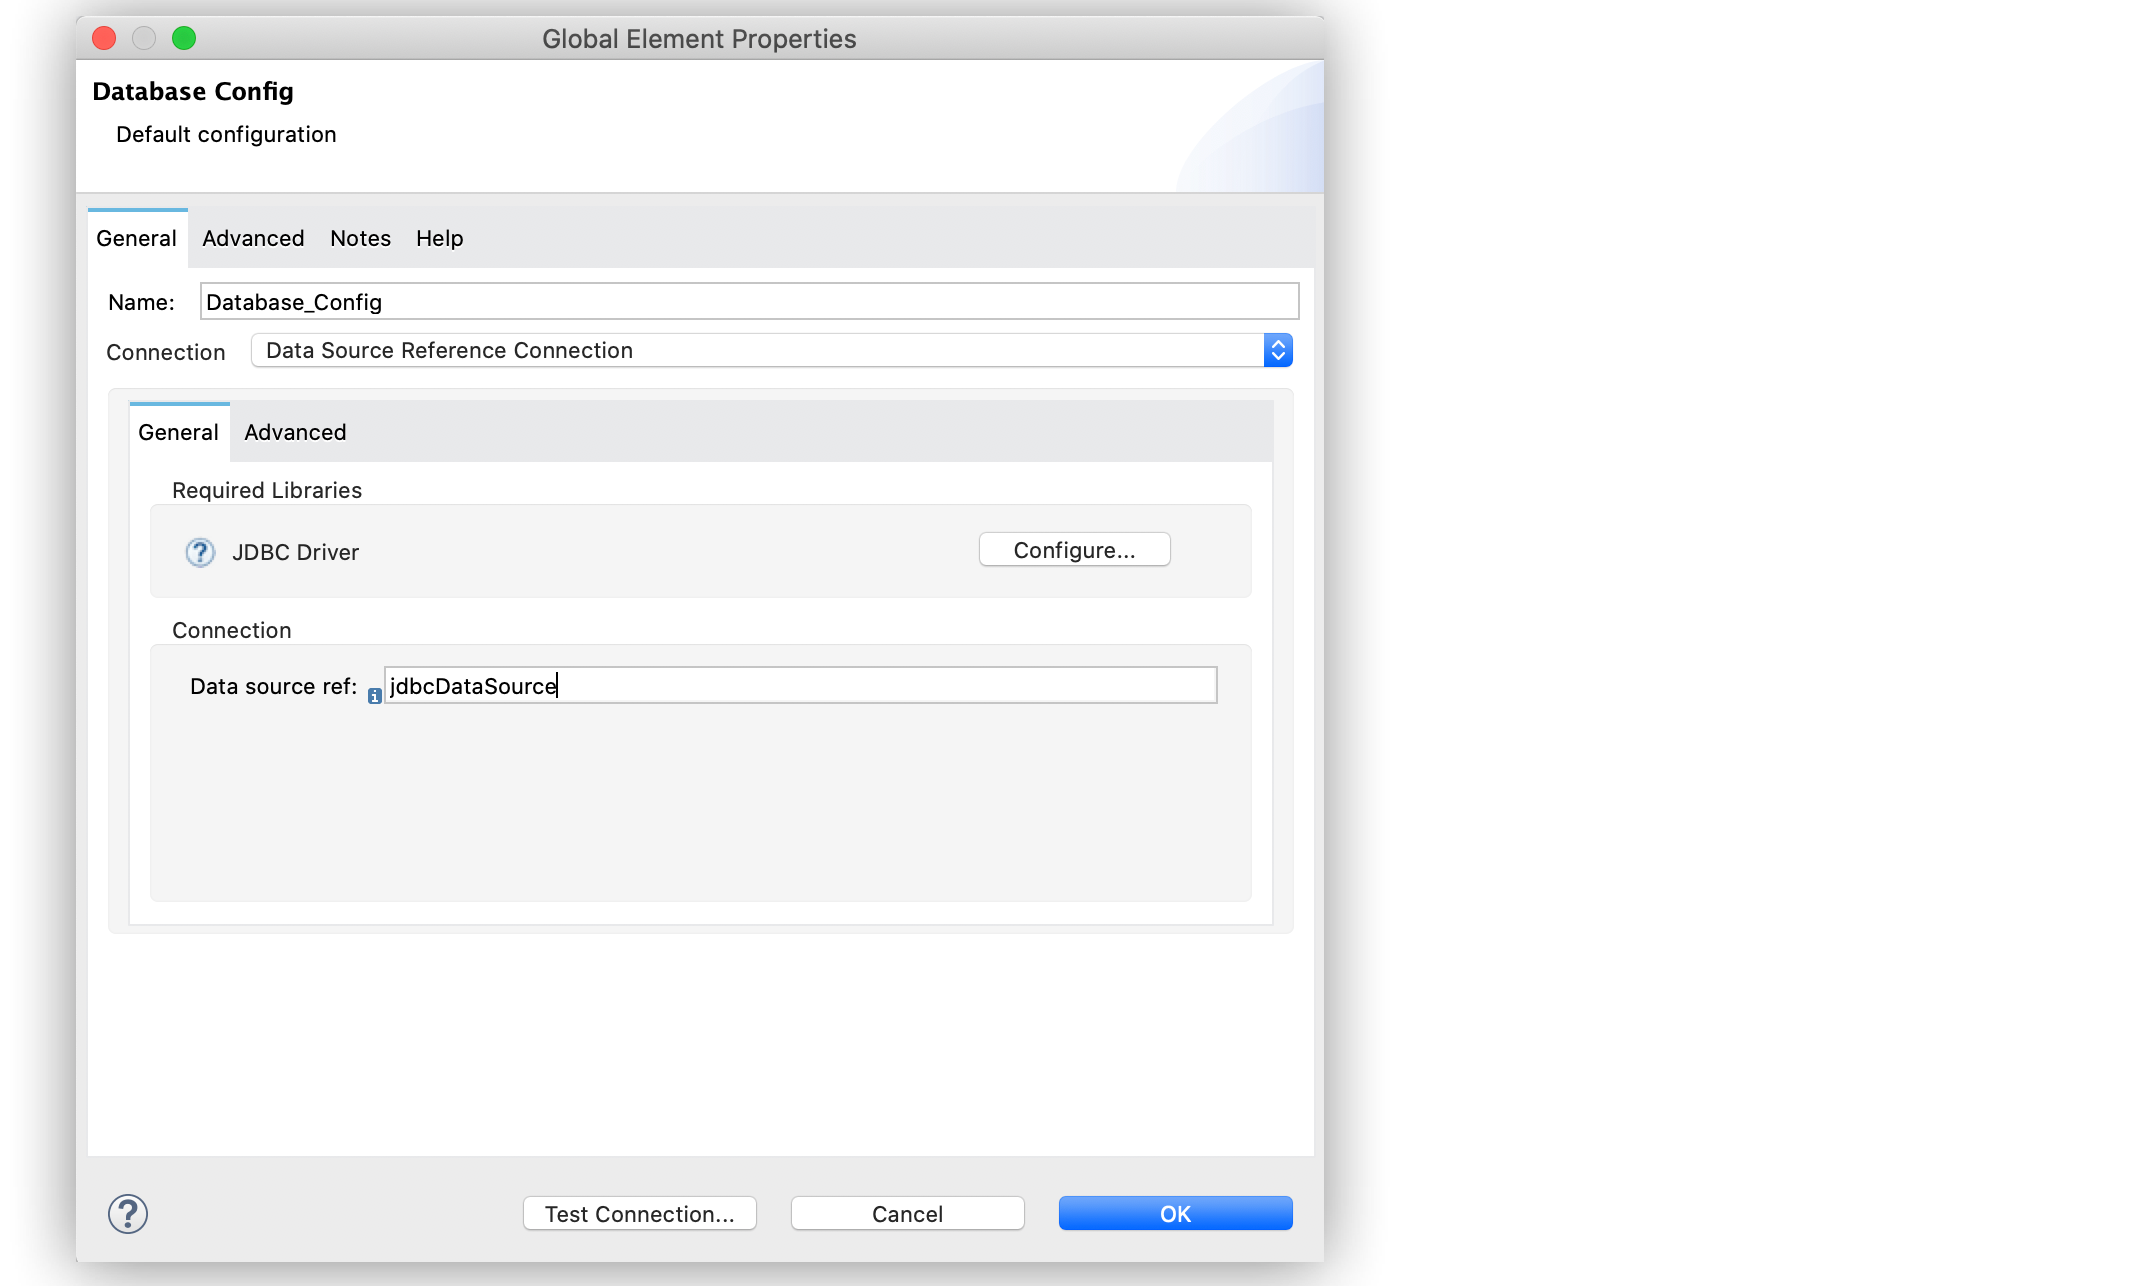
In the Database Config window, for the Connection field, select Data Source Reference Connection.
-
Click Configure to add the required JDBC driver and select either:
-
Use local file
Install the library using a local file. -
Add Maven dependency
Install a Maven dependency to add to the project.
-
-
For Data source ref, add the bean id
jdbcDataSourcecreated in thedatasource-config.xmlbean file. -
Click Test Connection to confirm that Mule can connect to the database.
-
Click OK.
The following screenshoot shows the configuration:
In the XML editor, both the spring and database configurations look like this:
<spring:config name="datasource" files="datasource-config.xml" />

<db:config name="Database_Config">
   <db:data-source-connection dataSourceRef="jdbcDataSource" />
</db:config>
Configure a Derby Connection
Use the Derby Connection field type when you want to connect to a Derby database.
The following example shows how to configure the connection in Anypoint Studio:
-
In Studio, navigate to the Global Elements view.
-
Click Create to open the Choose Global Type view.
-
In the Filter field, type
database, select Database Config, and click OK. -
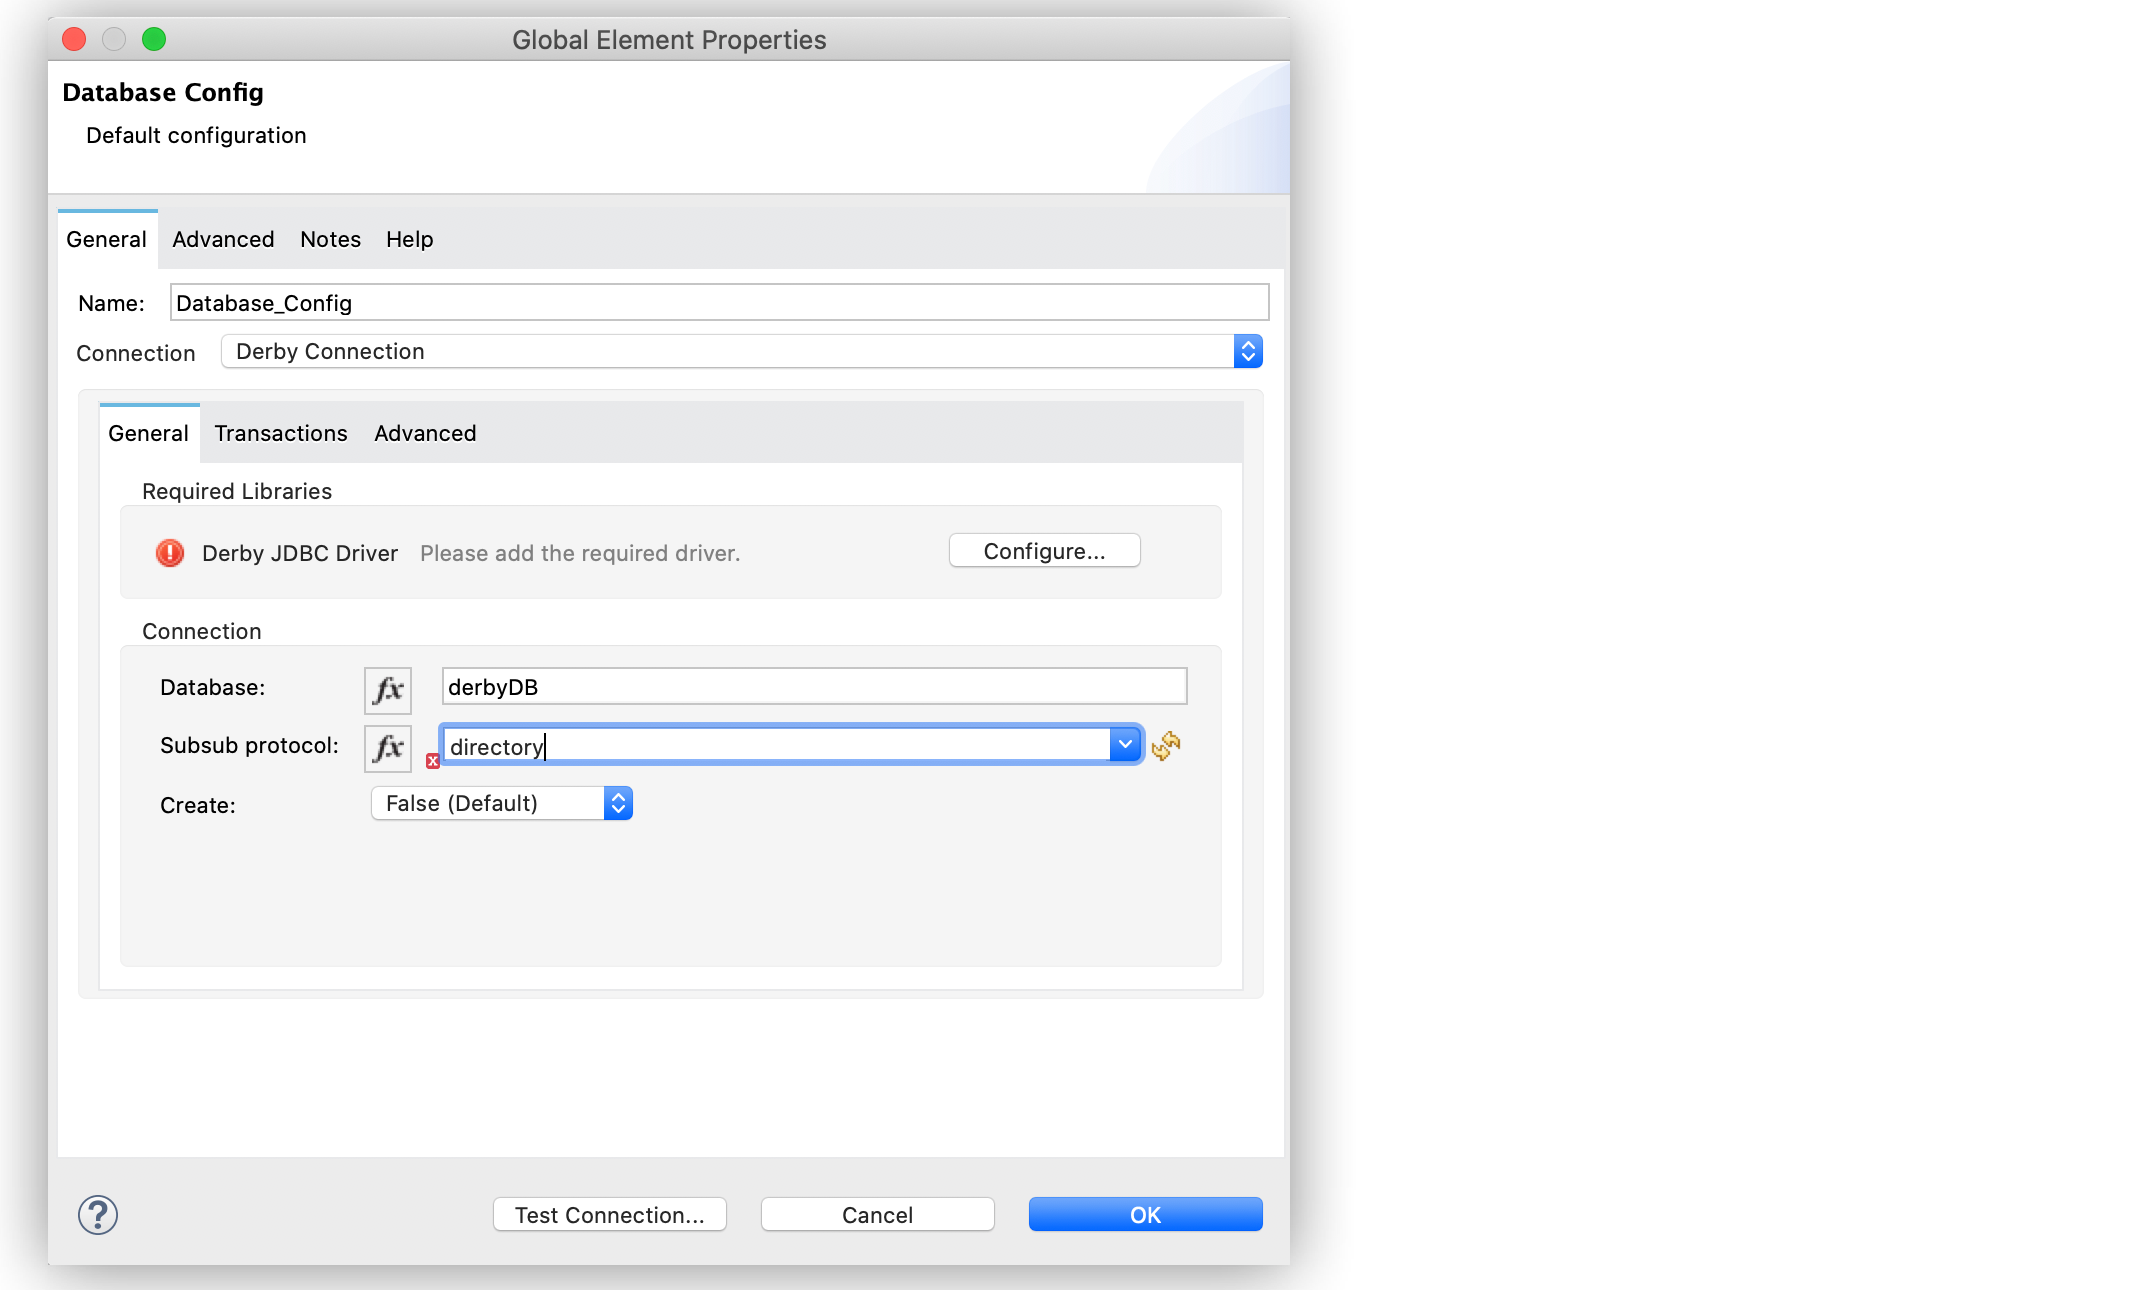
In the Database Config window, for the Connection field, select Derby Connection.
-
Click Configure to add the required Derby JDBC driver and select one of:
-
Add recommended library
Install the recommended library. -
Use local file
Install the library using a local file. -
Add Maven dependency
Install a Maven dependency to add to the project.
-
-
Set Database to
derbyDBand Subsub protocol todirectory. -
On the Transactions tab, optionally specify the transaction isolation, or XA transactions when connecting to the database.
-
On the Advanced tab, optionally specify connection pooling and reconnection information, including a reconnection strategy.
-
Click Test Connection to confirm that Mule can connect to the database.
-
Click OK.
The following screenshot shows the configuration in Studio:
In the XML editor, the configuration looks like this:
<db:config name="Database_Config" >
		<db:derby-connection database="derbyDB" />
	</db:config>
Configure a Generic Connection
Use the Generic Connection field type when you want to connect to:
-
A database for which MuleSoft does not provide a specific connection type
-
A supported database and you are using custom options that are not included in the connection types
The following example shows how to connect to an H2 database in Anypoint Studio:
-
In Studio, navigate to the Global Elements view.
-
Click Create to open the Choose Global Type view.
-
In the Filter field, type
database, select Database Config,and click OK. -
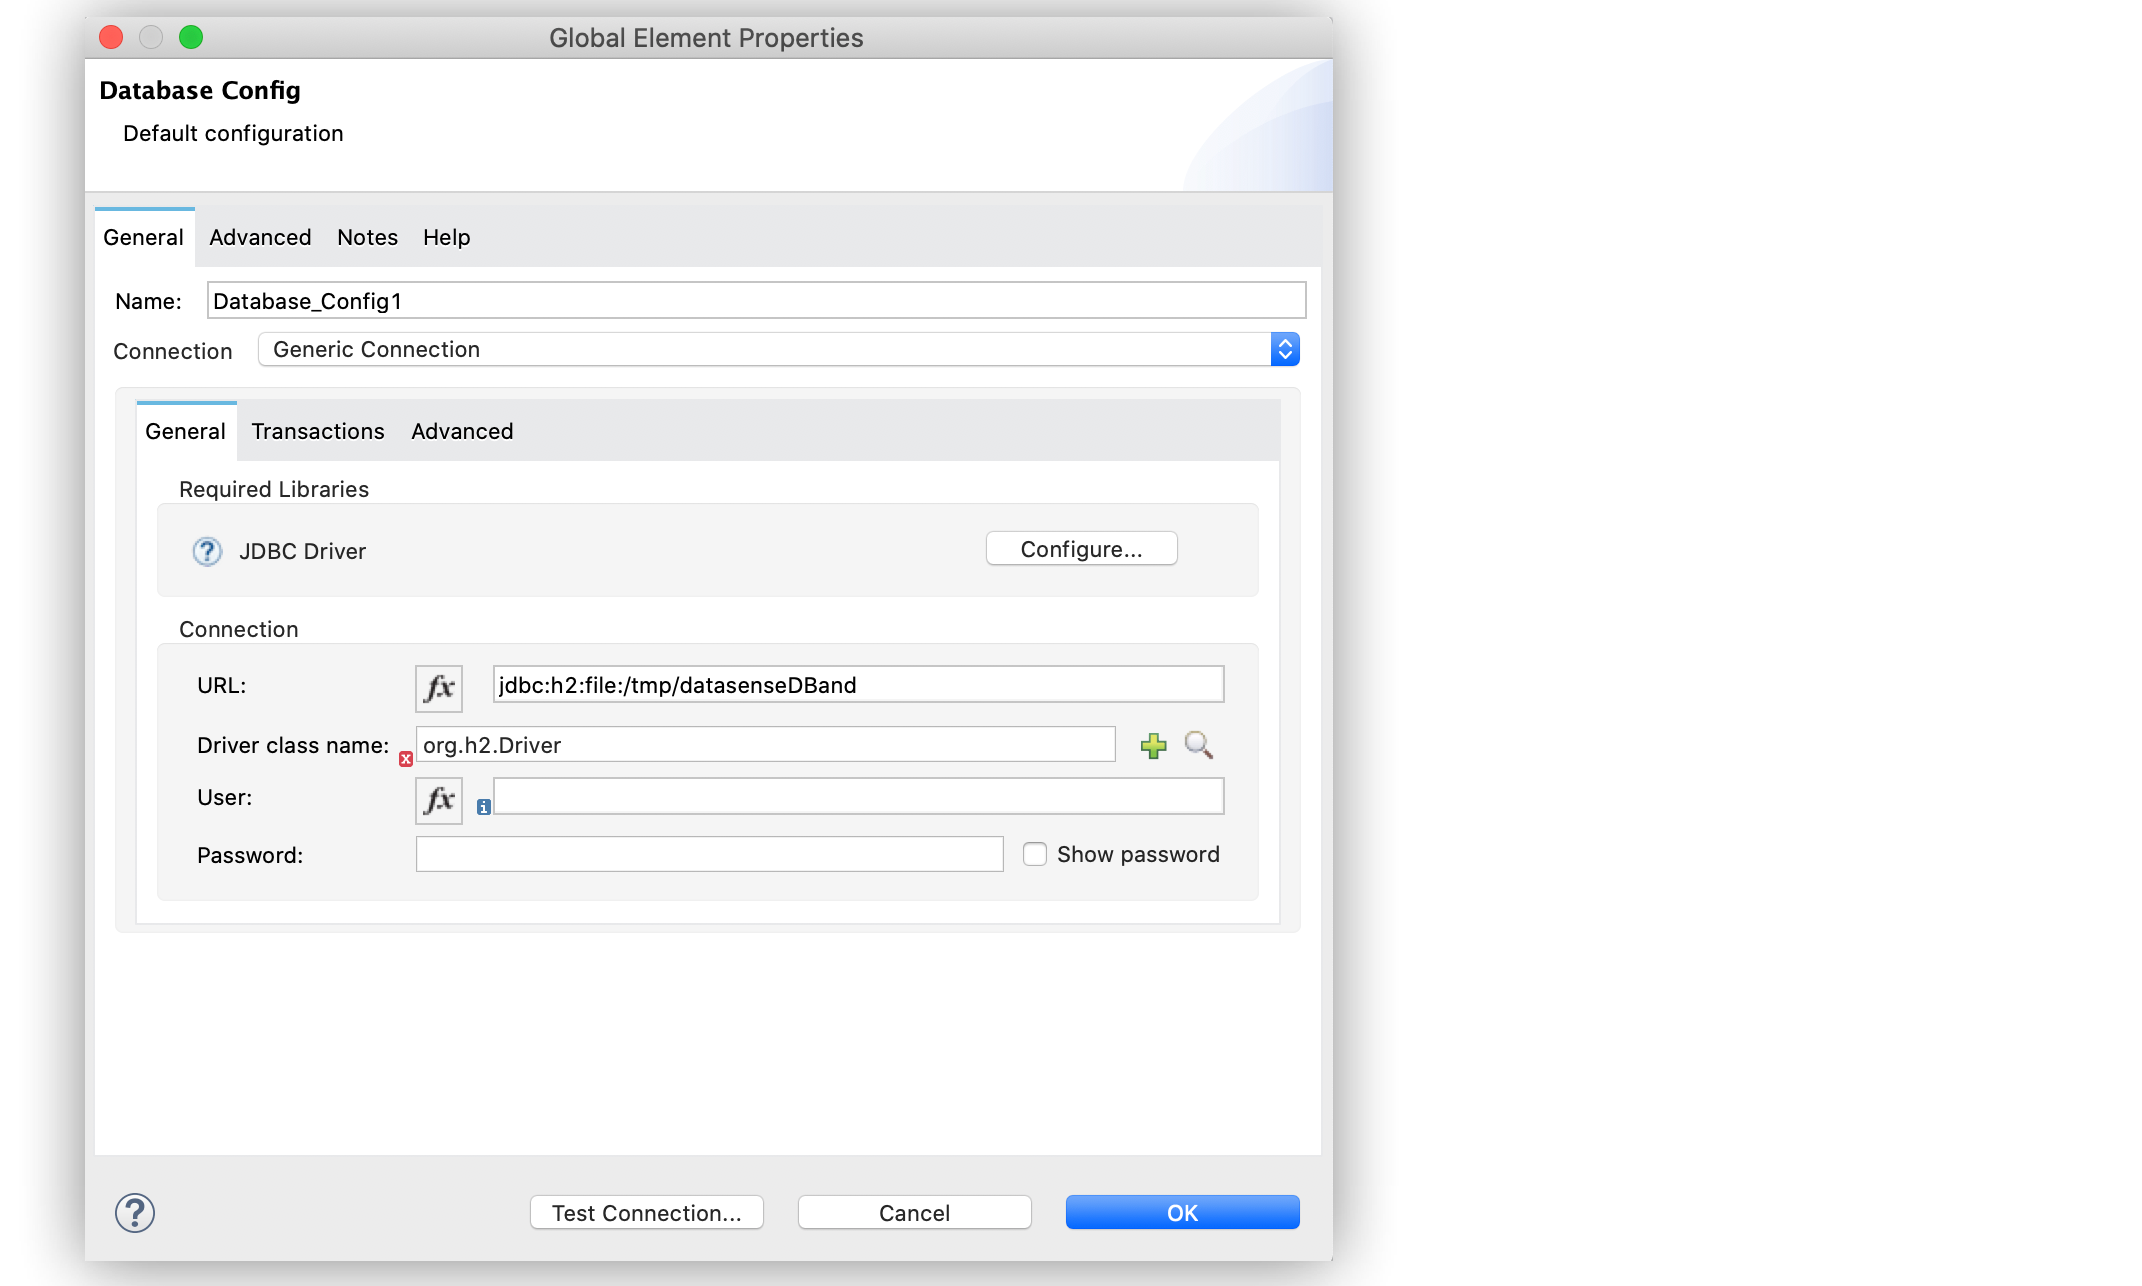
In the Database Config window, for the Connection field select Generic Connection.
-
Click Configure to add the required JDBC driver and select either:
-
Use local file
Install the library using a local file. -
Add Maven dependency
Install a Maven dependency to add to the project.
-
-
Set URL to
jdbc:h2:file:/tmp/datasenseDBandand Driver class name toorg.h2.Driver. -
Click Test Connection to validate the connection with the database.
-
Click OK.
The following screenshot shows the configuration in Studio:
In the XML editor, the configuration looks like this:
<db:config name="Database_Config">
    <db:generic-connection driverClassName="org.h2.Driver"
    url="jdbc:h2:file:/tmp/datasenseDB"/>
</db:config>
Configure a Microsoft SQL Server Connection
Use the Microsoft SQL Server Connection field type when you want to connect to a Microsoft SQL Server database.
The following example shows how to configure the connection in Anypoint Studio:
-
In Studio, navigate to the Global Elements view.
-
Click Create to open the Choose Global Type view.
-
In the Filter field, type
database, select Database Config, and click OK. -
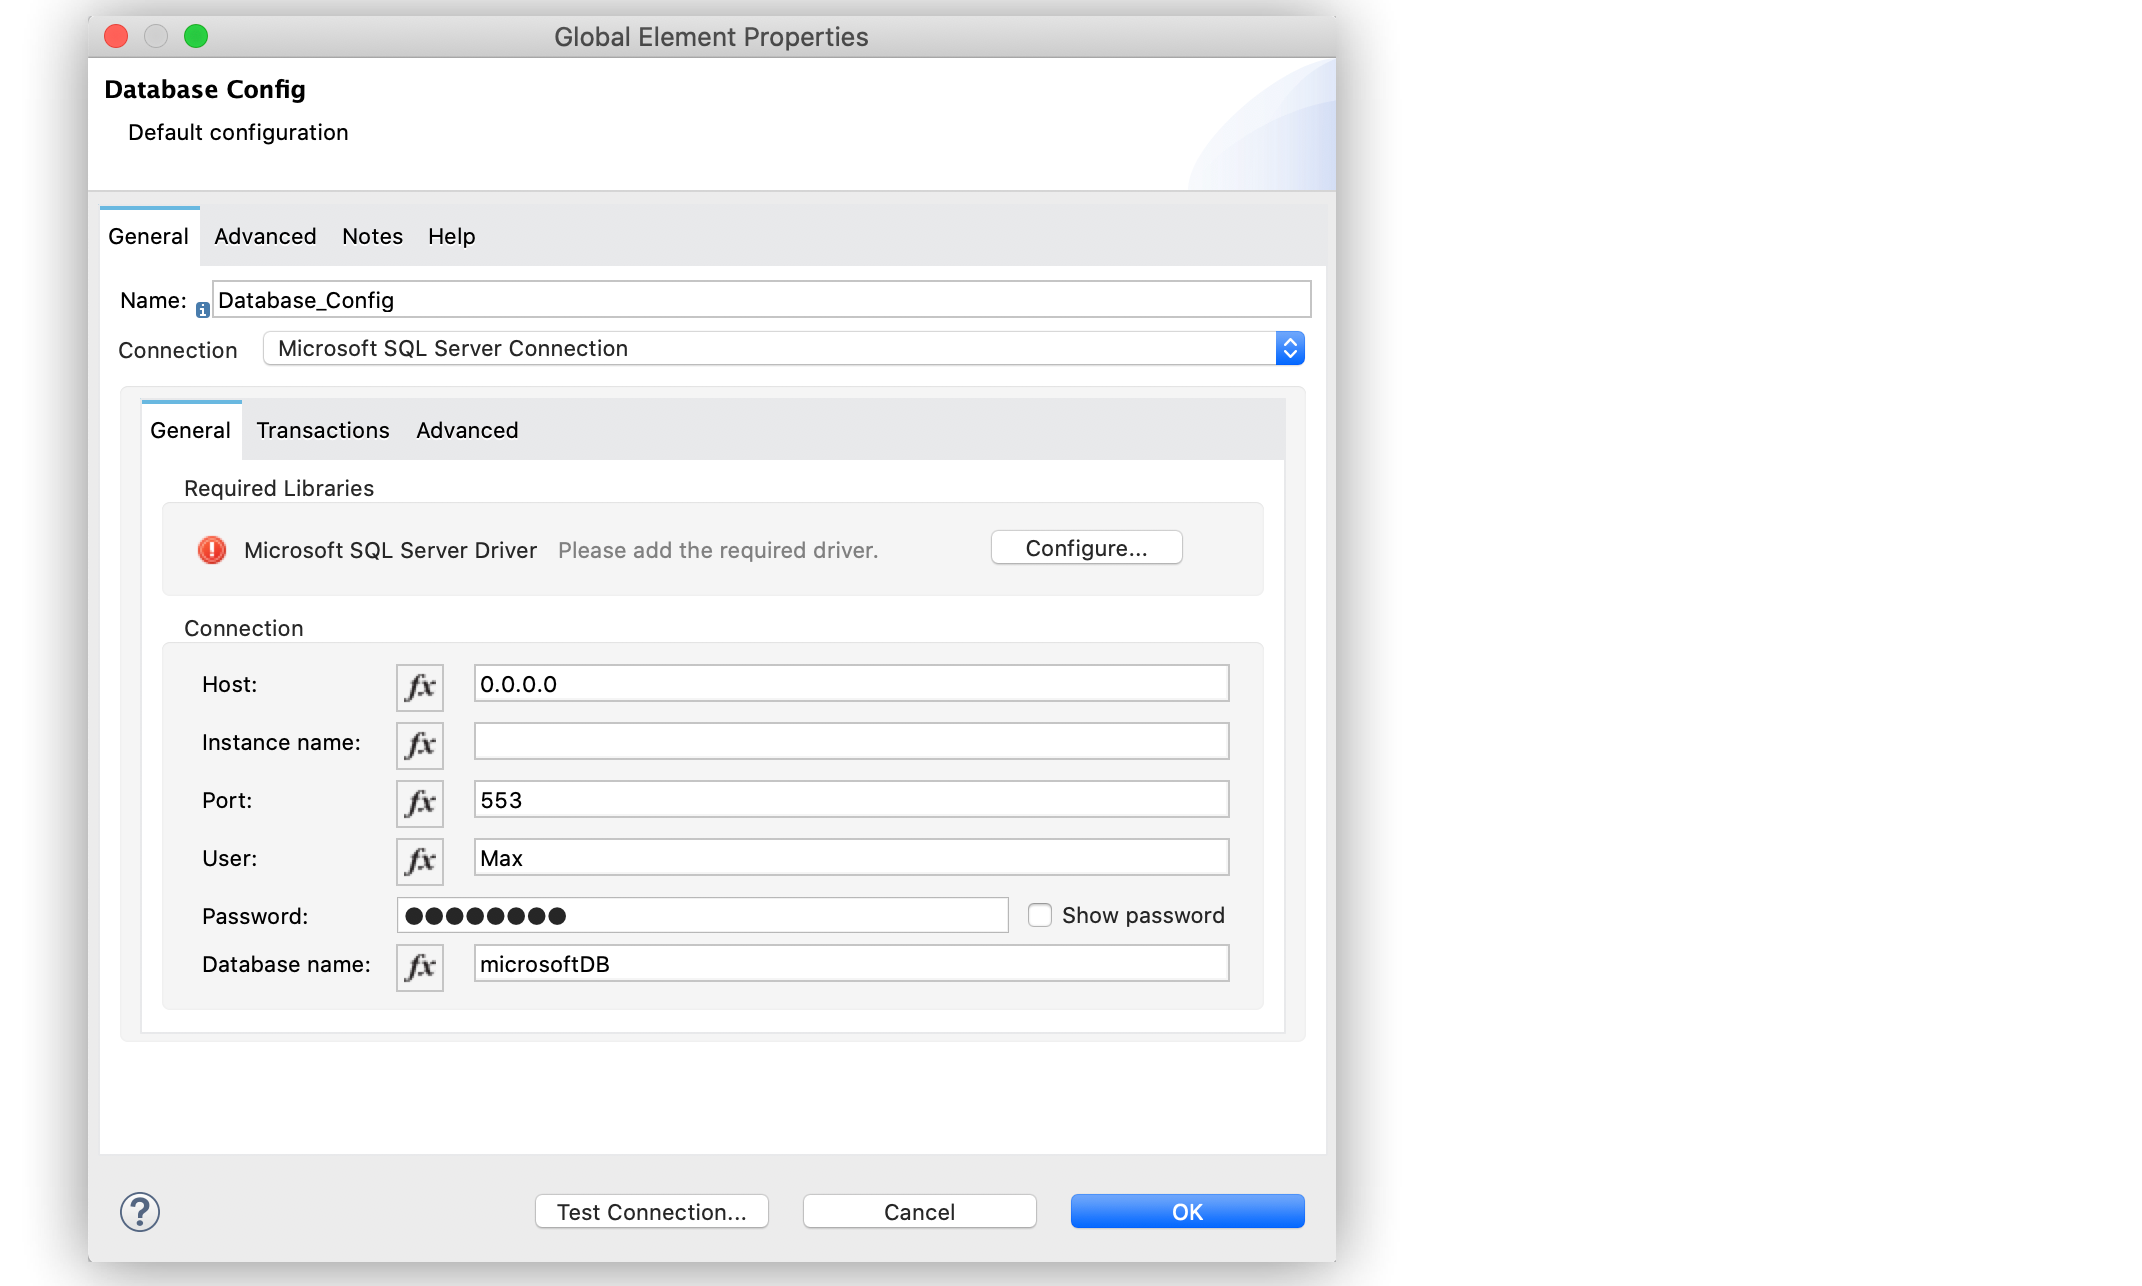
In the Database Config window, for the Connection field, select Microsoft SQL Server Connection.
-
Click Configure to add the required Microsoft SQL Server driver and select one of:
-
Add recommended library
Install the recommended library. -
Use local file
Install the library using a local file. -
Add Maven dependency
Install a Maven dependency to add to the project.
-
-
Set Host to
0.0.0.0, Port to553, User toMax, Password topasswordand Database name tomicrosoftDB. -
On the Transactions tab, optionally specify the transaction isolation, or XA transactions when connecting to the database.
-
On the Advanced tab, optionally specify connection pooling and reconnection information, including a reconnection strategy.
-
Click Test Connection to confirm that Mule can connect to the database.
-
Click OK.
The following screenshot shows the configuration in Studio:
In the XML editor, the configuration looks like this:
<db:config name="Database_Config">
    <db:mssql-connection
    host="0.0.0.0"
    port="553"
    user="Max"
    password="password"
    databaseName="microsoftDB" />
</db:config>
Configure a MySQL Database Connection
Use the MySQL Connection field type when you want to connect to a MySQL database.
The following example shows how to configure the connection in Anypoint Studio:
-
In Studio, navigate to the Global Elements view.
-
Click Create to open the Choose Global Type view.
-
In the Filter field, type
database, select Database Config, and click OK. -
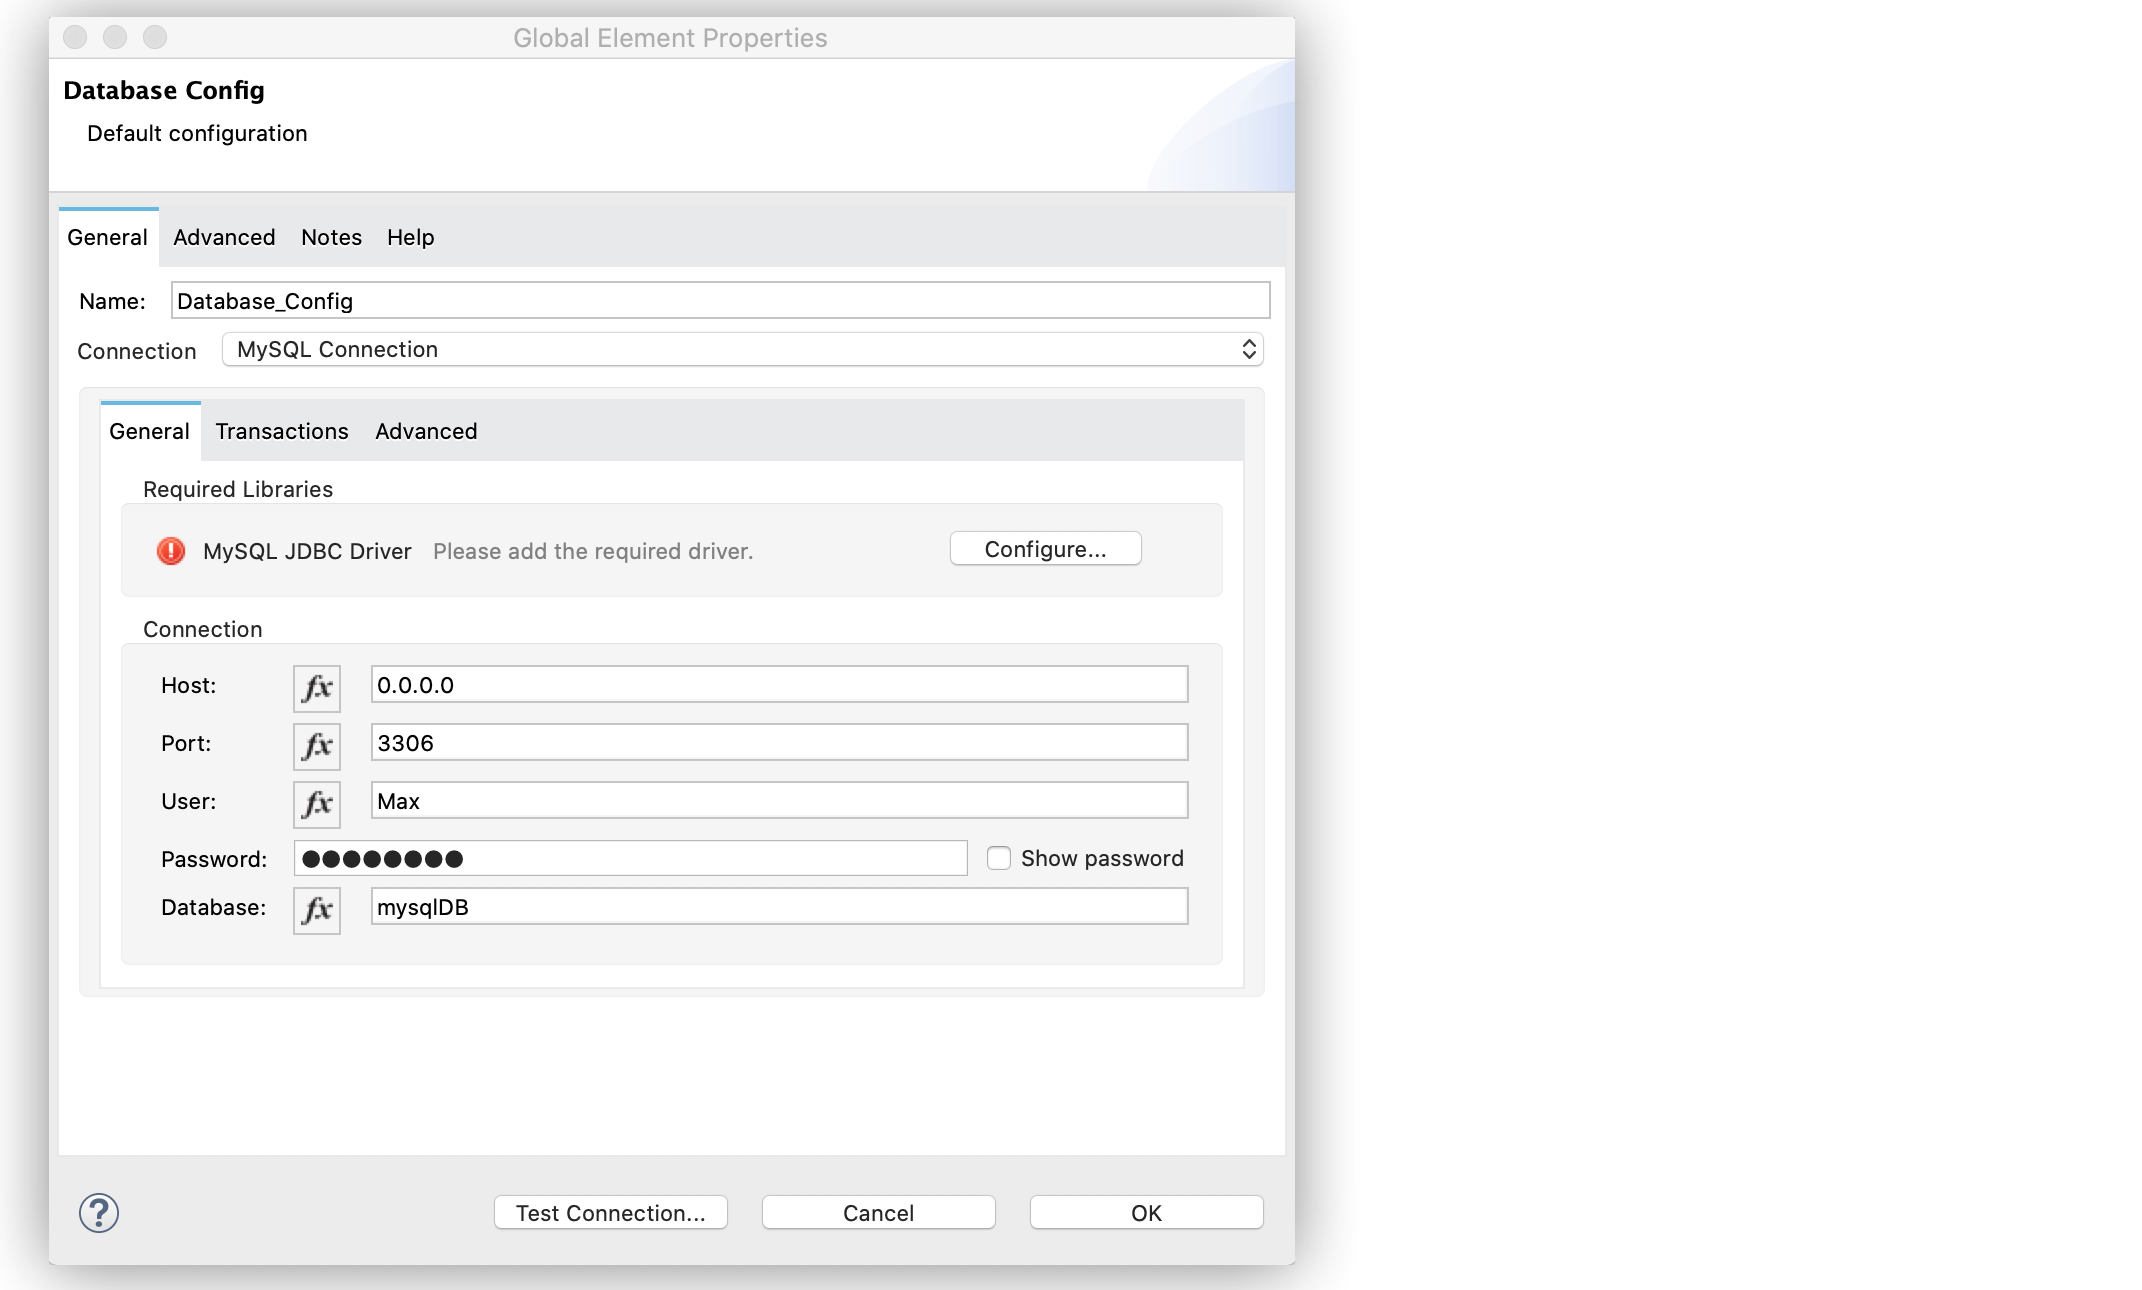
In the Database Config window, for the Connection field, select MySQL Connection.
-
Click Configure to add the required MySQL JDBC driver and select one of:
-
Add recommended library
Install the recommended library. -
Use local file
Install the library using a local file. -
Add Maven dependency
Install a Maven dependency to add to the project.
-
-
Set Host to
0.0.0.0, Port to3306, User toMax, Password topassword, and Database tosomeSchema. -
On the Transactions tab, optionally specify the transaction isolation, or XA transactions when connecting to the database.
-
On the Advanced tab, optionally specify connection pooling and reconnection information, including a reconnection strategy.
-
Click Test Connection to confirm that Mule can connect to the database.
-
Click OK.
The following screenshot shows the configuration in Studio:
In the XML editor, the configuration looks like this:
<db:config name="Database_Config">
  <db:my-sql-connection
  host="0.0.0.0"
  port="3306"
  user="Max"
  password="POWERS"
  database="mysqlDB"/>
</db:config>
Configure an Oracle Connection
Use the Oracle Connection field type when you want to connect to an Oracle database.
The following example shows how to configure the connection in Anypoint Studio:
-
In Studio, navigate to the Global Elements view.
-
Click Create to open the Choose Global Type view.
-
In the Filter field, type
database, select Database Config and click OK. -
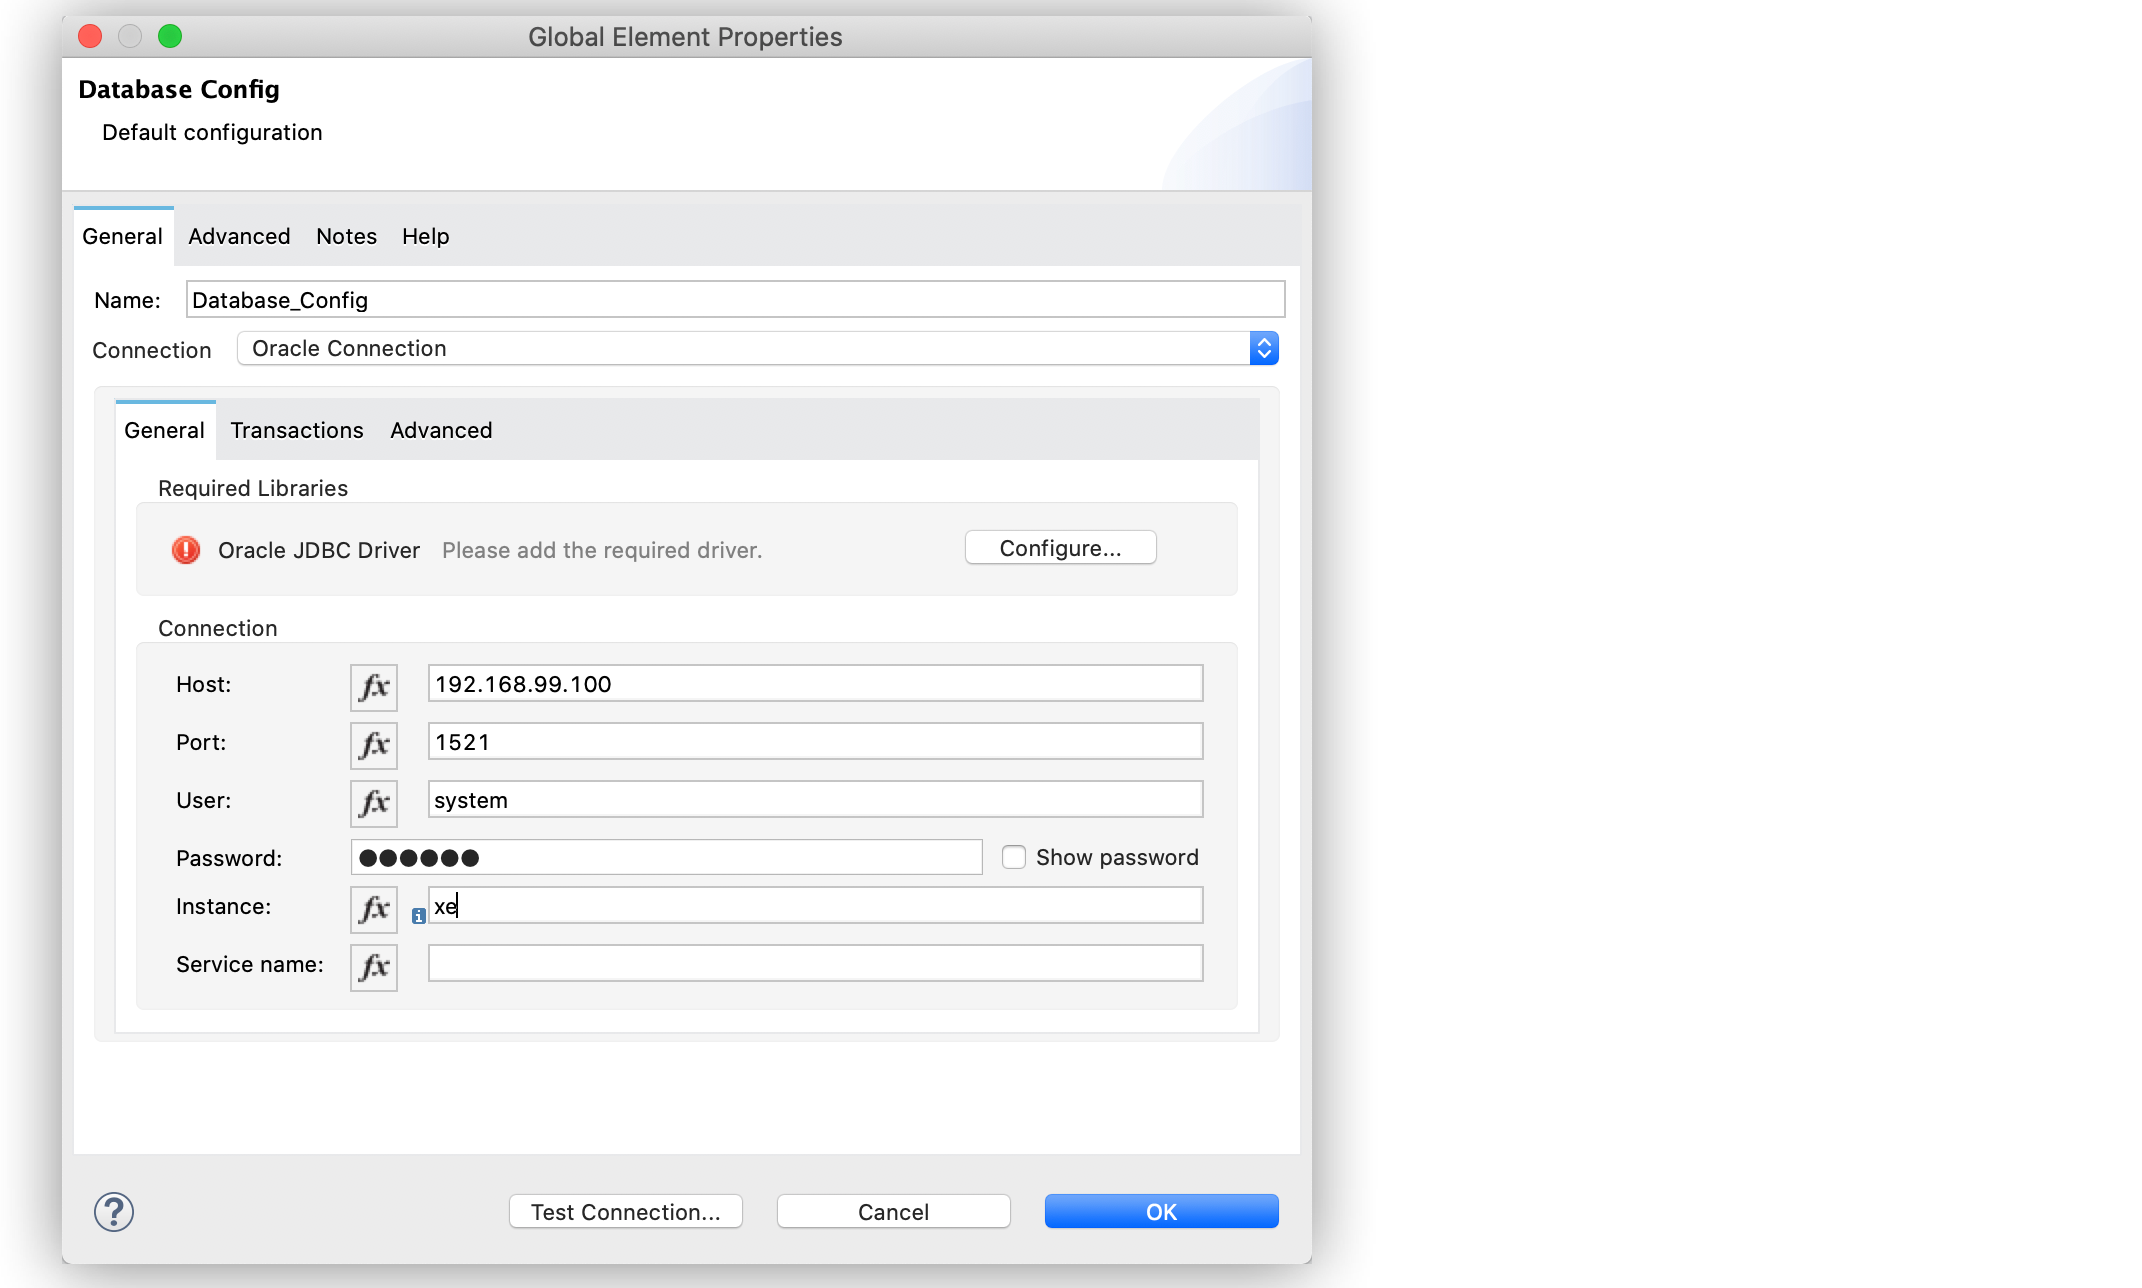
In the Database Config window, for the Connection field, select Oracle Connection.
-
Click Configure to add the required Oracle JDBC driver and select either:
-
Use local file
Install the library using a local file. -
Add Maven dependency
Install a Maven dependency to add to the project.
-
-
Set Host to
192.168.99.100, Port to1521, User tosystem, Password tooracle, and Instance toxe. -
On the Transactions tab, optionally specify the transaction isolation, or XA transactions when connecting to the database.
-
On the Advanced tab, optionally specify connection pooling and reconnection information, including a reconnection strategy.
-
Click Test Connection to confirm that Mule can connect to the database.
-
Click OK.
The following screenshot shows the configuration in Studio:
In the XML editor, the configuration looks like this:
<db:config name="Database_Config">
  <db:oracle-connection
  host="192.168.99.100"
  port="1521" instance="xe"
  user="system"
  password="oracle" />
</db:config>
Configure the JDBC Driver
After you configure the connections, you can add the JDBC driver. The following example shows how to add a driver for the MySQL database:
-
In Studio, you can add the driver using either of the following options:
-
In the Database Config window, click Configure, select Add Maven dependency, and pick the dependency:
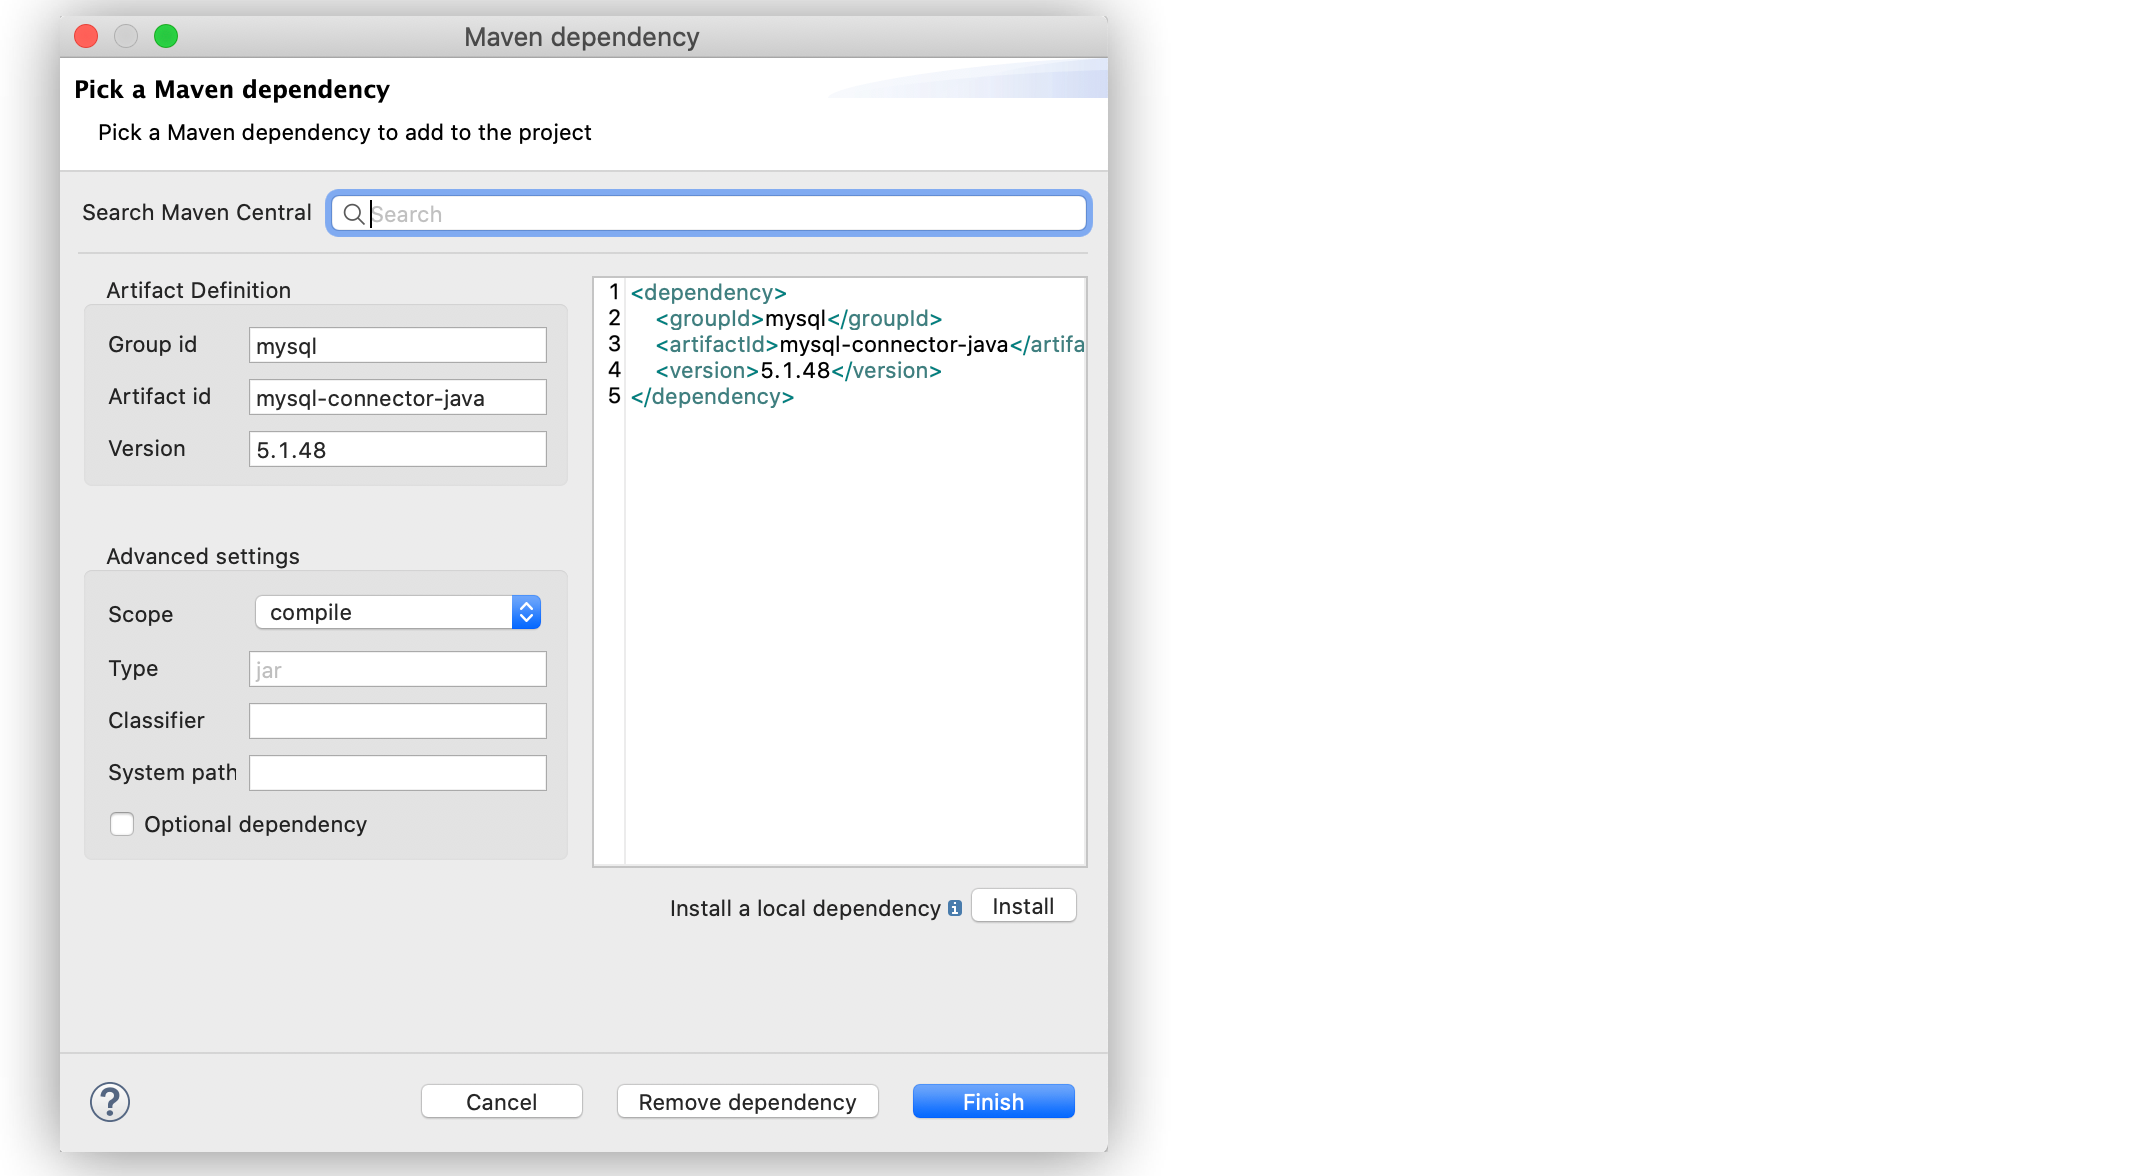 Figure 8. Pick Maven dependency
 -
Add the dependency directly to your project’s
pom.xmlfile:<dependency> <groupId>mysql</groupId> <artifactId>mysql-connector-java</artifactId> <version>5.1.48</version> </dependency>
-
-
Configure your
pom.xmlfile so that Mule exposes the driver dependency to Database Connector:<build> <plugins> <!-- Only used to declare the shared libraries--> <plugin> <groupId>org.mule.tools.maven</groupId> <artifactId>mule-maven-plugin</artifactId> <version>1.0.0</version> <configuration> <sharedLibraries> <sharedLibrary> <groupId>mysql</groupId> <artifactId>mysql-connector-java</artifactId> </sharedLibrary> </sharedLibraries> </configuration> </plugin> </plugins> </build>
Configure Connection Pools
Establishing connections is costly in terms of connectors, relational database management system (RDBMS) network, and processing overhead. Database Connector supports the Pooling profile field that enables you to build a connection pool to provide several connections.
All connection type configurations, except the Data Source Reference Connection, accept the Pooling profile field configuration. In JDBC, pooling occurs at the data source level, so to enable pooling, you have to configure the global data source.
The following example shows how to configure the Pooling profile field for a MySQL database connection:
-
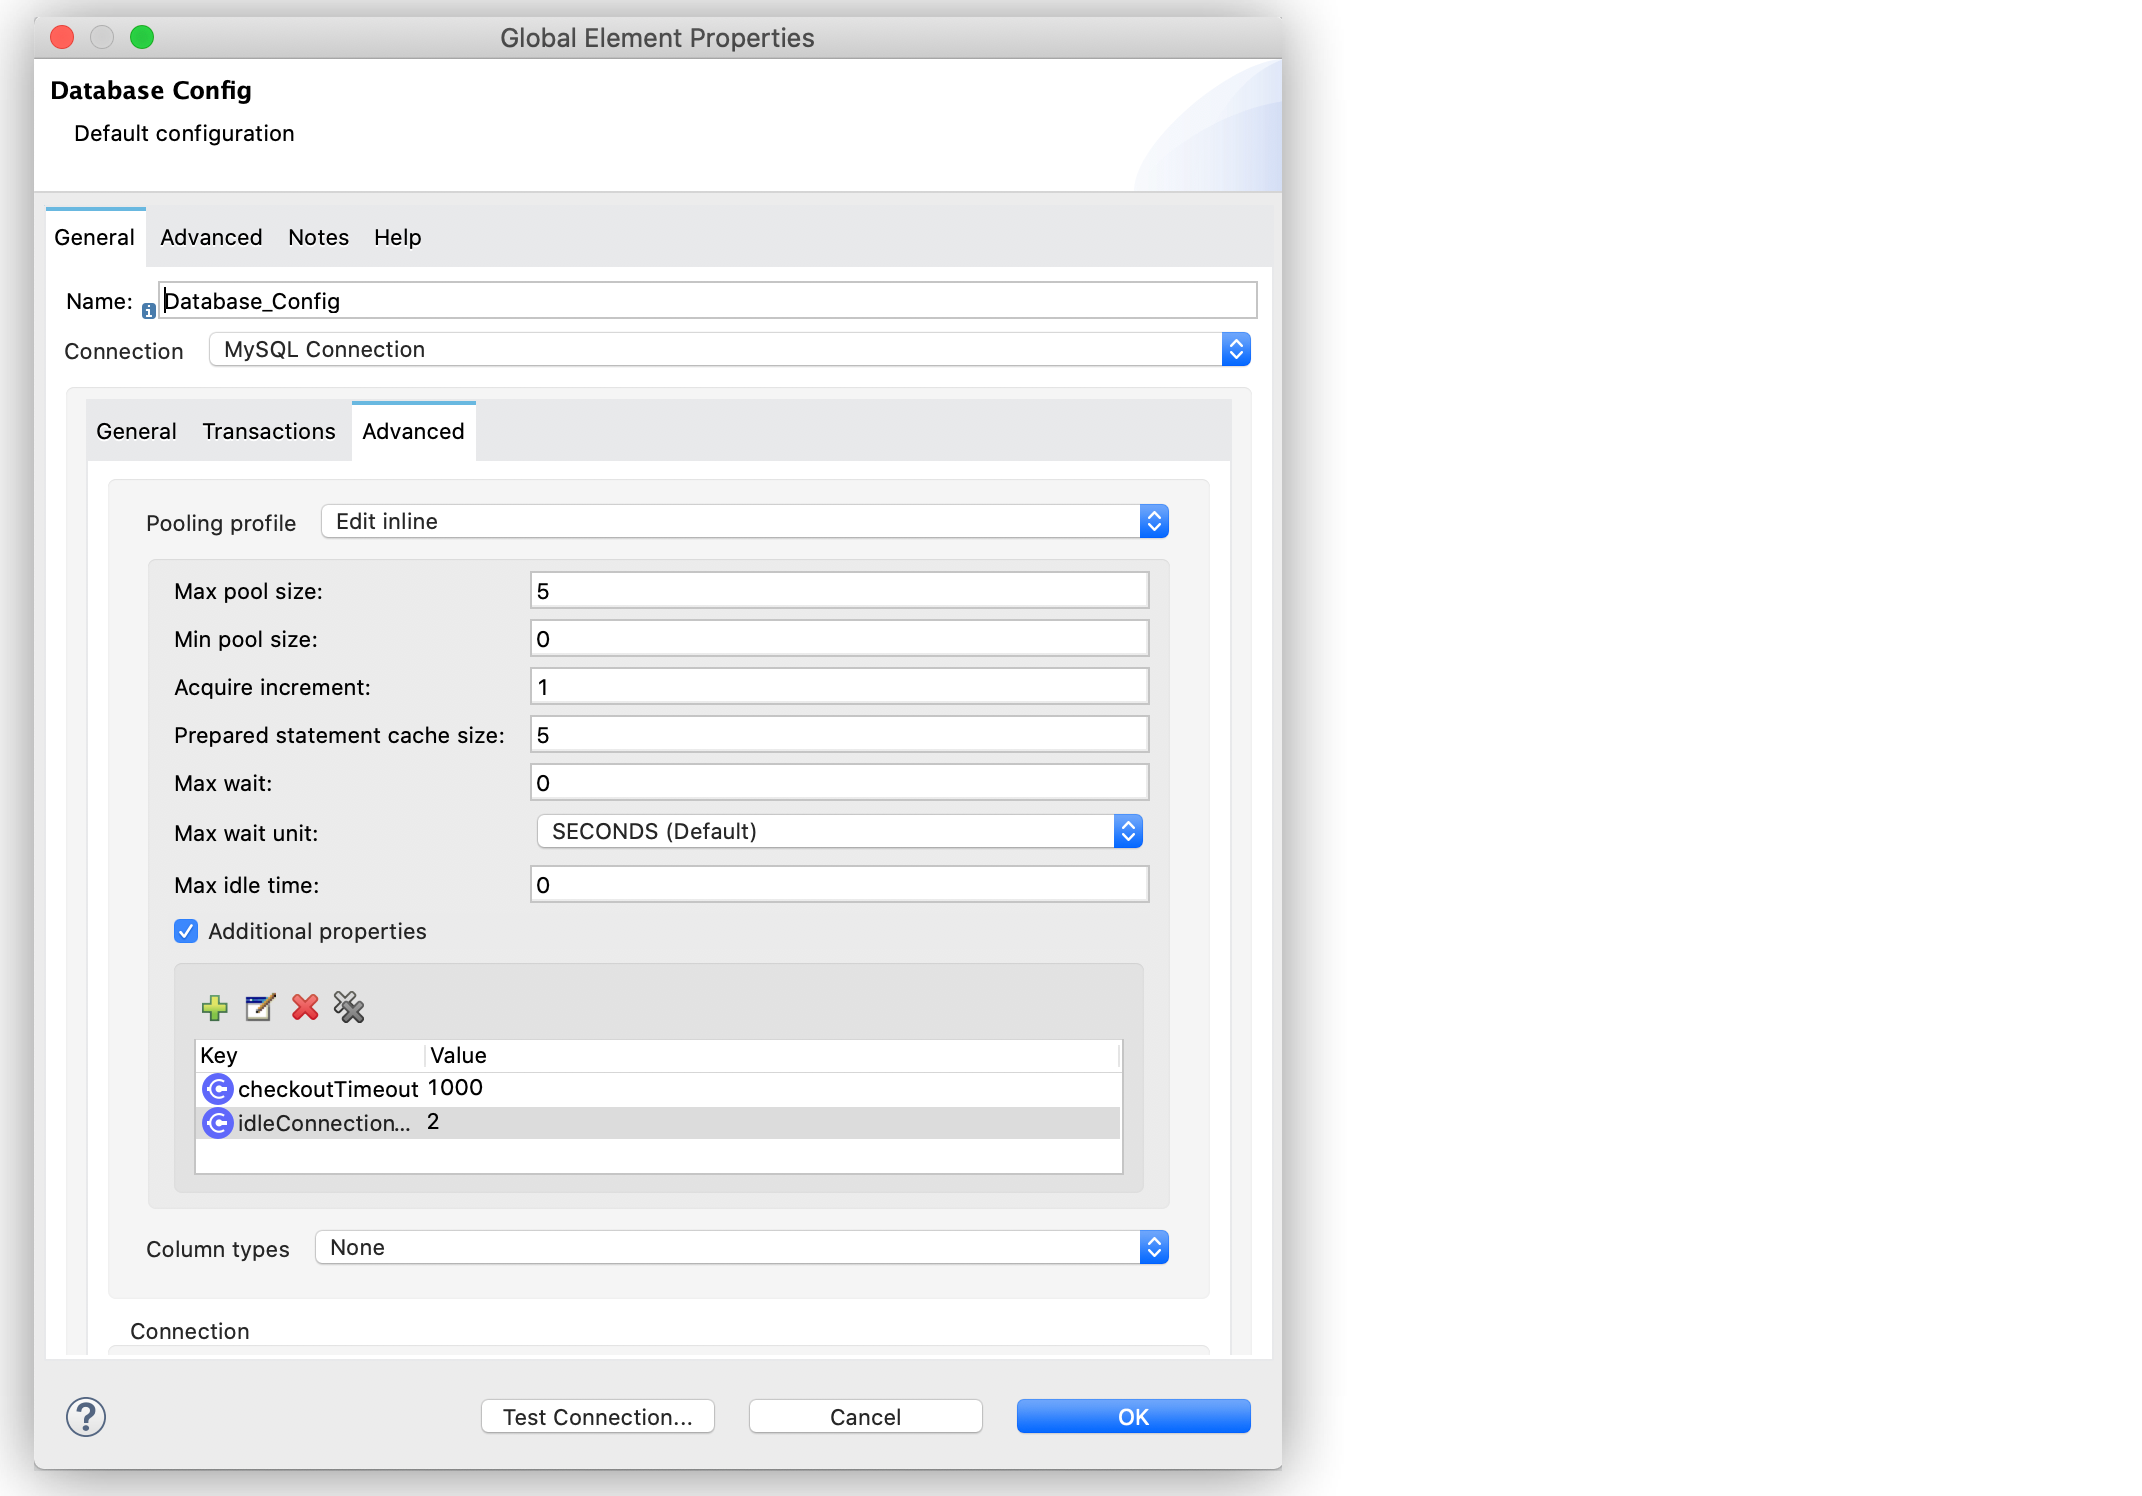
In the Database Config window, in the Advanced tab, for Pooling profile select Edit inline.
-
Set Max pool size to
5, Min pool size to0, Acquire increment to1, Prepared statement cache size to5, Max wait to0, Max wait unit toSECONDS (Default), and Max idle time to0. -
Enable the Additional properties parameter.
These additional properties do not override any previously set main properties. -
Click the (+) plus sign to add a new property.
-
In the Additional property window, set Key to
checkoutTimeout, Value to1000, and click Finish. -
To add a new property, set Key to
idleConnectionTestPeriodand Value to2, and then click Finish.
The following screenshot shows the configuration in Studio:
In the XML editor, the configuration uses the <db:pooling-profile> element rather than the standard Mule <pooling-profile> element because databases have special pooling attributes, such as the preparedStatementCacheSize element:
<db:config name="Database_Config">
    <db:my-sql-connection database="mozart_test" host="${host}" password="${password}" port="${port}" user="${user}">
        <db:pooling-profile acquireIncrement="1" maxPoolSize="5" maxWait="0" maxWaitUnit="SECONDS" minPoolSize="0" preparedStatementCacheSize="5"/>
        <db:additional-properties>
            <db:additional-property key="checkoutTimeout" value="1000"/>
            <db:additional-property key="idleConnectionTestPeriod" value="2" />
        </db:additional-properties>
    </db:my-sql-connection>
</db:config>
Configure an Oracle Connection with TNS Names
The following example shows how to configure the Generic Connection field to connect to an Oracle database that relies on the tnsnames.ora file.
If a firewall separates your Mule runtime engine from the database, use the ENABLE=BROKEN parameter to enable a keep-alive connection at the TNS connection.
If a keep-alive connection is not set, the connection can drop traffic due to expiring inactivity timers.
-
In Studio, navigate to the Global Elements view.
-
Click Create to open the Choose Global Type view.
-
In the Filter field, type
database, select Database Config and click OK. -
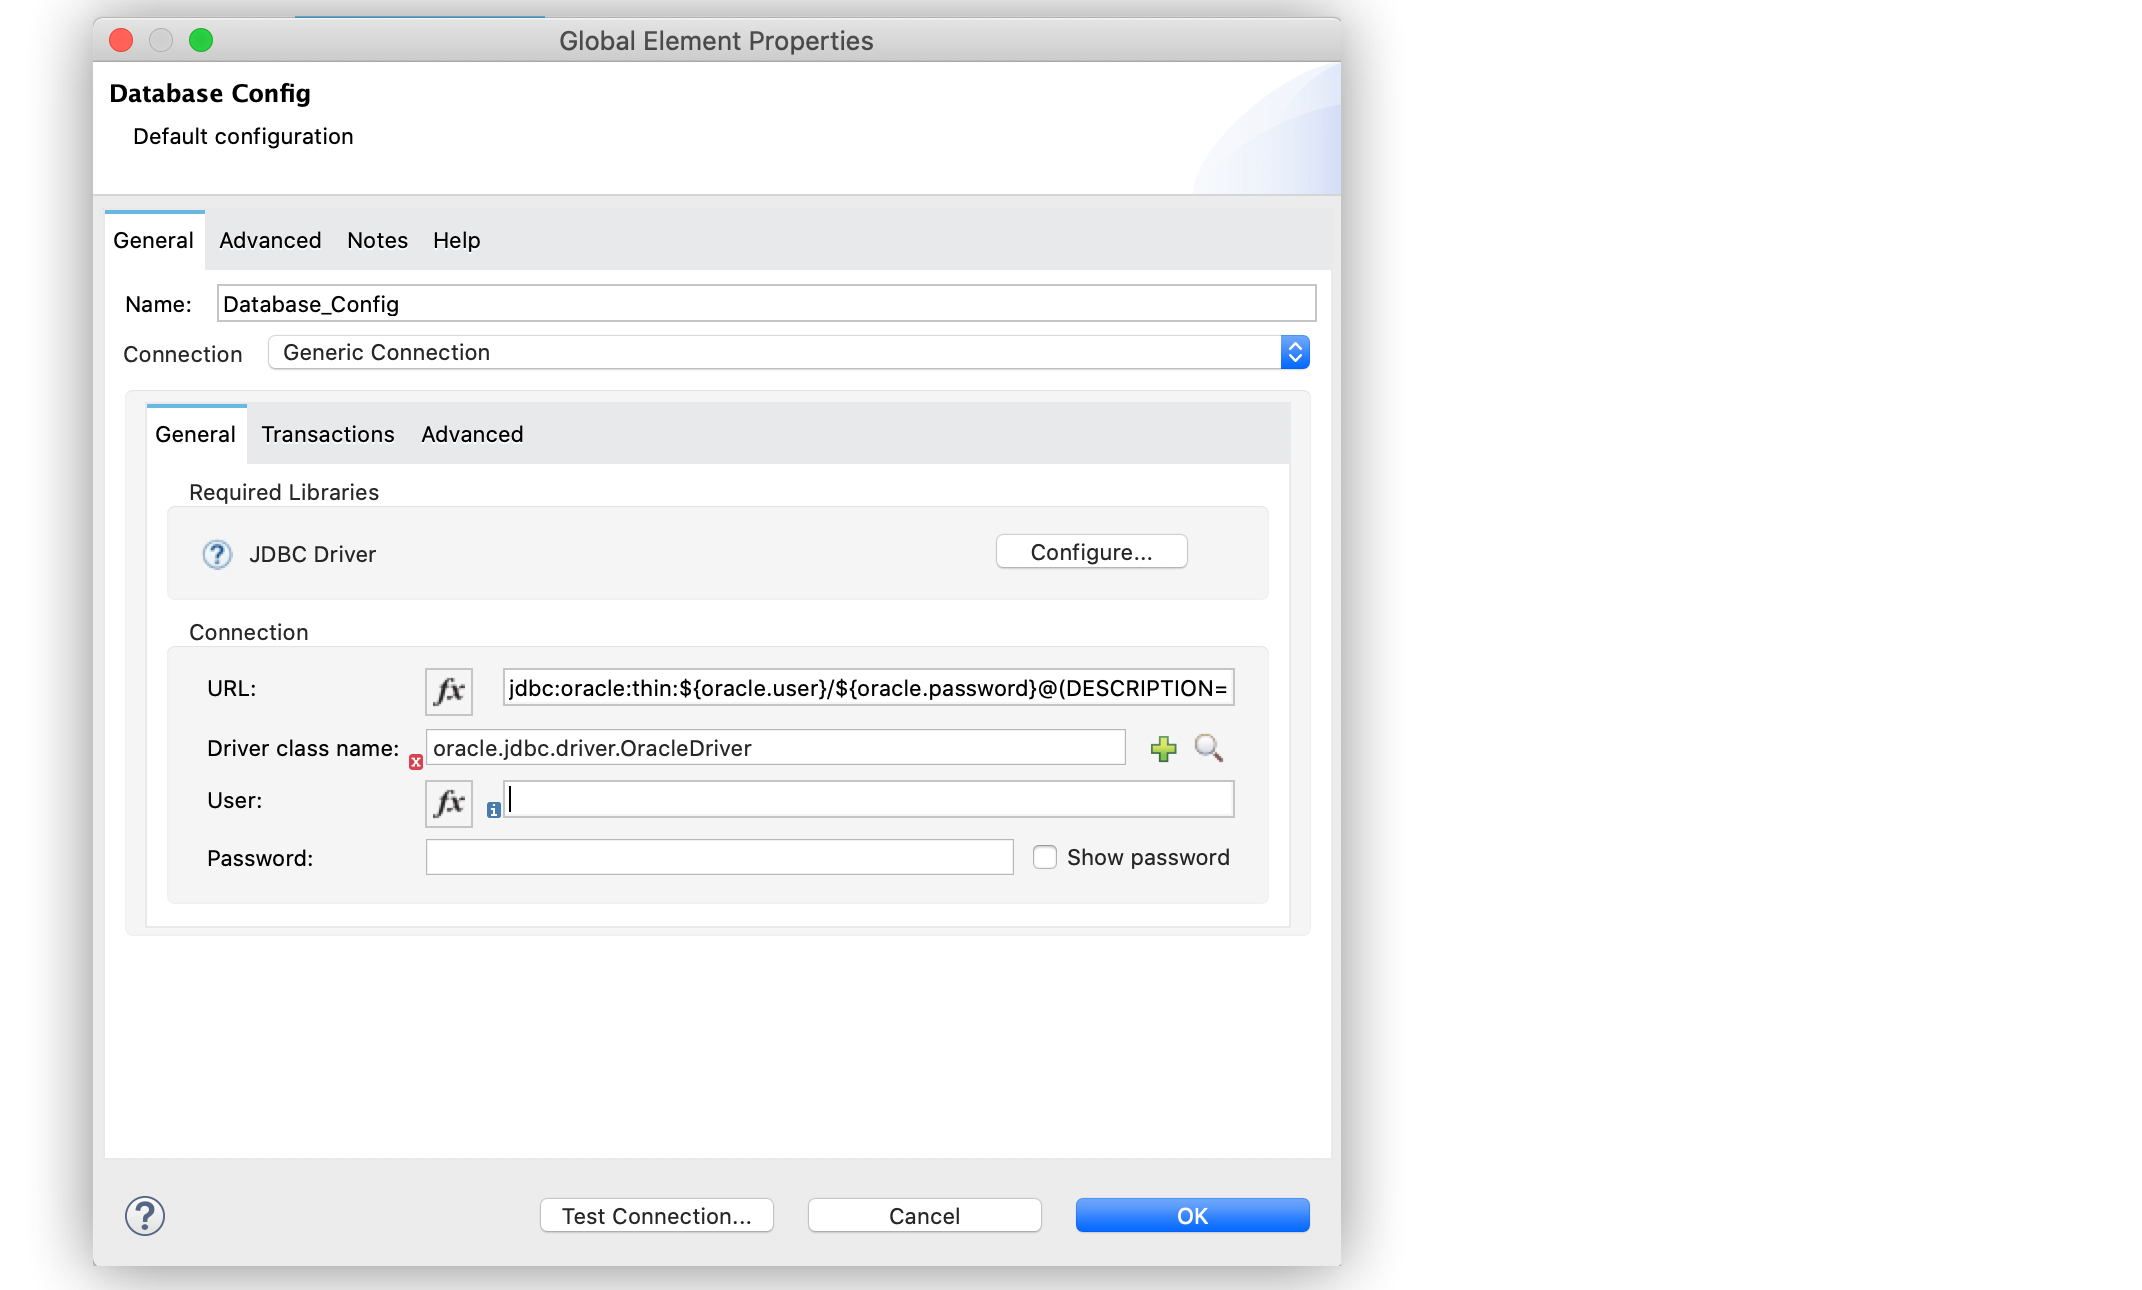
In the Database Config window, for the Connection field, select Generic Connection.
-
Click Configure to add the required JDBC driver and select either:
-
Use local file
Install the library using a local file. -
Add Maven dependency
Install a Maven dependency to add to the project.
-
-
Set the connection URL to
jdbc:oracle:thin:${oracle.user}/${oracle.password}@(DESCRIPTION=(ENABLE=BROKEN)(FAILOVER=ON)(ADDRESS_LIST=(ADDRESS=(PROTOCOL=TCP)(HOST=${oracle.host1})(PORT=${oracle.port}))(ADDRESS=(PROTOCOL=TCP)(HOST=${oracle.host2})(PORT=${oracle.port}))(CONNECT_DATA=(SERVICE_NAME=${oracle.service}))). -
Set Driver class name to
oracle.jdbc.driver.OracleDriver. -
Click Test Connection to validate the connection with the database.
-
Click OK.
The following screenshot shows the configuration in Studio:
In the XML editor, the configuration looks like this:
<db:config name="Database_Config">
    <db:generic-connection driverClassName="oracle.jdbc.driver.OracleDriver"
    url="jdbc:oracle:thin:${oracle.user}/${oracle.password}@(DESCRIPTION=(ENABLE=BROKEN)(FAILOVER=ON)(ADDRESS_LIST=(ADDRESS=(PROTOCOL=TCP)(HOST=${oracle.host1})(PORT=${oracle.port}))(ADDRESS=(PROTOCOL=TCP)(HOST=${oracle.host2})(PORT=${oracle.port}))(CONNECT_DATA=(SERVICE_NAME=${oracle.service})))` and *Driver class name* to `oracle.jdbc.driver.OracleDriver"/>
</db:config>