
Using Anypoint Studio to Configure FTPS Connector 2.0
Anypoint Studio (Studio) editors help you design and update your Mule applications, properties, and configuration files.
To add and configure a connector in Studio:
When you run the connector, you can view the app log to check for problems in real time, as described in View the App Log.
If you are new to configuring connectors in Studio, see Use Studio to Configure a Connector. If, after reading this topic, you need additional information about the connector fields, see the FTPS Connector Reference Reference.
Create a Mule Project
In Studio, create a new Mule project in which to add and configure the connector:
-
In Studio, select File > New > Mule Project.
-
Enter a name for your Mule project and click Finish.
Add the Connector to Your Mule Project
Add FTPS Connector to your Mule project to automatically populate the XML code with the connector’s namespace and schema location and to add the required dependencies to the project’s pom.xml file:
-
In the Mule Palette view, click (X) Search in Exchange.
-
In the Add Dependencies to Project window, type
ftpsin the search field. -
Click FTPS Connector in Available modules.
-
Click Add.
-
Click Finish.
Adding a connector to a Mule project in Studio does not make that connector available to other projects in your Studio workspace.
Configure a Source
A source initiates a flow when a specified condition is met. You can configure one of these sources to use with FTPS Connector:
-
On New or Updated File
Initiates a flow by polling a directory for files that have been created or updated and generates a message for each file found. -
HTTP Listener
Initiates a flow each time it receives a request on the configured host and port. -
Scheduler
Initiates a flow when a time-based condition is met.
For example, to configure the On New or Updated File source, follow these steps:
-
In the Mule Palette view, select On New or Updated File.
-
Drag On New or Updated File to the Studio canvas.
-
On the On New or Updated File configuration screen, optionally change the value of the Display Name field.
-
Specify a value for the Path field.
-
Click the plus sign (+) next to the Connector configuration field to configure a global element that can be used by all instances of On New or Updated File in the app.
-
On the General tab, specify the connection information for the connector.
-
Set Host to specify the FTPS server host, for example,
localhostor192.168.0.1. -
Click Test Connection to confirm that Mule can connect with the specified server.
-
Click OK.
-
On the On New or Updated File configuration screen, specify a Scheduling Strategy value and optionally complete other fields.
Add a Connector Operation to the Flow
When you add a connector operation to your flow, you immediately define a specific operation for that connector to perform.
To add an operation for FTPS Connector, follow these steps:
-
In the Mule Palette view, select FTPS and then select the desired operation.
-
Drag the operation onto the Studio canvas and to the right of the source.

Configure a Global Element for the Connector
When you configure a connector, it’s best to configure a global element that all instances of that connector in the app can use. Configuring a global element requires you to configure the FTP server connection.
To configure the global element for FTPS Connector, follow these steps:
-
Select the name of the connector in the Studio canvas.
-
Select the operation in the Studio canvas.
-
In the configuration screen for the operation, click the plus sign (+) next to the Connector configuration field to access the global element configuration fields.
-
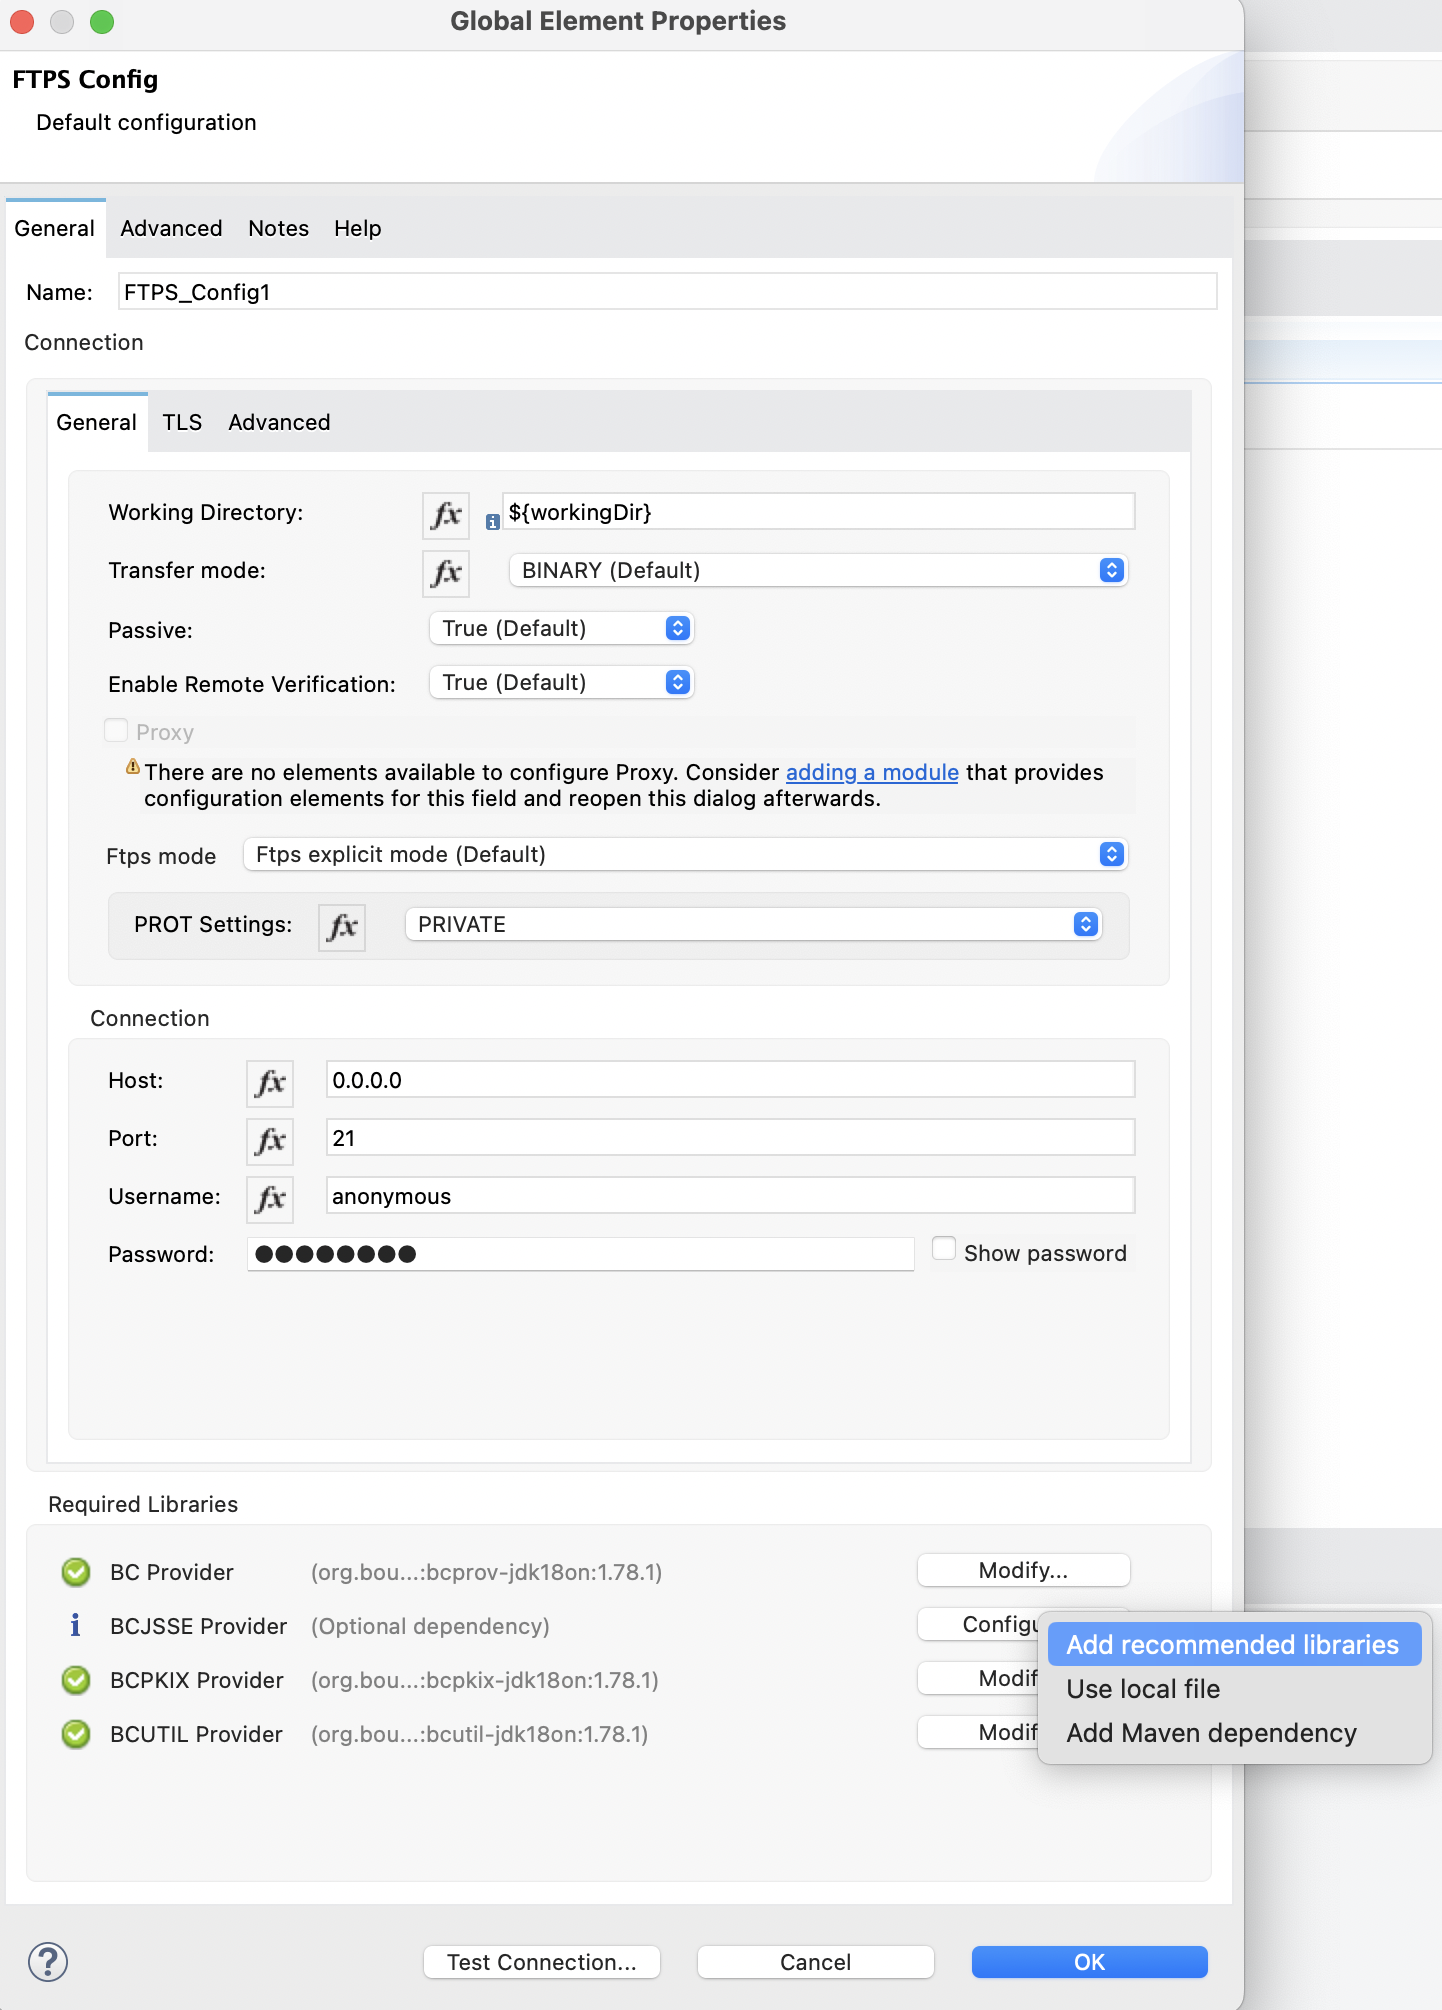
On the General tab, specify the connection information for the connector:
-
Set the Working Directory as the root of every relative path used with this connector.
If it’s not provided, the value defaults to the remote server. -
Set Host to specify the FTPS server host, for example,
localhostor0.0.0.0. -
Set Username and Password.
-
Configure Bouncy Castle libraries in the Required Libraries field.
-
On the Advanced tab, optionally specify a timeout configuration and reconnection strategy.
-
On the TLS tab, specify TLS configuration.
-
Click Test Connection to confirm that Mule can connect with the specified server.
-
Click OK.
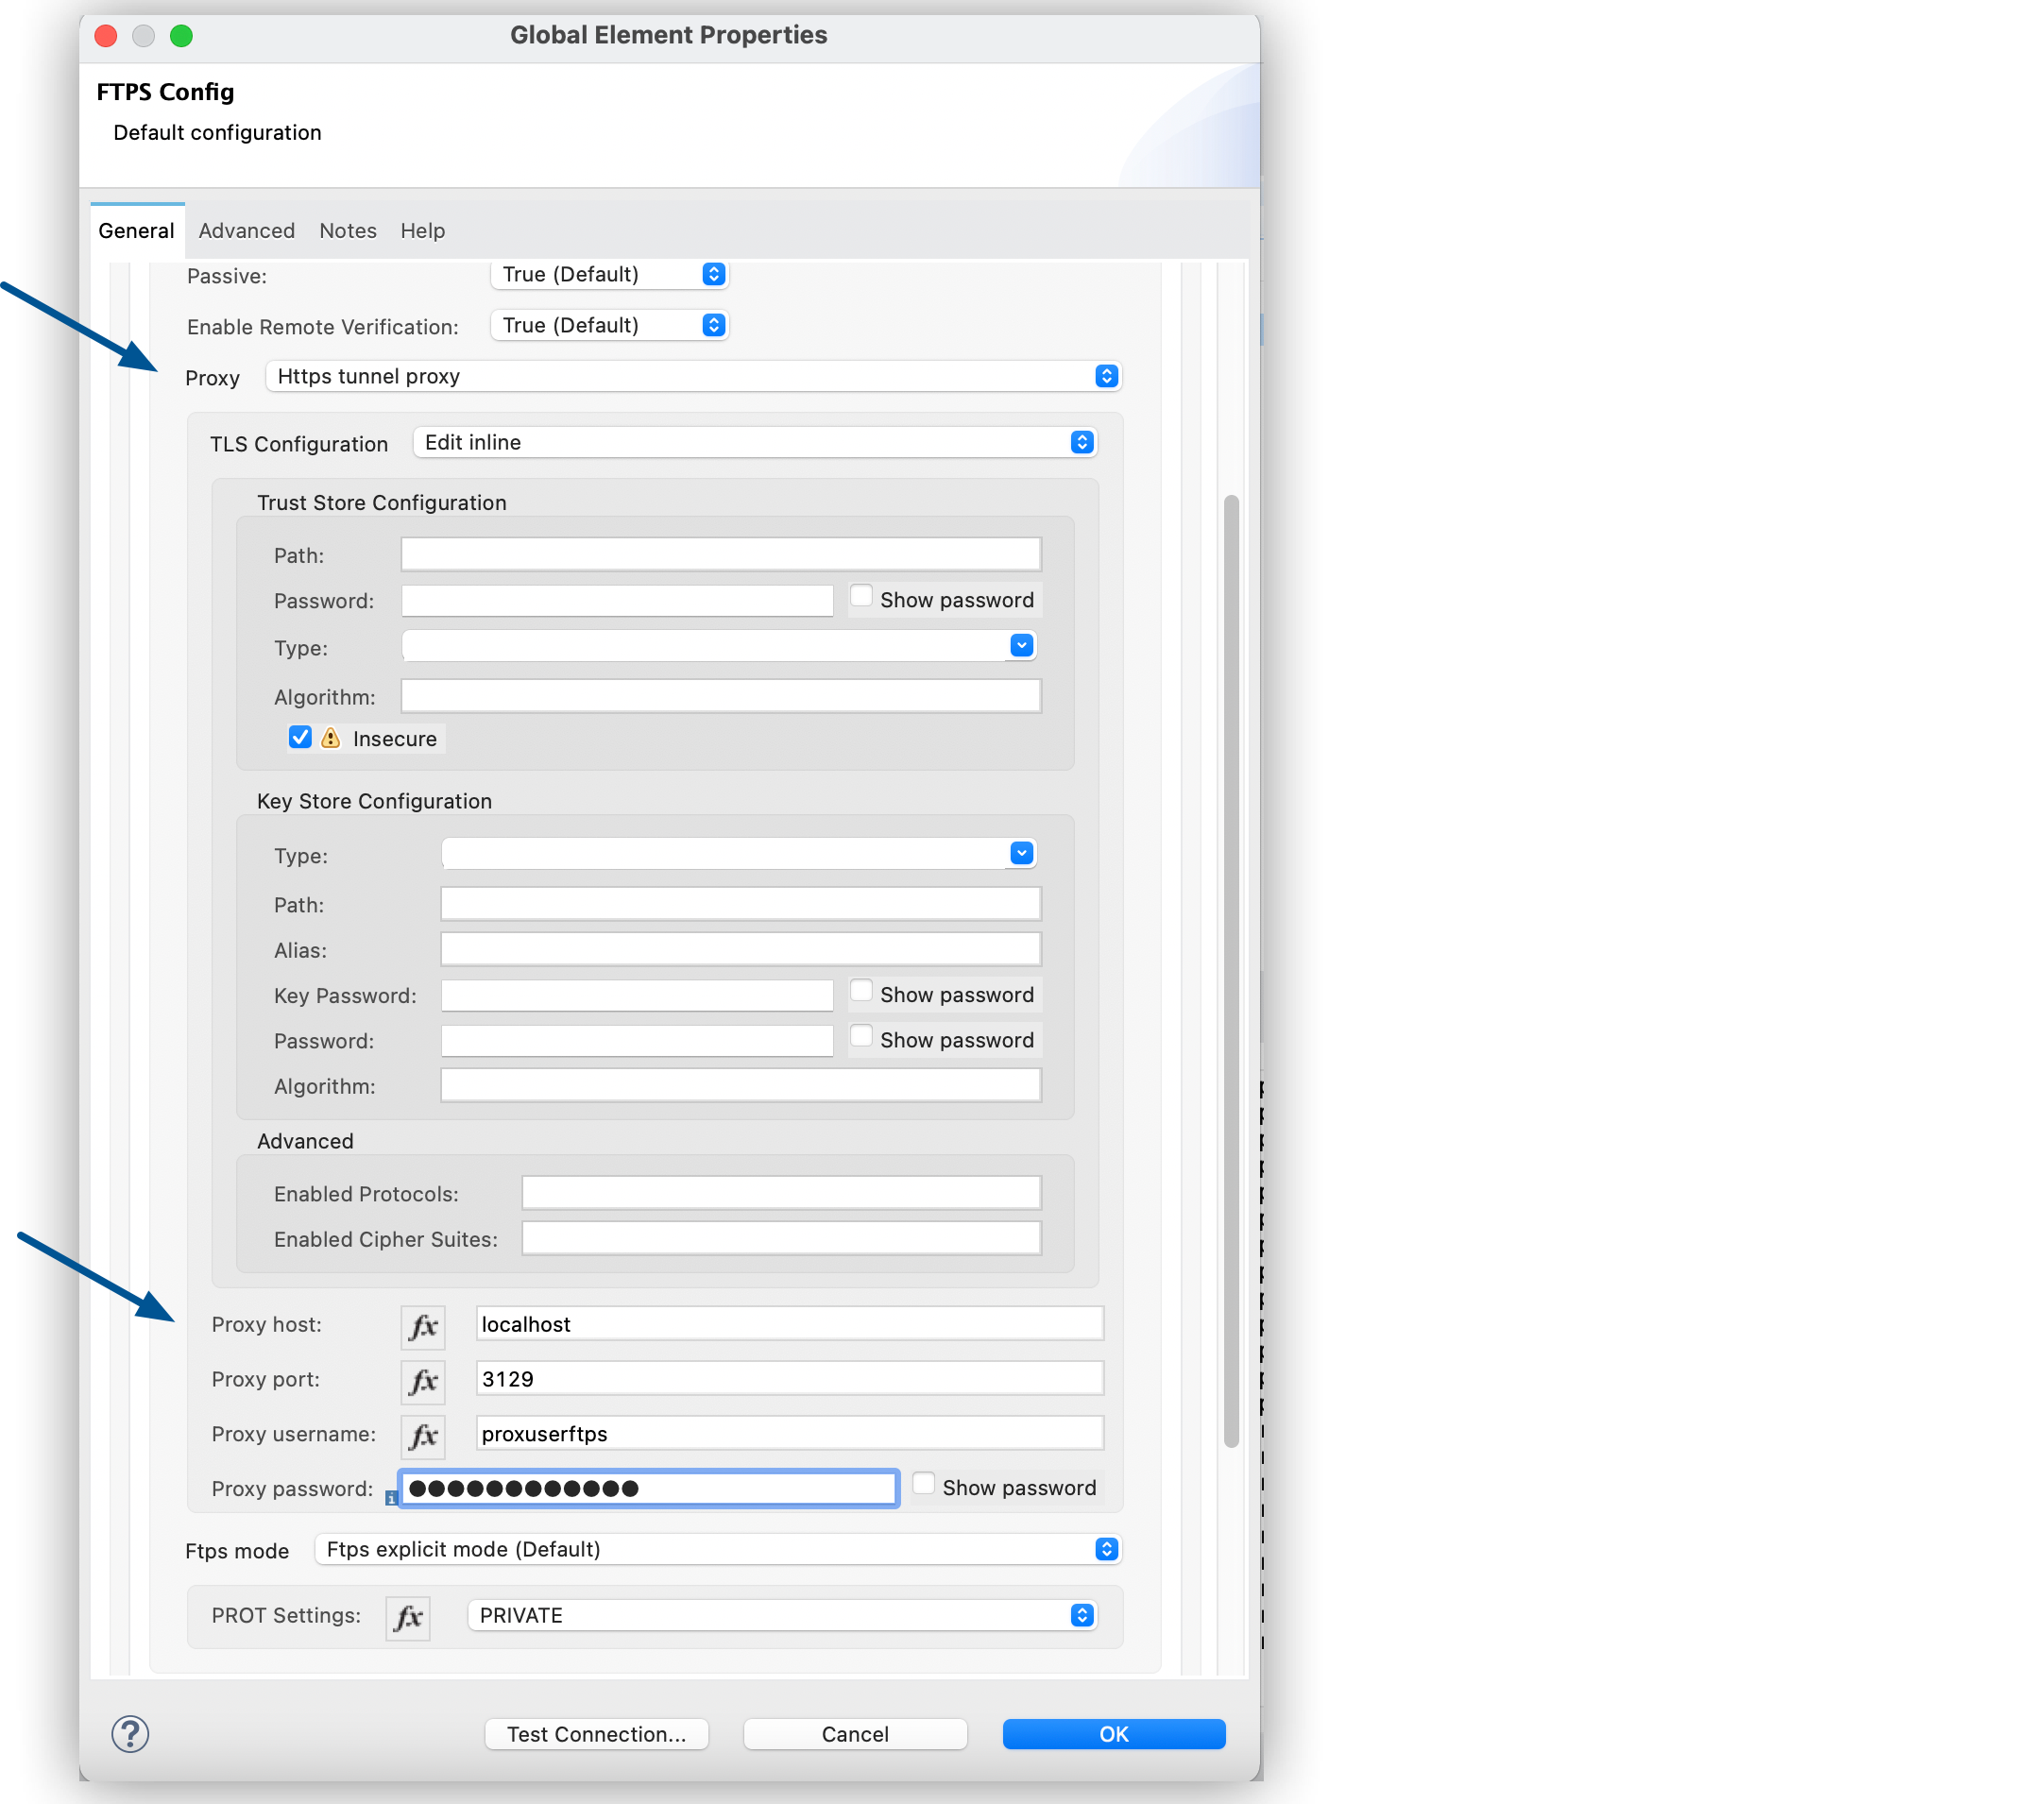
In the Configuration XML editor, the configuration ftps:config looks like this:
<ftps:config name="FTPS_Config">
  <ftps:connection username="anonymous" password="password"
   host="0.0.0.0" port="21" workingDir="${workingDir}">
    <tls:context>
        <tls:trust-store path="path/to/keystore" password="mulepassword" />
    </tls:context>
  </ftps:connection>
</ftps:config>
Configure FTPS Mode for FTPS Connector
In the global element configuration, you can configure the Ftps mode field to either the following options:
-
Ftps explicit mode (Default) The explicit mode connects in an unprotected way to the FTP server. The client can negotiate TLS for either the command or data channel.
-
Ftps implicit mode The implicit mode assumes that a secure connection through an SSL/TLS handshake must take place before any FTP command is sent. This ensures that the entire FTP session is encrypted.
When you configure the Ftps explicit mode (Default), you can also configure the data channel protection level through the PROT Settings field to either one of these options:
-
CLEAR The clear protection level indicates that the data channel carries the raw data of the file transfer, with no security applied. This is the default value.
-
PRIVATE The private protection level indicates that the integrity of the data and confidentiality are protected.
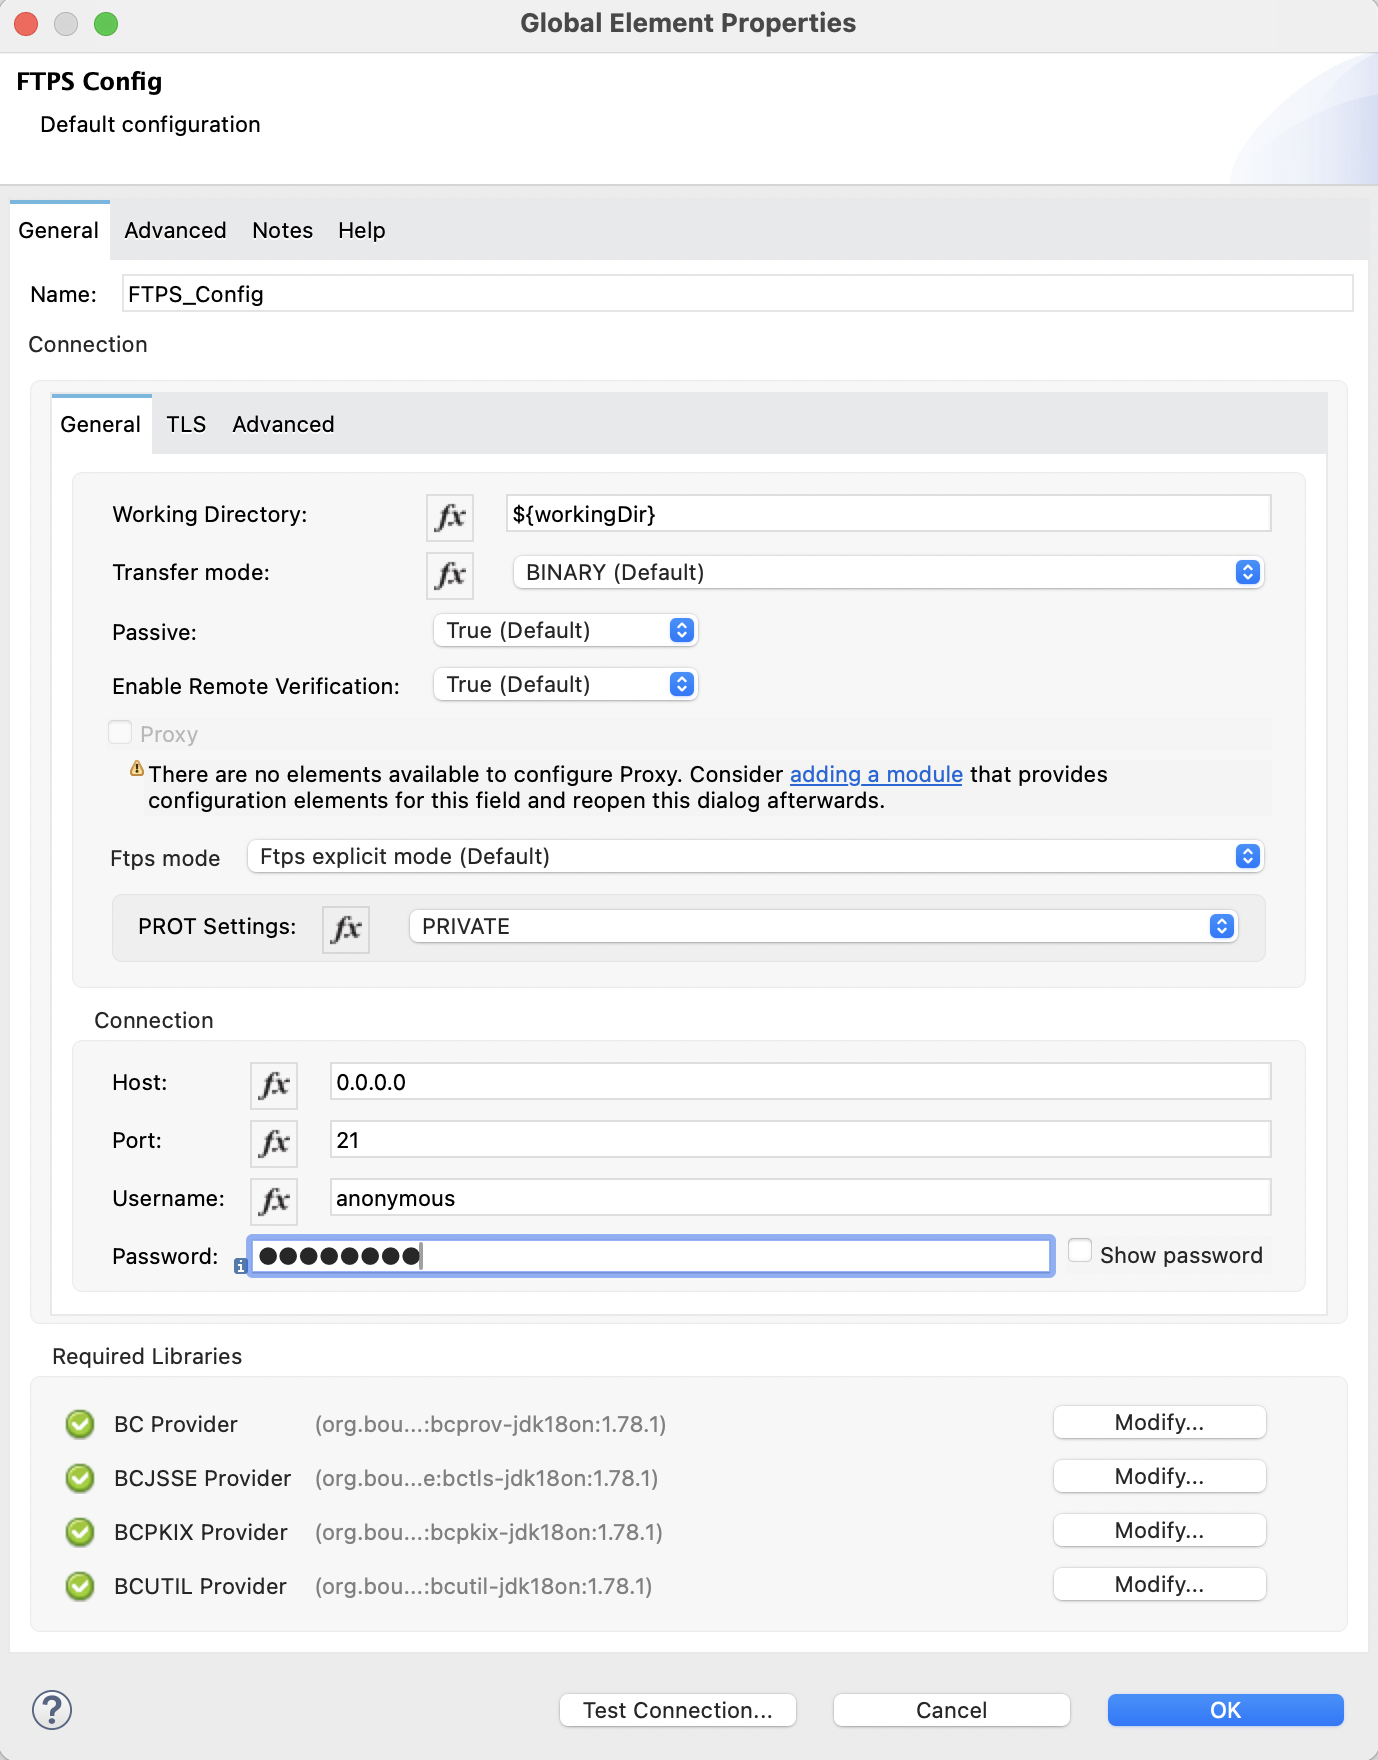
In the Configuration XML editor, the ftps=mode, ftps-explicit-mode, and protSetting configurations look like this:
 <ftps:config name="FTPS_Config">
   <ftps:connection username="anonymous" password="password"
    host="0.0.0.0" port="21" workingDir="${workingDir}">
     <tls:context>
         <tls:trust-store path="path/to/keystore" password="mulepassword" />
     </tls:context>
     <ftps:ftps-mode >
         <ftps:ftps-explicit-mode protSetting="PRIVATE" />
     </ftps:ftps-mode>
   </ftps:connection>
 </ftps:config>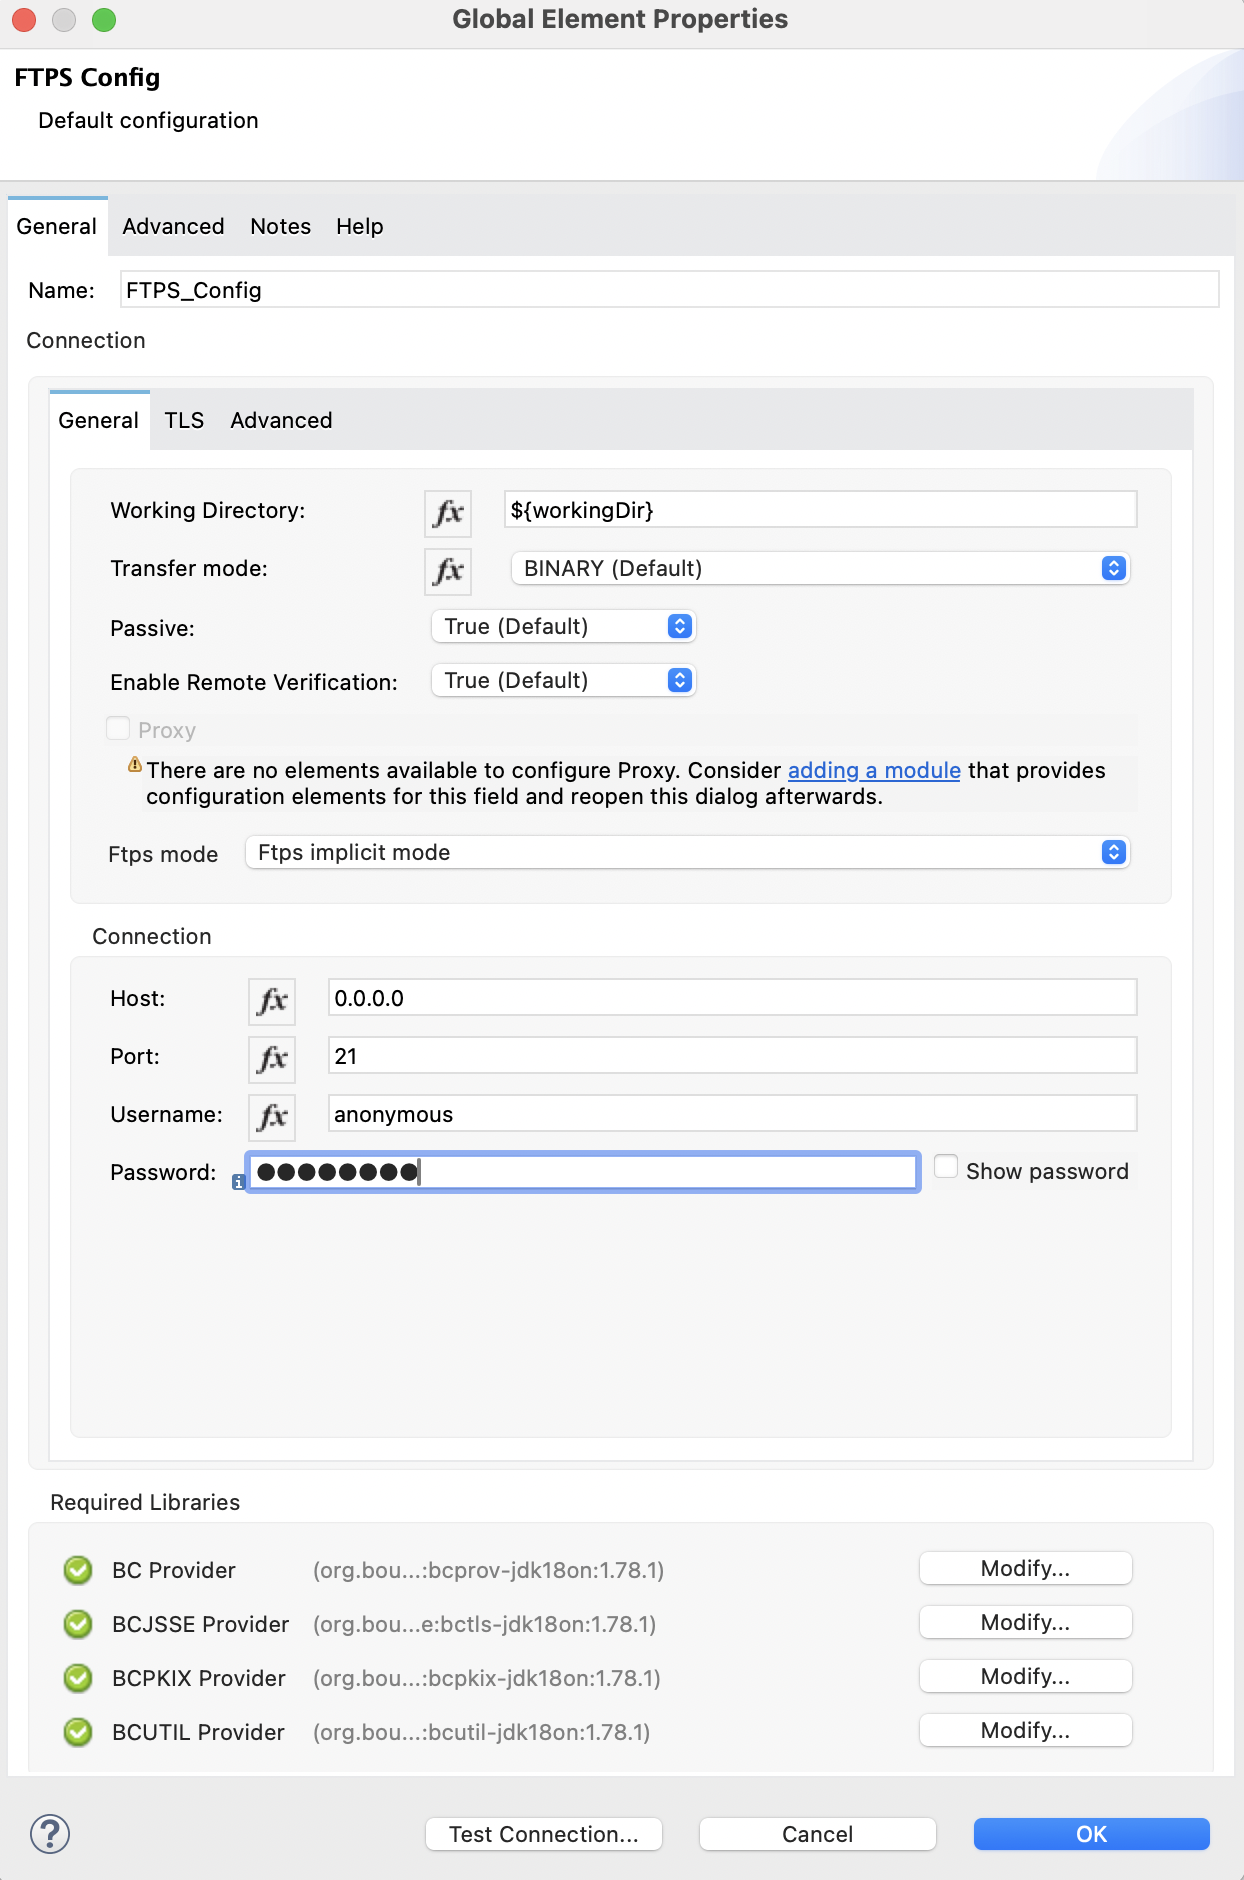
In the Configuration XML editor, the ftps=mode and ftps-implicit-mode configurations look like this:
<ftps:config name="FTPS_Config">
  <ftps:connection username="anonymous" password="password"
   host="0.0.0.0" port="21" workingDir="${workingDir}">
    <tls:context>
        <tls:trust-store path="path/to/keystore" password="mulepassword" />
    </tls:context>
    <ftps:ftps-mode >
        <ftps:ftps-implicit-mode />
    </ftps:ftps-mode>
  </ftps:connection>
</ftps:config>
Configure TLS with Keystores and Truststores
You can use Transport Layer Security (TLS) and configure FTPS by providing a key store with your certificate. You can also enable 2-way authentication by providing a trust store. For more information about TLS configuration, refer to the configure TLS with Keystores and Truststores documentation.
Configure Java JDK for Session Reuse
To reuse sessions using FTPS, you must disable the Extended Main Secret extension for compatibility (JDK-8192045), which by default is set to true. The extension protects users from vulnerabilities by using the same session on different groups of clients and servers, which contradicts the demand to use the same session for control and data connections. With the Extended Main Secret extension activated, session reuse is possible only by endpoint verification, which is implemented for HTTPS and LDAP only.
To disable the extension when working in Anypoint Studio, follow these steps:
-
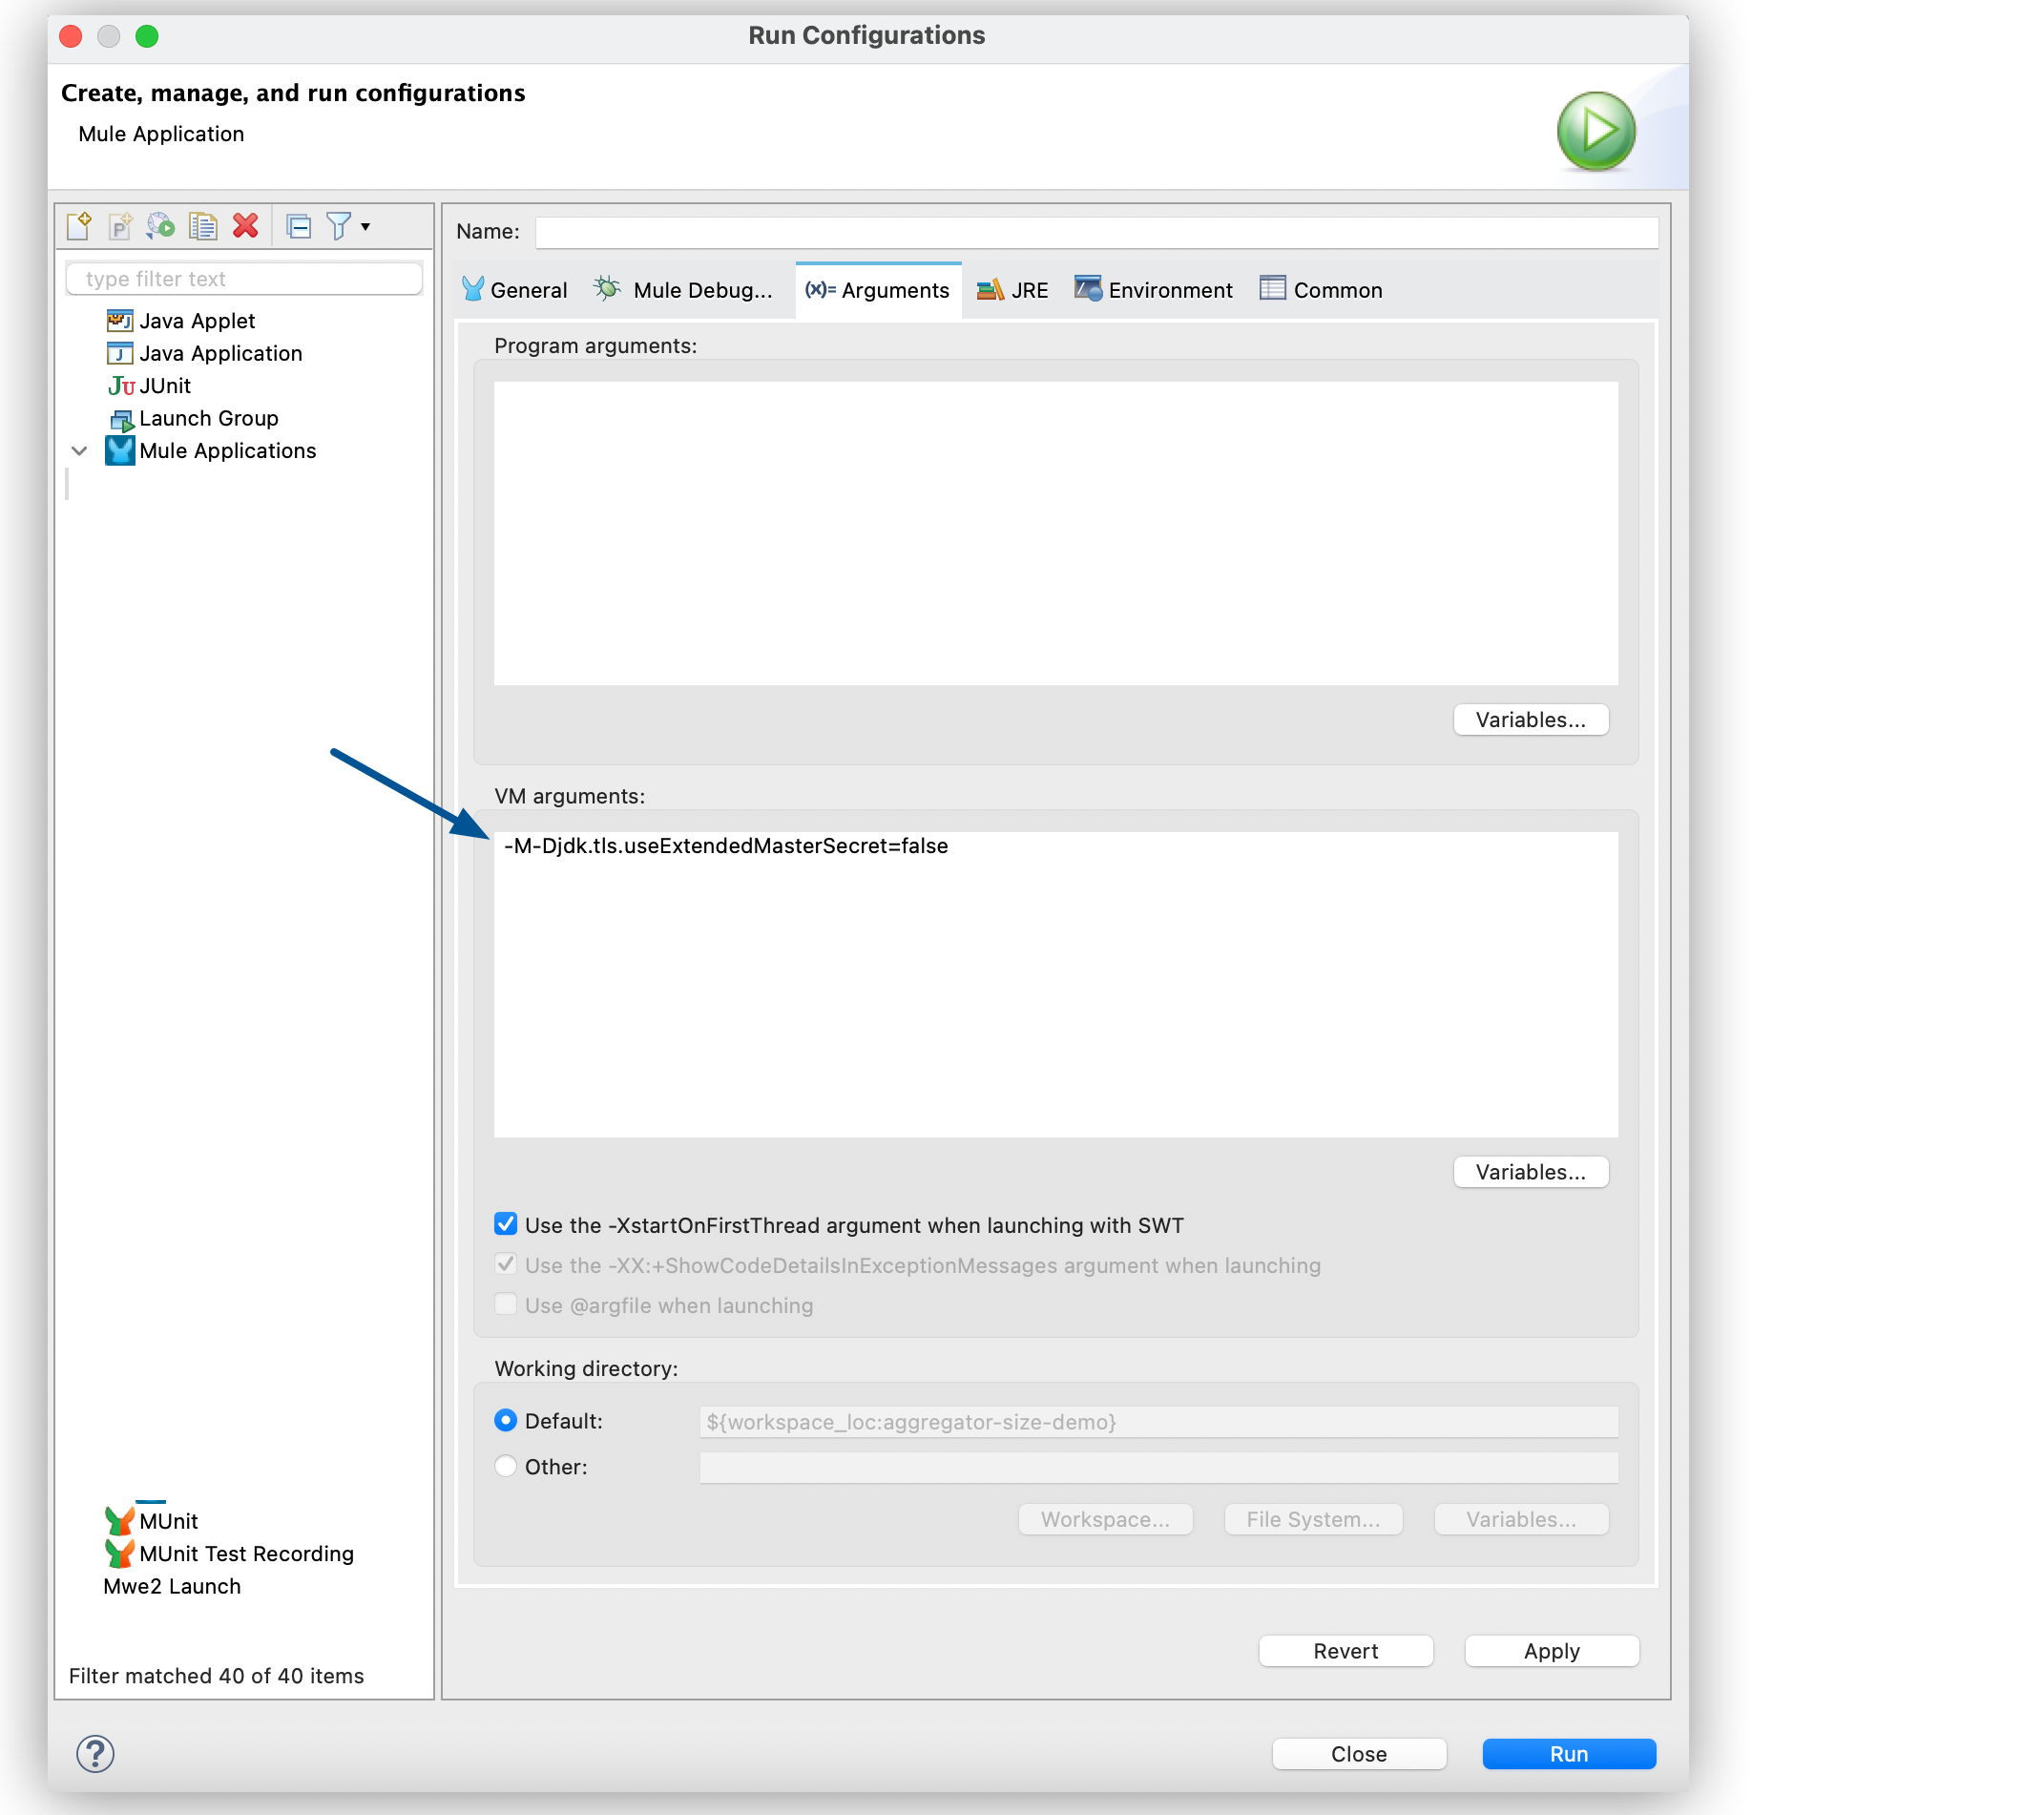
In Studio, click Run > Run Configurations….
-
In the Run Configurations screen, click the (x)=Arguments tab.
-
In the VM arguments box, add the following argument to the JVM execution:
-M-Djdk.tls.useExtendedMasterSecret=false
-
Click Apply.
-
Click Run.
To disable the Extended Main Secret extension when working in a standalone Mule environment, add the following argument to the JVM execution:
./bin/mule -Djdk.tls.useExtendedMasterSecret=false
Configure Bouncy Castle Libraries and Security Provider
This connector no longer uses reflection to reuse the SSL session from the command channel to data channels. Instead, it now supports SSL session resumption between the client and host by using externally provided Bouncy Castle libraries which are forcefully set as top security providers. You must add Bouncy Castle libraries to prevent MITM attacks.
To reuse sessions using FTPS Connector, you must configure Bouncy Castle libraries in the Required Libraries field while configuring the global element for the connector. You can choose one of the three available options to add these libraries.
You can also add these libraries to the JAVA_VM_FOLDER/jre/lib/ext folder and set up the Bouncy Castle security provider:
-
Open the
AnypointStudio.inifile and identify where Java VM is stored, for example,/Applications/AnypointStudio.app/Contents/Eclipse/plugins/org.mule.tooling.jdk.v8.macosx.x86_64_1.3.3/Contents/Home/jre/lib/ext. The path to Java VM is set up by the-vmcommand. In the following steps, assume the path where Java VM is stored isJAVA_VM_FOLDER. -
Download the
bcprov-jdk18on.jar,bctls-jdk18on.jar,bcpkix-jdk18on.jar, andbcutil-jdk18on.jarfiles from https://www.bouncycastle.org/download/bouncy-castle-java/. -
Copy the files to the
JAVA_VM_FOLDER/jre/lib/extfolder. -
Open the
JAVA_VM_FOLDER/jre/lib/security/java.securityfile. -
Set the Bouncy Castle security providers at the beginning of the file, as shown in the following section:
security.provider.1=org.bouncycastle.jce.provider.BouncyCastleProvider security.provider.2=org.bouncycastle.jsse.provider.BouncyCastleJsseProvider security.provider.3=sun.security.provider.Sun security.provider.4=sun.security.rsa.SunRsaSign security.provider.5=sun.security.ec.SunEC security.provider.6=com.sun.net.ssl.internal.ssl.Provider security.provider.7=com.sun.crypto.provider.SunJCE security.provider.8=sun.security.jgss.SunProvider security.provider.9=com.sun.security.sasl.Provider security.provider.10=org.jcp.xml.dsig.internal.dom.XMLDSigRI security.provider.11=sun.security.smartcardio.SunPCSC security.provider.12=apple.security.AppleProvider
-
Click Apply.
-
Click Run.
View the App Log
To check for problems, you can view the app log as follows:
-
If you’re running the app from Anypoint Platform, the output is visible in the Anypoint Studio console window.
-
If you’re running the app using Mule from the command line, the app log is visible in your OS console.
Unless the log file path is customized in the app’s log file (log4j2.xml), you can also view the app log in the default location MULE_HOME/logs/<app-name>.log.


