Google Pub/Sub Connector 1.0 Examples
These examples show you how to use Google Pub/Sub Connector to perform the following actions:
Configure a PubSub Connection
Because this connector uses PubSub to secure connections, you must specify the PubSub Connection field values. To do this:
Create a Configuration File for a PubSub Connection
Create a configuration file that includes properties for a PubSub Connection:
-
Create a file named
mule-app.propertiesin the/src/main/resources/folder. -
In the
mule-app.propertiesfile, create a set of properties forPubSub Connection, similar to the ones that follow, replacing the bracketed text (including the brackets) with the correct values for your configuration:config.private_key_id=<privatekeyid> config.private_key=<privatekey> config.client_id=<clientid> config.client_email=<clientemail> config.default_project_id=<defaultprojectid>
For more information about creating a properties file, refer to Configuring Property Placeholders.
Configure the PubSub Connection Global Elements
Configure global elements for the PubSub Connection file:
-
Create a new Mule project.
-
In the Mule Palette view, click Search in Exchange and enter
google pubsub. -
Add Google Pub/Sub Connector to the Selected modules section and click Finish.
-
Click the Global Elements tab and click Create.
-
Select Connector Configuration > Google PubSub Configuration and click OK.
-
Enter the following values:
Field Value Name
Google_Pub_Sub_ConfigurationPrivate key id
${config.private_key_id}Private key
${config.private_key}Client id
${config.client_id}Client email
${config.client_email}Default Project Id
${config.default_project_id}Default Subscription Name
orders-subscriptionDefault Topic Name
orders-topic -
Click OK.
Configure a Global Element for the Properties File
Configure a global element for the mule-app.properties file so that Mule knows
where to find it:
-
Click the Global Elements tab and click Create.
-
In the Choose Global Type dialog, select Configuration properties and click OK.
-
In the File field, enter
mule.app.properties. -
Click OK.
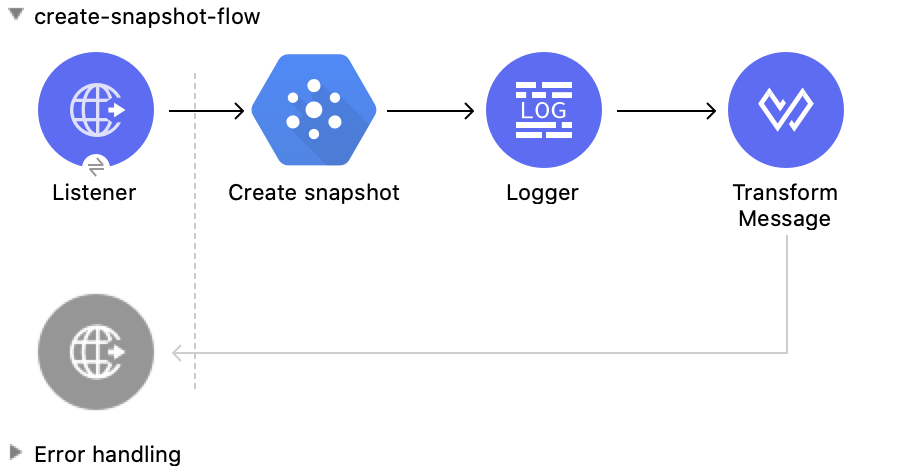
Create a Snapshot
This Mule flow creates a snapshot from the requested subscription.
This example uses the following operations:
-
HTTP Listener
Accepts data from HTTP requests -
Create snapshot
Creates a snapshot -
Logger
Shows the HTTP response from the Create snapshot operation -
Transform Message
Outputs the results of the Create snapshot operation in JSON format
XML for This Example
Paste this code into the Studio XML editor to quickly load the flow for this example into your Mule app:
<?xml version="1.0" encoding="UTF-8"?>

<mule xmlns:ee="http://www.mulesoft.org/schema/mule/ee/core"
      xmlns:pubsub="http://www.mulesoft.org/schema/mule/pubsub"
      xmlns:http="http://www.mulesoft.org/schema/mule/http"
      xmlns="http://www.mulesoft.org/schema/mule/core"
      xmlns:doc="http://www.mulesoft.org/schema/mule/documentation"
      xmlns:xsi="http://www.w3.org/2001/XMLSchema-instance"
      xsi:schemaLocation="http://www.mulesoft.org/schema/mule/core http://www.mulesoft.org/schema/mule/core/current/mule.xsd
                          http://www.mulesoft.org/schema/mule/http http://www.mulesoft.org/schema/mule/http/current/mule-http.xsd
                          http://www.mulesoft.org/schema/mule/pubsub http://www.mulesoft.org/schema/mule/pubsub/current/mule-pubsub.xsd
                          http://www.mulesoft.org/schema/mule/ee/core http://www.mulesoft.org/schema/mule/ee/core/current/mule-ee.xsd">

    <http:listener-config name="HTTP_Listener_config" doc:name="HTTP Listener config">
        <http:listener-connection host="0.0.0.0" port="8081" />
    </http:listener-config>

    <pubsub:config name="Google_Pub_Sub_Configuration" doc:name="Google Pub Sub Configuration" projectId="${config.default_project_id}">
        <pubsub:connection privateKeyId="${config.private_key_id}" privateKey="${config.private_key}" clientId="${config.client_id}" clientEmail="${config.client_email}" />
    </pubsub:config>

    <configuration-properties doc:name="Configuration properties" file="mule-app.properties" />

    <flow name="create-snapshot-flow">
        <http:listener doc:name="Listener" config-ref="HTTP_Listener_config" path="/createSnapshot"/>
        <pubsub:create-snapshot
                doc:name="Create snapshot"
                config-ref="Google_Pub_Sub_Configuration"
                snapshotName="#[attributes.queryParams.snapshot]"
                subscriptionName="#[attributes.queryParams.sub]">
            <pubsub:labels ><![CDATA[#[output application/java
---
{
	"label1" : "test-snapshot-demo"
}]]]></pubsub:labels>
        </pubsub:create-snapshot>
        <logger level="INFO" doc:name="Logger" message="Created Snapshot with name: #[payload.name]"/>
        <ee:transform doc:name="Transform Message">
            <ee:message >
                <ee:set-payload ><![CDATA[%dw 2.0
output application/json
---
payload]]></ee:set-payload>
            </ee:message>
        </ee:transform>
    </flow>
</mule>
Steps for Running This Example
-
Verify that your connector is configured.
-
Save the project.
-
From a web browser, test the application by entering
http://localhost:8081/. You should see the Create Snapshot form with pre-populated Snapshot Name and Subscription Name fields.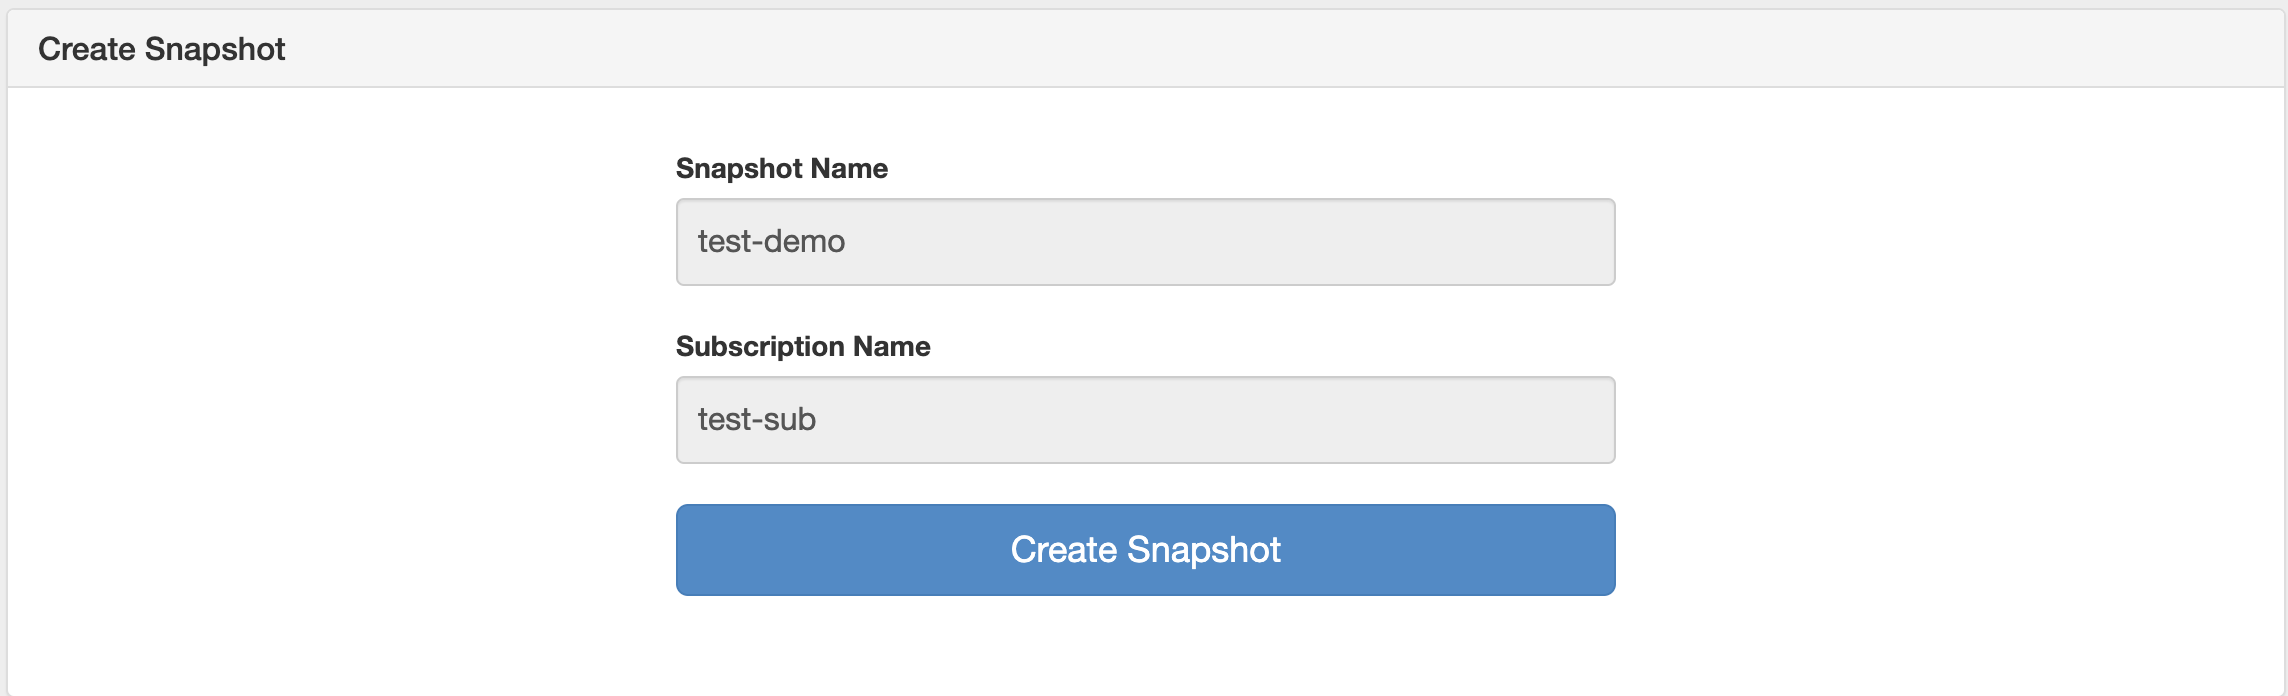
-
Click Create Snapshot. You should see an alert that the snapshot was successfully created.
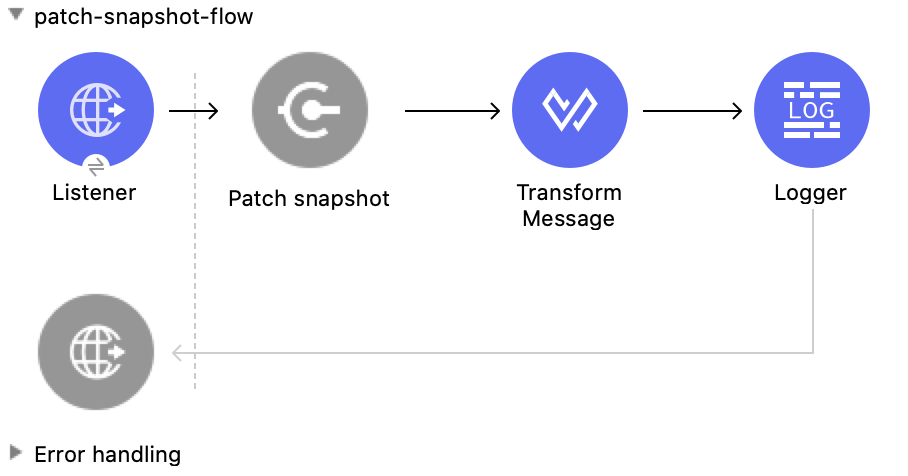
Patch a Snapshot
This Mule flow updates an existing snapshot.
This example uses the following operations:
-
HTTP Listener
Accepts data from HTTP requests -
Patch snapshot
Updates a snapshot -
Transform Message
Outputs the results of the Patch snapshot operation in JSON format -
Logger
Shows the HTTP response from the Patch snapshot operation
XML for This Example
Paste this code into the Studio XML editor to quickly load the flow for this example into your Mule app:
<?xml version="1.0" encoding="UTF-8"?>

<mule xmlns:ee="http://www.mulesoft.org/schema/mule/ee/core"
      xmlns:pubsub="http://www.mulesoft.org/schema/mule/pubsub"
      xmlns:http="http://www.mulesoft.org/schema/mule/http"
      xmlns="http://www.mulesoft.org/schema/mule/core"
      xmlns:doc="http://www.mulesoft.org/schema/mule/documentation"
      xmlns:xsi="http://www.w3.org/2001/XMLSchema-instance"
      xsi:schemaLocation="http://www.mulesoft.org/schema/mule/core http://www.mulesoft.org/schema/mule/core/current/mule.xsd
                          http://www.mulesoft.org/schema/mule/http http://www.mulesoft.org/schema/mule/http/current/mule-http.xsd
                          http://www.mulesoft.org/schema/mule/pubsub http://www.mulesoft.org/schema/mule/pubsub/current/mule-pubsub.xsd
                          http://www.mulesoft.org/schema/mule/ee/core http://www.mulesoft.org/schema/mule/ee/core/current/mule-ee.xsd">

    <http:listener-config name="HTTP_Listener_config" doc:name="HTTP Listener config">
        <http:listener-connection host="0.0.0.0" port="8081" />
    </http:listener-config>

    <pubsub:config name="Google_Pub_Sub_Configuration" doc:name="Google Pub Sub Configuration" projectId="${config.default_project_id}">
        <pubsub:connection privateKeyId="${config.private_key_id}" privateKey="${config.private_key}" clientId="${config.client_id}" clientEmail="${config.client_email}" />
    </pubsub:config>

    <configuration-properties doc:name="Configuration properties" file="mule-app.properties" />

     <flow name="patch-snapshot-flow">
        <http:listener doc:name="Listener" config-ref="HTTP_Listener_config" path="/patch-snapshot"/>
        <pubsub:patch-snapshot doc:name="Patch snapshot" config-ref="Google_Pub_Sub_Configuration" updateMask="labels">
            <pubsub:snapshot><![CDATA[#[%dw 2.0
output application/json
 ---
{
  "name": "projects/<<project-name>>/snapshots/<<snapshot-name>>",
    "topic": "projects/<<project-name>>/topic/<<topic-name>>"
    "expireTime": "2099-01-01T00:00:00Z",
    "labels": {
      "label1": "test-patch-snapshot"
    }
}]]]></pubsub:snapshot>
        </pubsub:patch-snapshot>
        <ee:transform doc:name="Transform Message">
            <ee:message>
                <ee:set-payload><![CDATA[%dw 2.0
output application/json
---
payload]]></ee:set-payload>
            </ee:message>
        </ee:transform>
        <logger level="INFO" doc:name="Logger" message="Updated Snapshot: #[payload]"/>
    </flow>
</mule>
Get a Snapshot
This Mule flow retrieves an existing snapshot.
This example uses the following operations:
-
HTTP Listener
Accepts data from HTTP requests -
Get snapshot
Retrieves a snapshot -
Logger
Shows the HTTP response from the Get snapshot operation -
Transform Message
Outputs the results of the Get snapshot operation in JSON format

XML for This Example
Paste this code into the Studio XML editor to quickly load the flow for this example into your Mule app:
<?xml version="1.0" encoding="UTF-8"?>

<mule xmlns:ee="http://www.mulesoft.org/schema/mule/ee/core"
      xmlns:pubsub="http://www.mulesoft.org/schema/mule/pubsub"
      xmlns:http="http://www.mulesoft.org/schema/mule/http"
      xmlns="http://www.mulesoft.org/schema/mule/core"
      xmlns:doc="http://www.mulesoft.org/schema/mule/documentation"
      xmlns:xsi="http://www.w3.org/2001/XMLSchema-instance"
      xsi:schemaLocation="http://www.mulesoft.org/schema/mule/core http://www.mulesoft.org/schema/mule/core/current/mule.xsd
                          http://www.mulesoft.org/schema/mule/http http://www.mulesoft.org/schema/mule/http/current/mule-http.xsd
                          http://www.mulesoft.org/schema/mule/pubsub http://www.mulesoft.org/schema/mule/pubsub/current/mule-pubsub.xsd
                          http://www.mulesoft.org/schema/mule/ee/core http://www.mulesoft.org/schema/mule/ee/core/current/mule-ee.xsd">

    <http:listener-config name="HTTP_Listener_config" doc:name="HTTP Listener config">
        <http:listener-connection host="0.0.0.0" port="8081" />
    </http:listener-config>

    <pubsub:config name="Google_Pub_Sub_Configuration" doc:name="Google Pub Sub Configuration" projectId="${config.default_project_id}">
        <pubsub:connection privateKeyId="${config.private_key_id}" privateKey="${config.private_key}" clientId="${config.client_id}" clientEmail="${config.client_email}" />
    </pubsub:config>

    <configuration-properties doc:name="Configuration properties" file="mule-app.properties" />

    <flow name="get-snapshot-flow">
        <http:listener doc:name="Listener" config-ref="HTTP_Listener_config" path="/getSnapshot"/>
        <pubsub:get-snapshot doc:name="Get snapshot" config-ref="Google_Pub_Sub_Configuration" snapshotName="#[attributes.queryParams.getsnapshot]"/>
        <logger level="INFO" doc:name="Logger" message="Received Snapshot Topic: #[payload.topic]"/>
        <ee:transform doc:name="Transform Message">
            <ee:message >
                <ee:set-payload ><![CDATA[%dw 2.0
output application/json
---
payload]]></ee:set-payload>
            </ee:message>
        </ee:transform>
    </flow>
</mule>
Steps for Running This Example
-
Verify that your connector is configured.
-
Save the project.
-
From a web browser, test the application by entering
http://localhost:8081/. You should see the Get Snapshot form with a pre-populated Snapshot Name field.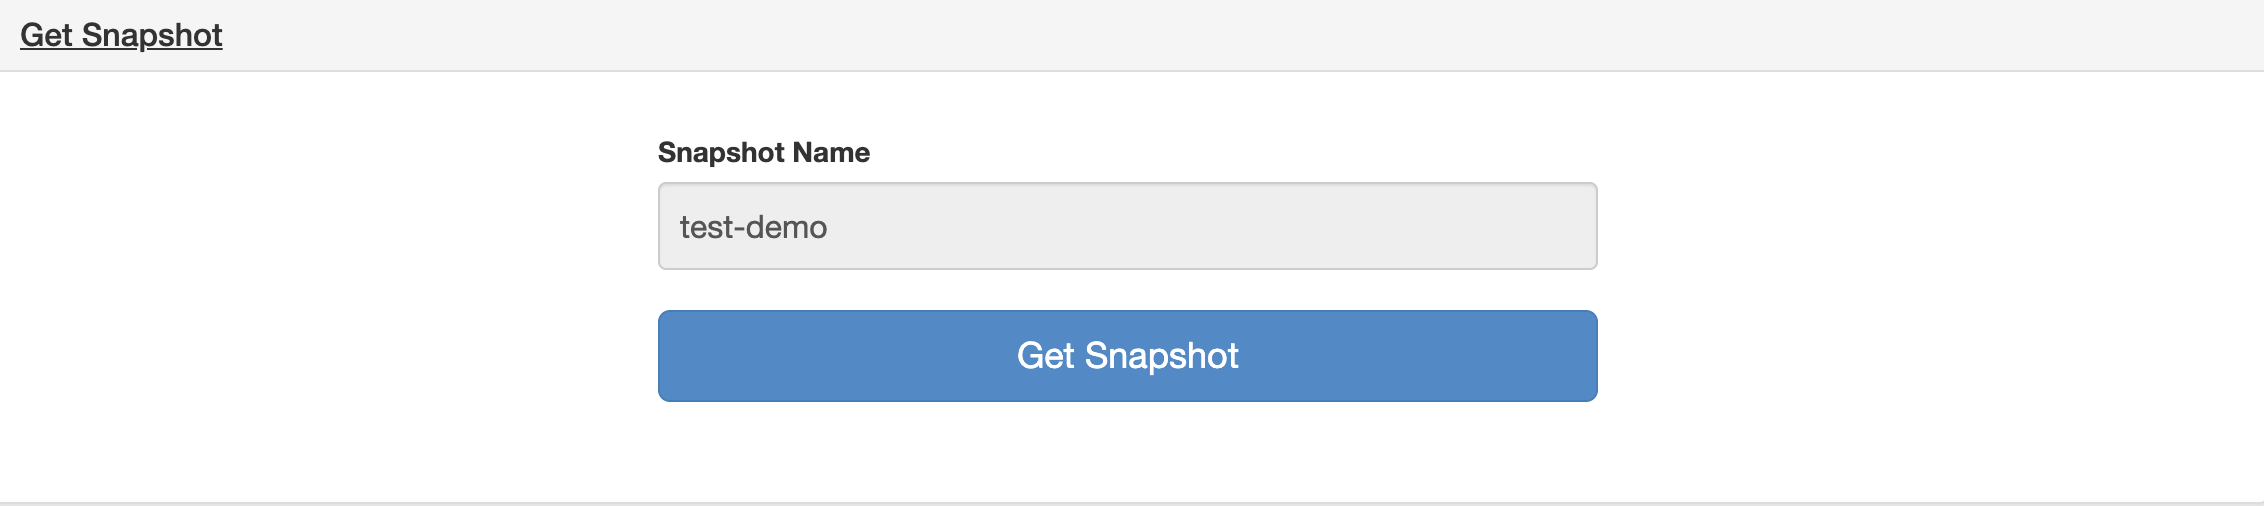
-
Click Get Snapshot. You should see an alert that the snapshot was successfully retrieved.
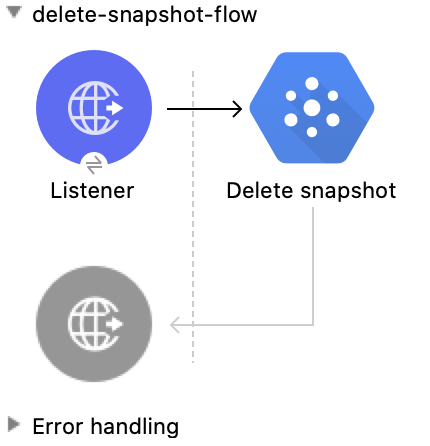
Delete a Snapshot
This Mule flow deletes an existing snapshot.
This example uses the following operations:
-
HTTP Listener
Accepts data from HTTP requests -
Delete snapshot
Deletes a snapshot
XML for This Example
Paste this code into the Studio XML editor to quickly load the flow for this example into your Mule app:
<?xml version="1.0" encoding="UTF-8"?>

<mule xmlns:ee="http://www.mulesoft.org/schema/mule/ee/core"
      xmlns:pubsub="http://www.mulesoft.org/schema/mule/pubsub"
      xmlns:http="http://www.mulesoft.org/schema/mule/http"
      xmlns="http://www.mulesoft.org/schema/mule/core"
      xmlns:doc="http://www.mulesoft.org/schema/mule/documentation"
      xmlns:xsi="http://www.w3.org/2001/XMLSchema-instance"
      xsi:schemaLocation="http://www.mulesoft.org/schema/mule/core http://www.mulesoft.org/schema/mule/core/current/mule.xsd
                          http://www.mulesoft.org/schema/mule/http http://www.mulesoft.org/schema/mule/http/current/mule-http.xsd
                          http://www.mulesoft.org/schema/mule/pubsub http://www.mulesoft.org/schema/mule/pubsub/current/mule-pubsub.xsd
                          http://www.mulesoft.org/schema/mule/ee/core http://www.mulesoft.org/schema/mule/ee/core/current/mule-ee.xsd">

    <http:listener-config name="HTTP_Listener_config" doc:name="HTTP Listener config">
        <http:listener-connection host="0.0.0.0" port="8081" />
    </http:listener-config>

    <pubsub:config name="Google_Pub_Sub_Configuration" doc:name="Google Pub Sub Configuration" projectId="${config.default_project_id}">
        <pubsub:connection privateKeyId="${config.private_key_id}" privateKey="${config.private_key}" clientId="${config.client_id}" clientEmail="${config.client_email}" />
    </pubsub:config>

    <configuration-properties doc:name="Configuration properties" file="mule-app.properties" />

    <flow name="delete-snapshot-flow">
        <http:listener doc:name="Listener" config-ref="HTTP_Listener_config" path="/deleteSnapshot"/>
        <pubsub:delete-snapshot doc:name="Delete snapshot" config-ref="Google_Pub_Sub_Configuration" snapshotName="#[attributes.queryParams.deletesnapshot]"/>
    </flow>
</mule>
Steps for Running This Example
-
Verify that your connector is configured.
-
Save the project.
-
From a web browser, test the application by entering
http://localhost:8081/. You should see the Delete Snapshot form with a pre-populated Snapshot Name field.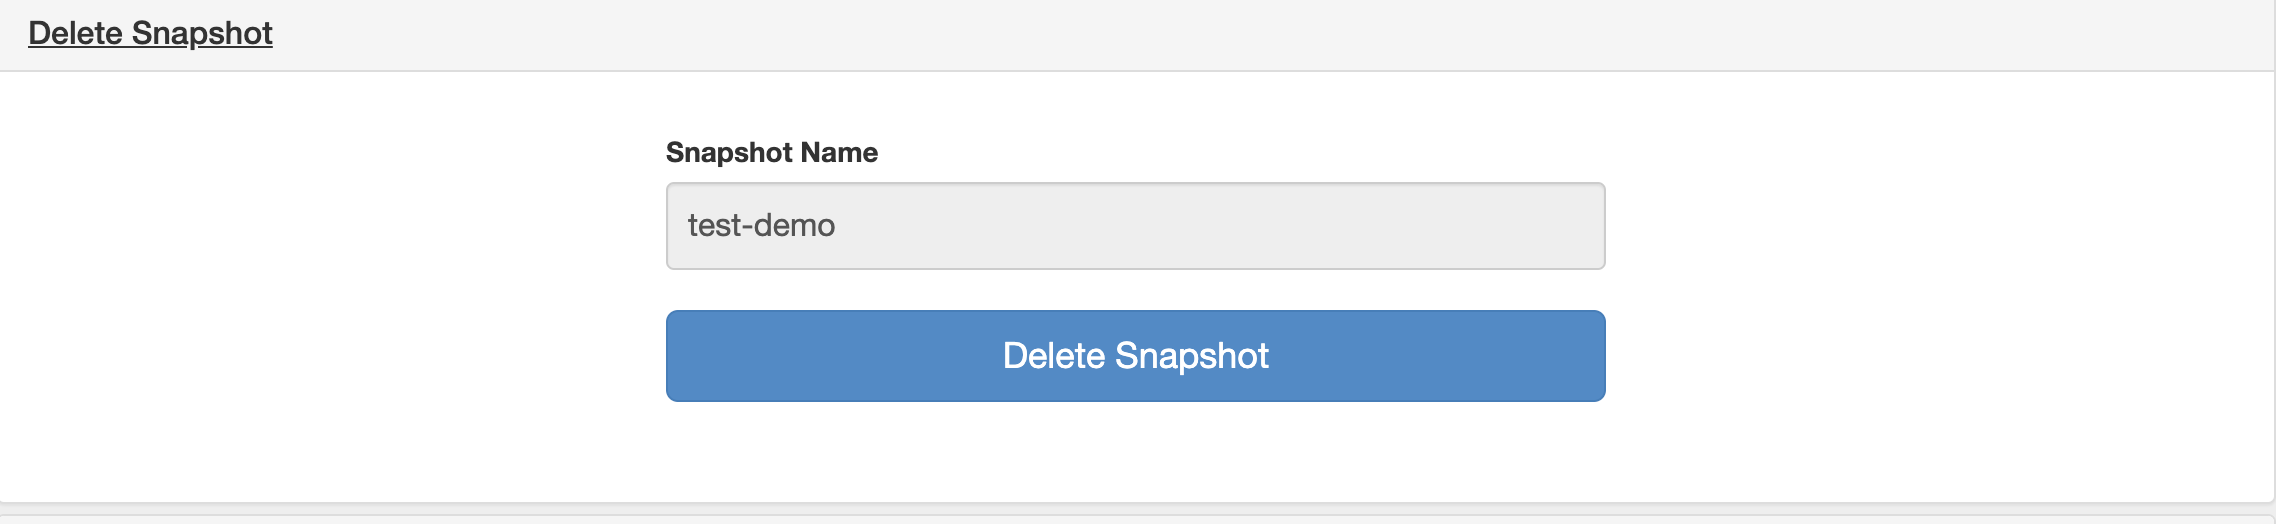
-
Click Delete Snapshot. You should see an alert that the snapshot was successfully deleted.
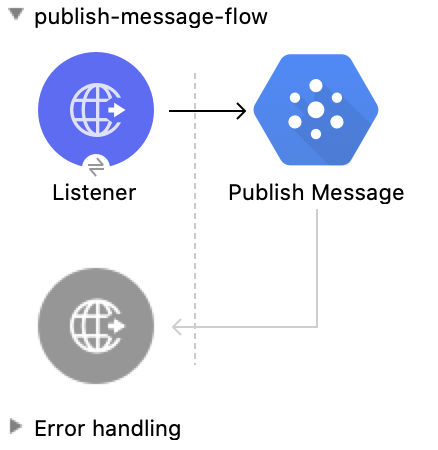
Publish a Message
This Mule flow publishes a single message to a selected topic.
This example uses the following operations:
-
HTTP Listener
Accepts data from HTTP requests -
Publish Message
Publishes a message
XML for This Example
Paste this code into the Studio XML editor to quickly load the flow for this example into your Mule app:
<?xml version="1.0" encoding="UTF-8"?>

<mule xmlns:ee="http://www.mulesoft.org/schema/mule/ee/core"
      xmlns:pubsub="http://www.mulesoft.org/schema/mule/pubsub"
      xmlns:http="http://www.mulesoft.org/schema/mule/http"
      xmlns="http://www.mulesoft.org/schema/mule/core"
      xmlns:doc="http://www.mulesoft.org/schema/mule/documentation"
      xmlns:xsi="http://www.w3.org/2001/XMLSchema-instance"
      xsi:schemaLocation="http://www.mulesoft.org/schema/mule/core http://www.mulesoft.org/schema/mule/core/current/mule.xsd
                          http://www.mulesoft.org/schema/mule/http http://www.mulesoft.org/schema/mule/http/current/mule-http.xsd
                          http://www.mulesoft.org/schema/mule/pubsub http://www.mulesoft.org/schema/mule/pubsub/current/mule-pubsub.xsd
                          http://www.mulesoft.org/schema/mule/ee/core http://www.mulesoft.org/schema/mule/ee/core/current/mule-ee.xsd">

    <http:listener-config name="HTTP_Listener_config" doc:name="HTTP Listener config">
        <http:listener-connection host="0.0.0.0" port="8081" />
    </http:listener-config>

    <pubsub:config name="Google_Pub_Sub_Configuration" doc:name="Google Pub Sub Configuration" projectId="${config.default_project_id}">
        <pubsub:connection privateKeyId="${config.private_key_id}" privateKey="${config.private_key}" clientId="${config.client_id}" clientEmail="${config.client_email}" />
    </pubsub:config>

    <configuration-properties doc:name="Configuration properties" file="mule-app.properties" />

    <flow name="publish-message-flow">
        <http:listener doc:name="Listener" config-ref="HTTP_Listener_config" path="/message"/>
        <pubsub:publish-message
                doc:name="Publish Message"
                config-ref="Google_Pub_Sub_Configuration"
                topicName="#[attributes.queryParams.topicname]"
                orderingKey="#[attributes.queryParams.orderkey]">
            <pubsub:message ><![CDATA[#[attributes.queryParams.message]]]></pubsub:message>
        </pubsub:publish-message>
    </flow>
</mule>
Steps for Running This Example
-
Verify that your connector is configured.
-
Save the project.
-
From a web browser, test the application by entering
http://localhost:8081/. You should see the Publish Message form with pre-populated Topic Name, Ordering Key, and Message fields.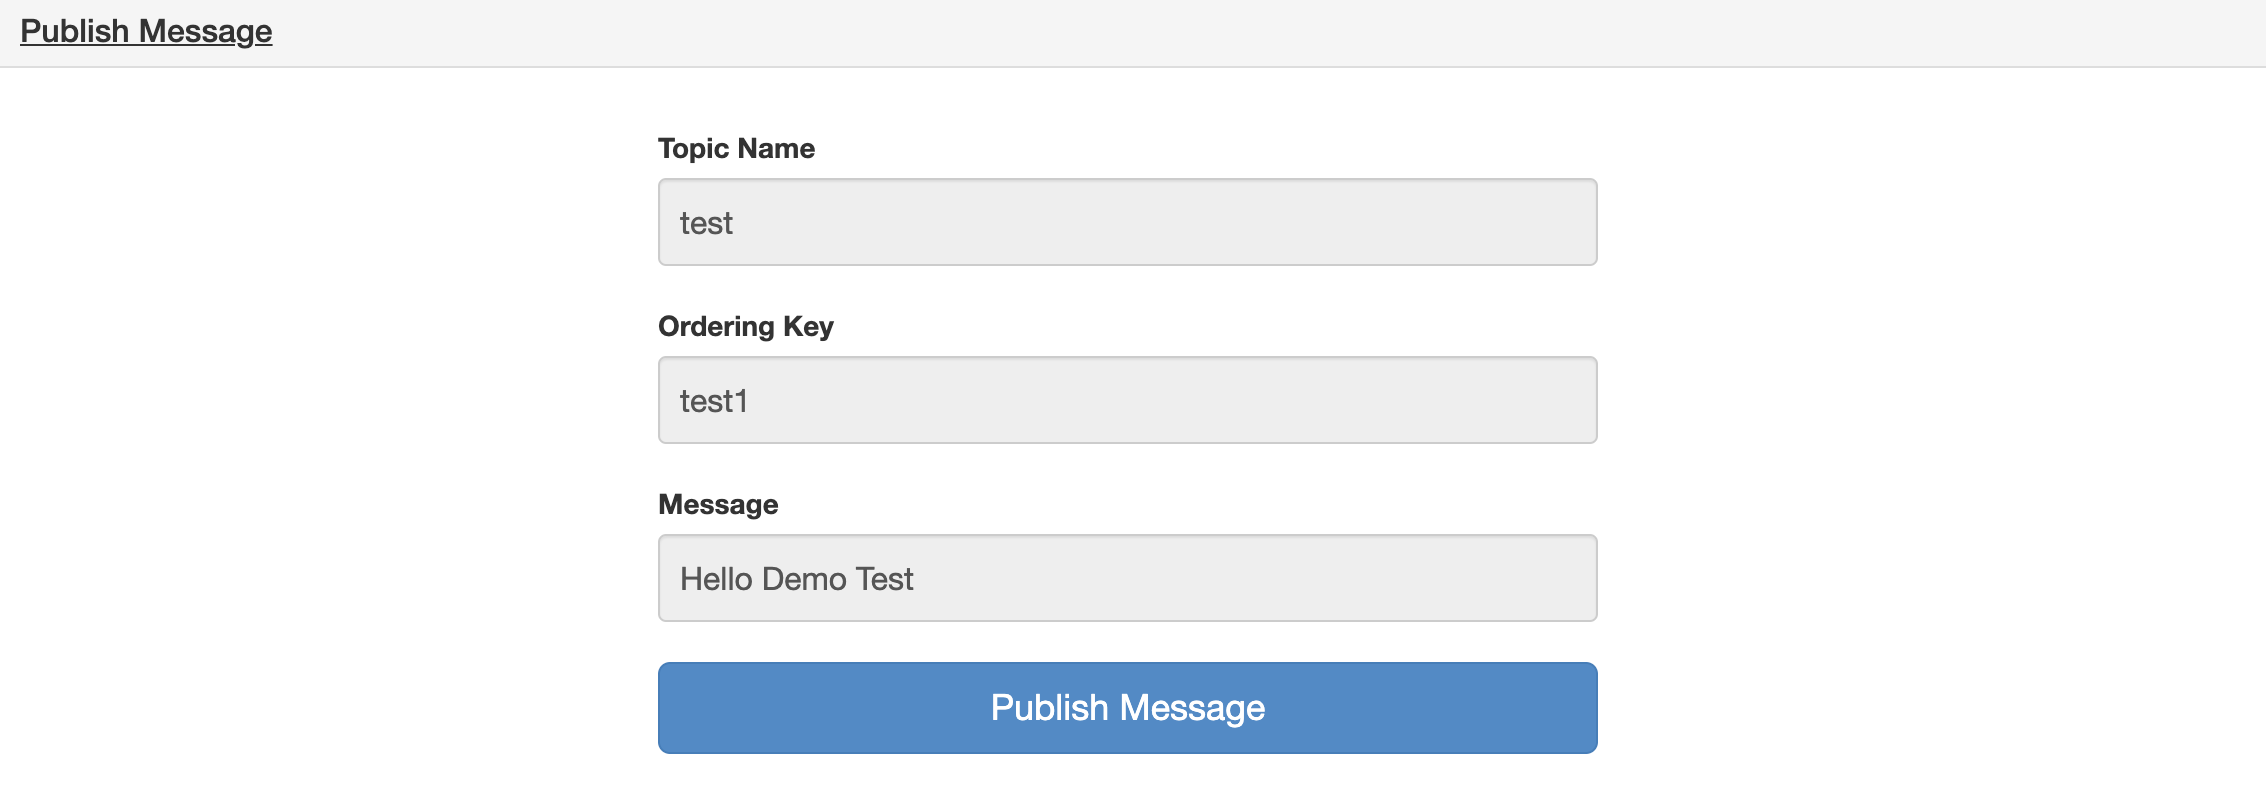
-
Click Publish Message. You should see an alert that the snapshot was successfully published.