Using Anypoint Studio to Configure JMS Connector 1.8
Anypoint Studio (Studio) editors help you design and update your Mule applications, properties, and configuration files.
To add and configure a connector in Studio:
When you run the connector, you can view the app log to check for problems, as described in View the App Log.
If you are new to configuring connectors in Studio, see Using Anypoint Studio to Configure a Connector. If, after reading this topic, you need additional information about the connector fields, see the JMS Connector Reference.
Create a Mule Project
In Studio, create a new Mule project in which to add and configure the connector:
-
In Studio, select File > New > Mule Project.
-
Enter a name for your Mule project and click Finish.
Add the Connector to Your Mule Project
Add Anypoint Connector for JMS (JMS Connector) to your Mule project to automatically populate the XML code with the connector’s namespace and schema location and to add the required dependencies to the project’s pom.xml file:
-
In the Mule Palette view, click (X) Search in Exchange.
-
In the Add Dependencies to Project window, type
jmsin the search field. -
Click JMS Connector in Available modules.
-
Click Add.
-
Click Finish.
Adding a connector to a Mule project in Studio does not make that connector available to other projects in your Studio workspace.
Configure a Source
A source initiates a flow when a specified condition is met. You can configure one of these input sources to use with JMS Connector:
-
JMS > On New Message
Initiates a flow by listening for incoming messages -
HTTP > Listener
Initiates a flow each time it receives a request on the configured host and port -
Scheduler
Initiates a flow when a time-based condition is met
For example, to configure an On New Message source, follow these steps:
-
In the Mule Palette view, select JMS > On New Message.
-
Drag On New Message to the Studio canvas.
-
In the On New Message configuration screen, optionally change the value of the Display Name field.
-
Click the plus sign (+) next to the Connector configuration field to configure a global element that can be used by all instances of the source in the app.
-
In the JMS Config window, for Connection, select either one of the connection types to provide to this configuration:
-
Active MQ Connection
-
Active MQ Connection -No Connectivity Test - (DEPRECATED)
-
Generic Connection
-
-
On the General tab, specify the connection information for the connector, such as required libraries for the broker, JMS specification, cache strategy, authentication, and connection factory.
-
On the TLS/SSL tab, optionally specify a TLS configuration.
-
On the Advanced tab, optionally specify a reconnection strategy and XA connection pool.
-
Click OK to close the window.
-
In the On New Message configuration screen, in Destination, specify the name of the destination from where to consume the message.
-
Configure other optional fields in the On New Message configuration screen.
Add a Connector Operation to the Flow
When you add a connector operation to your flow, you immediately define a specific operation for that connector to perform.
To add an operation for JMS Connector, follow these steps:
-
In the Mule Palette view, select JMS Connector and then select the desired operation.
-
Drag the operation onto the Studio canvas and to the right of the input source.
The following screenshot shows the JMS Connector operations in the Mule Palette view of Anypoint Studio:

Configure a Global Element for the Connector
To avoid connectivity issues, create separate JMS configurations for publishing and consuming, instead of creating a shared JMS configuration for both publishing and consuming. JMS Connector comes with a fine-tuned set of default values for publishing and consuming messages. The only requirement is to configure which connection to use. You can define a global default behavior for all the operations associated with the configuration and then override each parameter in only the operations that require a custom behavior.
To configure the global element for JMS Connector, follow these steps:
-
Select the operation in the Studio canvas.
-
In the configuration screen for the operation, click the plus sign (+) next to the Connector configuration field to access the global element configuration fields.
-
In the JMS Config window, for Connection, select either one of the connection types to provide to this configuration:
-
Active MQ Connection
-
Active MQ Connection -No Connectivity Test - (DEPRECATED)
-
Generic Connection
-
-
On the General tab, specify the connection information for the connector, such as required libraries for the broker, JMS specification, cache strategy, authentication, and connection factory.
-
On the TLS/SSL tab, optionally specify a TLS configuration.
-
On the Advanced tab, optionally specify a reconnection strategy, and XA connection pool.
-
On the Consumer tab, optionally define global default behavior configurations for all the Consume and On New Message operations you have in your flow.
-
On the Producer tab, optionally define global default behavior configurations for all the Publish and Publish consume operations you have in your flow.
-
Click OK to close the window.
The following screenshot shows the JMS Connector Global Element Configuration window in Anypoint Studio:
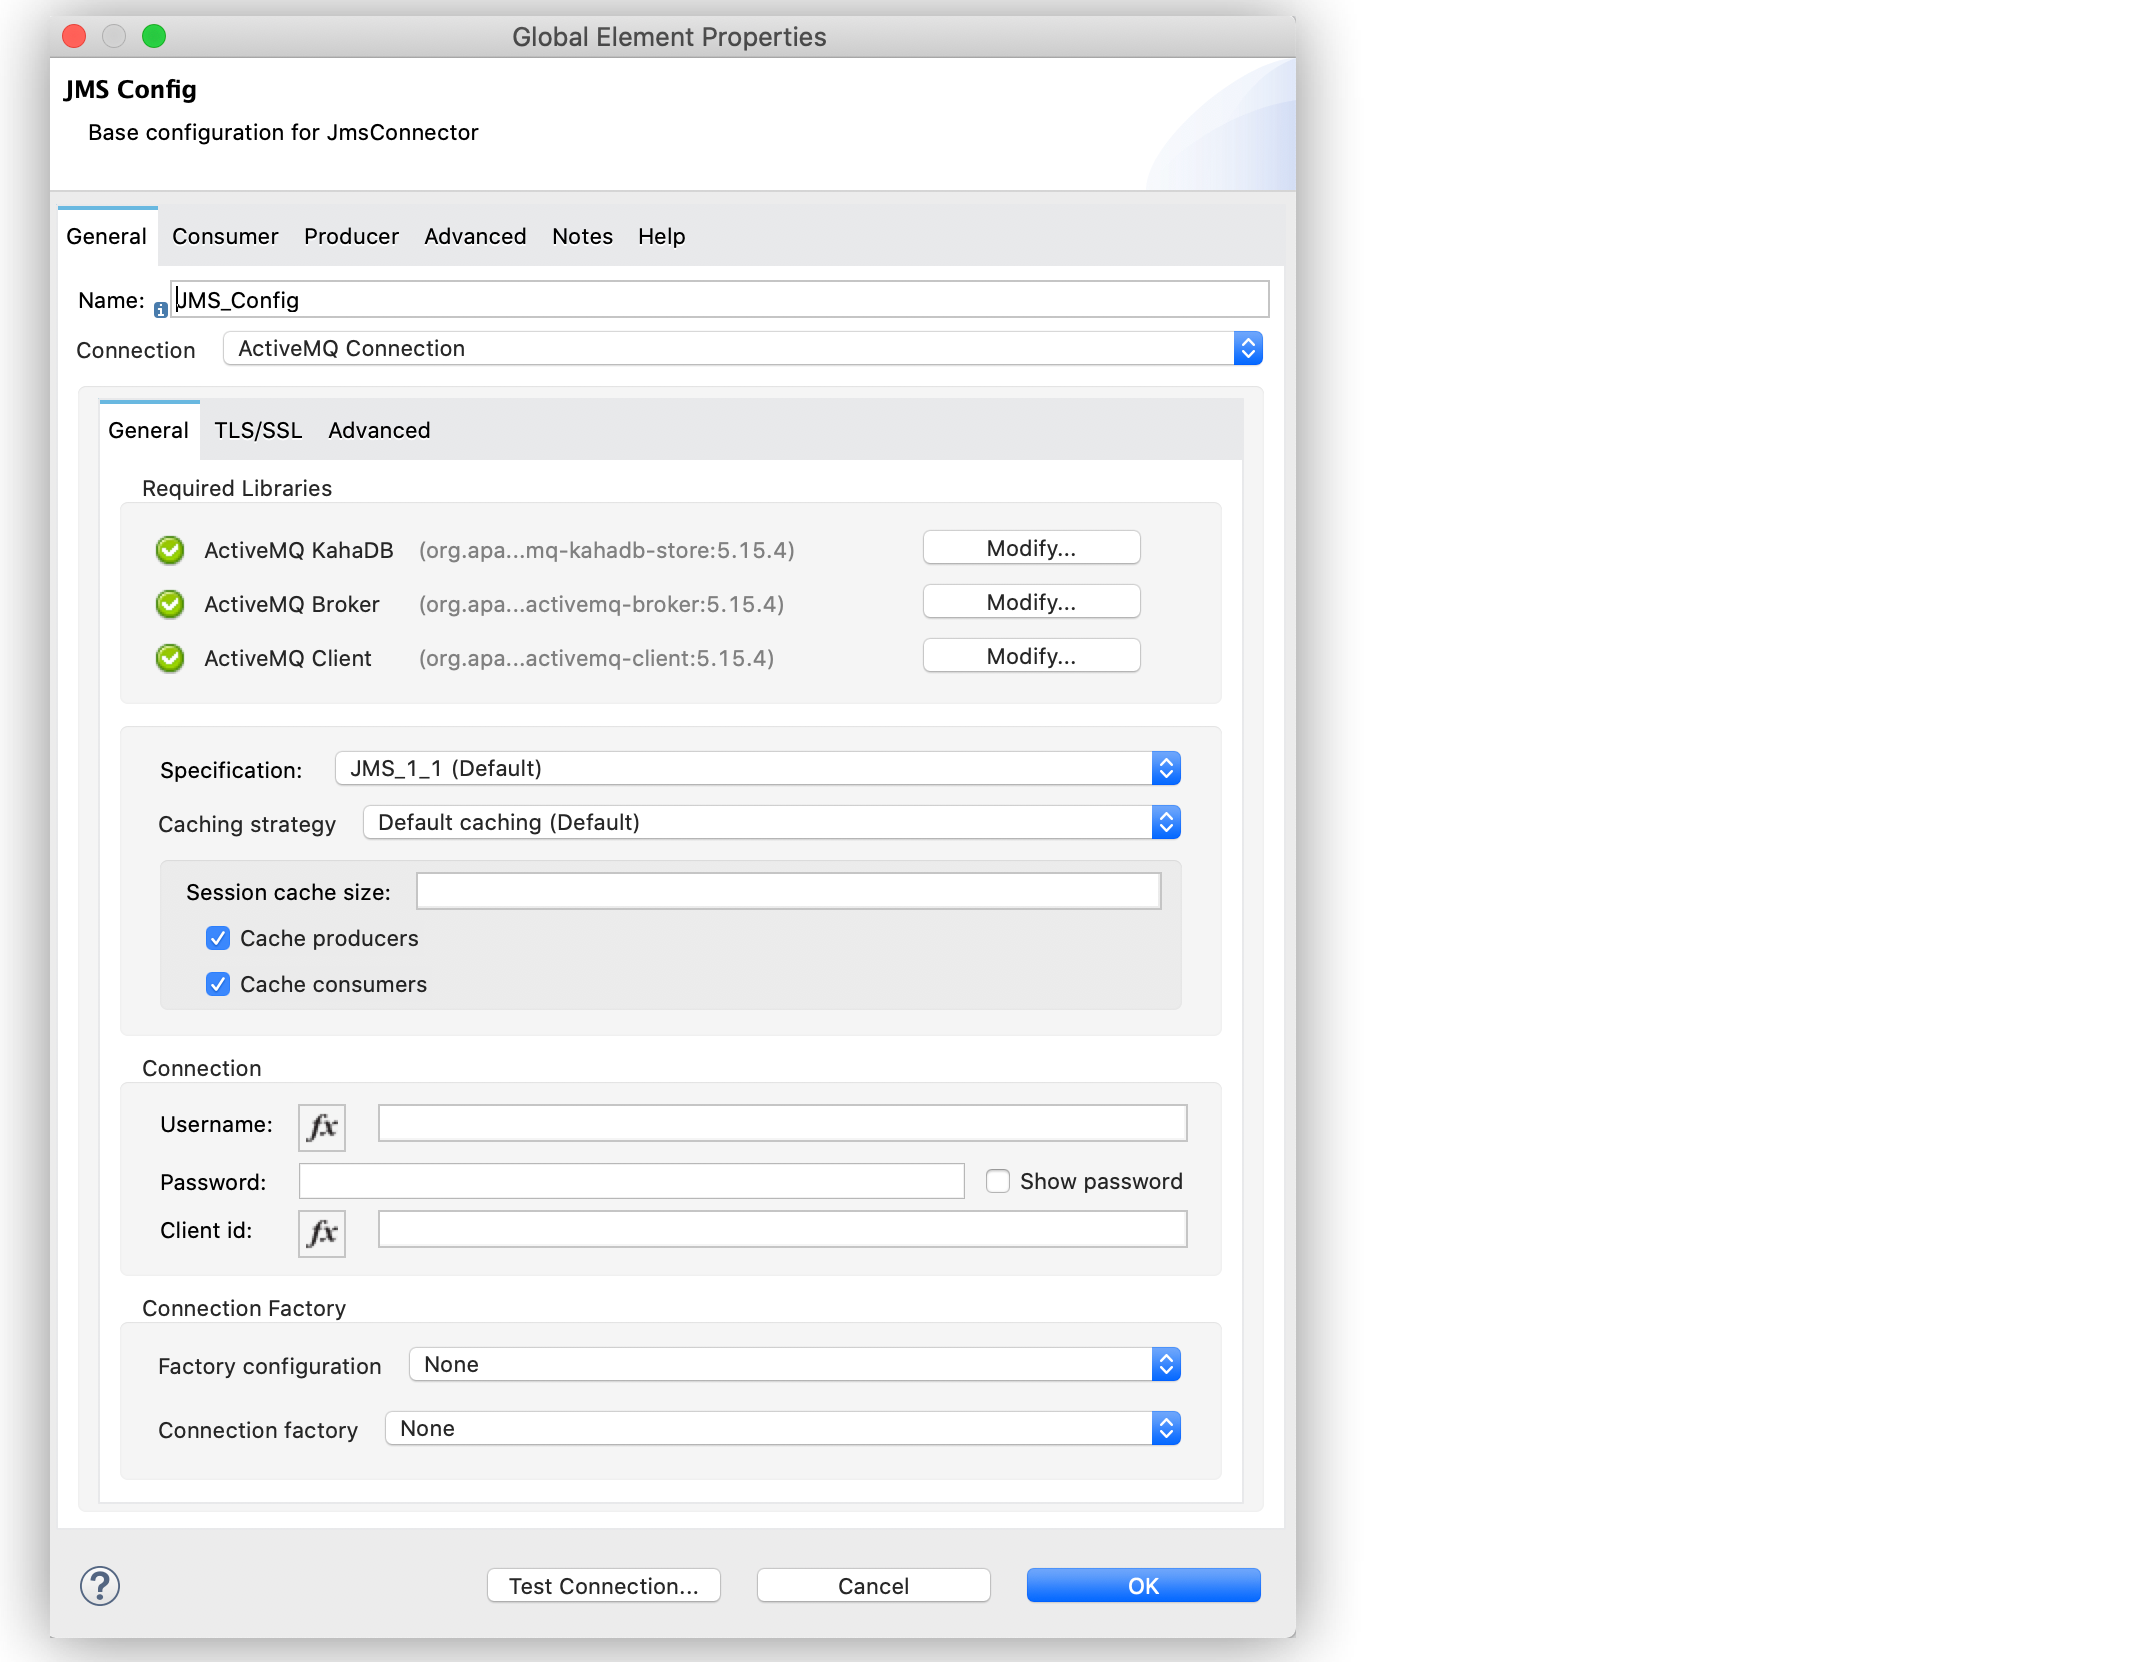
In the XML editor, the <jms:config> configuration looks like this:
<jms:config name="JMS_Config">
  <jms:active-mq-connection clientId="${env.clientId}"/>
</jms:config>
In the following example, you define a default Selector behavior when consuming a message in any of the Consume or On New Message operations associated with this configuration, while every Publish or Publish consume operation produces the outgoing message with a Time to live (TTL) of 60 seconds:
-
In Studio, navigate to the Global Elements tab.
-
Click Create.
-
In the filter box type
jmsand select JMS Config. -
Click OK.
-
In the JMS Config window, for Connection, select Active MQ Connection.
-
In the Consumer tab, set the Selector field to
JMSType = `INVOICEto filter incoming messages as invoices.

-
In the Producer tab, set the Time to live field to
60000to define the default time the message is in the broker before it expires and is discarded.
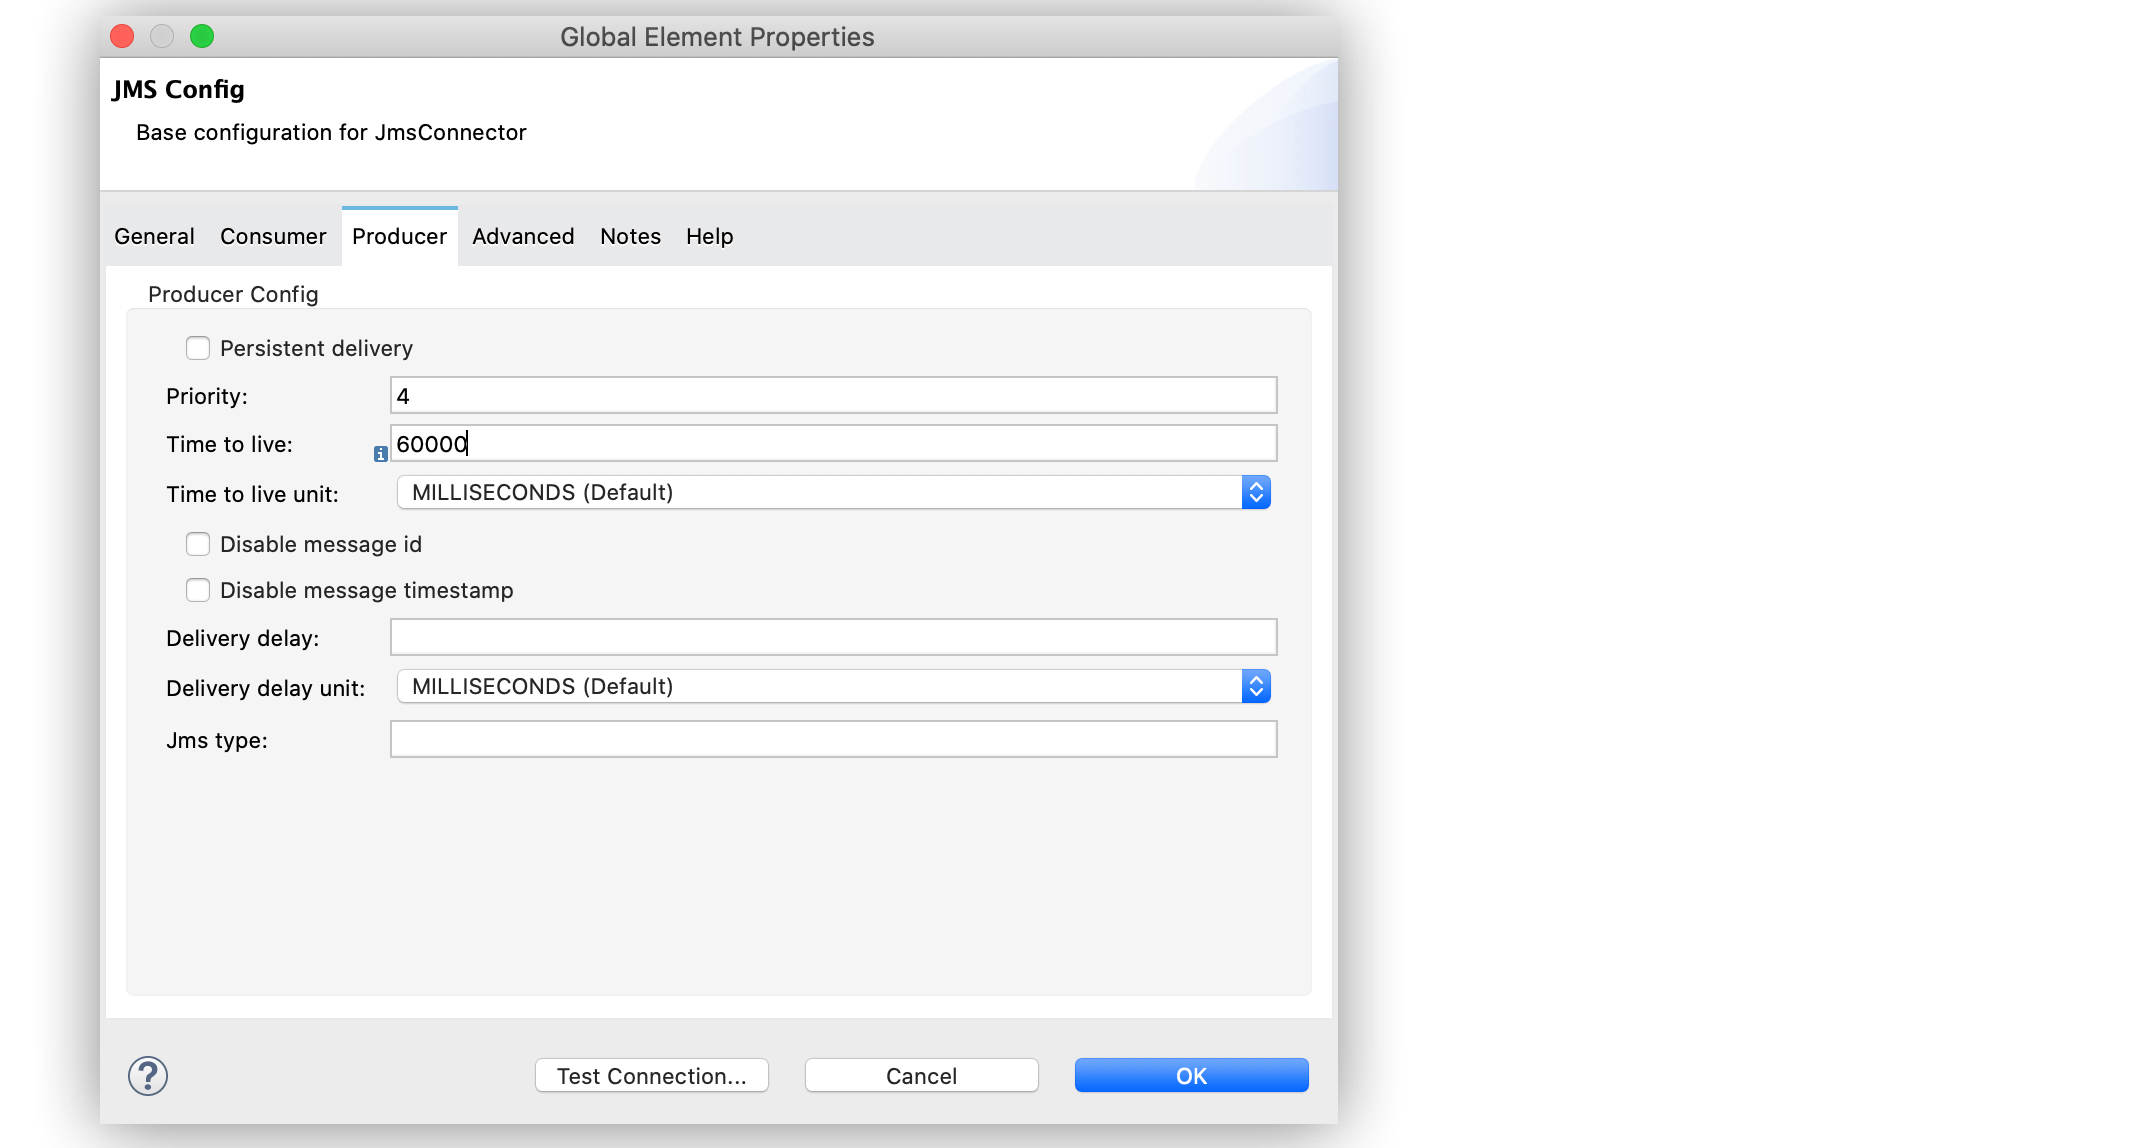
In the XML editor, the <jms:config>,selector, and timeToLive configurations looks like this:
<jms:config name="JMS_Config">
  <jms:active-mq-connection/>
  <jms:consumer-config selector="JMSType = `INVOICE`"/>
  <jms:producer-config timeToLive="60000"/>
</jms:config>
You can override these properties at the operation level when required. In the following example, you publish a message with a shorter TTL. To override the value of the Time to live field set on the global element, follow these steps:
-
In Studio, select the Publish operation from your flow.
-
In the Publish configuration screen, scroll down to the Publish Configuration section.
-
Set the Time to live field to
10000to override the default global configuration previously set.
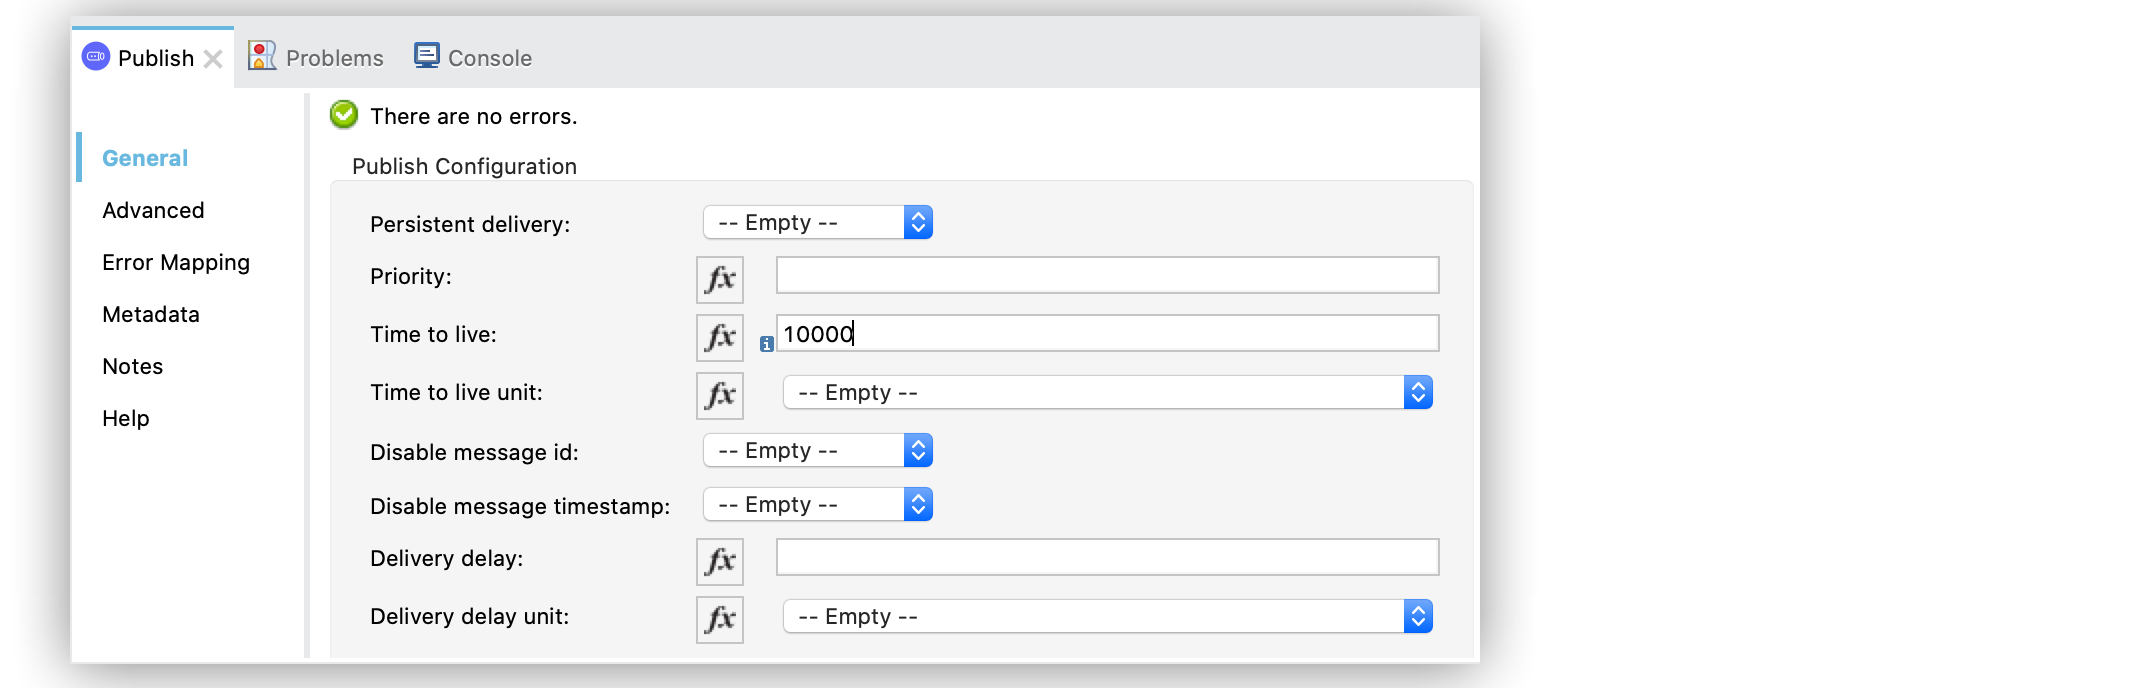
In the XML editor, the <jms:publish> and timeToLive configurations looks like this:
<jms:publish config-ref="JMS_Config" timeToLive="10000"/>Configure the Connection to a Broker
To configure the connection in the global element, define the connection by selecting either ActiveMQ Connection or Generic Connection and set up the connection libraries and the JMS specification.
JMS Connector also enables you to provide credentials, if you require an authenticated connection, and also to configure connection caching to increase the performance of the application.
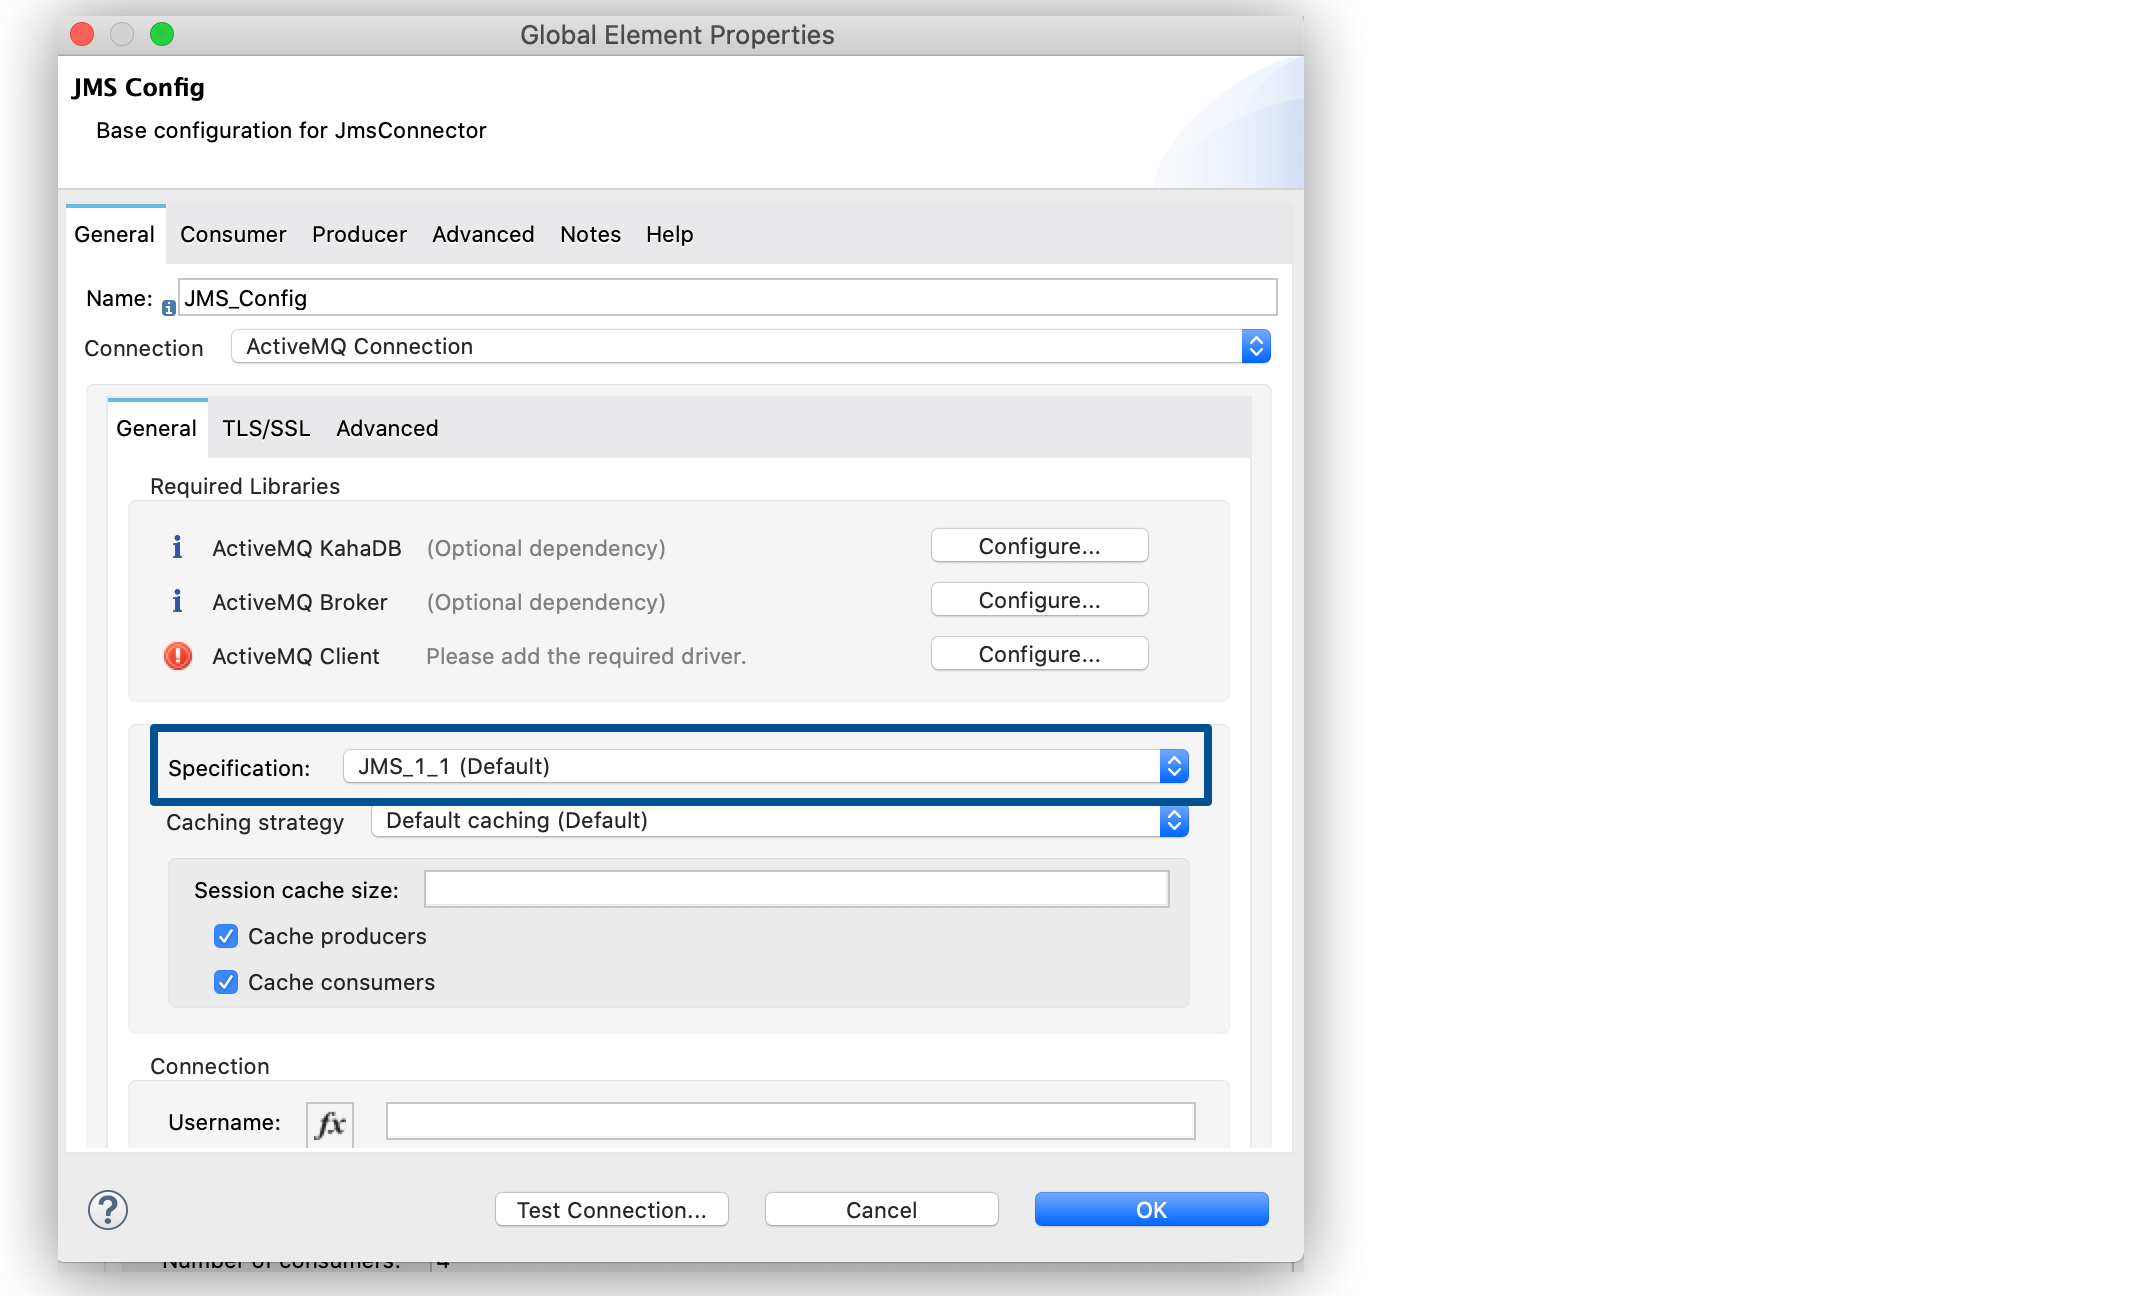
Configure an Active MQ Connection
JMS Connector supports ActiveMQ 5 by using the ActiveMQ Connection setting. With this connection, you can use JMS_1_1 (Default) or JMS_1_0_2b specifications. You can also configure all the general connection parameters for JMS, as well as the custom parameters present only in ActiveMQ.
After you declare the ActiveMQ connection, customize Connection Factory to your desired configuration. Every parameter in the connection comes with a default value, meaning that you are required to configure only the parameters relevant for your use case. Also, the ActiveMQ connection exposes parameters that are exclusive to the ActiveMQ implementation, like Initial redelivery delay.
In the following example, you configure an ActiveMQ Connection:
-
In Studio, navigate to the Global Elements tab.
-
Click Create.
-
In the filter box type
jmsand select JMS Config. -
Click OK.
-
In the Connection field select ActiveMQ Connection.
-
In the Factory configuration field, select Edit Inline.
-
Set the Broker url field value to the address of the broker to connect to, for example,
tcp://localhost:61616. -
Click OK.
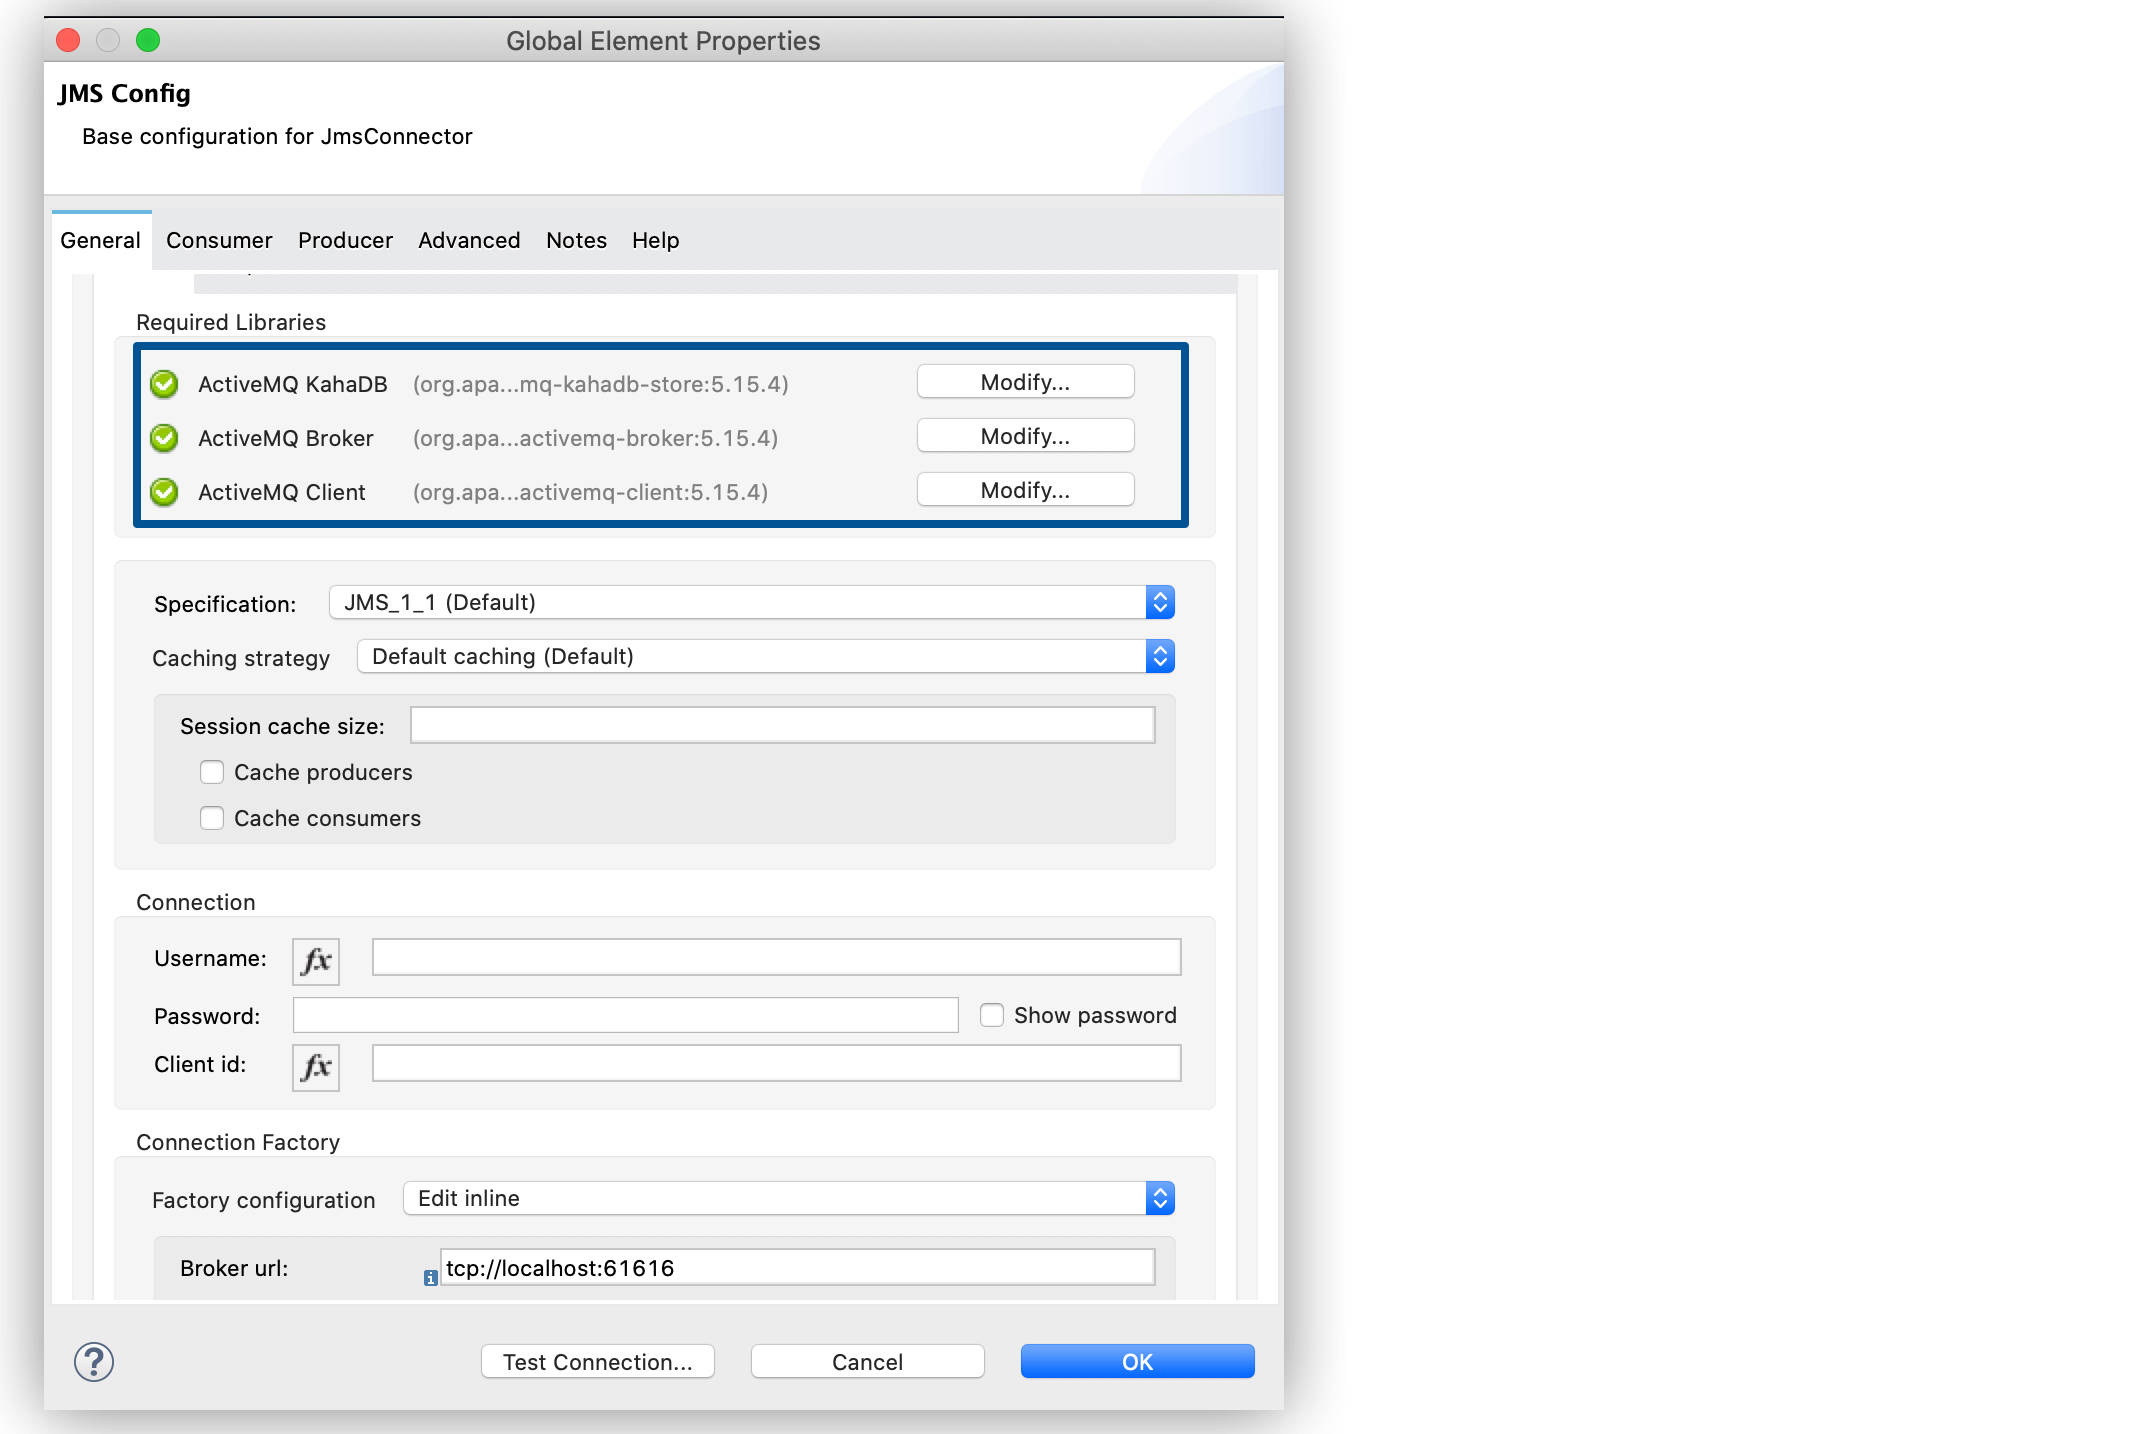
In the XML editor, the <jms:active-mq-connection> and <jms:factory-configuration> configuration looks like this:
 <jms:config name="JMS_Config">
  <jms:active-mq-connection >
   <jms:factory-configuration brokerUrl="tcp://localhost:61616" />
  </jms:active-mq-connection>
 </jms:config>
Configure a Generic Connection
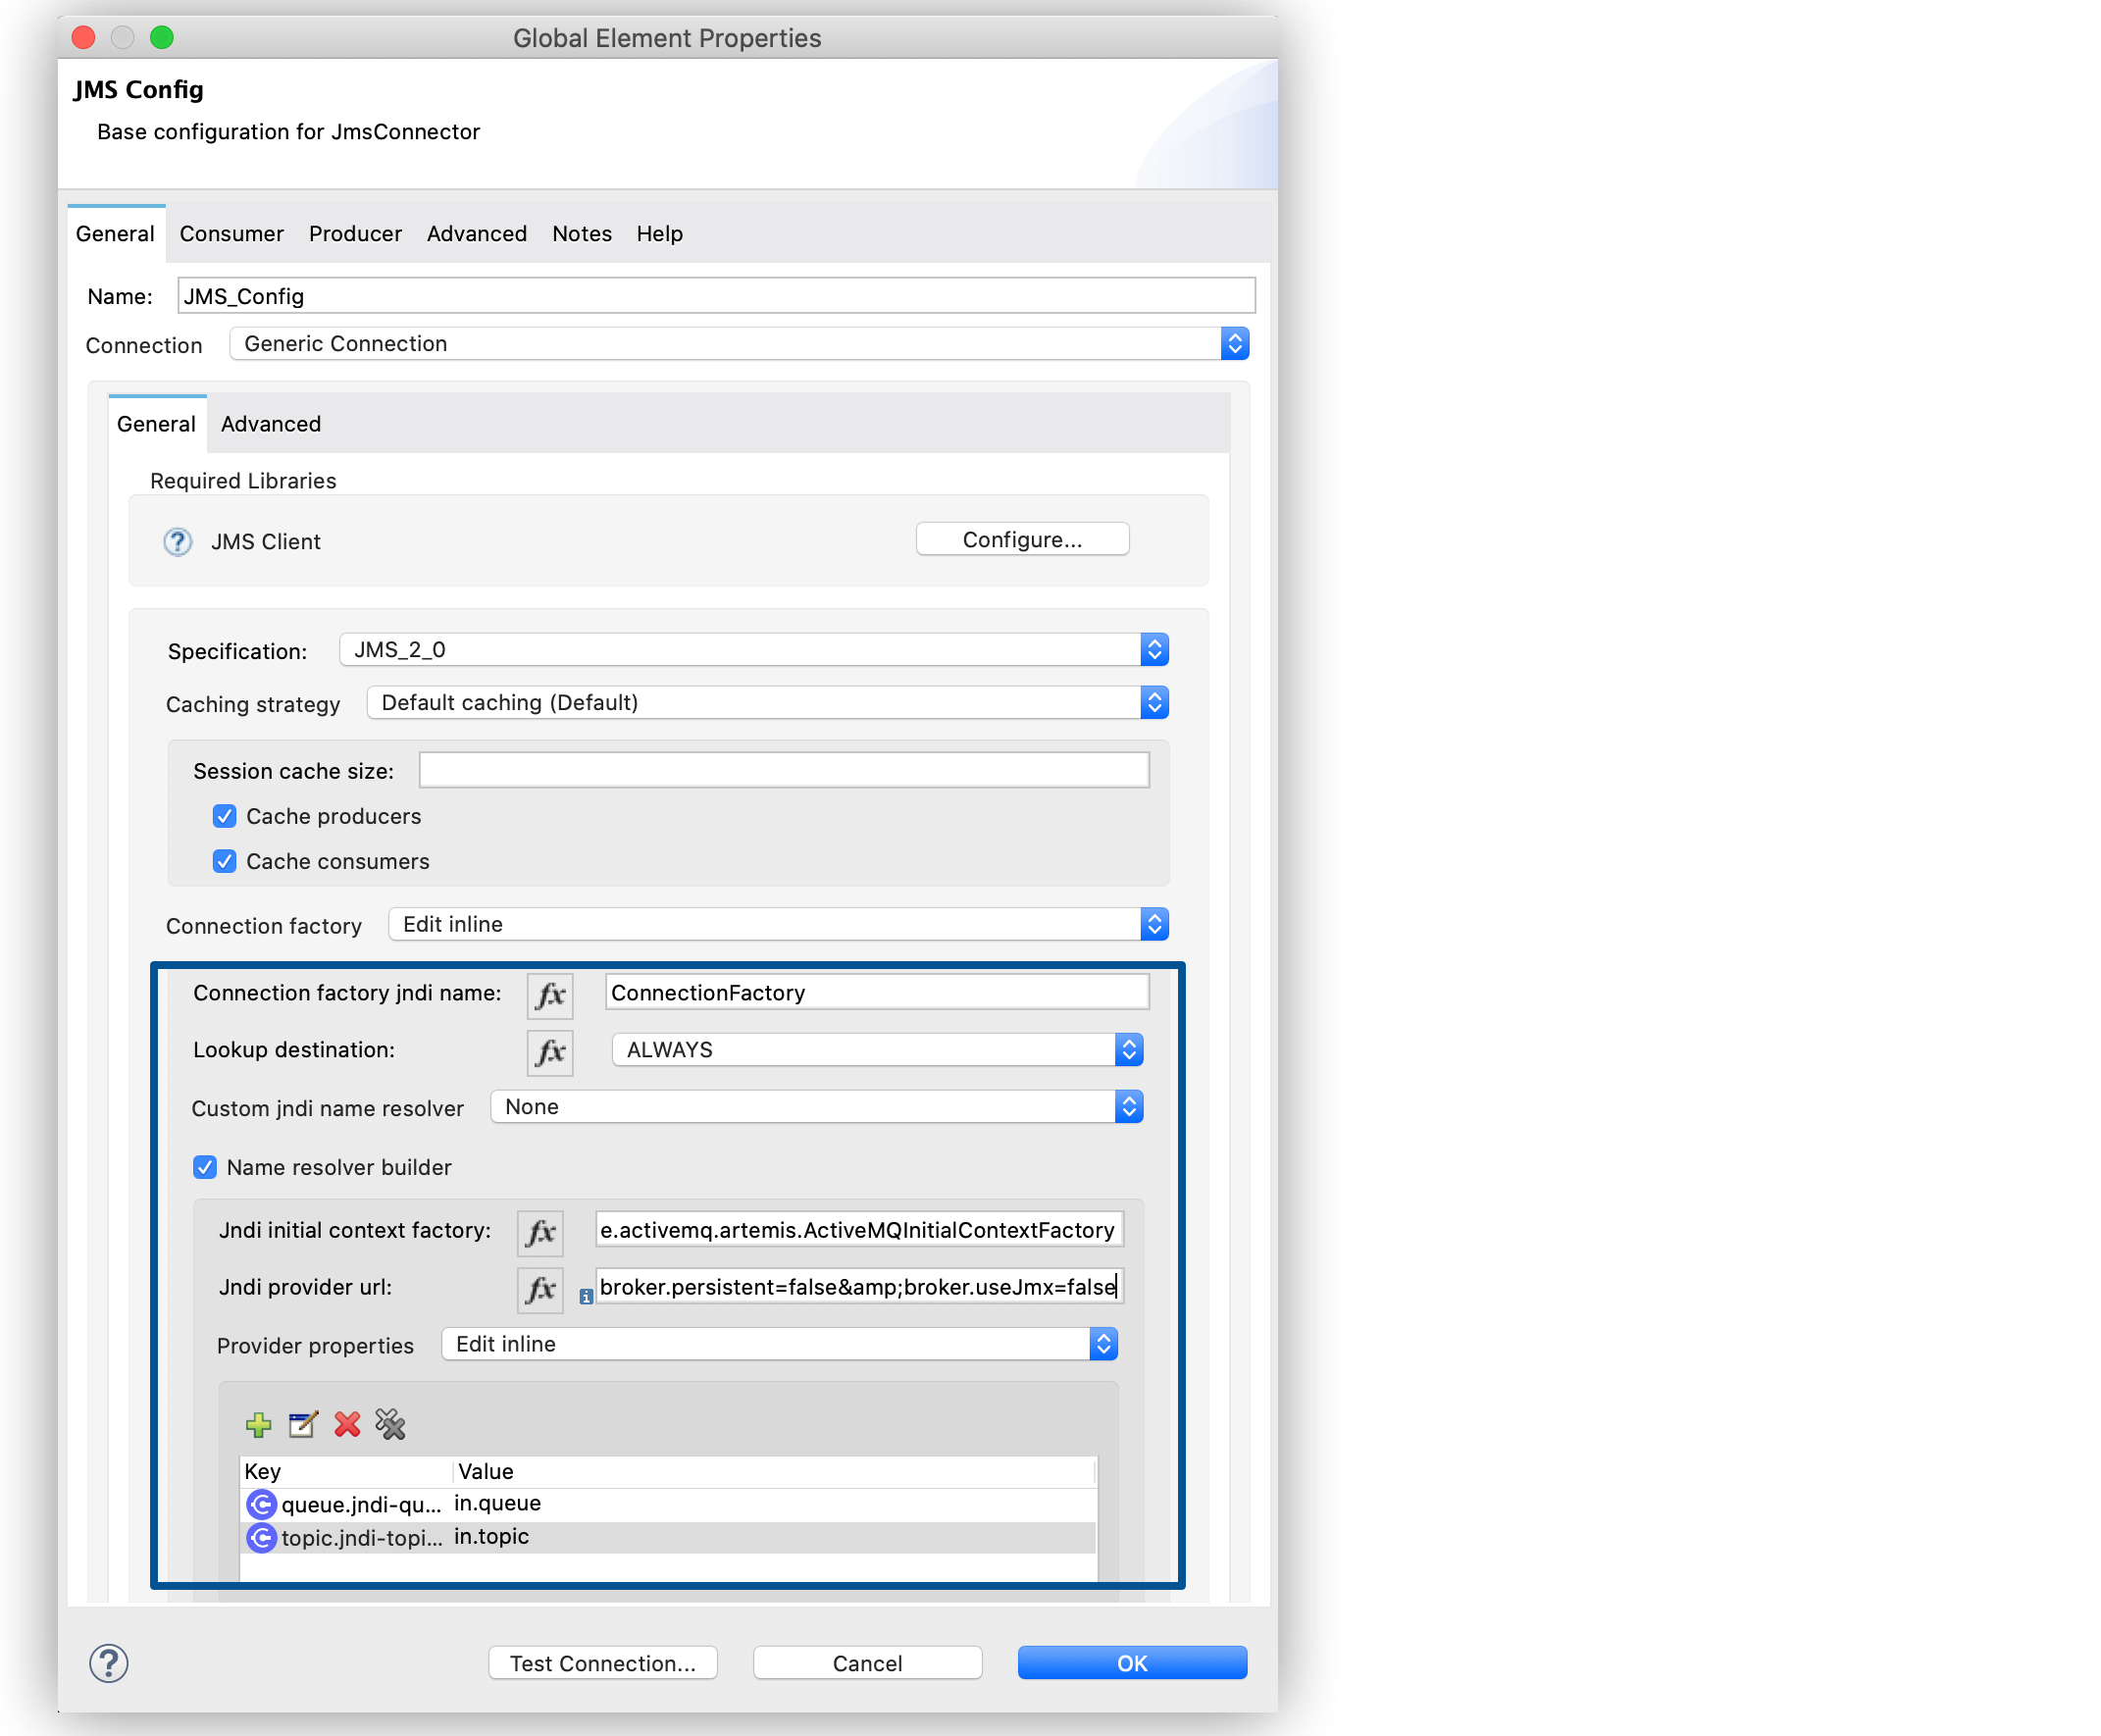
Use Generic Connection to configure a connection to any broker implementation. JMS Connector provides a JNDI based (Java Naming and Directory Interface) connection factory builder that enables you to configure the connection using JNDI in the context of the application.
In the following example, you configure Generic Connection to Artemis to use the JMS_2_0 specification using JNDI:
-
In Studio, navigate to the Global Elements tab.
-
Click Create.
-
In the filter box, type
jmsand select JMS Config. -
Click OK.
-
In the Connection field, select Generic Connection.
-
In the Specification field, select JMS_2_0.
-
In the Connection factory field, select Edit inline.
-
Set the Connection factory jndi name field to
ConnectionFactory. -
In the Lookup destination field, select any of the following options:
-
NEVER
No lookup is done and the destinations are created using the existing JMS session.
-
TRY_ALWAYS
Tries to find the destination using JNDI, and in case it doesn’t exist, creates the destination using the current JMS session.
-
ALWAYS
If a queue or topic cannot be found via JNDI, the lookup fails with a
JMS:DESTINATION_NOT_FOUNDerror.
-
-
Select the Name resolver builder field.
-
Set the Jndi initial context factory field to
org.apache.activemq.artemis.ActiveMQInitialContextFactory. -
Set the Jndi provider url field to
tcp://localhost:61616?broker.persistent=false&broker.useJmx=false. -
Set Provider properties to Edit inline.
-
Click the plus sign (+) to add a new provider property.
-
In the Provider property window, set the Key field to
queue.jndi-queue-inand the Value field toin.queue. -
Click Finish.
-
Repeat Step 14.
-
Set the Key field to
topic.jndi-topic-inand the Value field toin.topic. -
Click OK.
In the XML editor, the <jms:generic-connection> and <jms:jndi-connection-factory> configuration looks like this:
<jms:config name="JMS_Config">
<jms:generic-connection specification="JMS_2_0">
<jms:connection-factory>
<jms:jndi-connection-factory connectionFactoryJndiName="ConnectionFactory" lookupDestination="ALWAYS">
<jms:name-resolver-builder
jndiInitialContextFactory="org.apache.activemq.artemis.ActiveMQInitialContextFactory"
jndiProviderUrl="tcp://localhost:61616?broker.persistent=false&broker.useJmx=false">
<jms:provider-properties>
<jms:provider-property key="queue.jndi-queue-in" value="in.queue"/>
<jms:provider-property key="topic.jndi-topic-in" value="in.topic"/>
</jms:provider-properties>
</jms:name-resolver-builder>
</jms:jndi-connection-factory>
</jms:connection-factory>
</jms:generic-connection>
</jms:config>Configure the Connection Libraries
When you configure any connection type, you must always configure a library containing the JMS client implementation, because JMS Connector is not bound to any particular implementation. You can configure ActiveMQ external libraries and generic external libraries found in the global elements view of Studio, you can manually add the library dependency in your pom.xml file.
ActiveMQ External Libraries
For an ActiveMQ Connection, you can configure three libraries:
-
ActiveMQ KahaDB
Theactivemq-kahadb-storedependency is required only when using an persistent in-memory broker based on the VM transport (such asvm://localhost?broker.persistent=true). This dependency provides a validorg.apache.activemq.store.kahadb.KahaDBPersistenceAdapterimplementation.In your
pom.xmlfile in Studio, adding the dependency looks like this:<dependency> <groupId>org.apache.activemq</groupId> <artifactId>activemq-kahadb-store</artifactId> <version>5.14.4</version> </dependency> -
ActiveMQ Broker
Theactivemq-brokerdependency is required only when using an in-memory broker based on the VM transport (which is the one configured by default). This dependency provides a validorg.apache.activemq.broker.Brokerimplementation.In your
pom.xmlfile in Studio, adding the dependency looks like this:<dependency> <groupId>org.apache.activemq</groupId> <artifactId>activemq-broker</artifactId> <version>5.14.4</version> </dependency> -
ActiveMQ Client
Theactivemq-clientdependency is always required. Choose one that provides a validorg.apache.activemq.ActiveMQConnectionFactoryimplementation.
In your pom.xml file in Studio, adding the dependency looks like this:
+
<dependency>
     <groupId>org.apache.activemq</groupId>
     <artifactId>activemq-client</artifactId>
     <version>5.14.4</version>
 </dependency>
To configure these libraries in the Global Element view, follow these steps:
-
In Studio, navigate to the Global Elements tab.
-
Click Create.
-
In the filter box, type
jmsand select JMS Config. -
Click OK.
-
In the Connection field, select ActiveMQ Connection.
-
In the Required Libraries section that shows the ActiveMQ KahaDB, ActiveMQ Broker and ActiveMQ Client libraries, click the Configure… button to install the dependency.
-
Select any of the following install options:
-
Add recommended library Installs the recommended library.
-
Use local file Browse to a local file for the required engine library and install it.
-
Add Maven dependency Browse to the dependency and install it.
-
Generic External Libraries
For Generic Connection, provide all the libraries that the connection factory of your implementation requires. Ensure that you supply all the required dependencies to the application.
In the following example, you configure a generic library for a connection that uses a JMS 2.0 specification, which requires a generic connection with a different client library, like Apache Artemis:
In your pom.xml file in Studio, adding the dependency looks like this:
<dependency>
    <groupId>org.apache.activemq</groupId>
    <artifactId>artemis-jms-client-all</artifactId>
    <version>2.17.0</version>
</dependency>
To configure these libraries in the Global Element view, follow these steps:
-
In Studio, navigate to the Global Elements tab.
-
Click Create.
-
In the filter box, type
jmsand select JMS Config. -
Click OK.
-
In the Connection field, select Generic Connection.
-
In the Required Libraries section that shows the JMS Client, click the Configure… button to install the dependency.
-
Select any of the following install options:
-
Add recommended library Installs the recommended library.
-
Use local file Browse to a local file for the required engine library and install it.
-
Add Maven dependency Browse to the dependency and install it.
-
Configure the JMS Specification
The JMS Specification you configure must be supported by the broker implementation associated with the connection; otherwise, the connection fails.
Note that features that are available only in JMS_2_0 won’t work with any other specification.
To configure the JMS specification in Studio, follow these steps:
-
In Studio, open the JMS Config global element window.
-
In the Specification field, select one of the following supported specifications:
-
JMS_1_1 (Default)
-
JMS_1_0_2b
-
JMS_2_0
-
-
Click OK.
In the XML editor, the specification configuration looks like this:
<jms:config name="JMS_Config" >
		<jms:active-mq-connection specification="JMS_1_0_2b" />
	</jms:config>
Configure Connection Caching
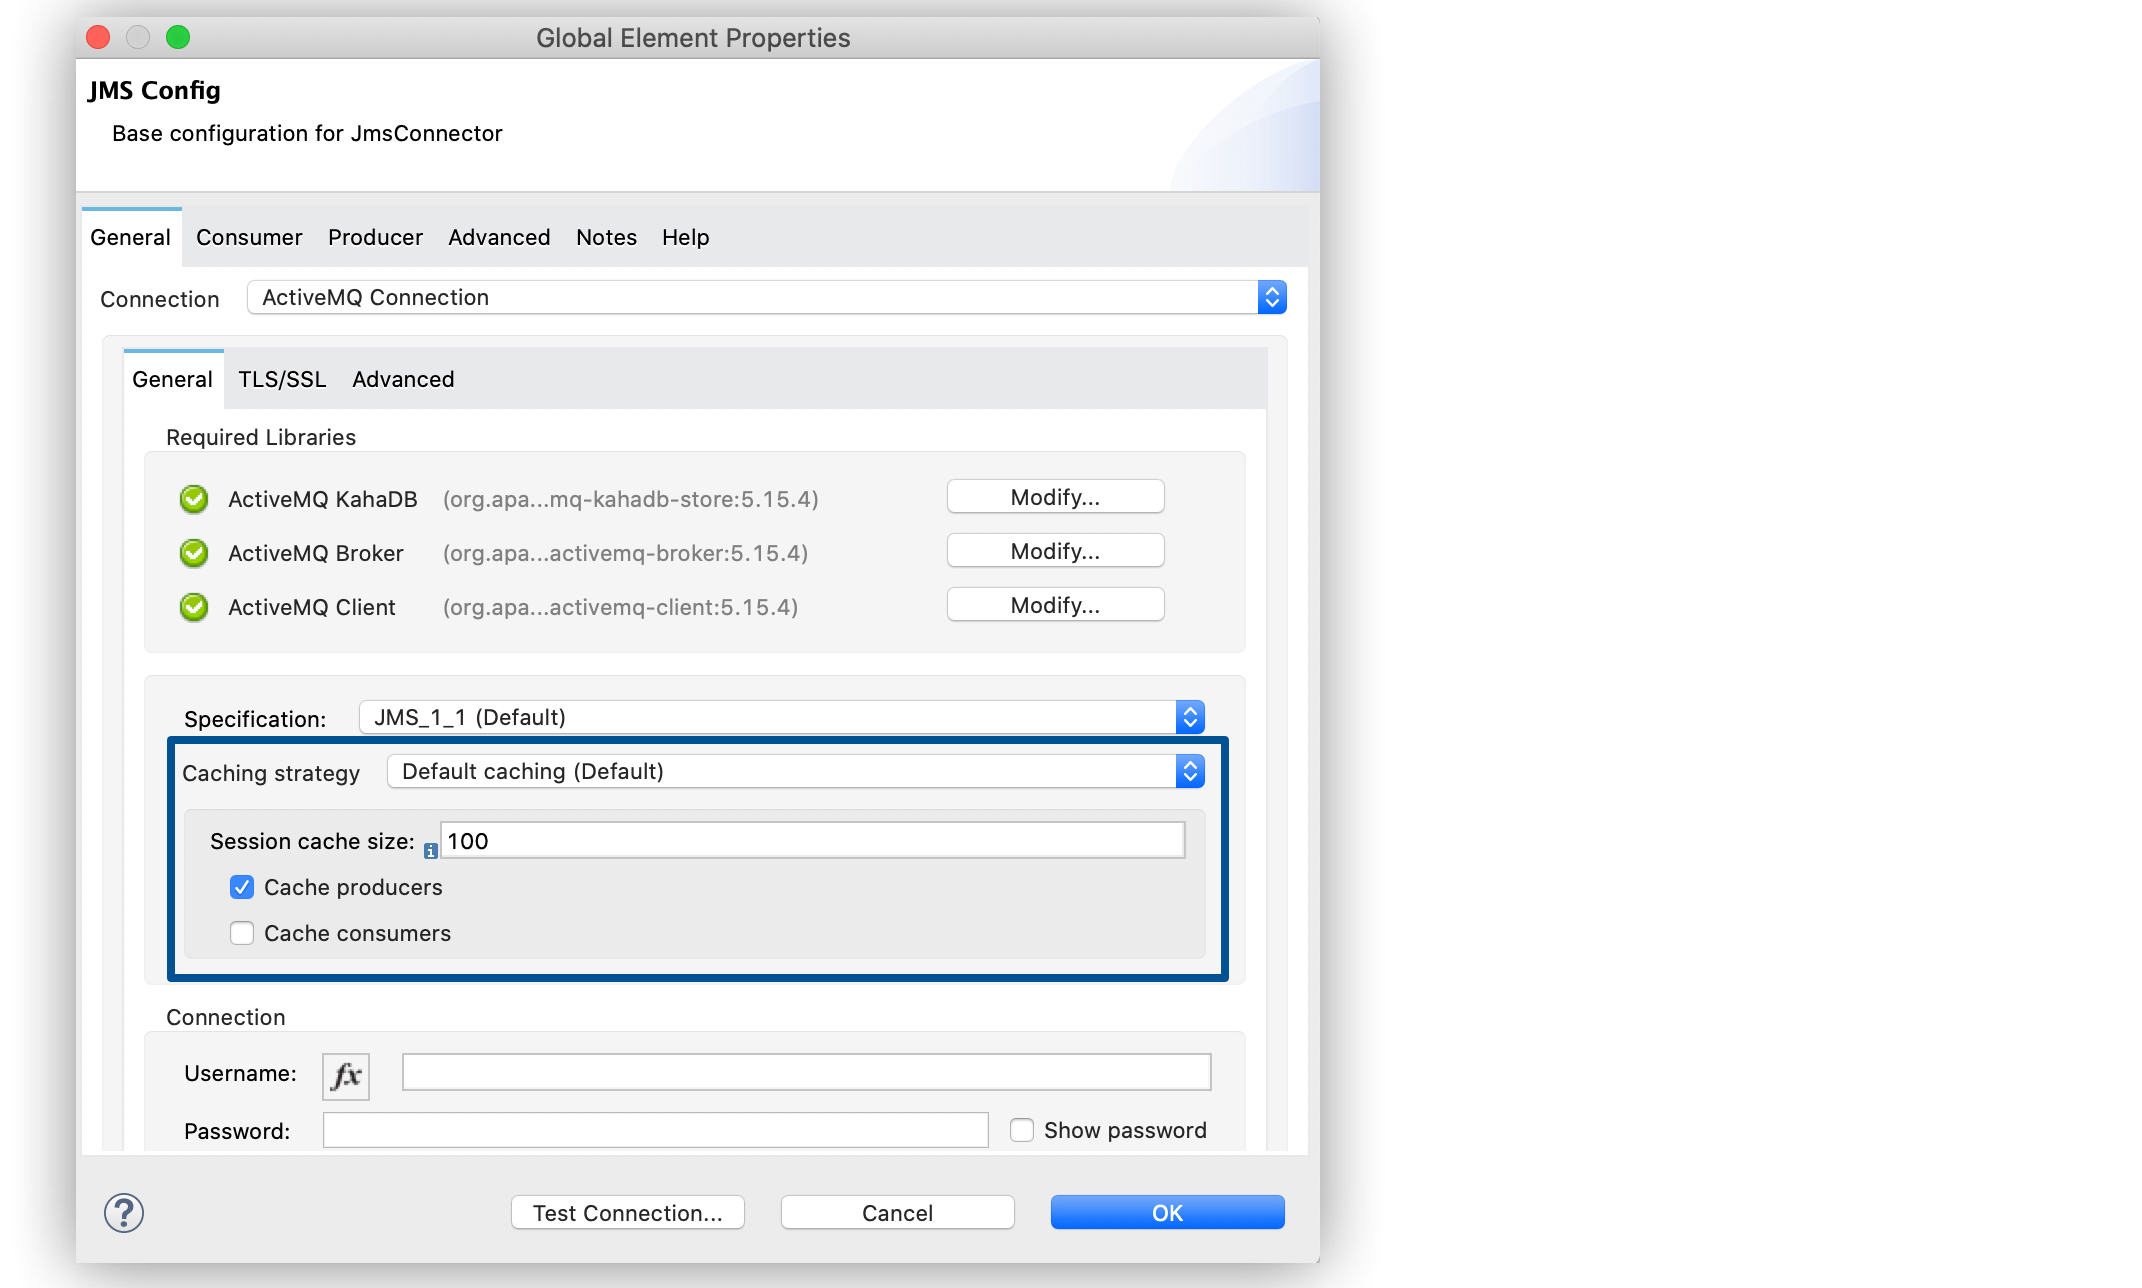
To connect with a broker and execute required operations, JMS Connector creates multiple sessions of consumers and producers that can be cached and reused to increase application performance. JMS Connector enables you to configure the Caching strategy field to use when creating new connections. By default, both consumers and producers are cached and as many concurrent instances are cached in memory.
Do not disable the sessions cache by using the No caching configuration, which is used only with a custom connection factory that already manages its own cache.
In the following example you configure the caching strategy:
-
In Studio, open the JMS Config global element window.
-
In the Caching strategy field, select Default caching (Default).
-
Set the Session cache size field to
100. -
Select Cache producers.
-
Click OK.
In the XML editor, the <jms:caching-strategy> and <default-caching> configuration looks like this:
<jms:config name="JMS_Config">
  <jms:active-mq-connection>
    <jms:caching-strategy>
      <jms:default-caching sessionCacheSize="100" consumersCache="false" producersCache="true"/>
    </jms:caching-strategy>
  </jms:active-mq-connection>
</jms:config>
In the following XML example, the <jms:no-caching/> configuration looks like this:
<jms:config name="JMS_Config">
<jms:generic-connection connectionFactory="customConnectionFactory">
<jms:caching-strategy>
<jms:no-caching/>
</jms:caching-strategy>
</jms:generic-connection>
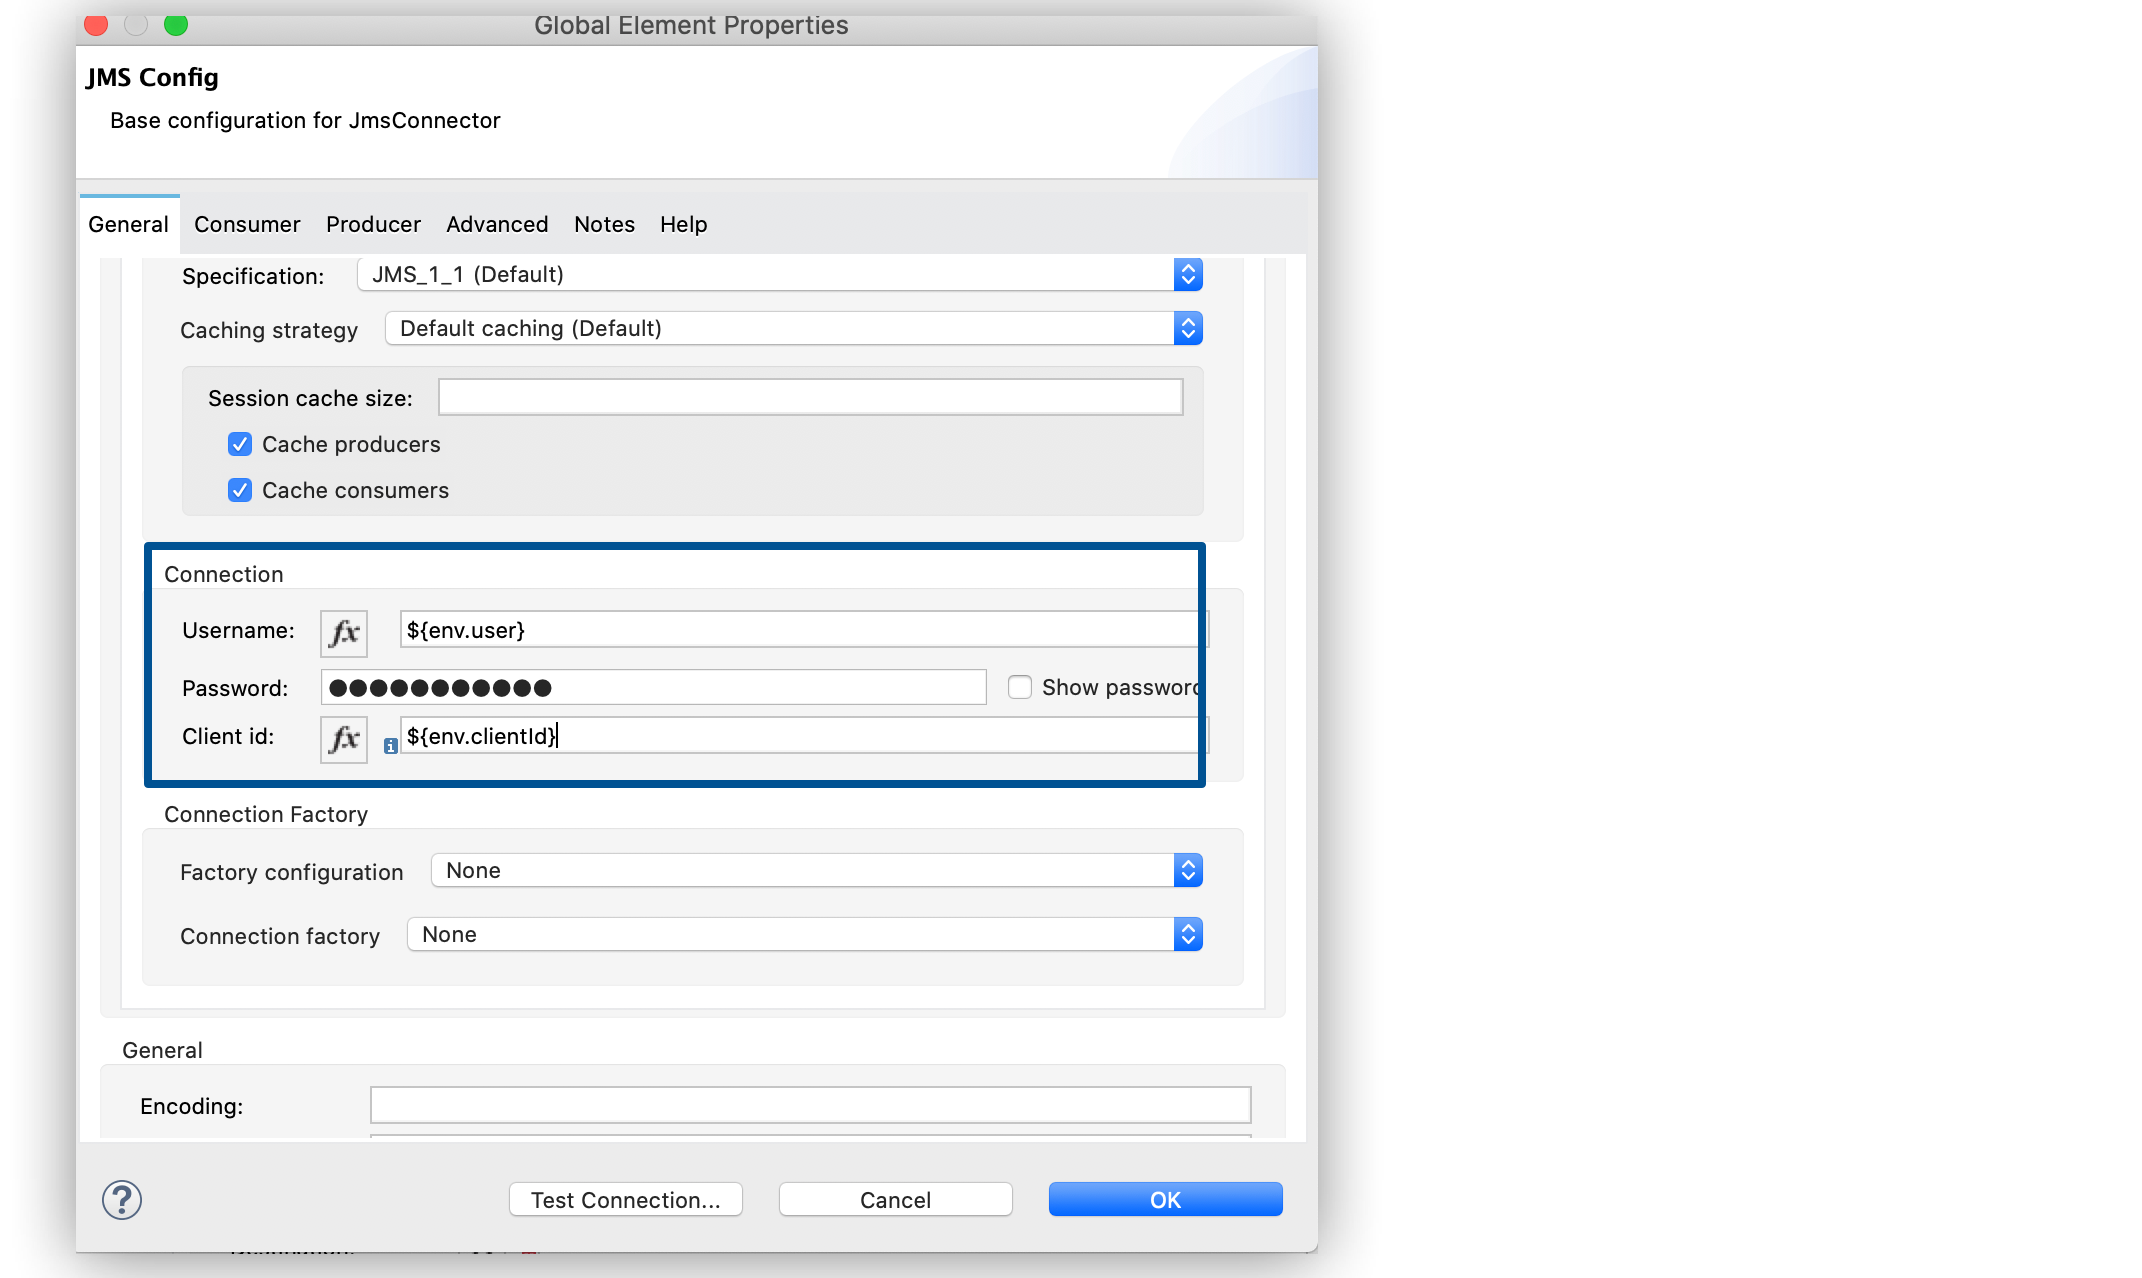
</jms:config>Configure the Client Identifier and Credentials for Authentication
The client identifier associates a connection and its objects with a state that is maintained on behalf of the client by a provider. It is mandatory for identifying an unshared durable subscription. Note that the client state identified in the Client id can be used by only one connection at a time.
In the following example, you configure an authenticated connection and the client identifier:
-
In Studio, open the JMS Config global element window.
-
In the Connection section, set the Username field to
${env.user}and the Password field to${env.pass}. -
Set the Client id field to
${env.clientId}. -
Click OK.
In the XML editor, the username, password, and clientId configuration looks like this:
<jms:config name="JMS_Config">
  <jms:active-mq-connection username="${env.user}" password="${env.pass}" clientId="${env.clientId}"/>
</jms:config>
View the App Log
To check for problems, you can view the app log as follows:
-
If you’re running the app from Anypoint Platform, the output is visible in the Anypoint Studio console window.
-
If you’re running the app using Mule from the command line, the app log is visible in your OS console.
Unless the log file path is customized in the app’s log file (log4j2.xml), you can also view the app log in the default location MULE_HOME/logs/<app-name>.log.