LDAP Connector
LDAP Connector v3.2
Anypoint Connector for Lightweight Directory Access Protocol (LDAP) is a public standard that facilitates maintenance and access to distributed directories (such as network user privilege information) over an Internet Protocol (IP) network.
Many LDAP servers are included in free-use open source projects and packages. The particulars of installing, running and configuring LDAP servers fall outside the scope of this document.
This document provides an example of a simple LDAP Connector configuration, including basic instructions for installing and connecting to an LDAP server using LDAP Connector.
Release Notes: LDAP Connector Release Notes
Exchange: LDAP Connector![]()
| This version of the connector supports only LDAP over TLS. |
Before You Begin
To use the LDAP Connector, you must have the following:
-
Access to either an OpenLDAP, Apache Directory, or MicroSoft Active Directory Instance.
-
Anypoint Studio version 7.0 (or higher).
To use the LDAP Connector in a production environment, you must have either:
-
An Enterprise license to use Mule.
-
A CloudHub Starter, Professional, or Enterprise account.
To use this information, you should be familiar with LDAP, Mule runtime engine (Mule), Anypoint Connectors, Anypoint Studio essentials, elements in a Mule flow, and global elements.
POM File Information
<dependency>
<groupId>com.mulesoft.connectors</groupId>
<artifactId>mule-ldap-connector</artifactId>
<version>x.x.x</version>
<classifier>mule-plugin</classifier>
</dependency>xmlReplace x.x.x with the version that corresponds to the connector you are using.
To obtain the most up-to-date pom.xml file information, access the connector in Anypoint Exchange![]() and click Dependency Snippets.
and click Dependency Snippets.
Compatibility
LDAP Connector is compatible with:
| Application/Service | Version |
|---|---|
Mule Runtime |
4.1.1 and later |
Java |
1.8.0_x or higher |
Anypoint Studio |
7.0 or higher |
Add the Connector to a Studio Project
Anypoint Studio provides two ways to add the connector to your Studio project: from the Exchange button in the Studio taskbar or from the Mule Palette view.
Add the Connector Using Exchange
-
In Studio, create a Mule project.
-
Click the Exchange icon (X) in the upper-left of the Studio task bar.
-
In Exchange, click Login and supply your Anypoint Platform username and password.
-
In Exchange, search for "ldap".
-
Select the connector and click Add to project.
-
Follow the prompts to install the connector.
Add the Connector in Studio
-
In Studio, create a Mule project.
-
In the Mule Palette view, click (X) Search in Exchange.
-
In Add Modules to Project, type "ldap" in the search field.
-
Click this connector’s name in Available modules.
-
Click Add.
-
Click Finish.
Configure the LDAP Connector Global Element
To use LDAP Connector in a Mule application, you must configure a global LDAP configuration element that can be used by as many LDAP Connectors as you require for your application. This connector supports server side pooling for Basic configuration, which can be configured in the Pooling section.
-
Click the Global Elements tab at the base of the canvas.
-
On the Global Configuration Elements screen, click Create.
The following window appears: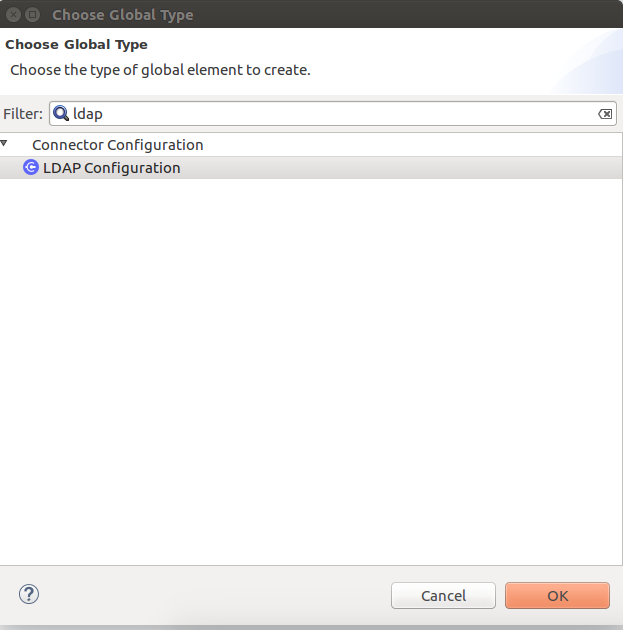
-
In the Choose Global Type wizard, expand Connector Configuration, select LDAP Configuration, and click OK.
The following window appears: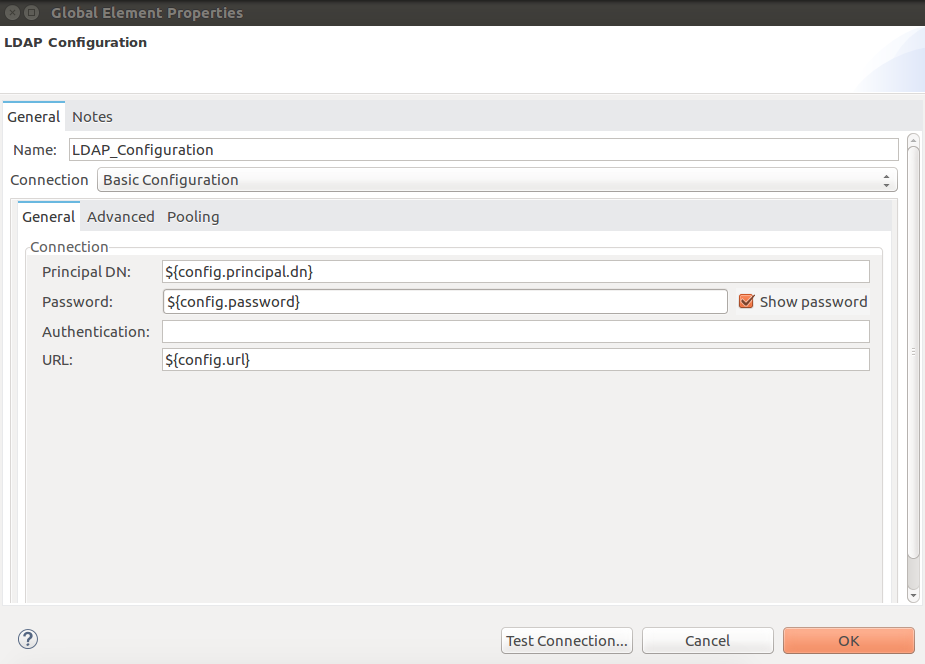
-
Choose Basic configuration or TLS configuration from the drop-down list and configure its properties.
Parameter Description Name
Name by which to reference the connector
Principal DN
The DN (distinguished name) of the user
Password
The password of the user
Authentication
Specifies the authentication mechanism to use. The default is
Simple.URL
The connection URL to the LDAP server
In the image above, the placeholder values refer to a configuration file
mule-artifact.propertiesplaced in thesrc/main/resourcesfolder of your project. You can either enter your credentials into the global configuration properties, or reference a configuration file that contains these values.Although you can hard-code your credentials into the global configuration properties, you can simplify maintenance and achieve better project reusability if you reference a configuration file that contains these values instead. Keeping these values in a separate file is useful if you need to deploy to different environments in which your access credentials differ (such as production, development, and QA).
-
In the Advanced and Pooling tabs, keep the default entries.
The Pooling tab is only available for Basic configuration. -
Click Test Connection to confirm that the parameters of your global configuration are accurate, and that Mule is able to successfully connect to your instance of LDAP server.
-
Click OK to save the global connector configuration.
Configure With the XML Editor or Standalone
-
Ensure that you have included the LDAP namespace in your configuration file.
<mule xmlns:ldap="http://www.mulesoft.org/schema/mule/ldap" xmlns="http://www.mulesoft.org/schema/mule/core" xmlns:doc="http://www.mulesoft.org/schema/mule/documentation" xmlns:spring="http://www.springframework.org/schema/beans" xmlns:xsi="http://www.w3.org/2001/XMLSchema-instance" xsi:schemaLocation="http://www.springframework.org/schema/beans http://www.springframework.org/schema/beans/spring-beans-current.xsd http://www.mulesoft.org/schema/mule/core http://www.mulesoft.org/schema/mule/core/current/mule.xsd http://www.mulesoft.org/schema/mule/ldap http://www.mulesoft.org/schema/mule/ldap/current/mule-ldap.xsd"> <!-- Put your flows and configuration elements here --> </mule>xml -
Create a global element for LDAP Basic configuration using the following configuration code:
<ldap:config name="LDAP_Configuration" doc:name="LDAP Configuration"> <ldap:basic-connection authDn="${config.principal.dn}" authPassword="${config.password}" url="${config.url}"> <ldap:extended-configurations> <ldap:extended-configuration key="key.name" value="key.value" /> </ldap:extended-configuration> </ldap:extended-configurations> </ldap:basic-connection> </ldap:config>xml -
Save the changes made to the XML file.
Use the Connector
The LDAP Connector supports the following operations:
| Operation | Description |
|---|---|
Bind |
Authenticates against the LDAP server. This occurs automatically before each operation but can also be performed on request. |
Search |
Performs an LDAP search in a base DN with a given filter. |
Search one |
Performs an LDAP search that is supposed to return a unique result. |
Paged result search |
Performs an LDAP search and streams result to the rest of the flow. |
Lookup |
Retrieves a unique LDAP entry. |
Exists |
Checks whether an LDAP entry exists in the LDAP server or not. |
Add |
Creates a new LDAP entry. |
Add single-valued attribute |
Adds a specific single-valued attribute to an existing LDAP entry. |
Add multi-valued attribute |
Adds a specific multi-valued attribute to an existing LDAP entry. |
Modify |
Updates an existing LDAP entry. |
Modify single-valued attribute |
Updates specific single-valued attribute of an existing LDAP entry. |
Modify multi-valued attribute |
Updates specific multi-valued attribute of an existing LDAP entry. |
Delete |
Deletes an existing LDAP entry. |
Delete single-valued attribute |
Deletes specific single-valued attribute to an existing LDAP entry. |
Delete multi-valued attribute |
Deletes specific multi-valued attribute to an existing LDAP entry. |
Rename |
Renames an existing LDAP entry. |
Connector Namespace and Schema
When designing your application in Studio, the act of dragging the connector from the palette onto the Anypoint Studio canvas should automatically populate the XML code with the connector namespace and schema location.
Namespace: http://www.mulesoft.org/schema/mule/ldap
Schema Location: http://www.mulesoft.org/schema/mule/ldap/current/mule-ldap.xsd
If you are manually coding the Mule application in Studio’s XML editor or other text editor, paste these into the header of your Configuration XML, inside the <mule> tag.
|
<mule xmlns:ldap="http://www.mulesoft.org/schema/mule/ldap" xmlns="http://www.mulesoft.org/schema/mule/core"
xmlns:doc="http://www.mulesoft.org/schema/mule/documentation"
xmlns:spring="http://www.springframework.org/schema/beans"
xmlns:xsi="http://www.w3.org/2001/XMLSchema-instance" xsi:schemaLocation="http://www.springframework.org/schema/beans http://www.springframework.org/schema/beans/spring-beans-current.xsd
http://www.mulesoft.org/schema/mule/core http://www.mulesoft.org/schema/mule/core/current/mule.xsd
http://www.mulesoft.org/schema/mule/ldap http://www.mulesoft.org/schema/mule/ldap/current/mule-ldap.xsd">
<!-- put your global configuration elements and flows here -->
</mule>xmlUse Cases and Demos
Listed below are the most common use cases for the LDAP Connector, and some demo application walkthroughs.
Adding User Accounts to Active Directory |
Business user accounts can be added to Active Directory groups defined on the base DN. |
Retrieve User attributes |
Basic attributes of the business user can be retrieved for one or more purposes, like e-mail or phone. |
Add to a Flow
-
Create a new Mule project in Anypoint Studio.
-
Add a suitable Mule inbound endpoint, such as the HTTP listener at the beginning of the flow.
-
Drag any operation of the LDAP Connector, such as Add entry operation and drop it onto the canvas.
-
Click the connector to open the Properties Editor.
-
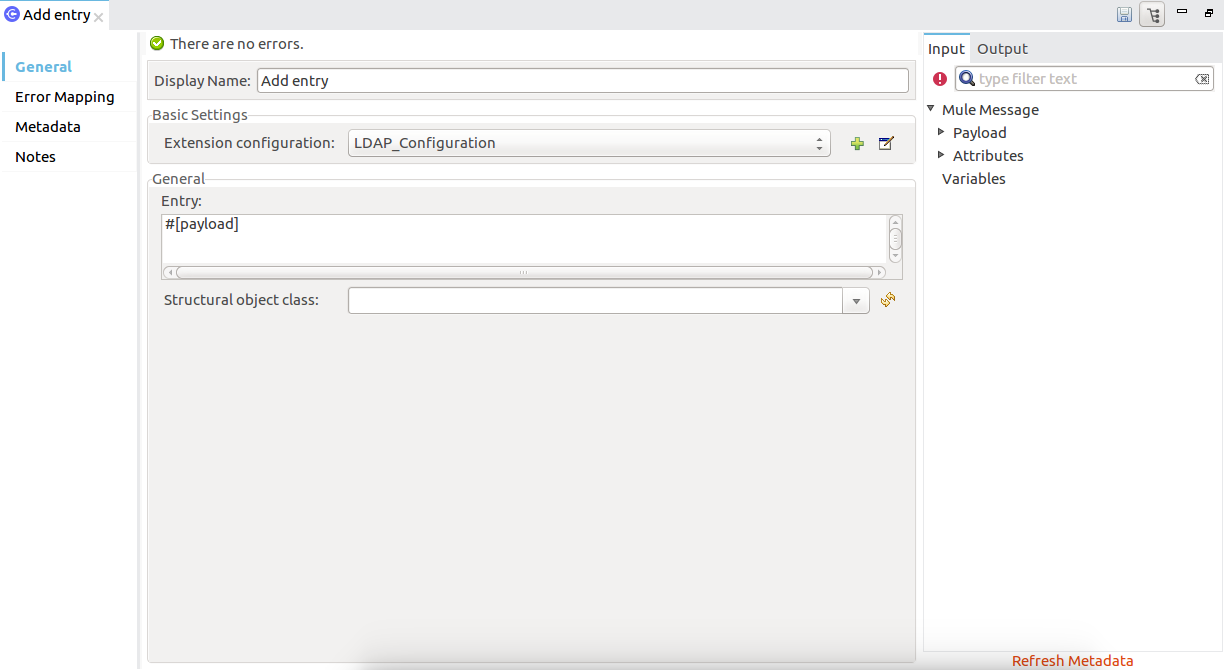
Configure the following parameters:
Field Description Display Name
Enter a unique label for the LDAP operation in your application.
Basic Settings
Connector configuration
Connect to a global element linked to this connector. Global elements encapsulate reusable data about the connection to the target resource or service. Select the global LDAP Connector element that you created.
General
Entry
#[payload], which refers to a LDAPEntry object created in the previous component typically a DataWeave component and transformed as input payload to this processor
-
Click the Refresh button just after the Structural object class text field to fetch the metadata based on the Structural Object Class, which traverses the directory information tree to retrieve the hierarchy and all the properties it inherits.
Example Use Case 1 with LDAP Connector
Add and delete an organizational person from an organizational unit.
-
Create a new Mule Project in Anypoint Studio.
-
Add the below properties to
mule-artifact.propertiesfile to hold your LDAP credentials and place it in the project’ssrc/main/resourcesdirectory.config.principal.dn=<DN> config.password=<Password> config.url=<URL>text -
Drag an HTTP Listener onto the canvas and configure the following parameters:
Parameter Value Display Name
HTTP
Connector configuration
If no HTTP element has been created yet, click the plus sign to add a new HTTP Listener Configuration and click OK. Leave the defaults.
Path
/
-
Create the organizational unit entry using a DataWeave component. Drag the DataWeave component next to the HTTP Listener and use the script below.
%dw 2.0 output application/java --- { dn : "ou=DevOpsGroup," ++ attributes.queryParams.dn, ou : "DevOpsGroup", objectclass : ["top", "organizationalUnit"] }java -
Drag Add entry operation of the LDAP Connector next to the DataWeave component to add the LDAP Entry.
-
Configure the LDAP Connector by adding a new LDAP global element. Click the plus sign next to the connector configuration field.
-
Configure the global element according to the table below:
Parameter Description Value Name
Enter a name for the configuration to reference it.
<Configuration_Name>
Principal DN
The DN (distinguished name) of the user.
${config.principal.dn}Password
The password of the user.
${config.password}URL
The connection URL to the LDAP server.
${config.url} -
The corresponding XML configuration should be as follows:
<ldap:config name="LDAP_Configuration" doc:name="LDAP Configuration"> <ldap:basic-connection authDn="${config.principal.dn}" authPassword="${config.password}" url="${config.url}"> <ldap:extended-configurations> <ldap:extended-configuration key="key.name" value="key.value" /> </ldap:extended-configuration> </ldap:extended-configurations> </ldap:basic-connection> </ldap:config>xml
-
-
Click Test Connection to confirm that Mule can connect with the LDAP server instance.
-
If the connection is successful, click OK to save the configuration.
Otherwise, review or correct any incorrect parameters, then test again. -
Return to the Properties editor of the LDAP Connector, and configure the parameters required for the add entry operation:
Parameter Value Display Name
Add Group Entry to LDAP Directory
Basic Settings
Connector configuration
Select the global LDAP Connector element that you created.
General
Entry
#[payload], the default value
-
Create the organizational person entry using a DataWeave component. Drag the DataWeave component next to the LDAP Connector and use the following script:
%dw 2.0 output application/java --- { dn : "cn=Test User,ou=DevOpsGroup," ++ attributes.queryParams.dn, uid : "testUser", cn : "Test User", sn : "User", userPassword : "test1234", objectclass : ["top", "person", "organizationalPerson", "inetOrgPerson"] }java -
Drag the LDAP Connector Add entry operation next to the DataWeave component to add the LDAP User Entry.
-
In the Properties editor of the LDAP Connector, configure the parameters as follows:
Parameter Value Display Name
Add User Entry to LDAP Directory
Basic Settings
Connector configuration
Select the global LDAP Connector element that you created.
General
Entry
#[payload], the default value
-
Now that you have successfully added the entries, try to delete them using the LDAP Connector.
-
Drag the Delete entry operation next to the LDAP Connector to delete the LDAP User Entry.
-
In the Properties editor of the LDAP Connector, configure the parameters as follows:
Parameter Value Display Name
Delete User Entry from LDAP Directory
Basic Settings
Connector configuration
Select the global LDAP Connector element that you created.
General
DN
#['cn=Test User,ou=DevOpsGroup,' ++ attributes.queryParams.dn] -
Drag another Delete entry operation next to the LDAP Connector to delete the LDAP Group Entry.
Parameter Value Display Name
Delete Group Entry from LDAP Directory
Basic Settings
Connector configuration
Select the global LDAP Connector element that you created.
General
DN
#['ou=DevOpsGroup,' ++ attributes.queryParams.dn] -
Drag the DataWeave component next to the LDAP Connector to set the payload to "Flow Successfully Completed".
Example Use Case 1 Code
Paste this code into your XML Editor to quickly load the flow for this example use case into your Mule application.
<?xml version="1.0" encoding="UTF-8"?>
<mule xmlns:ee="http://www.mulesoft.org/schema/mule/ee/core"
xmlns:ldap="http://www.mulesoft.org/schema/mule/ldap"
xmlns:http="http://www.mulesoft.org/schema/mule/http"
xmlns="http://www.mulesoft.org/schema/mule/core"
xmlns:doc="http://www.mulesoft.org/schema/mule/documentation"
xmlns:spring="http://www.springframework.org/schema/beans"
xmlns:xsi="http://www.w3.org/2001/XMLSchema-instance"
xsi:schemaLocation="http://www.springframework.org/schema/beans
http://www.springframework.org/schema/beans/spring-beans-current.xsd
http://www.mulesoft.org/schema/mule/core
http://www.mulesoft.org/schema/mule/core/current/mule.xsd
http://www.mulesoft.org/schema/mule/http
http://www.mulesoft.org/schema/mule/http/current/mule-http.xsd
http://www.mulesoft.org/schema/mule/ldap
http://www.mulesoft.org/schema/mule/ldap/current/mule-ldap.xsd
http://www.mulesoft.org/schema/mule/ee/core
http://www.mulesoft.org/schema/mule/ee/core/current/mule-ee.xsd">
<http:listener-config name="HTTP_Listener_config"
doc:name="HTTP Listener config">
<http:listener-connection host="127.0.0.1"
port="8081" />
</http:listener-config>
<ldap:config name="LDAP_Configuration" doc:name="LDAP Configuration">
<ldap:basic-connection authDn="${config.principal.dn}"
authPassword="${config.password}" url="${config.url}">
<ldap:extended-configurations>
<ldap:extended-configuration key="key.name" value="key.value" />
</ldap:extended-configuration>
</ldap:extended-configurations>
</ldap:basic-connection>
</ldap:config>
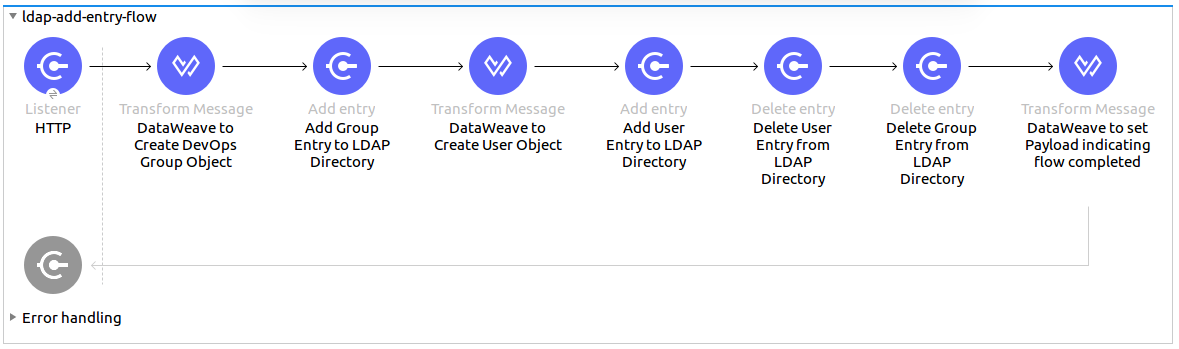
<flow name="ldap-add-entry-flow">
<http:listener config-ref="HTTP_Listener_config" path="/"
doc:name="HTTP" />
<ee:transform doc:name="DataWeave to Create DevOps Group Object">
<ee:message>
<ee:set-payload><![CDATA[%dw 2.0
output application/java
---
{
dn : "ou=DevOpsGroup," ++ attributes.queryParams.dn,
ou : "DevOpsGroup",
objectclass : ["top", "organizationalUnit"]
}
]]></ee:set-payload>
</ee:message>
</ee:transform>
<ldap:add config-ref="LDAP_Configuration"
doc:name="Add Group Entry to LDAP Directory" />
<ee:transform doc:name="DataWeave to Create User Object">
<ee:message>
<ee:set-payload><![CDATA[%dw 2.0
output application/java
---
{
dn : "cn=Test User,ou=DevOpsGroup," ++ attributes.queryParams.dn,
uid : "testUser",
cn : "Test User",
sn : "User",
userPassword : "test1234",
objectclass : ["top", "person", "organizationalPerson", "inetOrgPerson"]
}
]]></ee:set-payload>
</ee:message>
</ee:transform>
<ldap:add config-ref="LDAP_Configuration"
doc:name="Add User Entry to LDAP Directory" />
<ldap:delete config-ref="LDAP_Configuration"
dn="#['cn=Test User,ou=DevOpsGroup,' ++ attributes.queryParams.dn]"
doc:name="Delete User Entry from LDAP Directory" />
<ldap:delete config-ref="LDAP_Configuration"
dn="#['ou=DevOpsGroup,' ++ attributes.queryParams.dn]"
doc:name="Delete Group Entry from LDAP Directory" />
<ee:transform doc:name="DataWeave to set Payload indicating flow completed">
<ee:message>
<ee:set-payload><![CDATA[%dw 2.0
output application/json
---
{
result : "Flow Successfully Completed"
}
]]></ee:set-payload>
</ee:message>
</ee:transform>
</flow>
</mule>xmlExample Use Case 2 with LDAP Connector
A custom trust store can be setup to tell which servers are allowed to communicate to.
Extended configuration parameters can be used for this to specify a custom trust store.
The same Use Case 1 (above) can be used to execute this except for the configuration part of LDAP connector which should now use TLS configuration.
Find below the XML configuration snippet of LDAP Connector which uses TLS configuration and update the Use Case 1 XML file (above) with it.
<ldap:config name="LDAP_Configuration" doc:name="LDAP Configuration">
<ldap:tls-connection authDn="${config.principal.dn}"
authPassword="${config.password}" url="${config.url}">
<ldap:extended-configurations>
<ldap:extended-configuration
key="org.mule.module.ldap.trustStorePath"
value="the_path_to_trust_store_jks_file" />
<ldap:extended-configuration
key="org.mule.module.ldap.trustStorePassword"
value="changeit" />
</ldap:extended-configurations>
</ldap:tls-connection>
</ldap:config>xmlRun Demo Application
-
Save and run the project as a Mule Application.
-
Open a web browser and check the response after entering the URL:
http://localhost:8081/?dn=dc=mulesoft,dc=org.