# Config
config.tenantId=
config.environment=Production

# OAuth2 Configuration
oauth.client.id=
oauth.client.secret=
oauth.callbackPath=callback

# Api
api.companyId=


# Static Configuration
config.baseUri=https://api.businesscentral.dynamics.com/v2.0/${config.tenantId}/${config.environment}/api/v2.0/
oauth.authUrl=https://login.microsoftonline.com/${config.tenantId}/oauth2/v2.0/authorize
oauth.tokenUrl=https://login.microsoftonline.com/${config.tenantId}/oauth2/v2.0/token
oauth.externalCallbackPath=http://localhost:${http.port}/${oauth.callbackPath}
Microsoft Dynamics 365 Business Central Connector 1.0 Examples
These examples show you how to use Microsoft Dynamics 365 Business Central Connector to perform the following actions:
Before You Begin
-
Java 8, 11, or 17
-
Anypoint Studio 7.x
-
Mule runtime engine (Mule) 4.3.0 and later
-
Credentials for a Business Central instance
-
Registered OAuth protected application in the Azure Active Directory application registry
Configure a Business Central Connection
Specify the Business Central connection field values to secure connections. To do this:
Create a Configuration File for a Business Central Connection
Create a configuration file that includes properties for a Business Central connection:
-
Create a file named
mule-app.propertiesin the/src/main/resources/folder. -
In the
mule-app.propertiesfile, create a set of properties for eitherBasic AuthorOAuth2, similar to the ones that follow, replacing the bracketed text (including the brackets) with the correct values for your configuration:For more information about creating a properties file, refer to Configuring Property Placeholders.
Find your Company ID
To find your company ID, follow these steps:
-
Log in to your Business Central account and navigate to the Companies tab.
-
Select the company you want to use.

-
Click the question mark button on the top right corner and select Help & Support.
-
Under the troubleshooting section, click Inspect pages and data.
-
In the inspector, you can enter
Idin the search field and the first result contains your company ID.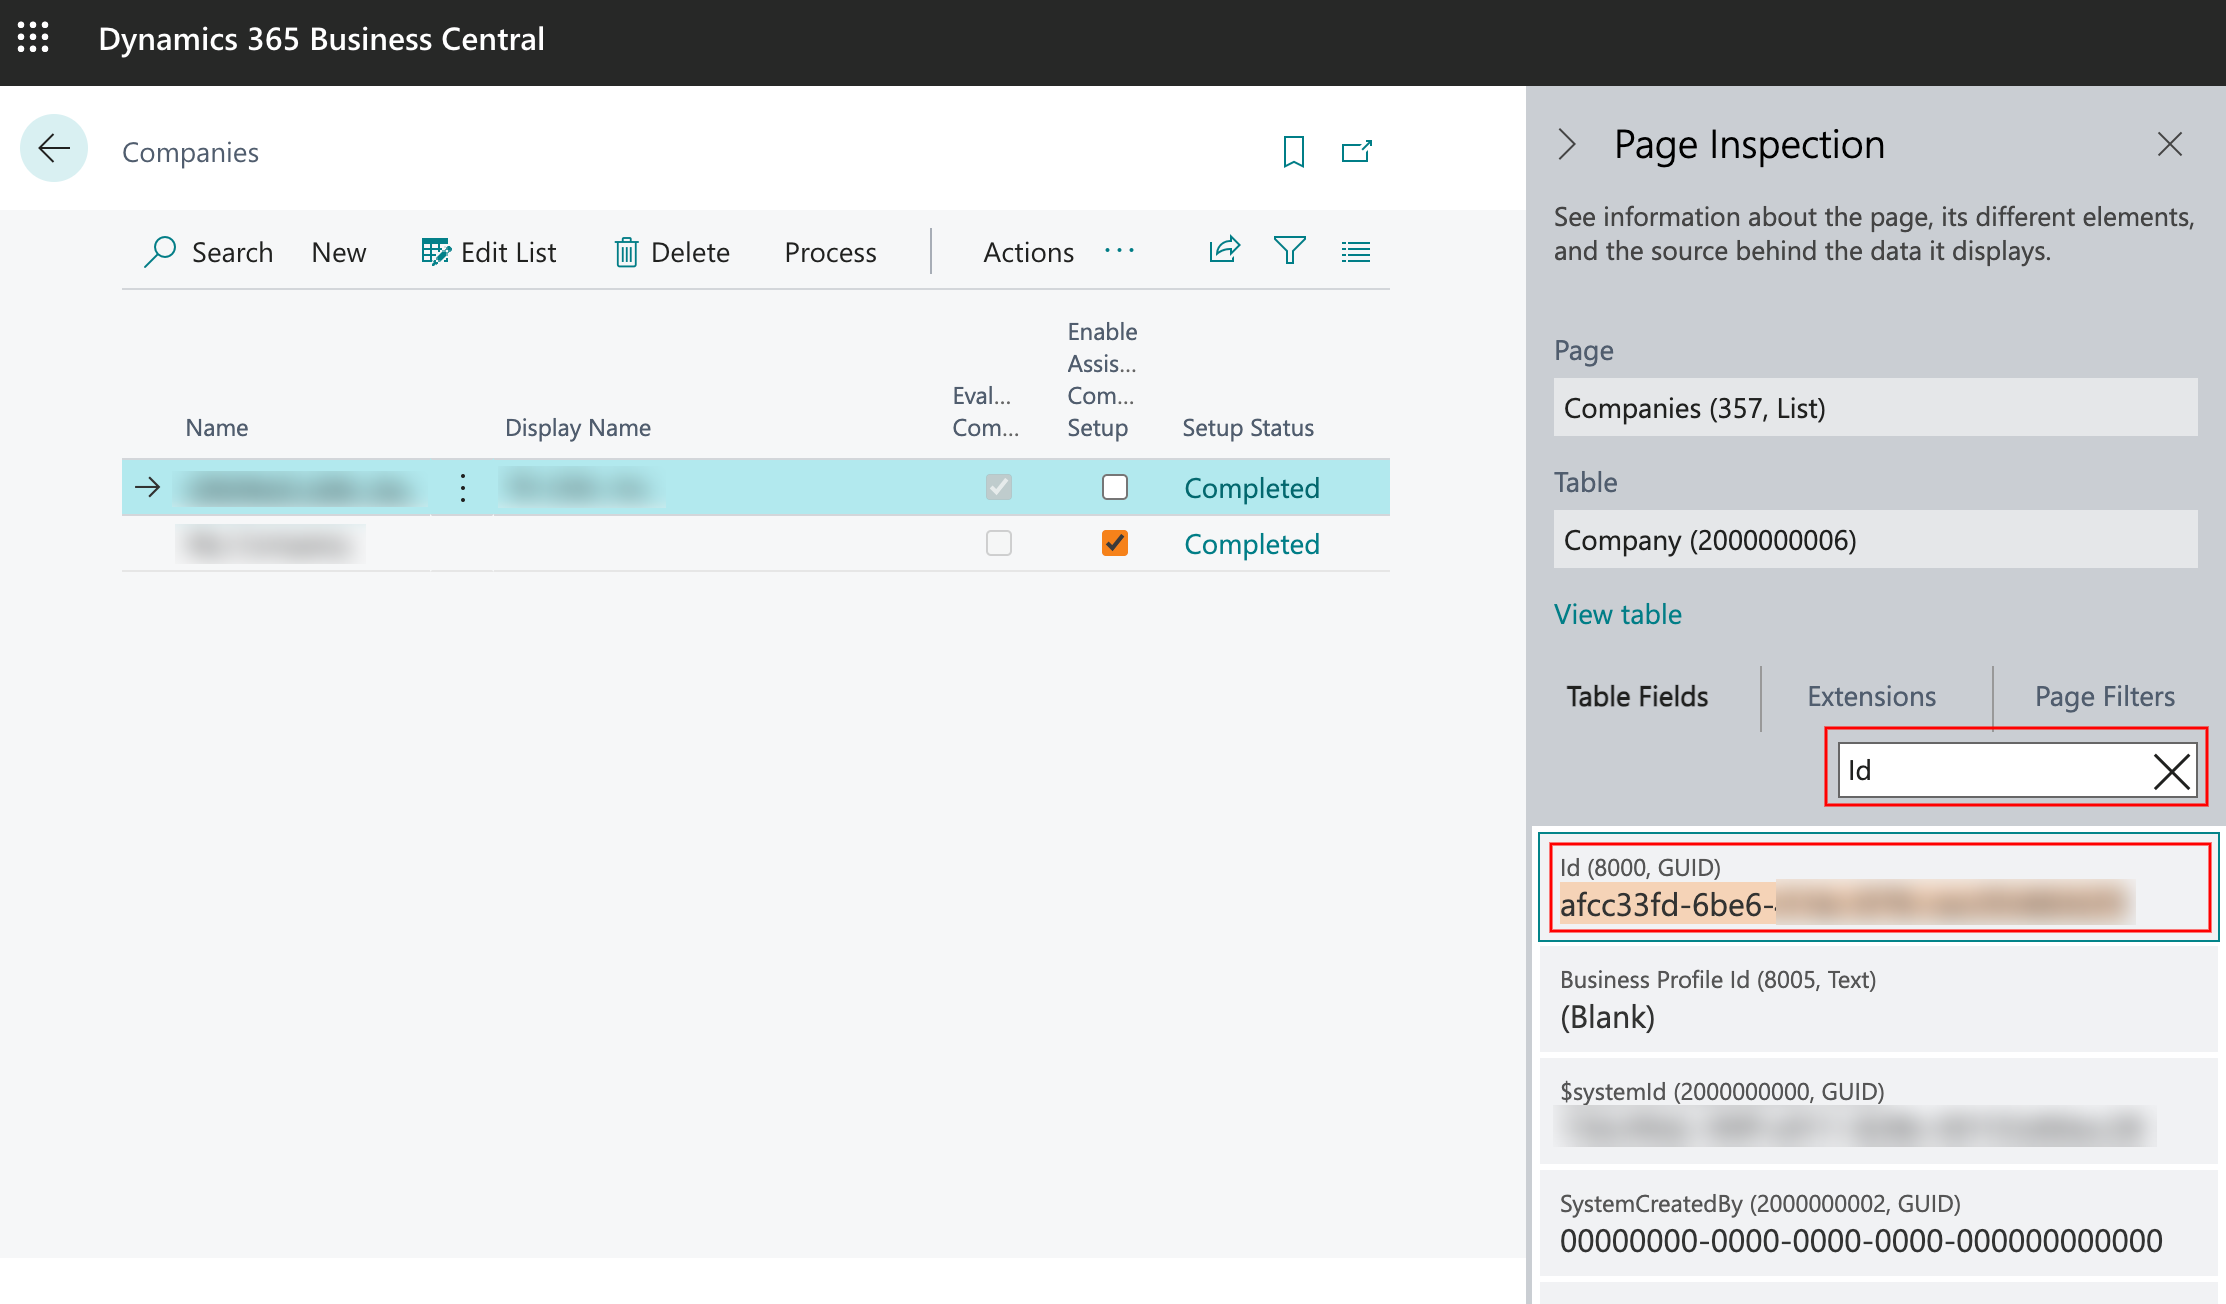
You can copy this ID and paste it into the
src/main/resources/mule-app.propertiesfile for the propertyapi.companyId=.
Configure the Business Central Connection Global Elements
Configure global elements for either Basic Auth or OAuth2:
-
Create a new Mule project.
-
In the Mule Palette view, click Search in Exchange and enter
microsoft dynamics 365 business central. -
Add Microsoft Dynamics 365 Business Central Connector to the Selected modules section and click Finish.
-
Click the Global Elements tab and click Create.
-
Select Connector Configuration > Basic Auth or Connector Configuration > OAuth2 and click OK.
-
Enter the following values:
-
Enter the following values for Basic Auth:
Field Value Name
Basic AuthUsername
Username used to authenticate the requests
-
Enter the following values for OAuth2:
Field Value Name
OAuth2Consumer Key
OAuth consumer key, as registered with the service provider
Consumer Secret
OAuth consumer secret, as registered with the service provider
Listener Config
Configuration for the HTTP listener that listens for requests on the access token callback endpoint
Callback Path
Path of the access token callback endpoint
Authorize Path
Path of the local HTTP endpoint that triggers the OAuth dance
-
-
Click OK.
Configure a Global Element for the Properties File
Configure a global element for the mule-app.properties file so that Mule knows
where to find it:
-
Click the Global Elements tab and click Create.
-
In the Choose Global Type dialog, select Configuration properties and click OK.
-
In the File field, enter
mule.app.properties. -
Click OK.
List Items
This Mule flow lists all items.
The first flow uses the following operations:
-
HTTP Listener
Accepts data from HTTP requests -
Parse Template
Processes a template
The second flow uses the following operations:
-
HTTP Listener
Accepts data from HTTP requests -
List Entities
Retrieves a list of entities -
Set Payload
Defines how Mule sets the payload
output application/json
---
payload.payload map (item) -> {
		"id": item.id,
		"name": item.displayName
	}

Template for this Example
You can use this HTML template to create a file and copy the content to test the application using a graphical interface:
<!--
    (c) 2003-2022 MuleSoft, Inc. This software is protected under international
    copyright law. All use of this software is subject to MuleSoft's Main
    Services Agreement (or other Terms of Service) separately entered
    into between you and MuleSoft. If such an agreement is not in
    place, you may not use the software.
-->
<!DOCTYPE html>
<html lang="en">
<head>
    <meta charset="utf-8">
    <meta http-equiv="X-UA-Compatible" content="IE=edge">

    <!-- JQuery will be required for this demo -->
    <script src="http://cdnjs.cloudflare.com/ajax/libs/jquery/2.1.0/jquery.js"></script>

    <!-- Import Twitter bootstrap libs + css -->
    <link rel="stylesheet" type="text/css"
          href="http://cdnjs.cloudflare.com/ajax/libs/twitter-bootstrap/3.1.1/css/bootstrap.css">
    <script src="http://cdnjs.cloudflare.com/ajax/libs/twitter-bootstrap/3.1.1/js/bootstrap.js"></script>
</head>
<body>
<!-- Keep this simple ... define CSS for this simple webpage in the same file -->
<style>
    body {
    padding-top: 40px;
    padding-bottom: 40px;
    background-color: #eee;
    }
    .demo-form {
    max-width: 500px;
    padding: 15px;
    margin: 0 auto;
    }
    .demo-form .demo-heading,
    .demo-form .checkbox {
    margin-bottom: 10px;
    }
    .demo-form .checkbox {
    font-weight: normal;
    }
    .demo-form .form-control {
    position: relative;
    height: auto;
    -webkit-box-sizing: border-box;
    -moz-box-sizing: border-box;
    box-sizing: border-box;
    padding: 10px;
    font-size: 16px;
    }
    .demo-form .form-control:focus {
    z-index: 2;
    }
</style>
<script type="text/javascript">
		$(document).ready( function() {

			var operationOneForm 	= $('#operationOneForm');

			handleSubmit = function(e) {
			  form = $(this);
              $.ajax({
                type: 'GET',							  	// Submit an HTTP POST request
                url: form.data('url'), 			      		// The URL where your endpoint is listening
                data: form.serialize(),	              		// Serialized form URL-encoded input
                success: function(data) {				  	// Success function called if request succeeds
                  alert("Operation Response : " + JSON.stringify(data));
                  if (form.data('ref-target')) {
                  	const fieldName = form.data('ref');
                  	const target = form.data('ref-target');
                  	$(target).html(data[fieldName]);
                  }
                },
                error: function(request, status, error){  // Error function is executed if an exception occurs in the flow
              	  alert(request.responseText);			  // Alert the user of any errors
              	}
              });

              return false;								  // Let jQuery handle the form submission
            };

			operationOneForm.submit(handleSubmit);
		});


</script>
<div class="container">
    <div class="panel-group" id="accordion">

        <div class="panel panel-default">
            <div class="panel-heading">
                <h2 class="panel-title demo-heading">
                    <a data-toggle="collapse" data-parent="#accordion" href="#operationOne">List Items</a>
                </h2>
            </div>
            <div id="operationOne" class="panel-collapse collapse in">
                <div class="panel-body">
                    <form id="operationOneForm" class="demo-form" role="form" data-url="/items">
                        <input class="btn btn-lg btn-primary btn-block" type="submit" value="List"><br>
                    </form>
                </div>
            </div>
        </div>

    </div>
</div>
</body>
</html>
XML for This Example
Paste this code into the Studio XML editor to quickly load the flow for this example into your Mule app:
<?xml version="1.0" encoding="UTF-8"?>
<mule xmlns:dynamics365-bc="http://www.mulesoft.org/schema/mule/dynamics365-bc" xmlns:http="http://www.mulesoft.org/schema/mule/http"
xmlns="http://www.mulesoft.org/schema/mule/core"
xmlns:doc="http://www.mulesoft.org/schema/mule/documentation" xmlns:xsi="http://www.w3.org/2001/XMLSchema-instance" xsi:schemaLocation="http://www.mulesoft.org/schema/mule/core http://www.mulesoft.org/schema/mule/core/current/mule.xsd
http://www.mulesoft.org/schema/mule/http http://www.mulesoft.org/schema/mule/http/current/mule-http.xsd
http://www.mulesoft.org/schema/mule/dynamics365-bc http://www.mulesoft.org/schema/mule/dynamics365-bc/current/mule-dynamics365-bc.xsd">
<configuration-properties file="mule-app.properties"/>
<configuration-properties file="advanced.properties"/>
<http:listener-config name="HTTP_Listener_config" doc:name="HTTP Listener config" basePath="/">
<http:listener-connection host="0.0.0.0" port="8081" />
</http:listener-config>
<dynamics365-bc:config name="Business_Central_BasicAuth" doc:name="Microsoft Dynamics 365 - Business Central Config" >
<dynamics365-bc:basic-connection baseUri="${config.baseUri}" username="${auth.username}" password="${auth.password}" />
</dynamics365-bc:config>
<flow name="Home" >
<http:listener doc:name="/" config-ref="HTTP_Listener_config" path="/" />
<parse-template doc:name="Parse Template" location="dynamics365-bc-demo-template.html" />
</flow>
<flow name="flow-list-items" >
<http:listener doc:name="/items" config-ref="HTTP_Listener_config" path="/items"/>
<dynamics365-bc:list-entities doc:name="List Entities" config-ref="Business_Central_BasicAuth" companyId="${api.companyId}" entity="items"/>
<set-payload value='#[output application/json --- payload.payload map (item) -> { "id": item.id, "name": item.displayName }]' doc:name="Set Payload" />
</flow>
</mule>Steps for Running This Example
-
Verify that your connector is configured.
-
Save the project.
-
From a web browser, test the application by entering
http://localhost:8081/. You should see the List Items tab expanded with a List button.
-
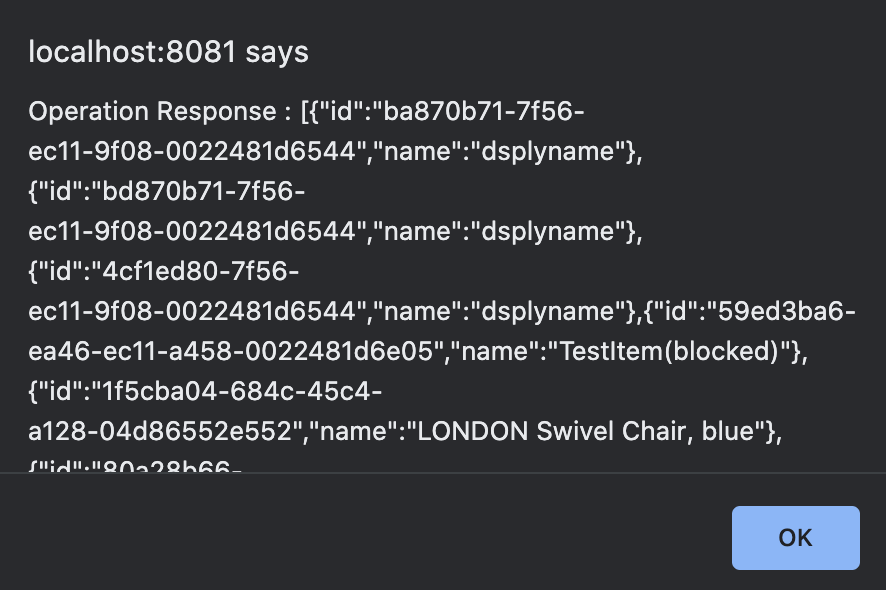
Click on the List button. You should see an alert showing a sample JSON of the response listing the ID and display names of all items.
Get an Item
This Mule flow retrieves an item.
The first flow uses the following operations:
-
HTTP Listener
Accepts data from HTTP requests -
Parse Template
Processes a template
The second flow uses the following operations:
-
HTTP Listener
Accepts data from HTTP requests -
Get Entity
Retrieves a single entity by its ID if it exists

Template for this Example
You can use this HTML template to create a file and copy the content to test the application using a graphical interface:
<!--
    (c) 2003-2022 MuleSoft, Inc. This software is protected under international
    copyright law. All use of this software is subject to MuleSoft's Main
    Services Agreement (or other Terms of Service) separately entered
    into between you and MuleSoft. If such an agreement is not in
    place, you may not use the software.
-->
<!DOCTYPE html>
<html lang="en">
<head>
    <meta charset="utf-8">
    <meta http-equiv="X-UA-Compatible" content="IE=edge">

    <!-- JQuery will be required for this demo -->
    <script src="http://cdnjs.cloudflare.com/ajax/libs/jquery/2.1.0/jquery.js"></script>

    <!-- Import Twitter bootstrap libs + css -->
    <link rel="stylesheet" type="text/css"
          href="http://cdnjs.cloudflare.com/ajax/libs/twitter-bootstrap/3.1.1/css/bootstrap.css">
    <script src="http://cdnjs.cloudflare.com/ajax/libs/twitter-bootstrap/3.1.1/js/bootstrap.js"></script>
</head>
<body>
<!-- Keep this simple ... define CSS for this simple webpage in the same file -->
<style>
    body {
    padding-top: 40px;
    padding-bottom: 40px;
    background-color: #eee;
    }
    .demo-form {
    max-width: 500px;
    padding: 15px;
    margin: 0 auto;
    }
    .demo-form .demo-heading,
    .demo-form .checkbox {
    margin-bottom: 10px;
    }
    .demo-form .checkbox {
    font-weight: normal;
    }
    .demo-form .form-control {
    position: relative;
    height: auto;
    -webkit-box-sizing: border-box;
    -moz-box-sizing: border-box;
    box-sizing: border-box;
    padding: 10px;
    font-size: 16px;
    }
    .demo-form .form-control:focus {
    z-index: 2;
    }
</style>
<script type="text/javascript">
		$(document).ready( function() {

			var operationTwoForm 	= $('#operationTwoForm');

			handleSubmit = function(e) {
			  form = $(this);
              $.ajax({
                type: 'GET',							  	// Submit an HTTP POST request
                url: form.data('url'), 			      		// The URL where your endpoint is listening
                data: form.serialize(),	              		// Serialized form URL-encoded input
                success: function(data) {				  	// Success function called if request succeeds
                  alert("Operation Response : " + JSON.stringify(data));
                  if (form.data('ref-target')) {
                  	const fieldName = form.data('ref');
                  	const target = form.data('ref-target');
                  	$(target).html(data[fieldName]);
                  }
                },
                error: function(request, status, error){  // Error function is executed if an exception occurs in the flow
              	  alert(request.responseText);			  // Alert the user of any errors
              	}
              });

              return false;								  // Let jQuery handle the form submission
            };

			operationTwoForm.submit(handleSubmit);
		});


</script>
<div class="container">
    <div class="panel-group" id="accordion">

        <div class="panel panel-default">
            <div class="panel-heading">
                <h2 class="panel-title demo-heading">
                    <a data-toggle="collapse" data-parent="#accordion" href="#operationTwo">Get Item</a>
                </h2>
            </div>
            <div id="operationTwo" class="panel-collapse collapse">
                <div class="panel-body">
                    <form id="operationTwoForm" class="demo-form" role="form" data-url="/item">
                        <label>ID of any Item</label>
                        <input type="text" name="id" placeholder="00000000-0000-0000-0000-000000000000" value="" required class="form-control"><br>
                        <input class="btn btn-lg btn-primary btn-block" type="submit" value="Get"><br>
                    </form>
                </div>
            </div>
        </div>

    </div>
</div>
</body>
</html>
XML for This Example
Paste this code into the Studio XML editor to quickly load the flow for this example into your Mule app:
<?xml version="1.0" encoding="UTF-8"?>

<mule xmlns:dynamics365-bc="http://www.mulesoft.org/schema/mule/dynamics365-bc" xmlns:http="http://www.mulesoft.org/schema/mule/http"
      xmlns="http://www.mulesoft.org/schema/mule/core"
      xmlns:doc="http://www.mulesoft.org/schema/mule/documentation" xmlns:xsi="http://www.w3.org/2001/XMLSchema-instance" xsi:schemaLocation="http://www.mulesoft.org/schema/mule/core http://www.mulesoft.org/schema/mule/core/current/mule.xsd
http://www.mulesoft.org/schema/mule/http http://www.mulesoft.org/schema/mule/http/current/mule-http.xsd
http://www.mulesoft.org/schema/mule/dynamics365-bc http://www.mulesoft.org/schema/mule/dynamics365-bc/current/mule-dynamics365-bc.xsd">
    <configuration-properties file="mule-app.properties"/>
    <configuration-properties file="advanced.properties"/>

    <http:listener-config name="HTTP_Listener_config" doc:name="HTTP Listener config" basePath="/">
        <http:listener-connection host="0.0.0.0" port="8081" />
    </http:listener-config>

    <dynamics365-bc:config name="Business_Central_BasicAuth" doc:name="Microsoft Dynamics 365 - Business Central Config" >
        <dynamics365-bc:basic-connection baseUri="${config.baseUri}" username="${auth.username}" password="${auth.password}" />
    </dynamics365-bc:config>

    <flow name="Home" >
        <http:listener doc:name="/" config-ref="HTTP_Listener_config" path="/" />
        <parse-template doc:name="Parse Template" location="dynamics365-bc-demo-template.html" />
    </flow>

    <flow name="flow-get-item" >
        <http:listener doc:name="/item" config-ref="HTTP_Listener_config" path="/item"/>
        <dynamics365-bc:get-entity entity="items" doc:name="Get Entity" config-ref="Business_Central_BasicAuth" companyId="${api.companyId}" entityId="#[attributes.queryParams.id]"/>
    </flow>
</mule>
Steps for Running This Example
-
Verify that your connector is configured.
-
Save the project.
-
From a web browser, test the application by entering
http://localhost:8081/. -
Click on the Get Item form.
-
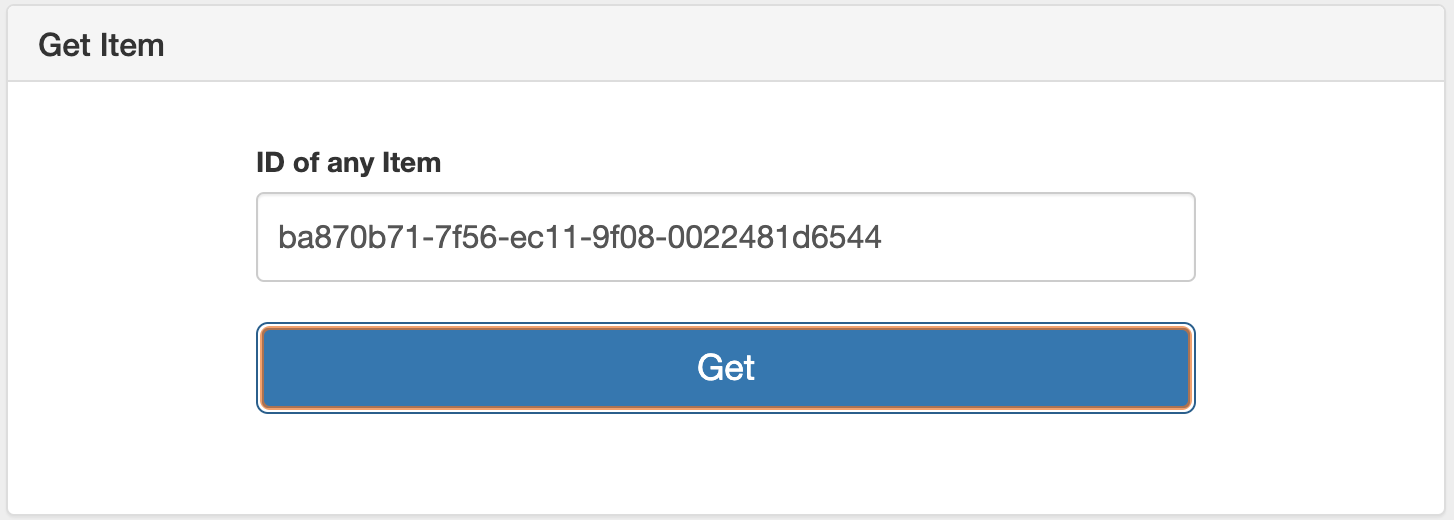
After the form shows up, fill in a valid item ID, for example, a previous item ID from List Items.
-
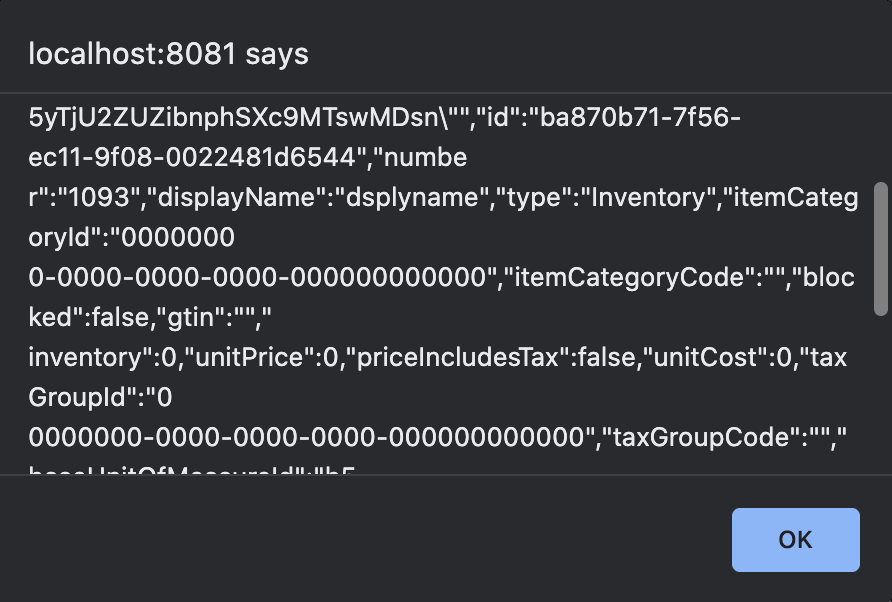
Click Get. You should see an alert showing a JSON with all the details available for this item, such as its number, type, and price.
Add an Item
This Mule flow adds an item.
The first flow uses the following operations:
-
HTTP Listener
Accepts data from HTTP requests -
Parse Template
Processes a template
The second flow uses the following operations:
-
HTTP Listener
Accepts data from HTTP requests -
Create Entity
Creates a single new entity

Template for this Example
You can use this HTML template to create a file and copy the content to test the application using a graphical interface:
<!--
    (c) 2003-2022 MuleSoft, Inc. This software is protected under international
    copyright law. All use of this software is subject to MuleSoft's Main
    Services Agreement (or other Terms of Service) separately entered
    into between you and MuleSoft. If such an agreement is not in
    place, you may not use the software.
-->
<!DOCTYPE html>
<html lang="en">
<head>
    <meta charset="utf-8">
    <meta http-equiv="X-UA-Compatible" content="IE=edge">

    <!-- JQuery will be required for this demo -->
    <script src="http://cdnjs.cloudflare.com/ajax/libs/jquery/2.1.0/jquery.js"></script>

    <!-- Import Twitter bootstrap libs + css -->
    <link rel="stylesheet" type="text/css"
          href="http://cdnjs.cloudflare.com/ajax/libs/twitter-bootstrap/3.1.1/css/bootstrap.css">
    <script src="http://cdnjs.cloudflare.com/ajax/libs/twitter-bootstrap/3.1.1/js/bootstrap.js"></script>
</head>
<body>
<!-- Keep this simple ... define CSS for this simple webpage in the same file -->
<style>
    body {
    padding-top: 40px;
    padding-bottom: 40px;
    background-color: #eee;
    }
    .demo-form {
    max-width: 500px;
    padding: 15px;
    margin: 0 auto;
    }
    .demo-form .demo-heading,
    .demo-form .checkbox {
    margin-bottom: 10px;
    }
    .demo-form .checkbox {
    font-weight: normal;
    }
    .demo-form .form-control {
    position: relative;
    height: auto;
    -webkit-box-sizing: border-box;
    -moz-box-sizing: border-box;
    box-sizing: border-box;
    padding: 10px;
    font-size: 16px;
    }
    .demo-form .form-control:focus {
    z-index: 2;
    }
</style>
<script type="text/javascript">
		$(document).ready( function() {

			var operationThreeForm 	= $('#operationThreeForm');

			handleSubmit = function(e) {
			  form = $(this);
              $.ajax({
                type: 'GET',							  	// Submit an HTTP POST request
                url: form.data('url'), 			      		// The URL where your endpoint is listening
                data: form.serialize(),	              		// Serialized form URL-encoded input
                success: function(data) {				  	// Success function called if request succeeds
                  alert("Operation Response : " + JSON.stringify(data));
                  if (form.data('ref-target')) {
                  	const fieldName = form.data('ref');
                  	const target = form.data('ref-target');
                  	$(target).html(data[fieldName]);
                  }
                },
                error: function(request, status, error){  // Error function is executed if an exception occurs in the flow
              	  alert(request.responseText);			  // Alert the user of any errors
              	}
              });

              return false;								  // Let jQuery handle the form submission
            };

			operationThreeForm.submit(handleSubmit);
		});


</script>
<div class="container">
    <div class="panel-group" id="accordion">

        <div class="panel panel-default">
            <div class="panel-heading">
                <h2 class="panel-title demo-heading">
                    <a data-toggle="collapse" data-parent="#accordion" href="#operationThree">Add Item</a>
                </h2>
            </div>
            <div id="operationThree" class="panel-collapse collapse">
                <div class="panel-body">
                    <form id="operationThreeForm" class="demo-form" role="form" data-url="/item/add" data-ref="id" data-ref-target="#createdId">
                        <label>Number</label>
                        <input type="text" name="number" placeholder="My Item Number" maxlength=20 value="" required class="form-control">
                        <small id="numberNote" class="text-muted">At most 20 characters long</small><br>
                        <label>Display Name</label>
                        <input type="text" name="name" placeholder="My Item Name" maxlength=100 value="" required class="form-control">
                        <small id="displayNameNote" class="text-muted">At most 100 characters long</small><br><br>
                        <input class="btn btn-lg btn-primary btn-block" type="submit" value="Create"><br>
                    </form>
                    <div>Created ID: <div id="createdId"></div></div>
                </div>
            </div>
        </div>

    </div>
</div>
</body>
</html>
XML for This Example
Paste this code into the Studio XML editor to quickly load the flow for this example into your Mule app:
<?xml version="1.0" encoding="UTF-8"?>

<mule xmlns:dynamics365-bc="http://www.mulesoft.org/schema/mule/dynamics365-bc" xmlns:http="http://www.mulesoft.org/schema/mule/http"
      xmlns="http://www.mulesoft.org/schema/mule/core"
      xmlns:doc="http://www.mulesoft.org/schema/mule/documentation" xmlns:xsi="http://www.w3.org/2001/XMLSchema-instance" xsi:schemaLocation="http://www.mulesoft.org/schema/mule/core http://www.mulesoft.org/schema/mule/core/current/mule.xsd
http://www.mulesoft.org/schema/mule/http http://www.mulesoft.org/schema/mule/http/current/mule-http.xsd
http://www.mulesoft.org/schema/mule/dynamics365-bc http://www.mulesoft.org/schema/mule/dynamics365-bc/current/mule-dynamics365-bc.xsd">
    <configuration-properties file="mule-app.properties"/>
    <configuration-properties file="advanced.properties"/>

    <http:listener-config name="HTTP_Listener_config" doc:name="HTTP Listener config" basePath="/">
        <http:listener-connection host="0.0.0.0" port="8081" />
    </http:listener-config>

    <dynamics365-bc:config name="Business_Central_BasicAuth" doc:name="Microsoft Dynamics 365 - Business Central Config" >
        <dynamics365-bc:basic-connection baseUri="${config.baseUri}" username="${auth.username}" password="${auth.password}" />
    </dynamics365-bc:config>

    <flow name="Home" >
        <http:listener doc:name="/" config-ref="HTTP_Listener_config" path="/" />
        <parse-template doc:name="Parse Template" location="dynamics365-bc-demo-template.html" />
    </flow>

    <flow name="flow-add-item" >
        <http:listener doc:name="/item/add" config-ref="HTTP_Listener_config" path="/item/add"/>
        <dynamics365-bc:create-entity entity="items" doc:name="Create Entity" config-ref="Business_Central_BasicAuth" companyId="${api.companyId}">
            <dynamics365-bc:body ><![CDATA[#[output application/json
---
{
	number: attributes.queryParams.number,
	displayName: attributes.queryParams.name
}]]]></dynamics365-bc:body>
        </dynamics365-bc:create-entity>
    </flow>
</mule>
Steps for Running This Example
-
Verify that your connector is configured.
-
Save the project.
-
From a web browser, test the application by entering
http://localhost:8081/. -
Click on the Create Item form.
-
After the form shows up, fill in an item number you want to create and its display name.
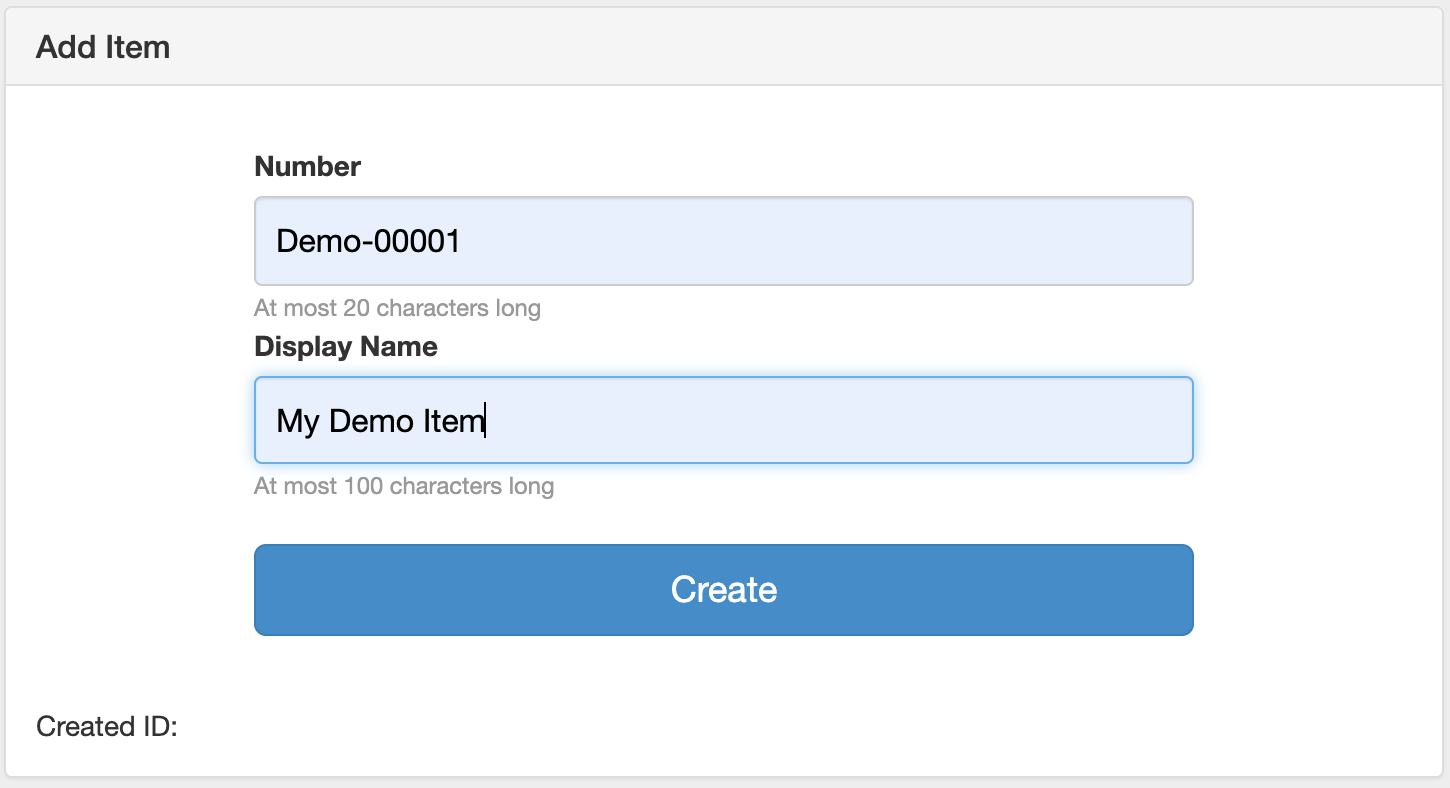
-
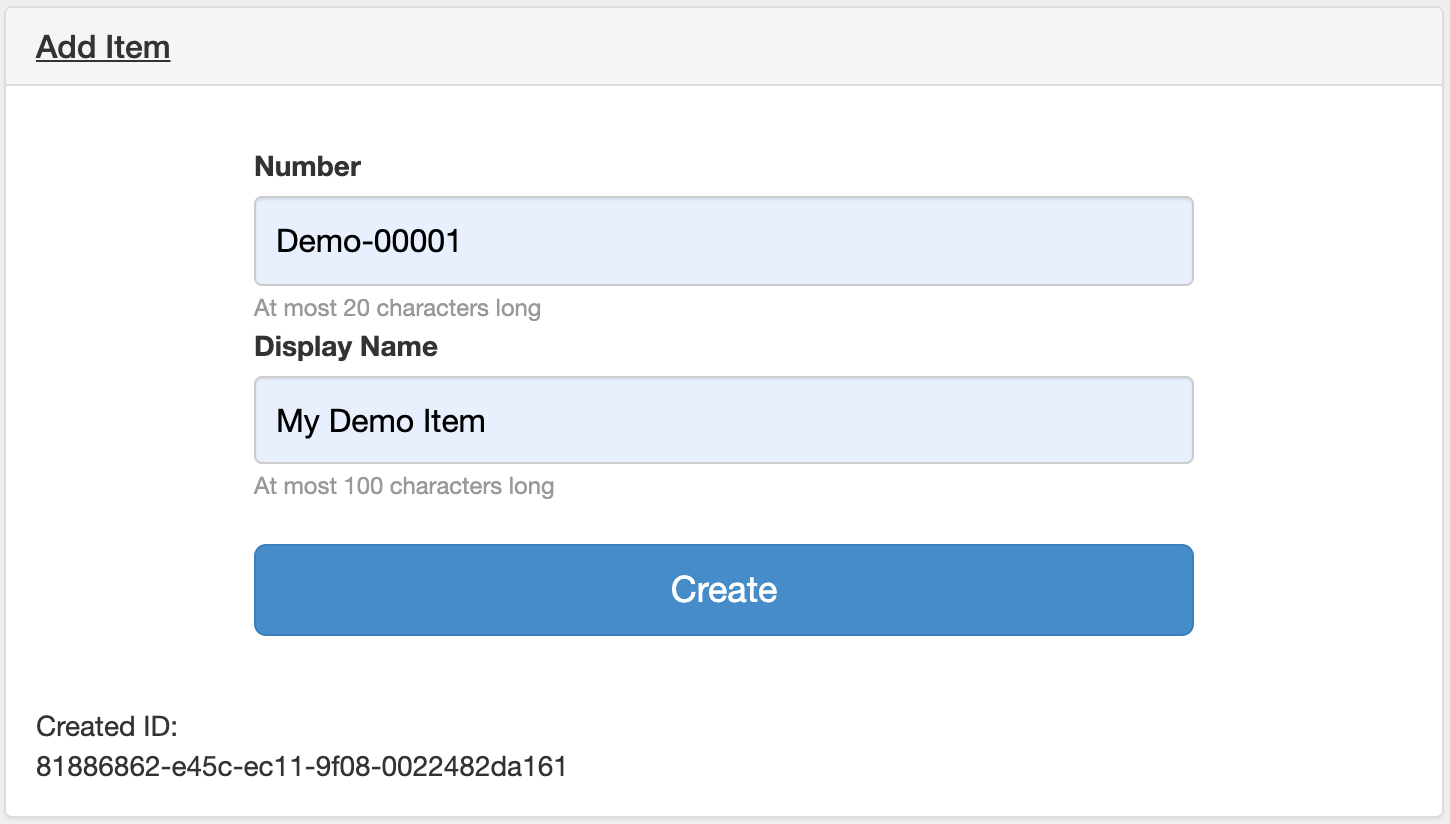
Click Create. You should see an alert showing the details of your newly created item. The newly created item ID shows up on the bottom of the form, which you can use in future operations.
Update an Item
This Mule flow updates an item.
The first flow uses the following operations:
-
HTTP Listener
Accepts data from HTTP requests -
Parse Template
Processes a template
The second flow uses the following operations:
-
HTTP Listener
Accepts data from HTTP requests -
Get Entity
Retrieves a single entity by its ID if it exists -
Update Entity
Updates a single entity by its ID

Template for this Example
You can use this HTML template to create a file and copy the content to test the application using a graphical interface:
<!--
    (c) 2003-2022 MuleSoft, Inc. This software is protected under international
    copyright law. All use of this software is subject to MuleSoft's Main
    Services Agreement (or other Terms of Service) separately entered
    into between you and MuleSoft. If such an agreement is not in
    place, you may not use the software.
-->
<!DOCTYPE html>
<html lang="en">
<head>
    <meta charset="utf-8">
    <meta http-equiv="X-UA-Compatible" content="IE=edge">

    <!-- JQuery will be required for this demo -->
    <script src="http://cdnjs.cloudflare.com/ajax/libs/jquery/2.1.0/jquery.js"></script>

    <!-- Import Twitter bootstrap libs + css -->
    <link rel="stylesheet" type="text/css"
          href="http://cdnjs.cloudflare.com/ajax/libs/twitter-bootstrap/3.1.1/css/bootstrap.css">
    <script src="http://cdnjs.cloudflare.com/ajax/libs/twitter-bootstrap/3.1.1/js/bootstrap.js"></script>
</head>
<body>
<!-- Keep this simple ... define CSS for this simple webpage in the same file -->
<style>
    body {
    padding-top: 40px;
    padding-bottom: 40px;
    background-color: #eee;
    }
    .demo-form {
    max-width: 500px;
    padding: 15px;
    margin: 0 auto;
    }
    .demo-form .demo-heading,
    .demo-form .checkbox {
    margin-bottom: 10px;
    }
    .demo-form .checkbox {
    font-weight: normal;
    }
    .demo-form .form-control {
    position: relative;
    height: auto;
    -webkit-box-sizing: border-box;
    -moz-box-sizing: border-box;
    box-sizing: border-box;
    padding: 10px;
    font-size: 16px;
    }
    .demo-form .form-control:focus {
    z-index: 2;
    }
</style>
<script type="text/javascript">
		$(document).ready( function() {

			var operationFourForm 	= $('#operationFourForm');

			handleSubmit = function(e) {
			  form = $(this);
              $.ajax({
                type: 'GET',							  	// Submit an HTTP POST request
                url: form.data('url'), 			      		// The URL where your endpoint is listening
                data: form.serialize(),	              		// Serialized form URL-encoded input
                success: function(data) {				  	// Success function called if request succeeds
                  alert("Operation Response : " + JSON.stringify(data));
                  if (form.data('ref-target')) {
                  	const fieldName = form.data('ref');
                  	const target = form.data('ref-target');
                  	$(target).html(data[fieldName]);
                  }
                },
                error: function(request, status, error){  // Error function is executed if an exception occurs in the flow
              	  alert(request.responseText);			  // Alert the user of any errors
              	}
              });

              return false;								  // Let jQuery handle the form submission
            };

			operationFourForm.submit(handleSubmit);
		});


</script>
<div class="container">
    <div class="panel-group" id="accordion">

        <div class="panel panel-default">
            <div class="panel-heading">
                <h2 class="panel-title demo-heading">
                    <a data-toggle="collapse" data-parent="#accordion" href="#operationFour">Update Item</a>
                </h2>
            </div>
            <div id="operationFour" class="panel-collapse collapse">
                <div class="panel-body">
                    <form id="operationFourForm" class="demo-form" role="form" data-url="/item/update">
                        <label>ID of item to update</label>
                        <input type="text" name="id" placeholder="00000000-0000-0000-0000-000000000000" value="" required class="form-control"><br>
                        <label>New Name</label>
                        <input type="text" name="name" placeholder="New Item Name" value="" required class="form-control">
                        <small id="displayNameNote" class="text-muted">At most 100 characters long</small><br><br>
                        <input class="btn btn-lg btn-primary btn-block" type="submit" value="Update"><br>
                    </form>
                </div>
            </div>
        </div>

    </div>
</div>
</body>
</html>
XML for This Example
Paste this code into the Studio XML editor to quickly load the flow for this example into your Mule app:
<?xml version="1.0" encoding="UTF-8"?>

<mule xmlns:dynamics365-bc="http://www.mulesoft.org/schema/mule/dynamics365-bc" xmlns:http="http://www.mulesoft.org/schema/mule/http"
      xmlns="http://www.mulesoft.org/schema/mule/core"
      xmlns:doc="http://www.mulesoft.org/schema/mule/documentation" xmlns:xsi="http://www.w3.org/2001/XMLSchema-instance" xsi:schemaLocation="http://www.mulesoft.org/schema/mule/core http://www.mulesoft.org/schema/mule/core/current/mule.xsd
http://www.mulesoft.org/schema/mule/http http://www.mulesoft.org/schema/mule/http/current/mule-http.xsd
http://www.mulesoft.org/schema/mule/dynamics365-bc http://www.mulesoft.org/schema/mule/dynamics365-bc/current/mule-dynamics365-bc.xsd">
    <configuration-properties file="mule-app.properties"/>
    <configuration-properties file="advanced.properties"/>

    <http:listener-config name="HTTP_Listener_config" doc:name="HTTP Listener config" basePath="/">
        <http:listener-connection host="0.0.0.0" port="8081" />
    </http:listener-config>

    <dynamics365-bc:config name="Business_Central_BasicAuth" doc:name="Microsoft Dynamics 365 - Business Central Config" >
        <dynamics365-bc:basic-connection baseUri="${config.baseUri}" username="${auth.username}" password="${auth.password}" />
    </dynamics365-bc:config>

    <flow name="Home" >
        <http:listener doc:name="/" config-ref="HTTP_Listener_config" path="/" />
        <parse-template doc:name="Parse Template" location="dynamics365-bc-demo-template.html" />
    </flow>

    <flow name="flow-update-item" >
        <http:listener doc:name="/item/update" config-ref="HTTP_Listener_config" path="/item/update"/>
        <dynamics365-bc:get-entity entity="items" doc:name="Get Entity" config-ref="Business_Central_BasicAuth" companyId="${api.companyId}" entityId="#[attributes.queryParams.id]" target="entity">
            <dynamics365-bc:select-query-params >
                <dynamics365-bc:select-query-param value="id" />
            </dynamics365-bc:select-query-params>
        </dynamics365-bc:get-entity>
        <dynamics365-bc:update-entity entity="items" doc:name="Update Entity" config-ref="Business_Central_BasicAuth" companyId="${api.companyId}" entityId="#[attributes.queryParams.id]" etag="#[vars.entity.'@odata.etag']">
            <dynamics365-bc:body ><![CDATA[#[output application/json
---
{
	displayName: attributes.queryParams.name
}]]]></dynamics365-bc:body>
        </dynamics365-bc:update-entity>
    </flow>
</mule>
Steps for Running This Example
-
Verify that your connector is configured.
-
Save the project.
-
From a web browser, test the application by entering
http://localhost:8081/. -
Click on the Update Item form.
-
After the form shows up, type in the ID of the item you want to update and a new name to update the item with.
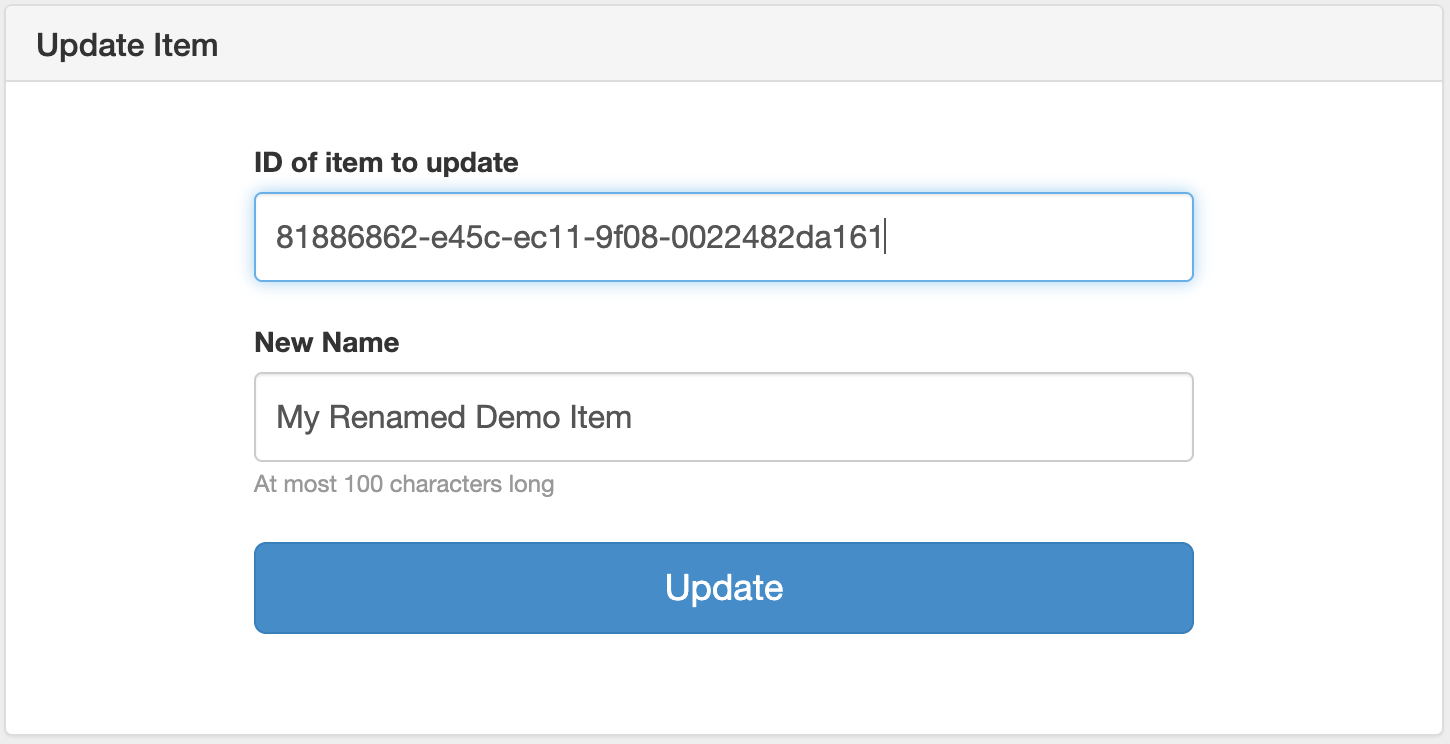
-
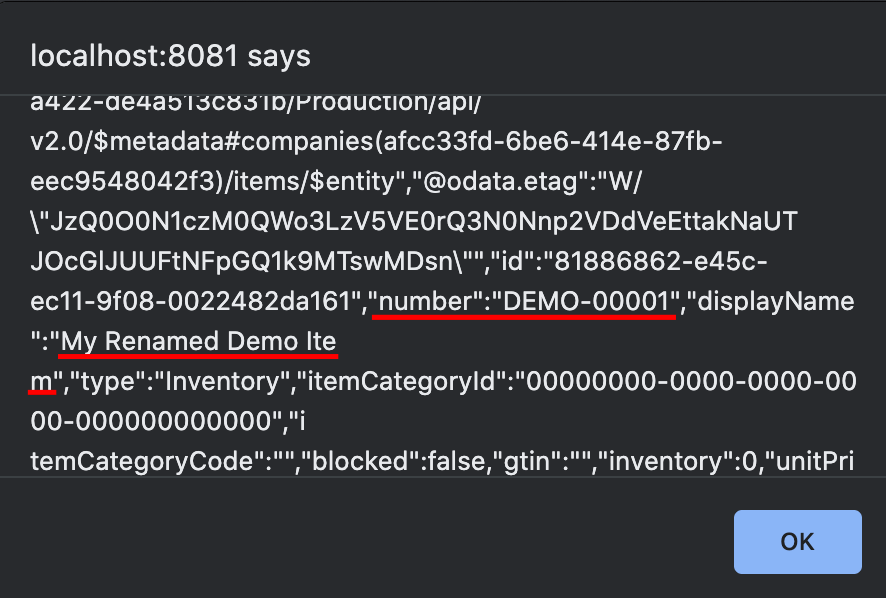
Click Update. You should see an alert showing the new details of the updated item. Notice that the name is changed for the item you updated.
Delete an Item
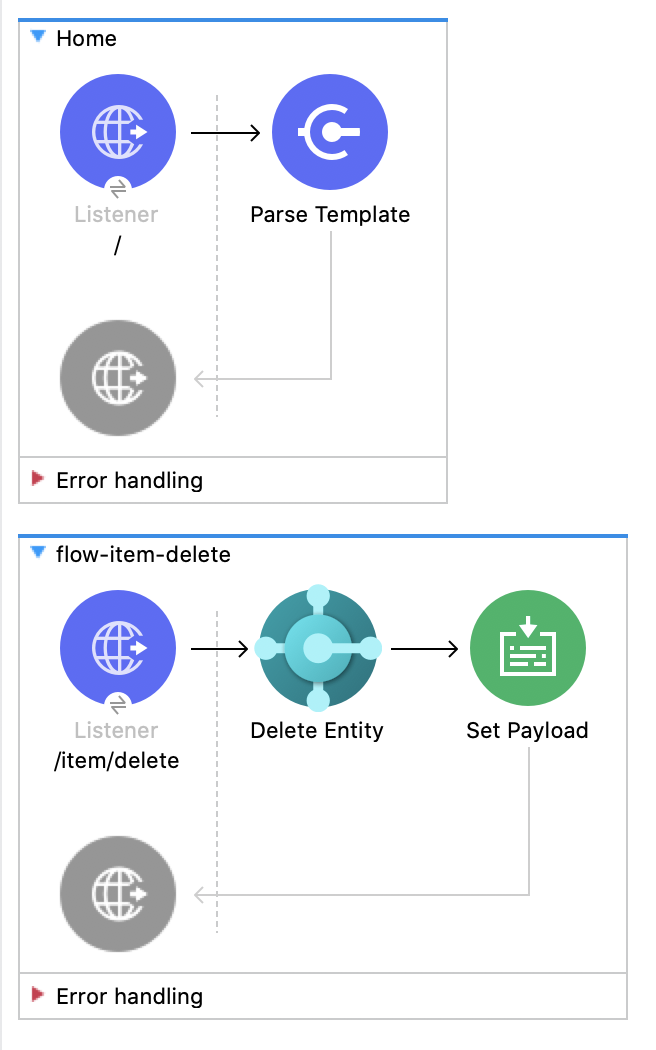
This Mule flow deletes an item.
The first flow uses the following operations:
-
HTTP Listener
Accepts data from HTTP requests -
Parse Template
Processes a template
The second flow uses the following operations:
-
HTTP Listener
Accepts data from HTTP requests -
Delete Entity
Deletes a single entity by ID -
Set Payload
Defines how Mule sets the payloadItem deleted
Template for this Example
You can use this HTML template to create a file and copy the content to test the application using a graphical interface:
<!--
    (c) 2003-2022 MuleSoft, Inc. This software is protected under international
    copyright law. All use of this software is subject to MuleSoft's Main
    Services Agreement (or other Terms of Service) separately entered
    into between you and MuleSoft. If such an agreement is not in
    place, you may not use the software.
-->
<!DOCTYPE html>
<html lang="en">
<head>
    <meta charset="utf-8">
    <meta http-equiv="X-UA-Compatible" content="IE=edge">

    <!-- JQuery will be required for this demo -->
    <script src="http://cdnjs.cloudflare.com/ajax/libs/jquery/2.1.0/jquery.js"></script>

    <!-- Import Twitter bootstrap libs + css -->
    <link rel="stylesheet" type="text/css"
          href="http://cdnjs.cloudflare.com/ajax/libs/twitter-bootstrap/3.1.1/css/bootstrap.css">
    <script src="http://cdnjs.cloudflare.com/ajax/libs/twitter-bootstrap/3.1.1/js/bootstrap.js"></script>
</head>
<body>
<!-- Keep this simple ... define CSS for this simple webpage in the same file -->
<style>
    body {
    padding-top: 40px;
    padding-bottom: 40px;
    background-color: #eee;
    }
    .demo-form {
    max-width: 500px;
    padding: 15px;
    margin: 0 auto;
    }
    .demo-form .demo-heading,
    .demo-form .checkbox {
    margin-bottom: 10px;
    }
    .demo-form .checkbox {
    font-weight: normal;
    }
    .demo-form .form-control {
    position: relative;
    height: auto;
    -webkit-box-sizing: border-box;
    -moz-box-sizing: border-box;
    box-sizing: border-box;
    padding: 10px;
    font-size: 16px;
    }
    .demo-form .form-control:focus {
    z-index: 2;
    }
</style>
<script type="text/javascript">
		$(document).ready( function() {

			var operationFiveForm 	= $('#operationFiveForm');

			handleSubmit = function(e) {
			  form = $(this);
              $.ajax({
                type: 'GET',							  	// Submit an HTTP POST request
                url: form.data('url'), 			      		// The URL where your endpoint is listening
                data: form.serialize(),	              		// Serialized form URL-encoded input
                success: function(data) {				  	// Success function called if request succeeds
                  alert("Operation Response : " + JSON.stringify(data));
                  if (form.data('ref-target')) {
                  	const fieldName = form.data('ref');
                  	const target = form.data('ref-target');
                  	$(target).html(data[fieldName]);
                  }
                },
                error: function(request, status, error){  // Error function is executed if an exception occurs in the flow
              	  alert(request.responseText);			  // Alert the user of any errors
              	}
              });

              return false;								  // Let jQuery handle the form submission
            };

			operationFiveForm.submit(handleSubmit);
		});


</script>
<div class="container">
    <div class="panel-group" id="accordion">

        <div class="panel panel-default">
            <div class="panel-heading">
                <h2 class="panel-title demo-heading">
                    <a data-toggle="collapse" data-parent="#accordion" href="#operationFive">Delete Item</a>
                </h2>
            </div>
            <div id="operationFive" class="panel-collapse collapse">
                <div class="panel-body">
                    <form id="operationFiveForm" class="demo-form" role="form" data-url="/item/delete">
                        <label>ID of item to delete</label>
                        <input type="text" name="id" placeholder="00000000-0000-0000-0000-000000000000" value="" required class="form-control"><br>
                        <input class="btn btn-lg btn-primary btn-block" type="submit" value="Delete">
                        <small id="deleteNote" class="text-muted">This action is irreversible.</small><br>
                    </form>
                </div>
            </div>
        </div>

    </div>
</div>
</body>
</html>
XML for This Example
Paste this code into the Studio XML editor to quickly load the flow for this example into your Mule app:
<?xml version="1.0" encoding="UTF-8"?>

<mule xmlns:dynamics365-bc="http://www.mulesoft.org/schema/mule/dynamics365-bc" xmlns:http="http://www.mulesoft.org/schema/mule/http"
      xmlns="http://www.mulesoft.org/schema/mule/core"
      xmlns:doc="http://www.mulesoft.org/schema/mule/documentation" xmlns:xsi="http://www.w3.org/2001/XMLSchema-instance" xsi:schemaLocation="http://www.mulesoft.org/schema/mule/core http://www.mulesoft.org/schema/mule/core/current/mule.xsd
http://www.mulesoft.org/schema/mule/http http://www.mulesoft.org/schema/mule/http/current/mule-http.xsd
http://www.mulesoft.org/schema/mule/dynamics365-bc http://www.mulesoft.org/schema/mule/dynamics365-bc/current/mule-dynamics365-bc.xsd">
    <configuration-properties file="mule-app.properties"/>
    <configuration-properties file="advanced.properties"/>

    <http:listener-config name="HTTP_Listener_config" doc:name="HTTP Listener config" basePath="/">
        <http:listener-connection host="0.0.0.0" port="8081" />
    </http:listener-config>

    <dynamics365-bc:config name="Business_Central_BasicAuth" doc:name="Microsoft Dynamics 365 - Business Central Config" >
        <dynamics365-bc:basic-connection baseUri="${config.baseUri}" username="${auth.username}" password="${auth.password}" />
    </dynamics365-bc:config>

    <flow name="Home" >
        <http:listener doc:name="/" config-ref="HTTP_Listener_config" path="/" />
        <parse-template doc:name="Parse Template" location="dynamics365-bc-demo-template.html" />
    </flow>

    <flow name="flow-item-delete" >
        <http:listener doc:name="/item/delete" config-ref="HTTP_Listener_config" path="/item/delete"/>
        <dynamics365-bc:delete-entity entity="items" doc:name="Delete Entity" config-ref="Business_Central_BasicAuth" companyId="${api.companyId}" entityId="#[attributes.queryParams.id]"/>
        <set-payload value="Item deleted" doc:name="Set Payload" />
    </flow>
</mule>
Steps for Running This Example
-
Verify that your connector is configured.
-
Save the project.
-
From a web browser, test the application by entering
http://localhost:8081/. -
Click on the Delete Item form.
-
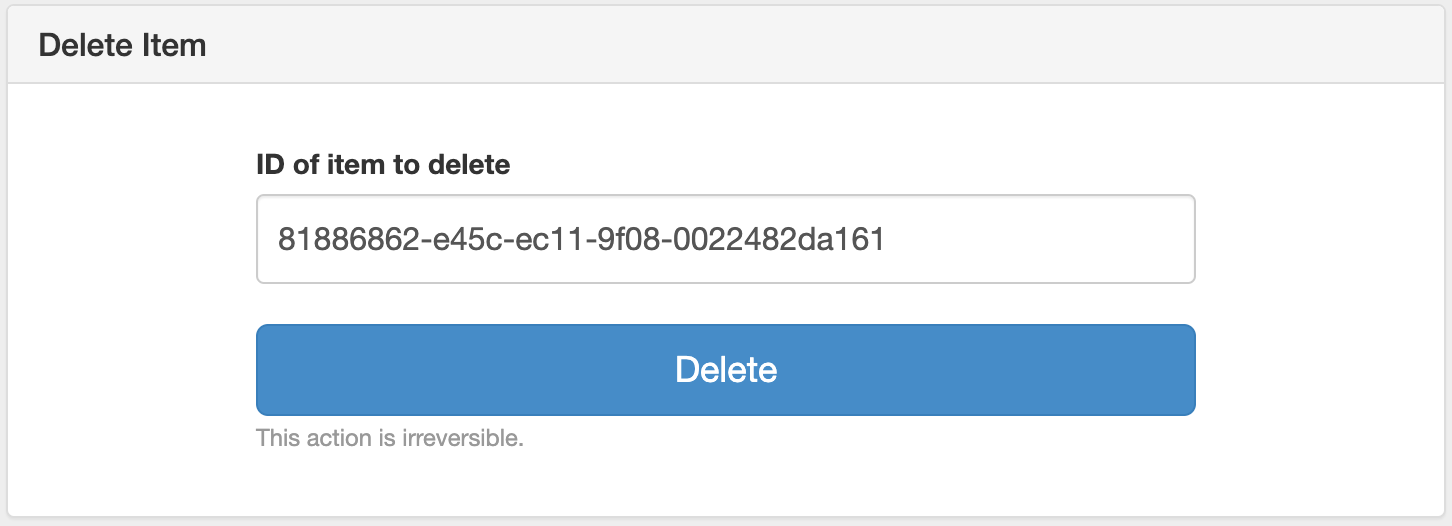
After the form shows up, type in the ID of the item you want to delete.
-
Click Delete. You should see an alert saying that the item was deleted.

Link Records to Related Entities
You can establish relationships between entities by referencing related record IDs in navigation properties. Use the related entity’s ID field to create the association.
Example: Link a Contact to a Customer
When creating a Contact, reference the Customer ID to establish the relationship:
output application/json
---
{
    type: "Person",
    displayName: payload.ContactName,
    email: payload.EmailAddress,
    customerId: payload.CustomerId
}
The customerId field links the Contact to the specified Customer record. Check your Business Central API metadata for available navigation properties and relationship fields for each entity type.


