Oracle PeopleSoft Connector 3.1
Anypoint Connector for Oracle PeopleSoft (PeopleSoft Connector) is a closed-source connector that uses the Component Interface (CI) to communicate in real-time with the service. This is a component provided by Oracle’s PeopleTools.
Release Notes: Oracle PeopleSoft Connector Release Notes
Exchange: Oracle PeopleSoft Connector![]()
|
To run the connector on PeopleTools 8.61, you must add the
|
Before You Begin
To use this information, you should be familiar with PeopleSoft, Mule runtime engine (Mule), Anypoint Connectors, Anypoint Studio, Mule concepts, elements in a Mule flow, and Global Elements.
You need login credentials to test your connection to your target resource.
POM File Information
<dependency>
<groupId>org.mule.connectors</groupId>
<artifactId>mule-peoplesoft-connector</artifactId>
<version>x.x.x</version>
<classifier>mule-plugin</classifier>
</dependency>xmlReplace x.x.x with the version that corresponds to the connector you are using.
To obtain the most up-to-date pom.xml file information, access the connector in Anypoint Exchange![]() and click Dependency Snippets.
and click Dependency Snippets.
What’s New in this Connector
Reorganized user interface in the Connector configuration. The input and output of Operations is JSON. Fixed date conversion in Save operation.
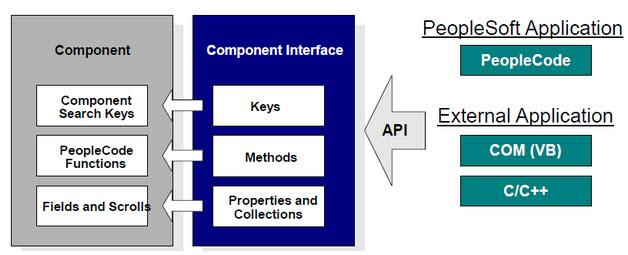
Component Interfaces
PeopleSoft’s Component Interfaces (CI) provides a one-way real-time interface to a PeopleSoft database instance. A component in PeopleSoft is a logical grouping of PeopleSoft pages representing a complete business transaction, such as Employee Onboarding. Component Interfaces expose the underlying APIs used by PeopleSoft Components and, therefore, ensure that validations, defaults, and business logic are preserved from the original definition of those components.
The Component Interfaces allow you to query PeopleSoft for specific records, update data, and create new instances of the records.
Attributes and Architecture
A component interface has the following four main attributes:
-
Component Interface Name: Each component interface requires a unique name. The programs calling a component use the name of the component interface to access properties and methods.
-
Keys (Get keys, Create keys, and Find keys): Keys are special properties containing values that retrieve an instance (get keys) or a list of instances (find keys) of the component interface. You can add, remove, or change keys in PeopleSoft Application Designer. Keys are created automatically when you create a component interface.
-
Get keys: Map to fields marked as search keys in the Components Search record.
-
Create keys: Generated in CI when the Use tab on the Component Properties dialog allows the Add action.
-
Find keys: Map to fields marked as both Alternate Search keys and Search Key in the Component Search Record.
-
Properties and Collections (Fields and Records): Properties provide access to both component data and component interface settings. A property can correspond to a field or a scroll (collection). A component interface collection is a special type of property that corresponds to a scroll and contains fields and subordinate scrolls as defined in its underlying component.
Types of properties:-
Standard properties are assigned automatically when a component interface is created.
-
-
User-defined properties map to record fields on the PeopleSoft component and are displayed in the PeopleSoft Application Designer.
-
Methods: A method is a function that performs a specific task on a component interface at run time. There are two main types of methods: standard and user-defined.
Standard methods are those that are available for all component interfaces. The following are the standard methods that the connector supports:
Method Description Create
Add a new instance of the Component Interface to the PeopleSoft database. This is similar to clicking Add and entering the relevant keys through the PeopleSoft Web UI.
Cancel
Cancel an instance of the Component Interface. This is equivalent of the Cancel operation in the Web UI when working on a particular component.
Find
Search for any instances of the component that match the provided Search Keys. This returns a list of possible matches.
Get
Retrieve instances that match the specific keys you provide. This returns a single record or none at all.
Save
Save changes made to the component, new, or existing.
The Save operation tries to update an existing record before creating a new one. For new records, the connector automatically populates the keys with default values provided by the PeopleSoft instance, thereby reducing the need for the user to provide the default key/values pairs.
-
-
User-defined methods are created in PeopleSoft Application Designer to provide added functionality to the component interface.
Add the Connector to a Studio Project
Anypoint Studio provides two ways to add the connector to your Studio project: from the Exchange button in the Studio taskbar or from the Mule Palette view.
Add the Connector Using Exchange
-
In Studio, create a Mule project.
-
Click the Exchange icon (X) in the upper-left of the Studio task bar.
-
In Exchange, click Login and supply your Anypoint Platform username and password.
-
In Exchange, search for "peoplesoft".
-
Select the connector and click Add to project.
-
Follow the prompts to install the connector.
Add the Connector in Studio
-
In Studio, create a Mule project.
-
In the Mule Palette view, click (X) Search in Exchange.
-
In Add Modules to Project, type "peoplesoft" in the search field.
-
Click this connector’s name in Available modules.
-
Click Add.
-
Click Finish.
Configure in Studio
-
Drag the connector to the Studio Canvas.
-
Create the connector configuration, configure the parameters and add the
psjoalibrary. -
In the properties editor of the Invoke Operation, configure the remaining parameters:
Parameter Value Display Name
Name of the operation to display in Studio
Extension Configuration
The reference name to the global element you have created.
Component Name
The component interface name .
Operation
An operation to run over the selected CI.
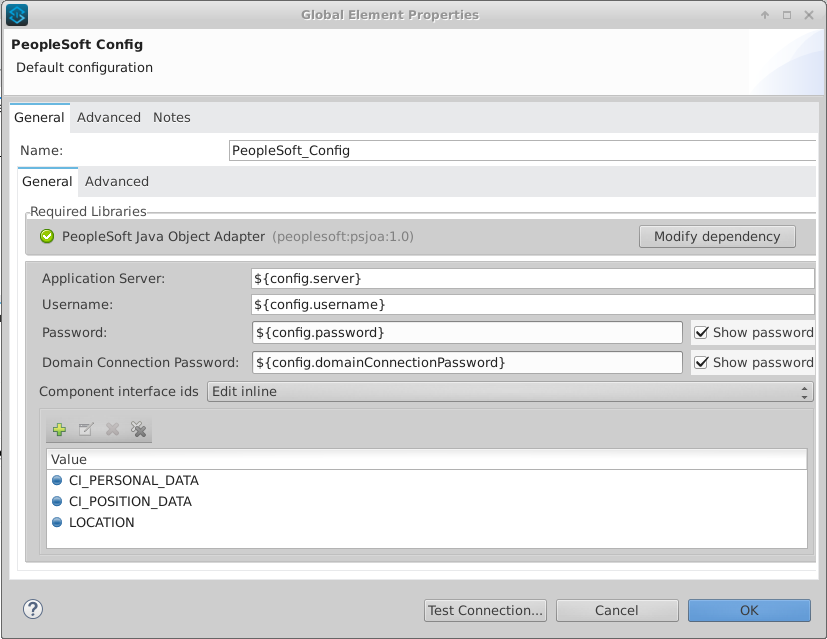
The connector configuration should look like the image below:
Log Requests and Responses
To log requests and responses when using the connector, configure a logger by adding this line to the Loggers element of the log4j2.xml configuration file for the Mule app:
<AsyncLogger name="org.mule.modules.peoplesoft.extension.internal.service.PeopleSoftServiceImpl" level="DEBUG"/>xmlThe following example shows the Loggers element with the AsyncLogger line added:
<?xml version="1.0" encoding="UTF-8"?>
<Configuration status="WARN">
<Appenders>
<Console name="Console" target="SYSTEM_OUT">
<PatternLayout pattern="%d{HH:mm:ss.SSS} [%t] %-5level %logger{36} - %msg%n"/>
</Console>
</Appenders>
<Loggers>
<AsyncLogger name="org.mule.modules.peoplesoft.extension.internal.service.PeopleSoftServiceImpl" level="DEBUG" additivity="false">
<appender-ref ref="Console" level="debug"/>
</AsyncLogger>
</Loggers>
</Configuration>xmlYou can view the app log as follows:
-
If you’re running the app from the Anypoint Platform, the output is visible in the Anypoint Studio console window.
-
If you’re running the app using Mule from the command line, the app log is visible in your OS console.
Unless the log file path was customized in the app’s log file (log4j2.xml), you can also view the app log in this default location:
MULE_HOME/logs/<app-name>.log
For more information about the app log, see Configuring Logging.
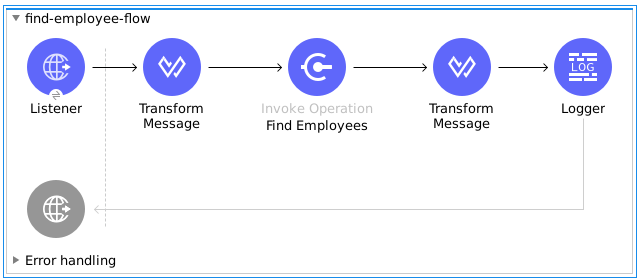
Use Case: Retrieve a Collection of Employee Records
-
Create a new Mule Project in Anypoint Studio.
-
Drag a HTTP Listener to the canvas and configure the following parameters:
Parameter Value Display Name
HTTP
Extension Configuration
If no HTTP element has been created yet, click the plus sign to add a new HTTP Listener Configuration, set the Host and Port, and click OK.
Path
/find -
Drag the PeopleSoft Invoke Operation next to the HTTP endpoint component and configure it according to the steps below:
-
Add a new PeopleSoft Configuration by clicking the plus sign in the Basic Settings field.
-
Configure the global element completing required fields with your credentials.
-
Add the
psjoalibrary. -
Add CI_PERSONAL_DATA to the Component interface IDs.
-
-
Click Test Connection to confirm that Mule can connect with the PeopleSoft instance. If the connection is successful, click OK to save the configurations. Otherwise, review or correct any incorrect parameters, then test again.
-
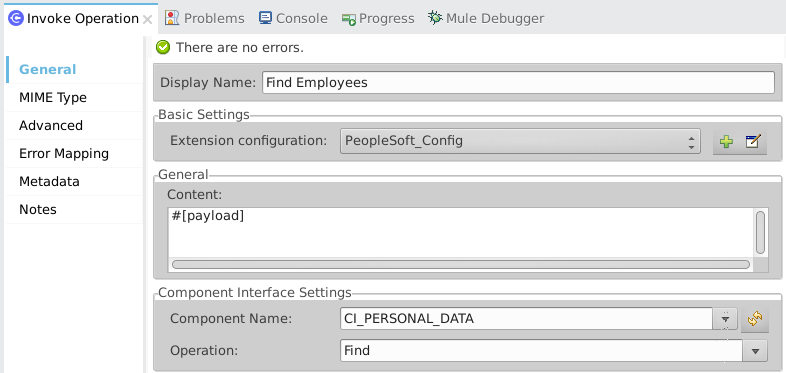
Back in the properties editor of the Invoke Operation, configure the remaining parameters:
Parameter Value Display Name
Find Employees
Extension Configuration
PeopleSoft (the reference name to the global element you have created).
Component Name
CI_PERSONAL_DATA (the component interface name that holds the employee data).
Operation
Find
The connector settings should look like:
-
Add a Transform Message (Core) element between the HTTP endpoint and the PeopleSoft endpoint to provide the input parameters required by the FIND method. The input fields should be automatically populated:
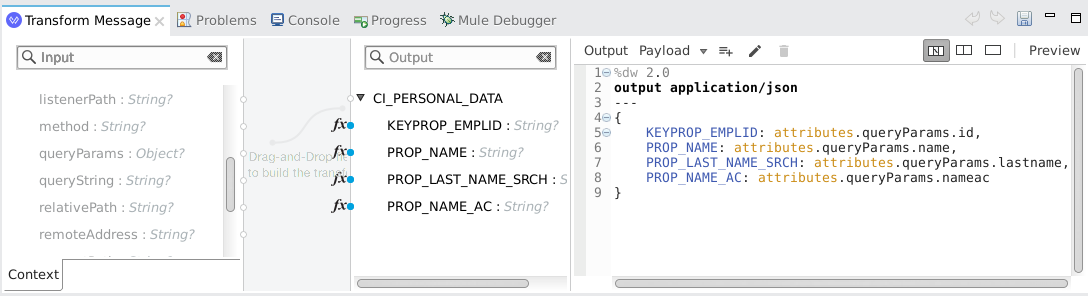
Inside the Transform Message, associate fields with queryParamas. This way, each value can be dynamically set from the URL.
%dw 2.0 output application/json --- { KEYPROP_EMPLID: attributes.queryParams.id, PROP_NAME: attributes.queryParams.name, PROP_LAST_NAME_SRCH: attributes.queryParams.lastname, PROP_NAME_AC: attributes.queryParams.nameac }dataweave -
Add other Transform Message after the PeopleSoft element to display the response in the browser:
%dw 2.0 output application/json --- payloaddataweave -
Add a Logger scope after the JSON transformer to print the data that is being passed to the PeopleSoft connector in the Mule Console.
-
Save and Run as Mule Application. Then, open a web browser and check the response after entering the URL
http://localhost:8081/find?id=0004&name=&last_name=&name_ac=. If there are records in your PeopleSoft database whose KEYPROP_EMPLID contains the value "MULE", you should get a JSON collection with those records. Otherwise, you receive an empty collection.
[
{
"KEYPROP_EMPLID": "MULE0001",
"PROP_NAME": "Muley",
"PROP_LAST_NAME_SRCH": "The Mule",
"PROP_NAME_AC": ""
},
{
"KEYPROP_EMPLID": "MULE0002",
"PROP_NAME": "Second Muley",
"PROP_LAST_NAME_SRCH": "The Backup Mule",
"PROP_NAME_AC": ""
},
...
]json+
In this example, all input parameters for the FIND operation are optional. If none of them defined (http://localhost:8081/find?id=&name=&last_name=&name_ac=), then PeopleSoft will retrieve the first 300 records available (the maximum limited by the server).
Use Case: XML
<?xml version="1.0" encoding="UTF-8"?>
<mule xmlns:ee="http://www.mulesoft.org/schema/mule/ee/core"
xmlns:peoplesoft="http://www.mulesoft.org/schema/mule/peoplesoft"
xmlns:http="http://www.mulesoft.org/schema/mule/http"
xmlns="http://www.mulesoft.org/schema/mule/core"
xmlns:doc="http://www.mulesoft.org/schema/mule/documentation"
xmlns:spring="http://www.springframework.org/schema/beans"
xmlns:xsi="http://www.w3.org/2001/XMLSchema-instance"
xsi:schemaLocation="http://www.springframework.org/schema/beans
http://www.springframework.org/schema/beans/spring-beans-current.xsd
http://www.mulesoft.org/schema/mule/core
http://www.mulesoft.org/schema/mule/core/current/mule.xsd
http://www.mulesoft.org/schema/mule/http
http://www.mulesoft.org/schema/mule/http/current/mule-http.xsd
http://www.mulesoft.org/schema/mule/peoplesoft
http://www.mulesoft.org/schema/mule/peoplesoft/current/mule-peoplesoft.xsd
http://www.mulesoft.org/schema/mule/ee/core
http://www.mulesoft.org/schema/mule/ee/core/current/mule-ee.xsd">
<http:listener-config name="HTTP_Listener_config" doc:name="HTTP Listener config" >
<http:listener-connection host="0.0.0.0" port="8081" />
</http:listener-config>
<peoplesoft:config name="PeopleSoft_Config" doc:name="PeopleSoft Config" >
<peoplesoft:connection
server="${config.server}"
username="${config.username}"
password="${config.password}"
domainConnectionPassword="${config.domainPassword}" >
<peoplesoft:component-interface-ids >
<peoplesoft:component-interface-id value="CI_PERSONAL_DATA" />
</peoplesoft:component-interface-ids>
</peoplesoft:connection>
</peoplesoft:config>
<flow name="find-employee-flow" >
<http:listener config-ref="HTTP_Listener_config" path="/find" doc:name="Listener" />
<ee:transform doc:name="Transform Message" >
<ee:message >
<ee:set-payload ><![CDATA[%dw 2.0
output application/json
---
{
KEYPROP_EMPLID: attributes.queryParams.id,
PROP_NAME: attributes.queryParams.name,
PROP_LAST_NAME_SRCH: attributes.queryParams.lastname,
PROP_NAME_AC: attributes.queryParams.nameac
}]]></ee:set-payload>
</ee:message>
</ee:transform>
<peoplesoft:invoke-operation
config-ref="PeopleSoft_Config"
component="CI_PERSONAL_DATA"
operation="Find"
doc:name="Find Employees" />
<ee:transform doc:name="Transform Message" >
<ee:message >
<ee:set-payload ><![CDATA[%dw 2.0
output application/json
---
payload]]></ee:set-payload>
</ee:message>
</ee:transform>
<logger level="INFO" doc:name="Logger" message="#[payload]"/>
</flow>
<flow name="peoplesoft_demoFlow" >
<http:listener
config-ref="HTTP_Listener_config"
path="/save"
doc:name="Listener" />
<ee:transform doc:name="Transform Message" >
<ee:message >
<ee:set-payload ><![CDATA[%dw 2.0
output application/java
---
{
}]]></ee:set-payload>
</ee:message>
</ee:transform>
<peoplesoft:invoke-operation
config-ref="PeopleSoft_Config"
component="CI_PERSONAL_DATA"
operation="Save"
doc:name="Invoke Operation" />
</flow>
</mule>xmlSee Also
-
Visit Oracle’s PeopleSoft Component Interface API site
