Using Anypoint Studio to Configure Redis Connector 5.4
|
Where possible, we changed noninclusive terms to align with our company value of Equality. We maintained certain terms to avoid any effect on customer implementations. |
Anypoint Studio (Studio) editors help you design and update your Mule applications, properties, and configuration files.
To add and configure a connector in Studio:
When you run your app, you can view the app log as described in View the App Log.
If you are new to configuring connectors in Studio, see Using Anypoint Studio to Configure a Connector. If, after reading this topic, you need additional information about the connector fields, see the Redis Connector 5.4 Reference.
Create a Mule Project
In Studio, create a new Mule project in which to add and configure the connector:
-
In Studio, select File > New > Mule Project.
-
Enter a name for your Mule project and click Finish.
Add the Connector to Your Mule Project
Add Aynpoint Connector for Redis to your Mule project to automatically populate the XML code with the connector’s namespace and schema location and add the required dependencies to the project’s pom.xml file:
-
In the Mule Palette view, click (X) Search in Exchange.
-
In Add Dependencies to Project, type
redisin the search field. -
Click Redis Connector in Available modules.
-
Click Add.
-
Click Finish.
Adding a connector to a Mule project in Studio does not make that connector available to other projects in your Studio workspace.
Configure an Input Source
An input source initiates a flow when a specified condition is met. You can configure one of these input sources to use with Redis Connector:
-
Subscribe
Enables the Mule app to listen to specified channels -
HTTP Listener
Initiates a flow each time it receives a request on the configured host and port -
Scheduler
Initiates a flow when a time-based condition is met
For example, to configure the Subscribe input source, follow these steps:
-
In the Mule Palette view, select Redis > Subscribe.
-
Drag Subscribe to the Studio canvas.
-
On the Subscribe configuration screen, optionally change the value of the Display Name field.
-
In Channels provide a list of Redis channel names or globbing patterns.
Add a Connector Operation to the Flow
When you add a connector operation to your flow, you immediately define a specific operation for that connector to perform.
To add an operation for Redis Connector, follow these steps:
-
In the Mule Palette view, select Redis and then select the desired operation.
-
Drag the operation onto the Studio canvas to the right of the input source.
Configure a Global Element for the Connector
When you configure a connector, it’s best to configure a global element that all instances of that connector in the app can use. Configuring a global element requires you to provide the authentication credentials the connector uses to access the target Redis system. Redis Connector supports global elements for clustered Redis configurations and non-clustered Redis configurations.
-
Select the operation in the Studio canvas.
-
In the configuration screen for the operation, click the plus sign (+) next to the Connector configuration field to configure a global element that can be used by all instances of Redis Connector in the app.
When you configure a global element, you can reference a configuration file that contains ANT-style property placeholders (recommended), or you can enter your authorization credentials in the global configuration properties. For information about the benefits of using property placeholders and how to configure them, see Anypoint Connector Configuration.
-
On the Connection tab, select the connection type:
-
Click Test Connection to confirm that Mule can connect with the specified server.
-
Click OK.
Clustered Redis Configuration
Enter the following information on the General tab of the Global Element Properties screen to configure a Clustered connection:
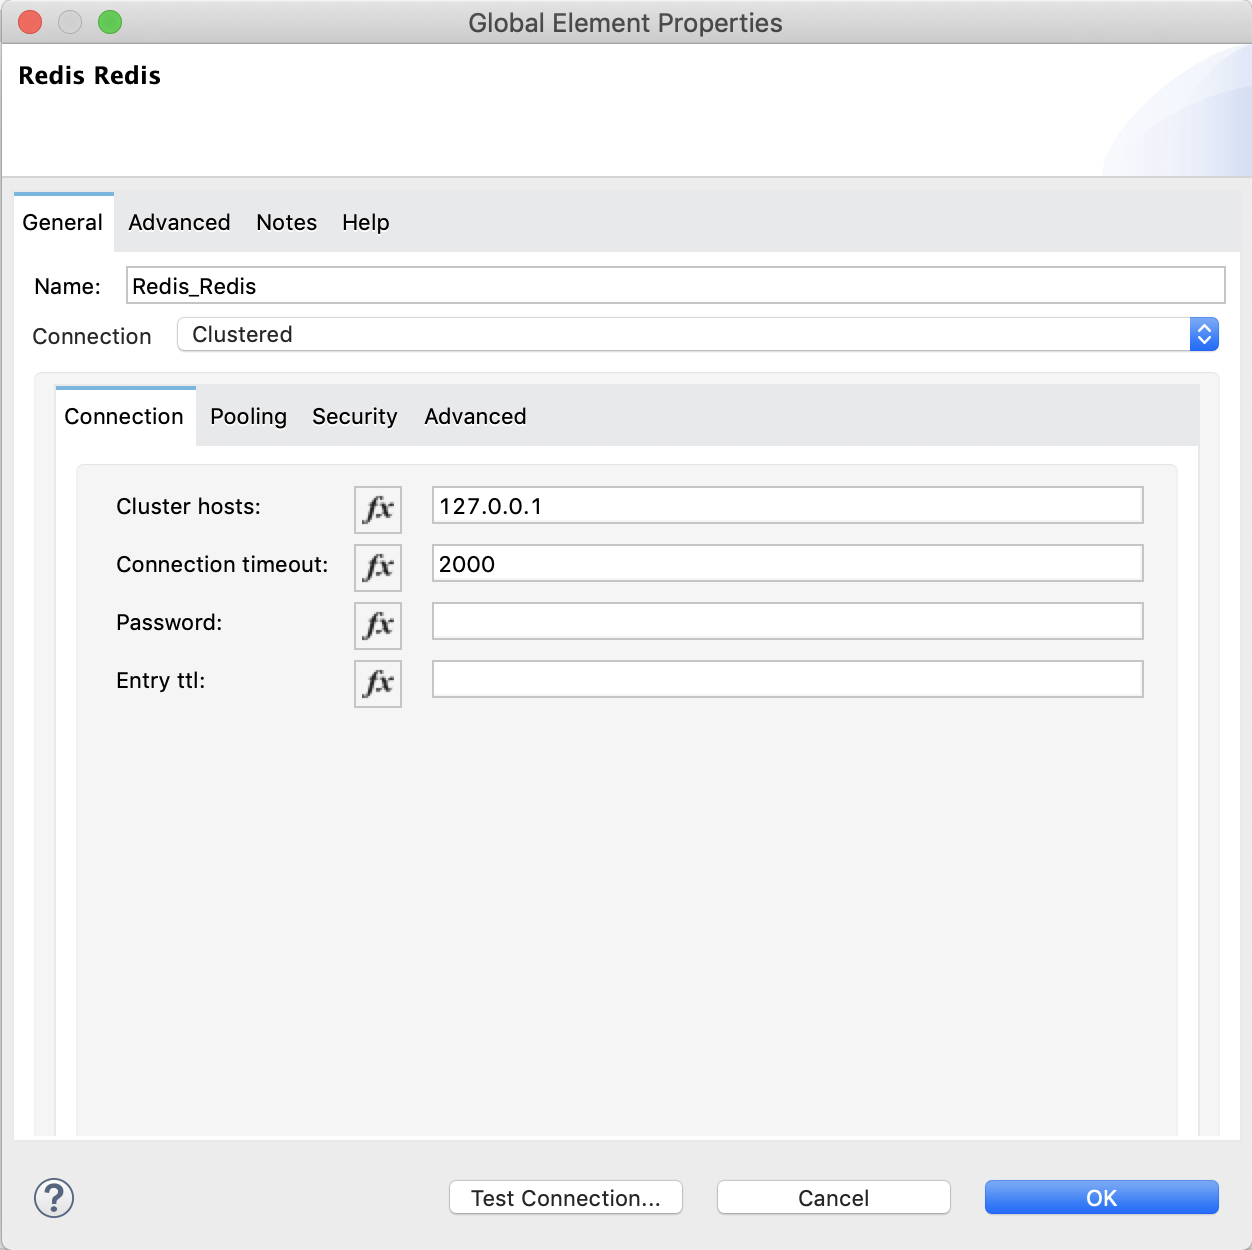
-
In Name, enter a name for the configuration.
-
In Connection, select Clustered to use the connector with a clustered Redis configuration.
-
Enter values for the following fields:
-
Cluster hosts
Comma-separated list for all Redis cluster hosts using the formathost:port -
Connection timeout
Optional connection timeout value, in milliseconds -
Entry Ttl Optional default time-to-live value to set on keys stored through the connector Password
Redis password for server authentication
-
-
Click Test Connection.
-
Click OK.
Nonclustered Redis Configuration
Enter the following information on the General tab of the Global Element Properties screen to configure a non-clustered connection:
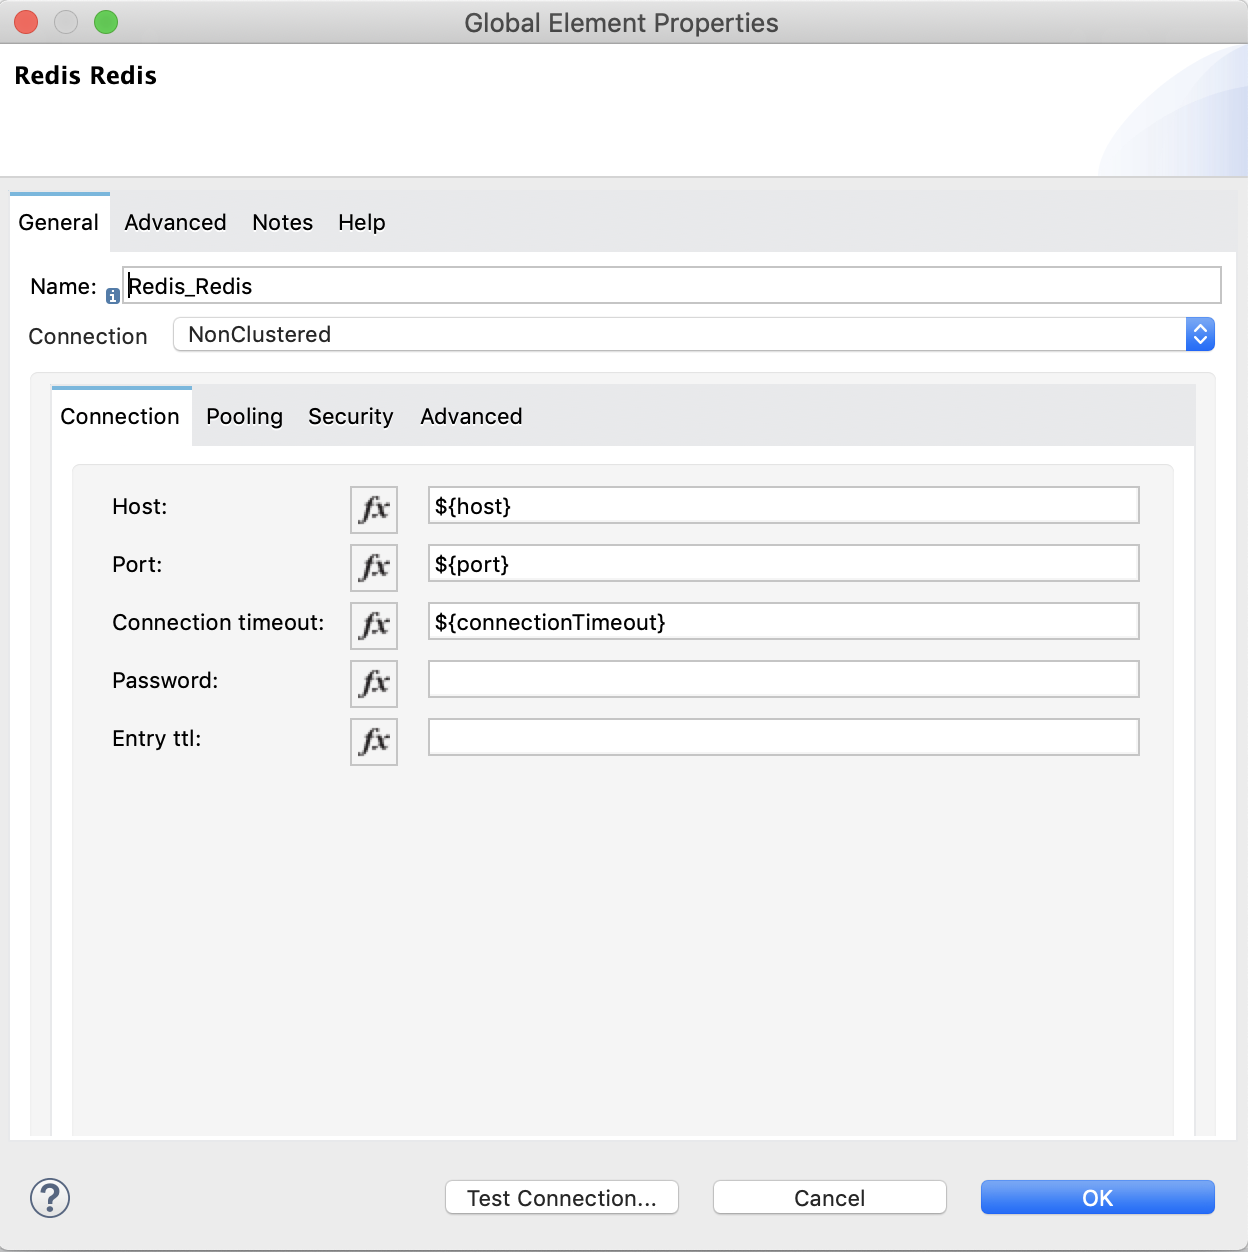
-
In Name, enter a name for the configuration.
-
In Connection, select NonClustered to use the connector with a non-clustered Redis configuration.
-
Enter values for the following fields:
-
Host
Host for the Redis server -
Port
Port on which the non-clustered server is running Connection Timeout
Optional connection timeout value, in milliseconds -
Entry Ttl
Optional default time-to-live value to set on keys stored through the connector. -
Password
Password for server authentication.
-
-
Click Test Connection.
-
Click OK.
Sentinel Configuration
Sentinel provides a high-availability solution in case of failure on your Redis cluster.
To configure a Sentinel connection:
-
On the General tab of the Global Element Properties, enter a name for the configuration.
-
In Connection, select Sentinel to use the connector with a non-clustered Redis configuration.
-
Enter values for the following fields:
-
Sentinels hosts
Sentinel addresses that monitor the Redis master host to which the connector will connect -
Master name
Name of the Redis master for which Sentinel discovers and returns the address of the master instance to connect to -
Sentinel password
Password for Sentinel server authentication -
Index
Index of the database that the pool uses -
Password
Password for Redis server authentication -
Entry ttl
Optional default time-to-live value to set on keys stored through the connector
-
-
Click Test Connection.
-
Click OK.
TLS Configuration
To enable and configure TLS for your app:
-
In the Connection section for the configuration, click the Security tab.
-
To configure a truststore, in TLS Configuration, select Edit inline and provide the following values:
-
Path
Location of the truststore file. -
Password
Password for the truststore file. -
Type
File format of the truststore file. -
Algorithm
Algorithm the truststore uses. -
Insecure
Boolean that determines whether or not to validate the truststore. If set totrue, no validation occurs. The default value isfalse.
-
-
To configure a keystore, enter the following values:
-
Type
Optionally specify the file format of the keystore file. The default value isJKS. -
Path
Optionally specify the location of the keystore file. This can be used for two-way authentication for the connector. -
Alias
Attribute that indicates the alias of the key to use when the keystore contains many private keys. If not defined, the first key in the file is used by default. -
Key password
Key manager password, which is the password for the private key inside the keystore. -
Password
Store password for the keystore file. This is required only if the Key Store Location is configured.-
Algorithm
Algorithm used in the keystore.
-
-
-
Click Test Connection.
-
Click OK.
View the App Log
You can view the app log for the connector as follows:
-
If you’re running the app from the Anypoint Platform, the output is visible in the Anypoint Studio Console window.
-
If you’re running the app using Mule from the command line, the app log is visible in your OS console.
Unless the log file path was customized in the app’s log file (log4j2.xml), you can also view the app log in
MULE_HOME/logs/<app-name>.log.
For more information about the app log, see Configuring Logging.