Rosettanet Connector Examples
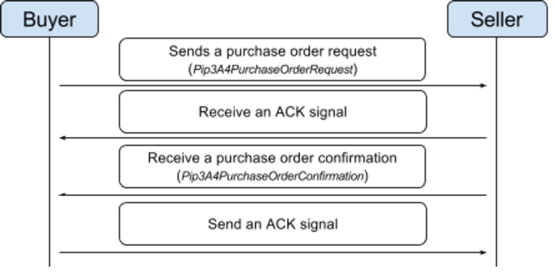
This example consists of two apps:
-
The Buyer app sends a purchase order request message to a Seller App.
-
The Seller app sends a purchase order confirmation message to the Buyer app when the order is fulfilled.
The following diagram shows the relationship between the two apps:

Buyer App
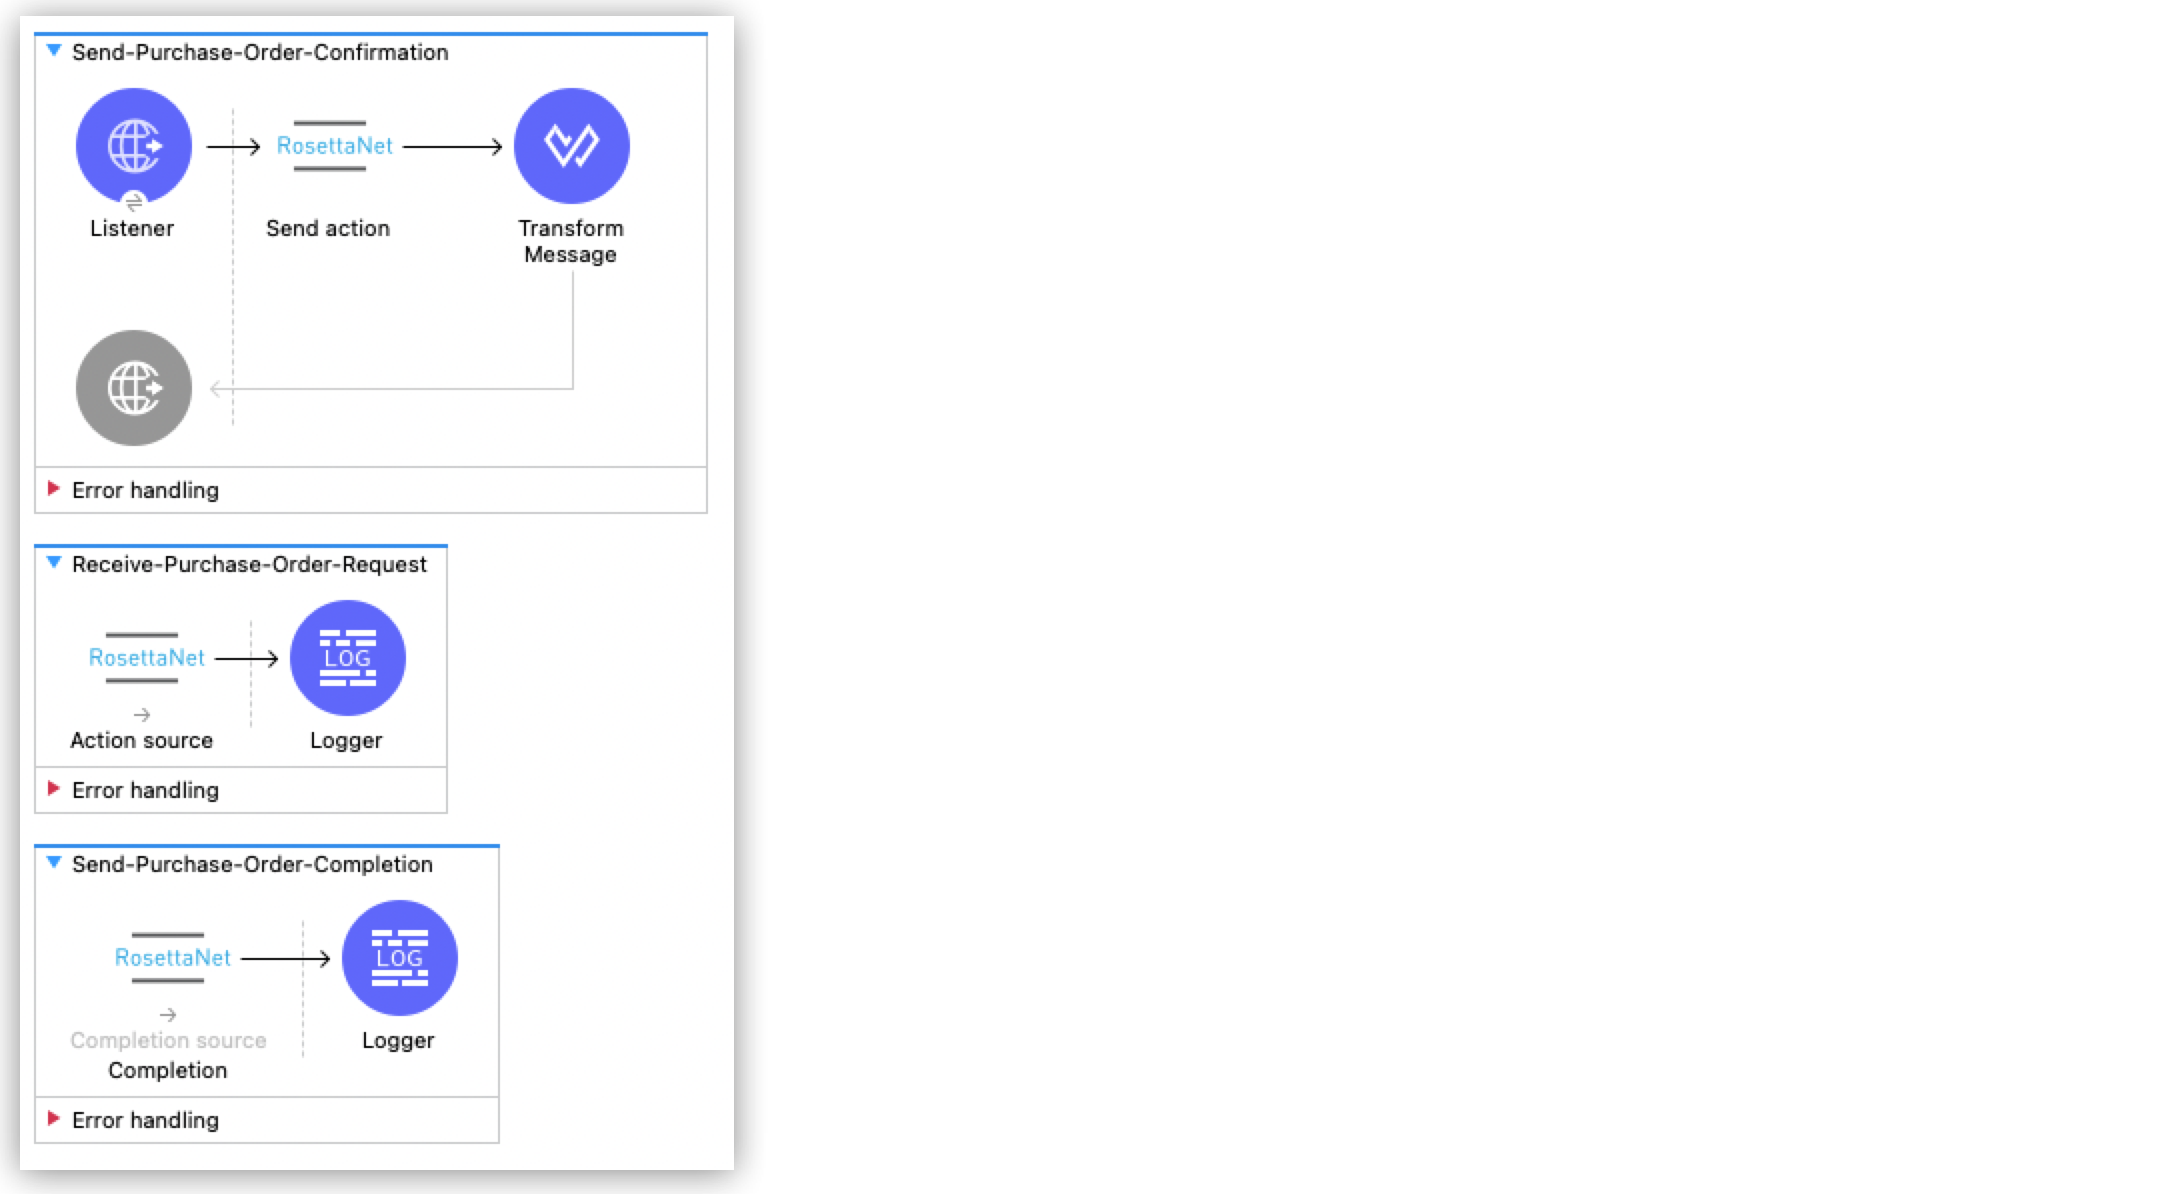
The Buyer app performs the following actions:
-
Receives an input purchase order request document via an
HTTP POST. -
Uses the RosettaNet Send action operation to send a purchase order request message to the Seller app.
-
Transforms the message ID from the purchase order request message to plain text for use in responding to the
HTTP POST. -
Receives an acknowledgment signal from the Seller app and logs information about the signal.
-
Receives a purchase order confirmation message from the seller and logs information about the confirmation message.
-
Receives the completion state from the Seller app and logs information about the completion state.
The following screenshot shows the Anypoint Studio app flows for the Buyer app:

The keystore for the Buyer app, which includes the buyer private key, buyer certificate, and seller certificate is located in the project under src/main/resources.
|
Create the First Flow of the Buyer App
The first flow of the Buyer app receives a purchase order request document via an HTTP POST and sends this as a RosettaNet action message to the Seller app. Configuring this flow involves creating a new Mule project, configuring the HTTP Listener source, adding a Send action operation, and adding a Transform component.
Configure the HTTP Listener Source
Configure the HTTP Listener source to initiate a Mule flow when a call is made to the default path (/):
-
Create a new Mule project in Studio.
-
From the Mule Palette view, select HTTP and drag the Listener component to the canvas.
-
In the properties window, click + next to the Connector configuration field to add a global element.
-
In the Name field, enter
HTTP_InputListenerand accept the default values.
Add the PO_InitiatorConfig_Buyer Global Element
Add the PO_InitiatorConfig_Buyer global element for the Send action operation:
-
In the properties window for the Send action operation, click + next to the Module configuration field to add a global element.
-
In the RosettaNet Config window, complete the following fields:
Global HTTP Listener HTTP_Listener-config Service Endpoint Path
/partner1
Global HTTP Request
HTTP_Request_configuration
Request Endpoint Path
/partner2
Keystore Path
/partner1.jks
Keystore Access password
nosecret
Signing key password
partner1
Global usage code
Test
Mule DUNS identifier
123456789
Mule location identifier
partner1
Partner DUNS identifier
123456788
Partner location identifier
partner2
role in PIP
INITIATOR
PIP definition path
/PIP3A4/V02_02.xml
-
Click OK.
Add the Send Action Operation
Add the Send action operation to send the purchase order request message to the Seller app by using the configuration defined for the PO_InitiatorConfig_Buyer global element:
-
From the Mule Palette view, select RosettaNet and drag the Send action operation next to Listener.
-
In the properties window, complete the following fields:
Field Value Display Name
Send action
Module configuration
PO_InitiatorConfig_Buyer
Add a Transform Message Component
Add a Transform Message component to transform the message ID in the purchase order request message to plain text:
-
From the Mule Palette view, select Core and drag a Transform Message component next to Send action.
-
In the properties window, overlay the brackets in the Output section with this DataWeave code:
%dw 2.0
output text/plain
---
"Buyer sent action message " ++ attributes.messageId ++ "\n"
Create the Second Flow of the Buyer App
The second flow of the Buyer app receives an acknowledgment signal from the Seller app and logs information about the signal. It also receives the purchase order confirmation message from the Seller app and logs information about the message.
Configure the Action Source
Configure the Action source source to initiate a Mule flow when a call is made to the /partner2 path:
-
From the Mule Palette view, select Rosettanet and drag the Action source source to the canvas.
-
In the Module configuration field, enter
PO_InitiatorConfig_Buyer.
Add a Logger Component
Add a Logger component to log a message that includes information about the acknowledgment and purchase order confirmation message:
-
From the Mule Palette view, select Core and drag a Logger component next to Action source on the canvas.
-
In the Message field, enter the following text:
"Buyer received action message #[attributes.messageId]"
Create the Third Flow of the Buyer App
The third flow of the Buyer app receives the completion state from the Seller app and logs information about the completion state.
Configure the Completion Source
Configure the Completion source source to listen for a purchase order completion state message from the seller:
-
From the Mule Palette view, select Rosettanet and drag the Completion source source to the canvas.
-
In the Module configuration field, enter
PO_InitiatorConfig_Buyer.
Add a Logger Component
Add a Logger component to log information about the purchase order completion state:
-
From the Mule Palette view, select Core and drag a Logger component next to Completion source on the canvas.
-
In the Message field, enter the following text:
Buyer action message #[attributes.replyAttributes.messageId] completed as #[payload.completionCode]
Save and Run the App
To save the app, click File > Save.
To run the app, click Run > Run as > Mule Application.
XML for the Buyer App
Paste this code into the Studio XML editor to quickly load the flow for the Buyer app into your Mule app:
<?xml version="1.0" encoding="UTF-8"?>

<mule xmlns:ee="http://www.mulesoft.org/schema/mule/ee/core"
	xmlns:http="http://www.mulesoft.org/schema/mule/http"
	xmlns:rosetta="http://www.mulesoft.org/schema/mule/rosetta"
	xmlns="http://www.mulesoft.org/schema/mule/core"
	xmlns:doc="http://www.mulesoft.org/schema/mule/documentation"
	xmlns:xsi="http://www.w3.org/2001/XMLSchema-instance"
	xsi:schemaLocation="
http://www.mulesoft.org/schema/mule/http http://www.mulesoft.org/schema/mule/http/current/mule-http.xsd
http://www.mulesoft.org/schema/mule/ee/core http://www.mulesoft.org/schema/mule/ee/core/current/mule-ee.xsd
http://www.mulesoft.org/schema/mule/core
http://www.mulesoft.org/schema/mule/core/current/mule.xsd
http://www.mulesoft.org/schema/mule/rosetta
http://www.mulesoft.org/schema/mule/rosetta/current/mule-rosetta.xsd
http://www.mulesoft.org/schema/mule/http
http://www.mulesoft.org/schema/mule/http/current/mule-http.xsd
http://www.mulesoft.org/schema/mule/ee/core
http://www.mulesoft.org/schema/mule/ee/core/current/mule-ee.xsd">
	<http:listener-config name="HTTP_Listener_config"
	doc:name="HTTP Listener config" >
		<http:listener-connection host="localhost" port="8081" />
	</http:listener-config>
	<http:request-config name="HTTP_Request_configuration"
	doc:name="HTTP Request configuration">
		<http:request-connection host="localhost" port="8082" />
	</http:request-config>
	<rosetta:config name="PO_InitiatorConfig_Buyer"
	pipRole="INITIATOR" doc:name="RosettaNet Config"
	listenerConfigName="HTTP_Listener_config"
	servicePath="/partner1"
	requesterConfigName="HTTP_Request_configuration"
	requestPath="/partner2"
	keystorePath="/partner1.jks"
	keystorePass="nosecret"
	privatePass="partner1"
	globalUsageCode="Test"
	selfBusinessIdentifier="123456789"
	selfLocationId="partner1"
	partnerBusinessIdentifier="123456788"
	partnerLocationId="partner2"
	pipFile="/PIP3A4/V02_02.xml"/>
	<http:listener-config name="HTTP_InputListener"
	doc:name="HTTP Listener config" >
		<http:listener-connection host="localhost" port="8801" />
	</http:listener-config>
	<flow name="Send-Purchase-Order-Request" >
		<http:listener doc:name="Listener" config-ref="HTTP_InputListener"
		path="/"
		allowedMethods="POST"/>
		<rosetta:send-action doc:name="Send action"
		 config-ref="PO_InitiatorConfig_Buyer"/>
		<ee:transform doc:name="Transform Message"  >
			<ee:message >
				<ee:set-payload ><![CDATA[%dw 2.0
output text/plain
---
"Buyer sent action message " ++ attributes.messageId ++ "\n"]]></ee:set-payload>
			</ee:message>
		</ee:transform>
	</flow>
	<flow name="Receive-Purchase-Order-Confirmation"  >
		<rosetta:action-source doc:name="Action source"
		config-ref="PO_InitiatorConfig_Buyer"/>
		<logger level="INFO" doc:name="Logger"
		message="Buyer received action message #[attributes.messageId]"/>
	</flow>
	<flow name="Send-Purchase-Order-Completion" >
		<rosetta:completion-source doc:name="Completion"
		config-ref="PO_InitiatorConfig_Buyer"/>
		<logger level="INFO" doc:name="Logger"
		message="Buyer action message #[attributes.replyAttributes.messageId] completed as #[payload.completionCode]"/>
	</flow>
</mule>
Seller App
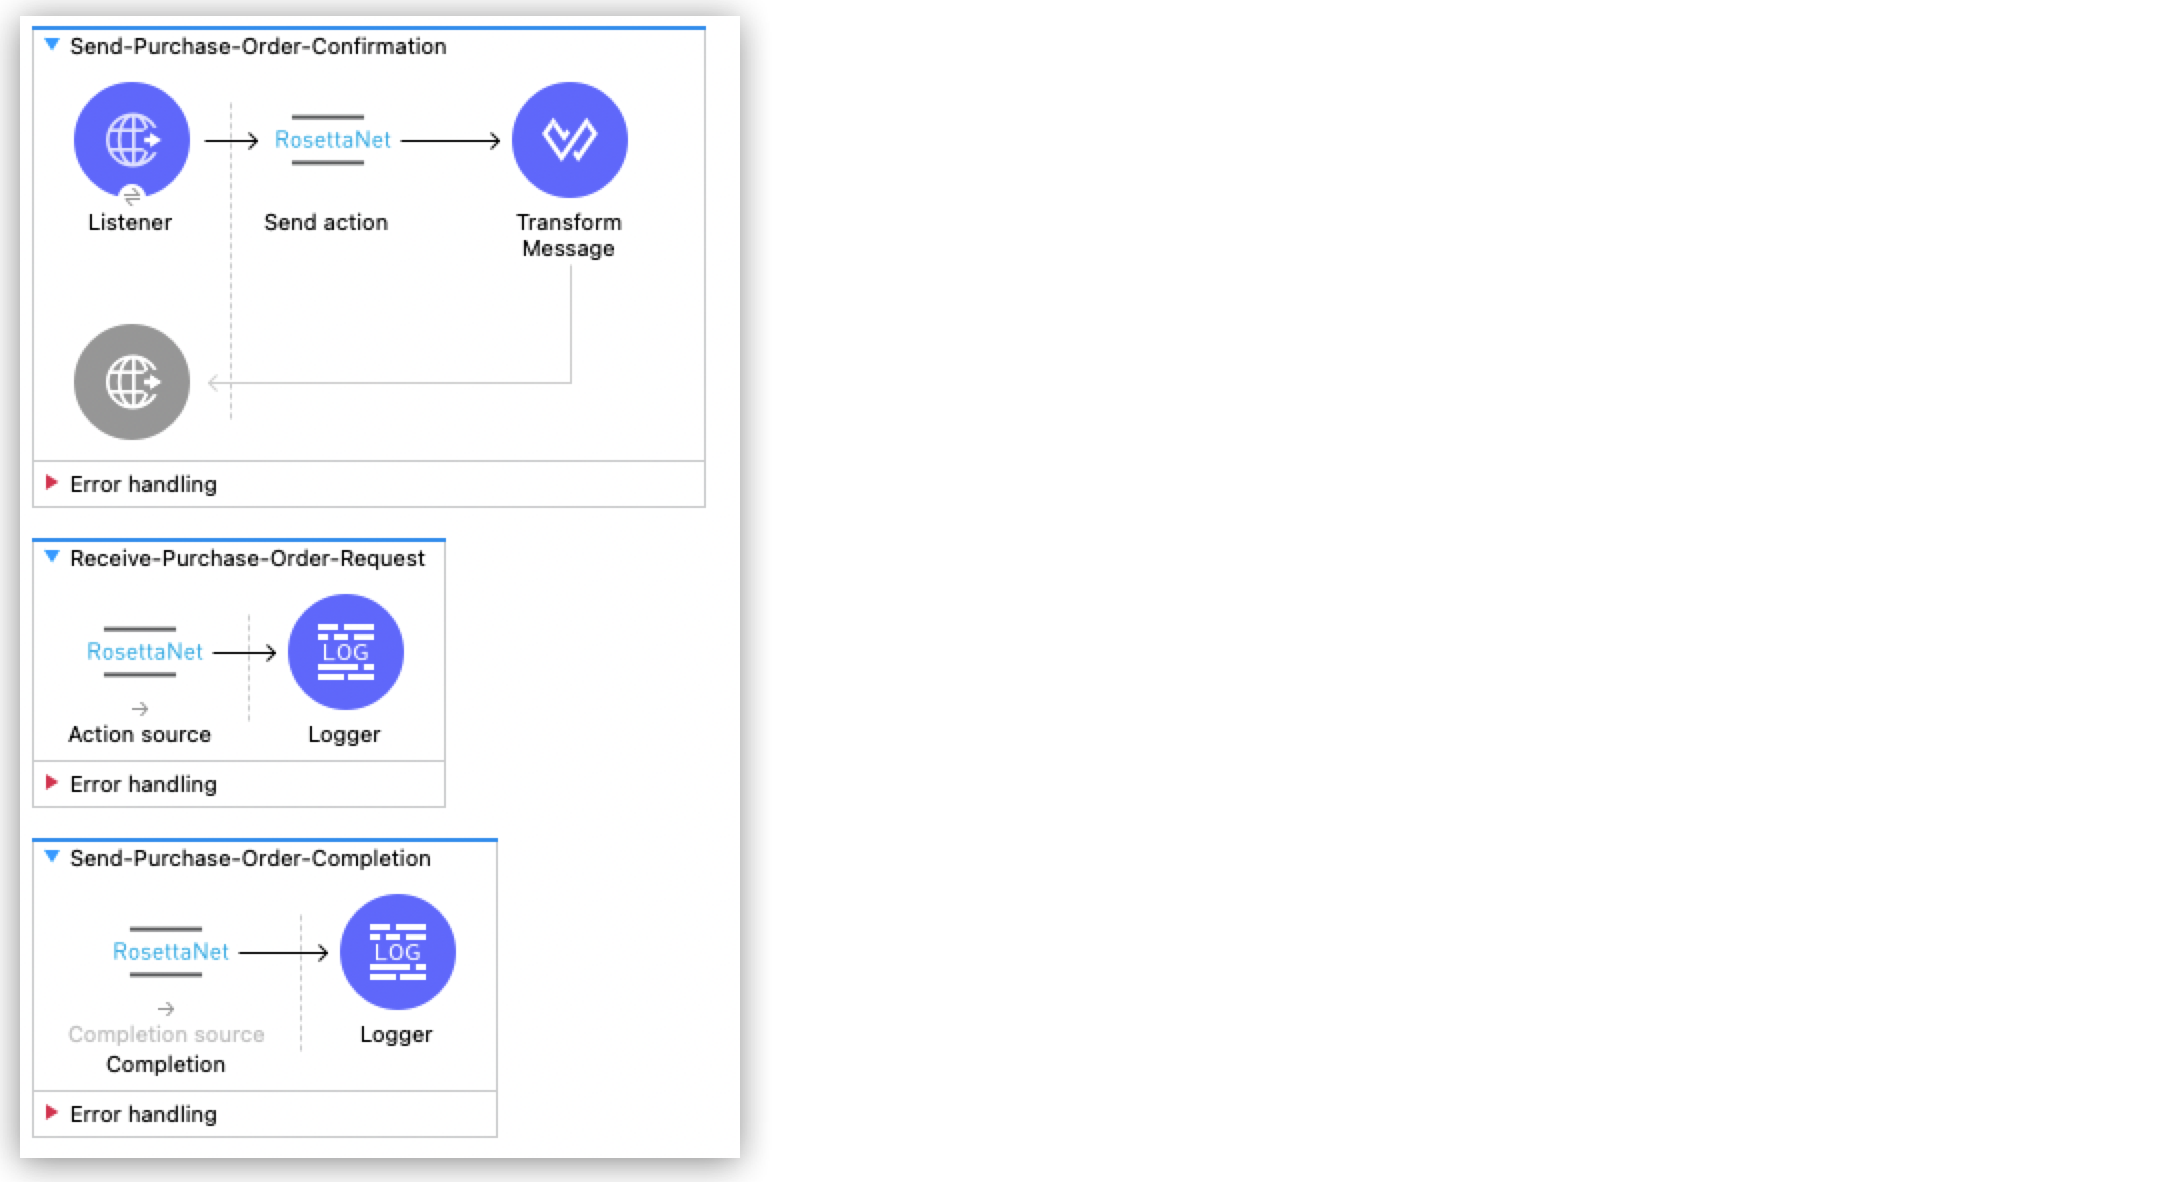
The Seller app performs the following actions:
-
Receives an input purchase order request confirmation document via an
HTTP POST. -
Uses a RosettaNet Send action operation to send a purchase order confirmation message to the buyer.
-
Transforms the RosettaNet message ID from the purchase order confirmation message to plain text for use in responding to the
HTTP POST. -
Receives a purchase order request message from the Buyer app and logs information about the request message.
-
Receives an acknowledgment signal from the Buyer app and logs information about the signal.
-
Receives a completion state message from the Buyer app and logs information about the completion state message.
The following screenshot shows the Anypoint Studio app flows for the Seller app:

The keystore in the Seller app, which includes the seller private key, seller certificate, and buyer certificate is located in the project under src/main/resources.
|
Create the First Flow of the Seller App
The first flow of the Seller app receives a purchase order request confirmation document via HTTP POST and sends this as a RosettaNet action message to the Buyer app. Configuring this flow involves creating a new Mule project, configuring the HTTP Listener source, configuring the RosettaNet Send action operation, and adding a Transform component.
Configure the HTTP Listener Source
Configure the HTTP Listener source to initiate a Mule flow when a call is made to the default path (/):
-
Create a new Mule project in Studio.
-
From the Mule Palette view, select HTTP and drag the Listener component to the canvas.
-
In the properties window, click + next to the Connector configuration field to add a global element.
-
In Name, enter
HTTP_InputListener. -
In Port, enter
8082. -
In Read timeout, enter
3000.
Add a Global Element for the Send Action Operation
Create a global element named PO_ResponderConfig_Seller for the Send action operation.
-
In the properties window for the Send action operation, click + next to the Module configuration field to add a global element.
-
In the RosettaNet Config window, configure the following fields:
Field Value Global HTTP Listener
HTTP_Listener-config
Service Endpoint Path
/partner2
Global HTTP Request
HTTP_Request_configuration
Request Endpoint Path
/partner1
Keystore Path
/partner2.jks
Keystore Access password
nosecret
Signing key password
partner2
Global usage code
Test
Mule DUNS identifier
123456788
Mule location identifier
partner2
Partner DUNS identifier
123456789
Partner location identifier
partner1
role in PIP
RESPONDER
PIP definition path
/PIP3A4/V02_02.xml
-
Click OK.
Add the Send Action Operation
Add the Send action operation to send a purchase order confirmation message to the Buyer app:
-
From the Mule Palette view, select RosettaNet and drag the Send action operation next to Listener.
-
In the properties window, configure the following fields:
Field Value Display Name
Send action
Module configuration
PO_ResponderConfig_Seller
-
Click OK.
Add a Transform Message Component
Add a Transform Message component to transform the message ID from the purchase order confirmation message for use in responding to the HTTP POST.
-
From the Mule Palette view, select Core and drag a Transform Message component next to Send action on the canvas.
-
In the properties window, overlay the brackets in the Output section with this DataWeave code:
%dw 2.0
output text/plain
---
"Seller sent action message " ++ attributes.messageId ++ "\n"
Create the Second Flow of the Seller App
The second flow of the Seller app receives an acknowledgment signal from the Buyer app and logs information about the signal. It also receives a purchase order request message from the Buyer app and logs information about the request.
Configure the Action Source
Configure the Action source to initiate a Mule flow when a call is made to the default path (/):
-
From the Mule Palette view, select Rosettanet and drag the Action source source to the canvas.
-
In the Module configuration field, enter
PO_ResponderConfig_Seller.
Add a Logger Component
Add a Logger component to log information about the acknowledgment signal and purchase order request message:
-
From the Mule Palette view, select Core and drag a Logger component next to Completion source on the canvas.
-
In the Message field, enter the following text:
Seller received action message #[attributes.messageId]
Create the Third Flow of the Seller App
The third flow of the Seller app sends a purchase order completion state message to the Buyer app and logs information about the purchase order completion state message. Configuring this flow involves configuring the Action source and adding a Logger component.
Configure the Action Source
Configure the Action source to receive the completion state from the Buyer app.
Adding a Logger Component
Add a Logger component to log information about the purchase order state completion message.
-
From the Mule Palette view, select Core and drag a Logger component next to Action source on the canvas.
-
In the Message field, enter the following text:
Seller action message #[attributes.replyAttributes.messageId] completed as #[payload.completionCode]
XML for the Seller App
Paste this code into the Studio XML editor to quickly load the flow for the Seller app into your Mule app:
<?xml version="1.0" encoding="UTF-8"?>

<mule xmlns:ee="http://www.mulesoft.org/schema/mule/ee/core"
	xmlns:http="http://www.mulesoft.org/schema/mule/http"
	xmlns:rosetta="http://www.mulesoft.org/schema/mule/rosetta"
	xmlns="http://www.mulesoft.org/schema/mule/core"
	xmlns:doc="http://www.mulesoft.org/schema/mule/documentation"
	xmlns:xsi="http://www.w3.org/2001/XMLSchema-instance" xsi:schemaLocation="
http://www.mulesoft.org/schema/mule/core
http://www.mulesoft.org/schema/mule/core/current/mule.xsd
http://www.mulesoft.org/schema/mule/rosetta
http://www.mulesoft.org/schema/mule/rosetta/current/mule-rosetta.xsd
http://www.mulesoft.org/schema/mule/http
http://www.mulesoft.org/schema/mule/http/current/mule-http.xsd
http://www.mulesoft.org/schema/mule/ee/core
http://www.mulesoft.org/schema/mule/ee/core/current/mule-ee.xsd">
	<http:listener-config name="HTTP_Listener_config"
	doc:name="HTTP Listener config" >
		<http:listener-connection host="localhost" port="8082" />
	</http:listener-config>
	<http:request-config name="HTTP_Request_configuration"
	doc:name="HTTP Request configuration" >
		<http:request-connection host="localhost" port="8081" />
	</http:request-config>
	<rosetta:config name="PO_ResponderConfig_Seller"
	pipRole="RESPONDER"
	doc:name="RosettaNet Config"
	listenerConfigName="HTTP_Listener_config"
	servicePath="/partner2"
	requesterConfigName="HTTP_Request_configuration"
	requestPath="/partner1"
	keystorePath="/partner2.jks"
	keystorePass="nosecret"
	privatePass="partner2"
	globalUsageCode="Test"
	partnerBusinessIdentifier="123456789"
	partnerLocationId="partner1"
	selfBusinessIdentifier="123456788"
	selfLocationId="partner2" pipFile="/PIP3A4/V02_02.xml"/>
	<http:listener-config name="HTTP_InputListener"
	doc:name="HTTP Listener config" >
		<http:listener-connection host="localhost" port="8802" />
	</http:listener-config>
	<flow name="Send-Purchase-Order-Confirmation">
		<http:listener doc:name="Listener"
		config-ref="HTTP_InputListener"
		path="/" allowedMethods="POST"/>
		<rosetta:send-action doc:name="Send action"
		 config-ref="PO_ResponderConfig_Seller"/>
		<ee:transform doc:name="Transform Message">
			<ee:message >
				<ee:set-payload ><![CDATA[%dw 2.0
output text/plain
---
"Seller sent action message " ++ attributes.messageId ++ "\n"]]></ee:set-payload>
			</ee:message>
		</ee:transform>
	</flow>
	<flow name="Receive-Purchase-Order-Request">
		<rosetta:action-source doc:name="Action source"
		config-ref="PO_ResponderConfig_Seller"/>
		<logger level="INFO" doc:name="Logger"
		 message="Seller received action message #[attributes.messageId]"/>
	</flow>
	<flow name="Send-Purchase-Order-Completion">
		<rosetta:completion-source doc:name="Completion"
		config-ref="PO_ResponderConfig_Seller"/>
		<logger level="INFO" doc:name="Logger"
		message="Seller action message #[attributes.replyAttributes.messageId] completed as #[payload.completionCode]"/>
	</flow>
</mule>
Test the Examples
To test the Buyer and Seller apps, do the following after you run the apps:
-
Provide the purchase order request to the Buyer app.
-
Provide the purchase order request response to the Seller app.
Provide the Purchase Order Request Document
Use an HTTP POST to the Buyer app HTTP_InputListener endpoint to provide the purchase order request to send to the seller.
You can download a sample purchase order request. You can then use any HTTP tool, such as a browser plugin, standalone tool such as PostMan, or console tool such as curl to POST the data to the Buyer app.
For example, the following curl command posts a purchase order request:
curl -v -H "Content-Type: application/xml" -XPOST --data-binary @sample-purchase-order-request-content.xml http://localhost:8801
RosettaNet Connector generates a RosettaNet message based on the purchase order request and sends it to the seller, responding to the HTTP POST operation with a message identifier. In your console, your output should look like this:
INFO  ... Seller received action message pMAIhTBMsGzAf/NFx83KBO9nt+T+DV2RNLhwlpNqnXM=0
INFO  ... Buyer action message pMAIhTBMsGzAf/NFx83KBO9nt+T+DV2RNLhwlpNqnXM=0 completed as SUCCESS
Provide the Purchase Order Confirmation Document
Use an HTTP POST to the Seller app HTTP_InputListener endpoint to provide the purchase order confirmation to send to the buyer.
You can download a sample purchase order confirmation and then use any HTTP tool to post the data to the Seller app.
For example, the following curl command posts a purchase order confirmation:
curl -v -H "Content-Type: application/xml" -XPOST --data-binary @sample-purchase-order-confirmation-content.xml http://localhost:8802
RosettaNet Connector generates a RosettaNet message based on the purchase order confirmation and sends it to the buyer, responding to the HTTP POST operation with a message identifier. In your console, your output should look like this:
INFO  ... Buyer received action message ng7+TalLLPTJZHok4tQSBi8RYZD8IsD9+iB85cubzM=1
INFO  ... Seller action message sng7+TalLLPTJZHok4tQSBi8RYZD8IsD9+iB85cubzM=1 completed as SUCCESS
The purchase order confirmation action sent by this sample app is only an example. To send a real purchase order confirmation, you must configure the replyAttributes on the RosettaNet send-action operation with the information provided by when you received the corresponding purchase order request. These replayAttributes enable the RosettaNet protocol to distinguish between many concurrent requests.


