SAP SuccessFactors Connector 3.1
Anypoint Connector for SAP SuccessFactors (SuccessFactors Connector) provides full support to query, create, update, and delete entities using the ODATA API exposed by SuccessFactors.
This connector enables operations to:
-
Create, update, and delete entities.
-
Retrieve a single entity or query multiple entities.
Release Notes: SAP SuccessFactors Connector Release Notes
Exchange: SuccessFactors Connector![]()
Before You Begin
To use this information, you should be familiar with SAP SuccessFactors, Mule runtime engine (Mule), Anypoint Connectors, and the Anypoint Studio Essentials.
To use this connector you need the following:
-
A developer account or other valid SAP SuccessFactors instance.
-
MuleSoft Enterprise License.
For software requirements and compatibility information, see the Connector Release Notes.
To use this connector with Maven, view the pom.xml dependency information in the Dependency Snippets in Anypoint Exchange.
POM File Information
<dependency>
<groupId>com.mulesoft.connectors</groupId>
<artifactId>mule-sap-successfactors-connector</artifactId>
<version>x.y.z</version>
<classifier>mule-plugin</classifier>
</dependency>xmlReplace x.y.z with the version that corresponds to the connector you are using.
To obtain the most up-to-date pom.xml file information, access the connector in Anypoint Exchange![]() and click Dependency Snippets.
and click Dependency Snippets.
What’s New in this Connector
This version of the connector adds support for Mule 4.x.
This connector supports ODATA API exposed by the SuccessFactors.
Supported Operations
The SuccessFactors connector supports the following outbound operations:
-
Create Entity
-
Delete Entity
-
Get Entity by ID
-
Query
-
Update
-
Update Entity
Add the Connector to a Studio Project
Anypoint Studio provides two ways to add the connector to your Studio project: from the Exchange button in the Studio taskbar or from the Mule Palette view.
Add the Connector Using Exchange
-
In Studio, create a Mule project.
-
Click the Exchange icon (X) in the upper-left of the Studio task bar.
-
In Exchange, click Login and supply your Anypoint Platform username and password.
-
In Exchange, search for "success".
-
Select the connector and click Add to project.
-
Follow the prompts to install the connector.
Add the Connector in Studio
-
In Studio, create a Mule project.
-
In the Mule Palette view, click (X) Search in Exchange.
-
In Add Modules to Project, type "success" in the search field.
-
Click this connector’s name in Available modules.
-
Click Add.
-
Click Finish.
Configure the SuccessFactors Connector Global Element
To use the SuccessFactors connector in a Mule application, you must configure a global SuccessFactors configuration element that can be used by as many SuccessFactors connectors as you require for your application.
-
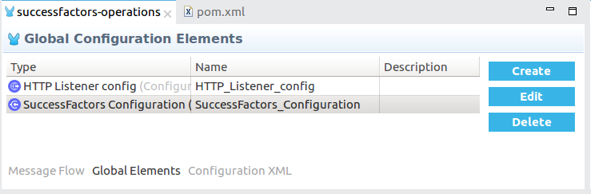
Click the Global Elements tab at the base of the canvas.
-
In the Global Configuration Elements screen, click Create. Following window would be displayed.
-
In the Choose Global Type wizard, expand Connector Configuration, select SuccessFactors connector Config, and click OK.
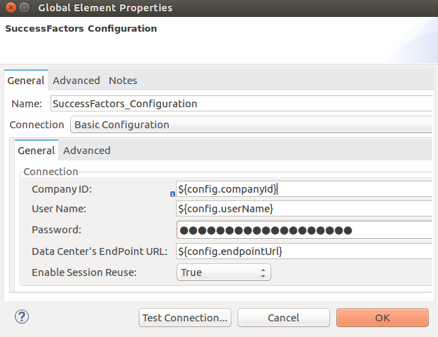
The following configuration screen for Basic Connection appears.
-
Configure these properties:
Parameter Description CompanyID
Your company ID
User Name
User name to connect
Password
Password to connect
Data Center’s Endpoint URL
SuccessFactors Web API URL
Enable Session Reuse
The session is alive.
Notes:
-
In the Basic configuration screens above, the placeholder values refer to a configuration file
mule-artifact.propertiesin thesrc/main/resourcesfolder of your project. -
You can either enter your credentials into the global configuration properties, or reference a configuration file that contains these values.
-
For simpler maintenance and better re-usability of your project, Mule recommends that you use a configuration file. Keeping these values in a separate file is useful if you need to deploy to different environments, such as production, development, and QA, where your access credentials differ.
-
-
Click OK to save the global connector configurations.
Use Case: Set Up and Run in Studio
-
In Anypoint Studio, click File > New > Mule Project.
-
Specify a Project Name and click Finish.
-
Search for "http" and drag the HTTP connector to the canvas. Click the green plus sign next to Connector Configuration, and click OK in the menu to accept the default values.
-
Drag the SuccessFactors connector Operation to the canvas. Click the green plus next to Connector Configuration, and specify your access credentials.
-
Click a connection strategy for authentication:
-
Basic Connection
-
To Configure Basic Connection
Configure Basic connection as described in the previous section, To Configure the SuccessFactors Connector Global Element.
To Run a Flow
-
In Package Explorer, right click your project’s name, and click Run As > Mule Application.
-
Check the console to see when the application starts. You should see messages such as these if no errors occur:
************************************************************ INFO 2019-07-14 22:12:42,003 [main] org.mule.module.launcher.DeploymentDirectoryWatcher: ++++++++++++++++++++++++++++++++++++++++++++++++++++++++++++ + Mule is up and kicking (every 5000ms) + ++++++++++++++++++++++++++++++++++++++++++++++++++++++++++++ INFO 2019-07-14 22:12:42,006 [main] org.mule.module.launcher.StartupSummaryDeploymentListener: ********************************************************** * - - + DOMAIN + - - * - - + STATUS + - - * ********************************************************** * default * DEPLOYED * ********************************************************** ************************************************************************ * - - + APPLICATION + - - * - - + DOMAIN + - - * - - + STATUS + - - * ************************************************************************ * myapp * default * DEPLOYED * ************************************************************************text
Example: Success Factors
This example demonstrates the use of SuccessFactors Connector.
To build and run this demo project, you need:
-
Anypoint Studio with at least the Mule 4.0 Runtime.
-
SuccessFactors Connector v3.0.0 or later.
-
Credentials to send ODATA API requests.
To Test the Flow
-
Import the demo project into your workspace using Anypoint Exchange or in Anypoint Studio using the Import command in the File menu.
-
Specify your basic credentials in the
/src/main/app/mule-app.propertiesfile: -
Run the project in Studio.
-
Type
localhost:8081in your browser to access the selection menu of the demo. -
Optionally you can configure the Connection Timeout and Read Timeout.
The Connection Timeout is the timeout in making the initial connection with the server. The Read Timeout is the timeout on waiting to read data from the server.
You can use the selection menu from http://localhost:8081 to test the flows.
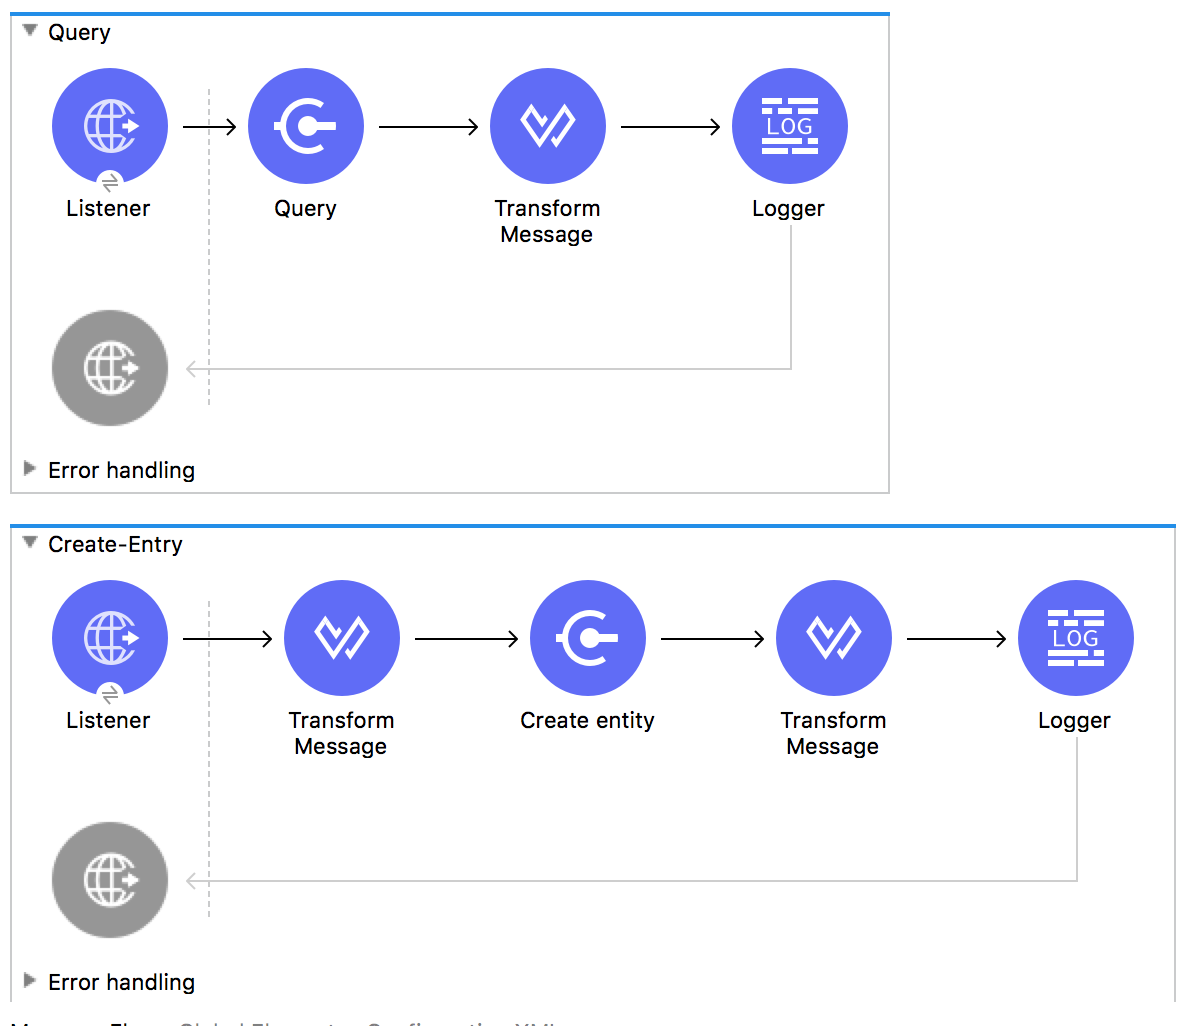
Use Case: Success Factors Operations

<?xml version="1.0" encoding="UTF-8"?>
<mule xmlns:ee="http://www.mulesoft.org/schema/mule/ee/core"
xmlns:successfactors="http://www.mulesoft.org/schema/mule/successfactors"
xmlns:http="http://www.mulesoft.org/schema/mule/http"
xmlns="http://www.mulesoft.org/schema/mule/core"
xmlns:doc="http://www.mulesoft.org/schema/mule/documentation"
xmlns:xsi="http://www.w3.org/2001/XMLSchema-instance" xsi:schemaLocation="
http://www.mulesoft.org/schema/mule/ee/core
http://www.mulesoft.org/schema/mule/ee/core/current/mule-ee.xsd
http://www.mulesoft.org/schema/mule/core
http://www.mulesoft.org/schema/mule/core/current/mule.xsd
http://www.mulesoft.org/schema/mule/http
http://www.mulesoft.org/schema/mule/http/current/mule-http.xsd
http://www.mulesoft.org/schema/mule/successfactors
http://www.mulesoft.org/schema/mule/successfactors/current/mule-successfactors.xsd">
<http:listener-config name="HTTP_Listener_config" doc:name="HTTP Listener config" >
<http:listener-connection host="0.0.0.0" port="8081" />
</http:listener-config>
<successfactors:config name="SuccessFactors_Configuration" doc:name="SuccessFactors Configuration" >
<successfactors:basic-connection
companyId="${config.companyId}"
userName="${config.userName}"
password="${config.password}"
endpointUrl="${config.endpointUrl}"/>
</successfactors:config>
<configuration-properties file="automation-credentials.properties"/>
<flow name="Query">
<http:listener doc:name="Listener" config-ref="HTTP_Listener_config" path="/list"/>
<successfactors:query entitySetName="VendorInfo" doc:name="Query"
config-ref="SuccessFactors_Configuration" />
<ee:transform doc:name="Transform Message">
<ee:message >
<ee:set-payload ><![CDATA[%dw 2.0
output application/json
---
payload]]></ee:set-payload>
</ee:message>
</ee:transform>
<logger level="INFO" doc:name="Logger" message="#[payload]"/>
</flow>
<flow name="Create-Entry">
<http:listener doc:name="Listener" config-ref="HTTP_Listener_config" path="/createVendor"/>
<ee:transform doc:name="Transform Message">
<ee:message >
<ee:set-payload ><![CDATA[%dw 2.0
output application/java
---
{
vendorCode: "XYZ123ABC",
effectiveStartDate: "2018-07-08T00:00:00" as DateTime,
effectiveStatus: "I"
}]]></ee:set-payload>
</ee:message>
</ee:transform>
<successfactors:create-entity doc:name="Create entity"
config-ref="SuccessFactors_Configuration" entitySetName="VendorInfo"/>
<ee:transform doc:name="Transform Message" >
<ee:message >
<ee:set-payload ><![CDATA[%dw 2.0
output application/json
---
payload]]></ee:set-payload>
</ee:message>
</ee:transform>
<logger level="INFO" doc:name="Logger" message="#[payload]"/>
</flow>
<flow name="Get-Entity-by-Id">
<http:listener doc:name="Listener" config-ref="HTTP_Listener_config" path="/getById"/>
<ee:transform doc:name="Transform Message">
<ee:message>
<ee:set-payload><![CDATA[%dw 2.0
output application/java
---
{
effectiveStartDate: attributes.queryParams.effectiveStartDate as DateTime,
vendorCode: attributes.queryParams.vendorCode
}]]></ee:set-payload>
</ee:message>
</ee:transform>
<successfactors:get-entity-by-id entitySetName="VendorInfo" doc:name="Get entity by id"
config-ref="SuccessFactors_Configuration" />
<ee:transform doc:name="Transform Message">
<ee:message >
<ee:set-payload ><![CDATA[%dw 2.0
output application/json
---
payload]]></ee:set-payload>
</ee:message>
</ee:transform>
<logger level="INFO" doc:name="Logger" message="#[payload]"/>
</flow>
<flow name="Delete-Entry">
<http:listener doc:name="Listener" config-ref="HTTP_Listener_config" path="/deleteVendor"/>
<ee:transform doc:name="Transform Message">
<ee:message >
<ee:set-payload ><![CDATA[%dw 2.0
output application/java
---
{
effectiveStartDate: attributes.queryParams.effectiveStartDate as DateTime,
vendorCode: attributes.queryParams.vendorCode as String
}]]></ee:set-payload>
</ee:message>
</ee:transform>
<successfactors:delete-entity entitySetName="VendorInfo" doc:name="Delete entity"
config-ref="SuccessFactors_Configuration" />
<ee:transform doc:name="Transform Message">
<ee:message >
<ee:set-payload ><![CDATA[%dw 2.0
output application/json
---
payload]]></ee:set-payload>
</ee:message>
</ee:transform>
<logger level="INFO" doc:name="Logger" message="#[payload]"/>
</flow>
</mule>xmlUse a Query as a Filter
-
In the Anypoint Studio’s Filter field, select the Query value, which enables you to create your own filter.
-
In the Value field, enter the filter options using the format described in the ODATA URI Conventions
 site, item 4.5.
 -
Important: You don’t need to add the "Entity set name" in the query. You have to select it from the list.
Examples:
-
startswith(username, 'Mule') eq true -
startswith(username, 'JA') eq true or endswith(username, 'n3') eq true -
username eq 'Mike'
In conclusion, the Query value is used only for the Filter field. The actual query is built by the connector.