Snowflake Connector 1.1 Examples
The following example returns all rows of a table based on a watermark.
This example uses variables for some field values. You can either:
-
Replace the variables with their values in the code.
-
Provide the values for each variable in a properties file and then refer to that file from the connector configuration.
If you don’t know how to use a properties file, refer to Configuring Property Placeholders.
Before you try the examples, access Anypoint Studio (Studio) and verify that the Mule Palette view displays entries for Snowflake Connector. If not, follow the instructions in Add the Connector to Your Mule Project.
Return All Rows of a Table
This example shows how to use the On Table Row source to return rows that contain columns with a greater watermark value than that of the last watermark processed.
The following screenshot shows the app flow for this example:
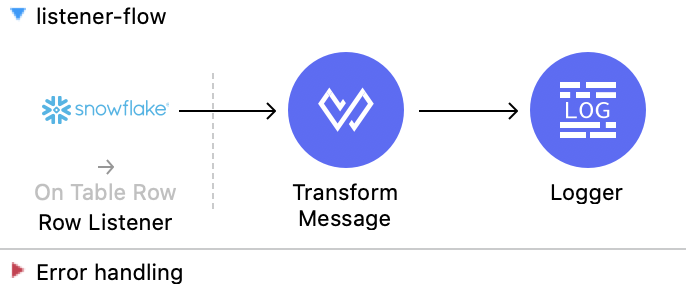
Add the On Table Row Source
The On Table Row source selects from a table at a regular interval and generates one message per obtained row.
-
In the Mule Palette view, select Snowflake and drag the On Table Row source to the canvas.
-
In the Search properties window, click + next to the Connector configuration field to add a global element.
-
Enter the following values:
Field Value Configuration
Name of the configuration.
Config Ref
Snowflake_ConfigTable
USERSWatermark Column
CREATION_DATEId Column
IDSince
2021-12-14 11:00:00.000
Add the Transform Message Component
The Transform Message component outputs the rows of the table in JSON format.
-
In the Mule Palette view, select Core and drag the Transform Message component to the right of On Table Row.
-
Click the Transform Message component and set the output format to
application/json.
Add the Logger Component
The Logger component logs the query result to the console.
-
In the Mule Palette view, select Core and drag the Logger component to the right of Transform Message.
-
Enter the following values:
Field Value Display Name
LoggerMessage
payloadLevel
INFO (Default)
XML for This Example
Paste this code into the Studio XML editor to quickly load the flow for this example into your Mule app:
<?xml version="1.0" encoding="UTF-8"?>

<mule xmlns:db="http://www.mulesoft.org/schema/mule/db" xmlns:ee="http://www.mulesoft.org/schema/mule/ee/core"
	xmlns:snowflake="http://www.mulesoft.org/schema/mule/snowflake"
	xmlns:salesforce="http://www.mulesoft.org/schema/mule/salesforce" xmlns:http="http://www.mulesoft.org/schema/mule/http" xmlns="http://www.mulesoft.org/schema/mule/core" xmlns:doc="http://www.mulesoft.org/schema/mule/documentation" xmlns:xsi="http://www.w3.org/2001/XMLSchema-instance" xsi:schemaLocation="http://www.mulesoft.org/schema/mule/core http://www.mulesoft.org/schema/mule/core/current/mule.xsd
http://www.mulesoft.org/schema/mule/http http://www.mulesoft.org/schema/mule/http/current/mule-http.xsd
http://www.mulesoft.org/schema/mule/snowflake http://www.mulesoft.org/schema/mule/snowflake/current/mule-snowflake.xsd
http://www.mulesoft.org/schema/mule/ee/core http://www.mulesoft.org/schema/mule/ee/core/current/mule-ee.xsd
http://www.mulesoft.org/schema/mule/db http://www.mulesoft.org/schema/mule/db/current/mule-db.xsd">

	<configuration-properties file="mule-app.properties"/>

	<snowflake:snowflake-config name="Snowflake_Config" >
		<snowflake:snowflake-connection accountName="${config.accountName}" warehouse="${config.warehouse}" database="${config.database}" schema="${config.schema}" user="${config.user}" password="${config.password}" role="${config.role}"/>
	</snowflake:snowflake-config>
	<flow name="listener-flow" >
		<snowflake:row-listener doc:name="Row Listener" config-ref="Snowflake_Config" table="USERS" watermarkColumn="CREATION_DATE" idColumn="ID" since="2021-12-14 11:00:00.000">
			<scheduling-strategy >
				<fixed-frequency />
			</scheduling-strategy>
		</snowflake:row-listener>
		<ee:transform doc:name="Transform Message" >
			<ee:message >
				<ee:set-payload ><![CDATA[%dw 2.0
output application/json
---
payload]]></ee:set-payload>
			</ee:message>
		</ee:transform>
		<logger level="INFO" doc:name="Logger" message="#[payload]"/>
	</flow>
</mule>