MuleSoft Accelerators Common Services
The MuleSoft Accelerators leverage a number of common components, referred to here as "common services". These services include the following:
-
Common Scheduler - unified scheduling
-
Notification Services - send notifications
-
Security Services - API security policies
The notification and scheduler services can be configured and installed as independent applications. The notification services consists of multiple applications, depending on which notification targets are selected. One or more security policies can be applied using API Manager.
Common Scheduler
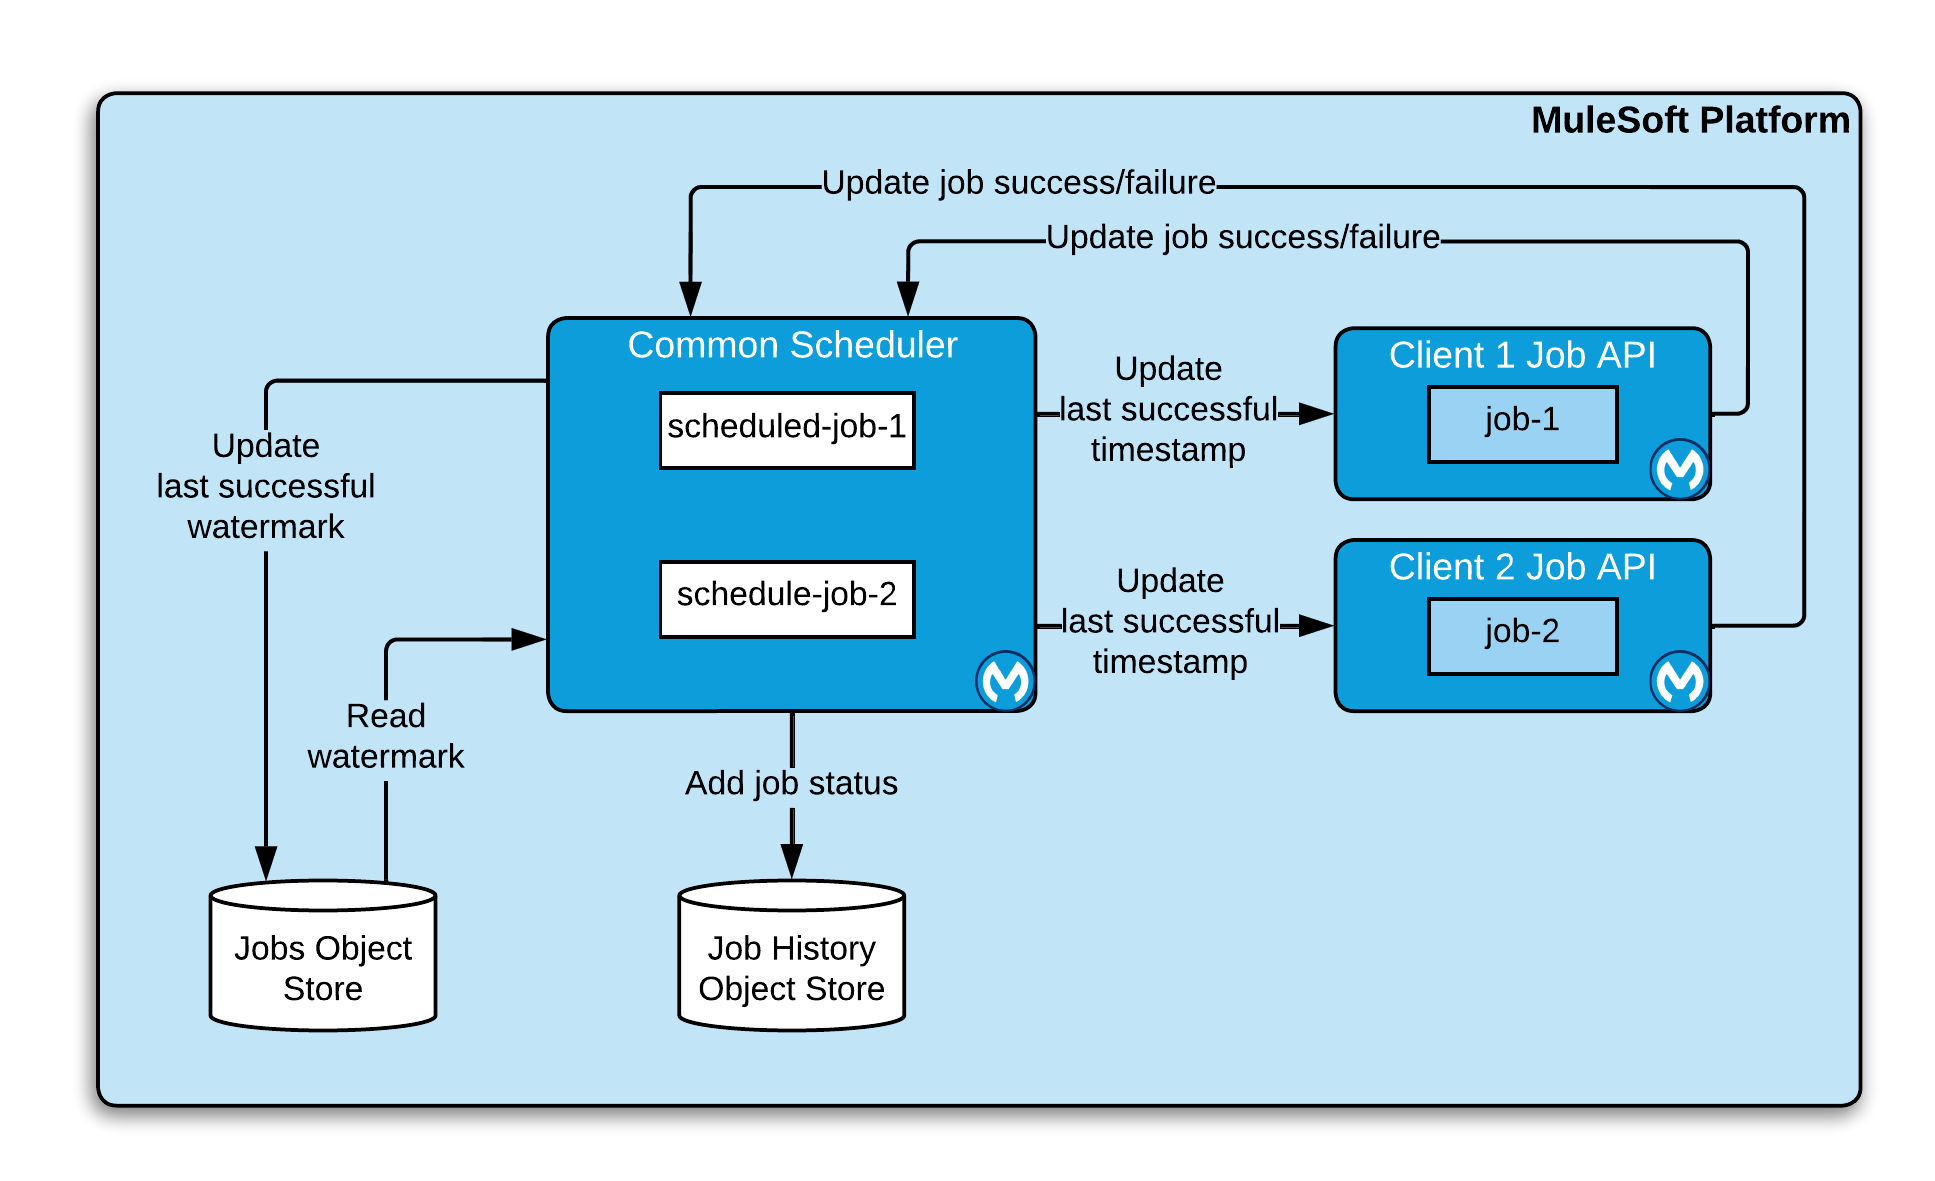
The Common Scheduling Service is an optional component that will run schedules and perform API calls. The benefit of having a common scheduler service is to have all the integration-level schedules maintained in one place. Here is a high-level view of how the scheduler service works:
The service may be built in two different ways, depending on the target deployment platform. The Anypoint Platform offers operational advantages to applications deployed in CloudHub when dealing with schedules.
High-level Workflow
The following is a high level description of the workflow for the scheduler process:
-
A predefined schedule is triggered. Schedules have enriched information about the last execution such as SCHEDULE_TYPE and WATERMARK.
-
The scheduling service calls the job configured for this event and updates the schedule status to "TRIGGERED" with a current timestamp. A Trigger ID and CALLBACK URL are generated.
-
Once the process completes, it does a call-back to the scheduling status service through the callback URLs to report the execution status.
For service configuration details please refer to the Getting Started guide as well as the implementation template for the services itself.
Notification Services
The solution provides an optional Notifications Process API, which consumes notification events and sends notifications to individuals or groups via SMS, email, or Slack via system APIs specific to those services. The high-level design is as follows:
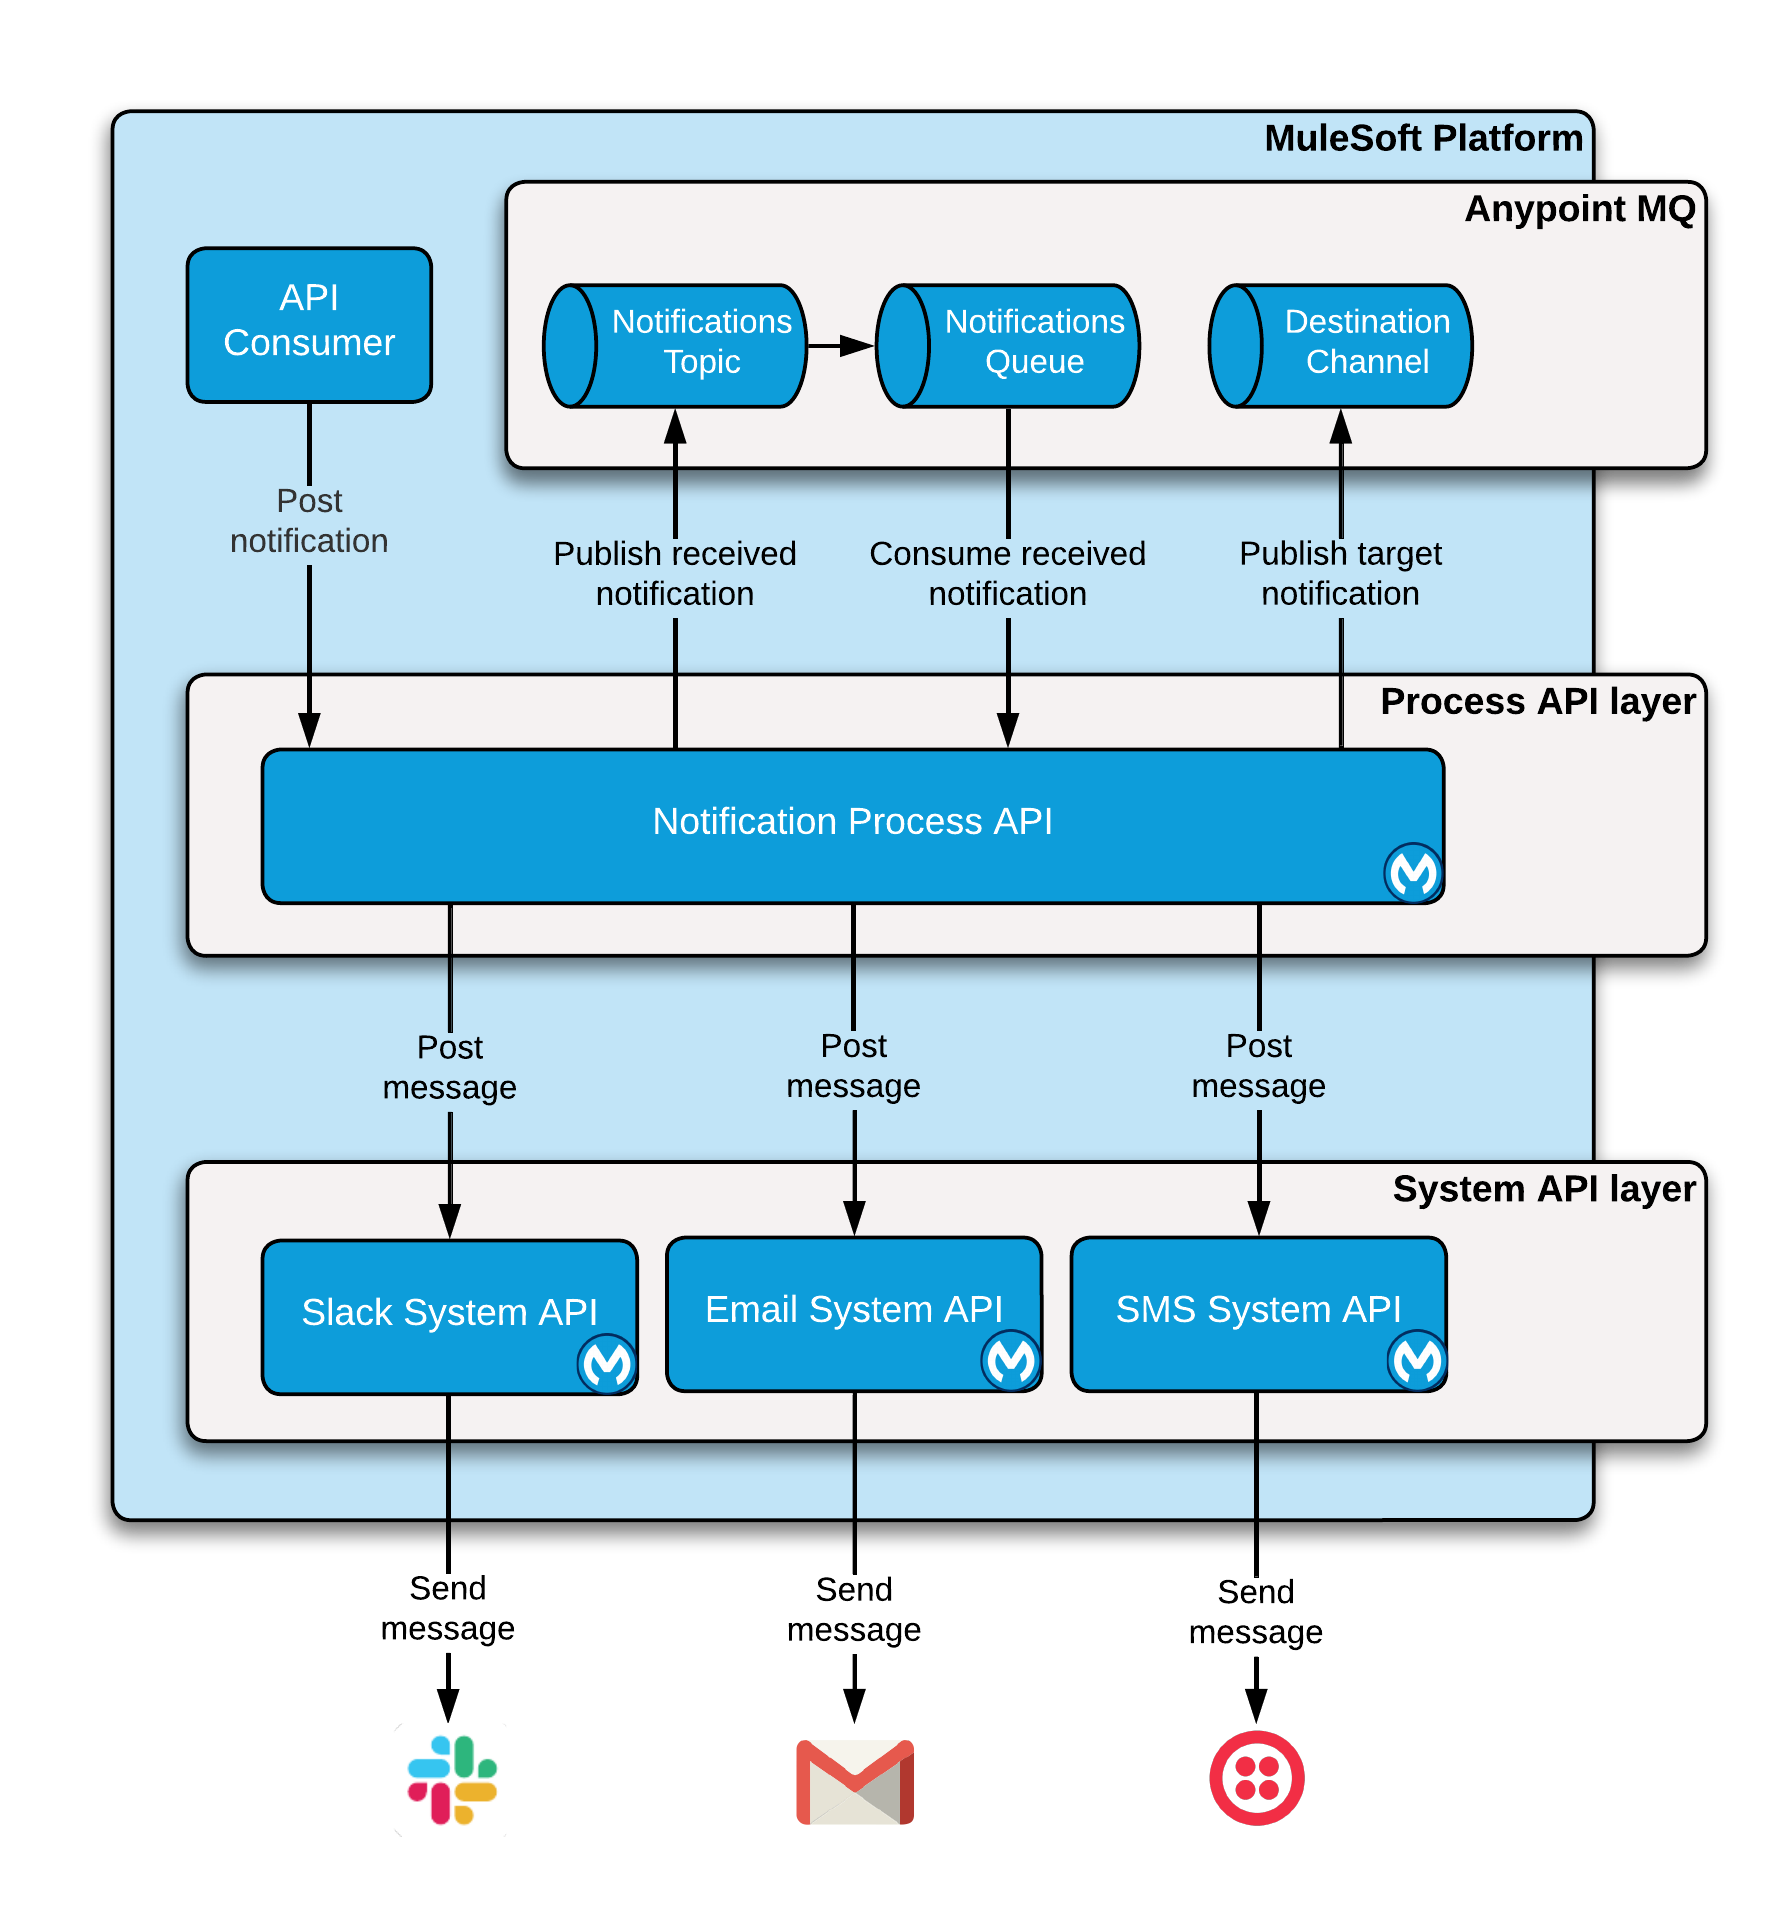
As you can see, the API offloads incoming requests directly to a queue in order to avoid blocking calling apps.
High-level Workflow
The following is a high level description of the workflow for the notification process:
-
A module calls the Notifications Process API, providing:
-
NOTIFICATION\_TYPE— Either email, sms, or slack -
NOTIFICATION\_ADDRESS— Destination address/number -
NOTIFICATION\_MESSAGE— Notification message text
-
-
The API places the message on a queue for downstream processing and immediately returns a success response.
-
A queue subscriber receives the message and routes it to the appropriate System API based on the
NOTIFICATION\_TYPE. -
The System API synchronously processes the message and posts it to the back-end service.
For service configuration details please refer to the Getting Started guide as well as the individual RAML specifications and implementation templates for the individual services themselves.
Security Services
Most APIs use the HTTPS protocol by default for secure communications. The APIs provided by the solution can also be secured by applying the Client ID enforcement policy in API Manager; the Basic Authentication policy is also supported.
CloudHub load balancers and HTTPS
Applications that expose API endpoints or make calls to other APIs will do so via the HTTPS protocol. To simplify deployment, listeners use a self-signed certificate provided by the accelerator-common-core library. While this approach works fine when using the shared CloudHub load balancer in the target deployment region, the certificate will generally need to be replaced if running under a Dedicated Load Balancer.
How to apply the API Manager policy
This section describes the procedure to enable the Client ID enforcement policy for a deployed API.
Your organization must have API Manager included in your Anypoint subscription in order to proceed.
Creating the managed API instance
The simplest way to create a managed API instance is from an existing Exchange asset. Here are the steps:
-
Download the API RAML Definition asset from the MuleSoft Exchange and upload it to your own Exchange instance. Be sure to select the correct business group.
-
In API Manager, select the same business group and choose a target environment. Click the
Manage APIbutton and then select theManage API from Exchangeoption. -
In the
API Namefield, start typing the name of the API to manage. The asset type and version fields should populate automatically. -
Scroll down to the
Mule versionoption and enable it. Clear the contents of theImplementation URIfield. -
To make the API easier to find later, expand the
Advanced optionssection and enter the full display name of the API in theLabelfield (for example,Accelerator Jira Experience API). -
Click
Saveto create the API instance. On the summary page, copy theAPI IDvalue found under theAutodiscoverylabel.
Requesting access to the API
Locate the API asset in Exchange and select the Request access option from the menu located in the top-right corner of the asset page (may be hidden under the "three dots" menu). Select the API you created earlier and choose an application to use (create one if necessary). Be sure to copy the client ID and client secret values.
In your local Maven settings.xml file (the one you configured specifically for the accelerator deployments), set the values of the accelerator-api.client-id and accelerator-api.client-id properties in the target deployment profile (for example, CloudHub-DEV) using the values you copied above.
For a higher degree of security, create a separate application for each API consumer. For API to API calls, you will need to add each client ID/secret pair to your deployment profile and update the property name references in the pom.xml file for the consuming API.
Enabling support for API Manager in applications
Each application must include a configuration element corresponding to the API ID that it’s implementing. The accelerator applications already include support for this; you only need to update them as follows:
-
In the implementation project, open the
global.xmlfile found under thesrc/main/mulefolder. -
When the editor opens, select the
Configuration XMLtab to reveal the XML source. -
Locate the
api-gateway:autodiscoveryelement and uncomment it. Leave the values as they are. -
In the property file representing the target deployment environment (for example,
config-dev.yaml) under thesrc/main/resources/configfolder, locate theautodiscoveryIDproperty and set it to the value copied from theAPI IDvalue, above. Be sure to keep the double-quotes (this applies to all YAML config properties). -
Deploy the updated application and monitor the log file. Just before the
Your application is startedmessage, there should be one similar to the following:API ApiKey{id='16422525'} is now unblocked (available). -
Verify that the status of the API instance in API Manager now shows as "Available".
Applying the policy
The following steps describe how to apply the Client ID enforcement policy to a specific API:
-
In API Manager, locate the API to apply the policy to and click the version label to bring up the API settings page.
-
Select the
Policiesitem from the left navigation menu and click theApply New Policybutton. -
Select the latest version of the
Client ID enforcementpolicy and then clickConfigure Policy. -
In the policy configuration page, choose the
HTTP Basic Authentication Headeroption for theCredentials originsetting. -
Click the
Applybutton to create and apply the policy to the API.
The policy should take effect after a few moments.
See Also
-
The API Template Project is a generic implementation template that allows you to quickly create implementations for new API specifications.
-
The Maven Archetype Plugin is a Maven archetype pre-built with Accelerator best practices to help developers kick start their development of new APIs.
-
The Getting Started guide provides detailed information about configuring and using these services. Refer to the navigation pages on the left for more information about these services from a functional perspective.
-
The MuleSoft Accelerators main page.