Amazon Redshift Connector 1.0 Example
This example shows you how to use Anypoint Connector for Amazon Redshift (Amazon Redshift Connector) to load data from Amazon S3 to Amazon Redshift.
Create the Mule Project
-
In Studio, select File > New > Mule Project.
-
Enter
redshift-demoas the name for your Mule project and click Finish. -
Open the
redshift-demo.xmlfile insrc/main/mulefolder. -
In the Mule Palette view, click (X) Search in Exchange.
-
In Add Modules to Project, type
redshiftin the search field. -
Click Amazon Redshift Connector in Available modules.
-
Click Add.
-
Click Finish.
-
Repeat the previous steps to also add the Amazon S3 Connector (search for
amazon s3) and File Connector (search forfile) to the Mule project.
XML Code for This Example
Overwrite the contents of redshift-demo.xml file with the following XML snippet:
<?xml version="1.0" encoding="UTF-8"?>

<mule xmlns:ee="http://www.mulesoft.org/schema/mule/ee/core"
	  xmlns:file="http://www.mulesoft.org/schema/mule/file"
	  xmlns:s3="http://www.mulesoft.org/schema/mule/s3"
	  xmlns:redshift="http://www.mulesoft.org/schema/mule/redshift"
	  xmlns:http="http://www.mulesoft.org/schema/mule/http"
	  xmlns="http://www.mulesoft.org/schema/mule/core"
	  xmlns:doc="http://www.mulesoft.org/schema/mule/documentation"
	  xmlns:xsi="http://www.w3.org/2001/XMLSchema-instance"
	  xsi:schemaLocation="http://www.mulesoft.org/schema/mule/core http://www.mulesoft.org/schema/mule/core/current/mule.xsd
http://www.mulesoft.org/schema/mule/http http://www.mulesoft.org/schema/mule/http/current/mule-http.xsd
http://www.mulesoft.org/schema/mule/redshift http://www.mulesoft.org/schema/mule/redshift/current/mule-redshift.xsd
http://www.mulesoft.org/schema/mule/s3 http://www.mulesoft.org/schema/mule/s3/current/mule-s3.xsd
http://www.mulesoft.org/schema/mule/file http://www.mulesoft.org/schema/mule/file/current/mule-file.xsd
http://www.mulesoft.org/schema/mule/ee/core http://www.mulesoft.org/schema/mule/ee/core/current/mule-ee.xsd">

	<http:listener-config name="HTTP_Listener_config" doc:name="HTTP Listener config" basePath="/">
		<http:listener-connection host="0.0.0.0" port="8081" />
	</http:listener-config>

	<redshift:config name="Amazon_Redshift_Connector_Config" doc:name="Amazon Redshift Connector Config">
		<redshift:basic-connection
				clusterId="${redshift.cluster_id}"
				database="${redshift.database}"
				user="${redshift.user}"
				password="${redshift.password}"
				region="${redshift.region}"
				port="${redshift.port}"
		/>
	</redshift:config>

	<s3:config name="Amazon_S3_Configuration" doc:name="Amazon S3 Configuration">
		<s3:basic-connection accessKey="${s3.access_key}" secretKey="${s3.secret_key}" region="${s3.region}"/>
	</s3:config>

	<file:config name="File_Config" doc:name="File Config">
		<file:connection workingDir="${mule.home}/apps/${app.name}/" />
	</file:config>

	<configuration-properties doc:name="Configuration properties" file="mule-artifact.properties" />

	<flow name="Create-Redshift-Table-S3-Bucket-S3-Object-Flow">
		<http:listener doc:name="Listener" config-ref="HTTP_Listener_config" path="/init"/>
		<set-variable value="username-bucket" doc:name="Bucket Name" variableName="bucket" />
		<redshift:execute-ddl doc:name="Execute DDL" config-ref="Amazon_Redshift_Connector_Config">
			<redshift:sql ><![CDATA[CREATE TABLE username (Username VARCHAR(50), Identifier INTEGER, First_Name VARCHAR(50), Last_Name VARCHAR(50));]]></redshift:sql>
		</redshift:execute-ddl>
		<s3:create-bucket doc:name="Create bucket" config-ref="Amazon_S3_Configuration" bucketName="#[vars.bucket]"/>
		<file:read doc:name="Read" config-ref="File_Config" path="username.csv"/>
		<s3:create-object doc:name="Create object" config-ref="Amazon_S3_Configuration" bucketName="#[vars.bucket]" key="username.csv" contentType="text/csv"/>
		<ee:transform doc:name="Transform Message">
			<ee:message >
				<ee:set-payload ><![CDATA[%dw 2.0
output application/json
---
{
	success: true,
	redshiftTable: "username",
	s3bucket: vars.bucket,
	s3object: "username.csv"
}]]></ee:set-payload>
			</ee:message>
		</ee:transform>
	</flow>

	<flow name="Execute-Copy-Command-Flow">
		<http:listener doc:name="Listener" config-ref="HTTP_Listener_config" path="/execute"/>
		<set-variable value="#['s3://username-bucket/username.csv']" doc:name="Bucket Name" variableName="bucketNameEndpoint"/>
		<set-variable value="${copy.access_key}" doc:name="Access Key" variableName="access_key"/>
		<set-variable value="${copy.secret_key}" doc:name="Secret Key" variableName="secret_key"/>
		<redshift:execute-script doc:name="Execute script" config-ref="Amazon_Redshift_Connector_Config">
			<redshift:sql ><![CDATA[#["copy username from " ++ "'" ++ vars.bucketNameEndpoint ++ "'" ++ " access_key_id " ++ "'" ++ vars.access_key ++ "'" ++ " secret_access_key " ++ "'" ++ vars.secret_key ++ "'" ++ " delimiter ';' IGNOREHEADER 1 IGNOREBLANKLINES"]]]></redshift:sql>
		</redshift:execute-script>
		<ee:transform doc:name="Transform Message">
			<ee:message >
				<ee:set-payload ><![CDATA[%dw 2.0
output application/json
---
{
	"success": true
}
]]></ee:set-payload>
			</ee:message>
		</ee:transform>
	</flow>

	<flow name="Delete-Redshift-Table-S3-Bucket-Flow">
		<http:listener doc:name="Listener" config-ref="HTTP_Listener_config" path="/deleteAll"/>
		<set-variable value="username-bucket" doc:name="Set Variable" variableName="bucketDelete"/>
		<redshift:execute-ddl doc:name="Execute DDL" config-ref="Amazon_Redshift_Connector_Config">
			<redshift:sql ><![CDATA[DROP TABLE username;]]></redshift:sql>
		</redshift:execute-ddl>
		<s3:delete-bucket doc:name="Delete bucket" config-ref="Amazon_S3_Configuration" force="true" bucketName='#[vars.bucketDelete]'/>
		<ee:transform doc:name="Transform Message">
			<ee:message >
				<ee:set-payload ><![CDATA[%dw 2.0
output application/json
---
{
	"success": true
}]]></ee:set-payload>
			</ee:message>
		</ee:transform>
	</flow>

</mule>
Configure Global Elements
-
Create a file named
mule-artifact.propertiesin thesrc/main/resources/folder. -
Add the following properties in the
mule-artifact.propertiesfile and assign the correct values:s3.access_key= s3.secret_key= s3.region= redshift.cluster_id= redshift.region= redshift.port= redshift.database= redshift.user= redshift.password= copy.access_key= copy.secret_key=
-
You must have Amazon S3 credentials to create and delete buckets and to create an object.
-
Amazon Redshift credentials are required to establish a connection to the database.
-
This example is using a
COPYcommand to load a table in parallel from a data file on Amazon S3.To use the
COPYcommand, you must authenticate using your IAM user credentials with the correct policies attached to it, therefore, it is best to use the Amazon S3 Read only policy for thecopy.access_keyandcopy.secret_keyproperties. -
Alternatively, it is possible to use an IAM Role instead of the Access and Secret key pair.
To do this, you must ensure the role has the correct policies attached to it. It is best to use the Amazon S3 Read only policy for this purpose.
-
To create an IAM role to allow your Redshift cluster to communicate with the Amazon S3 service on your behalf, follow the steps in this Amazon Redshift tutorial.
-
-
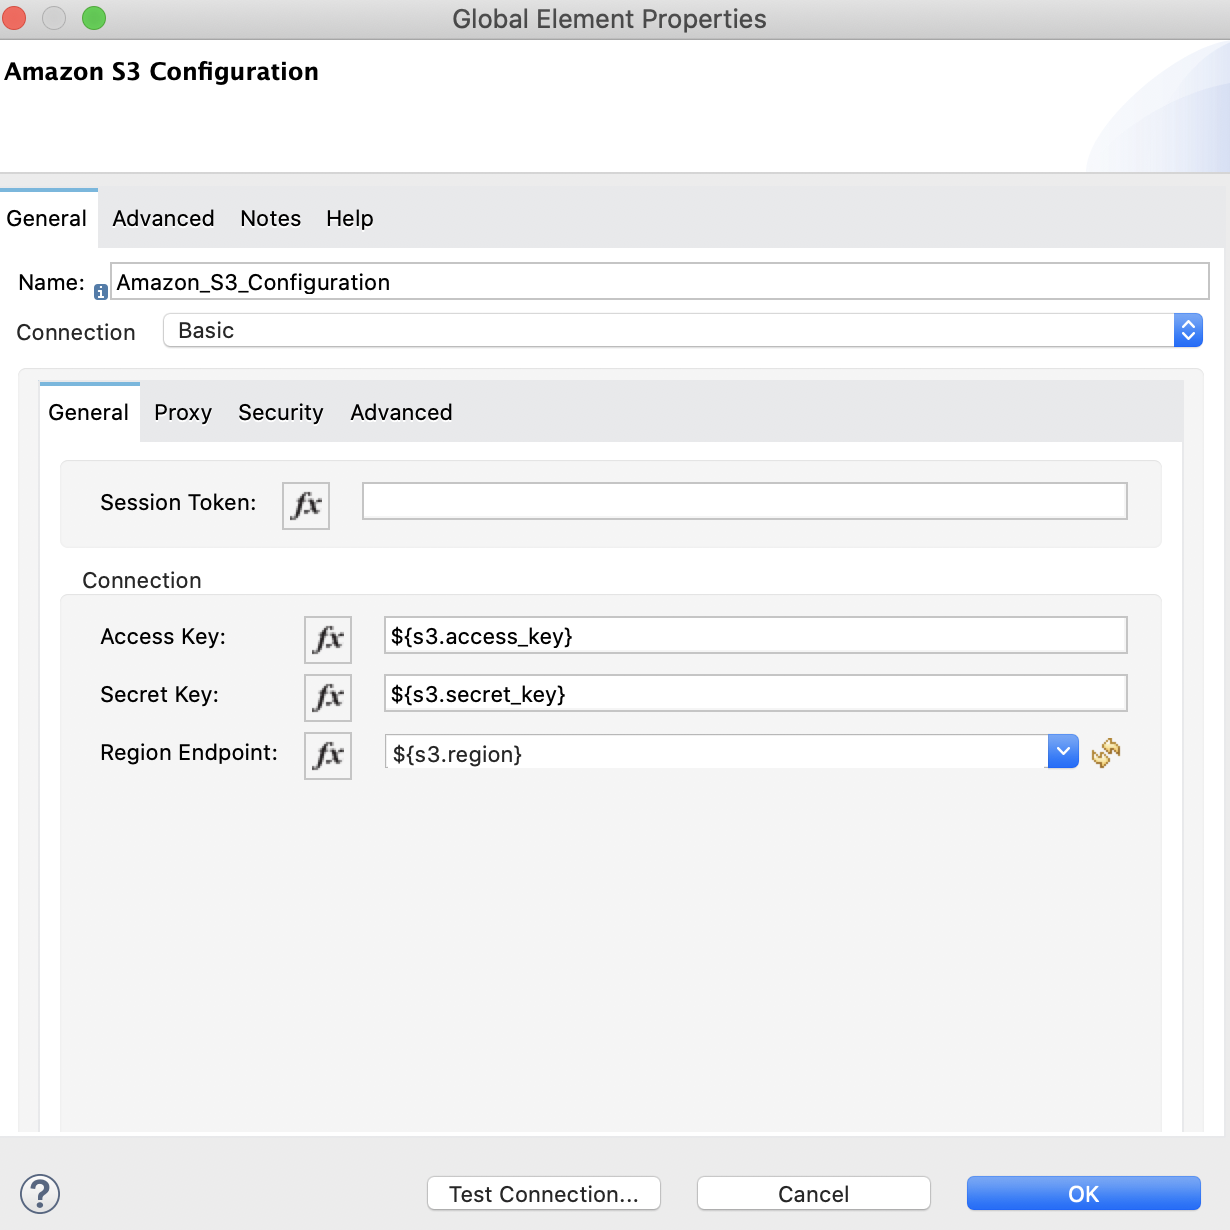
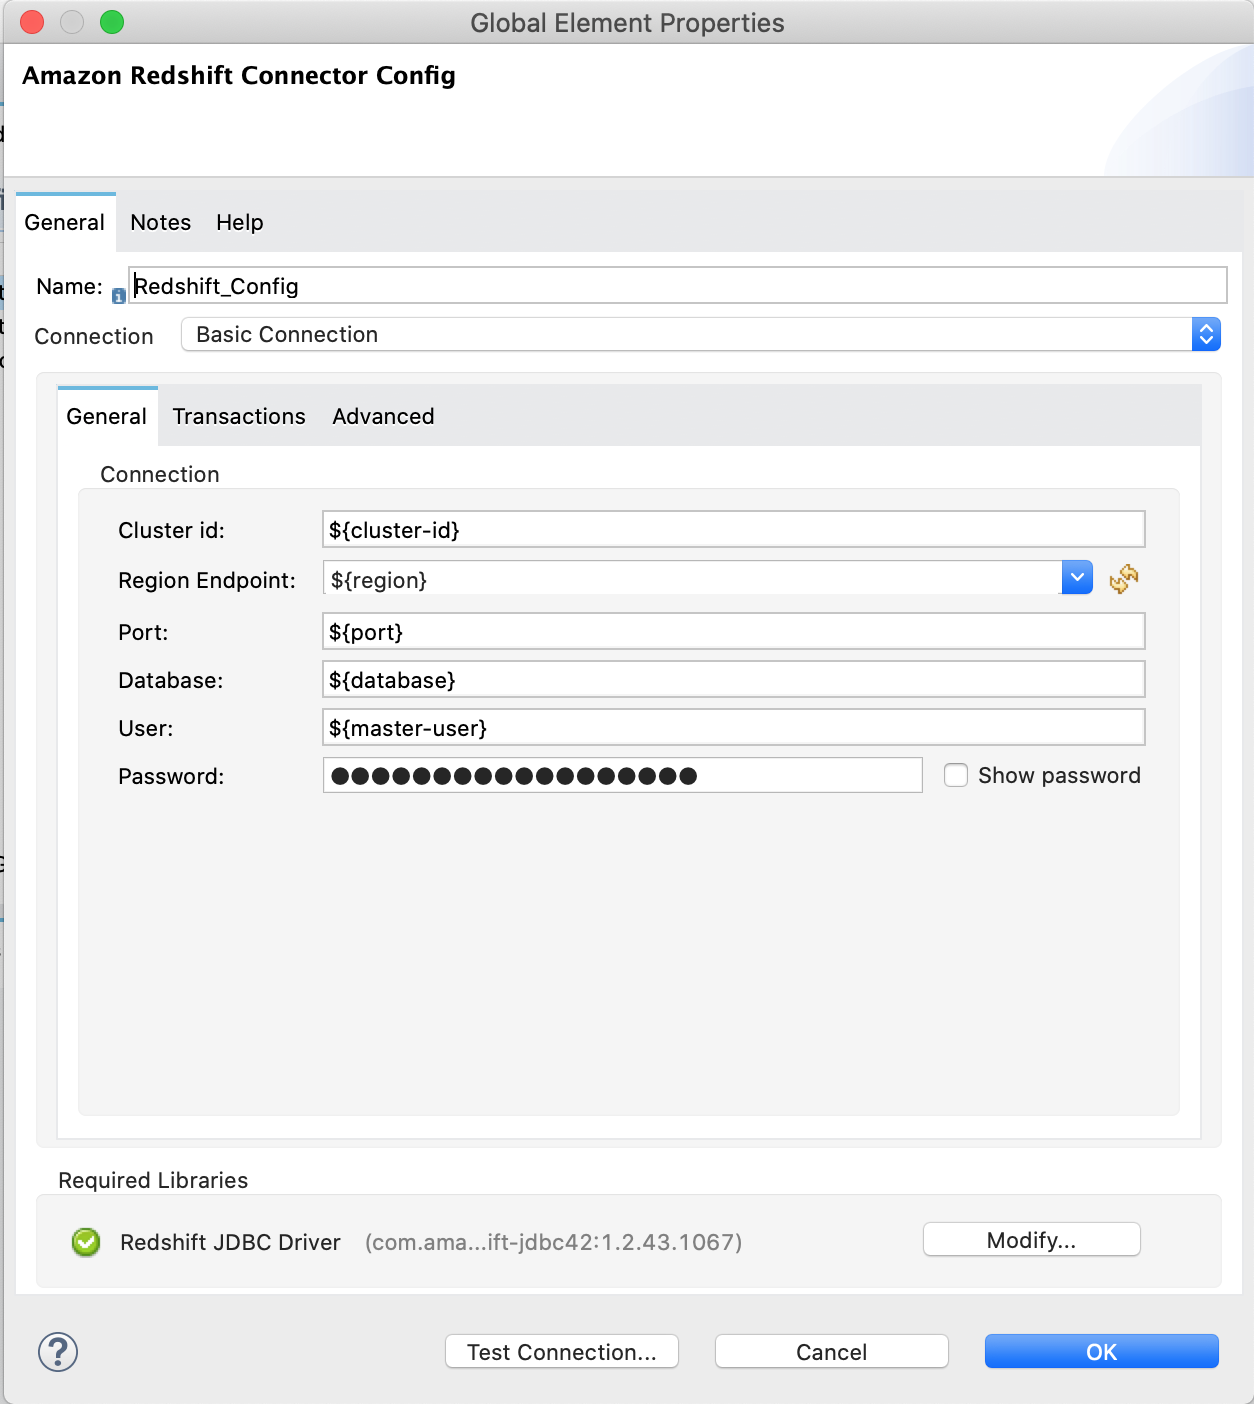
Open the Amazon Redshift configuration, scroll down, and configure the JDBC driver in the Required libraries section. In this example, choose the Add recommended library option. If this doesn’t work, add the Amazon Maven repository to your
pom.xmlfile and try again:<repositories> ... <repository> <id>redshift</id> <url>https://s3.amazonaws.com/redshift-maven-repository/release</url> </repository> </repositories>
The following images show the Amazon S3 and Amazon Redshift configurations:
Prepare the Data File
Prepare a data file to upload to Amazon S3. This data file will then be used as the data set in the COPY command for the Amazon Redshift table.
-
Create a file named
username.csvin thesrc/main/resources/folder in your Mule project. -
Populate the
username.csvfile with the following sample data:
Username; Identifier;First name;Last name
booker12;9012;Rachel;Booker
grey07;2070;Laura;Grey
johnson81;4081;Craig;Johnson
jenkins46;9346;Mary;Jenkins
smith79;5079;Jamie;Smith
Flows in This Example
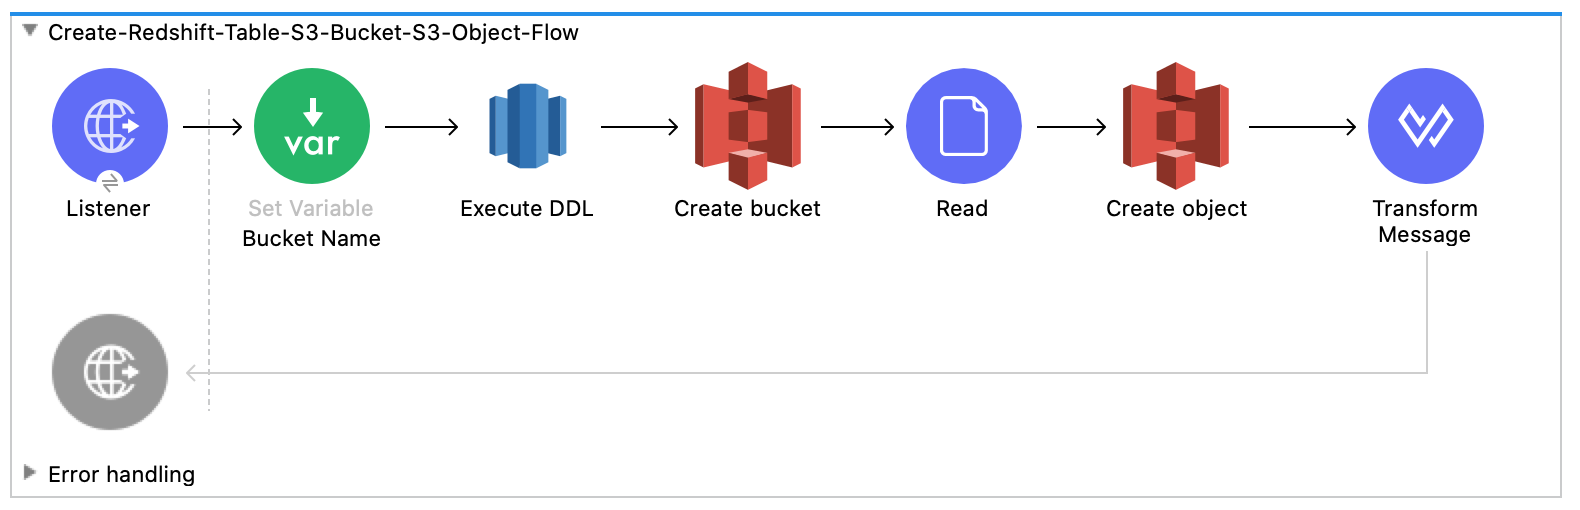
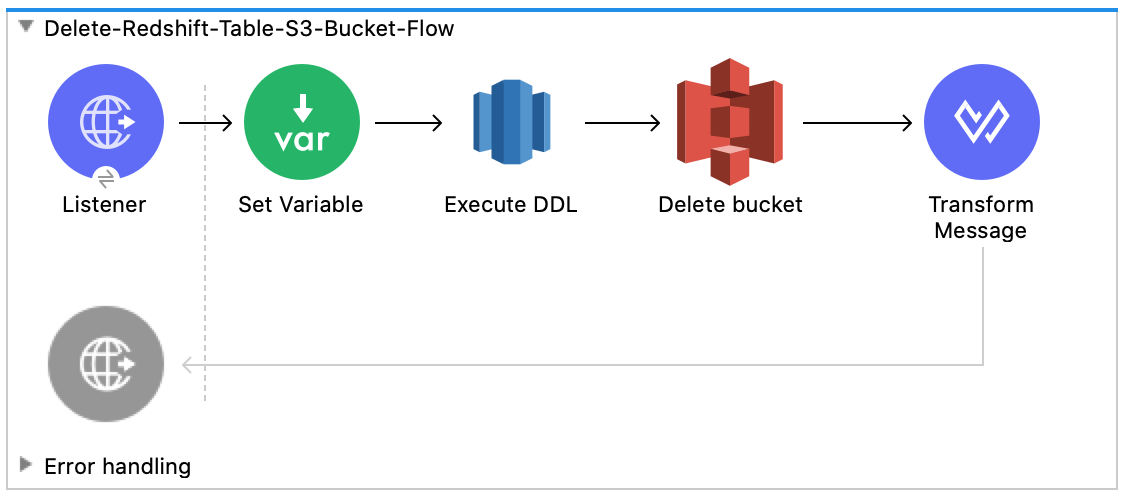
The following screenshots show the Anypoint Studio app flows for this example:
-
This flow creates the Amazon Redshift table, Amazon S3 bucket and object:
-
This flow executes the
COPYcommand, which leverages the Amazon Redshift massively parallel processing (MPP) architecture to load data in parallel from a file in an Amazon S3 bucket: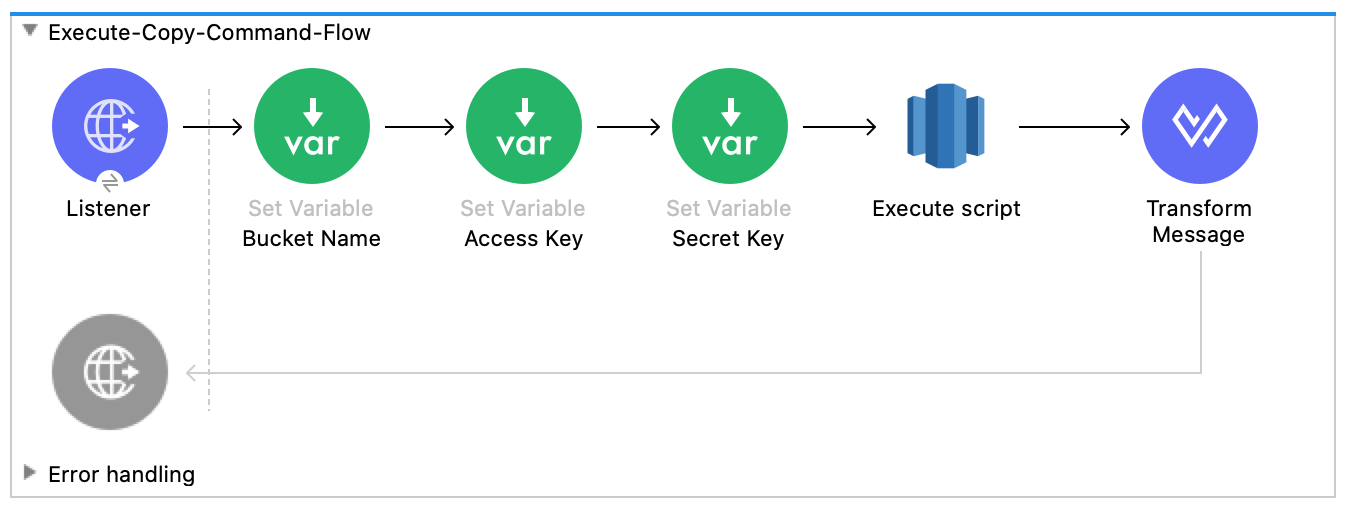
-
This flow deletes the Amazon Redshift table and Amazon S3 bucket:
Run the Example
-
Right-click in the project’s canvas and select Run project redshift-demo.
-
Open
localhost:8081/initin a web browser and wait until it returns a response containingsuccess:truewith the created table, bucket, and an object. -
Verify that the new Amazon S3 bucket
username-bucketwas created in your Amazon S3 instance. -
Verify that the new Redshift table
usernamewas created in your Amazon Redshift instance. -
Open
localhost:8081/executein a web browser and wait until it returns a response containingsuccess:true. -
Verify that the
usernametable contains data from theusername.csvfile you added to the Mule project in Prepare the Data File. -
Open
localhost:8081/deletein a web browser and wait until it returns a response containingsuccess:true. -
Verify that both the
usernameAmazon Redshift table andusername-bucketAmazon S3 bucket were deleted.