Tutorial: Create a Queue and Send Messages to It
Use this tutorial to get started with using Anypoint MQ to send messages to and retrieve messages from a queue, which is a temporary storage area for a message.
In this tutorial, you:
-
Create a queue in Anypoint MQ.
-
Send messages to the queue, verify that they arrived, and view the message payload.
-
Configure a connected app and use the ID and secret to configure Anypoint Connector for MQ (Anypoint MQ Connector) version 4.x.
To use connected apps with Anypoint MQ, you must use Anypoint MQ Connector 4.x for Mule 4. If you are using Anypoint MQ Connector version 3.x or earlier, configure a client app instead. For information, see Configuring Client Apps.
-
Create a Mule 4.x app in Anypoint Studio 7.x, configure Anypoint MQ Connector, and test the connection.
Before You Begin
Before you begin this tutorial, you must have:
-
Familiarity with Anypoint MQ Glossary
-
A paid Anypoint Platform package or subscription with the Anypoint MQ integration add-on
Contact your account team for information.
-
Anypoint Studio installed on your system
-
A
curlcommand line tool for testingThis tutorial uses the HTTP Listener trigger to initiate Anypoint MQ Connector access and a
curlcommand to submit REST API commands to the Anypoint MQ Broker API.
Step 1. Create a Queue
First, you create a queue, send messages to the queue, verify that the messages arrived, and view the message payload.
To create a queue:
-
Sign in to Anypoint Platform and click MQ in the navigation menu.
-
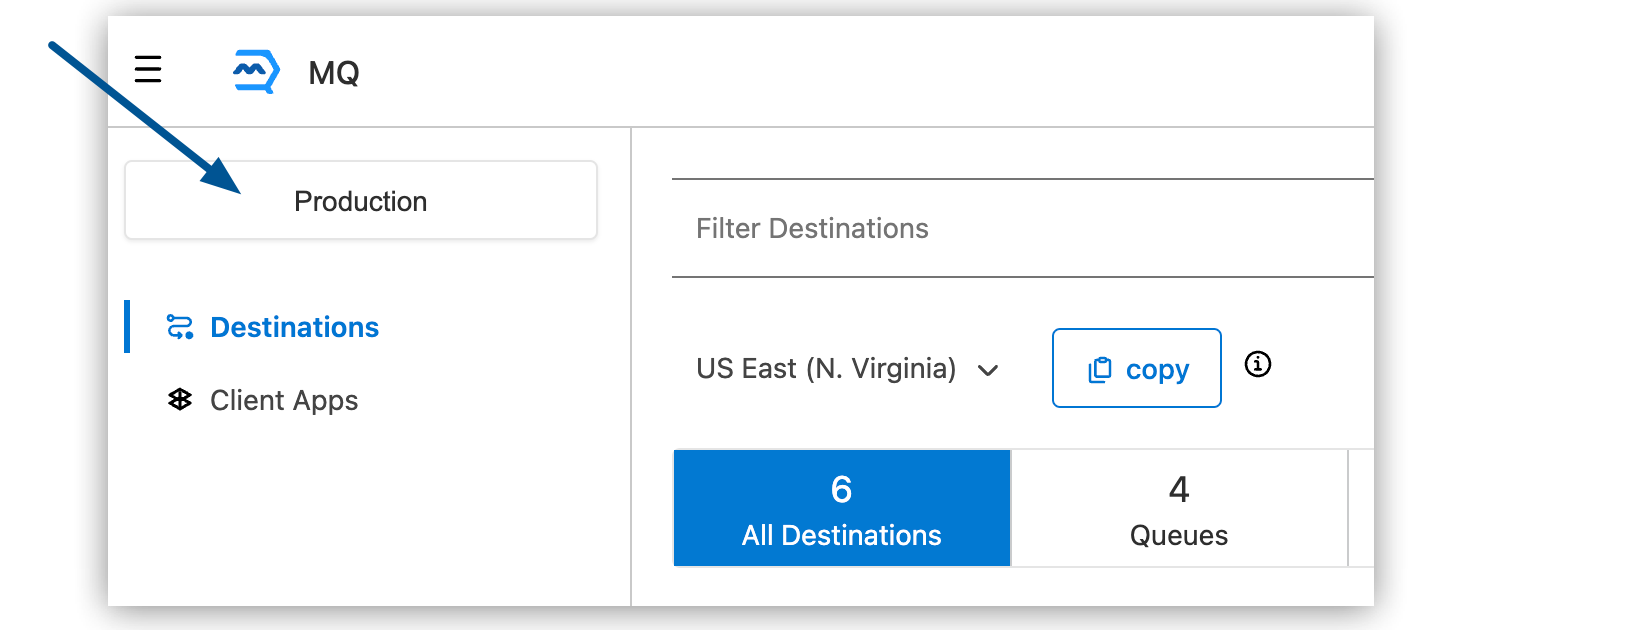
If you want to test the queue in Anypoint Studio 7.x, switch to any environment except Design.
For example, click the environment button and select Production:
-
Click Destinations:
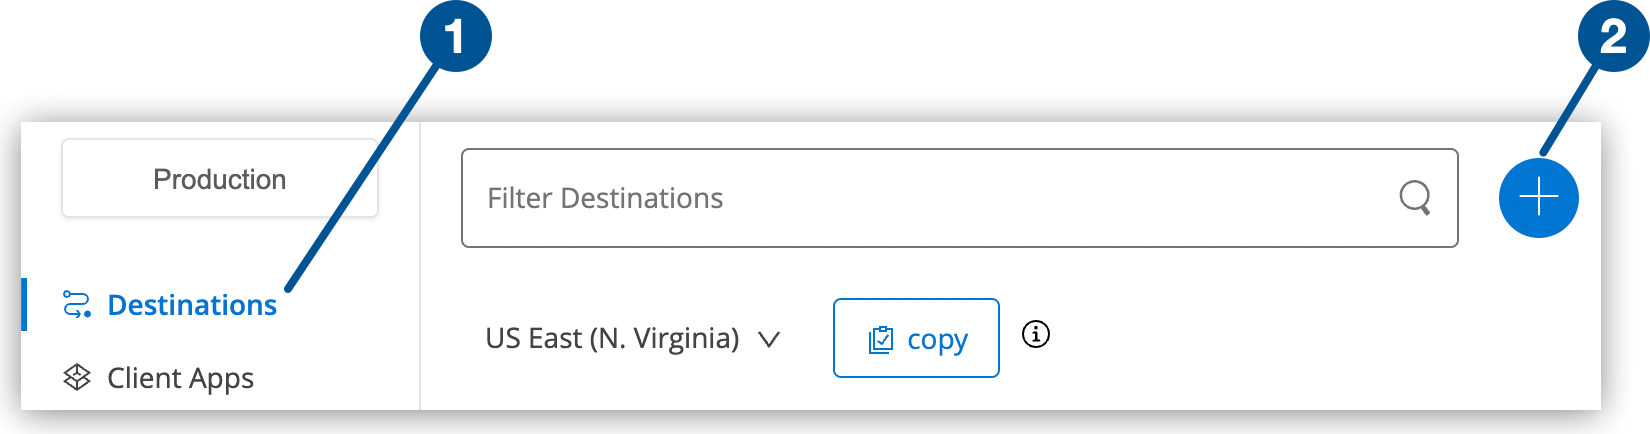
1 Destinations navigation menu displays available queues. 2 Add icon creates a new queue or exchange. -
Click the Add icon (
 ) to display the menu:
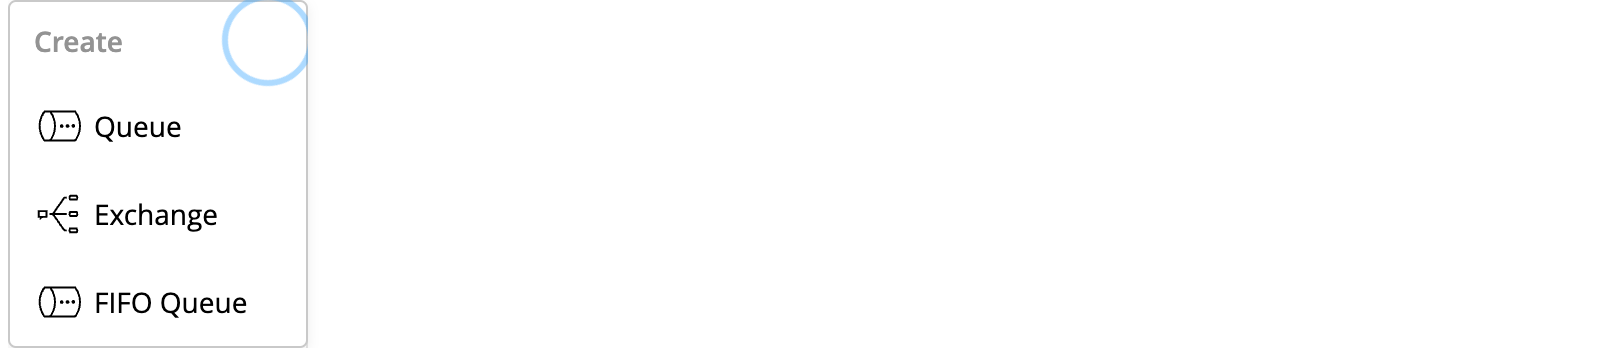
-
Select Queue.
-
In the Create Queue window, enter
myDemoQueuein the ID field: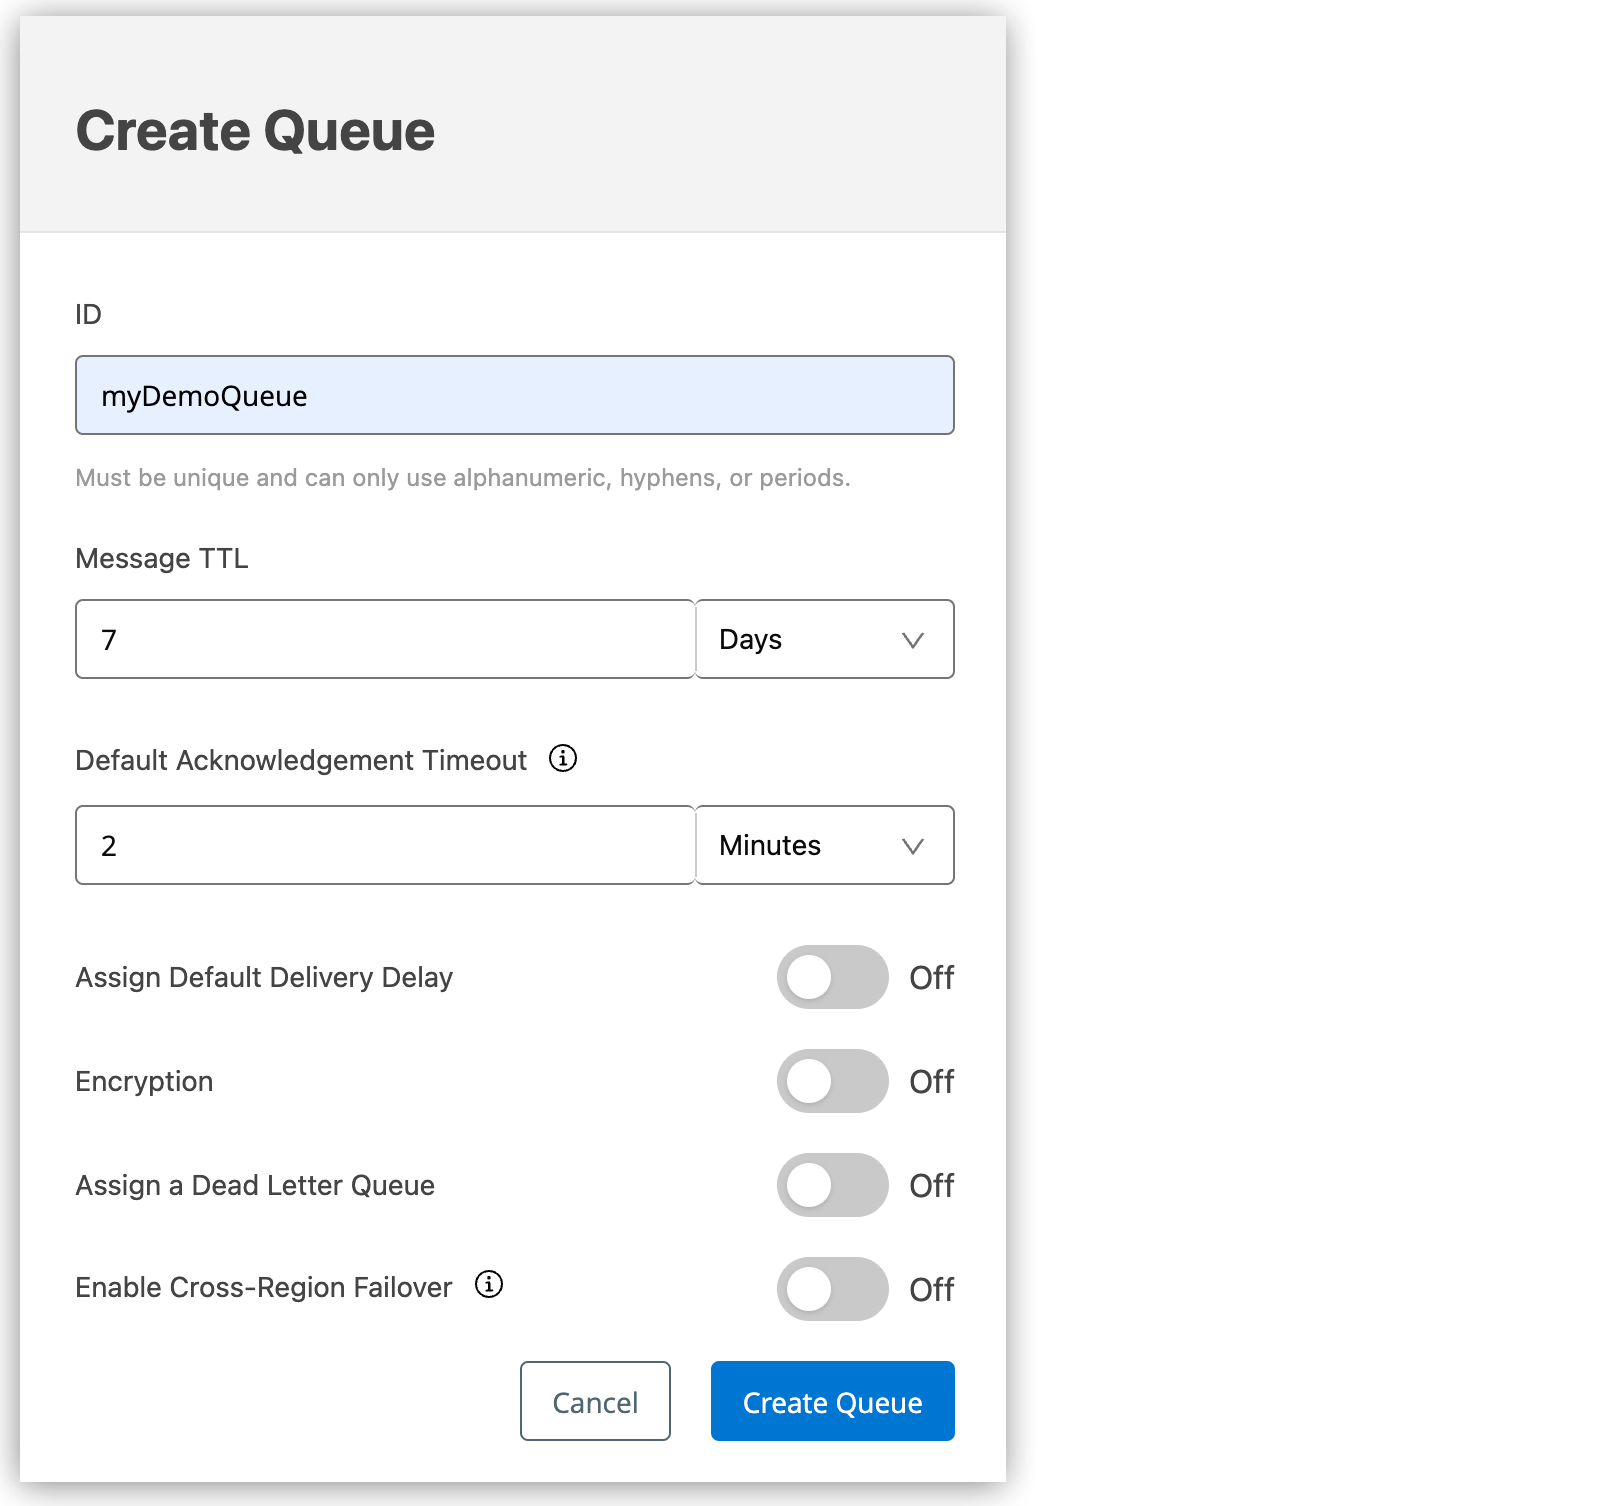
Queue names can contain up to 127 alphanumeric (a-z, A-Z, 0-9) and punctuation (. -) characters. They can’t contain spaces or other characters.
-
If you want, specify any other queue settings.
For information, see Create a Queue.
-
Click Create Queue.
Anypoint MQ creates the queue in the Destinations page:
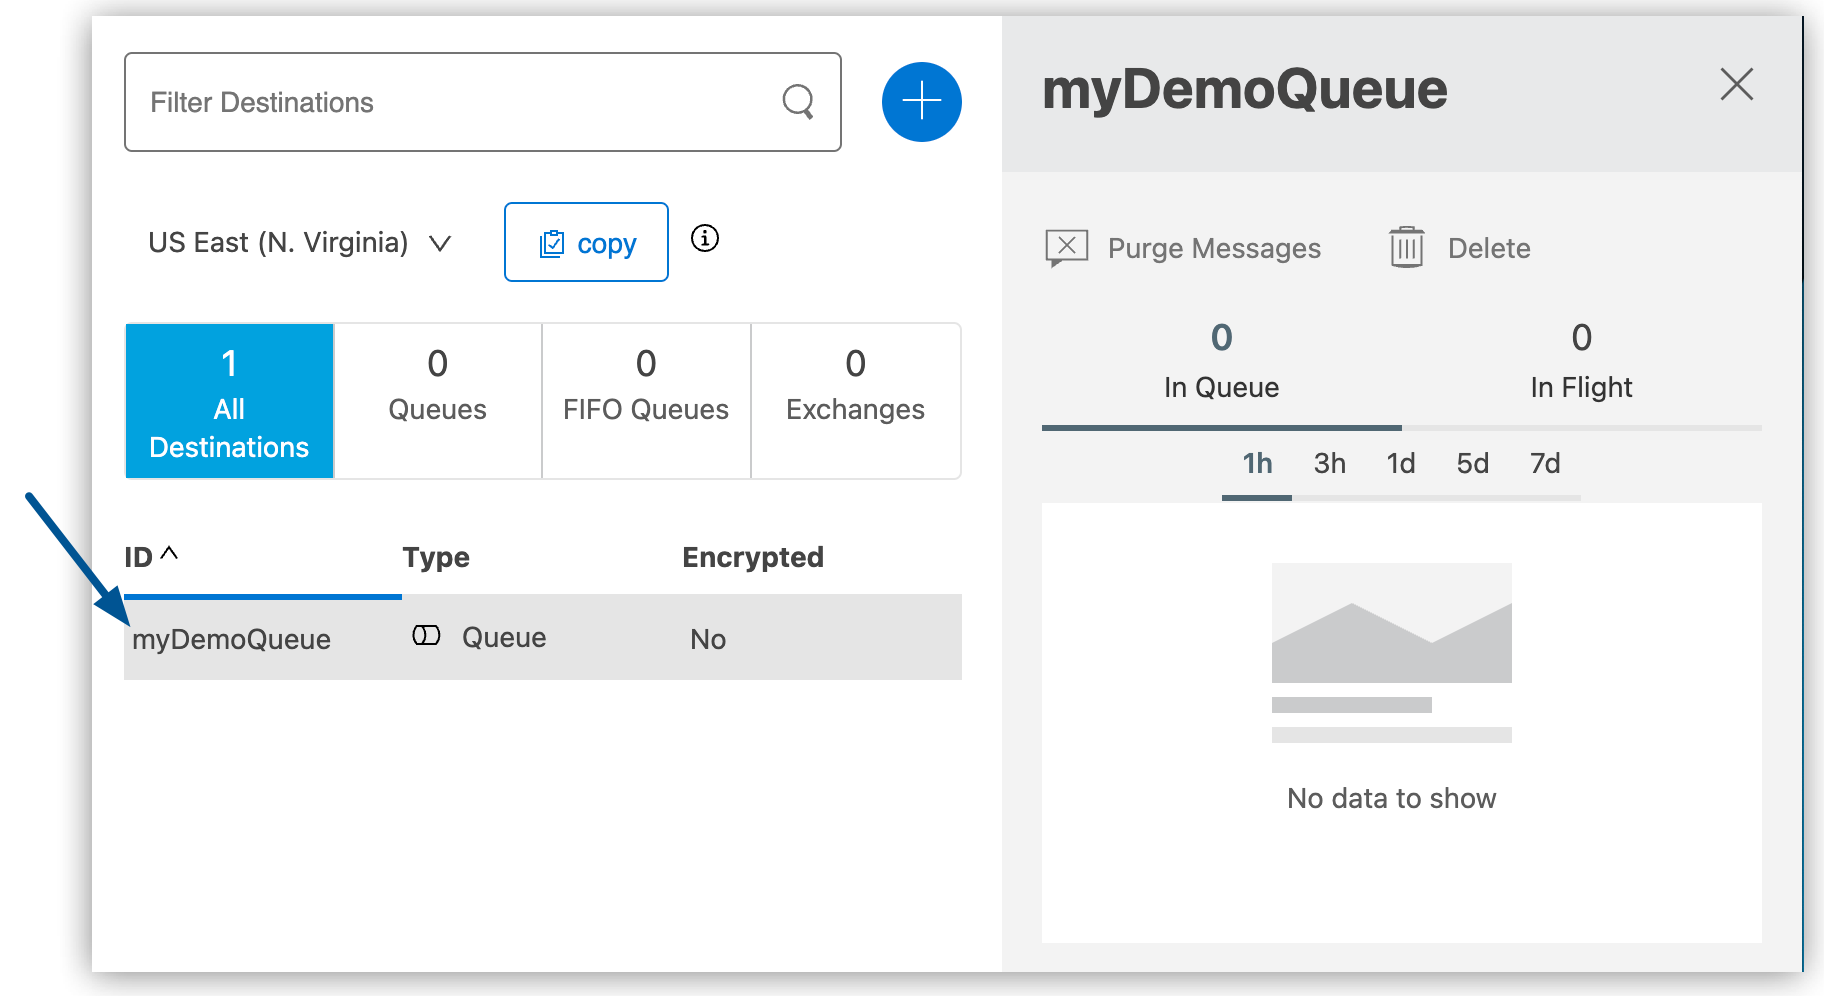
You have successfully created a queue. Next, you send messages to the queue, verify that the messages arrived, and view the message payload.
Step 2. Send Messages to a Queue and Verify That They Arrived
After you create the queue, you test the queue sending messages to it, validating that the messages arrived in the queue, and retrieving them from the queue.
To send and receive messages from a queue:
-
In the Destinations page, click
myDemoQueue. -
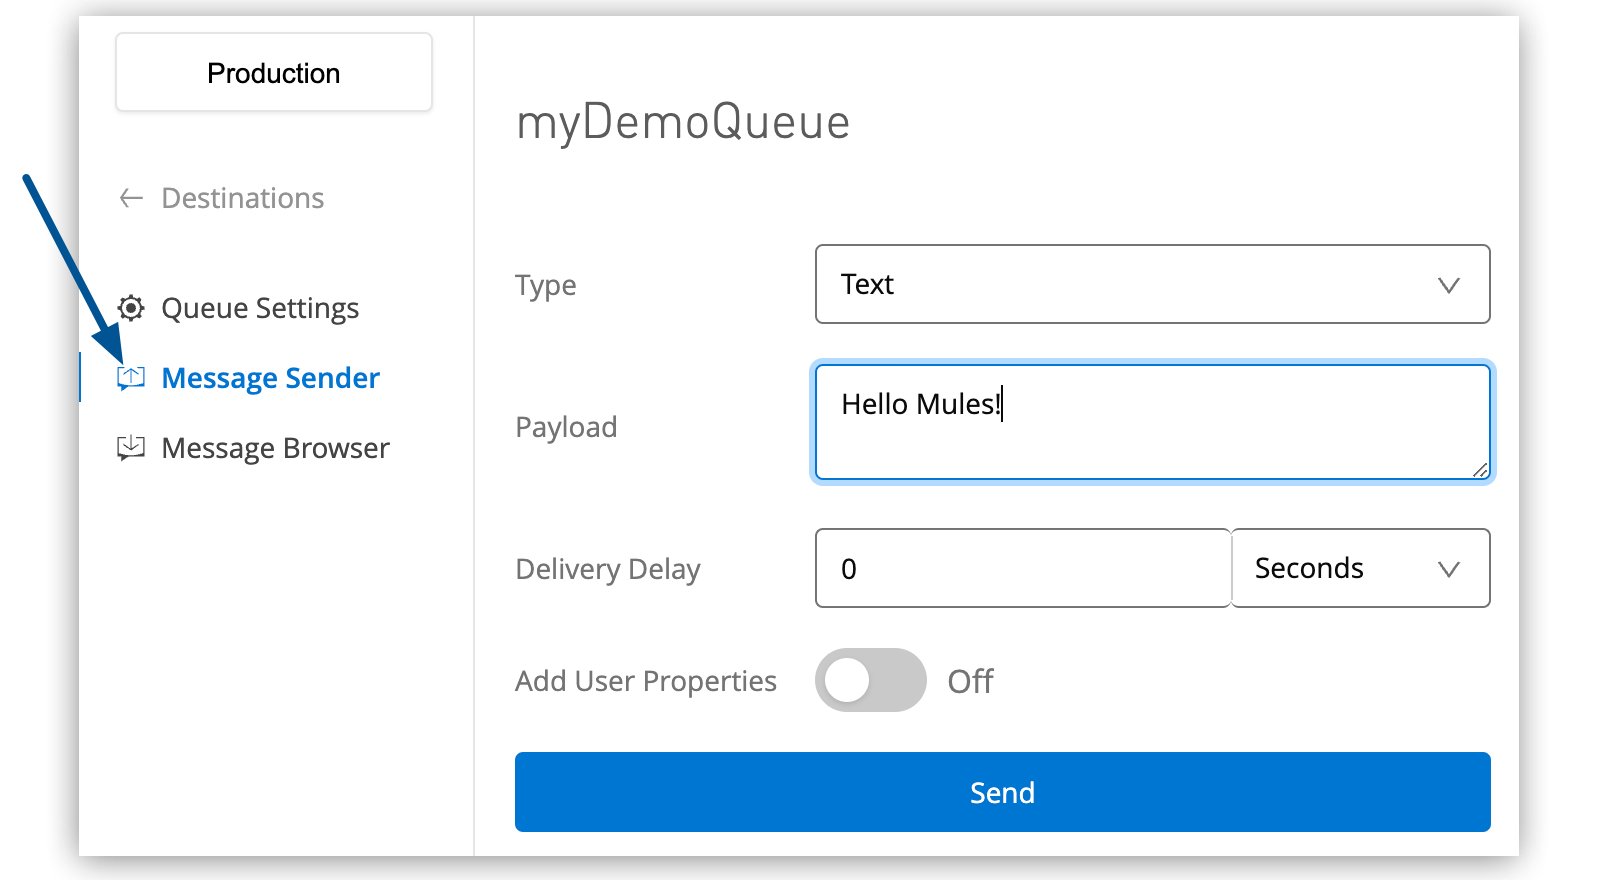
Click Message Sender in the navigation menu:
-
Leave the Type field set to Text and enter
Hello Mules!in the Payload field. -
If you want, toggle Add User Properties, specify the property name-value pairs to send, and click Add Property:
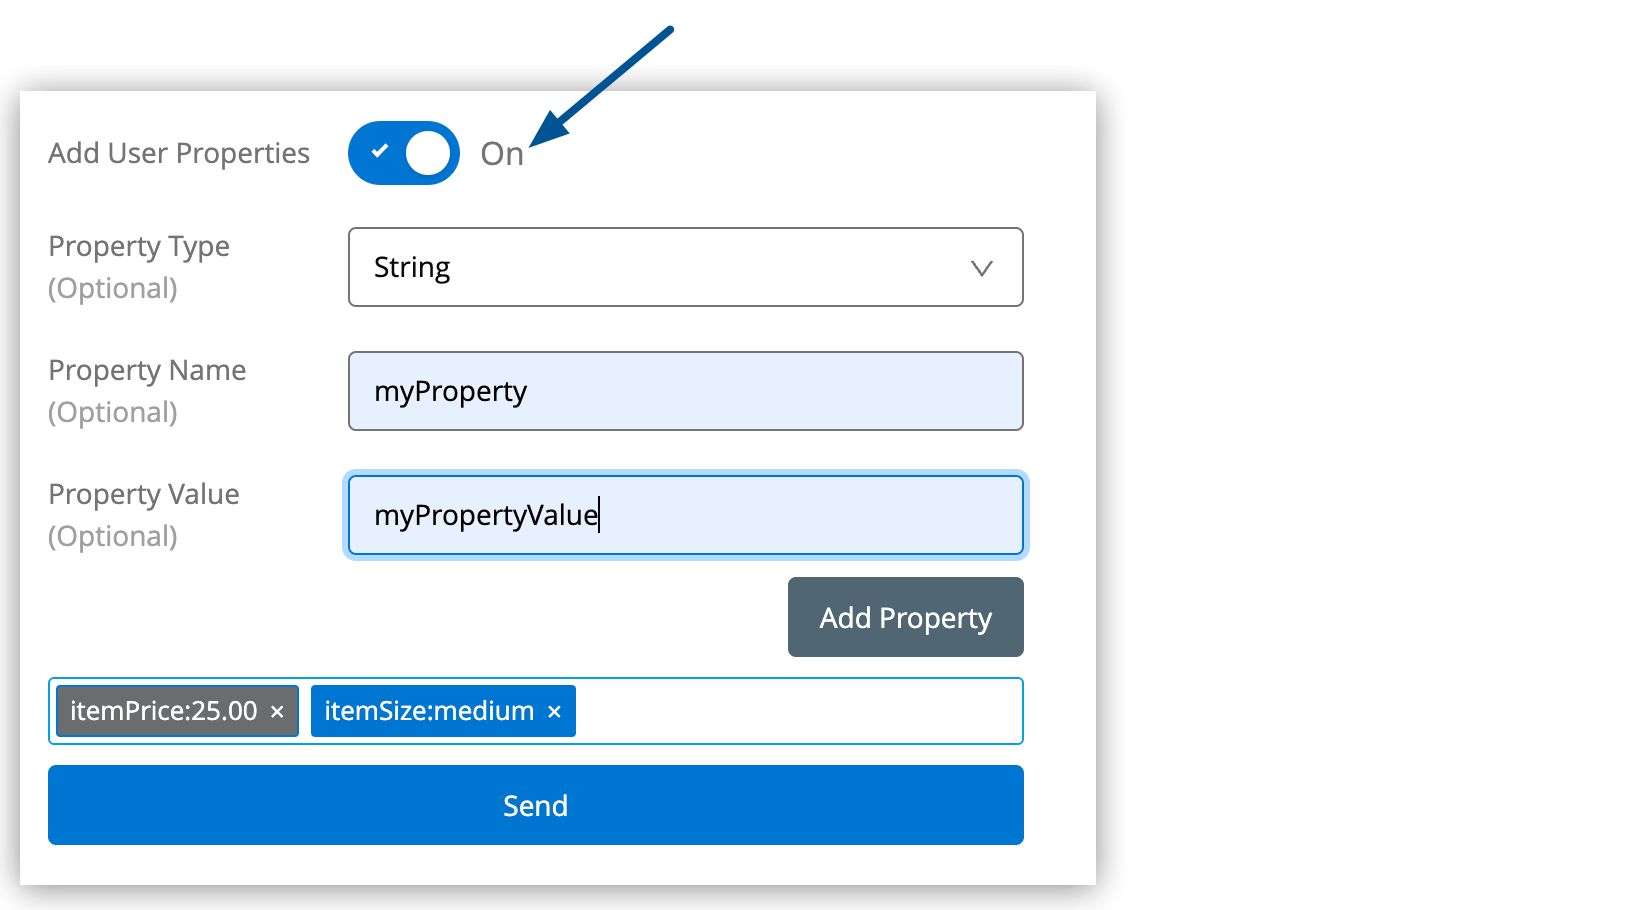
The Message Sender page shows added string properties in blue and number properties in gray.
-
Click Send.
-
Set the Type to CSV, enter this in the Payload field, and click Send:
"dog", "fish", "parrot" -
Set the Type to JSON, enter this in the Payload field, and click Send:
{
"animal that walks":"dog",
"animal that swims":"fish",
"animal that flies":"parrot"
}
Next, verify that the messages arrived in the queue.
-
Click Destinations.
-
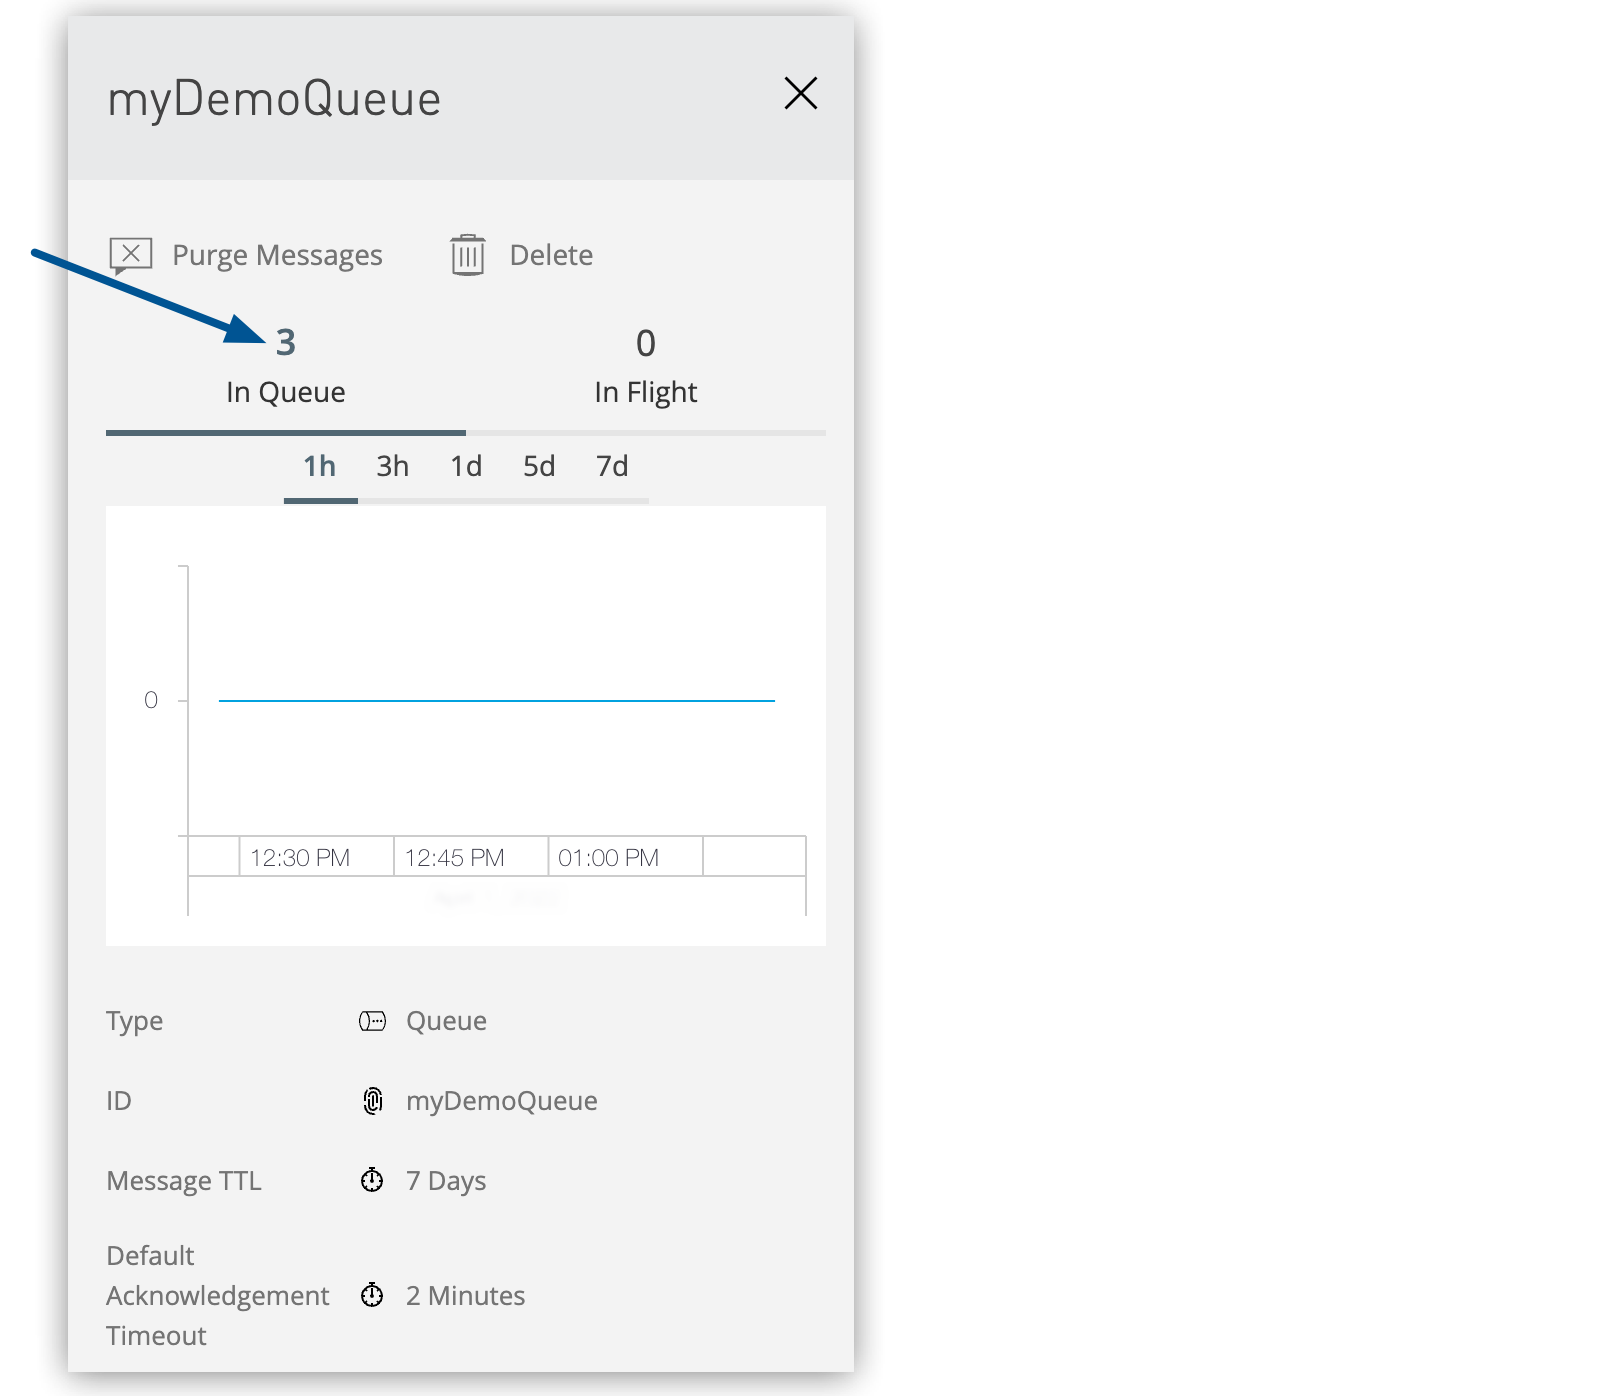
Click the queue type for
myDemoQueueto display its details.The details pane shows the number of messages in the queue:
-
In the details pane, click the queue details label
myDemoQueue. -
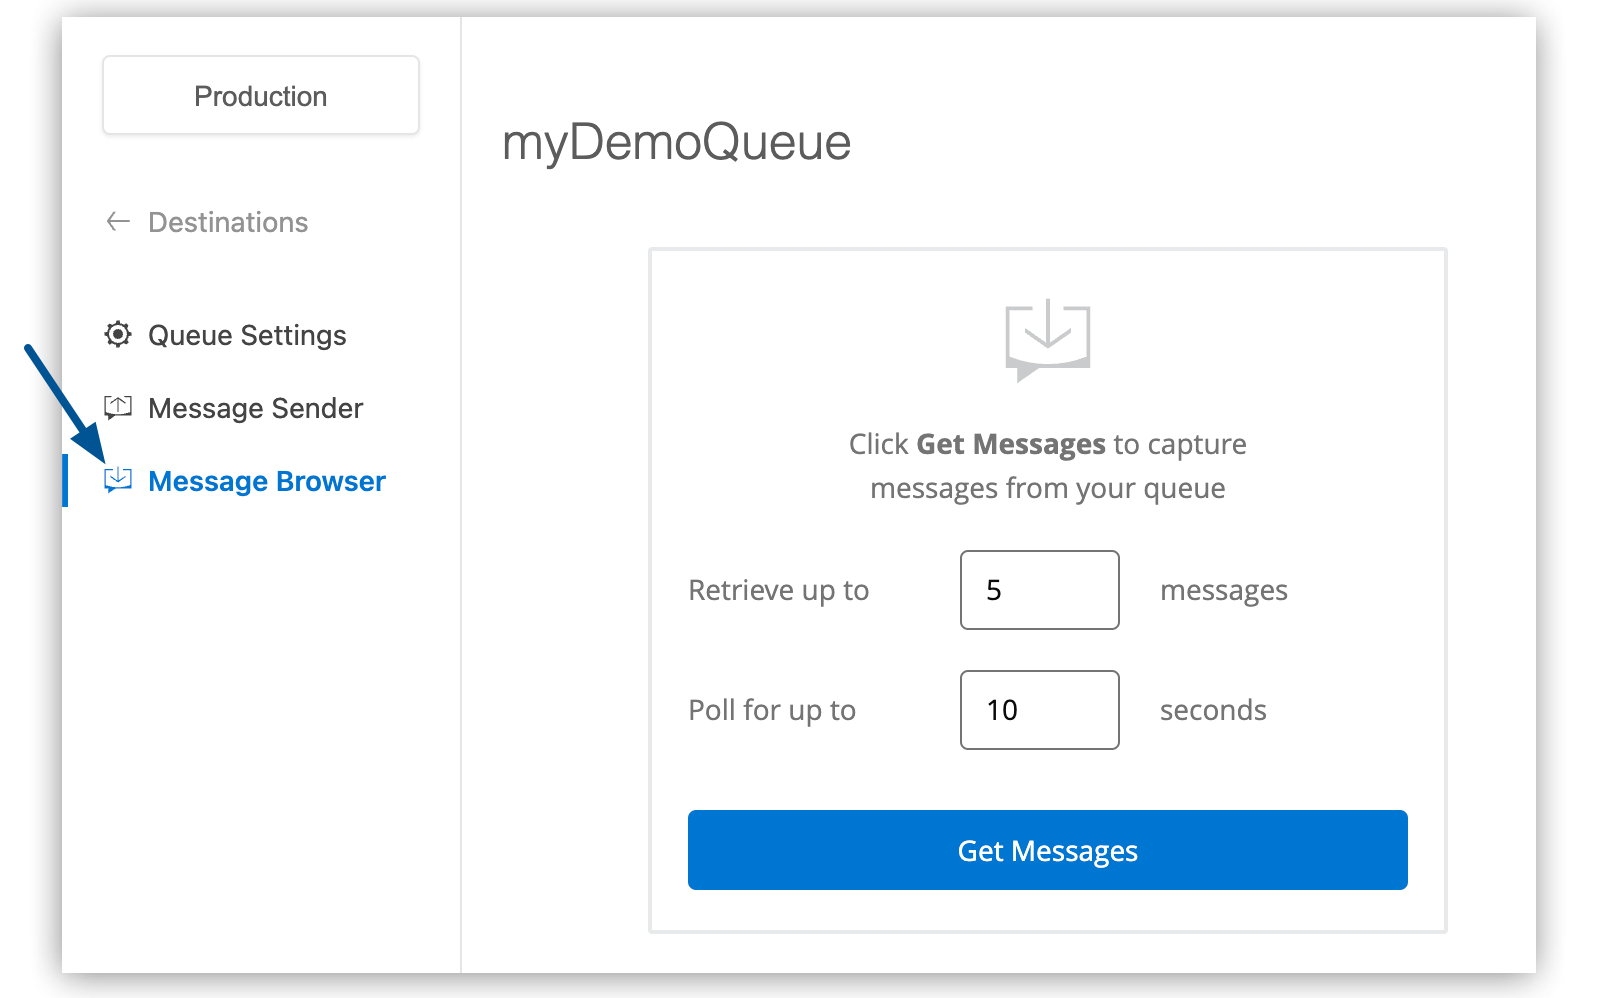
Click Message Browser in the navigation menu:
-
Enter
5for the number of messages to retrieve and10for the number of seconds to poll.You can retrieve between 1-500 messages and poll for between 1-3600 seconds.
-
Click Get Messages.
Anypoint MQ retrieves the messages from the queue and displays them in the Message Browser.
-
Click the message row to view the message payload in the details pane:
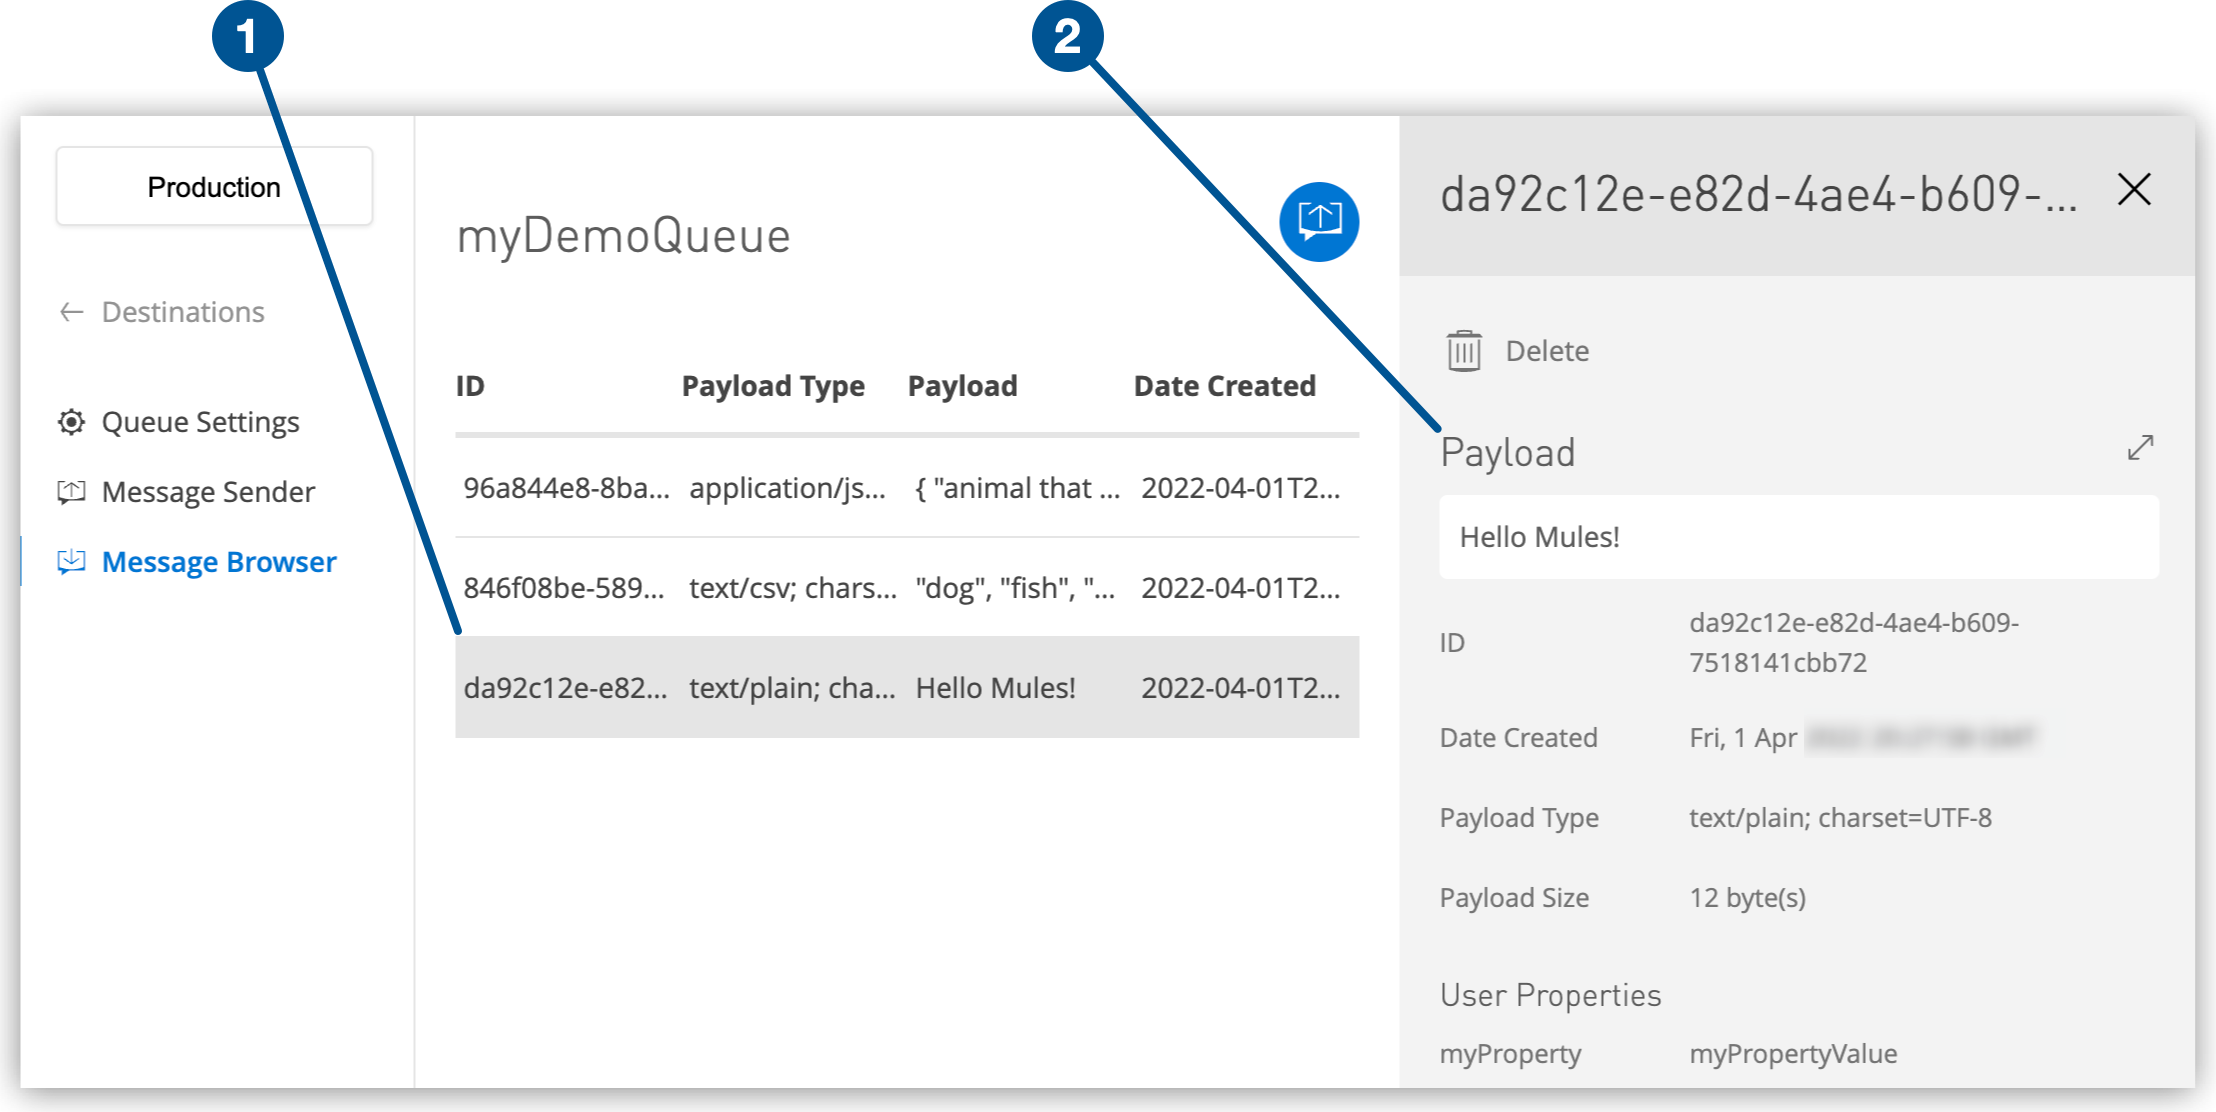
1 Selected message 2 Message payload in the details pane
You have successfully created a queue in Anypoint MQ, sent messages to the queue, verified that the messages arrived, and viewed the message payload. Next, you create a connected app to connect a Mule app to Anypoint MQ.
Step 3. Configure a Connected App
After you test the queue, you configure a connected app, which generates the ID and secret you use to configure Anypoint MQ Connector.
| To use connected apps with Anypoint MQ, you must use Anypoint MQ Connector 4.x for Mule 4. If you are using Anypoint MQ Connector version 3.x or earlier, configure a client app instead. For information, see Configuring Client Apps. |
To create a connected app with Anypoint MQ scopes:
-
In Anypoint Platform, go to Access Management.
-
Click Connected Apps in the navigation pane.
-
Click Create app.
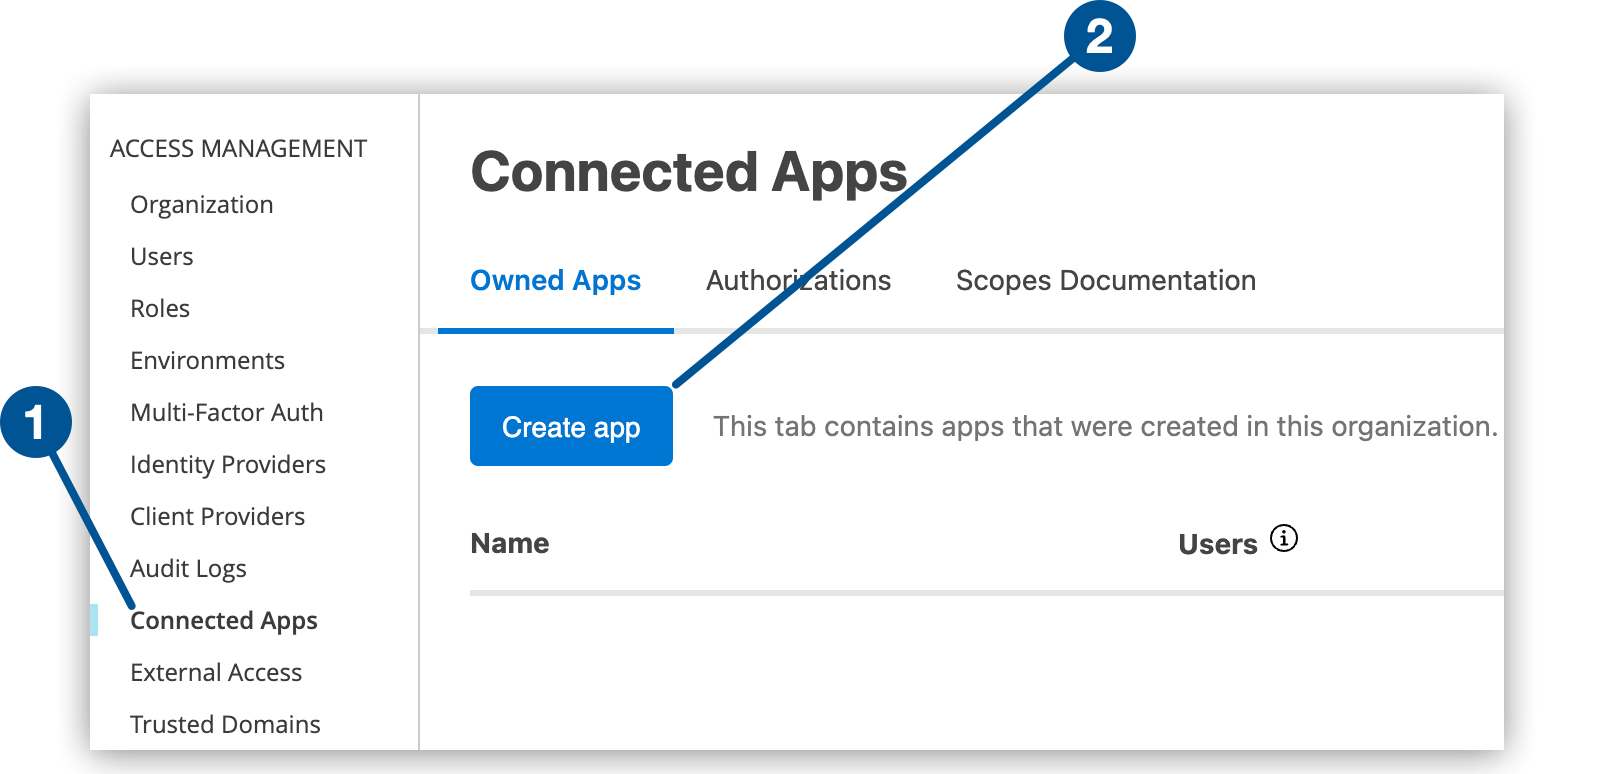
1 Connected Apps menu option displays and creates connected apps. 2 Create app button creates a connected app. -
Specify a name, such as
DemoApp1for the app. -
Select App acts on its own behalf (client credentials).
-
Click Add Scopes.
Scopes are roles with associated permissions, which determine which actions the app can perform within an organization and environment. See Anypoint MQ Scopes.
-
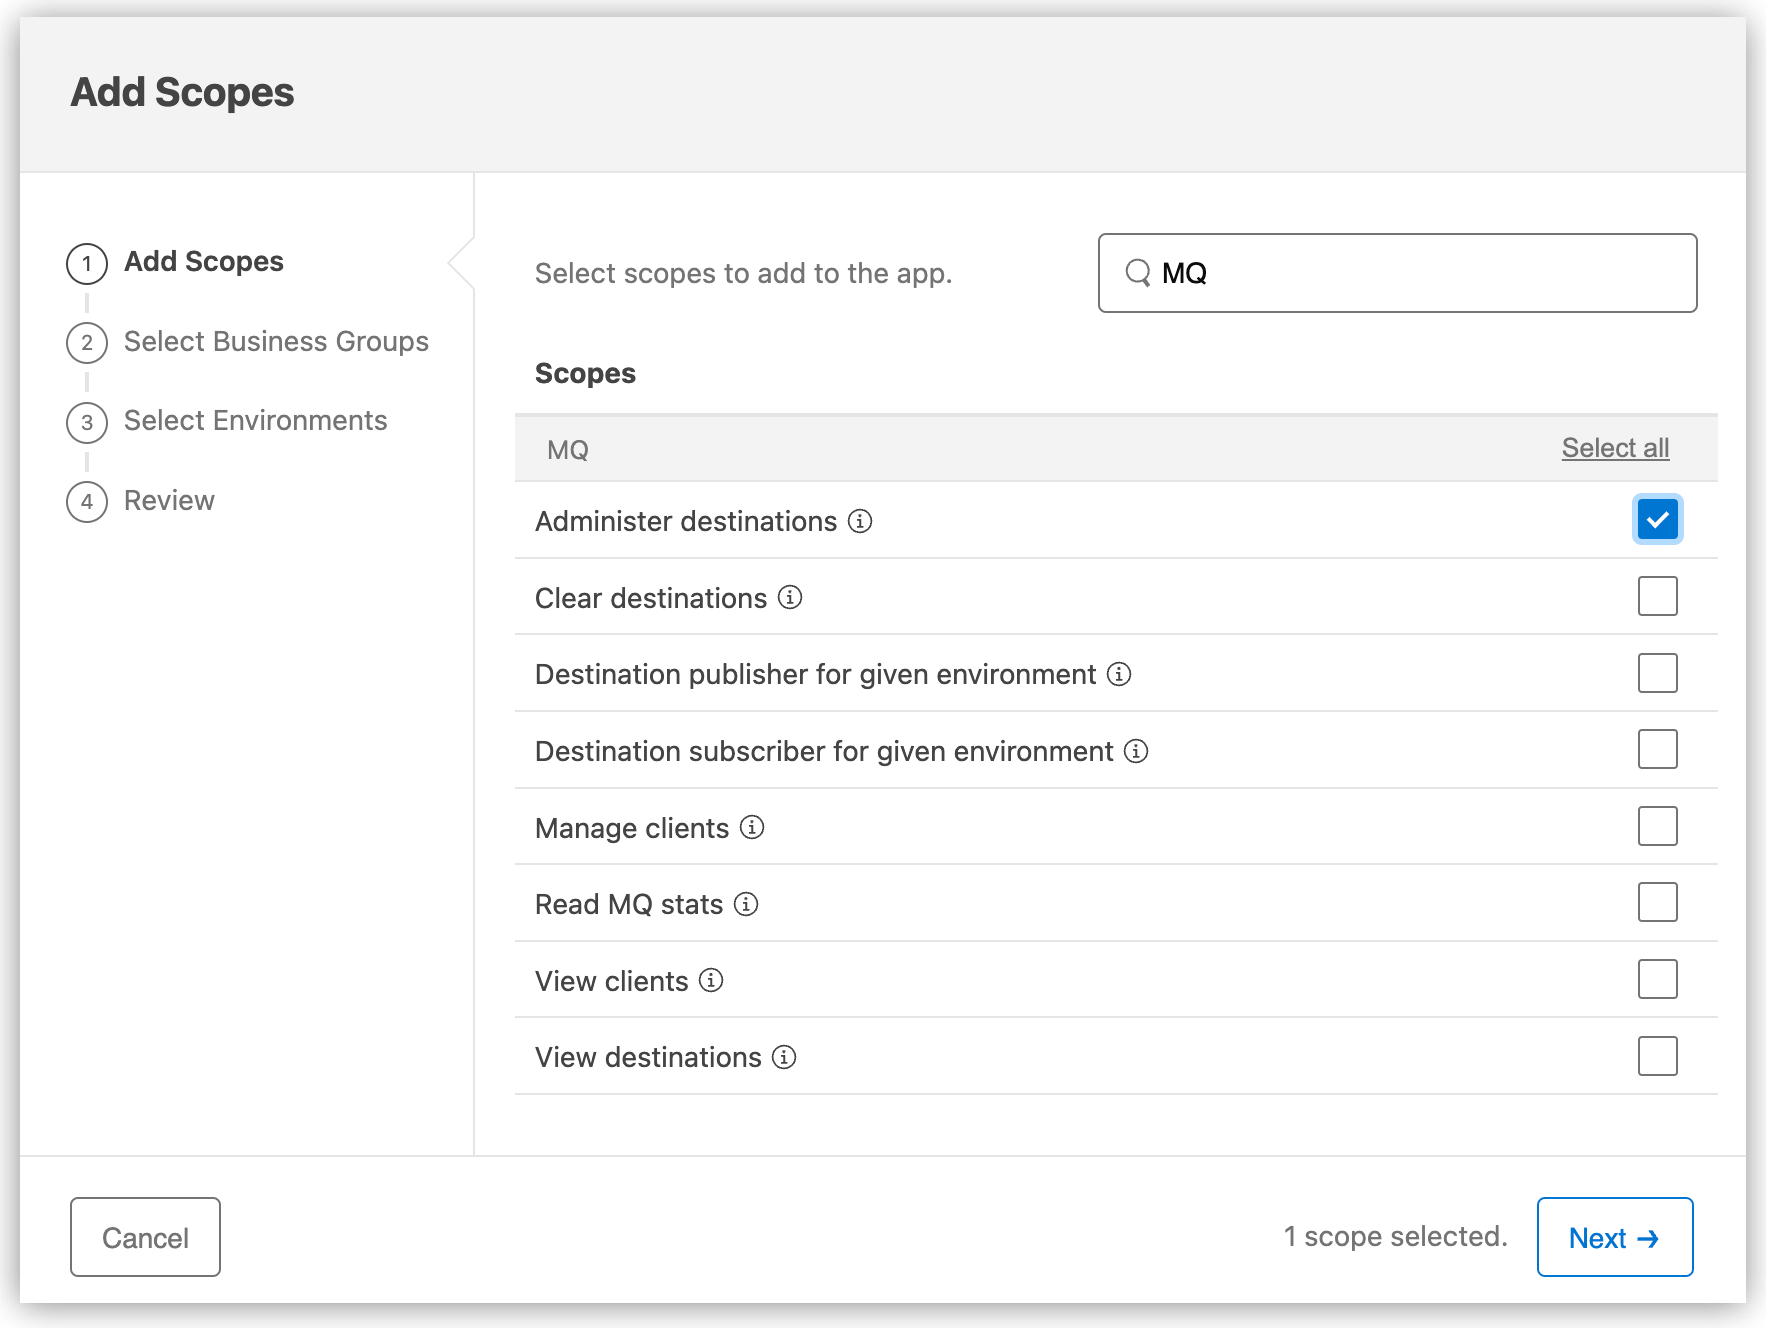
In Add Scopes window:
-
Enter "MQ" in the Filter scopes field.
-
Click Select all to select all scopes and click Next.
-
Select a business group to apply the scopes to and click Next.
-
Select the Production environment and click Next.
-
Click Add Scopes.
-
-
Click Save.
When you configure the connector in a later step, click Copy Id and Copy Secret to copy the ID and secret for DemoApp1:

You have successfully configured a connected app. Next, you create a Mule app in Anypoint Studio and connect it to Anypoint MQ.
Step 4. Create and Connect a Mule 4.x App to Anypoint MQ in Anypoint Studio 7.x
After you configure the connected app, use Anypoint Studio 7.x to configure an app that connects to Anypoint MQ.
Then, deploy the app to CloudHub, submit a curl command to test the connection, and use Anypoint MQ to view the results.
Before You Begin
-
Install Studio 7.x.
-
In Anypoint Platform, change to any environment except Design.
Ensure that the queue you created in Anypoint Platform > MQ is also in this environment.
Configure an App with Anypoint MQ in Anypoint Studio 7.x
First, use Studio 7.x to configure an app that connects to Anypoint MQ:
-
Start Studio, click File > New > Mule Project, and then name the project
mq-demo. -
Click the Exchange icon in the toolbar:

-
Enter your Anypoint Platform username and password.
-
In Exchange, click the Provided by MuleSoft navigation menu, select Connectors from the drop-down menu, and then search for Anypoint MQ Connector:
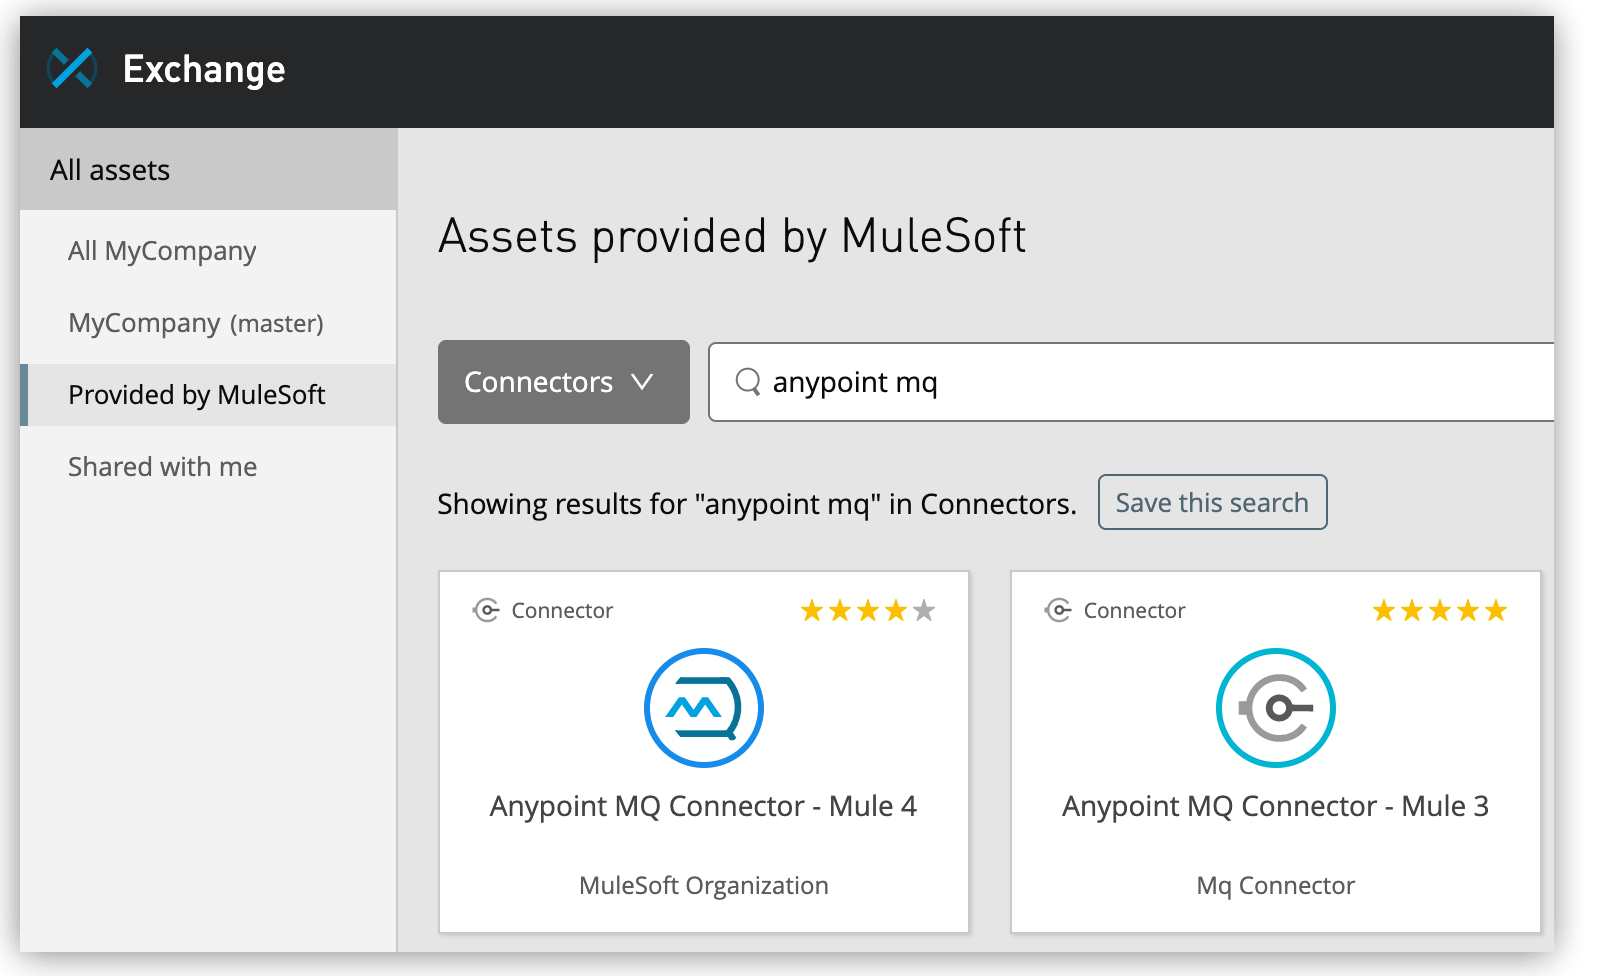
-
Select Anypoint MQ Connector - Mule 4.
Studio 7.x supports Mule 4.x.
-
Click Add to project:

-
At the confirmation prompt, click Proceed and then click OK in Studio.
-
In the Mule Palette view, click HTTP, and then drag the Listener to the Studio canvas:
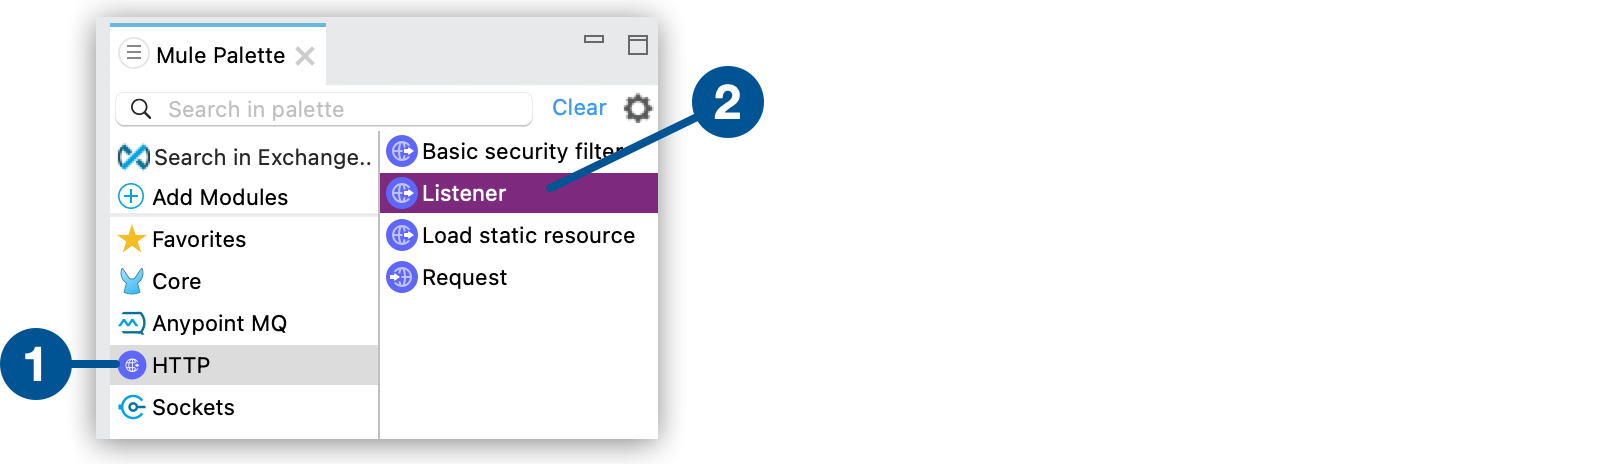
1 HTTP Connector displays the Listener operation. 2 Listener operation identifies the operation to drag to the Mule Palette. -
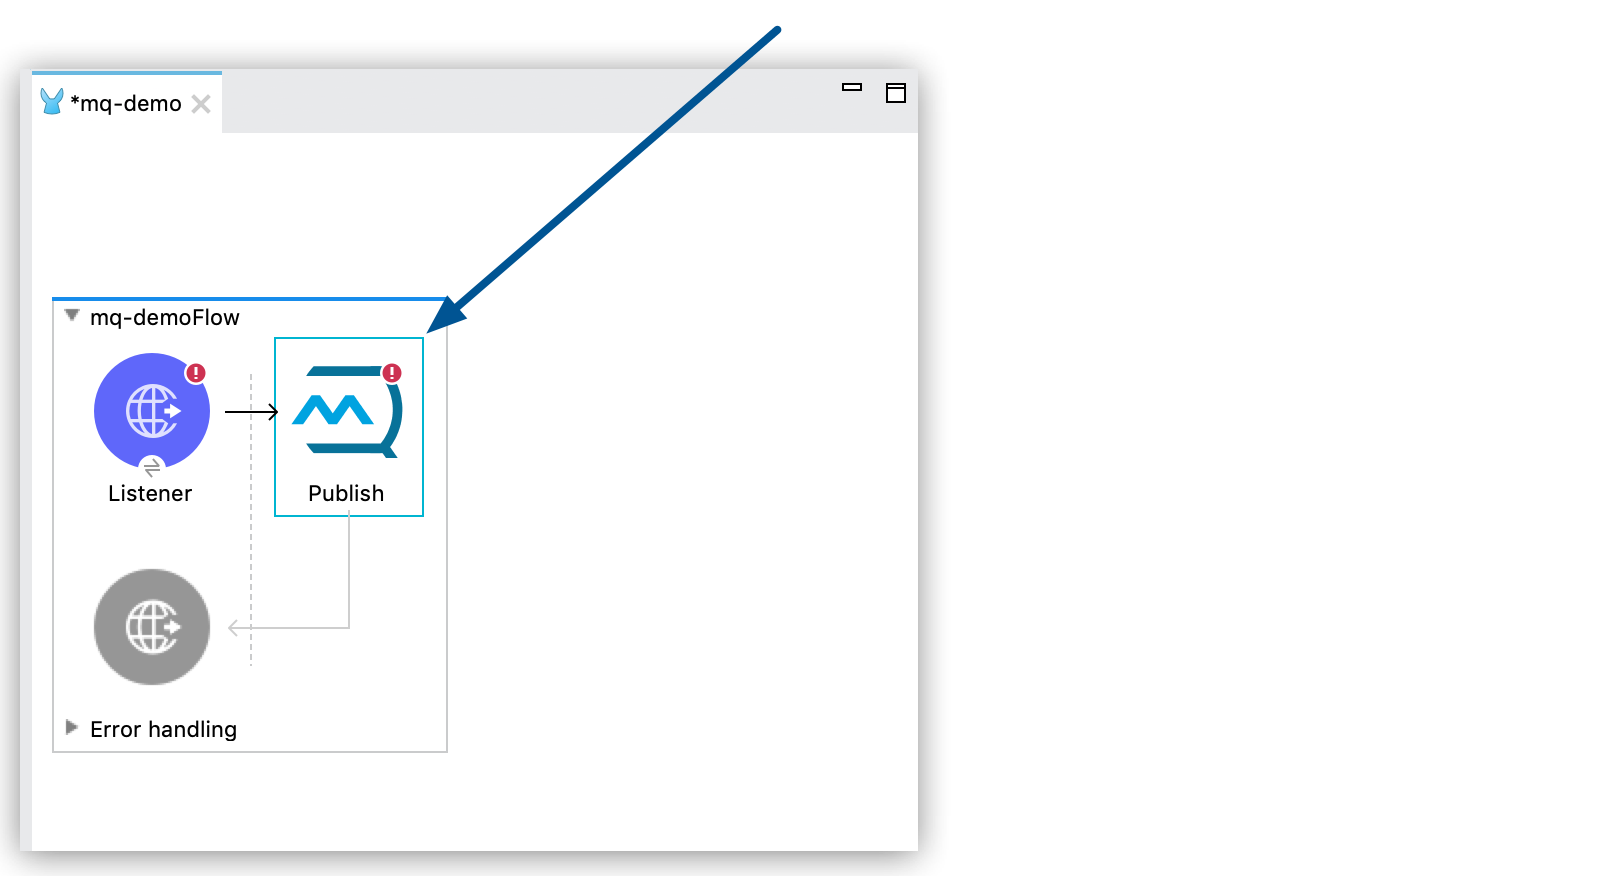
Click Anypoint MQ and then drag Publish to the Process area for the Listener on the canvas:
-
In the canvas, click Listener.
-
In the Listener properties window, set General > Path to
/mq/{messageId}: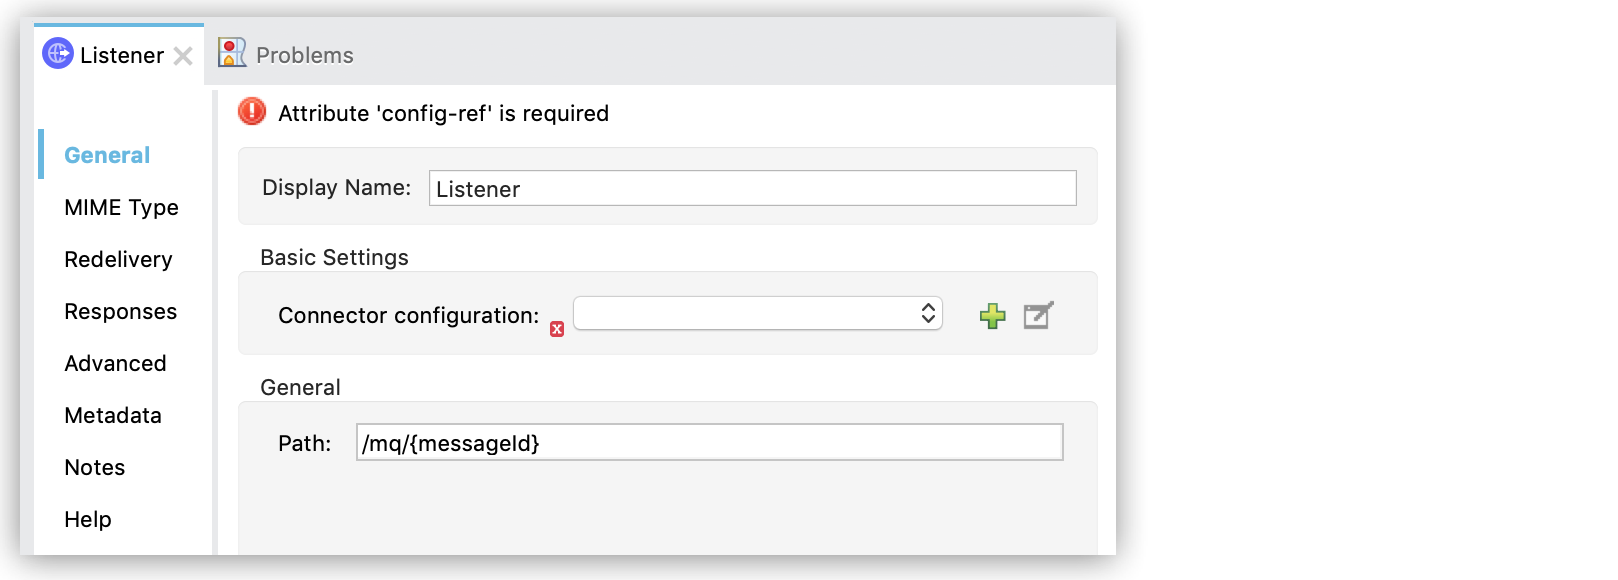
-
Click the green plus icon (
 ) for the Connector configuration field.
 -
In the HTTP Listener Global Element Properties window, verify that the value of Host is
All Interfaces [0.0.0.0]and Port is8081, and then click OK: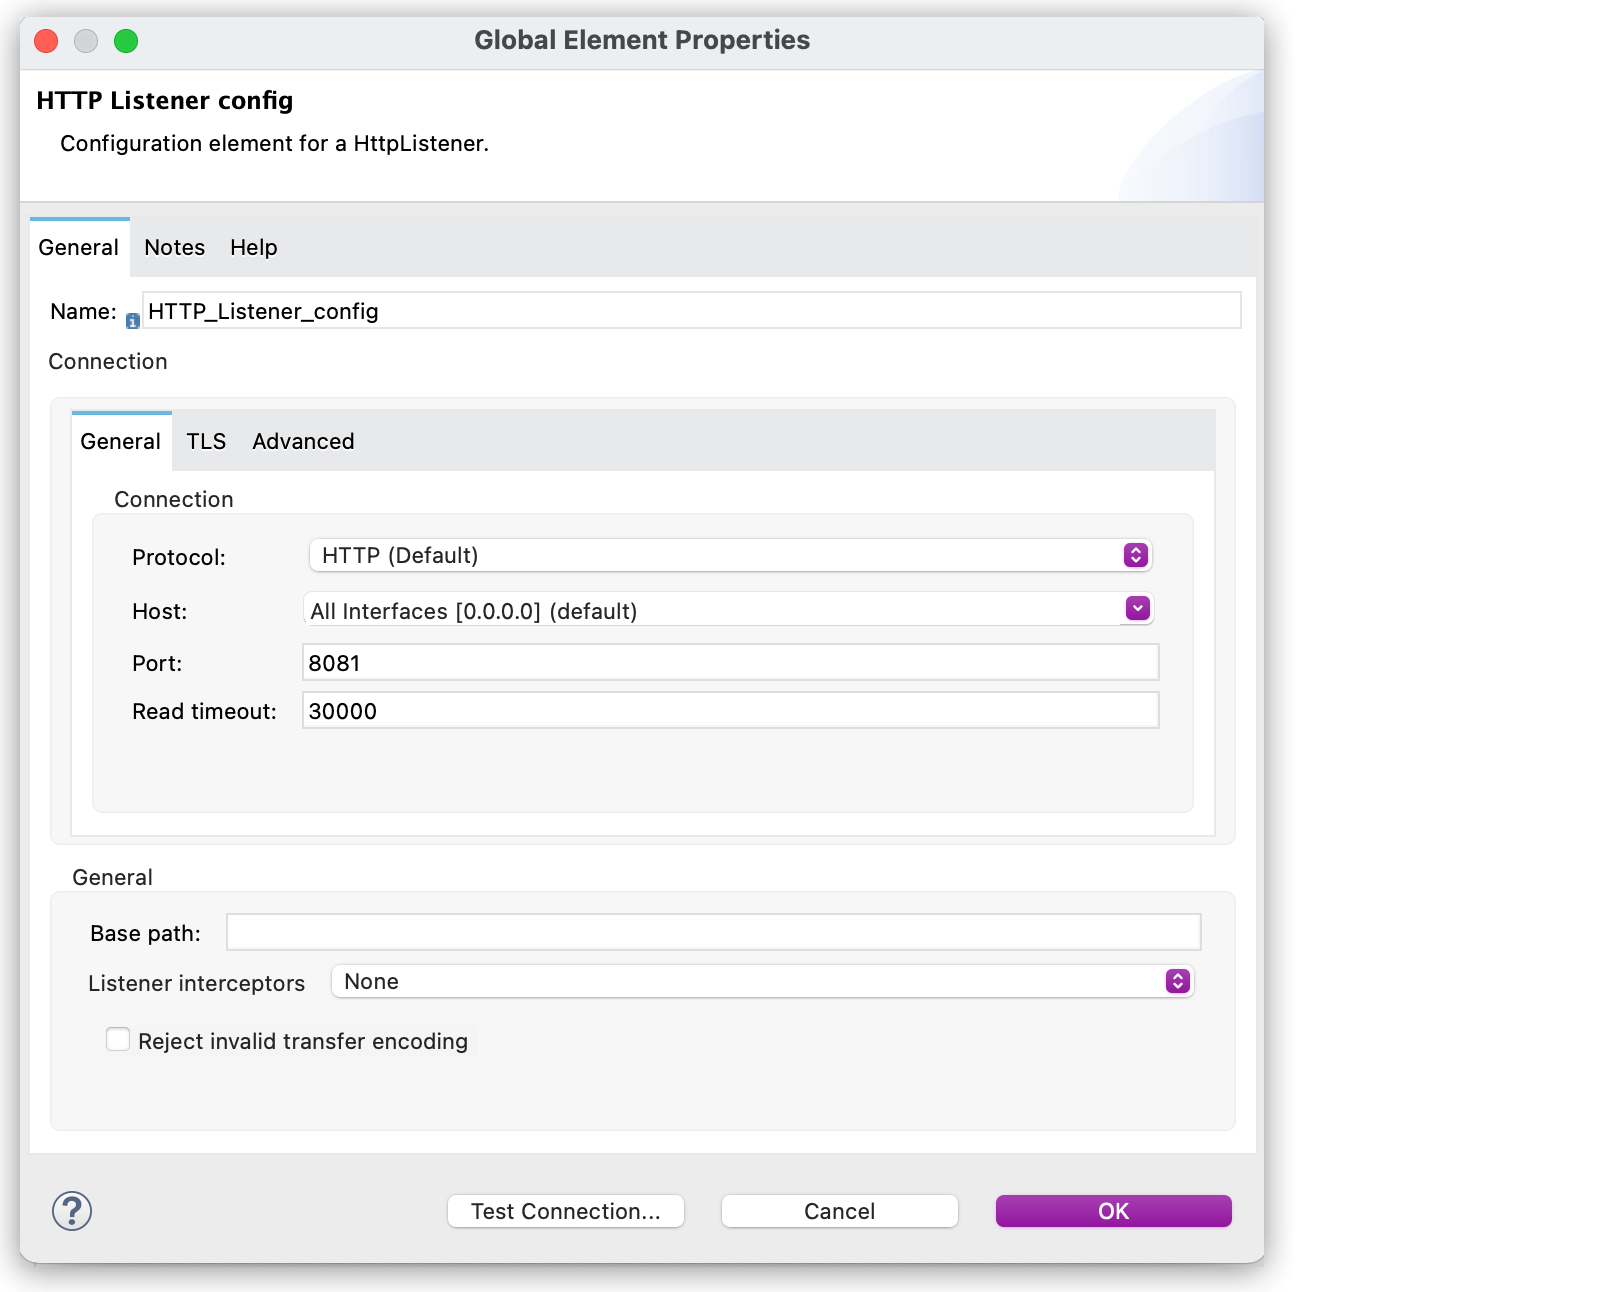
The Listener properties window now indicates that there are no errors.
-
In the canvas, click the Publish operation.
-
In the Publish properties window, set Destination to the
myDemoQueuequeue that you created earlier in Anypoint Platform > MQ: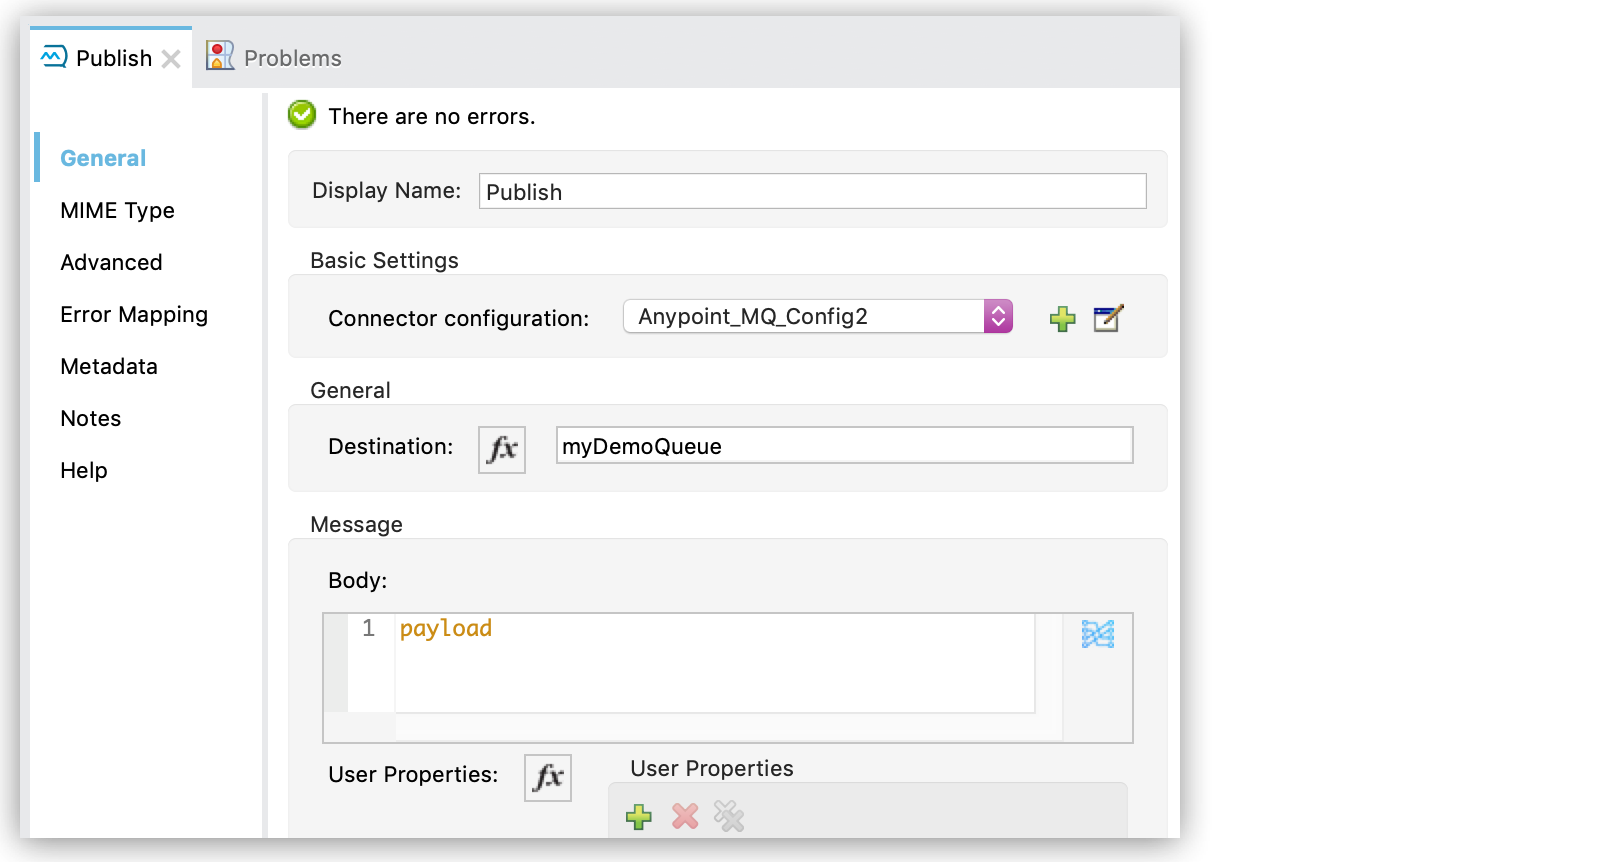
The location of the queue must be an environment other than Design.
-
Click the green plus icon (
) for the Connector configuration field to display the Global Element Properties window. -
Return to your Anypoint Platform > MQ browser window to copy the URL, ID, and secret values:
-
Click Destinations.
-
Click Copy and select Connector version 4.x and later from the menu to copy the URL:
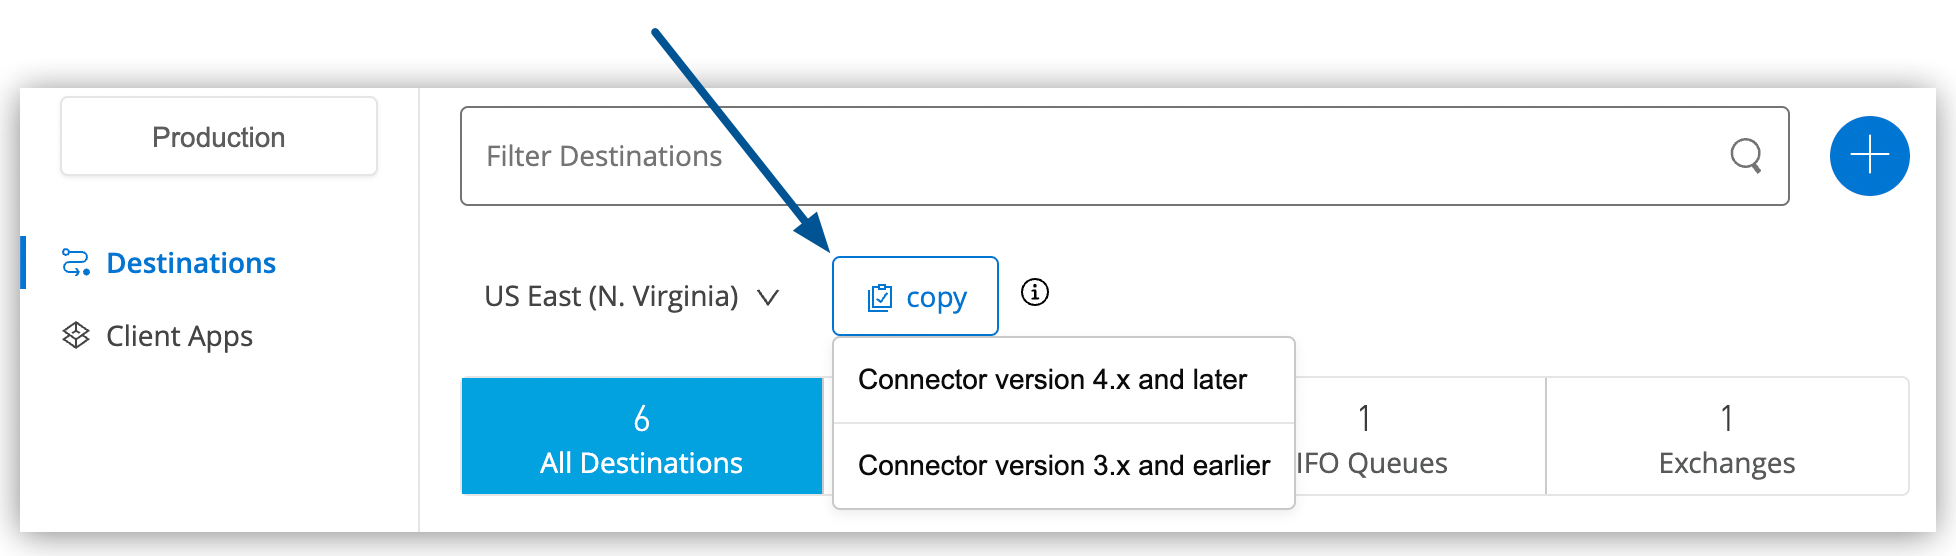
If you are using Anypoint MQ Connector version 3.x or earlier, configure a client app instead. For information, see Configuring Client Apps.
-
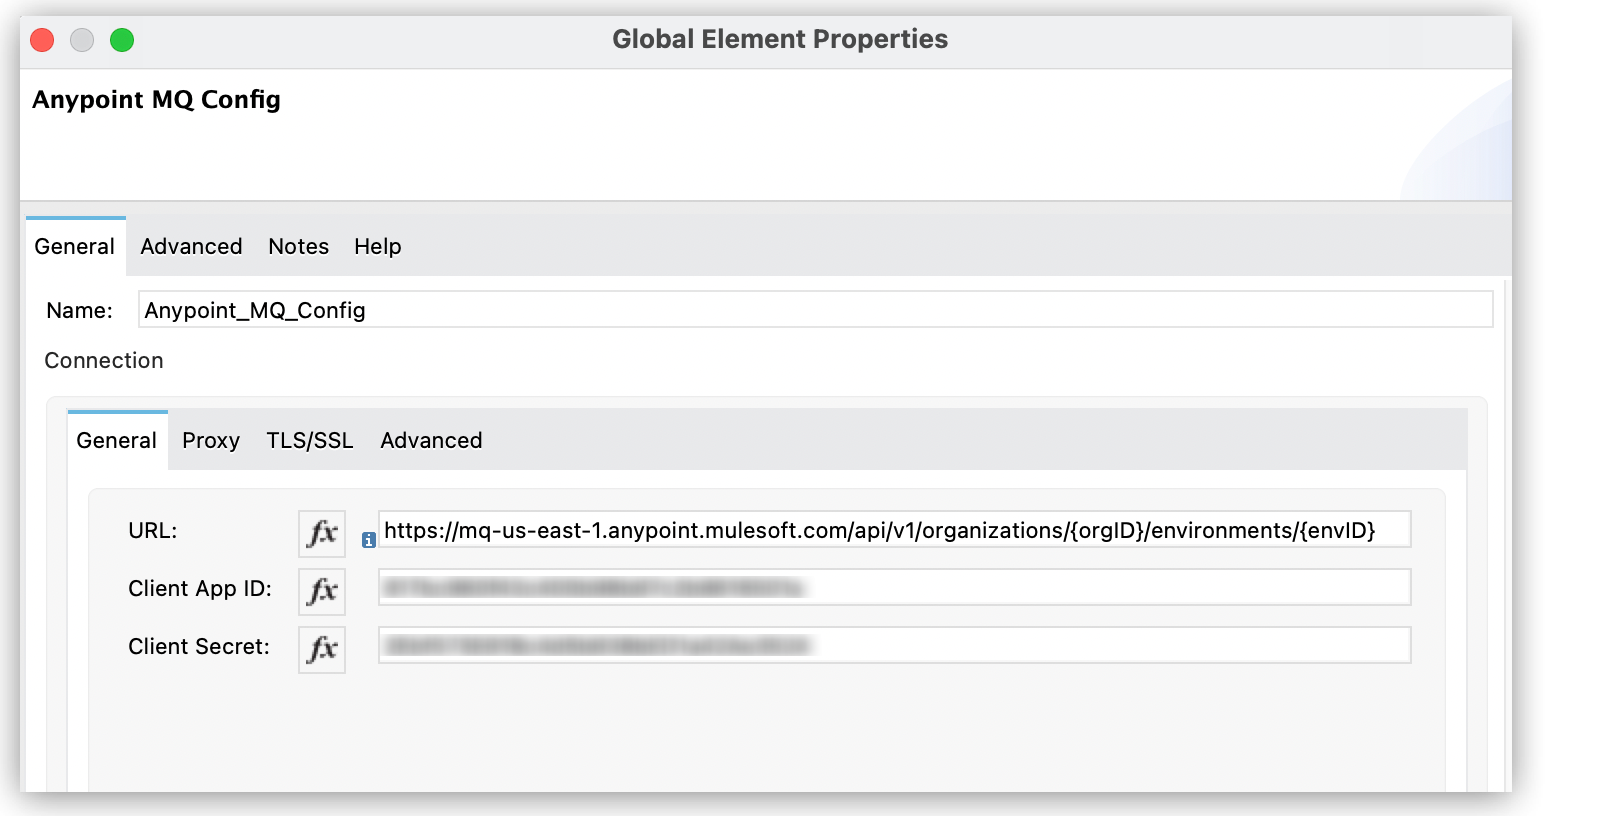
In the Anypoint MQ Config window in Studio, paste the URL in the URL field.
-
Return to the Connected Apps window and copy the ID and secret for the app.
-
Paste the ID and secret values to the Anypoint MQ Config window in Studio:
-
-
Click Test Connection to ensure that the values are correct, and then click OK twice.
-
Save your project.
-
In Package Explorer in Studio, right-click
mq-demoand select Anypoint Platform > Deploy to CloudHub. -
At the prompt, select the environment to which to deploy the app.
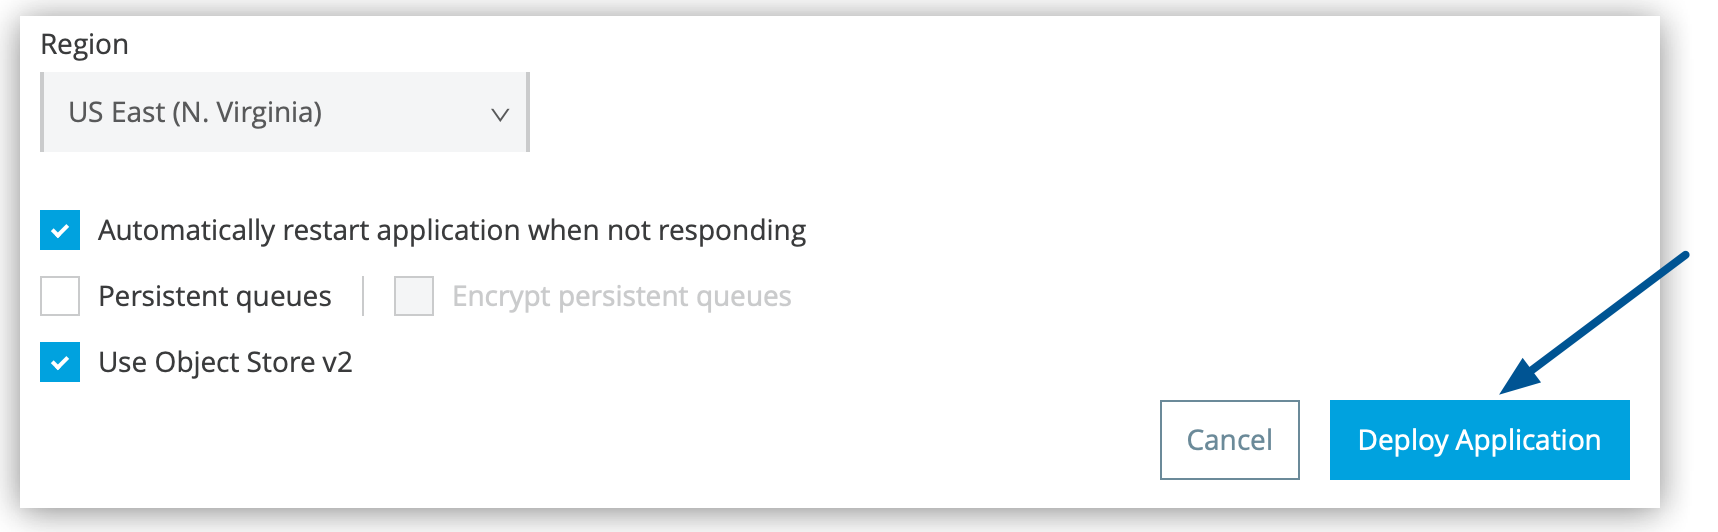
-
In the Runtime Manager Deploying Application window, click Deploy Application:
You have successfully used Studio 7.x to configure an app that connects to Anypoint MQ. Next, you test the connection by submitting REST API commands to the Anypoint MQ Broker API and using Anypoint MQ to view the results.
Test Your Mule 4.x App in Studio 7.x
After you create the app in Studio 7.x, you test your app using a curl command to submit a REST API command to the Anypoint MQ Broker API.
Then, use Anypoint MQ to view the results.
To test your app:
-
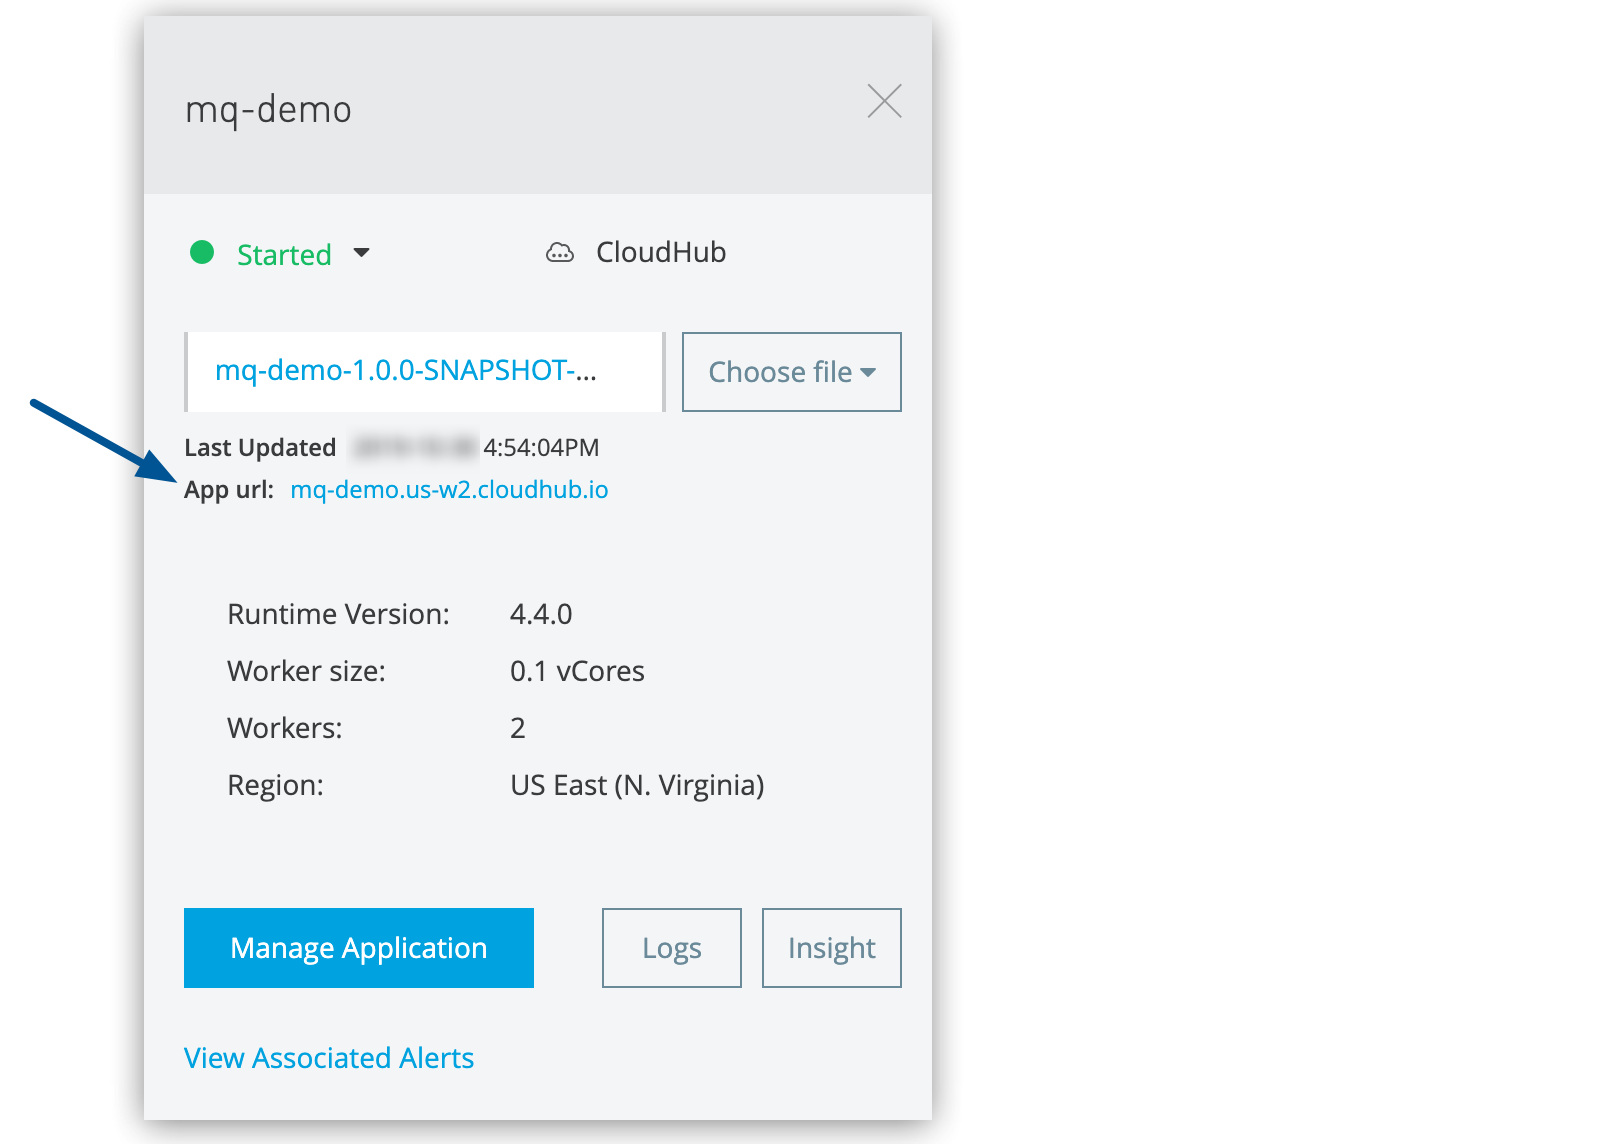
In Anypoint Platform, select Runtime Manager > Applications and ensure that the
mq-demoapp is running. -
Click the status for the
mq-demoapp to display the details pane. -
Copy the App url value:
-
Run this
curlcommand from a command prompt to send thebodyvalue as an Anypoint MQ message.Replace APP-URL with the App url value that you copied from Runtime Manager.
curl -X POST \
  http://APP-URL/mq/100 \
  -H 'content-type: application/json' \
  -d '[  {
    "body": "Welcome to MuleSoft!"
  }
]'
The
100value in the URL is the message ID value as specified by/mq/{messageId}in the HTTP Listener, which is the identifier for your message.If you see a 404 message for
destination not found, verify that the queue name in the MQ Publish > Destination field in Studio matches the name of the queue in Anypoint Platform > MQ.After making changes, redeploy your Mule app to CloudHub by right-clicking the project in Studio 7.x and selecting Anypoint Platform > Deploy to CloudHub.
-
In Anypoint Platform > MQ > Destinations, click the name of the
myDemoQueuequeue that you created earlier and specified in the Destination setting for your app in Studio 7.x. -
Click Message Browser in the navigation menu:
-
Enter
5for the number of messages to retrieve and10for the number of seconds to poll. -
Click Get Messages.
Anypoint MQ retrieves the messages from the queue and displays them in the Message Browser.
-
Click the message row to view the message payload in the details pane:
1 Selected message 2 Message payload in the details pane -
Try changing the body text in the
curlcommand and repeat the steps to view the message.
Example App XML for Studio 7.x
You can use this XML to create the mq-demo app in Studio 7.x.
Click the Configuration XML tab in Studio and compare your XML to this example. Make corrections if necessary.
<?xml version="1.0" encoding="UTF-8"?>

<mule xmlns:anypoint-mq="http://www.mulesoft.org/schema/mule/anypoint-mq" xmlns:http="http://www.mulesoft.org/schema/mule/http"
	xmlns="http://www.mulesoft.org/schema/mule/core"
	xmlns:doc="http://www.mulesoft.org/schema/mule/documentation" xmlns:xsi="http://www.w3.org/2001/XMLSchema-instance" xsi:schemaLocation="http://www.mulesoft.org/schema/mule/core http://www.mulesoft.org/schema/mule/core/current/mule.xsd
http://www.mulesoft.org/schema/mule/http http://www.mulesoft.org/schema/mule/http/current/mule-http.xsd
http://www.mulesoft.org/schema/mule/anypoint-mq http://www.mulesoft.org/schema/mule/anypoint-mq/current/mule-anypoint-mq.xsd">
	<http:listener-config name="HTTP_Listener_config" doc:name="HTTP Listener config" doc:id="0778dad7-d959-4396-8532-883a6c230501" >
		<http:listener-connection host="0.0.0.0" port="8081" />
	</http:listener-config>
	<anypoint-mq:config name="Anypoint_MQ_Config" doc:name="Anypoint MQ Config" doc:id="973e27ca-beff-4510-88d8-11a05053355b" >
		<anypoint-mq:connection url="https://mq-us-east-1.qax.anypoint.mulesoft.com/api/v1" clientId="CLIENT-ID" clientSecret="CLIENT-SECRET" />
	</anypoint-mq:config>
	<flow name="mq-demoFlow" doc:id="1e7b7e94-0759-4a2f-83f0-f425ca95b571" >
		<http:listener doc:name="Listener" doc:id="57828e3a-d5c0-4b94-ac82-84e2c0e4dd2e" config-ref="HTTP_Listener_config" path="/mq/{messageId}"/>
		<anypoint-mq:publish doc:name="Publish" doc:id="17060fa4-d043-4b2f-bc5b-ecc3c905f5a2" destination="myDemoQueue" config-ref="Anypoint_MQ_Config"/>
	</flow>
</mule>