Authentication in HTTP Requests
Use the authentication that you configure in HTTP requests when your Mule app is sending requests to a service that requires authentication, such as the Github OAuth2 server described in OAuth2 - Authorization Code. In this case, your Mule app is the client. On the other hand, when you want to protect your API or app from receiving requests from unauthorized access, use an API Manager policy, such as the OAuth 2.0 Access Token Enforcement Using External Provider policy.
The HTTP request connector supports connecting a Mule client app to a service that requires any of the following types of authentication:
If the target HTTP service of your request requires that you authenticate, provide the necessary credentials in the global HTTP Request Configuration element. Mule uses the credentials you configure in the authorization header of the request.
You can also configure Transport Layer Security (TLS) to encrypt the OAuth credentials.
Basic Authentication
This example builds and runs an app in Studio that sends a request to the Github API![]() for user information. The Github API accepts requests for user information on port 443 to https://api.github.com/user
for user information. The Github API accepts requests for user information on port 443 to https://api.github.com/user![]() .
.
To comply with the basic authentication requirements, the app provides the Github user name and password. You configure the HTTP Request Connector to provide these credentials.
This example requires that you have a Github account.
To call the Github API, first set up an HTTP listen connector:
Studio Visual Editor
-
In Studio, create a new Mule project: File > New > Mule Project. The New Mule Project dialog appears.
-
In Project Settings, set the following options for the HTTP Listen Connector:
-
Project Name:
myproject -
Runtime: Select or accept the default
Mule Server 3.8.0 EEor later.
-
-
Drag an HTTP component from the palette to the Source section of the flow.
-
In the properties editor, accept the default Path
/and set Allowed Methods to GET. -
In Connector Configuration, click
 .
.The HTTP Listen Configuration dialog appears.
-
Click OK to accept the following options:
-
Name: HTTP_Listen_Configuration
-
Protocol: HTTP
-
Host: 0.0.0.0
-
Port: 8081
-
-
Click OK.
-
Save changes.
The error indicator disappears.
Next, set up an HTTP Request connector:
-
Drag another HTTP connector from the palette, and drop it in the Process area of the flow.
-
In the properties editor, in Connector Configuration, click
.The HTTP Request Configuration dialog appears.
-
Set the following HTTP Request Configuration options:
-
Name: Accept
HTTP_Request_Configuration. -
Protocol: HTTPS
-
Host:
api.github.com -
Port:
443
-
-
On the Authentication tab, select Basic protocol.
-
In Username, type your Github user name.
-
In Password, type either your Github password or a personal access token
 .
. -
Check the Preemptive check box, and click OK.
The pre-emptive option passes the user name and password without waiting for a prompt from the server.
-
In the properties editor, set the following options for the HTTP Request connector:
-
Path:
/user -
Method: Select GET from the drop-down.
-
-
Save changes.
Format the output in JSON:
-
Drag a Transform Message component from the palette to the right of the HTTP request component.
-
In the properties editor, change the output of the payload as follows:
%dw 1.0
%output application/json
---
  payload
Finally, run the app:
-
Right-click the project name in project explorer, and choose Run as > Mule Application.
The console shows that the app is deployed.
-
Call the app using the following URL in a browser:
http://localhost:8081/The Github API returns your user information.
{
    "login":"kahn",
    "id":16xxx343,"avatar_url":"https://avatars.githubusercontent.com/u/16xxx343?v=3"`
    ...
}
XML Editor
<?xml version="1.0" encoding="UTF-8"?>
...
<http:listener-config name="HTTP_Listener_Configuration" host="0.0.0.0" port="8081" doc:name="HTTP Listener Configuration"/>
<http:request-config name="HTTP_Request_Configuration" protocol="HTTPS" host="api.github.com" port="443" doc:name="HTTP Request Configuration">
<http:basic-authentication username="kahn" password="7e5....921" preemptive="true"/>
</http:request-config>
<flow name="myprojectFlow">
<http:listener config-ref="HTTP_Listener_Configuration" path="/" doc:name="HTTP"/>
<http:request config-ref="HTTP_Request_Configuration" path="/user" method="GET" doc:name="HTTP"/>
<dw:transform-message doc:name="Transform Message">
<dw:set-payload><![CDATA[%dw 1.0
%output application/json
---
payload]]></dw:set-payload>
</dw:transform-message>
</flow>
</mule>xmlNTLM Authentication
NT LAN Manager (NTLM) authentication replaces the authentication protocol in Microsoft LAN Manager (LANMAN), an older Microsoft product. NTLM is available in Mule 3.7 and later.
In this example, a GET request is sent to http://www.example.com/test, adding an "Authorization" header with the provided username and password.
Studio Visual Editor
-
Drag an HTTP Connector to your canvas, create a new Connector Configuration element for it
-
Select the Authentication tab
-
In the Protocol dropdown menu, pick NTLM
-
Provide your Username and Password (or references to properties that contain them), also optionally your Domain and Workstation
XML Editor
NTLM authentication is configured in the same way as Basic Authentication, just provide username and password in the attributes of the child element. The only difference is that the child element is differently named: "ntlm-authentication" and that you can optionally add domain and workstation attributes.
<http:request-config name="HTTP_Request_Configuration" host="example.com" port="8081" doc:name="HTTP Request Configuration">
<http:ntlm-authentication username="myuser" password="mypass" domain="mydomain"/>
</http:request-config>
<flow name="digest_flow">
...
<http:request config-ref="HTTP_Request_Configuration" path="test" method="GET" />
</flow>xmlDigest Authentication
Studio Visual Editor
-
Drag an HTTP Connector to your canvas, create a new Connector Configuration element for it
-
Select the Authentication tab
-
In the Protocol dropdown menu, pick Digest
-
Provide your Username and Password (or references to properties that contain them)
XML Editor
Digest authentication is configured in the same way as Basic Authentication, just provide username and password in the attributes of the child element. The only difference is that the child element is differently named: "digest-authentication".
<http:request-config name="HTTP_Request_Configuration" host="example.com" port="8081" doc:name="HTTP Request Configuration"> <http:digest-authentication username="myuser" password="mypass"/> </http:request-config> <flow name="digest_flow"> ... <http:request config-ref="HTTP_Request_Configuration" path="test" method="GET" /> </flow>text
In this example, a GET request is sent to http://www.example.com/test, adding an "Authorization" header with the provided username and password.
OAuth2 - Authorization Code
The OAuth2 - Authorization Code configures the OAuth 2.0 authorization code grant type. The OAuth authentication server holds the resources that are protected by OAuth. For example, calls to the Github API can be authenticated through Github server using OAuth![]() . The example in this section shows you how to create Mule client application to access a protected resource, Github user data, on the Github OAuth authentication server. The example covers the following things:
. The example in this section shows you how to create Mule client application to access a protected resource, Github user data, on the Github OAuth authentication server. The example covers the following things:
-
Setup
-
Creating the Mule client app
-
Running the Mule client app
This example requires that you have a Github account.
Setup
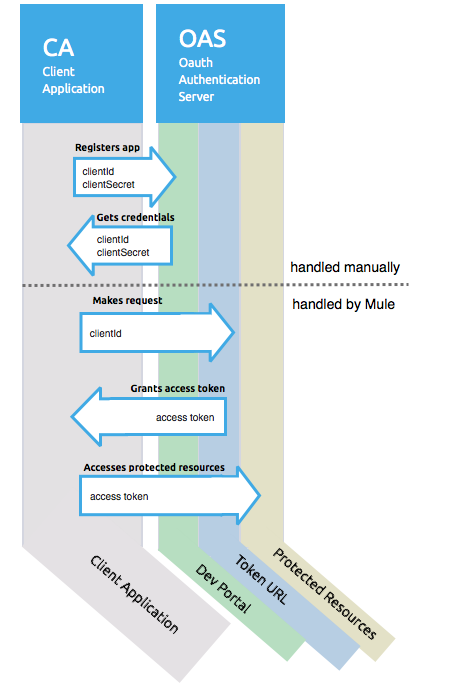
First, you register the client application on the authentication server. The authentication server assigns a client ID and client secret to the Mule client app. The app uses these credentials later to identify itself to the authentication server. During the registration, you also provide the URL to the Mule app home page and the application callback URL.
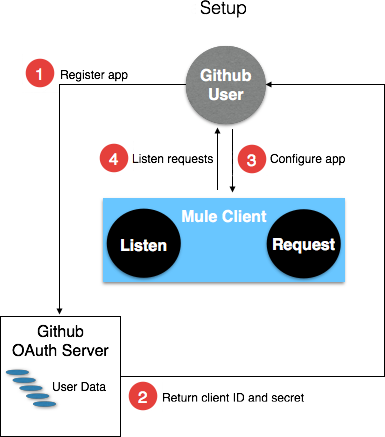
To set up the example Mule client application:
-
Log in to Github.
-
Register the application
in your Github personal settings. On the Register a new OAuth application page, fill in the following text boxes:-
Application name: Type an arbitrary application name. For this example, use
oauth-grant-code. -
Homepage URL: For this example, use
http://localhost:8082. -
Authorization callback URL: For this example, use
http://localhost:8082/callback. -
Click Register application.
Github creates a page for the registered application on
https://github.com/settings/applications/<app number>that includes the Github-assigned client ID and client secret.
-
Creating the Mule Client App
In this section, you create the Mule client app that uses the Github assigned client ID and client secret to access the user data on the Github OAuth2 authentication server. The sample consists of an HTTP listen connector, an HTTP request connector, and a DataWeave (Transform) component for transforming plain text to JSON. In the HTTP requester, you configure access to the authentication server.
In the following procedure, you configure a number of options, including these:
-
localauthorizationUrl
Defines a URL in your application that listens for incoming requests.
-
Authorization URL
Provided by Github
, this URL redirects the user request from the Mule client app to the Authorization URL of the Github authentication server. -
Token URL
The Mule client app sends the token to the Token URL that you configure in the Mule client app.
To configure the Mule client app for accessing the Github authentication server:
Studio Visual Editor
-
In Studio, create a new Mule project: File > New > Mule Project.
The New Mule Project dialog appears.
-
In Project Settings, set the following options for the HTTP Listen Connector:
-
Project Name:
oauth-grant-code -
Runtime: Select or accept the default
Mule Server 3.8.0 EEor later.
-
-
Drag an HTTP component from the palette to the Source section of the flow.
-
In the properties editor, accept the default Path
/. -
In Connector Configuration, click
.The HTTP Request Configuration dialog appears.
-
Click OK to accept the following options:
-
Name: HTTP_Request_Configuration
-
Protocol: HTTP
-
Host: 0.0.0.0
-
Port: 8081
-
Base Path: /github
-
-
Click OK.
-
Save changes.
The error indicator disappears.
Next, set up an HTTP request connector:
-
Drag another HTTP connector from the palette, and drop it in the Process area of the flow.
-
In the properties editor, in Connector Configuration, click
.The HTTP Request Configuration dialog appears.
-
Set the following HTTP Request Configuration options:
-
Name: Accept
HTTP_Request_Configuration. -
Protocol: HTTPS
-
Host:
api.github.com -
Port:
443
-
-
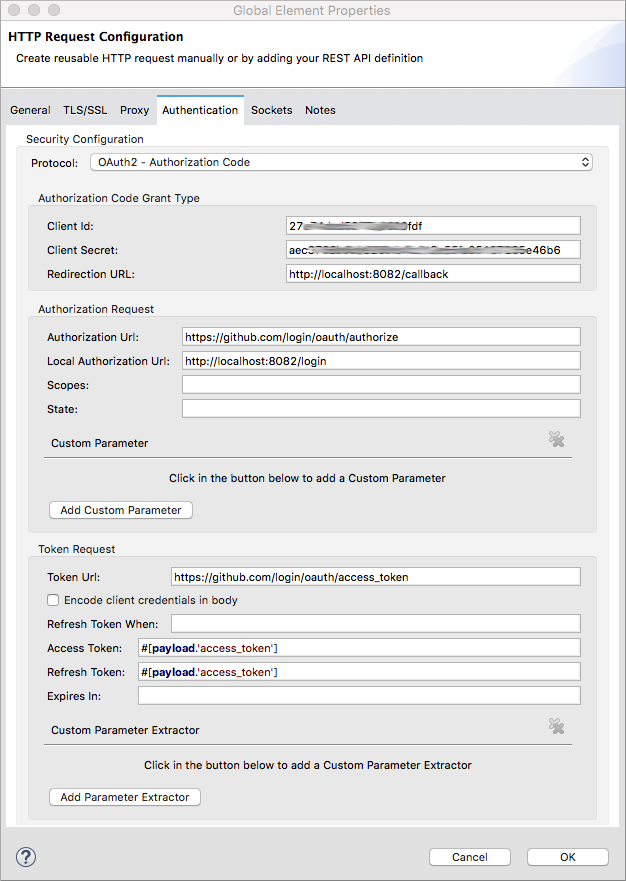
On the Authentication tab, select
OAuth2 - Authorization Code. -
Set the following options:
-
Client Id: Type the client Id that Github provided when you registered the app.
-
Client Secret: Type the client secret that Github provided when you registered the app.
-
Redirection URL:
http://localhost:8082/callbackThis value matches the value you configured for Authorization callback URL when registering the app in Github.
-
Authorization Url:
https://github.com/login/oauth/authorize -
Local Authorization Url:
https://localhost:8082/login -
Token Url:
https://github.com/login/oauth/access_token -
Access Token:
#[payload.'access_token']This MEL expression extracts an access token.
-
Refresh Token:
#[payload.'access_token']You can use the same MEL expression for the refresh token; however, Github doesn’t actually use a refresh token.
-
-
Click OK.
-
Save changes.
-
Drag a Transform Message component from the palette to the right of the HTTP request component.
-
In the properties editor, change the output of the payload as follows:
%dw 1.0
%output application/json
---
  payload
This formats the output of the user data in Github.
XML Editor
Within the global configuration of the connector, add an oauth2:authorization-code-grant-type child element, include the following values in it:
-
The clientId and clientSecret.
Use the client ID and client secret you received from Github when registering your application.
-
The redirectionUrl to which the Github authentication server will send the access token once the RO grants you access.
If you were required to provide a redirect URL when registering your application with Github, this value must match what you provided there.
Inside this element, add a oauth2:authorization-request child element with the following attributes:
-
The authorizationUrl that the Github authentication server exposes
-
The localauthorizationUrl
Also, at the same level, add a oauth2:token-request child element with the following attribute:
-
The tokenUrl that the Github authentication server exposes
<http:listener-config name="HTTP_Listener_Configuration" host="0.0.0.0" port="8081" doc:name="HTTP Listener Configuration" basePath="/github"/>
<http:request-config name="HTTP_Request_Configuration" protocol="HTTPS" host="api.github.com" port="443" doc:name="HTTP Request Configuration">
<oauth2:authorization-code-grant-type clientId="27...df" clientSecret="ae...6" redirectionUrl="http://localhost:8082/callback">
<oauth2:authorization-request authorizationUrl="https://github.com/login/oauth/authorize" localAuthorizationUrl="http://localhost:8082/login" />
<oauth2:token-request tokenUrl="https://github.com/login/oauth/access_token">
<oauth2:token-response accessToken="#[payload.'access_token']" refreshToken="#[payload.'access_token']"/>
</oauth2:token-request>
</oauth2:authorization-code-grant-type>
</http:request-config>
<flow name="oauth-grant-codeFlow">
<http:listener config-ref="HTTP_Listener_Configuration" path="/" doc:name="HTTP"/>
<http:request config-ref="HTTP_Request_Configuration" path="/user" method="GET" doc:name="HTTP">
<http:request-builder>
<http:header headerName="Accept" value="application/vnd.github.v3+json"/>
</http:request-builder>
</http:request>
<dw:transform-message doc:name="Transform Message">
<dw:set-payload><![CDATA[%dw 1.0
%output application/json
---
payload]]></dw:set-payload>
</dw:transform-message>
</flow>xmlRunning the Mule Client App
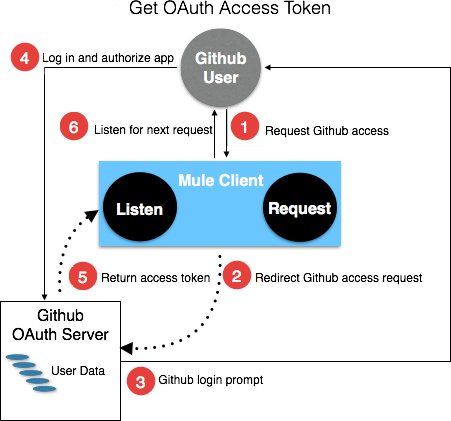
After deploying the Mule client app, you follow the procedure in this section to run the app. The procedure covers the following actions:
-
Submitting an HTTP request for Github access to the Mule client app (#1 in the following diagram)
The client app redirects the request to the Github authentication server (#2 in the diagram). Github prompts you to login and authorize the client app you registered.
-
Using your Github login account credentials to log in and authorize the application (#3-4 in the diagram)
In response, the Github authentication server returns an access token (#5 in the diagram).
-
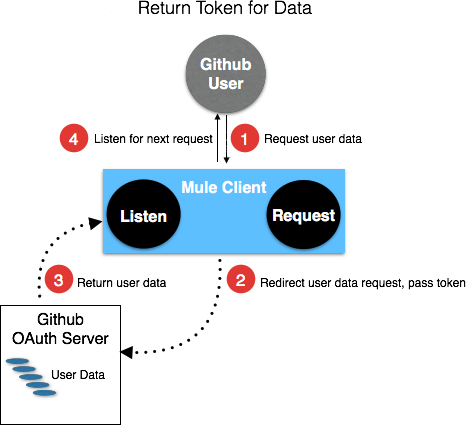
Requesting the secured user data using the access token (#1-2 in the following diagram)
The client app gets the user data from the Github authentication server (#3 in the diagram).
To run the Mule client app to get Github user data:
Perform these steps before the access token expires:
-
Right-click the project name in project explorer, and choose Run as > Mule Application.
The console shows that the app is deployed.
-
In a browser, enter the local authorization URL
http://localhost:8082/loginto initiate the OAuth2 dance.Github prompts you to log in.
-
Log in using your Github user name and password.
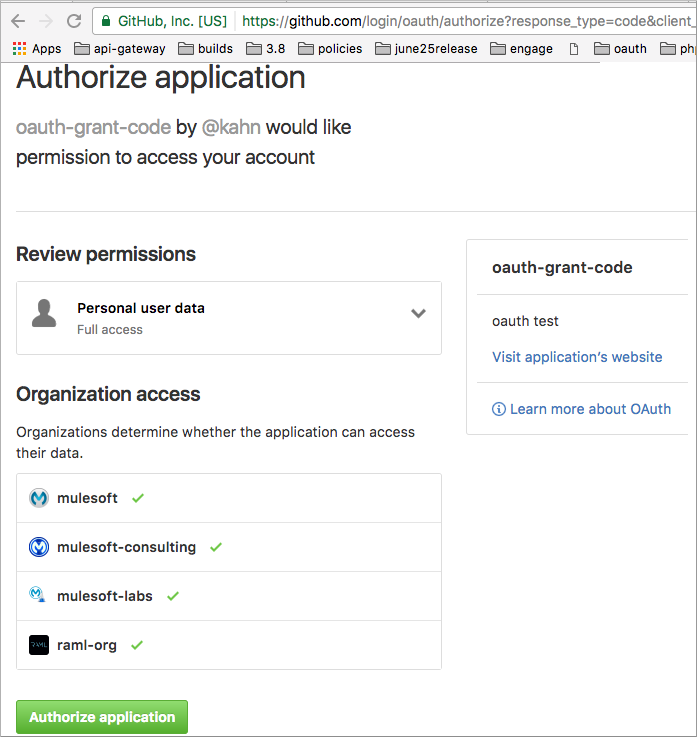
Github prompts you to authorize the application you registered to run.
-
Click Authorize application.
Successfully retrieved access tokenappears as body text in the browser you used to initiate the OAuth2 dance.To return the token to get data, enter the following URL in a browser:
http://localhost:8081/githubThe Github API returns your user information.
{
    "login":"kahn",
    "id":16xxx343,"avatar_url":"https://avatars.githubusercontent.com/u/16xxx343?v=3"`
    ...
}
Using Scopes
Configuring the scopes attribute in the Mule client app is optional, and not needed for the Github example. To configure scopes, define a comma separated list of OAuth scopes available in the authentication server. Scopes in OAuth are like security roles.
Sending Custom Parameters to the Authorization URL
There are OAuth implementations that require or allow extra query parameters to be sent when calling the Authentication URL of the OAS.
Studio Visual Editor
-
Drag an HTTP Connector to your canvas, create a new Connector Configuration element for it.
-
Select the Authentication tab.
-
In the Protocol dropdown menu, pick OAuth2 - Authorization Code.
-
Fill in the same fields as in the previous example.
-
Click the Add Custom Parameter as many times as you need and define a name and value for each custom parameter.
XML Editor
This example includes two Oauth2:custom-parameter child elements that define parameters that are specific to this API.
<http:request-config name="HTTP_Request_Configuration" host="api.box.com" port="443" basePath="/2.0" doc:name="HTTP Request Configuration" >
<oauth2:authorization-code-grant-type clientId="your_client_id" clientSecret="your_client_secret" redirectionUrl="http://localhost:8082/redirectUrl">
<oauth2:authorization-request authorizationUrl="http://www.box.com/api/oauth2/authorize" localAuthorizationUrl="http://localhost:8082/authorization">
<oauth2:custom-parameters>
<oauth2:custom-parameter paramName="box_device_id" value="123142"/>
<oauth2:custom-parameter paramName="box_device_name" value="my-phone"/>
</oauth2:custom-parameters>
</oauth2:authorization-request>
<oauth2:token-request tokenUrl="http://www.box.com/api/oauth2/token"/>
</oauth2:authorization-code-grant-type>
</http:request-config>xmlOverriding the Redirect URI (external redirect_uri)
The OAuth 2.0 specification![]() describes checking the redirect URI from the destination site of the redirect. The OAuth authentication server uses the URL to provide the authentication code to the Mule server for retrieving the access token. If you provide this URL, Mule creates an endpoint at the URL for storing the authentication code unless there’s already an endpoint registered to manually extract the authorization code.
describes checking the redirect URI from the destination site of the redirect. The OAuth authentication server uses the URL to provide the authentication code to the Mule server for retrieving the access token. If you provide this URL, Mule creates an endpoint at the URL for storing the authentication code unless there’s already an endpoint registered to manually extract the authorization code.
You configure the external redirect URI by setting the system property mule.oauth2.externalRedirectUrl.
Using mule.oauth2.externalRedirectUrl is particularly useful for deploying applications to CloudHub, for example. In the configuration of authentication, you need to specify the redirectionURL in the following format:
For example, the redirectionURLis http://localhost:8082/callback![]() in the previous example:
in the previous example:
To create the endpoint for CloudHub, Mule has to create an endpoint for CloudHub in a different format. For example:
https://<app>.cloudhub.io/<redirect Uri>
To instruct Mule to create the endpoint for CloudHub in the correct format, include the mule.oauth2.externalRedirectUrl system property in your Mule properties file. For example:
mule.env=dev
mule.oauth2.externalRedirectUrl=http://<app>.cloudhub.io/callback
...
Extracting Parameters from the Token URL Response
After you have obtained an authorization code from the authentication server, you make a request to the Token URL of the server to receive an access token.
The format of the response to the request to the token URL is not defined in the OAuth spec. Each implementation may therefore return different response formats. By default, Mule expects the response to be in JSON format. When this is the case, the HTTP Response Connector knows how to extract the required information, as long as its elements are named as below:
-
access token: JSON filed must be named
access_token -
refresh token: JSON field must be named
refresh_token -
expires: JSON field must be named
expires_in
When the response is in JSON format, the parameters are automatically extracted and you can use MEL expressions to reference these values in the Mule Message that was generated from the response to the request to the token URL, as shown in the previous Github example.
When the response is not in JSON format, then you must first configure the connector so that it knows how to extract these values. In the following example, the connector expects the response to have a Content-Type of application/x-www-form-urlencoded, so the body of the response is transformed into a Map in the payload. You extract the values from the Map through MEL expressions, such as #[payload.'access_token'].
Studio Visual Editor
On the Authentication tab, configure the options as follows for the OAuth2 - Authorization Code:
-
Access Token:
#[payload.'access_token'] -
Expires In
#[payload.'expires_in'] -
Refresh Token
#[payload.'refresh_token']
XML Editor
This example includes two Oauth2:custom-parameter child elements that define parameters specific to this API.
<http:request-config name="HTTP_Request_Configuration" host="api.box.com" port="443" basePath="/2.0" doc:name="HTTP Request Configuration">
<oauth2:authorization-code-grant-type clientId="your_client_id" clientSecret="your_client_secret" redirectionUrl="http://localhost:8082/redirectUrl">
<oauth2:authorization-request authorizationUrl="http://www.box.com/api/oauth2/authorize" localAuthorizationUrl="http://localhost:8082/authorization"/>
<oauth2:token-request tokenUrl="http://www.box.com/api/oauth2/token">
<oauth2:token-response accessToken="#[payload.'access_token']" expiresIn="#[payload.'expires_in']" refreshToken="#[payload.'refresh_token']"/>
</oauth2:token-request>
</oauth2:authorization-code-grant-type>
</http:request-config>xmlRefresh Access Token Customization
The access token you obtain from the token URL eventually expires. The length of time the token is valid depends on the authentication server implementation. After the access token expires, instead of going through the whole process once again, you can retrieve a new access token by using the refresh access token provided by the token URL response.
Mule handles this use case automatically. So by default, when an HTTP Request Connector is executed, if the response has a status code of 403, mule call the token URL and gets a new access token.
You can customize when Mule performs one of these requests to obtain a new access token using a MEL Expression. The expression is evaluated against the Mule Message that is generated from the response of the HTTP Request Connector call.
Studio Visual Editor
On the Authentication tab, configure the Request Token When field with the following MEL expression:
#[xpath3('/response/status/text()', payload, 'STRING') == ‘unauthorized’]
XML Editor
To set when to perform a call to obtain a new access token, set a MEL expression for the attribute refreshTokenwhen in the oauth2:token-request element.
<http:request-config name="HTTP_Request_Configuration" host="api.box.com" port="443" basePath="/2.0" doc:name="HTTP Request Configuration">
<oauth2:authorization-code-grant-type clientId="your_client_id" clientSecret="your_client_secret" redirectionUrl="http://localhost:8082/redirectUrl">
<oauth2:authorization-request authorizationUrl="http://www.box.com/api/oauth2/authorize" localAuthorizationUrl="http://localhost:8082/authorization"/>
<oauth2:token-request tokenUrl="http://www.box.com/api/oauth2/token" refreshTokenWhen="#[xpath3('/response/status/text()', payload, 'STRING') == ‘unauthorized’]"/>
</oauth2:authorization-code-grant-type>
</http:request-config>xmlWhen a request authorization fails, the response contains an XML node named status with value ‘unauthorized’. In the previous example, the MEL expression evaluates that condition. When it evaluates to true, Mule sends a request to the Token URL to retrieve a new access token.
Accessing Resources on Behalf of Several Users
In the preceding examples, you authenticated a single user. You can handle access tokens for multiple users in a single application by defining a way to identify each user during the authorization period. During this period, you send a request to the Token URL to retrieve an access token and execute operations against the API with the acquired access token.
To identify which user is granting access to the Mule client app, define a MEL expression to retrieve a Resource Owner ID against the call to the local authorization URL.
Studio Visual Editor
On the Authentication tab, configure the options as follows for the OAuth2 - Authorization Code: In the Advanced section of the Authentication tab, set:
-
Resource Owner ID to
#[flowVars.'userId'] -
Local Authorization URI #[message.inboundProperties.'http.query.params'.userId]
The field Resource Owner ID must be set with a MEL expression that allows each execution of the HTTP Request Connector to retrieve the RO identifier from the Mule Message. So on this example, whenever the HTTP Request Connector is executed, there must be a flow variable named ‘userId’ with the RO identifier to use. To create this variable, you can add a Variable transformer to your flow, positioned before the HTTP Request Connector, and configure the transformer to create the userId variable in the Mule Message.
The Local Authorization URI field (the one in the Advanced section), defines that in order to get the RO identifier, the userId query parameter must be parsed from the call done to the local authorization URL.
So if you hit http://localhost:8082/authorization?userId=john, then the RO john can grant access to the CA on his behalf. If you hit ![]()
http://localhost:8082/authorization?userId=peter then the RO peter can grant access to the CA on his behalf.![]()
XML Editor
Set resourceOwnerId to [flowVars.'userId'] and localAuthorizationUrlResourceOwnerId to [message.inboundProperties.'http.query.params'.userId]
<http:request-config name="HTTP_Request_Configuration" host="api.box.com" port="443" basePath="/2.0" doc:name="HTTP Request Configuration" tlsContext-ref="TLS_Context">
<oauth2:authorization-code-grant-type clientId="your_client_id" clientSecret="your_client_secret" redirectionUrl="http://localhost:8082/redirectUrl" localAuthorizationUrlResourceOwnerId="#[message.inboundProperties.'http.query.params'.userId]"
resourceOwnerId="#[flowVars.'userId']">
<oauth2:authorization-request authorizationUrl="http://www.box.com/api/oauth2/authorize" localAuthorizationUrl="http://localhost:8082/authorization" scopes="access_user_details, read_user_files"/>
<oauth2:token-request tokenUrl="http://www.box.com/api/oauth2/token" refreshTokenWhen="#[xpath3('/response/status/text()')]" />
</oauth2:authorization-code-grant-type>
</http:request-config>xmlThe attribute resourceOwnerId must be set with a MEL expression that allows each http:request execution to retrieve the RO identifier from the Mule Message. So on this example, whenever the http:request is executed, there must be a flow variable named ‘userId’ with the RO identifier to use.
<flow name="accessROFolders">
<set-variable variableName="userId" value="#['Peter']" doc:name="Variable"/>
<http:request config-ref="HTTP_Request_Configuration" path="/folders" method="GET" doc:name="HTTP"/>
</flow>xmlThe attribute localAuthorizationUrlResourceOwnerId defines that, in order to get the RO identifier, the userId query parameter must be parsed from the call done to the local authorization URL.
So if you hit http://localhost:8082/authorization?userId=john, then the RO john can grant access to the CA on his behalf. If you hit ![]()
http://localhost:8082/authorization?userId=peter then the RO peter can grant access to the CA on his behalf.![]()
Use HTTPS for OAuth Authorization Code
When you need to use HTTPS for the communication with the authentication server, typical in a production environment, apply HTTPS encoding to the OAuth credentials in all requests, including those done to:
-
the local authorization URL
-
the authorization URL
-
the redirect URL
-
the token URL
By specifying a TLS context in your HTTP Request Connector authentication settings, this is handled in all of these requests.
Studio Visual Editor
On the Authentication tab, configure the options as follows for the OAuth2 - Authorization Code:
-
In the TLS configuration section, select Use Global TLS Config
-
Click the green plus sign next to the field to create a new TLS Context
-
Set up the trust store and key store configuration and click OK to save
The TLS settings in the Authentication tab encode your OAuth credentials. The TLS/SSL tab of the HTTP Request Configuration encode the request body.
XML Editor
Set tlsContext-ref to reference a TLS context element, provide your trust store and key store credentials in this element.
<http:request-config name="HTTP_Request_Configuration_HTTPS" host="api.box.com" port="443" basePath="/2.0" doc:name="HTTP Request Configuration" tlsContext-ref="TLS_Context" protocol="HTTPS">
<oauth2:authorization-code-grant-type clientId="your_client_id" clientSecret="your_client_secret" redirectionUrl="http://localhost:8082/redirectUrl" tlsContext-ref="TLS_Context">
<oauth2:authorization-request authorizationUrl="https://www.box.com/api/oauth2/authorize" localAuthorizationUrl="https://localhost:8082/authorization" scopes="access_user_details, read_user_files"/>
<oauth2:token-request tokenUrl="https://www.box.com/api/oauth2/token" />
</oauth2:authorization-code-grant-type>
</http:request-config>
<tls:context name="TLS_Context" doc:name="TLS Context">
<tls:trust-store path="your_trust_store" password="your_password"/>
<tls:key-store path="your_keystore_path" password="your_password" keyPassword="your_key_password"/>
</tls:context>xmlThe tlsContext-ref attribute of the oauth2:authorization-code-grant-type element is for encoding your OAuth credentials. The tls:context child element of the http:request-config is for encoding your request’s body.
OAuth2 - Client Credentials
On the OAuth Authentication - Client Credentials tab you configure the client credentials grant type.
The OAuth Authentication Server (OAS) is a server that holds the resources that are protected by OAuth. ex: Box server provides an API with OAuth authentication.
The Client Application (CA) is the server that tries to access a protected resource that belongs to a resource owner and that is held in an OAuth authentication server. ex: a Mule Server trying to access the resources that belong to a Box user and that are held in a Box server.
In this case, the resource owner (RO) is also the CA. This means that the CA is implicitly authorized by the RO, which makes the whole procedure a lot simpler.
-
The CA must register an app to the OAS server. When this happens, the OAS assigns credentials to the CA that it can later use to identify itself: client ID and client secret. The OAS must also provide a Token URL, to which the CA can later send HTTP requests to retrieve an access token that is required when accessing the Protected Resources.
-
The CA makes a request to the Token URL of the OAS, containing its client ID to prove its identity. As a response, the OAS grants it an access token.
-
With this access token, the CA is now free to access the protected resources in the OAS as long as it includes it in its requests. Depending on the policies defined by the OAS, this token may eventually expire.
Configuration
Client credentials grant type is meant to be used by a CA to grant access to an application on behalf of itself, rather than on behalf of a RO (resource owner) in the OAS. To get an access token all you need is the application credentials.
Studio Visual Editor
-
Drag an HTTP Connector to your canvas, create a new Connector Configuration element for it
-
Select the Authentication tab
-
In the Protocol dropdown menu, pick OAuth2 - Client Credentials
-
Fill in the following fields:
-
The Client Id and Client Secret the OAS gave you when registering your application.
-
The Scopes field is optional, it allows you to define a comma separated list of OAuth scopes available in the OAS. Scopes in OAuth are very much like security roles.
-
The Token URI that the OAS exposes
-
XML Editor
You must include the following information:
-
The clientId and clientSecret the OAS gave you when registering your application.
-
The scopes attribute is optional, it allows you to define a comma separated list of OAuth scopes available in the OAS. Scopes in OAuth are very much like security roles.
-
The tokenUrl that the OAS exposes
<http:request-config name="HTTP_Request_Configuration" host="some.api.com" port="80" basePath="/api/1.0" doc:name="HTTP Request Configuration">
<oauth2:client-credentials-grant-type clientId="your_client_id" clientSecret="your_client_secret">
<oauth2:token-request tokenUrl="http://some.api.com/api/1.0/oauth/token" scopes="access_user_details, read_user_files"/>
</oauth2:client-credentials-grant-type>
</http:request-config>xmlWhen the mule application is deployed, it will try to retrieve an access token. If the app is not able to retrieve an access token, it will fail in the deployment.
Extracting Parameters from the Token URL Response
The same behavior that applies to authorization code can be applied for client credentials grant type.
Refresh Access Token Customization
The same behavior that applies to authorization code can be applied for client credentials grant type.
Token Manager Configuration
It’s possible to access authorization information for client credentials and authorization codes by using a token manager configuration.
Studio Visual Editor
-
Drag an HTTP Connector to your canvas, create a new Connector Configuration element for it
-
Select the Authentication tab
-
In the Protocol dropdown menu, pick OAuth2 - Client Credentials
-
In the Advanced section of the form, click the green plus sign next to Token Manager to create a new token manager
-
Assign it a reference to an object store
XML Editor
The tokenManager-ref attribute need to reference a token-manager-config element in the configuration.
<oauth2:token-manager-config name="Token_Manager_Config" doc:name="Token Manager Config"/>
<http:request-config name="HTTP_Request_Configuration" host="api.box.com" port="443" basePath="/2.0" doc:name="HTTP Request Configuration">
<oauth2:authorization-code-grant-type clientId="your_client_id" clientSecret="your_client_secret" redirectionUrl="http://localhost:8082/redirectUrl" tokenManager-ref="Token_Manager_Config" localAuthorizationUrlResourceOwnerId="#[message.inboundProperties.'http.query.params'.userId]" resourceOwnerId="#[flowVars.'userId']">
<oauth2:authorization-request authorizationUrl="https://www.box.com/api/oauth2/authorize" localAuthorizationUrl="https://localhost:8082/authorization" scopes="access_user_details, read_user_files"/>
<oauth2:token-request tokenUrl="https://www.box.com/api/oauth2/token"/>
</oauth2:authorization-code-grant-type>
</http:request-config>xmlAccess Authorization Information Through the Token Manager
Once you have a token manager associated with the authorization grant type (in the example below, with authorization code) we can use the oauthContext function in a MEL expression anywhere in your flow to access information from an OAuth authorization.
If you’re using client credentials or authorization code with a single RO, use the following function:
oauthContext(tokenManagerConfigName)
This function provides access to the OAuth authorization information from a token manager.
-
tokenManagerConfigName: Name of a token manager in the configuration
If you’re using authorization code with multiple RO , use the following function:
oauthContext(tokenManagerConfigName, resourceOwnerId)
This function provides access to OAuth authorization information from a token manager.
-
tokenManagerConfigName: Name of a token manager in the configuration -
resourceOwnerId: Identifier of a RO.
Examples
This table includes examples of how to retrieve information from a Token Manager. Use these expressions in any processor in your flow that you place after the HTTP Request Connector that handles your OAuth authentication.
| Function | Result |
|---|---|
|
accessToken value |
|
accessToken value for the RO identified with the id ‘Peter’ |
|
refreshToken value |
|
expires in value |
|
state used for the authorization URL |
|
custom parameter extracted from the token URL response |
|
custom parameter extracted from the token URL response for RO ‘Peter’. |
Access Token Invalidation
When using a Token Manager, you can block a particular RO.
Studio Visual Editor
-
Drag an Invalidate OAuth Context element to your canvas.
-
In its properties editor, set up the Token Manager Configuration so that it points to the same Token Manager that your HTTP Request Connector references when handling OAuth authentication.
XML Editor
<flow name="invalidateOauthContext">
<oauth2:invalidate-oauth-context config-ref="tokenManagerConfig"/>
</flow>xmlThe Invalidate OAuth Context element cleans up all of the OAuth information stored in the token manager.
When using multiple RO with a single Token Manager, if you want to only clear the OAuth information of one RO, then you must specify the resource owner id in the Invalidate OAuth Context element.
Studio Visual Editor
-
Drag an Invalidate OAuth Context element to your canvas.
-
In its properties editor, set up the Token Manager Configuration so that it points to the same Token Manager that your HTTP Request Connector references when handling OAuth authentication.
-
Set the Resource Owner Id to an expression that points to the RO you want to clear. For example #
[flowVars.'resourceOwnerId']
XML Editor
<flow name="invalidateOauthContextWithResourceOwnerId">
<oauth2:invalidate-oauth-context config-ref="tokenManagerConfig" resourceOwnerId="#[flowVars.'resourceOwnerId']"/>
</flow>xmlCustomizing the Token Manager Object Store
By default, the token manager uses an in-memory object store to store the credentials. You can customize the token manager object store by using the objectStore-ref attribute. See how to configure a custom object store.
See Also
-
HTTP Request Connector
-
HTTP Listener Connector
-
See a reference of the available XML configurable options in this connector