Azure Service Bus Connector 3.7 Examples
The examples in this section show application flows that:
-
Sends messages to and receives messages from Azure Service Bus
-
Sends and listens for messages and receives an acknowledgment using the
MANUALacknowledgment type -
Sends and receives messages using session IDs for session-aware queues
These examples use variables for some field values. You can either:
-
Replace the variables with their values in the code
-
Provide the values for each variable in a properties file and then refer to that file from the connector configuration
For more information about using a properties file, see Configuring Property Placeholders
Create a Mule Project
After you create a new Mule project and configure your credentials, you can create an application flow for each example by using the provided XML code.
To create a Mule project:
-
In Studio, select File > New > Mule Project.
-
Enter a name for your Mule project and click Finish.
-
Create a file named
mule-app.propertiesand save it in<project-name>/src/main/resources. -
Configure your Azure connection credentials in the file
mule-app.properties, and include the name of the Azure queue you created, for example:#============================================================== #Connection Parameters #============================================================== # Azure common authentication configuration azure.namespace=myazure queue.name=mytestqueue # Shared Access Signature authentication azure.keyname=SAStokenname azure.key=SAStoken # Azure Active Directory authentication azure.tenantId=TenantId azure.clientId=ClientId azure.clientSecret=ClientSecret
-
Save the file.
-
Open the Global Element Configuration and click Test Connection to verify your credentials.
Send and Receive Example
This flow shows an example of how to use the Send and Receive From Queue operations to send and receive messages:
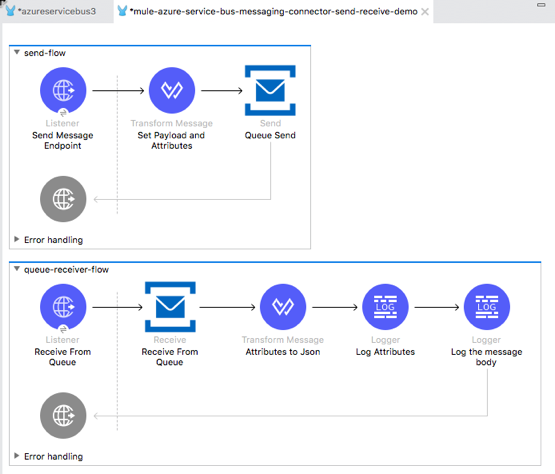
To create this flow:
-
In the Studio canvas, click Configuration XML.
-
Delete all the contents after the line
<?xml version="1.0" encoding="UTF-8"?>. -
Copy and paste the following XML after the line
<?xml version="1.0" encoding="UTF-8"?>:<mule xmlns:ee="http://www.mulesoft.org/schema/mule/ee/core" xmlns:http="http://www.mulesoft.org/schema/mule/http" xmlns:azure-service-bus-messaging="http://www.mulesoft.org/schema/mule/azure-service-bus-messaging" xmlns="http://www.mulesoft.org/schema/mule/core" xmlns:doc="http://www.mulesoft.org/schema/mule/documentation" xmlns:xsi="http://www.w3.org/2001/XMLSchema-instance" xsi:schemaLocation=" http://www.mulesoft.org/schema/mule/ee/core http://www.mulesoft.org/schema/mule/ee/core/current/mule-ee.xsd http://www.mulesoft.org/schema/mule/http http://www.mulesoft.org/schema/mule/http/current/mule-http.xsd http://www.mulesoft.org/schema/mule/core http://www.mulesoft.org/schema/mule/core/current/mule.xsd http://www.mulesoft.org/schema/mule/azure-service-bus-messaging http://www.mulesoft.org/schema/mule/azure-service-bus-messaging/current/mule-azure-service-bus-messaging.xsd"> <configuration-properties file="mule-app.properties" doc:name="Configuration properties"/> <http:listener-config name="HTTP_Listener_config" doc:name="HTTP Listener config" doc:id="290d1aa8-2e61-4707-8f04-65f0e5e4cf07" > <http:listener-connection host="0.0.0.0" port="8081" /> </http:listener-config> <azure-service-bus-messaging:config name="Azure_Service_Bus_Messaging_Connector_Config" doc:name="Azure Service Bus Messaging Connector Config" doc:id="71d0e711-6d29-4eff-b640-00986a41dfbc" > <azure-service-bus-messaging:sas-connection namespace="${azure.namespace}" sharedAccessKeyName="${azure.keyname}" sharedAccessKey="${azure.key}" /> </azure-service-bus-messaging:config> <flow name="send-flow" doc:id="2c8bce62-f192-4db2-9c70-792a5e78ac7f" > <http:listener doc:name="Send Message Endpoint" doc:id="aa79c404-2e41-4453-9fde-18b8ea74c805" config-ref="HTTP_Listener_config" path="/sendMessage" /> <ee:transform doc:name="Set Payload and Attributes" doc:id="bddebf8d-6d63-4db0-990f-94ecec23ddbd"> <ee:message> <ee:set-payload><![CDATA[%dw 2.0 output application/json --- { key1: "value1", key2: "value2 for Queue" }]]></ee:set-payload> </ee:message> <ee:variables> <ee:set-variable variableName="messageAttributes"><![CDATA[%dw 2.0 output application/json --- { messageId: "messageId1234", correlationStrategy: "AUTO", correlationId: "correlationId", label: "my_label", partitionKey: "the_partition_key", timeToLive: 60, ttlTimeUnit: "SECONDS", scheduledEnqueueTimeUtc: "2018-12-09 03:01:00.000", properties: { property1: "value1", property2: "value2" } }]]></ee:set-variable> </ee:variables> </ee:transform> <azure-service-bus-messaging:send doc:name="Queue Send" doc:id="50b3592c-f777-4667-b042-00fd266120e8" config-ref="Azure_Service_Bus_Messaging_Connector_Config" destinationName="${queue.name}" messageId="#[vars.messageAttributes.messageId]" correlationId="#[vars.messageAttributes.correlationId]" label="#[vars.messageAttributes.label]" sendCorrelationStrategy="#[vars.messageAttributes.correlationStrategy]" partitionKey="#[vars.messageAttributes.partitionKey]" timeToLive="#[vars.messageAttributes.timeToLive]" scheduledEnqueueTimeUtc='#[vars.messageAttributes.scheduledEnqueueTimeUtc as LocalDateTime {format: "yyyy-MM-dd HH:mm:ss.SSS"}]' timeToLiveTimeUnit="#[vars.messageAttributes.ttlTimeUnit]" properties="#[vars.messageAttributes.properties]"> </azure-service-bus-messaging:send> </flow> <flow name="queue-receiver-flow" doc:id="9b39aaa5-e81f-4257-b65e-d4f48c8ef2d8" > <http:listener doc:name="Receive From Queue" doc:id="386337a0-99c9-45cf-a81f-95d5e06f0b74" config-ref="HTTP_Listener_config" path="/receive"/> <azure-service-bus-messaging:receive doc:name="Receive From Queue" doc:id="05c8c754-79f6-4873-8329-af7f48f01d3b" config-ref="Azure_Service_Bus_Messaging_Connector_Config" destinationName="${queue.name}"/> <ee:transform doc:name="Attributes to Json" doc:id="a509a361-4bd7-4c6e-81cc-39ad36e7b625"> <ee:message> </ee:message> <ee:variables > <ee:set-variable variableName="jsonAttributes" ><![CDATA[%dw 2.0 output application/json --- attributes]]></ee:set-variable> </ee:variables> </ee:transform> <logger level="INFO" doc:name="Log Attributes" doc:id="94e7254c-a197-4fa2-b437-b64719acb23d" message="#[vars.jsonAttributes]" /> <logger level="INFO" doc:name="Log the message body" doc:id="d802b081-f3fc-4ec2-a23c-96bc0db3863c" message="#[payload]" /> </flow> </mule> -
When you are prompted to regenerate
doc:idvalues, click Yes. -
Save the project.
-
Right-click in the Studio canvas and select Run project <project-name> to run the project.
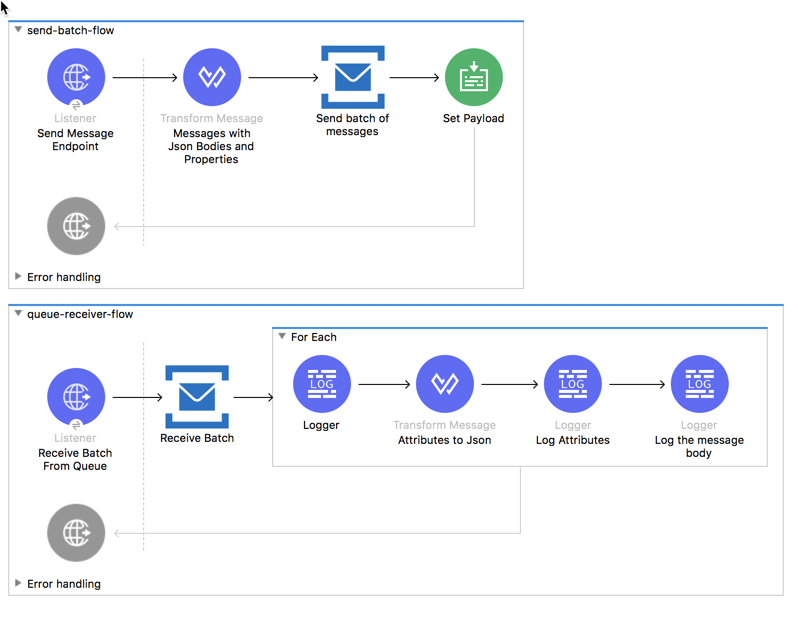
Batch Send and Receive Example
This application flow uses the Send batch and Receive Batch operations to send and receive batches of messages to and from an Azure Service Bus queue.
The following screenshot shows the application flow for sending and receiving batch messages:
To create this flow:
-
In the Studio canvas, click Configuration XML.
-
Delete all the contents after the line
<?xml version="1.0" encoding="UTF-8"?>. -
Copy and paste the following XML after the line
<?xml version="1.0" encoding="UTF-8"?>:<mule xmlns:ee="http://www.mulesoft.org/schema/mule/ee/core" xmlns:http="http://www.mulesoft.org/schema/mule/http" xmlns:azure-service-bus-messaging="http://www.mulesoft.org/schema/mule/azure-service-bus-messaging" xmlns="http://www.mulesoft.org/schema/mule/core" xmlns:doc="http://www.mulesoft.org/schema/mule/documentation" xmlns:xsi="http://www.w3.org/2001/XMLSchema-instance" xsi:schemaLocation=" http://www.mulesoft.org/schema/mule/ee/core http://www.mulesoft.org/schema/mule/ee/core/current/mule-ee.xsd http://www.mulesoft.org/schema/mule/http http://www.mulesoft.org/schema/mule/http/current/mule-http.xsd http://www.mulesoft.org/schema/mule/core http://www.mulesoft.org/schema/mule/core/current/mule.xsd http://www.mulesoft.org/schema/mule/azure-service-bus-messaging http://www.mulesoft.org/schema/mule/azure-service-bus-messaging/current/mule-azure-service-bus-messaging.xsd"> <configuration-properties file="mule-app.properties" doc:name="Configuration properties"/> <http:listener-config name="HTTP_Listener_config" doc:name="HTTP Listener config" doc:id="290d1aa8-2e61-4707-8f04-65f0e5e4cf07" > <http:listener-connection host="0.0.0.0" port="8081" /> </http:listener-config> <azure-service-bus-messaging:config name="Azure_Service_Bus_Messaging_Connector_Config" doc:name="Azure Service Bus Messaging Connector Config" doc:id="71d0e711-6d29-4eff-b640-00986a41dfbc" > <azure-service-bus-messaging:sas-connection namespace="${azure.namespace}" sharedAccessKeyName="${azure.keyname}" sharedAccessKey="${azure.key}" /> </azure-service-bus-messaging:config> <flow name="send-batch-flow" doc:id="2c8bce62-f192-4db2-9c70-792a5e78ac7f" > <http:listener doc:name="Send Message Endpoint" doc:id="aa79c404-2e41-4453-9fde-18b8ea74c805" config-ref="HTTP_Listener_config" path="/sendBatch" /> <ee:transform doc:name="Messages with Json Bodies and Properties" doc:id="1f28f155-28c8-4feb-834c-0e790cac7a53" > <ee:message > </ee:message> <ee:variables > <ee:set-variable variableName="messages" ><![CDATA[%dw 2.0 output application/java --- [{ body: "{\"key1\":\"value1\",\"key2\":\"otherValue1\"}" as Binary, messageId: "messageId1", sendCorrelationStrategy: "AUTO", correlationId: "correlation1", contentType: "application/json", replyToSessionId: "replyToSessionId1", label: "label_msg1", partitionKey: "the_partition_key1", timeToLive: 240, timeToLiveTimeUnit: "SECONDS", zoneId: "America/Buenos_Aires", scheduledEnqueueTimeUtc: "2018-12-09-00-0800" as LocalDateTime {format: "yyyy-MM-dd-HHZZZ"}, properties: { property1: "value1", property2: "value2" }, }, { body: "{\"key1\":\"value2\",\"key2\":\"otherValue2\"}" as Binary, messageId: "messageId2", sendCorrelationStrategy: "AUTO", correlationId: "correlation2", contentType: "application/json", replyToSessionId: "replyToSessionId2", label: "label_msg2", partitionKey: "the_partition_key2", timeToLive: 240, timeToLiveTimeUnit: "SECONDS", zoneId: "America/Buenos_Aires", scheduledEnqueueTimeUtc: "2018-12-09-00-0800" as LocalDateTime {format: "yyyy-MM-dd-HHZZZ"}, properties: { property1: "value1", property2: "value2" }, }, { body: "{\"key1\":\"value3\",\"key2\":\"otherValue3\"}" as Binary, messageId: "messageId3", sendCorrelationStrategy: "AUTO", correlationId: "correlation3", contentType: "application/json", replyToSessionId: "replyToSessionId3", label: "label_msg3", partitionKey: "the_partition_key3", timeToLive: 240, timeToLiveTimeUnit: "SECONDS", zoneId: "America/Buenos_Aires", scheduledEnqueueTimeUtc: "2018-12-09-00-0800" as LocalDateTime {format: "yyyy-MM-dd-HHZZZ"}, properties: { property1: "value1", property2: "value2" }, }]]]></ee:set-variable> </ee:variables> </ee:transform> <azure-service-bus-messaging:send-message-batch destinationName="${queue.name}" doc:name="Send batch of messages" doc:id="799d9ba3-68a9-4ef7-b518-6a715429b2a7" config-ref="Azure_Service_Bus_Messaging_Connector_Config"> <azure-service-bus-messaging:messages ><![CDATA[#[vars.messages]]]></azure-service-bus-messaging:messages> </azure-service-bus-messaging:send-message-batch> <set-payload value='#[%dw 2.0 output application/json --- { result: "Messages sent!" }]' doc:name="Set Payload" doc:id="c8b39b61-fa84-496d-b92c-e970a1a44003" /> </flow> <flow name="queue-receiver-flow" doc:id="9b39aaa5-e81f-4257-b65e-d4f48c8ef2d8" > <http:listener doc:name="Receive Batch From Queue" doc:id="386337a0-99c9-45cf-a81f-95d5e06f0b74" config-ref="HTTP_Listener_config" path="/receiveBatch"/> <azure-service-bus-messaging:receive-batch doc:name="Receive Batch" doc:id="ee30123a-cc9f-4e08-a2e9-c41aede3923f" config-ref="Azure_Service_Bus_Messaging_Connector_Config" maxMessageCount="3" destinationName="${queue.name}"/> <foreach doc:name="For Each" doc:id="16a42925-3142-48c7-9973-f951029af5fa" > <logger level="INFO" doc:name="Logger" doc:id="a5bfc3c6-2335-4c4e-845e-a67cf990a510" message='#["Received message number " ++ vars.counter]'/> <ee:transform doc:name="Attributes to Json" doc:id="a509a361-4bd7-4c6e-81cc-39ad36e7b625"> <ee:message> </ee:message> <ee:variables> <ee:set-variable variableName="jsonAttributes"><![CDATA[%dw 2.0 output application/json --- attributes]]></ee:set-variable> </ee:variables> </ee:transform> <logger level="INFO" doc:name="Log Attributes" doc:id="94e7254c-a197-4fa2-b437-b64719acb23d" message="#[vars.jsonAttributes]" /> <logger level="INFO" doc:name="Log the message body" doc:id="d802b081-f3fc-4ec2-a23c-96bc0db3863c" message="#[%dw 2.0 output application/json --- payload]" /> </foreach> </flow> </mule> -
Save the project.
-
Right-click in the Studio canvas and select Run project <project-name> to run the project.
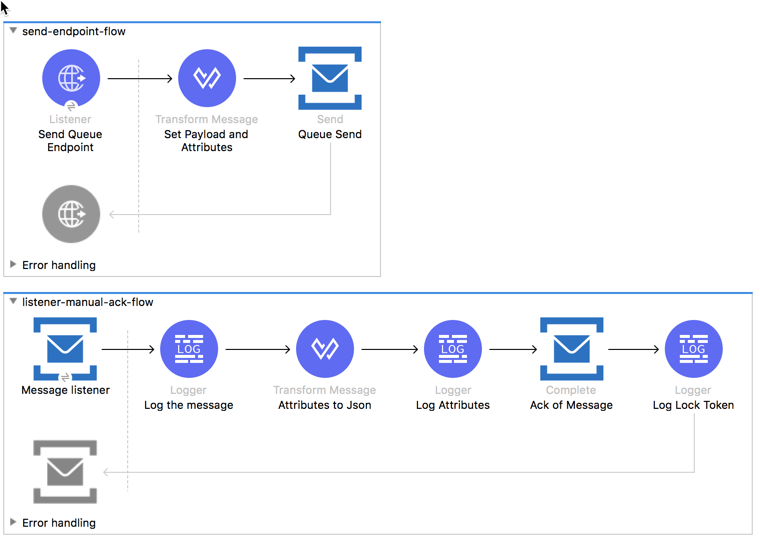
Send, Listen, and Acknowledge the Message Example
This application flow uses the Send and Message Listener operations. The Message Listener is using the MANUAL acknowledgment type, which means that the application logic is responsible for acknowledging receipt of the message. In this example, that logic is provided by adding the Complete operation to the same flow as the Message Listener.
The following screenshot shows this flow:
To create this flow:
-
In the Studio canvas, click Configuration XML.
-
Delete all the contents after the line
<?xml version="1.0" encoding="UTF-8"?>. -
Copy and paste the following XML after the line
<?xml version="1.0" encoding="UTF-8"?>:<mule xmlns:ee="http://www.mulesoft.org/schema/mule/ee/core" xmlns:http="http://www.mulesoft.org/schema/mule/http" xmlns:azure-service-bus-messaging="http://www.mulesoft.org/schema/mule/azure-service-bus-messaging" xmlns="http://www.mulesoft.org/schema/mule/core" xmlns:doc="http://www.mulesoft.org/schema/mule/documentation" xmlns:xsi="http://www.w3.org/2001/XMLSchema-instance" xsi:schemaLocation=" http://www.mulesoft.org/schema/mule/ee/core http://www.mulesoft.org/schema/mule/ee/core/current/mule-ee.xsd http://www.mulesoft.org/schema/mule/http http://www.mulesoft.org/schema/mule/http/current/mule-http.xsd http://www.mulesoft.org/schema/mule/core http://www.mulesoft.org/schema/mule/core/current/mule.xsd http://www.mulesoft.org/schema/mule/azure-service-bus-messaging http://www.mulesoft.org/schema/mule/azure-service-bus-messaging/current/mule-azure-service-bus-messaging.xsd"> <configuration-properties file="mule-app.properties" doc:name="Configuration properties"/> <http:listener-config name="HTTP_Listener_config" doc:name="HTTP Listener config" doc:id="290d1aa8-2e61-4707-8f04-65f0e5e4cf07" > <http:listener-connection host="0.0.0.0" port="8081" /> </http:listener-config> <azure-service-bus-messaging:config name="Azure_Service_Bus_Messaging_Connector_Config" doc:name="Azure Service Bus Messaging Connector Config" doc:id="71d0e711-6d29-4eff-b640-00986a41dfbc" > <azure-service-bus-messaging:sas-connection namespace="${azure.namespace}" sharedAccessKeyName="${azure.keyname}" sharedAccessKey="${azure.key}" /> </azure-service-bus-messaging:config> <flow name="send-endpoint-flow" doc:id="2c8bce62-f192-4db2-9c70-792a5e78ac7f" > <http:listener doc:name="Send Queue Endpoint" doc:id="aa79c404-2e41-4453-9fde-18b8ea74c805" config-ref="HTTP_Listener_config" path="/sendMessage" /> <ee:transform doc:name="Set Payload and Attributes" doc:id="bddebf8d-6d63-4db0-990f-94ecec23ddbd" > <ee:message > <ee:set-payload ><![CDATA[%dw 2.0 output application/json --- { key1: "value1", key2: "value2 for Queue" }]]></ee:set-payload> </ee:message> <ee:variables > <ee:set-variable variableName="messageAttributes" ><![CDATA[%dw 2.0 output application/json --- { messageId: "messageId1234", correlationStrategy: "AUTO", correlationId: "correlationId", label: "my_label", partitionKey: "the_partition_key", timeToLive: 60, ttlTimeUnit: "SECONDS", scheduledEnqueueTimeUtc: "2018-12-09 03:01:00.000", properties: { property1: "value1", property2: "value2" } }]]></ee:set-variable> </ee:variables> </ee:transform> <azure-service-bus-messaging:send doc:name="Queue Send" doc:id="50b3592c-f777-4667-b042-00fd266120e8" config-ref="Azure_Service_Bus_Messaging_Connector_Config" destinationName="${queue.name}" messageId='#[vars.messageAttributes.messageId]' correlationId="#[vars.messageAttributes.correlationId]" label="#[vars.messageAttributes.label]" sendCorrelationStrategy="#[vars.messageAttributes.correlationStrategy]" partitionKey="#[vars.messageAttributes.partitionKey]" timeToLive="#[vars.messageAttributes.timeToLive]" scheduledEnqueueTimeUtc='#[vars.messageAttributes.scheduledEnqueueTimeUtc as LocalDateTime {format: "yyyy-MM-dd HH:mm:ss.SSS"}]' timeToLiveTimeUnit="#[vars.messageAttributes.ttlTimeUnit]" properties="#[vars.messageAttributes.properties]"> </azure-service-bus-messaging:send> </flow> <flow name="listener-manual-ack-flow" doc:id="541d4149-41b1-43e4-8d61-c16cf3ee502f" > <azure-service-bus-messaging:message-listener doc:name="Message listener" doc:id="cb61833e-9e1f-48b3-9430-a83b47c11a4c" config-ref="Azure_Service_Bus_Messaging_Connector_Config" ackMode="MANUAL" destinationName="${queue.name}" numberOfConsumers="1"/> <logger level="INFO" doc:name="Log the message" doc:id="d802b081-f3fc-4ec2-a23c-96bc0db3863c" message="#[payload]"/> <ee:transform doc:name="Attributes to Json" doc:id="a509a361-4bd7-4c6e-81cc-39ad36e7b625" > <ee:message > <ee:set-payload ><![CDATA[%dw 2.0 output application/json --- attributes]]></ee:set-payload> </ee:message> </ee:transform> <logger level="INFO" doc:name="Log Attributes" doc:id="94e7254c-a197-4fa2-b437-b64719acb23d" message="#[payload]"/> <azure-service-bus-messaging:complete-message doc:name="Ack of Message" doc:id="6aa7238b-3bc9-4a61-a39b-e1bd260ee7c5" config-ref="Azure_Service_Bus_Messaging_Connector_Config" lockToken="#[attributes.lockToken]" /> <logger level="INFO" doc:name="Log Lock Token" doc:id="a91eea3e-231a-4675-9457-b6c7366ab647" message='#["LockToken = " ++ payload.lockToken]'/> </flow> </mule> -
When you are prompted to regenerate
doc:idvalues, click Yes. -
Save the project.
-
Right-click in the Studio canvas and select Run project <project-name> to run the project.
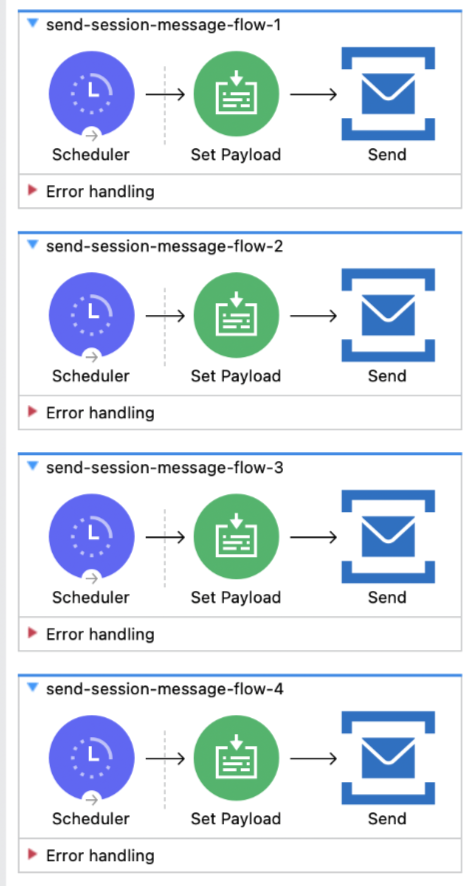
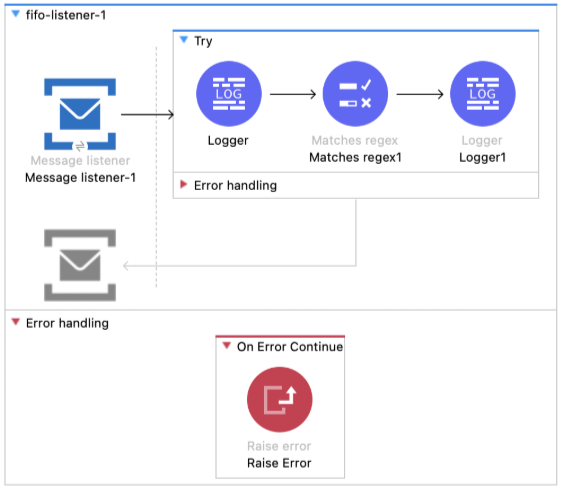
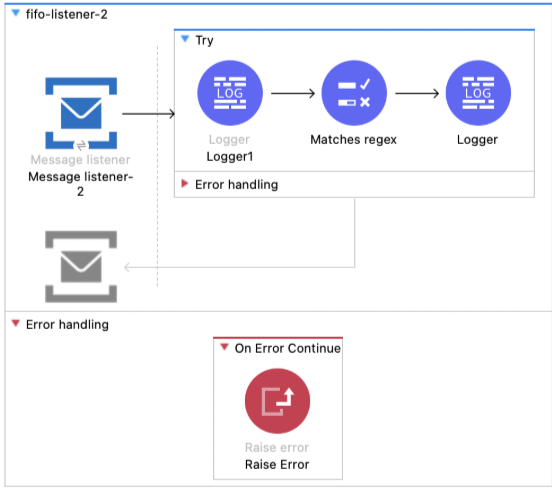
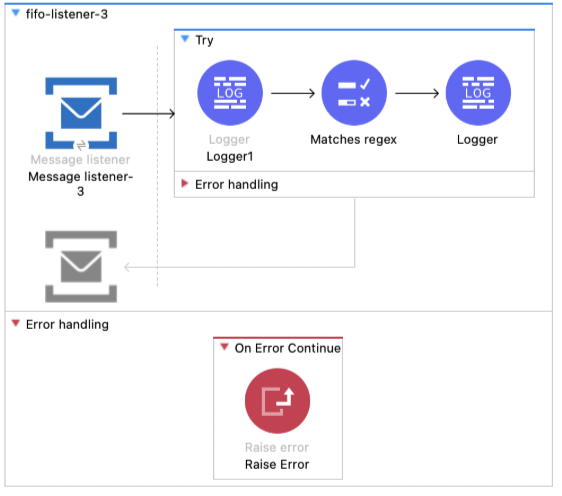
Send and Receive Messages Using Session IDs for Session-Aware Queues Example
This application flow uses the Send operation and Message Listener source. The flow is configured to use session IDs for session-aware queues.
To create this flow:
-
In the Studio canvas, click Configuration XML.
-
Delete all the contents after the line
<?xml version="1.0" encoding="UTF-8"?>. -
Copy and paste the following XML after the line
<?xml version="1.0" encoding="UTF-8"?>:<mule xmlns:json="http://www.mulesoft.org/schema/mule/json" xmlns:validation="http://www.mulesoft.org/schema/mule/validation" xmlns:doc="http://www.mulesoft.org/schema/mule/documentation" xmlns:ee="http://www.mulesoft.org/schema/mule/ee/core" xmlns:azure-service-bus-messaging="http://www.mulesoft.org/schema/mule/azure-service-bus-messaging" xmlns:http="http://www.mulesoft.org/schema/mule/http" xmlns="http://www.mulesoft.org/schema/mule/core" xmlns:xsi="http://www.w3.org/2001/XMLSchema-instance" xsi:schemaLocation=" http://www.mulesoft.org/schema/mule/json http://www.mulesoft.org/schema/mule/json/current/mule-json.xsd http://www.mulesoft.org/schema/mule/core http://www.mulesoft.org/schema/mule/core/current/mule.xsd http://www.mulesoft.org/schema/mule/ee/core http://www.mulesoft.org/schema/mule/ee/core/current/mule-ee.xsd http://www.mulesoft.org/schema/mule/http http://www.mulesoft.org/schema/mule/http/current/mule-http.xsd http://www.mulesoft.org/schema/mule/azure-service-bus-messaging http://www.mulesoft.org/schema/mule/azure-service-bus-messaging/current/mule-azure-service-bus-messaging.xsd http://www.mulesoft.org/schema/mule/validation http://www.mulesoft.org/schema/mule/validation/current/mule-validation.xsd"> <configuration-properties file="mule-app.properties" /> <!-- HTTP Listener Config for triggering send --> <http:listener-config name="HTTP_Listener_config" > <http:listener-connection host="0.0.0.0" port="8081" /> </http:listener-config> <!-- Azure Service Bus Messaging Connector Config --> <azure-service-bus-messaging:config name="Azure_Service_Bus_Messaging_Connector_Config"> <azure-service-bus-messaging:sas-connection namespace="${azure.namespace}" sharedAccessKeyName="${azure.keyname}" sharedAccessKey="${azure.key}" /> </azure-service-bus-messaging:config> <!-- Flow to send a message with sessionId --> <flow name="send-session-message-flow-1"> <scheduler doc:name="Scheduler" doc:id="85660b9c-19a0-4cb2-9dc0-1f07590d9e65" > <scheduling-strategy > <fixed-frequency frequency="30" timeUnit="SECONDS"/> </scheduling-strategy> </scheduler> <set-payload value='#[%dw 2.0 output application/json --- { currentTime: now(), session: "${session.id1}", }]' doc:name="Set Payload" doc:id="390220c9-9480-47d0-838b-6d9ba921bddc" mimeType="application/json"/> <azure-service-bus-messaging:send config-ref="Azure_Service_Bus_Messaging_Connector_Config" destinationName="${queue.name}" sessionId="${session.id1}"> </azure-service-bus-messaging:send> </flow> <!-- Flow to receive messages with sessionId --> <flow name="send-session-message-flow-2" doc:id="20d400a8-fbb4-4fbf-b7de-662e0c96bc08"> <scheduler doc:name="Scheduler"> <scheduling-strategy> <fixed-frequency frequency="30" timeUnit="SECONDS"/> </scheduling-strategy> </scheduler> <set-payload value='#[%dw 2.0 output application/json --- { currentTime: now(), session: "${session.id2}", }]' doc:name="Set Payload" doc:id="2490c774-3e34-4e11-8931-5feb1f8f6ac7" mimeType="application/json" /> <azure-service-bus-messaging:send destinationName="${queue.name}" doc:name="Send" doc:id="a12f8163-3260-411f-ae43-2dfc3b01a3eb" config-ref="Azure_Service_Bus_Messaging_Connector_Config" sessionId="${session.id2}" /> </flow> <flow name="send-session-message-flow-3" doc:id="38c54914-a253-4d4c-ad81-166b8cde6eeb"> <scheduler doc:name="Scheduler"> <scheduling-strategy> <fixed-frequency frequency="30" timeUnit="SECONDS"/> </scheduling-strategy> </scheduler> <set-payload value='#[%dw 2.0 output application/json --- { currentTime: now(), session: "${session.id3}", }]' doc:name="Set Payload" doc:id="439e969a-ec0c-447d-ae7a-636526e3871d" mimeType="application/json" /> <azure-service-bus-messaging:send destinationName="${queue.name}" doc:name="Send" doc:id="0e6d84ff-8ec2-488f-8ac7-cb7a8ac1844b" config-ref="Azure_Service_Bus_Messaging_Connector_Config" sessionId="${session.id3}" /> </flow> <flow name="send-session-message-flow-4" doc:id="0f0ca780-444d-448f-8abf-5c63d3ec42a7"> <scheduler doc:name="Scheduler" doc:id="e3605391-476d-486a-b183-341fd84f4dbe"> <scheduling-strategy> <fixed-frequency frequency="30" timeUnit="SECONDS" /> </scheduling-strategy> </scheduler> <set-payload value='#[%dw 2.0 output application/json --- { currentTime: now(), session: "${session.id4}", }]' doc:name="Set Payload" doc:id="9ec14ba0-3fe9-48e2-b493-f6414b601064" mimeType="application/json" /> <azure-service-bus-messaging:send destinationName="${queue.name}" doc:name="Send" doc:id="5347dc2f-f93c-4095-8c10-6f56fd8342c8" config-ref="Azure_Service_Bus_Messaging_Connector_Config" sessionId="${session.id4}" /> </flow> <flow name="fifo-listener-1"> <azure-service-bus-messaging:message-listener config-ref="Azure_Service_Bus_Messaging_Connector_Config" ackMode="MANUAL" doc:name="Message listener-1" sessionID="${session.id1}" numberOfConsumers="1" destinationName="${queue.name}"> <reconnect-forever /> <azure-service-bus-messaging:response timeToLive="1" timeToLiveTimeUnit="HOURS" messageId="1" correlationId="1"> </azure-service-bus-messaging:response> </azure-service-bus-messaging:message-listener> <try doc:name="Try"> <logger level="INFO" doc:name="Logger" doc:id="24c6b101-b7d3-4b7d-bbc5-f352617eee17" message='"listener1: #[payload]"' /> <validation:matches-regex doc:name="Matches regex1" doc:id="5810c860-a570-42bd-91cd-282150fea2c7" value="#[payload.session]" regex="${session.id1}" message="Error on ${session.id1}" /> <logger level="INFO" doc:name="Logger1" doc:id="0a0d03fa-1a8e-41be-a747-62fab5924d0c" message="#[payload]" /> </try> <error-handler> <on-error-continue> <raise-error type="VALIDATION1:VALIDATION_ERROR1" doc:name="Raise Error"> </raise-error> </on-error-continue> </error-handler> </flow> <flow name="fifo-listener-2" doc:id="4d3e547e-77c2-4760-b760-6930d8b93c9e"> <azure-service-bus-messaging:message-listener ackMode="MANUAL" destinationName="${queue.name}" doc:name="Message listener-2" doc:id="01832bbd-d2eb-4fb9-8ed1-a90587874a8b" config-ref="Azure_Service_Bus_Messaging_Connector_Config" numberOfConsumers="1" sessionID="${session.id2}"> <reconnect-forever /> </azure-service-bus-messaging:message-listener> <try doc:name="Try"> <logger level="INFO" doc:name="Logger1" doc:id="cf0e243b-5188-4418-abc1-a60275915adc" message='"listener2: #[payload]"' /> <validation:matches-regex doc:name="Matches regex" doc:id="05e5c2df-cf96-4bfe-a7b6-da22f09dd238" value="#[payload.session]" regex="${session.id2}" message="Error on ${session.id2}"/> <logger level="INFO" doc:name="Logger" doc:id="54b7b482-9c24-416e-8c46-c717af00acb0" message="#[payload]" /> </try> <error-handler> <on-error-continue> <raise-error type="VALIDATION2:VALIDATION_ERROR2" doc:name="Raise Error"> </raise-error> </on-error-continue> </error-handler> </flow> <flow name="fifo-listener-3" doc:id="3ecafefc-c19d-485a-8c6a-45d79c7b5cad"> <azure-service-bus-messaging:message-listener ackMode="MANUAL" destinationName="${queue.name}" doc:name="Message listener-3" doc:id="3b6fa3d6-f8cf-4191-bbb2-29208aae7d5b" config-ref="Azure_Service_Bus_Messaging_Connector_Config" numberOfConsumers="1" sessionID="${session.id3}"> <reconnect-forever /> </azure-service-bus-messaging:message-listener> <try doc:name="Try"> <logger level="INFO" doc:name="Logger1" doc:id="6b9ee655-0395-44f7-8322-36b0e77643b9" message='"listener3: #[payload]"' /> <validation:matches-regex doc:name="Matches regex" doc:id="de2db011-3a58-48e0-8dcf-222d5da01a22" value="#[payload.session]" regex="${session.id3}" message="Error on ${session.id3}"/> <logger level="INFO" doc:name="Logger" doc:id="fd1ad726-ff8f-4cff-9daa-726cb5e5d014" message="#[payload]" /> </try> <error-handler> <on-error-continue> <raise-error type="VALIDATION3:VALIDATION_ERROR3" doc:name="Raise Error"> </raise-error> </on-error-continue> </error-handler> </flow> </mule> -
When you are prompted to regenerate
doc:idvalues, click Yes. -
Save the project.
-
Right-click in the Studio canvas and select Run project <project-name> to run the project.
Using Azure Active Directory Connector Provider
Some organizations use Azure Active Directory to authenticate their instances. Any of the previous examples can be modified to support this scenario. Replace the Shared Access Signature authentication with the Azure Active Directory authentication:
<azure-service-bus-messaging:sas-connection namespace="${azure.namespace}" sharedAccessKeyName="${azure.keyname}" sharedAccessKey="${azure.key}" /><azure-service-bus-messaging:aad-connection namespace="${azure.namespace}" tenantId="${azure.tenantId}" clientId="${azure.clientId}" clientSecret="${azure.clientSecret}" />Ensure that:
-
Your
mule-app.propertiesfile contains the Tenant Id, Client Id, and Client Secret fields. -
Your app registration contains the proper permissions and roles.