Using Anypoint Studio to Configure Microsoft Dynamics 365 Connector 2.6
Anypoint Studio (Studio) editors help you design and update your Mule applications, properties, and configuration files.
To add and configure a connector in Studio:
When you run the connector, you can view the app log to check for problems, as described in View the App Log.
If you are new to configuring connectors in Studio, see Using Anypoint Studio to Configure a Connector. If, after reading this topic, you need additional information about the connector fields, see the Microsoft Dynamics Reference.
Create a Mule Project
In Studio, create a new Mule project in which to add and configure the connector:
-
In Studio, select File > New > Mule Project.
-
Enter a name for your Mule project and click Finish.
Add the Connector to Your Mule Project
Add Microsoft Dynamics 365 Connector to your Mule project to automatically populate the XML code with the connector’s namespace and schema location and to add the required dependencies to the project’s pom.xml file:
-
In the Mule Palette view, click (X) Search in Exchange.
-
In the Add Dependencies to Project window, type
dynamics 365in the search field. -
Click Microsoft Dynamics 365 in Available modules.
-
Click Add.
-
Click Finish.
Adding a connector to a Mule project in Studio does not make that connector available to other projects in your Studio workspace.
Configure a Source
A source initiates a flow when a specified condition is met. You can configure one of these sources to use with Microsoft Dynamics 365 Connector:
-
On new object
starts your app when an object is created -
On modified object
Starts your app when an object is modified -
On deleted object
Starts your app when an object is deleted -
HTTP > Listener
Initiates a flow each time it receives a request on the configured host and port -
Scheduler
Initiates a flow when a time-based condition is met
For example, to configure an On New Object source, follow these steps:
-
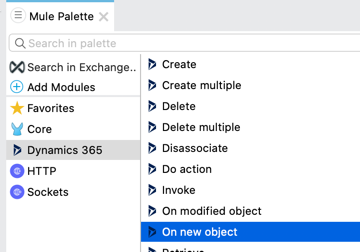
In the Mule Palette view, select Dynamics 365 > On new object.

-
Drag On new object to the Studio canvas.
-
On the On new object General configuration screen, optionally change the value of the Display Name field.
-
Specify a value for the Entity type field, for example
account.
The entity type string describes business data that is defined in the Microsoft Dynamics 365 instance.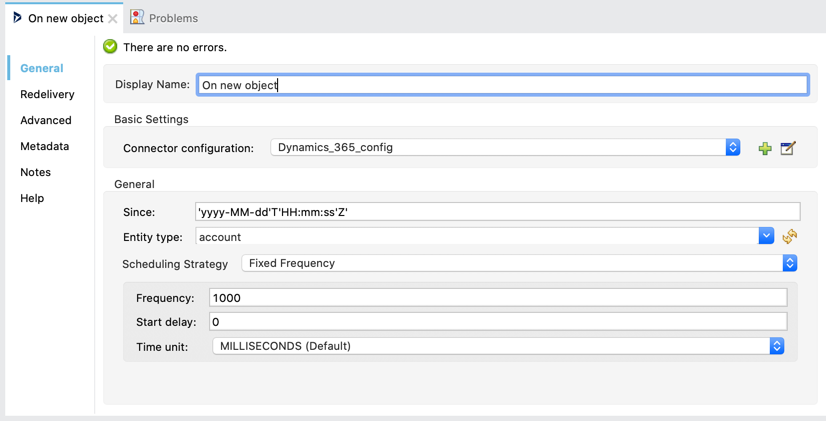
-
Click the plus sign (+) next to the Connector configuration field to configure a global element that can be used by all instances of the On new object source in the app.
-
On the General tab, specify the connection information for the connector.
-
On the TLS tab, optionally specify the TLS information for the connector.
-
On the Advanced tab, optionally specify reconnection information, including a reconnection strategy.
-
Click Test Connection to confirm that Mule can connect with the specified server.
-
Click OK.
Add a Connector Operation to the Flow
When you add a connector operation to your flow, you immediately define a specific operation for that connector to perform.
To add an operation for Microsoft Dynamics 365 Connector, follow these steps:
-
In the Mule Palette view, select Dynamics 365 and then select the desired operation.
-
Drag the operation onto the Studio canvas and to the right of the input source.
Configure a Global Element for the Connector
When you configure a connector, it’s best to configure a global element that all instances of that connector in the app can use. Configuring a global element requires you to provide the authentication credentials that the connector requires to access the target Microsoft Dynamics 365 system. Microsoft Dynamics 365 Connector supports the OAuth connection, OAuth client credentials, and OAuth username and password authentication types.
To configure the global element for Microsoft Dynamics 365 Connector, follow these steps:
-
Select the operation in the Studio canvas.
-
In the configuration screen for the operation, click the plus sign (+) next to the Connector configuration field to access the global element configuration fields.
-
On the General tab, in Connection, select the authentication method to configure:
-
On the Advanced tab, optionally specify reconnection information, including a reconnection strategy.
-
Click Test Connection to confirm that Mule can connect with the specified server.
-
Click OK.
OAuth 2.0 Authentication
Use OAuth 2.0 to delegate user authentication to the service hosting the user account. For more information, refer to Configuring OAuth 2.0 for Connectors or Configuring OAuth 2.0 for Connectors on CloudHub.
OAuth 2.0 delegates user authentication to the service hosting the user account.
To configure OAuth 2.0 authentication:
-
Enter the following required information on the General tab of the Global Element Properties screen:
-
Resource
Resource URL for accessing the Microsoft Dynamics 365 instance -
Consumer Key
OAuth consumer key registered with the service provider -
Consumer Secret
OAuth consumer secret registered with the service provider -
Listener Config
A reference to the listener that catches the access token callback endpoint -
Callback Path
The path of the access token callback endpoint -
Authorize Path
The path of the local HTTP endpoint that triggers the OAuth danceThe following image shows an example OAuth Connection configuration using property placeholder values:
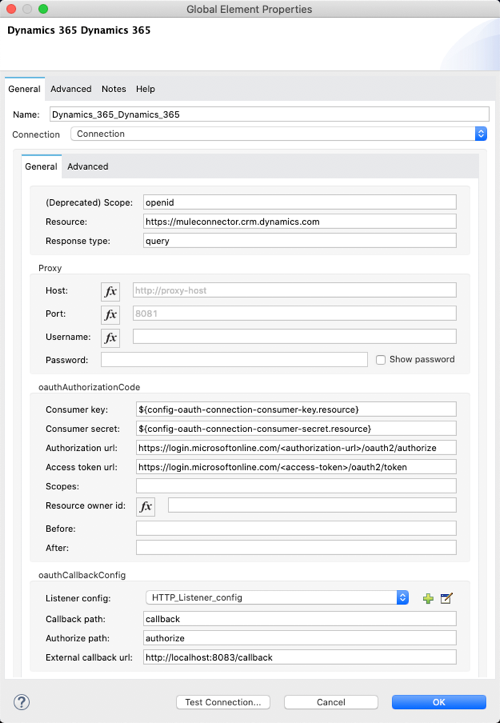
For the Authorization url and Access token url, replace the variables
<authorization-url>and<access-token>with your own authorization and access URL tokens.
-
-
Call the
/authorizepath by pasting it into a web page. -
On the returned web page, perform the authorization steps by providing your credentials, and so on.
After you complete the proper authorization steps, the web page is automatically redirected to the path you configured inside the Callback Path field, for example, /oauth2callback. This redirect contains additional properties, including an access code for the connector to use.
Once the app is authorized, the connector refreshes the token automatically. However, in the event of a restart, you must call the /authorize path again and perform the authorization steps.
OAuth 2.0 Client Credentials Authentication
With OAuth 2.0 client credentials authentication, clients authenticate themselves by using a client ID and client secret.
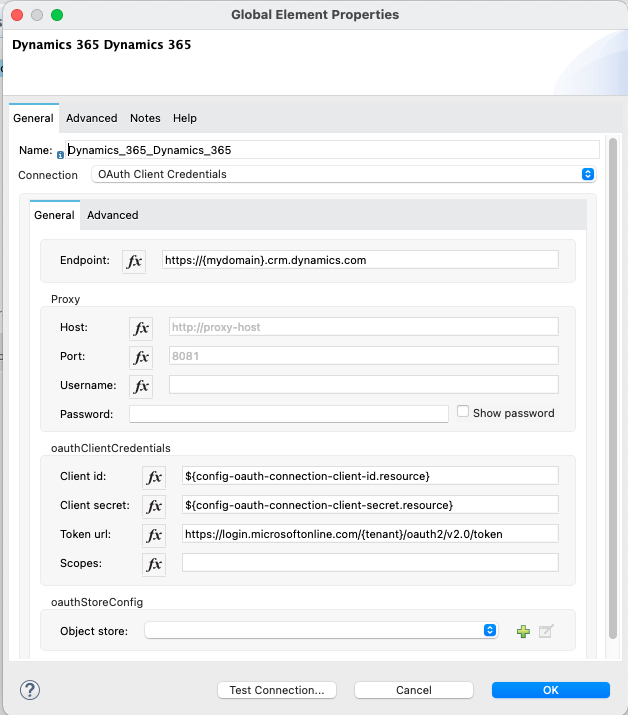
To configure OAuth 2.0 client credentials authentication, enter the following required information on the General tab of the Global Element Properties screen:
-
Endpoint
Location where to send the requests
-
Client id
The OAuth client ID, as registered with the service provider
-
Client secret
The OAuth client secret, as registered with the service provider
The following image shows an example OAuth client credentials configuration using property placeholder values:
OAuth 2.0 Username and Password Authentication
With OAuth 2.0 username and password authentication, the app makes a POST request that includes a username and password. If the credentials are valid, the server returns an access token.
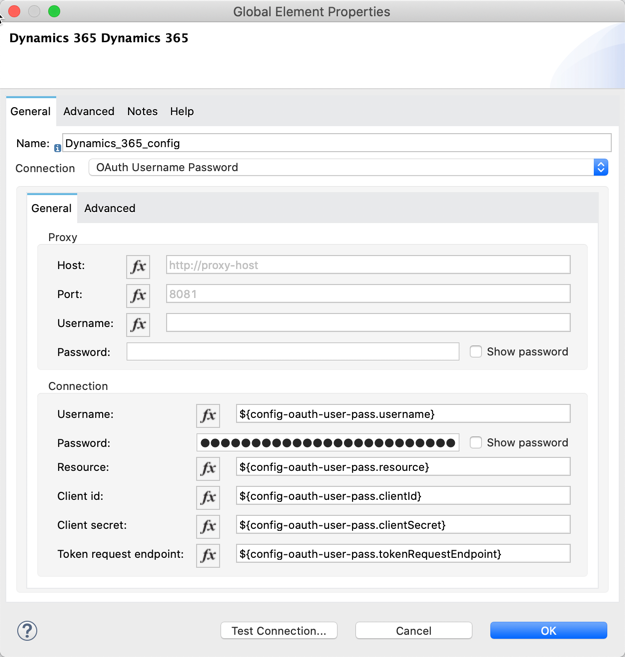
To configure OAuth 2.0 username and password authentication, enter the following information on the General tab of the Global Element Properties screen:
-
Username
User name used to initialize the session. -
Password
Password used to authenticate against the proxy -
Resource
Application ID URI of the web API’s secured resource -
Client ID
Application ID assigned to your app when you registered it with Azure AD. You can find this in the Azure Portal:-
Go to the Azure portal.
-
Click Active Directory, and select the directory.
-
Click the application, and then click Configure.
-
-
Client Secret
App secret that you created in the app registration portal for your appThe app secret should not be used in a native app, because client secrets cannot be reliably stored on devices. It is required for web apps and web APIs, which have the ability to store the client secret securely on the server side.
-
Token Request Endpoint
URL of the OAuth token request server
The following image shows an example OAuth username and password configuration using property placeholder values:
Run a Flow
-
In Package Explorer, right-click your project’s name and click Run As > Mule Application.
-
Check the console to see when the application starts. You should see messages such as these if no errors occur:
************************************************************
INFO  2019-10-14 22:12:42,003 [main] org.mule.module.launcher.DeploymentDirectoryWatcher:
++++++++++++++++++++++++++++++++++++++++++++++++++++++++++++
+ Mule is up and kicking (every 5000ms)                    +
++++++++++++++++++++++++++++++++++++++++++++++++++++++++++++
INFO  2019-10-14 22:12:42,006 [main] org.mule.module.launcher.StartupSummaryDeploymentListener:
**********************************************************
*  - - + DOMAIN + - -               * - - + STATUS + - - *
**********************************************************
* default                           * DEPLOYED           *
**********************************************************

************************************************************************
* - - + APPLICATION + - -   * - - + DOMAIN + - -  * - - + STATUS + - - *
************************************************************************
* myapp                     * default             * DEPLOYED           *
************************************************************************
View the App Log
To check for problems, you can view the app log as follows:
-
If you’re running the app from Anypoint Platform, the output is visible in the Anypoint Studio console window.
-
If you’re running the app using Mule from the command line, the app log is visible in your OS console.
Unless the log file path is customized in the app’s log file (log4j2.xml), you can also view the app log in the default location MULE_HOME/logs/<app-name>.log.
Next Step
After you configure a global element and connection information, see the Examples topic for more configuration information.


