
DataWeave Quickstart
In this guide, you run DataWeave version 2 scripts on sample data, without relying on external data sources.
The examples introduce some key DataWeave concepts that you can explore further whenever you are ready, and they show how to turn the Transform Message component into a DataWeave playground.
To run the scripts, you copy them into the source code area of a Transform Message component in Studio, then view the results in the component’s Preview pane. You also load content from files so that your DataWeave script can act on it. Once you feel comfortable with DataWeave examples here and elsewhere in the docs, you can use the DataWeave playground to practice writing your own DataWeave scripts on sample data.
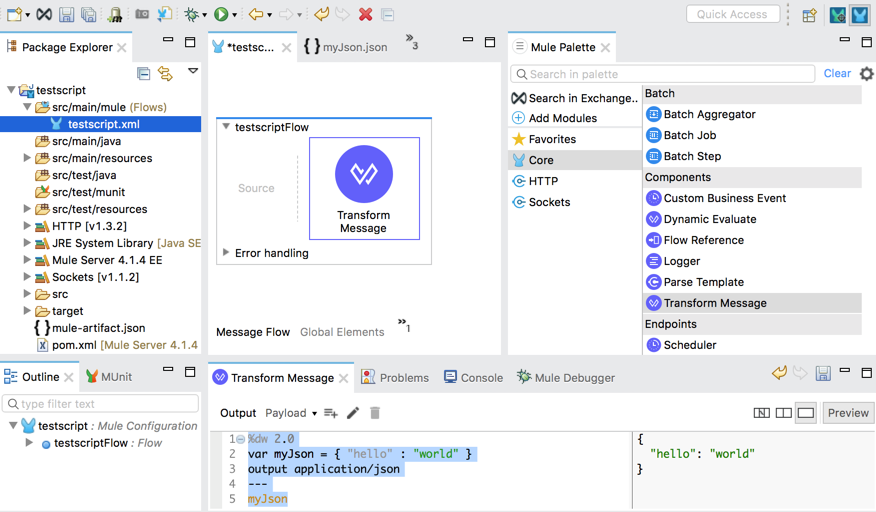
The figure shows a Transform Message component in the center canvas, within testingscriptFlow. Below the Studio canvas, the Transform Message tab includes a DataWeave script in the source code area with output in the Preview pane.
Prerequisites
Studio 7 is required. Versions 7.3 or 7.2.3 are recommended. Other Studio 7 versions are untested with this guide.
Once Studio is installed, you need to set up a project with a Transform Message component. See Set Up a Project in Studio.
Set Up a Project in Studio
Set up a Mule project that serves as a DataWeave playground:
-
In Studio, click File → New → Mule Project to create a Mule project.
-
Provide the name
testscriptfor the project, and click Finish. -
From the Mule Palette tab of your new project, click Core, and then drag the Transform Message component into the Studio canvas.
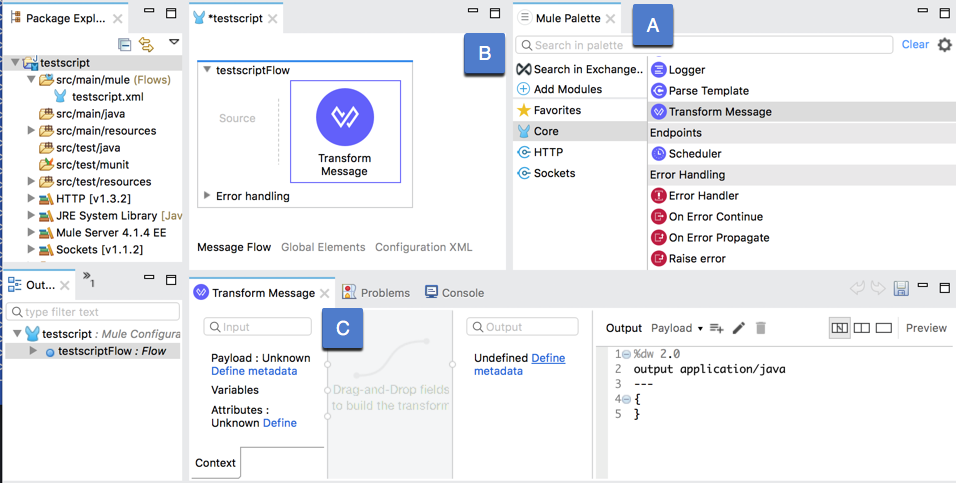
(A) Mule Palette tab
(B) Studio canvas with Transform Message component
(C) Transform Message tab
-
In the Transform Message tab, click Preview (on the far right) to open the Preview pane, and click the empty rectangle next to Preview to expand the source code area.
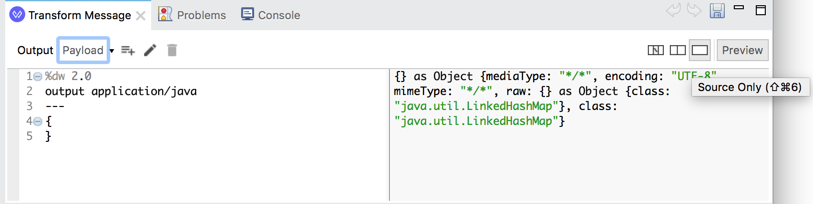
The source code area on the left is the place where you are going to add DataWeave scripts, and the Preview pane on the right is where you view the output of the scripts.
-
Proceed to Start Scripting.
Start Scripting
Concatenate Two Strings into a Single String
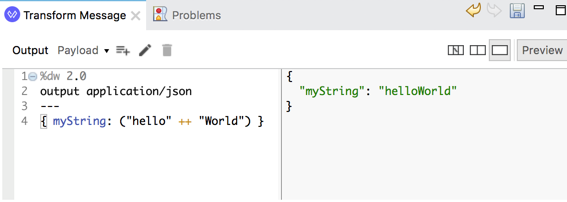
Begin with a simple DataWeave script that concatenates two strings ("hello" and "World") together into a single string ("helloWorld").
-
Replace the current script in the source code area of the Transform Message tab with this one:
%dw 2.0 output application/json --- { myString: ("hello" ++ "World") }-
The body of the DataWeave script contains a key-value pair (
{ myString: ("hello" ++ "World") }). The value of this input object is a DataWeave expression (("hello" ++ "World")) for concatenating the strings "hello" and "World" into a single string, "helloWorld".When you are ready, you can learn about the DataWeave ++ function used to concatenate the strings.
-
The header of the script is all the content above the three dashes,
---. It includes important directives, including one for specifying the output formatapplication/json. You can learn more about DataWeave Scripts when you are ready.
-
-
See the JSON output in the Preview pane:
{ "myString": "helloWorld" } -
Proceed to Transform JSON Input to XML Output.
Transform JSON Input to XML Output
Many integrations require transformations from one format to another. This
procedure uses the output directive to produce XML output from JSON input.
-
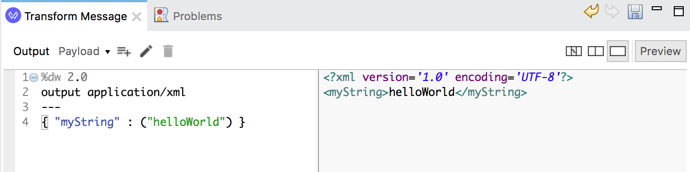
Replace the body of the current script in the source code area with JSON output from Concatenate Two Strings into a Single String, and change the
output application/jsondirective tooutput application/xml:%dw 2.0 output application/xml --- { "myString" : ("helloWorld") } -
See the XML output in the Preview pane:
<?xml version='1.0' encoding='UTF-8'?>
<myString>helloWorld</myString>
Notice that the
"myString"key of the input JSON object{ "myString" : ("helloWorld") }is converted to the root element of the XML output and that the concatenated string becomes the value of that XML object. So the XML output is<myString>helloWorld</myString>. That output is preceded by a standard XML declaration that specifies the XML version and encoding.Without a single key to serve as a root node for XML output (for example, if the input is simply ("helloWorld")), the transformation to XML will fail with a yellow warning (!) in the source code area. The warning message isTrying to output non-whitespace characters outside main element tree. If you like, you can try to produce this warning on your own.DataWeave supports many output and input formats. You can learn more about Supported Data Formats when you are ready.
-
Proceed to Learn About Supported Data Types
Learn About Supported Data Types
Now provide a DataWeave script that simply introduces you to a variety of supported data types and shows how to add comments to a script.
-
Replace the current script in the source code area of the Transform Message tab with this one:
%dw 2.0
output application/json
---
{
  /*
   * A multi-line
   * comment here.
   */
  myString: "hello world",
  myNumber: 123,
  myFloatingPointNumber: 123.456,
  myVeryBigNumber: 12341234134123412341234123,
  myDate: |2018-12-07|,
  myTime: |11:55:56|,
  myDateTime: |2018-10-01T23:57:59-03:00|,
  myBoolean: true,
  myArray: [ 1, 2, 3, 5, 8],
  myMixedArray: [ 1, 2, "blah", { hello: "there" } ],
  myObjectKeyValuePair: { innerKey: "innerValue" },
  myObjectWithConditionalField: { a : { b : 1, ( c : 2 ) if true, (d : 4) if false } },
  myNull: null,
  myBinary: "abcd1234123" as Binary
  //A one-line comment here.
}
DataWeave supports multi-line comments within
/* */markup and single-line comments after forward slashes (//). It also supports many data types, shown after the colon (:) in key-value pairs, such asmyString: "hello world"andmyNumber: 123. These types include strings (surrounded by quotation marks,""), numbers, date and time structures (within pipes,||), Booleans (trueandfalse), arrays (within square brackets,[]), JSON-like objects (key-value structures within curly braces,{}),null, and binaries. When you are ready for more on this topic, you can review DataWeave types. -
See the JSON output in the Preview pane:
{ "myString": "hello world", "myNumber": 123, "myFloatingPointNumber": 123.456, "myVeryBigNumber": 12341234134123412341234123, "myDate": "2018-12-07", "myTime": "11:55:56", "myDateTime": "2018-10-01T23:57:59-03:00", "myBoolean": true, "myArray": [ 1, 2, 3, 5, 8 ], "myMixedArray": [ 1, 2, "blah", { "hello": "there" } ], "myObjectKeyValuePair": { "innerKey": "innerValue" }, "myObjectWithConditionalField": { "a": { "b": 1, "c": 2 } }, "myNull": null, "myBinary": "abcd1234123" } -
Proceed to Define and Use a DataWeave Variable as Input
Define and Use a DataWeave Variable as Input
Now try a simple DataWeave script that outputs the value of the DataWeave
variable myJson. You set the variable using the var directive in the
script’s header.
-
Replace the current script in the source code area of the Transform Message tab with this one:
%dw 2.0
var myJson = { "hello" : "world" }
output application/json
---
myJson
A JSON object (
{ "hello" : "world" }) is defined as themyJsonvariable in the script’s header. You can learn more about DataWeave Variables when you are ready. -
See the output in the Preview pane:
{
  "hello": "world"
}
Use a DataWeave Function in a DataWeave Variable
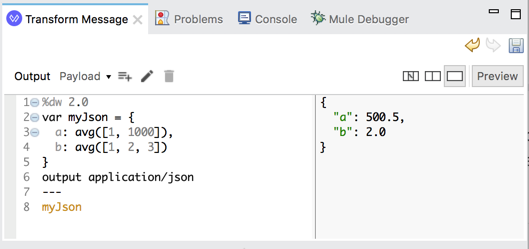
Now try a script that uses the DataWeave avg function in a DataWeave
variable (myJson) to get averages of two sets of numbers.
-
Replace the current script in the source code area with this one:
%dw 2.0 var myJson = { a: avg([1, 1000]), b: avg([1, 2, 3]) } output application/json --- myJson -
Preview the output:
{ "a": 500.5, "b": 2.0 } -
Proceed to Read, Transform, and Select Content from an Input
Read, Transform, and Select Content from an Input
Now try a more complicated script that reads XML input, transforms it to
JSON, and only selects the contents of the car element.
-
Replace the current script in the source code area with this one:
%dw 2.0
var myRead = read("<car><color>red</color></car>",
                "application/xml")
output application/json
---
{
  mySelection : myRead.car
}
If you encounter an issue previewing this example, try changing
myRead.cartomyRead."car". Learn more about the read function, Supported Data Formats, and DataWeave Selectors when you are ready. -
Preview the output:
{ "mySelection": { "color": "red" } } -
Proceed to Read File Contents with a DataWeave Function
Read File Contents with a DataWeave Function
Now use readUrl to read the contents of a file in the Studio
src/main/resources folder so you can use that content as sample data for a
DataWeave script.
-
Add a file by right-clicking the
src/main/resourcesfolder in the Package Explorer tab, then navigating to New → File, providing the file namemyJson.jsonfor that file, and clicking Finish. -
From
src/main/resources, provide and save the following sample content in the myJson.json tab (or within the Source sub-tab of the myJson.json tab, if it is present):{ "hello": "world" }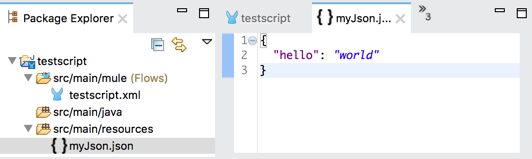 Figure 1. myJson.json in Studio
 -
Returning to the Transform Message component within the testscript tab, replace the current script with one that uses
readUrlto read the JSON contents from your file:%dw 2.0 output application/json --- readUrl("classpath://myJson.json", "application/json")Learn more about the readUrl function when you are ready.
-
View the matching output in the Preview pane.
{ "hello": "world" }Note that you can also load the contents of a file through a metadata type in the Transform Message component. That procedure is covered later, in Run Examples with Longer Payloads. It uses the
myJson.jsonfile you just created. -
Proceed to Map Elements from an Array into an Object
Map Elements from an Array into an Object
Almost all integrations require data mappings. Here, you map elements within an array to keys and values of a JSON object:
-
Replace the current script in the source code area with this one:
%dw 2.0
output application/json
---
{
  (
    ["a", "b", "c"] map ((value, index) -> {
        (index): value
    })
  )
}
The
mapfunction iterates over the array on the left to apply the lambda (anonymous function) on the right (((value, index) → { (index): value })) to elements in that array. The lambda uses named parameters (valueandindex) to select the values and indices from the array and populate a JSON object with key-value pairs. Learn about map, and when you are ready, comparemapwith mapObject, which takes an object as input. -
{ "0": "a", "1": "b", "2": "c" } -
Proceed to Pluck Values from an Object into an Array
Pluck Values from an Object into an Array
Now use the DataWeave pluck function to iterate over values in a JSON
object and output those values into an array.
-
Replace the contents of the source code area with a script that uses
pluckon a JSON object:%dw 2.0 output application/json --- { "0": "a", "1": "b", "2": "c" } pluck ((value) -> value) -
Preview the output:
[ "a", "b", "c" ] -
Proceed to Map and Merge Fields.
Map and Merge Fields
Now try a more complex example that maps and merges fields from items in separate arrays. The point here is simply to provide a taste of DataWeave’s ability to handle more complex mappings and transformations needed for some integrations.
-
Replace the current script in the source code area with this one:
%dw 2.0
var myVar = [
  { bookId: 101,
    title: "world history",
    price: "19.99"
  },
  {
    bookId: 202,
    title: 'the great outdoors',
    price: "15.99"
  }
]
var myVar2 = [
  {
    bookId: 101,
    author: "john doe"
  },
  {
    bookId: 202,
    author: "jane doe"
  }
]
output application/json
---
myVar map (item, index) -> using (id = item.bookId) {
	"id" : id,
	"topic" : item.title,
	"cost" : item.price as Number,
	(myVar2 filter ($.*bookId contains id) map (item) -> {
		author : item.author
	})
}
When you are ready to explore the language further, you can learn how the filter function used near the end returns
authorvalues from the array in themyVar2variable. You can read about type coercion with DataWeave to see howasworks with the data type in the line"cost" : item.price as Number,to coerce input strings like"19.99"into numbers like19.99. You can see howusing(shown inusing (id = item.bookId)) enables you to create local DataWeave variables in a script. -
Preview the output:
[ { "id": "101", "topic": "world history", "cost": 19.99, "author": "john doe" }, { "id": "202", "topic": "the great outdoors", "cost": 15.99, "author": "jane doe" } ] -
Proceed to Try Out More DataWeave Examples.
Try Out More DataWeave Examples
Now you are ready to run DataWeave examples on your own. In your DataWeave playground, you can run examples from the docs whenever you want to discover more about the DataWeave language. You can play with the examples and use them to start your own scripts.
For examples that use payload to reference input data (such as the
contains or
mapObject function examples), you
can avoid payload-related issues by using techniques described in Run Examples that Act on a Payload.
|
-
Find many more examples to try out in Studio here:
-
DataWeave Reference: Docs on the DataWeave function modules provide many examples that use DataWeave functions.
-
Proceed to Next Steps.
Run Examples that Act on a Payload
In DataWeave, payload is a built-in Mule Runtime variable that holds the
contents of a Mule message. It enables
you to retrieve the body of a message simply by typing payload into the
DataWeave script. The docs often refer to this content as "the payload."
To try out DataWeave examples that use payload to get the contents of a
Mule message, you have some options:
-
Run Examples with Short Payloads: You can use a DataWeave variable.
-
Run Examples with Longer Payloads: Add the payload content through a file. This technique also works for short payloads.
Alternatives that require a running Mule app (such as using Set Payload) are not covered here but are introduced in Next Steps.
Run Examples with Short Payloads
For short examples with a few lines of sample data, you can convert the input
payload to a variable. You simply copy the payload’s content into a DataWeave
variable (var) in the header of a DataWeave script. Then, in the body of the
script, you replace payload with the name of the new variable to reference
that variable.
-
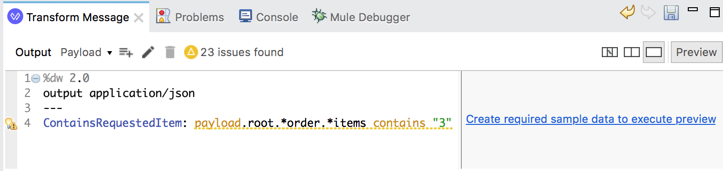
Start with this script in the source code area:
%dw 2.0
output application/json
---
ContainsRequestedItem: payload.root.*order.*items contains "3"
Notice that you cannot preview it yet:
-
Now modify this example so that it uses some sample input instead of attempting to use
payloadto input content of a Mule message that does not exist:-
Add a
myInputDataWeave variable supplying some input data the script can read, and change the Mulepayloadvariable in the body of the script to the DataWeavemyInputvariable.%dw 2.0 var myInput = read("<root> <order> <items>1</items> <items>3</items> </order> <order> <items>2</items> </order> </root>", "application/xml") output application/json --- ContainsRequestedItem: myInput.root.*order.*items contains "3" -
Preview the results:
{
  "ContainsRequestedItem": true
}
When you are ready, learn more about the contains function and about the built-in
payloadvariable, in Predefined Variables.
-
Run Examples with Longer Payloads
For DataWeave examples with many lines of sample data, consider creating a metadata type through Transform Message. Metadata types can accept a local file that contains sample data.
-
Use the readUrl example to create
src/main/resources/myJson.jsonin Studio.You can skip this step if you still have the file in Studio. The next steps show how to use the contents of this file as your payload.
-
Now replace the current script from the source code area of the Transform Message with one that selects the payload of the input:
%dw 2.0 output application/json --- payload -
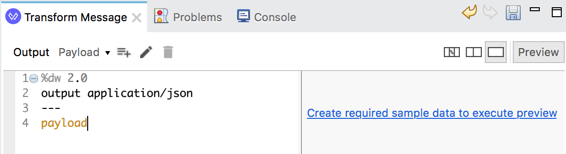
Notice that you cannot preview a payload now because it does not exist yet.
-
Now provide a simple JSON object as the payload of the Transform Message:
-
In the Transform Message tab, click the left-most rectangle from the Preview button to open the columned, graphical view next to the source code area:
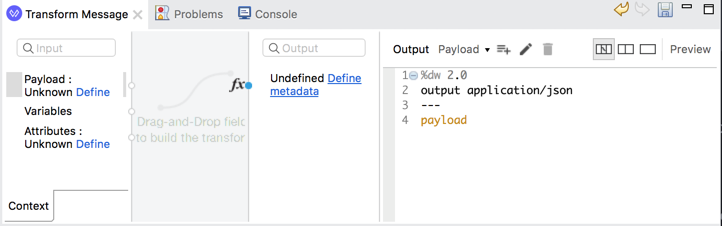
If you mouse over that rectangle, you can see the label Show Graphic.
-
In the left-most column of the Transform Message tab, find Payload: Unknown, and click Define metadata.
If you do not see the Define metadata link, simply right-click the Payload: entry in the left-most column, and then click Set Metadata to open the Select metadata type dialog.
-
-
Now load the contents of
myJson.json(created in the readUrl example) into the Transform Message component:-
Click +Add to open the Create new type dialog.
-
In the dialog, provide the Type id
myJsonType, and click Create type.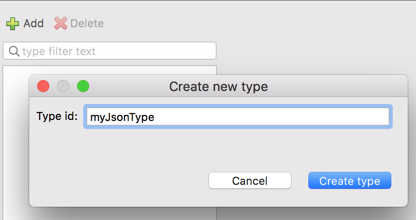
-
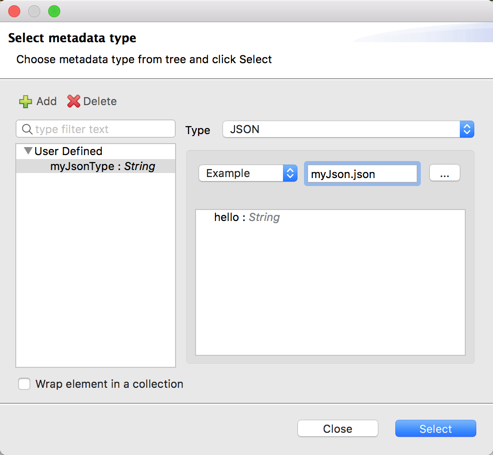
Back in the Select metadata type dialog that opens, select JSON from the Type drop-down menu.
-
Below the new type, change Schema to Example (as shown above).
-
Use the navigation button with the ellipsis (…) to find
src/main/resources/myJson.json, and click Open, which displays the structure of the file contents (hello: String) in the Select metadata type window. -
Now click Select to load the contents of the file into the message payload.
-
Notice that the JSON object from
myJson.jsonis now in the Preview pane.If necessary, you can click Preview to open the Preview pane.
-
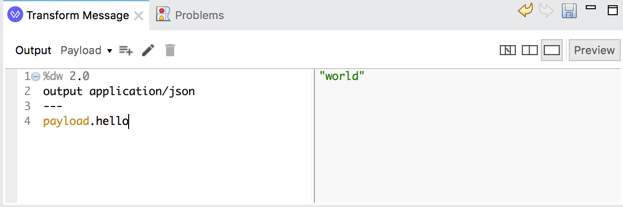
Now click the empty rectangle next to the Preview button to open the source code area, and change the body of the script to
payload.hello, retaining the existing DataWeave header content.Notice that the Preview pane now contains only the value of the payload:
"world".Here is what this example looks like in Studio:
Learn more about DataWeave Selectors when you are ready.
-
Next Steps
-
To get started with Mule app development and data mapping through the Studio UI, see Tutorial: Create a Mule app that uses the Database Connector and DataWeave.
-
Beyond the Transform Message component, many Mule connectors, modules, and Core components accept DataWeave selectors and short DataWeave expressions in their fx fields.
To learn about the components, you can start from Mule Components.
To try out sample data in a running Mule app, without relying on external data sources, you can use these Core components with or without Transform Message:
-
Set Payload to provide content for the payload of a Mule event.
-
Set Variable to create content in a Mule event variable.
-
Scheduler to trigger the regular generation of Mule events.
-
Logger to view output and issues logged in the Studio console.
-
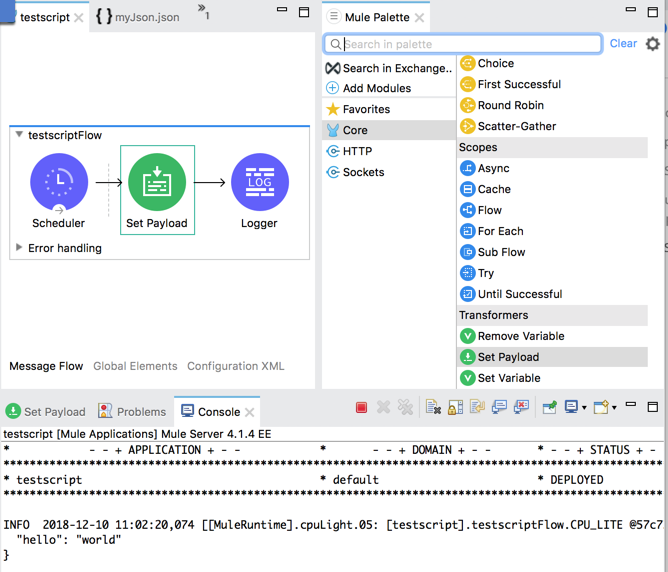
Here is an example that uses some of these components:
-
The fx value of Set Payload is set to
output application/json --- { hello : "world"}. -
The fx value of the Logger is set to
payload, which looks like#[payload]in the UI and the XML configuration file for the project. -
The Console tab of the running Mule app (
testscript) displays the payload from Set Payload.