NetSuite Connector 10.0 Examples
The following examples show how to perform searches in Anypoint Connector for NetSuite (NetSuite Connector):
Account Basic Search Filtering by an Integer Field
This example shows how to use the NetSuite Connector Search operation to obtain the Account records with internal IDs that are less than the value of the query parameter.
This example requires that at least one basic account meets the search condition in the NetSuite instance.
The following screenshot shows the Studio app flow for this example:
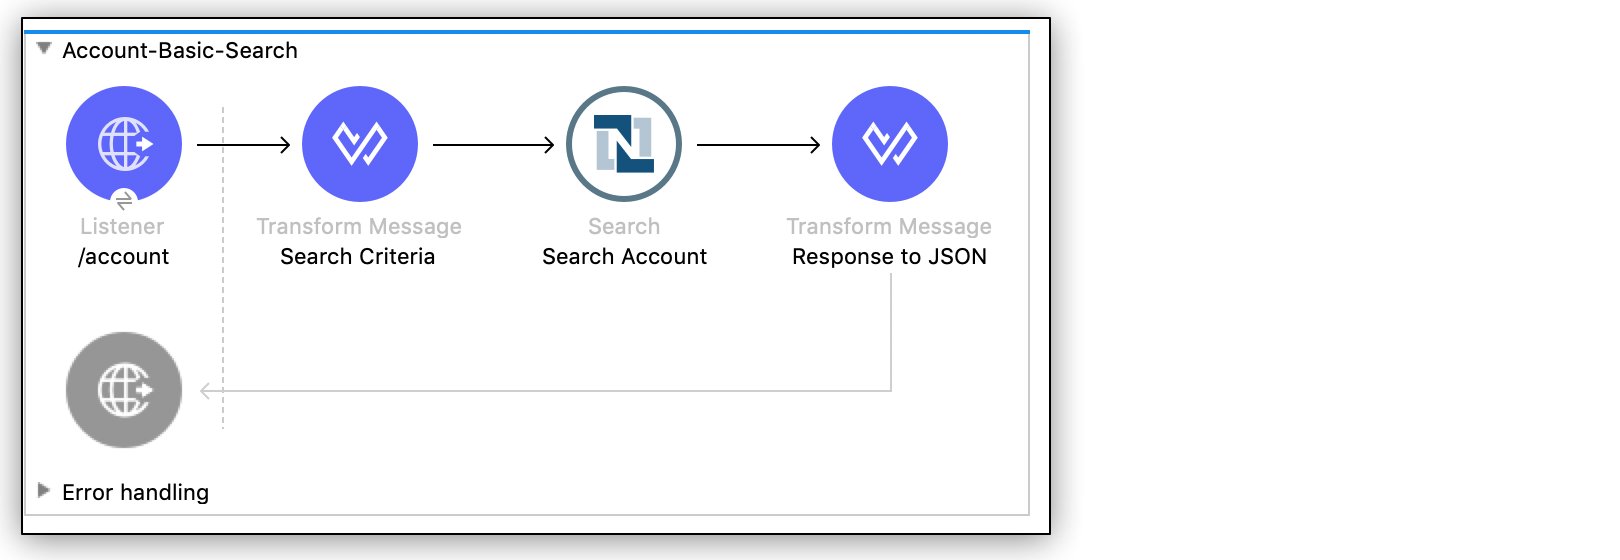
Creating this example involves creating a new Mule project and configuring HTTP Listener, the NetSuite Connector Search operation, and two Transform Message components.
Configure HTTP Listener
Configure HTTP Listener to initiate a Mule flow when a call is made to the /account path on localhost port 8081:
-
Create a new Mule project in Studio.
-
In Studio, click HTTP and drag the Listener operation to the canvas.
-
Change the display name of the Listener operation to
/account. -
On the Listener properties window, click + next to the Connector configuration field to add a global element.
-
Accept the defaults.
-
On the Listener properties window, set the Path field value to
/account.
Add the NetSuite Connector Search Operation
-
From the Mule Palette view, select NetSuite and drag the Search operation to the right of Listener.
-
Change the display name of the Search operation to
Search Account. -
On the Search properties window, click + next to the Connector configuration field to add a global element.
-
Accept the defaults.
-
On the Search properties window:
-
In the Key field, select
ACCOUNT_BASIC. -
Set the Page Size field value to an integer value between
10and1000.
-
Add the First Transform Message Component
This Transform Message component contains the search criteria for the flow:
-
From the Mule Palette view, drag a Transform Message component to the left of Search.
-
Change the name of the Transform Message component to
Search Criteria. -
Click the Transform Message component.
The Output column displays the metadata of the AccountSearchBasic object.
-
Under the internalid object in the metadata:
-
Double-click the operator field and set its value to
"LESS_THAN". -
Double-click the searchValue field and set its value to
attributes.queryParams["internalId"].Setting the searchValue field value to
attributes.queryParams["internalId"]directs the connector to use the value of theinternalIdquery parameter as the search criteria.
The DataWeave code should look like this:
%dw 2.0 output application/java --- { internalIdNumber: { operator: "LESS_THAN", searchValue: attributes.queryParams["internalId"] } } as Object { class : "org.mule.module.netsuite.extension.api.AccountSearchBasic" } -
Add the Second Transform Message Component
This Transform Message component converts the response to JSON format:
-
From the Mule Palette view, drag a Transform Message component to the right of Search.
-
Change the name of the Transform Message component to
Response to JSON. -
Click the Transform Message component and set the output to
application/json.%dw 2.0 output application/json --- payload
Run the App
To run the app:
-
Start the Mule app.
-
Call
http://localhost:8081/account?internalId=5to retrieve theAccountrecords with internal IDs that are less than 5.
XML for Account Basic Search Flow
Paste this code into a new Mule app in Studio to quickly load the flow for the Account basic search example. If needed, change the values to reflect your environment.
<?xml version="1.0" encoding="UTF-8"?>

<mule xmlns:ee="http://www.mulesoft.org/schema/mule/ee/core"
	xmlns:netsuite="http://www.mulesoft.org/schema/mule/netsuite"
	xmlns:http="http://www.mulesoft.org/schema/mule/http" xmlns="http://www.mulesoft.org/schema/mule/core"
	xmlns:doc="http://www.mulesoft.org/schema/mule/documentation"
	xmlns:xsi="http://www.w3.org/2001/XMLSchema-instance"
	xsi:schemaLocation="http://www.mulesoft.org/schema/mule/core http://www.mulesoft.org/schema/mule/core/current/mule.xsd
http://www.mulesoft.org/schema/mule/http http://www.mulesoft.org/schema/mule/http/current/mule-http.xsd
http://www.mulesoft.org/schema/mule/netsuite http://www.mulesoft.org/schema/mule/netsuite/current/mule-netsuite.xsd
http://www.mulesoft.org/schema/mule/ee/core http://www.mulesoft.org/schema/mule/ee/core/current/mule-ee.xsd">

    <http:listener-config name="HTTP_Listener_config" doc:name="HTTP Listener config">
        <http:listener-connection host="0.0.0.0" port="8081"/>
    </http:listener-config>

    <netsuite:config name="NetSuite_Config" doc:name="NetSuite Config">
        <netsuite:request-based-authentication-connection
    		email="${email}" password="${password}" account="${account}"
    		roleId="${roleId}" applicationId="${applicationId}" />
    </netsuite:config>

    <flow name="netsuite-search-account">
	    <http:listener doc:name="/account" config-ref="HTTP_Listener_config" path="/account"/>
	    <ee:transform doc:name="Search Criteria">
		    <ee:message >
			    <ee:set-payload ><![CDATA[%dw 2.0
output application/java
---
{
	internalIdNumber: {
		operator: "LESS_THAN",
		searchValue: attributes.queryParams["internalId"]
	}
} as Object {
	class : "org.mule.module.netsuite.extension.api.AccountSearchBasic"
}]]></ee:set-payload>
			</ee:message>
		</ee:transform>
		<netsuite:search key="ACCOUNT_BASIC" doc:name="Search Account" config-ref="NetSuite_Config" pageSize="10"/>
		<ee:transform doc:name="Response to Json">
			<ee:message >
				<ee:set-payload ><![CDATA[%dw 2.0
output application/json
---
payload]]></ee:set-payload>
			</ee:message>
		</ee:transform>
	</flow>
</mule>
Employee Basic Search Filtering by the Boolean and String Fields
This example shows how to use the Search operation to obtain the inactive Employee records that have last names beginning with a specified letter.
This example requires that at least one employee record in the NetSuite instance meets the search conditions.
The following screenshot shows the Studio app flow for the Employee basic search example:
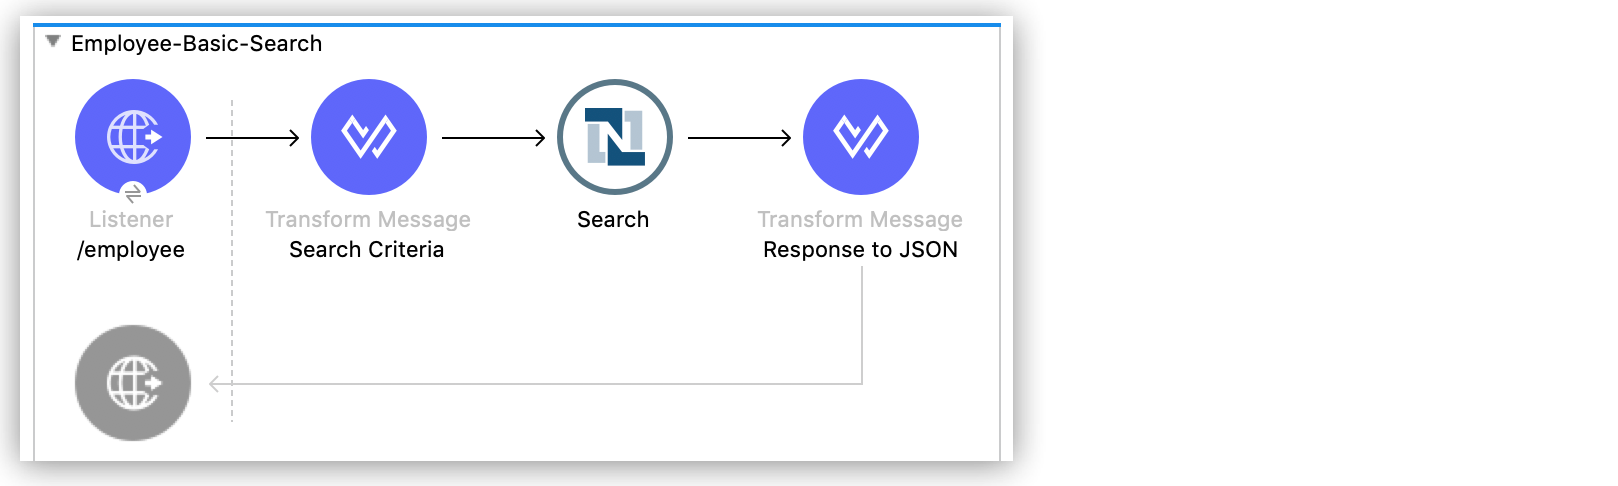
Creating this example involves creating a new Mule project and configuring HTTP Listener, the NetSuite Connector Search operation, and two Transform Message components.
Configure HTTP Listener
Configure HTTP Listener to initiate a Mule flow when a call is made to the /employee path on localhost port 8081:
-
In Studio, click HTTP and drag the Listener operation to the canvas.
-
Change the display name of the Listener operation to
/employee. -
Either select an existing global element or create a new one for HTTP Listener and keep the defaults.
-
On the Listener properties window, set the Path field value to
/employee.
Add the NetSuite Connector Search Operation
-
From the Mule Palette view, select NetSuite and drag the Search operation to the right of HTTP Listener.
-
Change the display name of the Search operation to
Search Employee. -
Select an existing global element or create a new one for the Search operation.
-
On the Search properties window:
-
In the Key field, select
Employee_BASIC. -
Set the Page Size field value to an integer value between
10and1000.
-
Add the First Transform Message Component
This Transform Message component contains the search criteria for the flow:
-
From the Mule Palette view, drag the Transform Message component to the left of Search.
-
Change the name of the Transform Message component to
Search Criteria. -
Click the Transform Message component.
The Output column displays the metadata of the EmployeeSearchBasic object.
-
Under the isInactive object in the metadata, double-click the searchValue field and set its value to
attributes.queryParams["isInactive"].This value directs the connector to search for inactive employee accounts.
-
Under the lastName object:
-
Double-click the operator field and set its value to
STARTS_WITH. -
Double-click the searchValue field and set its value to
attributes.queryParams["lastName"].This value directs the connector to search employee last names.
-
The DataWeave code should look like this:
%dw 2.0
output application/java
---
{
	isInactive: {
		searchValue: attributes.queryParams["isInactive"]
	},
	lastName: {
		operator: "STARTS_WITH",
		searchValue: attributes.queryParams["lastName"]
	}
} as Object {
	class : "org.mule.module.netsuite.extension.api.EmployeeSearchBasic"
}
Add the Second Transform Message Component
This Transform Message component converts the response to JSON format:
-
From the Mule Palette view, drag a Transform Message component to the right of Search.
-
Click Transform Message and set the output to
application/json:%dw 2.0 output application/json --- payload
Run the App
-
Start the Mule app.
-
Call
http://localhost:8081/employee?isInactive=false&lastName=Ato retrieve the inactiveEmployeerecords that have last names beginning withA.
XML for Employee Basic Search Flow
Paste this code into a new Mule app in Studio to quickly load the flow for the Employee basic search example. If needed, change the values to reflect your environment.
<?xml version="1.0" encoding="UTF-8"?>

<mule xmlns:ee="http://www.mulesoft.org/schema/mule/ee/core"
	xmlns:netsuite="http://www.mulesoft.org/schema/mule/netsuite"
	xmlns:http="http://www.mulesoft.org/schema/mule/http" xmlns="http://www.mulesoft.org/schema/mule/core"
	xmlns:doc="http://www.mulesoft.org/schema/mule/documentation"
	xmlns:xsi="http://www.w3.org/2001/XMLSchema-instance"
	xsi:schemaLocation="http://www.mulesoft.org/schema/mule/core http://www.mulesoft.org/schema/mule/core/current/mule.xsd
http://www.mulesoft.org/schema/mule/http http://www.mulesoft.org/schema/mule/http/current/mule-http.xsd
http://www.mulesoft.org/schema/mule/netsuite http://www.mulesoft.org/schema/mule/netsuite/current/mule-netsuite.xsd
http://www.mulesoft.org/schema/mule/ee/core http://www.mulesoft.org/schema/mule/ee/core/current/mule-ee.xsd">

    <http:listener-config name="HTTP_Listener_config" doc:name="HTTP Listener config">
        <http:listener-connection host="0.0.0.0" port="8081"/>
    </http:listener-config>

    <netsuite:config name="NetSuite_Config" doc:name="NetSuite Config">
        <netsuite:request-based-authentication-connection
    		email="${email}" password="${password}" account="${account}"
    		roleId="${roleId}" applicationId="${applicationId}" />
    </netsuite:config>

    <flow name="netsuite-search-employee">
    		<http:listener doc:name="/employee" config-ref="HTTP_Listener_config"
    			path="/employee" />
    		<ee:transform doc:name="Search Criteria">
    			<ee:message >
    				<ee:set-payload ><![CDATA[%dw 2.0
    output application/java
    ---
    {
    	isInactive: {
    		searchValue: attributes.queryParams["isInactive"]
    	},
    	lastName: {
    		operator: "STARTS_WITH",
    		searchValue: attributes.queryParams["lastName"]
    	}
    } as Object {
    	class : "org.mule.module.netsuite.extension.api.EmployeeSearchBasic"
    }]]></ee:set-payload>
    			</ee:message>
    		</ee:transform>
    		<netsuite:search doc:name="Search Employee"config-ref="NetSuite_Config" key="EMPLOYEE_BASIC" pageSize="10" />
    		<ee:transform doc:name="Response to Json">
    			<ee:message >
    				<ee:set-payload ><![CDATA[%dw 2.0
    output application/json
    ---
    payload]]></ee:set-payload>
    			</ee:message>
    		</ee:transform>
    	</flow>
</mule>
Customer Advanced Search Filtering by the Date and Array fields
This example shows how to use the Search operation to obtain the customer records that were created after 2015 and that are in the LEAD stage.
This examples requires that at least one customer record meets the search conditions in the NetSuite instance.
The following screenshot shows the Studio app flow for this example:
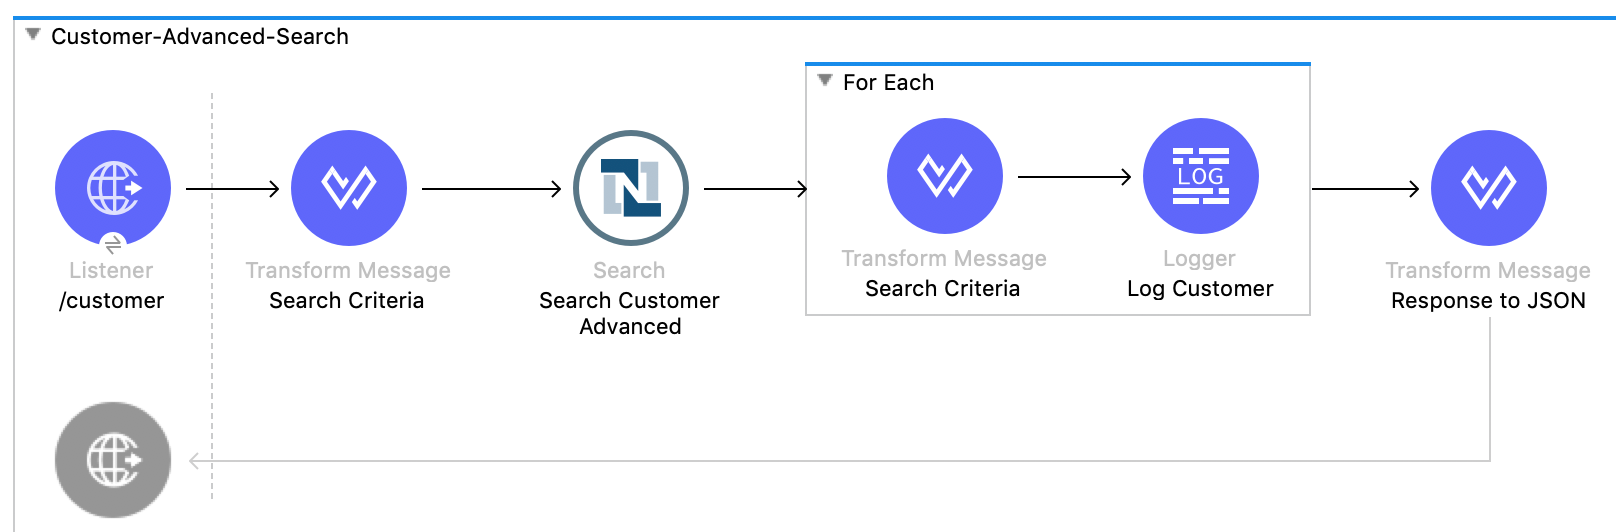
Creating this example involves creating a new Mule project and configuring HTTP Listener, the NetSuite Search operation, three Transform Message components, and a For-Each scope.
Configure HTTP Listener
Configure HTTP Listener to initiate a Mule flow when a call is made to the /customer path on localhost port 8081:
-
In Studio, click HTTP and drag the Listener operation to the canvas.
-
Change the display name of the Listener operation to
/customer. -
Select an existing global element or create a new one for the Listener operation.
-
On the Listener properties window, set the path field value to
/customer.
Add the NetSuite Connector Search Operation
-
From the Mule Palette view, select NetSuite and drag the Search operation to the right of Listener.
-
Change the display name of the Search operation to
Search Customer Advanced. -
Select an existing global element or create a new one for the Search operation.
-
On the Search properties window:
-
In the Key field, select
CUSTOMER_ADVANCED. -
Set the Page Size field value to an integer value between
10and1000.
-
Add the First Transform Message Component
This Transform Message component configures custom labels for the search results and specifies the search criteria for the flow:
-
From the Mule Palette view, drag the Transform Message component to the left of Search.
-
Change the name of the Transform Message component to
Search Criteria. -
Click the Transform Message component.
The Output column displays the metadata of the CustomerSearchAdvanced object.
-
To configure the fields in the search results:
-
Under CustomerSearchAdvanced, expand the basic object.
-
Expand dateCreated.
-
Double-click the customLabel field and set its value to
"Created". -
Under the entityId object, double-click the customLabel field and set its value to
"Entity ID". -
Under the stage object, double-click the customLabel field and set its value to
Stage.
-
-
To configure the search criteria for the flow:
-
Under CustomerSearchAdvanced, expand the Criteria object.
-
Expand the basic object.
-
Under the dateCreated object, double-click the operator field and set its value to
"AFTER". -
Double-click the searchValue field and set its value to
attributes.queryParams["dateCreated"] as LocalDateTime {format: "yyyy-MM-dd HH:mm:ss.SSS"}.This setting converts the value of the
dateCreatedquery parameter to theLocalDateTimeformat. -
Expand the stage object.
-
Double-click the operator field and set its value to
"ANY_OF". -
Double-click the searchValue field and set its value to
[attributes.queryParams["stage"]].This setting converts the value from the
stagequery parameter to an array item.
-
The DataWeave code should look like this:
%dw 2.0
output application/java
---
{
	columns: {
		basic: {
			dateCreated: [{
				customLabel: "Created"
			}],
			entityId: [{
				customLabel: "Entity Id"
			}],
			stage: [{
				customLabel: "Stage"
			}]
		}
	},
	criteria: {
		basic: {
			dateCreated: {
				operator: "AFTER",
				searchValue: attributes.queryParams["dateCreated"] as LocalDateTime {format: "yyyy-MM-dd HH:mm:ss.SSS"}
			},
			stage: {
				operator: "ANY_OF",
				searchValue: [attributes.queryParams["stage"]]
			}
		}
	}
} as Object {
	class : "org.mule.module.netsuite.extension.api.CustomerSearchAdvanced"
}
Add a For-Each Scope
A For-Each scope processes each record on the list returned by the Search operation individually so that the records can be displayed on the console.
-
From the Mule Palette view, drag a For-Each scope to the right of Search.
-
Drag a Transform Message component inside the For Each box and replace the DataWeave code in the Transform Message Output column with this code:
%dw 2.0 output application/json --- { entityId: payload.entityId, dateCreated: payload.dateCreated, stage: payload.stage } -
Drag a Logger component from the Mule Palette view to the right of Transform, inside the For Each box.
-
Change the display name of the Logger operation to
Log Customer. -
On the Logger properties window, set the Message field value to
#[payload].
Add a Third Transform Message Component
This Transform Message component converts the response to JSON format:
-
From the Mule Palette view, drag another Transform Message component to the end of the flow, outside the For Each box.
-
Change the name of the Transform Message component to
Response to JSON. -
Click Transform Message and set the output to
application/json:%dw 2.0 output application/json --- payload -
Start the Mule app.
-
Call
http://localhost:8081/customer?dateCreated=2015-02-02%2000:00:00.000&stage=LEAD.
XML for the Customer Advanced Search Flow
Paste this code into a new Mule app in Studio to quickly load the flow for the Customer Advanced Search example. If needed, change the values to reflect your environment.
<?xml version="1.0" encoding="UTF-8"?>

<mule xmlns:ee="http://www.mulesoft.org/schema/mule/ee/core"
	xmlns:netsuite="http://www.mulesoft.org/schema/mule/netsuite"
	xmlns:http="http://www.mulesoft.org/schema/mule/http" xmlns="http://www.mulesoft.org/schema/mule/core"
	xmlns:doc="http://www.mulesoft.org/schema/mule/documentation"
	xmlns:xsi="http://www.w3.org/2001/XMLSchema-instance"
	xsi:schemaLocation="http://www.mulesoft.org/schema/mule/core http://www.mulesoft.org/schema/mule/core/current/mule.xsd
http://www.mulesoft.org/schema/mule/http http://www.mulesoft.org/schema/mule/http/current/mule-http.xsd
http://www.mulesoft.org/schema/mule/netsuite http://www.mulesoft.org/schema/mule/netsuite/current/mule-netsuite.xsd
http://www.mulesoft.org/schema/mule/ee/core http://www.mulesoft.org/schema/mule/ee/core/current/mule-ee.xsd">

    <http:listener-config name="HTTP_Listener_config" doc:name="HTTP Listener config">
        <http:listener-connection host="0.0.0.0" port="8081"/>
    </http:listener-config>

    <netsuite:config name="NetSuite_Config" doc:name="NetSuite Config">
        <netsuite:request-based-authentication-connection
    		email="${email}" password="${password}" account="${account}"
    		roleId="${roleId}" applicationId="${applicationId}" />
    </netsuite:config>

    <flow name="netsuite-search-customer-advanced">
    		<http:listener doc:name="/customer" config-ref="HTTP_Listener_config" path="/customer"/>
    		<ee:transform doc:name="Search Criteria">
    			<ee:message>
    				<ee:set-payload><![CDATA[%dw 2.0
    output application/java
    ---
    {
    	columns: {
    		basic: {
    			dateCreated: [{
    				customLabel: "Created"
    			}],
    			entityId: [{
    				customLabel: "Entity Id"
    			}],
    			stage: [{
    				customLabel: "Stage"
    			}]
    		}
    	},
    	criteria: {
    		basic: {
    			dateCreated: {
    				operator: "AFTER",
    				searchValue: attributes.queryParams["dateCreated"] as LocalDateTime {format: "yyyy-MM-dd HH:mm:ss.SSS"}
    			},
    			stage: {
    				operator: "ANY_OF",
    				searchValue: [attributes.queryParams["stage"]]
    			}
    		}
    	}
    } as Object {
    	class : "org.mule.module.netsuite.extension.api.CustomerSearchAdvanced"
    }]]></ee:set-payload>
    			</ee:message>
    		</ee:transform>
    		<netsuite:search key="CUSTOMER_ADVANCED" doc:name="Search Customer Advanced" config-ref="NetSuite_Config" pageSize="10"/>
    		<foreach doc:name="For Each">
    			<ee:transform doc:name="Transform Customer">
    				<ee:message >
    					<ee:set-payload ><![CDATA[%dw 2.0
    output application/json
    ---
    {
    	entityId: payload.entityId,
    	dateCreated: payload.dateCreated,
    	stage: payload.stage
    }]]></ee:set-payload>
    				</ee:message>
    			</ee:transform>
    			<logger level="INFO" doc:name="Logger Customer" message="#[payload]"/>
    		</foreach>
    		<ee:transform doc:name="Response to Json">
    			<ee:message >
    				<ee:set-payload ><![CDATA[%dw 2.0
    output application/json
    ---
    payload]]></ee:set-payload>
    			</ee:message>
    		</ee:transform>
    	</flow>
</mule>