Redis Connector 5.7 Examples
The following examples show how to use Redis Connector to set a key value on the Redis server and how to use Redis Connector as a custom object store in a Mule app.
Set a Key Value on the Redis Server
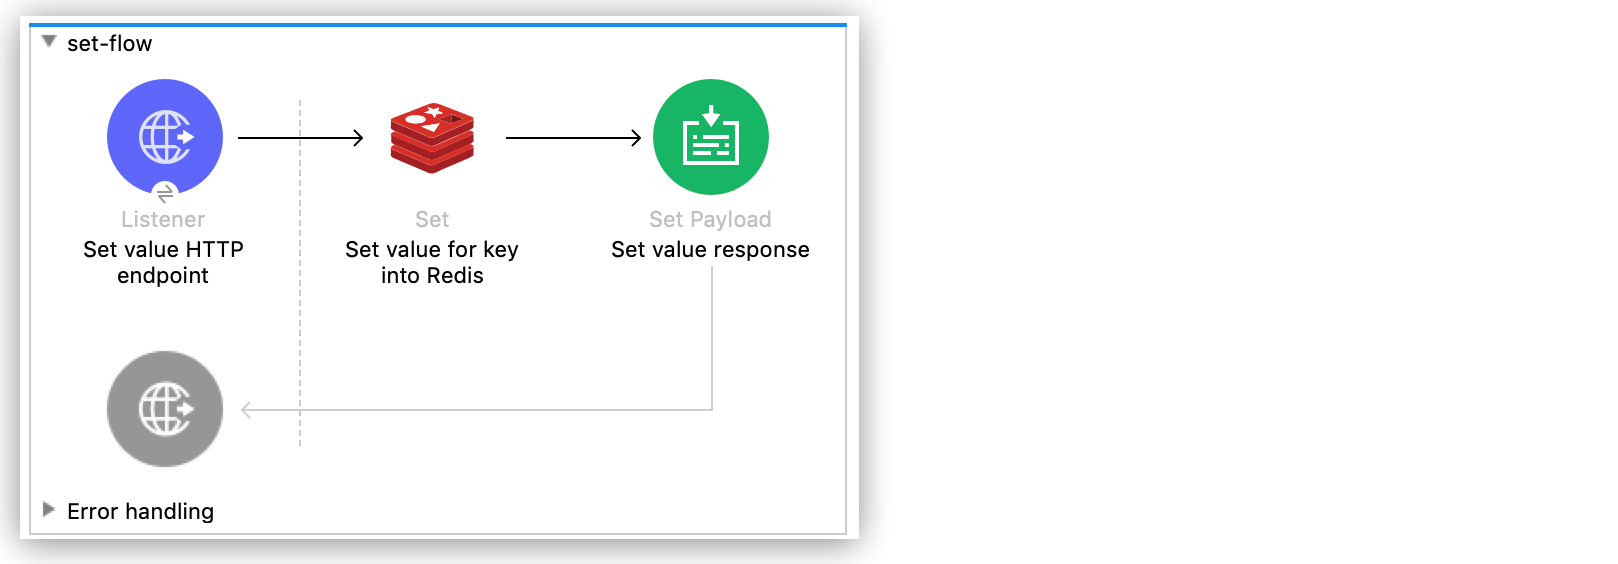
The following screenshot shows the flow for this example:
To use Anypoint Studio to set a key value on the Redis server:
-
Create a new Mule project by clicking File > New > Mule Project.
-
Enter a name for the new project and click Finish.
-
In the Mule Palette view, select HTTP > Listener and drag it to the Studio canvas.
HTTP Listener is the entry point for the flow and provides the key and its value.
-
Click the plus sign (+) next to the Connector Configuration field.
-
Leave the default configuration and click OK.
-
Set the Path field to
/. -
In the Mule Palette view, search for
redisand drag the Set operation to the right of Listener.The Set operation sends data to the Redis server.
-
Set the properties for the Set operation as follows:
-
Set the Display Name field to
Set value for key into Redis. -
Set the Key field to
#[payload.key]. -
Set the Value field to
#[payload.value]: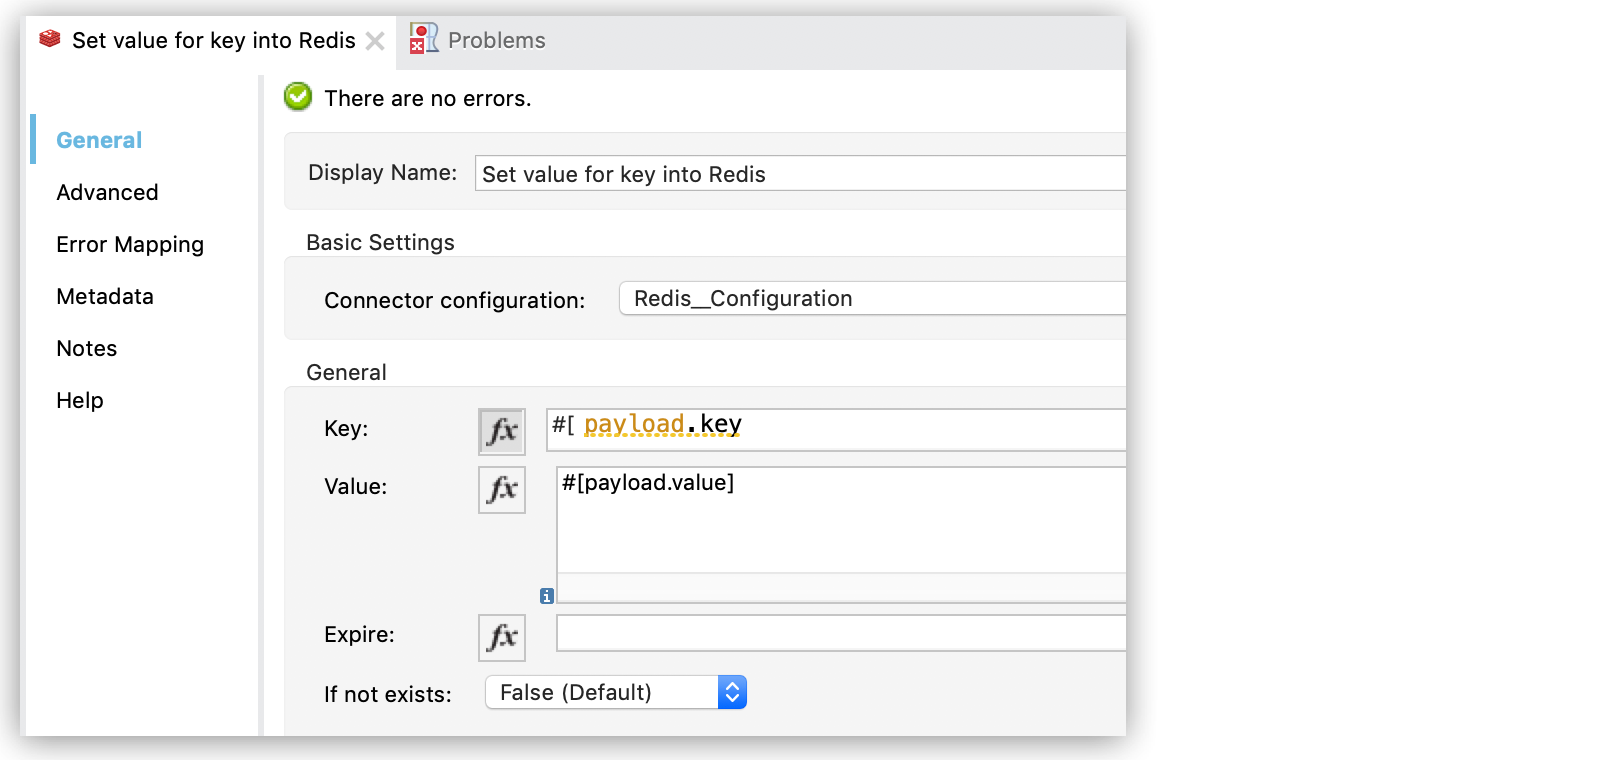
-
-
In the Mule Palette view, search for
payloadand drag the Set Payload component to the right of Set value for key into Redis on the Studio canvas.The Set Payload component creates the response for the incoming HTTP request.
-
Set the Set Payload properties as follows:
-
Set the Display Name field to
Set value response. -
Set the Value field to
Successfully set value: #[payload.value] to key: #[payload.key]:
-
-
Save your changes and deploy the app by right-clicking the Studio canvas and selecting Run project <project name>.
-
When the app is running, use an HTTP client app to send a POST request to
localhost:8081/with content-typeapplication/x-www-form-urlencodedand a body inurl-encodedformat.The request body should contain a key and value:
curl -X POST -d "key=test-key" -d "value=test-value" localhost:8081/
The XML for this example should look like this:
<?xml version="1.0" encoding="UTF-8"?>
<mule xmlns:redis="http://www.mulesoft.org/schema/mule/redis"
xmlns:tracking="http://www.mulesoft.org/schema/mule/ee/tracking"
xmlns:http="http://www.mulesoft.org/schema/mule/http"
xmlns="http://www.mulesoft.org/schema/mule/core"
xmlns:doc="http://www.mulesoft.org/schema/mule/documentation"
xmlns:spring="http://www.springframework.org/schema/beans"
xmlns:xsi="http://www.w3.org/2001/XMLSchema-instance"
xsi:schemaLocation="
http://www.mulesoft.org/schema/mule/http http://www.mulesoft.org/schema/mule/http/current/mule-http.xsd http://www.springframework.org/schema/beans
http://www.springframework.org/schema/beans/spring-beans-current.xsd
http://www.mulesoft.org/schema/mule/core
http://www.mulesoft.org/schema/mule/core/current/mule.xsd
http://www.mulesoft.org/schema/mule/http
http://www.mulesoft.org/schema/mule/http/current/mule-http.xsd
http://www.mulesoft.org/schema/mule/ee/tracking
http://www.mulesoft.org/schema/mule/ee/tracking/current/mule-tracking-ee.xsd
http://www.mulesoft.org/schema/mule/redis
http://www.mulesoft.org/schema/mule/redis/current/mule-redis.xsd">
<redis:config
name="Redis__Configuration"
host="${config.host}"
connectionTimeout="${config.connectionTimeout}"
port="${config.port}"
doc:name="Redis: Configuration"/>
<http:listener-config name="HTTP_Listener_config" doc:name="HTTP Listener config" basePath="/">
<http:listener-connection host="0.0.0.0" port="8081" />
</http:listener-config>
<flow name="set-flow">
<http:listener
config-ref="HTTP_Listener_config"
path="/"
doc:name="Set value HTTP endpoint"/>
<redis:set
config-ref="Redis__Configuration"
key="#[payload.key]"
value="#[payload.value]"
doc:name="Set value for key into Redis">
<redis:value ><![CDATA[payload.key]]></redis:value>
</redis:set>
<set-payload
value="Successfully set value: #[payload.value] to key: #[payload.key]"
doc:name="Set value response"/>
</flow>
</mule>Use Redis Connector as a Custom Object Store
In Studio to configure Redis Connector as a custom object store in a Mule app:
-
Add the Redis namespace to the
<mule>element:xmlns:redis="http://www.mulesoft.org/schema/mule/redis" -
Add the location of the Redis schema referred to by the Redis namespace:
http://www.mulesoft.org/schema/mule/redis http://www.mulesoft.org/schema/mule/redis/current/mule-redis.xsd -
Add the HTTP namespace to the
<mule>element:xmlns:http="http://www.mulesoft.org/schema/mule/http" -
Add the location of the HTTP schema referred to by the HTTP namespace:
http://www.mulesoft.org/schema/mule/http http://www.mulesoft.org/schema/mule/http/current/mule-http.xsd -
Add the object store namespace to the
<mule>element:xmlns:os="http://www.mulesoft.org/schema/mule/os" -
Add the location of the object store schema referred to by the object store’s namespace:
http://www.mulesoft.org/schema/mule/os http://www.mulesoft.org/schema/mule/os/current/mule-os.xsd -
Using the Studio XML editor, add an
<os:config>element to your project and configure it to contain a Redis connection type (clustered-connectionornonclustered-connection).<os:config name="ObjectStore_Config"> <redis:nonclustered-connection host="${redis.host}"/> </os:config> -
Add an
<os:object-store>element to your project and configure it to reference the configuration created previously:<os:object-store name="Object_store" config-ref="ObjectStore_Config" maxEntries="1" entryTtl="60" expirationInterval="10" expirationIntervalUnit="SECONDS"/> -
Add an
<http:listener-config>element to your project and configure its attributes:<http:listener-config name="HTTP_Listener_Configuration" host="0.0.0.0" port="8081" doc:name="Listener"/> -
Add an empty
<flow>element to your project:<<flow> name="set-flow"> </flow> -
Within the
<flow>element, add an<http:listener>element:<http:listener config-ref="HTTP_Listener_Configuration" path="/" /> -
Within the
<flow>element, add an<os:store>element after the<http:listener>element and configure<os:store>to use the object store created previously:<os:store key="#[attributes.queryParams.key]" objectStore="Object_store" failIfPresent="true" failOnNullValue="false"> <os:value ><![CDATA[#[attributes.queryParams.value]]]></os:value> </os:store>When you’re done, the XML file should look like this:
<?xml version="1.0" encoding="UTF-8"?> <mule xmlns:ee="http://www.mulesoft.org/schema/mule/ee/core" xmlns:http="http://www.mulesoft.org/schema/mule/http" xmlns:os="http://www.mulesoft.org/schema/mule/os" xmlns:redis="http://www.mulesoft.org/schema/mule/redis" xmlns="http://www.mulesoft.org/schema/mule/core" xmlns:doc="http://www.mulesoft.org/schema/mule/documentation" xmlns:xsi="http://www.w3.org/2001/XMLSchema-instance" xsi:schemaLocation=" http://www.mulesoft.org/schema/mule/http http://www.mulesoft.org/schema/mule/http/current/mule-http.xsd http://www.mulesoft.org/schema/mule/ee/core http://www.mulesoft.org/schema/mule/ee/core/current/mule-ee.xsd http://www.mulesoft.org/schema/mule/core http://www.mulesoft.org/schema/mule/core/current/mule.xsd http://www.mulesoft.org/schema/mule/redis http://www.mulesoft.org/schema/mule/redis/current/mule-redis.xsd http://www.mulesoft.org/schema/mule/os http://www.mulesoft.org/schema/mule/os/current/mule-os.xsd http://www.mulesoft.org/schema/mule/http http://www.mulesoft.org/schema/mule/http/current/mule-http.xsd"> <http:listener-config name="HTTP_Listener_config"> <http:listener-connection host="0.0.0.0" port="8081" /> </http:listener-config> <os:object-store name="Object_store" config-ref="ObjectStore_Config" maxEntries="1" entryTtl="60" expirationInterval="10" expirationIntervalUnit="SECONDS"/> <os:config name="ObjectStore_Config"> <redis:nonclustered-connection host="${redis.host}"/> </os:config> <flow name="StoreFlow" > <http:listener doc:name="Listener" config-ref="HTTP_Listener_config" path="/store"/> <os:store doc:name="Store" key="#[attributes.queryParams.key]" objectStore="Object_store" failIfPresent="true" failOnNullValue="false"> <os:value ><![CDATA[#[attributes.queryParams.value]]]></os:value> </os:store> </flow> </mule>