Using Anypoint Studio to Configure Sockets Connector 1.2
Anypoint Studio (Studio) editors help you design and update your Mule applications, properties, and configuration files.
To add and configure a connector in Studio:
If you are new to configuring connectors in Studio, see Using Anypoint Studio to Configure a Connector. If, after reading this topic, you need additional information about the connector fields, see the Sockets Connector Reference.
Create a Mule Project
In Studio, create a new Mule project in which to add and configure the connector:
-
In Studio, select File > New > Mule Project.
-
Enter a name for your Mule project and click Finish.
Add the Connector to Your Mule Project
Add Anypoint Connector for Sockets (Sockets Connector) to your Mule project to automatically populate the XML code with the connector’s namespace and schema location and add the required dependencies to the project’s pom.xml file:
-
In the Mule Palette view, click (X) Search in Exchange.
-
In the Add Dependencies to Project view, type
socketsin the search field. -
Click Sockets in Available modules.
-
Click Add.
-
Click Finish.
Adding a connector to a Mule project in Studio does not make that connector available to other projects in your Studio workspace.
Configure the Sockets Listener Source
A source initiates a flow when a specified condition is met. The Sockets Listener source represents a socket endpoint to which clients can connect. By browsing to this endpoint, external clients establish a TCP or UDP socket connection and trigger the flow each time they send a message:
-
In the Mule Palette view, select Sockets > Listener.
-
Drag Listener to the Studio canvas.
-
On the Listener configuration screen, optionally change the value of the Display Name field.
-
Click the plus sign (+) next to the Connector configuration field to configure a global element that can be used by all instances of
sockets listenerin the app. -
On the General tab, for Connection select the
Tcp listeneror theUdp listenerconnections. -
Configure the specific tabs for the selected connection:
Tab Name Description General
Set the required Host and Port attributes and configure any other optional fields.
Buffer Configuration
Optionally specify send and receive buffer size information.
TLS
Optionally specify the TLS information.
Timeout Configuration
Optionally specify the client and server timeout information.
Advanced
Optionally specify the reconnection information, including a reconnection strategy.
-
Click Test Connection to confirm that Mule can connect with the specific server.
-
Click OK.
In Studio, the Sockets Listener source in the flow looks like this:
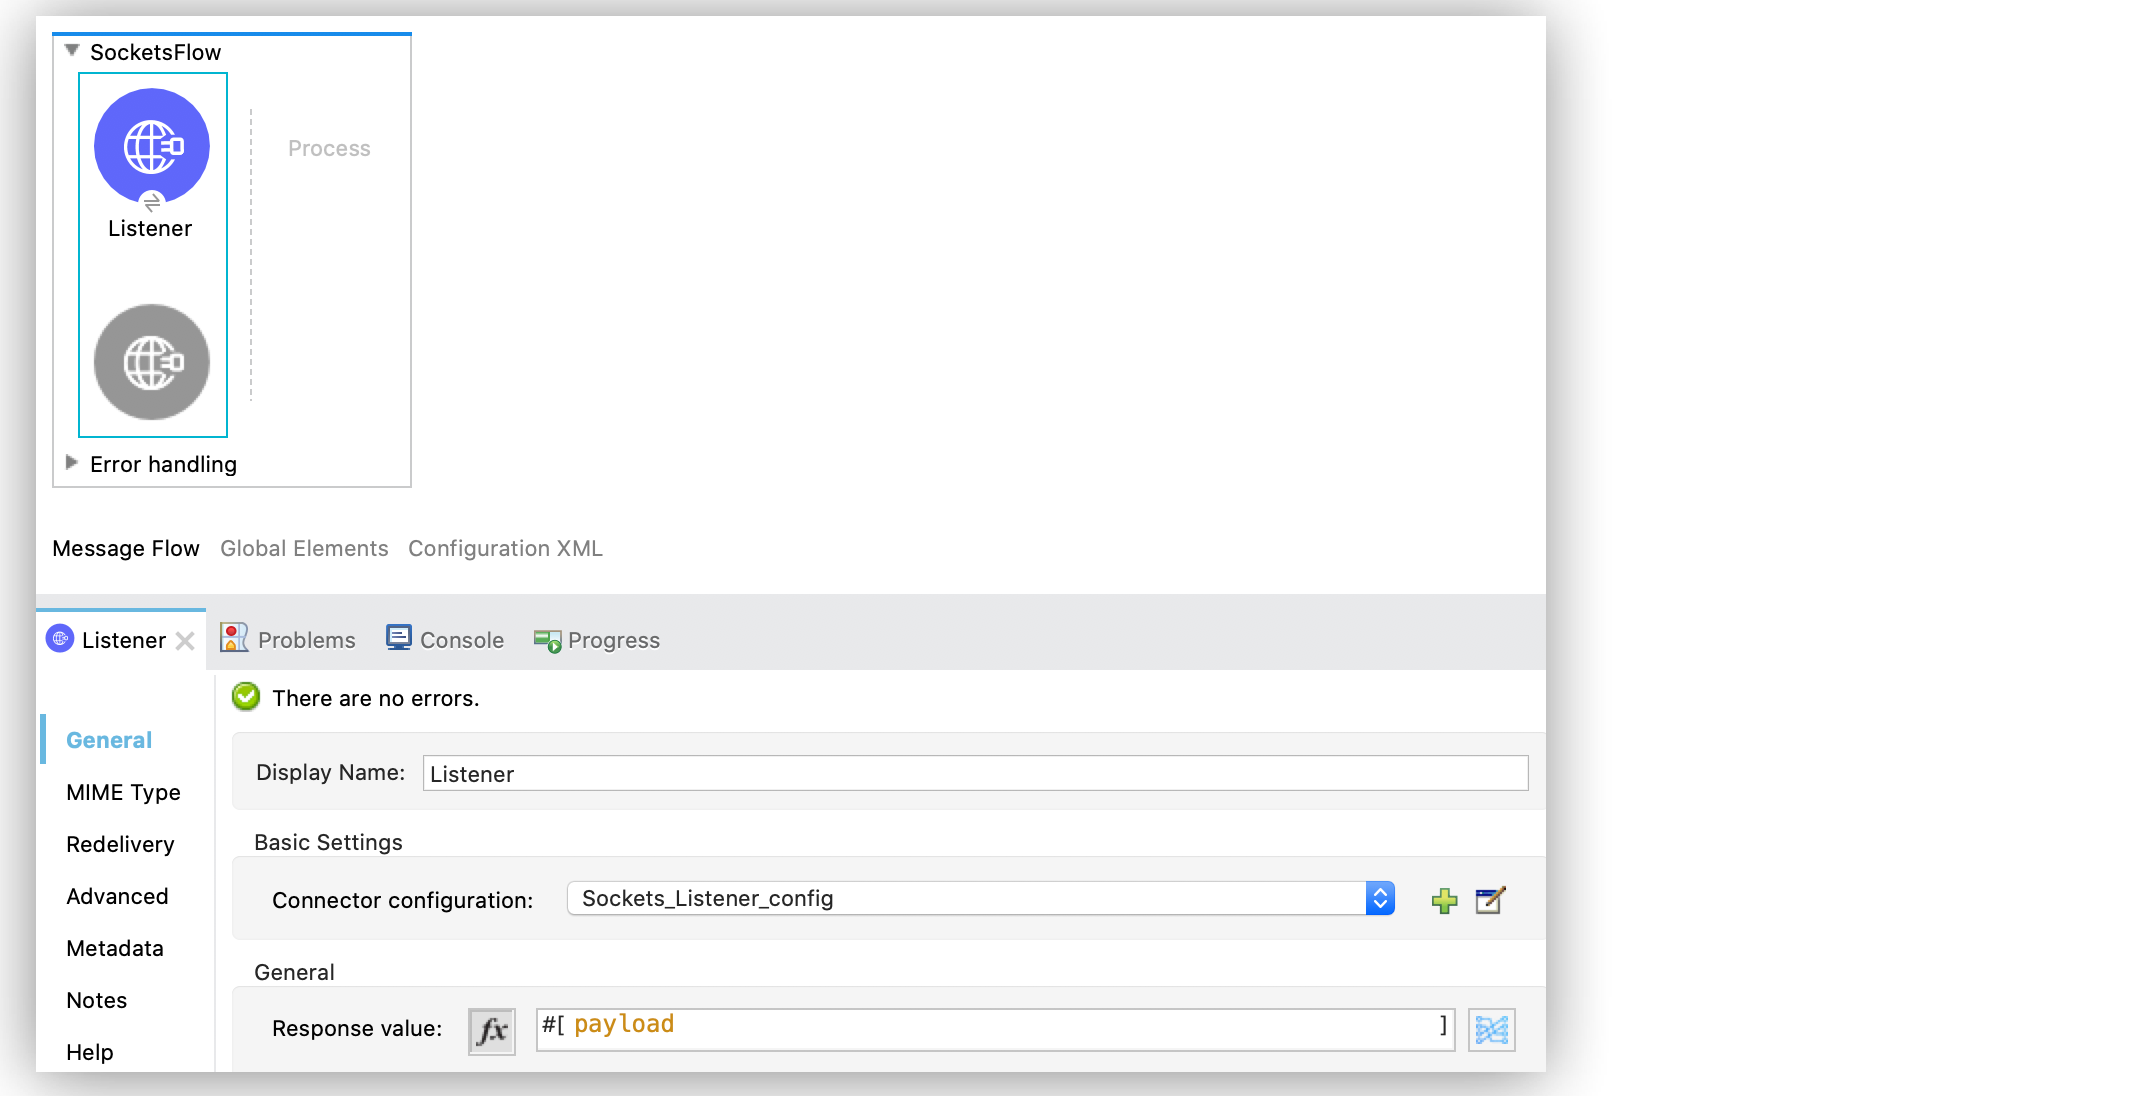
In Studio, configuring the Sockets Listener source with a TCP connection to accept local incoming connections on port 8082 looks like this:

In the Configuration XML tab, the XML looks like this:
	<sockets:listener-config name="Sockets_Listener_config">
		<sockets:tcp-listener-connection host="localhost" port="8082" />
	</sockets:listener-config>

	<flow name="SocketsFlow" >
		<sockets:listene config-ref="Sockets_Listener_config"/>
	</flow>
Configure the Send Operation and the Send and Receive Operation
When you add a connector operation to your flow, you immediately define a specific operation for that connector to perform. Sockets Connector provides two basic operations:
-
Send
Sends the data using the client associated to the RequesterConnection -
Send and receive
Sends the data using the associated client and then blocks until a response is received or the timeout is met, in which case the operation returns a null payload
To configure the Send operation or the Send and Receive operation:
-
In the Mule Palette view, select either:
-
Sockets > Send
-
Sockets > Send and receive.
-
-
Drag the Send or the Send and receive operation to the Studio canvas.
-
On the operation configuration screen, optionally change the value of the Display Name field.
-
Click the plus sign (+) next to the Connector configuration field to configure a global element that can be used by all instances of
Sockets SendorSockets Send and receivein the app. -
On the General tab, for Connection select the
Tcp requesteror theUdp requesterconnections. -
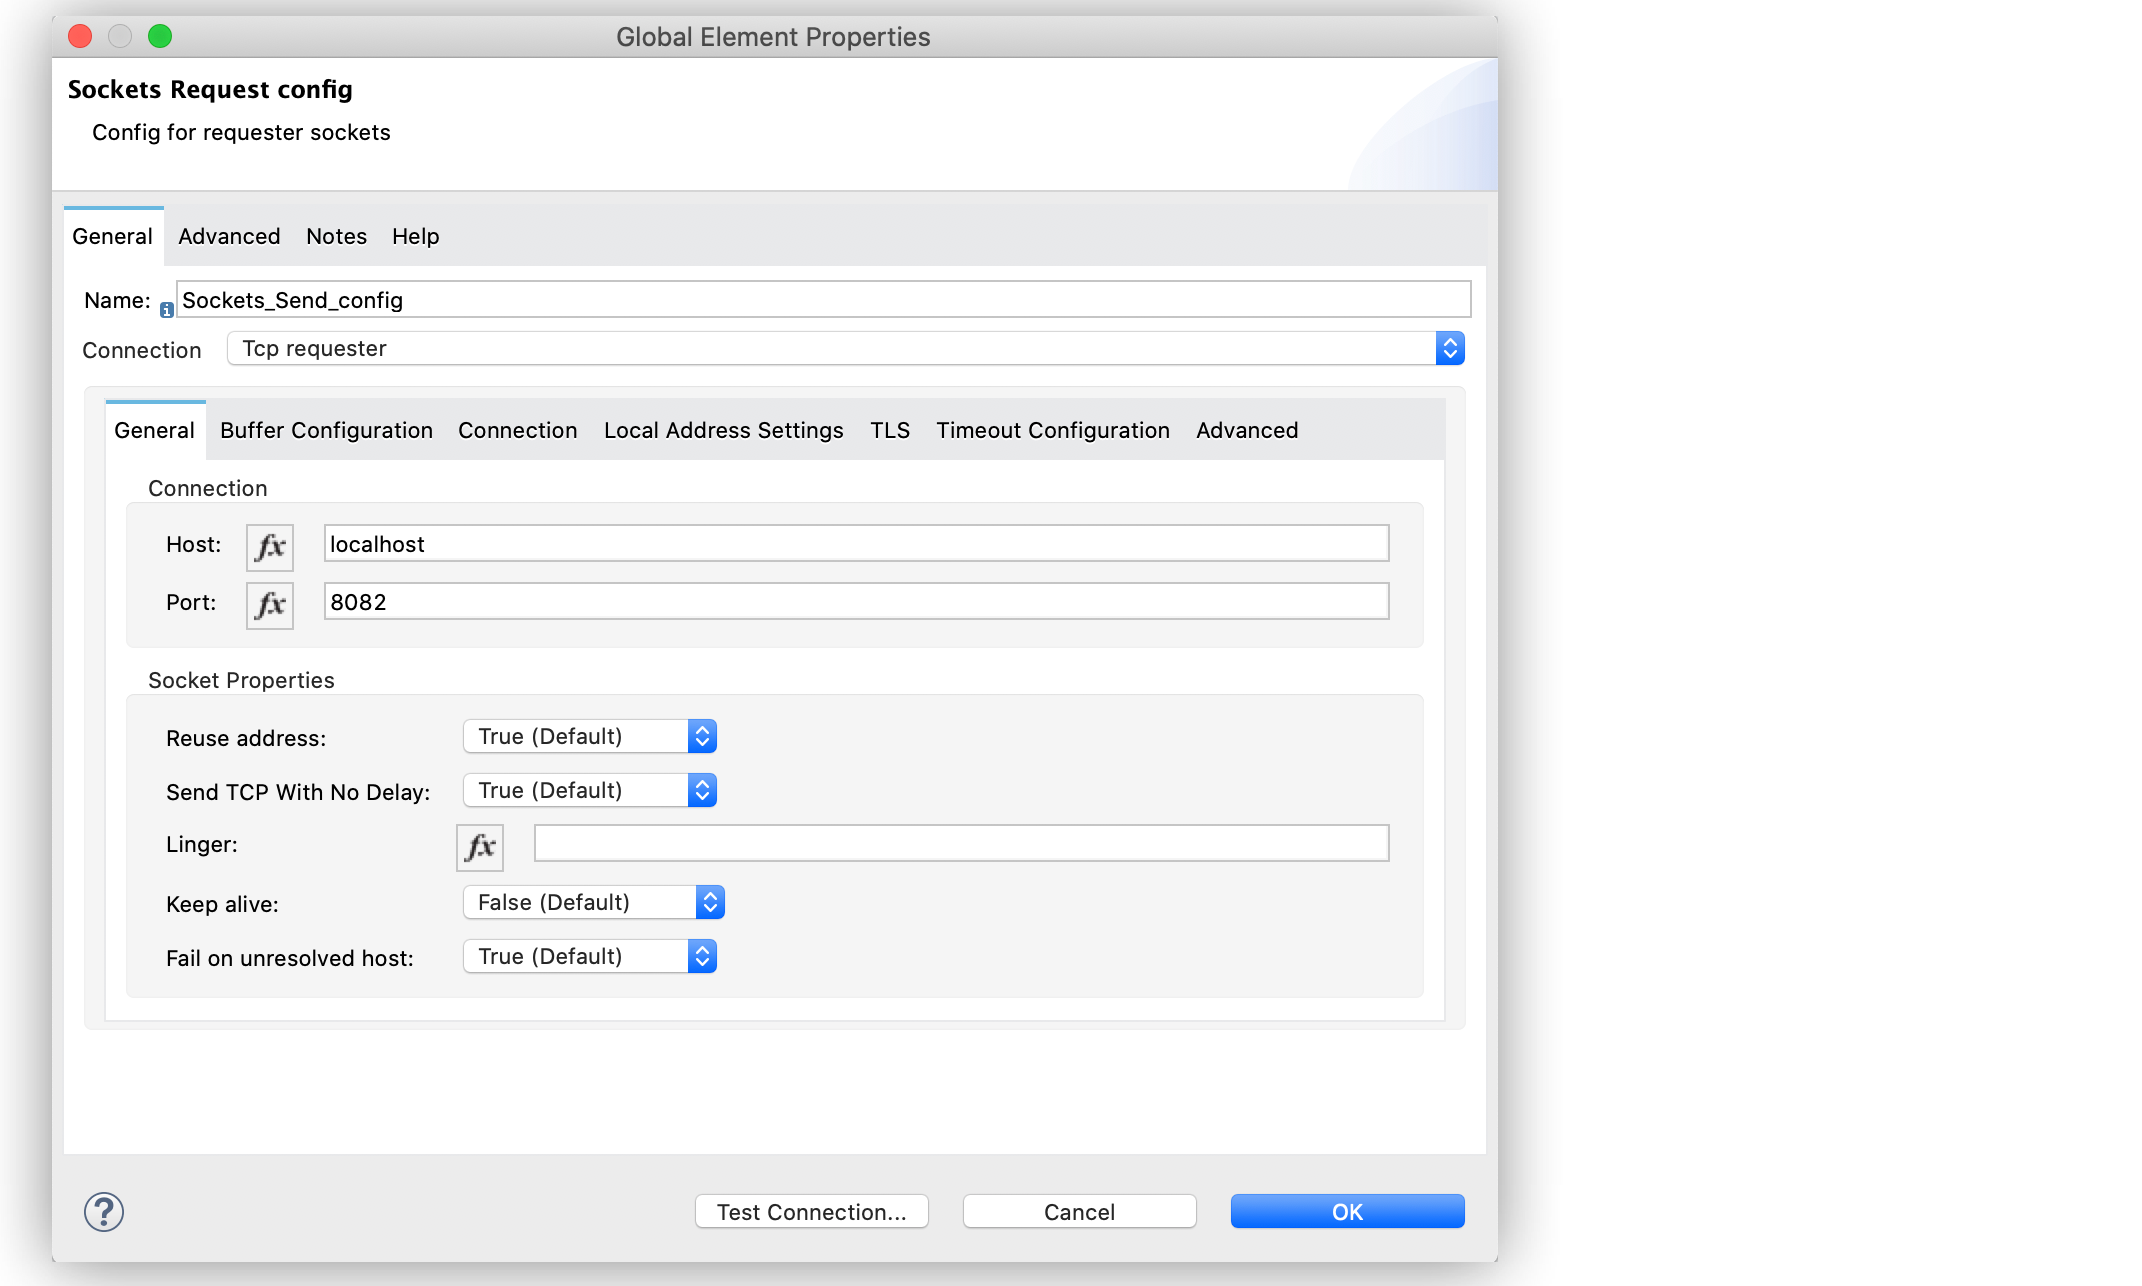
Configure the specific tabs for the selected connection:
Tab Name Description General
Set the required Host and Port attributes and configure optional fields as required.
Buffer Configuration
Optionally specify send and receive buffer size information.
Connection
Optionally select and configure one of the supported TCP protocols.
Local Address Settings
Optionally specify the local address.
TLS
Optionally specify the TLS information.
Timeout Configuration
Optionally specify the client and server timeout information.
Advanced
Optionally specify the reconnection information, including a reconnection strategy.
-
Click Test Connection to confirm that Mule can connect with the specific server.
-
Click OK.
Additionally, for the Send and receive operation, configure the MIME type as follows:
-
Click the Send and receive operation from your flow.
-
On the MIME Type tab, select a MIME type from field menu.
In Studio, the Sockets Send operation and Send and receive operation in the flow look like this:
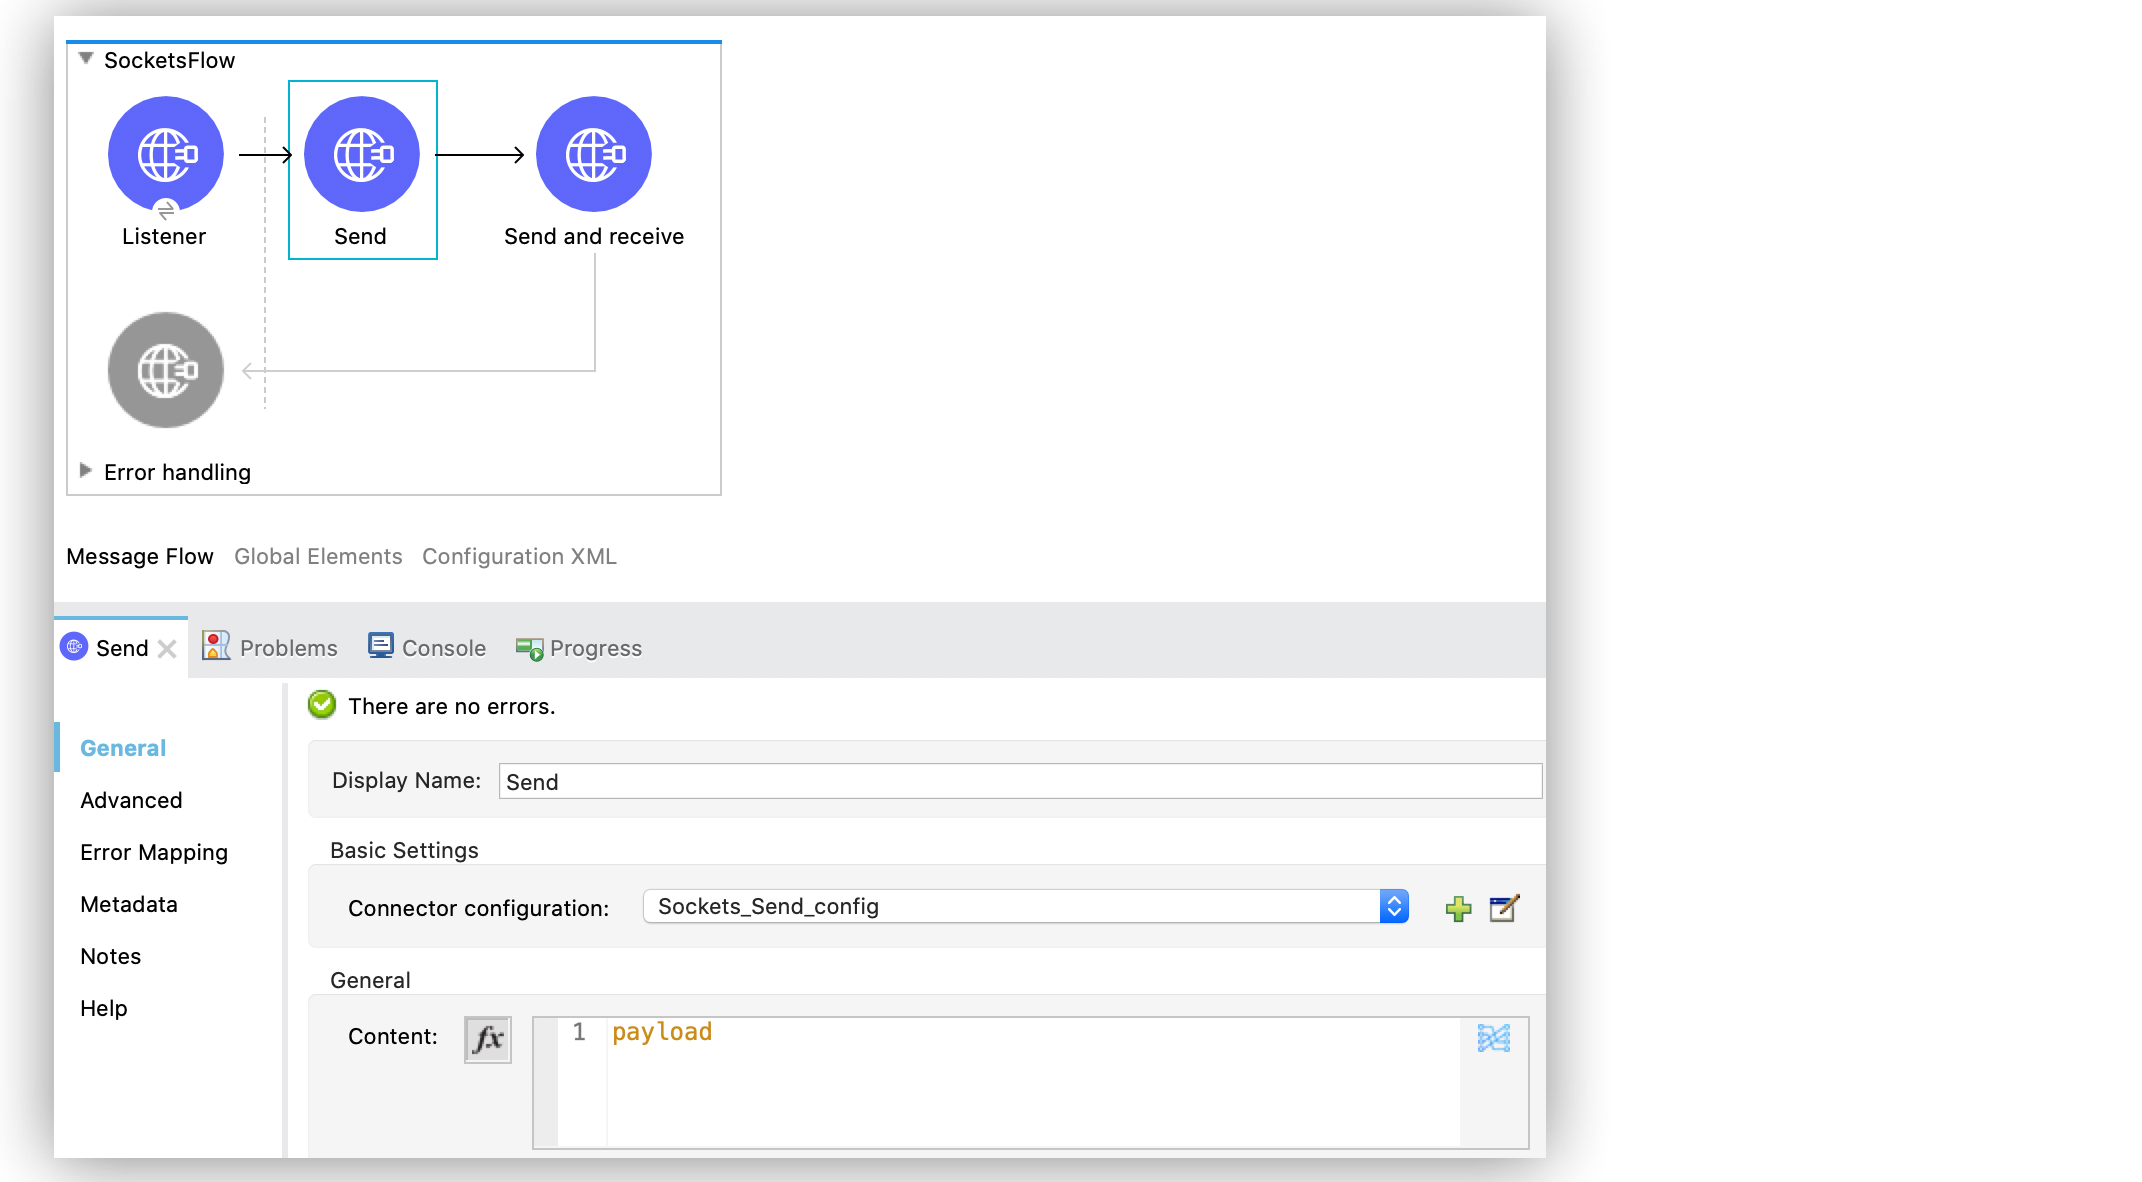
In Studio, configuring either the Send operation or the Send and receive operation with a TCP connection to accept local incoming connections on port 8082 looks like this:
In the Configuration XML tab, the Send operation configuration XML looks like this:
<sockets:request-config name="Sockets_Send_config">
		<sockets:tcp-requester-connection host="localhost" port="8082" />
	</sockets:request-config>

	<flow name="SocketsFlow" >
		<sockets:send config-ref="Sockets_Send_config"/>
	</flow>
In Studio, configuring the MIME type as application/json for the Send and receive operation looks like this:
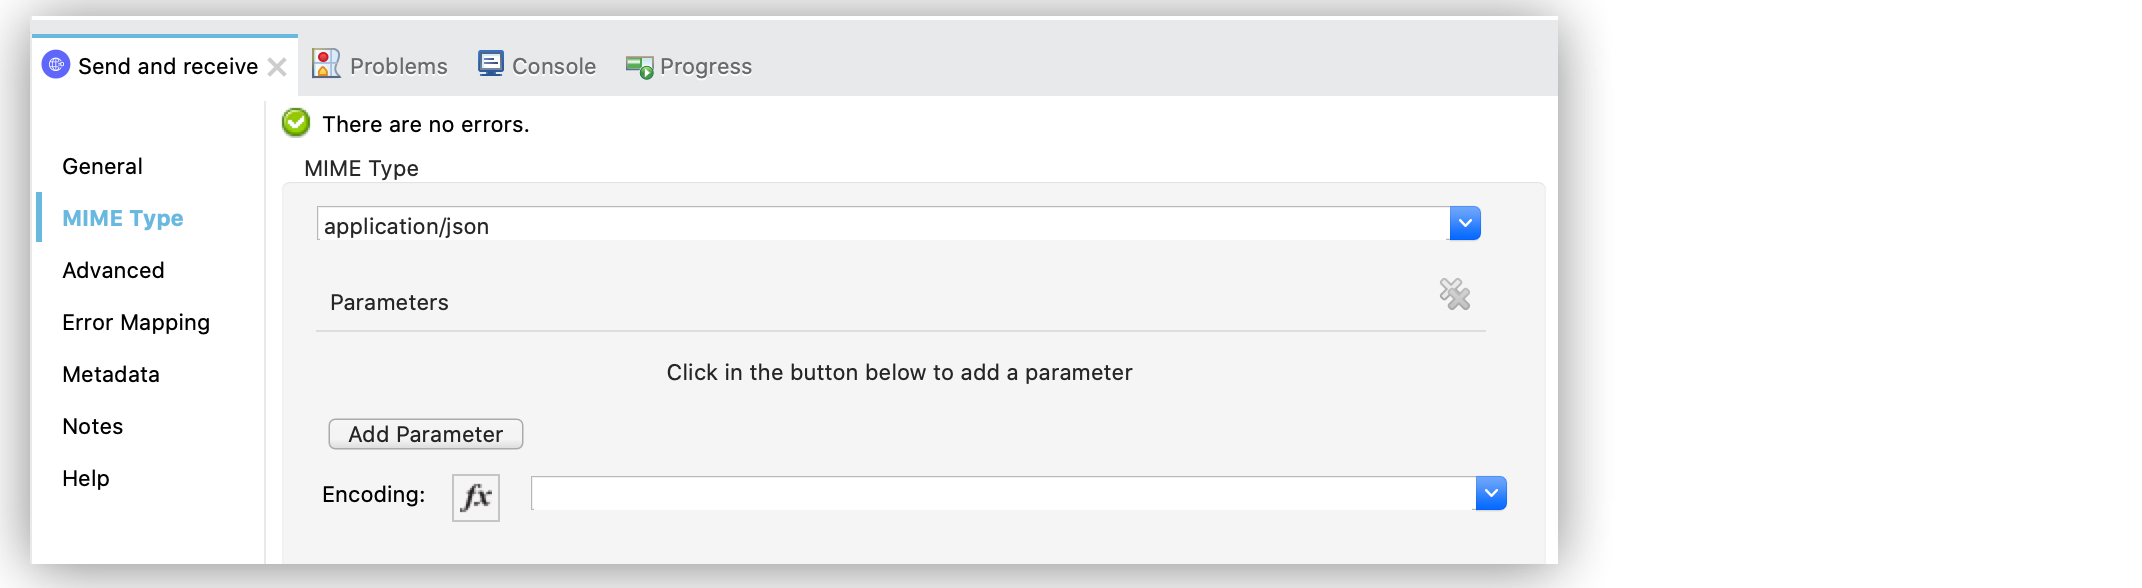
In the Configuration XML tab, the Send and receive operation configuration XML looks like this:
<sockets:request-config name="Sockets_Send_config">
	<sockets:tcp-requester-connection host="localhost" port="8082" />
</sockets:request-config>

<flow name="SocketsFlow" >
	<sockets:send-and-receive config-ref="Sockets_Send_Receive_config" outputMimeType="application/json"/>
</flow>
Configure the Supported TCP Protocols
Sockets Connector supports application-level protocols implemented on top of TCP. You must implement these protocols in both client and server ends so they can work properly.
By default, the Sockets Connector implements the Safe Protocol; however, you can configure a different protocol for the connector operations both in Anypoint Studio and XML.
Supported TCP protocols include the following:
-
Direct Protocol
The socket reads until no more bytes are immediately available. On slow networks,EOFProtocolandLengthProtocolmight be more reliable. -
EOF Protocol
Reading is terminated by the stream being closed by the client. -
Length Protocol
This protocol is defined by sending or reading an integer (the packet length) and then the data to transfer. -
Custom Class Loading Length Protocol
A length protocol that uses a specific class loader to load objects from streams. -
Safe Protocol
A test protocol that precedes every message with a cookie and which should not be used in production environments. -
Streaming Protocol
Allows the socket’s Send operation to return a message with the originalInputStreamas payload. -
XML Message Protocol
Use this protocol to read streaming XML documents. The only requirement is that each document includes an XML declaration at the beginning of the document in the form of<?xml…..
Data is read until a new document is found or until there is no more currently available data. For slower networks,XmlMessageEofProtocolmight be more reliable.
Also, because the default character encoding for the platform is used to decode the message bytes when looking for the XML declaration, some caution with message character encodings is warranted. -
XML Message EOF Protocol
ExtendsXmlMessageProtocolto continue reading until either a new message or EOF is found. -
Custom Protocol
Define your own custom protocol by writing a class that extendsTcpProtocol.
Configure TCP Protocols for the Sockets Listener
To configure supported TCP protocols for the Sockets Listener:
-
Open the Global Element Properties configuration of the Sockets Listener.
-
On the General tab, for Connection select
Tcp listener. -
In the General section of the General tab, for Protocol select one of the supported protocols.
-
Set the required fields for the connector.
-
Click Test Connection to confirm that Mule can connect with the specific server.
-
Click OK.
In Studio, configuring the Sockets Listener to use Direct Protocol looks like this:
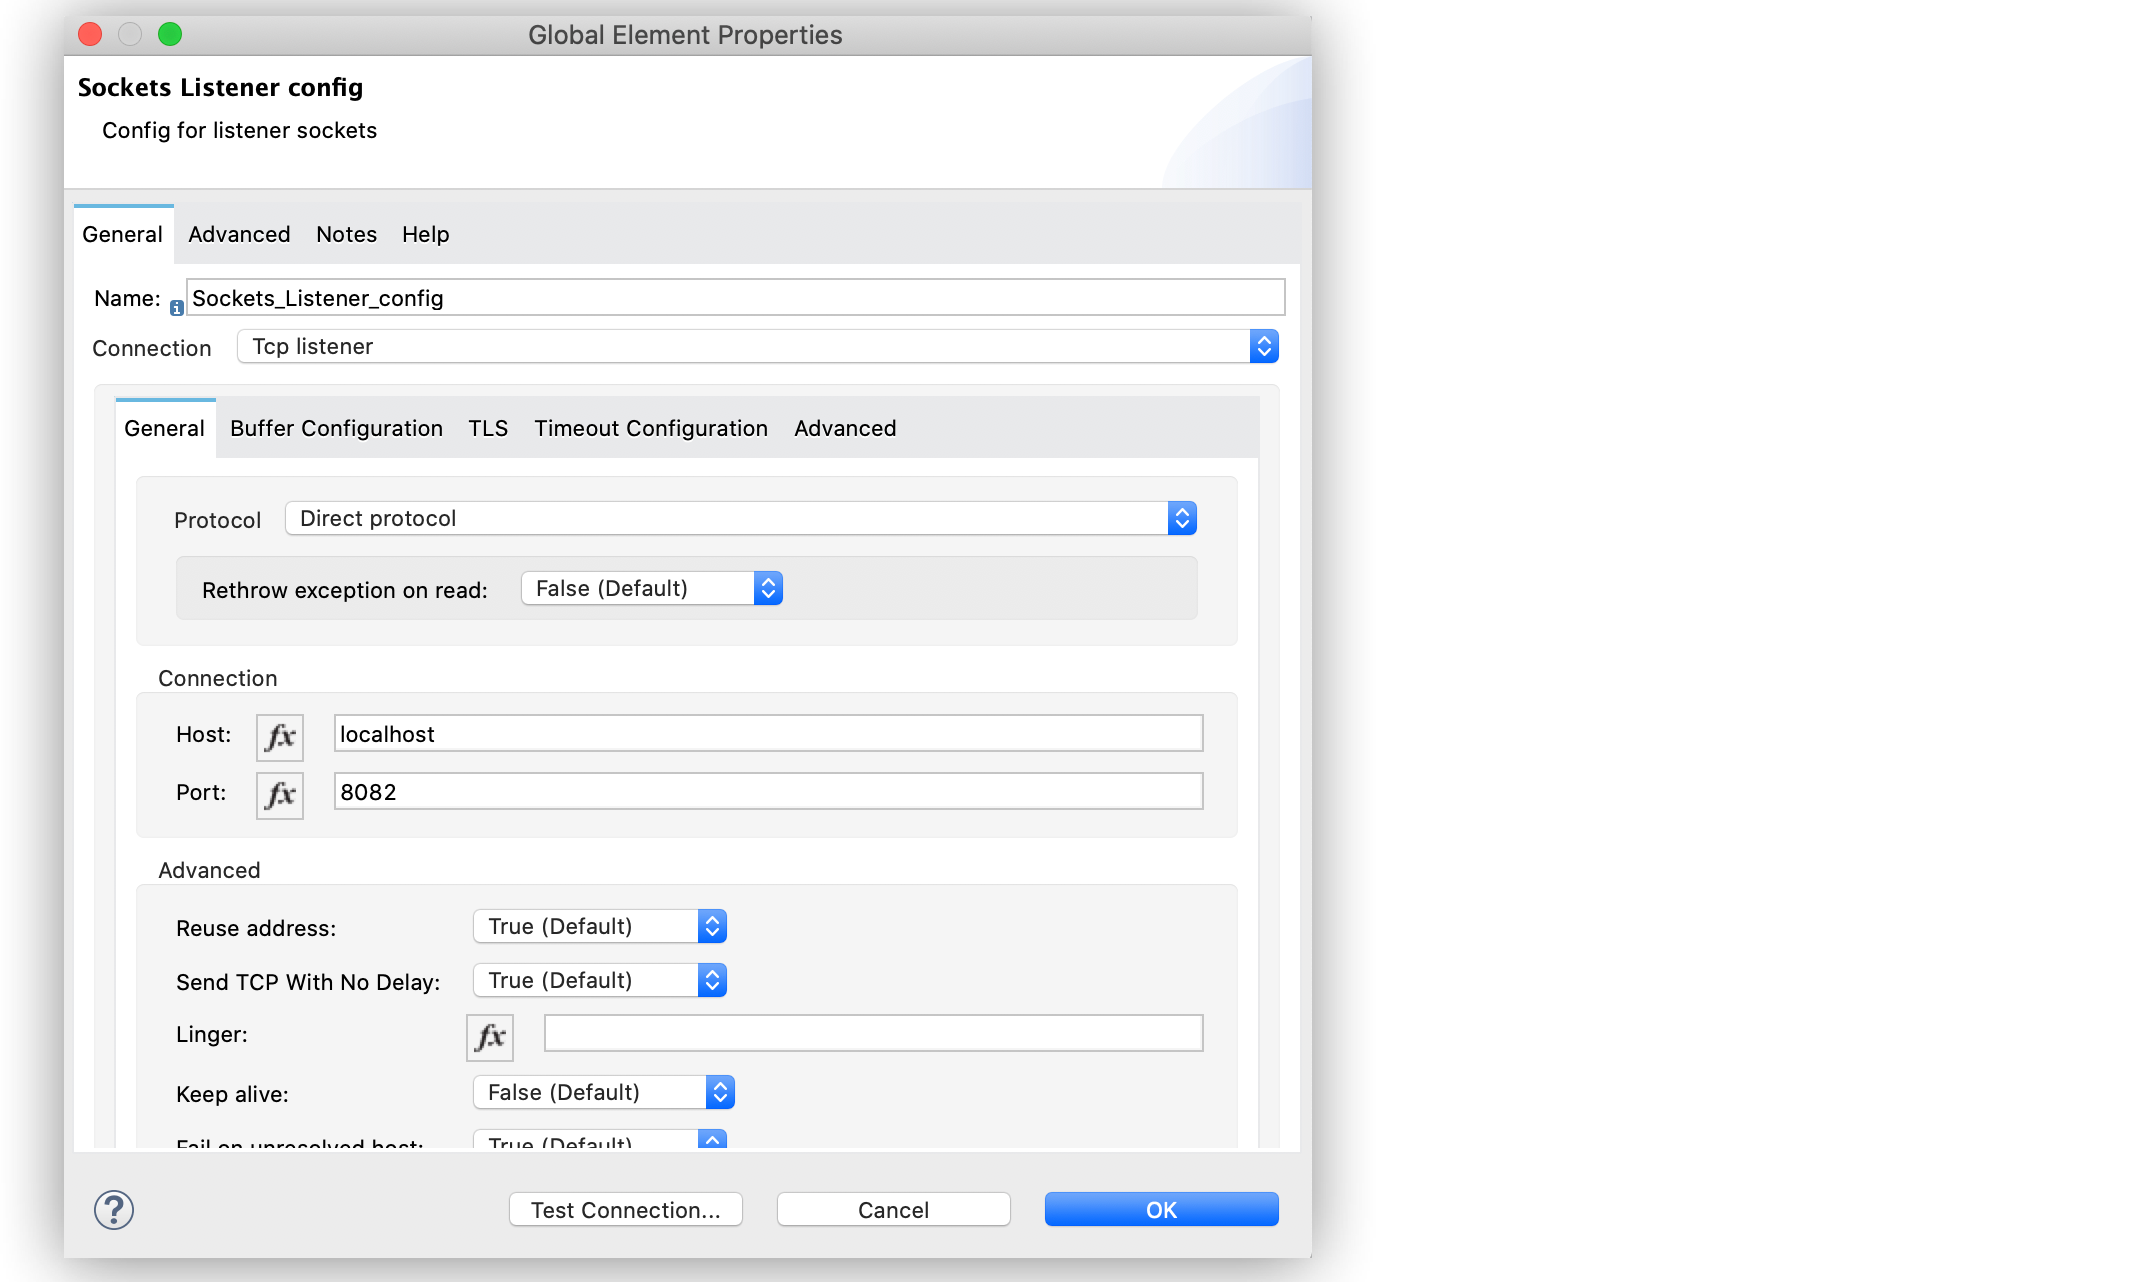
In the Configuration XML tab, the XML looks as follows:
	<sockets:listener-config name="Sockets_Listener_config" >
		<sockets:tcp-listener-connection host="localhost" port="8082" >
			<sockets:protocol>
				<sockets:direct-protocol />
			</sockets:protocol>
		</sockets:tcp-listener-connection>
	</sockets:listener-config>
Configure TCP Protocols for Send and Receive Operations
To configure supported TCP protocols for either the Send operation or the Send and receive operation:
-
Open the Global Element Properties configuration of your Sockets operation.
-
On the General tab, for Connection select
Tcp requester. -
On the Connection tab, for Protocol select one of the supported protocols.
-
Set the required fields for the connector.
-
Click Test Connection to confirm that Mule can connect with the specific server.
-
Click OK.
In Studio, configuring the Send operation to use Direct Protocol looks like this:
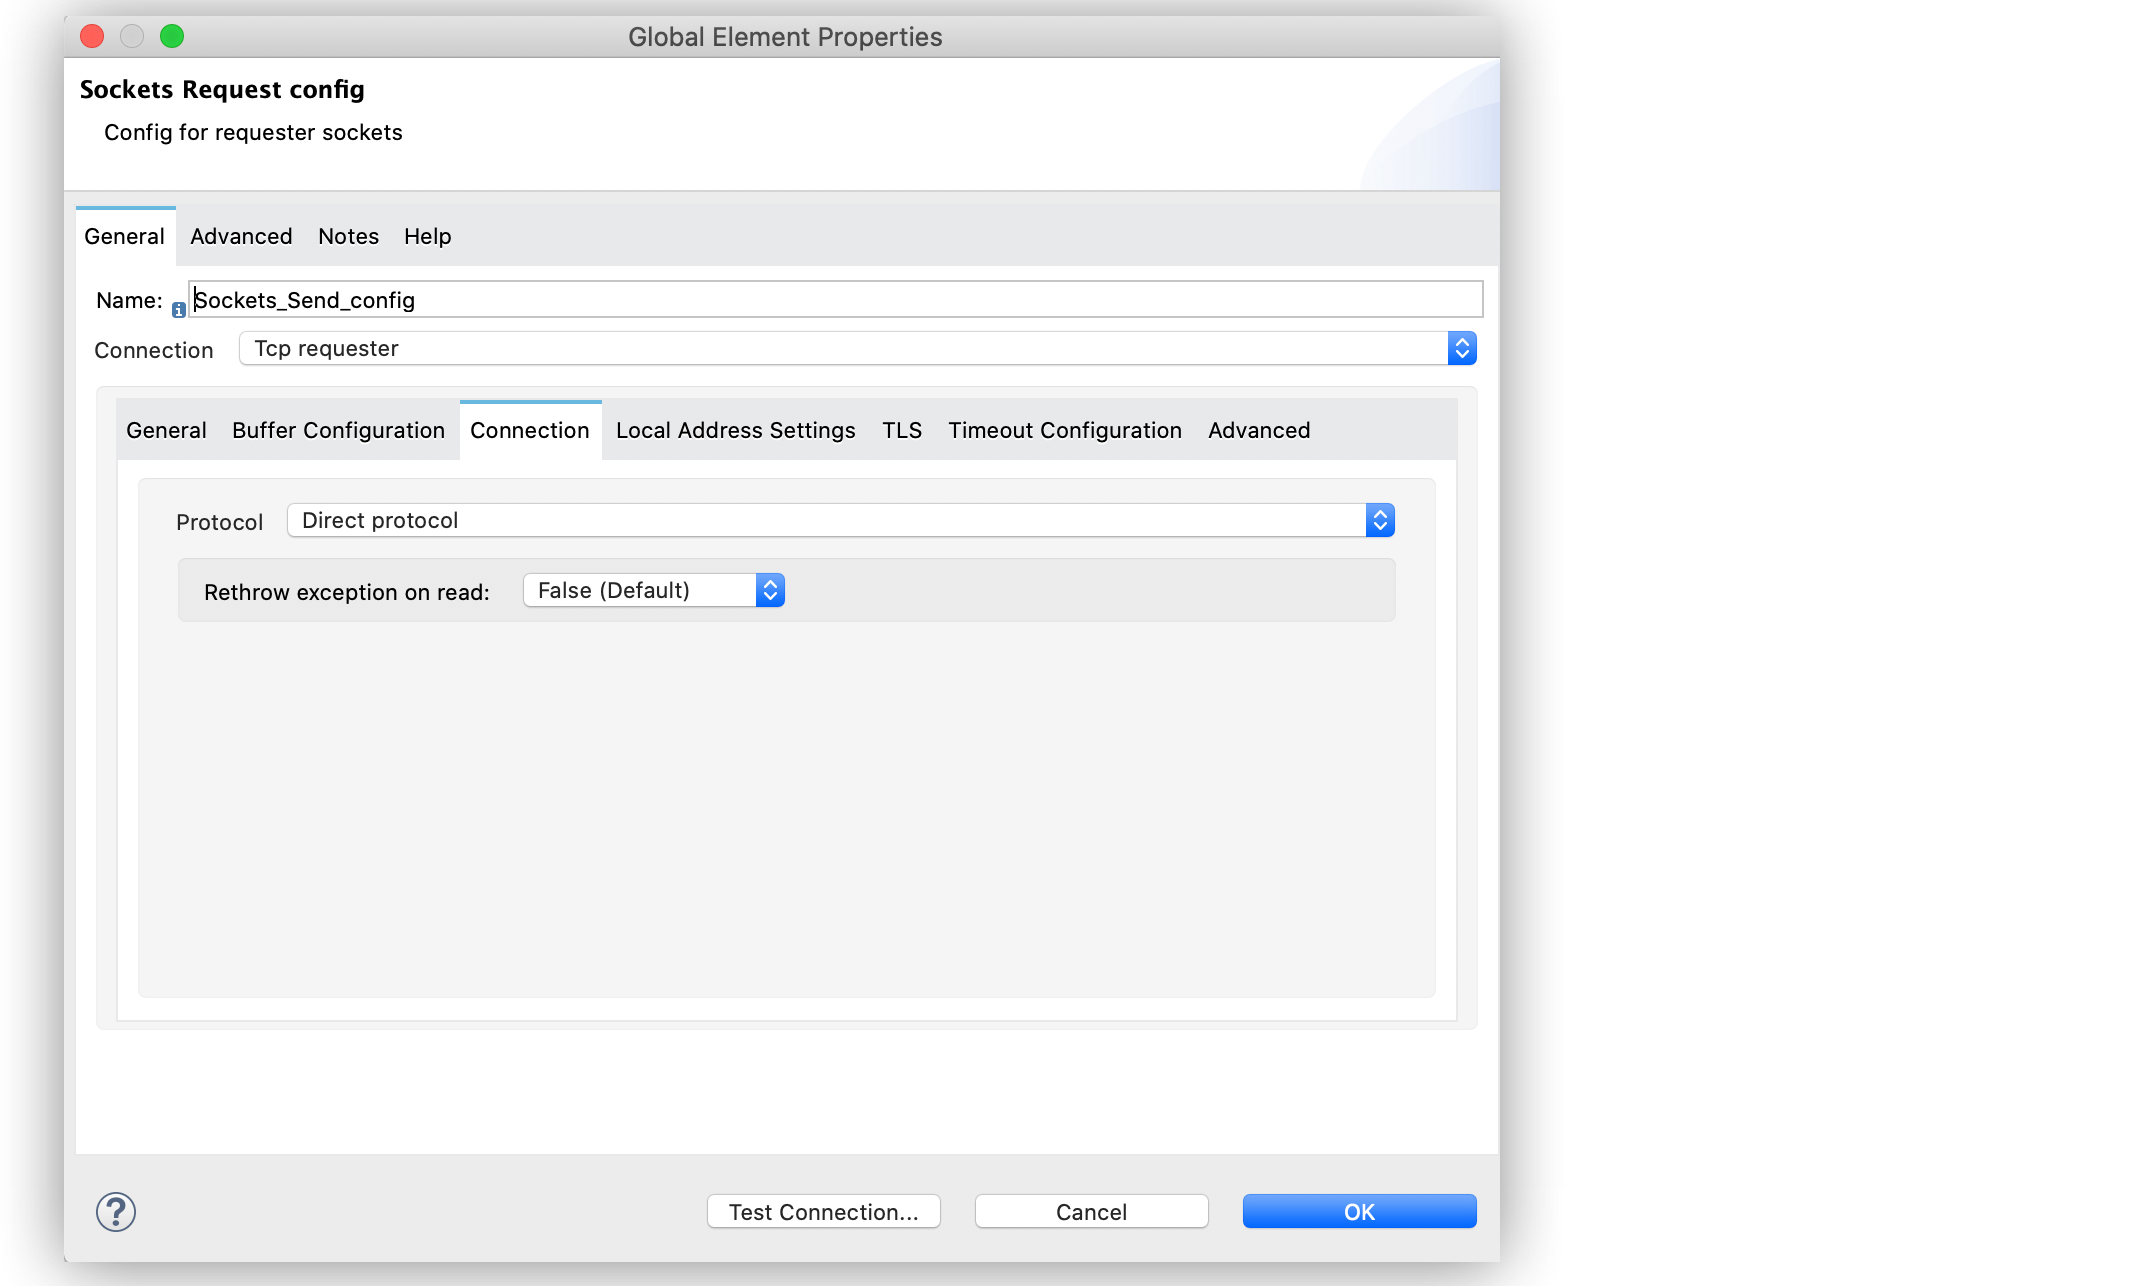
In the Configuration XML tab, the XML looks like this:
<sockets:request-config name="Sockets_Send_config" >
	<sockets:tcp-requester-connection >
		<sockets:protocol >
			<sockets:direct-protocol />
		</sockets:protocol>
	</sockets:tcp-requester-connection>
</sockets:request-config>
View the App Log
To check for problems, you can view the app log:
-
If you’re running the app from Anypoint Platform, the output is visible in the Anypoint Studio console window.
-
If you’re running the app using Mule from the command line, the app log is visible in your OS console.
Unless the log file path is customized in the app’s log file (log4j2.xml), you can also view the app log in the default location MULE_HOME/logs/<app-name>.log.