Using Anypoint Studio to Configure Veeva Vault Connector 1.4
Anypoint Studio (Studio) editors help you design and update your Mule applications, properties, and configuration files.
To add and configure a connector in Studio:
When you run the connector, you can view the app log to check for problems in real time, as described in View the App Log.
If you are new to configuring connectors in Studio, see Using Anypoint Studio to Configure a Connector. If, after reading this topic, you need additional information about the connector fields, see the Veeva Vault Reference.
Create a Mule Project
In Studio, create a new Mule project in which to add and configure the connector:
-
In Studio, select File > New > Mule Project.
-
Enter a name for your Mule project and click Finish.
Add the Connector to Your Mule Project
Add Veeva Vault Connector to your Mule project to automatically populate the XML code with the connector’s namespace and schema location and add the required dependencies to the project’s pom.xml file:
-
In Mule Palette, click (X) Search in Exchange.
-
In Add Dependencies to Project, type
veeva vaultin the search field. -
Click Veeva Vault in Available modules.
-
Click Add.
-
Click Finish.
Adding a connector to a Mule project in Studio does not make that connector available to other projects in your Studio workspace.
Configure a Source
A source initiates a flow when a specified condition is met. You can configure one of these sources to use with Veeva Vault Connector:
-
HTTP Listener
Initiates a flow each time it receives a request on the configured host and port -
Scheduler
Initiates a flow when a time-based condition is met
For example, to configure an HTTP Listener source, follow these steps:
-
In Mule Palette, select HTTP > Listener.
-
Drag Listener to the Studio canvas.
-
On the Listener configuration screen, optionally change the value of the Display Name field.
-
Specify a value for the Path field.
-
Click the plus sign (+) next to the Connector configuration field to configure a global element that can be used by all instances of the HTTP Listener source in the app.
-
On the General tab, specify connection information for the connector.
-
On the TLS tab, optionally specify the TLS information for the connector.
-
On the Advanced tab, optionally specify reconnection information, including a reconnection strategy.
-
Click Test Connection to confirm that Mule can connect with the specified server.
-
Click OK.
Add a Connector Operation to the Flow
When you add a connector operation to your flow, you are specifying an action for that connector to perform.
To add an operation for Veeva Vault Connector, follow these steps:
-
In Mule Palette, select Veeva Vault and then select the desired operation.
-
Drag the operation onto the Studio canvas, next to the input source.
Configure a Global Element for the Connector
When you configure a connector, configure a global element that all instances of that connector in the app can use. Configuring a global element requires you to provide the authentication credentials that the connector requires to access the target Veeva Vault system. Veeva Vault Connector supports Basic authentication.
To configure the global element for Veeva Vault Connector, follow these steps:
-
Select the operation in the Studio canvas.
-
In the General configuration screen for the operation, click the Add icon to access the global element configuration fields.
-
In the General tab, in Connection, select the authentication method to configure:
-
OAuth 2.0 / Open ID Connection Provider
You can reference a configuration file that contains ANT-style property placeholders (recommended), or you can enter your authorization credentials in the global configuration properties. For information about the benefits of using property placeholders and how to configure them, see Anypoint Connector Configuration.
-
In the Advanced tab, optionally specify reconnection information, including a reconnection strategy.
-
Click Test Connection to confirm that Mule can connect with the specified server.
-
Click OK.
Basic Connection
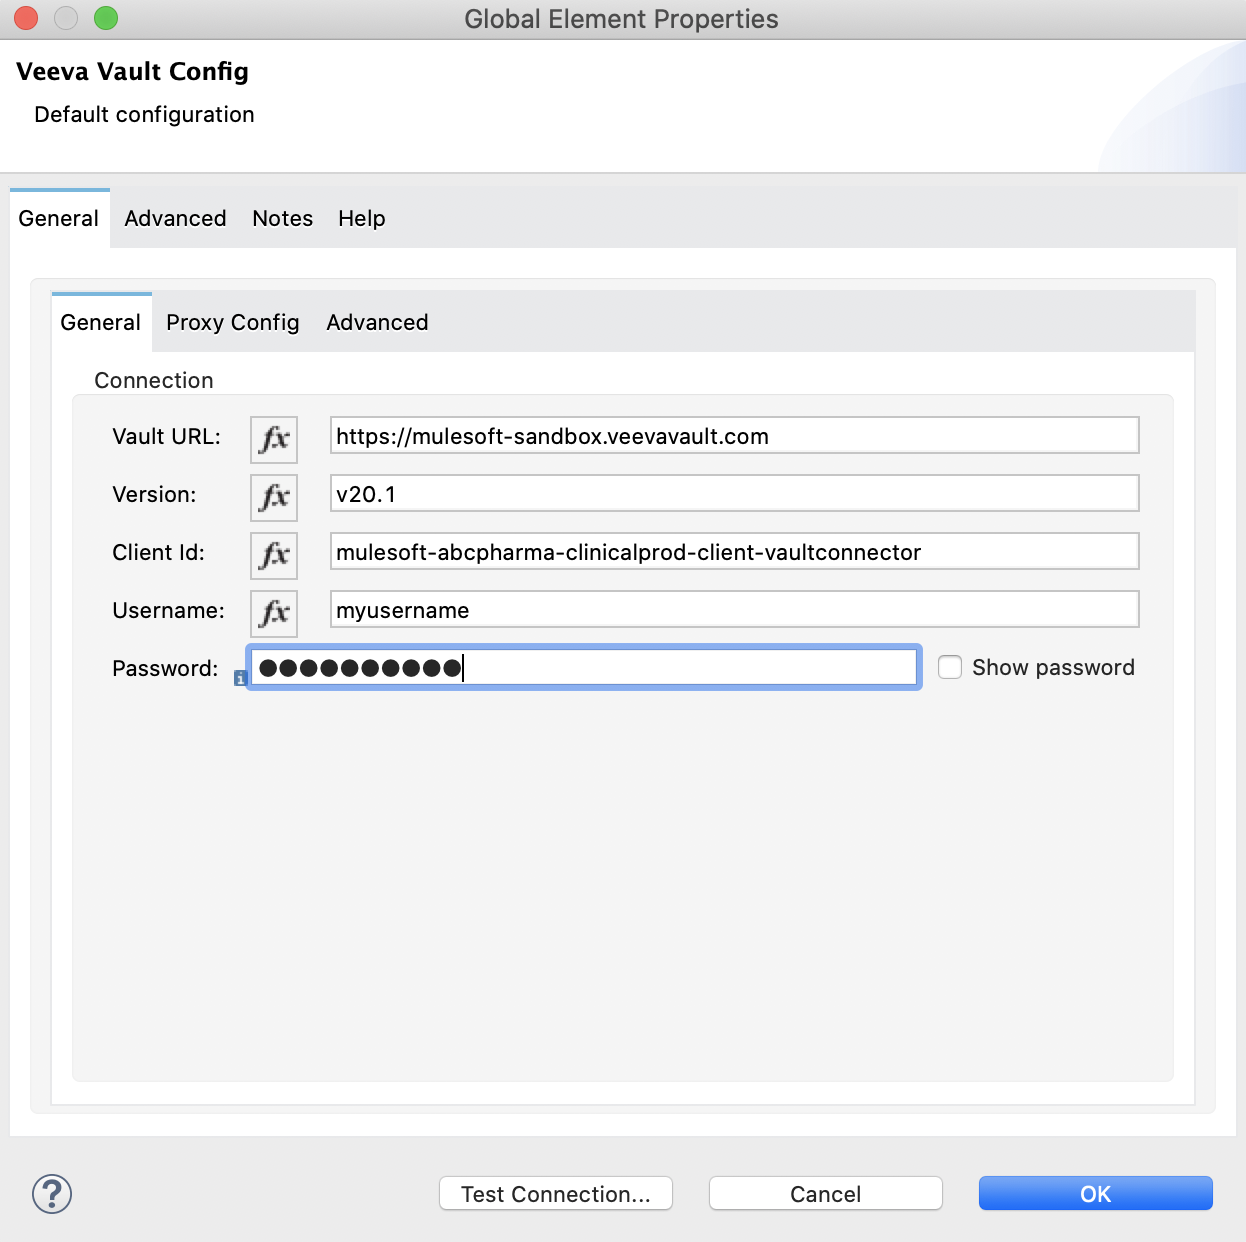
Enter the following information in the General tab of the Global Element Properties screen to configure Basic authentication:
| Field | Description |
|---|---|
Name |
Configuration name |
Vault URL |
URL of the Veeva Vault instance required for the connection |
Username |
Username used to initialize the session |
Password |
Password used to authenticate the user |
Client Id |
Client ID to send with each request header to the Veeva Vault instance for tracking purposes, in the format The client ID has the prefix |
The following image shows an example of configuring the General tab for Basic authentication:
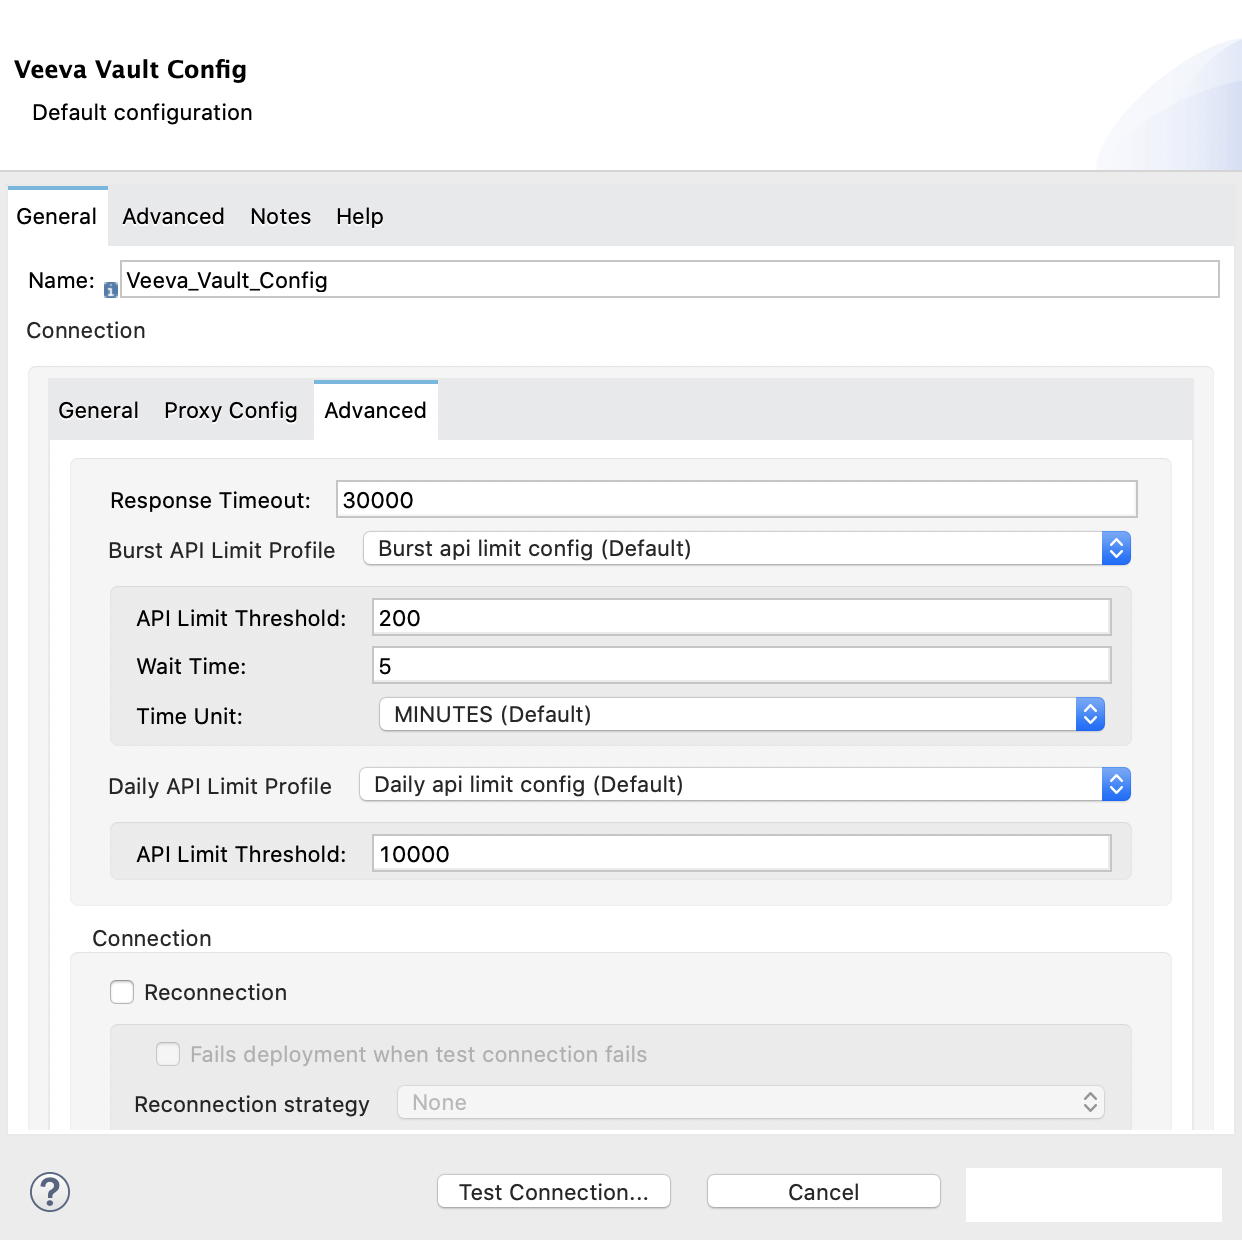
Enter the following information in the Advanced tab of the Global Element Properties screen to configure the burst API limit for Basic authentication:
| Field | Description |
|---|---|
Response Timeout |
Maximum amount of time, in milliseconds, that the connector waits for the Veeva Vault response. If the maximum amount of time is exceeded, a timeout exception is thrown. The default is 30,000 milliseconds (30 seconds). |
Burst API Limit Profile |
Burst API limit profile configuration to act upon if the specified burst API limit of the Veeva Vault API reaches or exceeds the configured threshold. If Burst API limit config is enabled (default), then the connector evaluates the Veeva Vault API’s response header ( The following example shows an application log with a warning message at WARN 2019-06-06 10:34:45,096 [[MuleRuntime].io.27: [veevavault-connector-demo].get-documents-operationFlow.BLOCKING @2dd2ffaf] [event: 99716950-8818-11e9-90e2-d61515f42856] org.mule.extension.veevavault.internal.service.HttpRequestService: Burst API Limit remaining calls [1997] has exceeded/reached an API Limit Profile threshold set as [1997]. As per API Limit Profile, Veeva Vault Connector will wait for [5] MINUTES. WARN 2019-06-06 10:39:45,098 [[MuleRuntime].io.27: [veevavault-connector-demo].get-documents-operationFlow.BLOCKING @2dd2ffaf] [event: 99716950-8818-11e9-90e2-d61515f42856] org.mule.extension.veevavault.internal.operations.VeevaVaultOperations: Properties or Fields is not available for api [/api/v18.2/metadata/objects/documents/types/site_management__c] , will use input list [[name__v, type__v, subtype__v, classification__v, lifecycle__v, status__v, study__v, product__v, id]] if configured to build VQL query INFO 2019-06-06 10:39:45,098 [[MuleRuntime].io.27: [veevavault-connector-demo].get-documents-operationFlow.BLOCKING @2dd2ffaf] [event: 99716950-8818-11e9-90e2-d61515f42856] org.mule.extension.veevavault.internal.pagination.GetDocumentsPagingProvider: Query Build :: SELECT name__v, type__v, subtype__v, classification__v, lifecycle__v, status__v, study__v, product__v, id FROM documents WHERE name__v= 'F22611234--6764' INFO 2019-06-06 10:39:46,024 [[MuleRuntime].io.27: [veevavault-connector-demo].get-documents-operationFlow.BLOCKING @2dd2ffaf] [event: 99716950-8818-11e9-90e2-d61515f42856] org.mule.extension.veevavault.internal.service.HttpRequestService: Response received for sync http request :: 'https://[vault-domain]/api/v18.2/query?q=SELECT+name__v%2C+type__v%2C+subtype__v%2C+classification__v%2C+lifecycle__v%2C+status__v%2C+study__v%2C+product__v%2C+id+FROM+documents+WHERE+name__v%3D+%27F22611234--6764%27++LIMIT+1000+OFFSET+0' in 925 milliseconds. |
API Limit Threshold |
Veeva Vault API limit threshold for Burst API Limit Profile. When the specified limit is reached or exceeded, the connector waits for the specified amount of time. The default is |
Wait Time |
Amount of time that the connector waits if the API Limit Threshold is reached or exceeded. The default is |
Time Unit |
Time unit for the wait time. The default is |
Daily API Limit Profile |
Daily API limit exceed profile configuration to use if the daily API limit of the Veeva Vault API reaches or exceeds the configured threshold. The daily limit is the total number of API calls within any 24-hour window. The following example shows an application log with a warning message at WARN 2019-06-06 10:47:31,698 [[MuleRuntime].io.44: [veevavault-connector-demo].get-documents-operationFlow.BLOCKING @108e7f43] [event: 624cfa50-881a-11e9-90e2-d61515f42856] org.mule.extension.veevavault.internal.service.HttpRequestService: Veeva Daily API Limit remaining calls [10000] has exceeded/reached an Daily API Limit Profile threshold set as [10000]. As per API Limit Profile, Veeva Vault Connector will throw an exception.
ERROR 2019-06-06 10:47:31,699 [[MuleRuntime].io.44: [veevavault-connector-demo].get-documents-operationFlow.BLOCKING @108e7f43] [event: 624cfa50-881a-11e9-90e2-d61515f42856] org.mule.extension.veevavault.internal.service.HttpRequestService: Exception caught while processing Sync request ::: https://xxxxx-xxxxx.veevavault.com/api/v20.1/metadata/vobjects/site__v, Exception ::: \{"responseStatus":"FAILURE","errors":[\{"type":"API_LIMIT_EXCEED","message":"The Veeva Vault Connector has reached/exceeded daily API limit remaining calls [10000]. The configured daily api limit threshold is \(10000\)"}\]}
ERROR 2019-06-06 10:47:31,767 [[MuleRuntime].io.44: [veevavault-connector-demo].get-documents-operationFlow.BLOCKING @108e7f43] [event: 624cfa50-881a-11e9-90e2-d61515f42856] org.mule.runtime.core.internal.exception.OnErrorPropagateHandler:
**********************************************************************************
Message : An error occurred from the Veeva Vault API.
Error Code: API_LIMIT_EXCEED.
Original Error Message: The Veeva Vault Connector has reached/exceeded daily API limit remaining calls [10000]. The configured daily api limit threshold is (10000).
Error type : VEEVAVAULT:API_LIMIT_EXCEED
**********************************************************************************
|
API Limit Threshold |
Veeva Vault API limit threshold for Daily API Limit Profile. When the specified limit is reached or exceeded, the connector waits for the specified amount of time. The default is |
The following image shows an example of configuring the Advanced tab for Basic authentication:
OAuth 2.0 / Open ID Connection Provider
Use OAuth 2.0 to delegate user authentication to the service hosting the user account. For more information, refer to Configuring OAuth 2.0 for Connectors or Configuring OAuth 2.0 for Connectors on CloudHub.
Veeva Vault supports several OAuth providers, such as Azure AD, Ping Federate, and any other provider that supports OIDC (OpenID Connect).
| Currently, Okta and any other providers that require PKCE are not supported. |
Configure the OAuth provider for Veeva Vault Connector. The following steps show how to configure the Veeva service to communicate with the OAuth provider:
-
In the Veeva Vault Admin panel, navigate to the Settings tab.
-
In Domain Settings, select OAuth 2.0 / OpenID Connect Profiles.
-
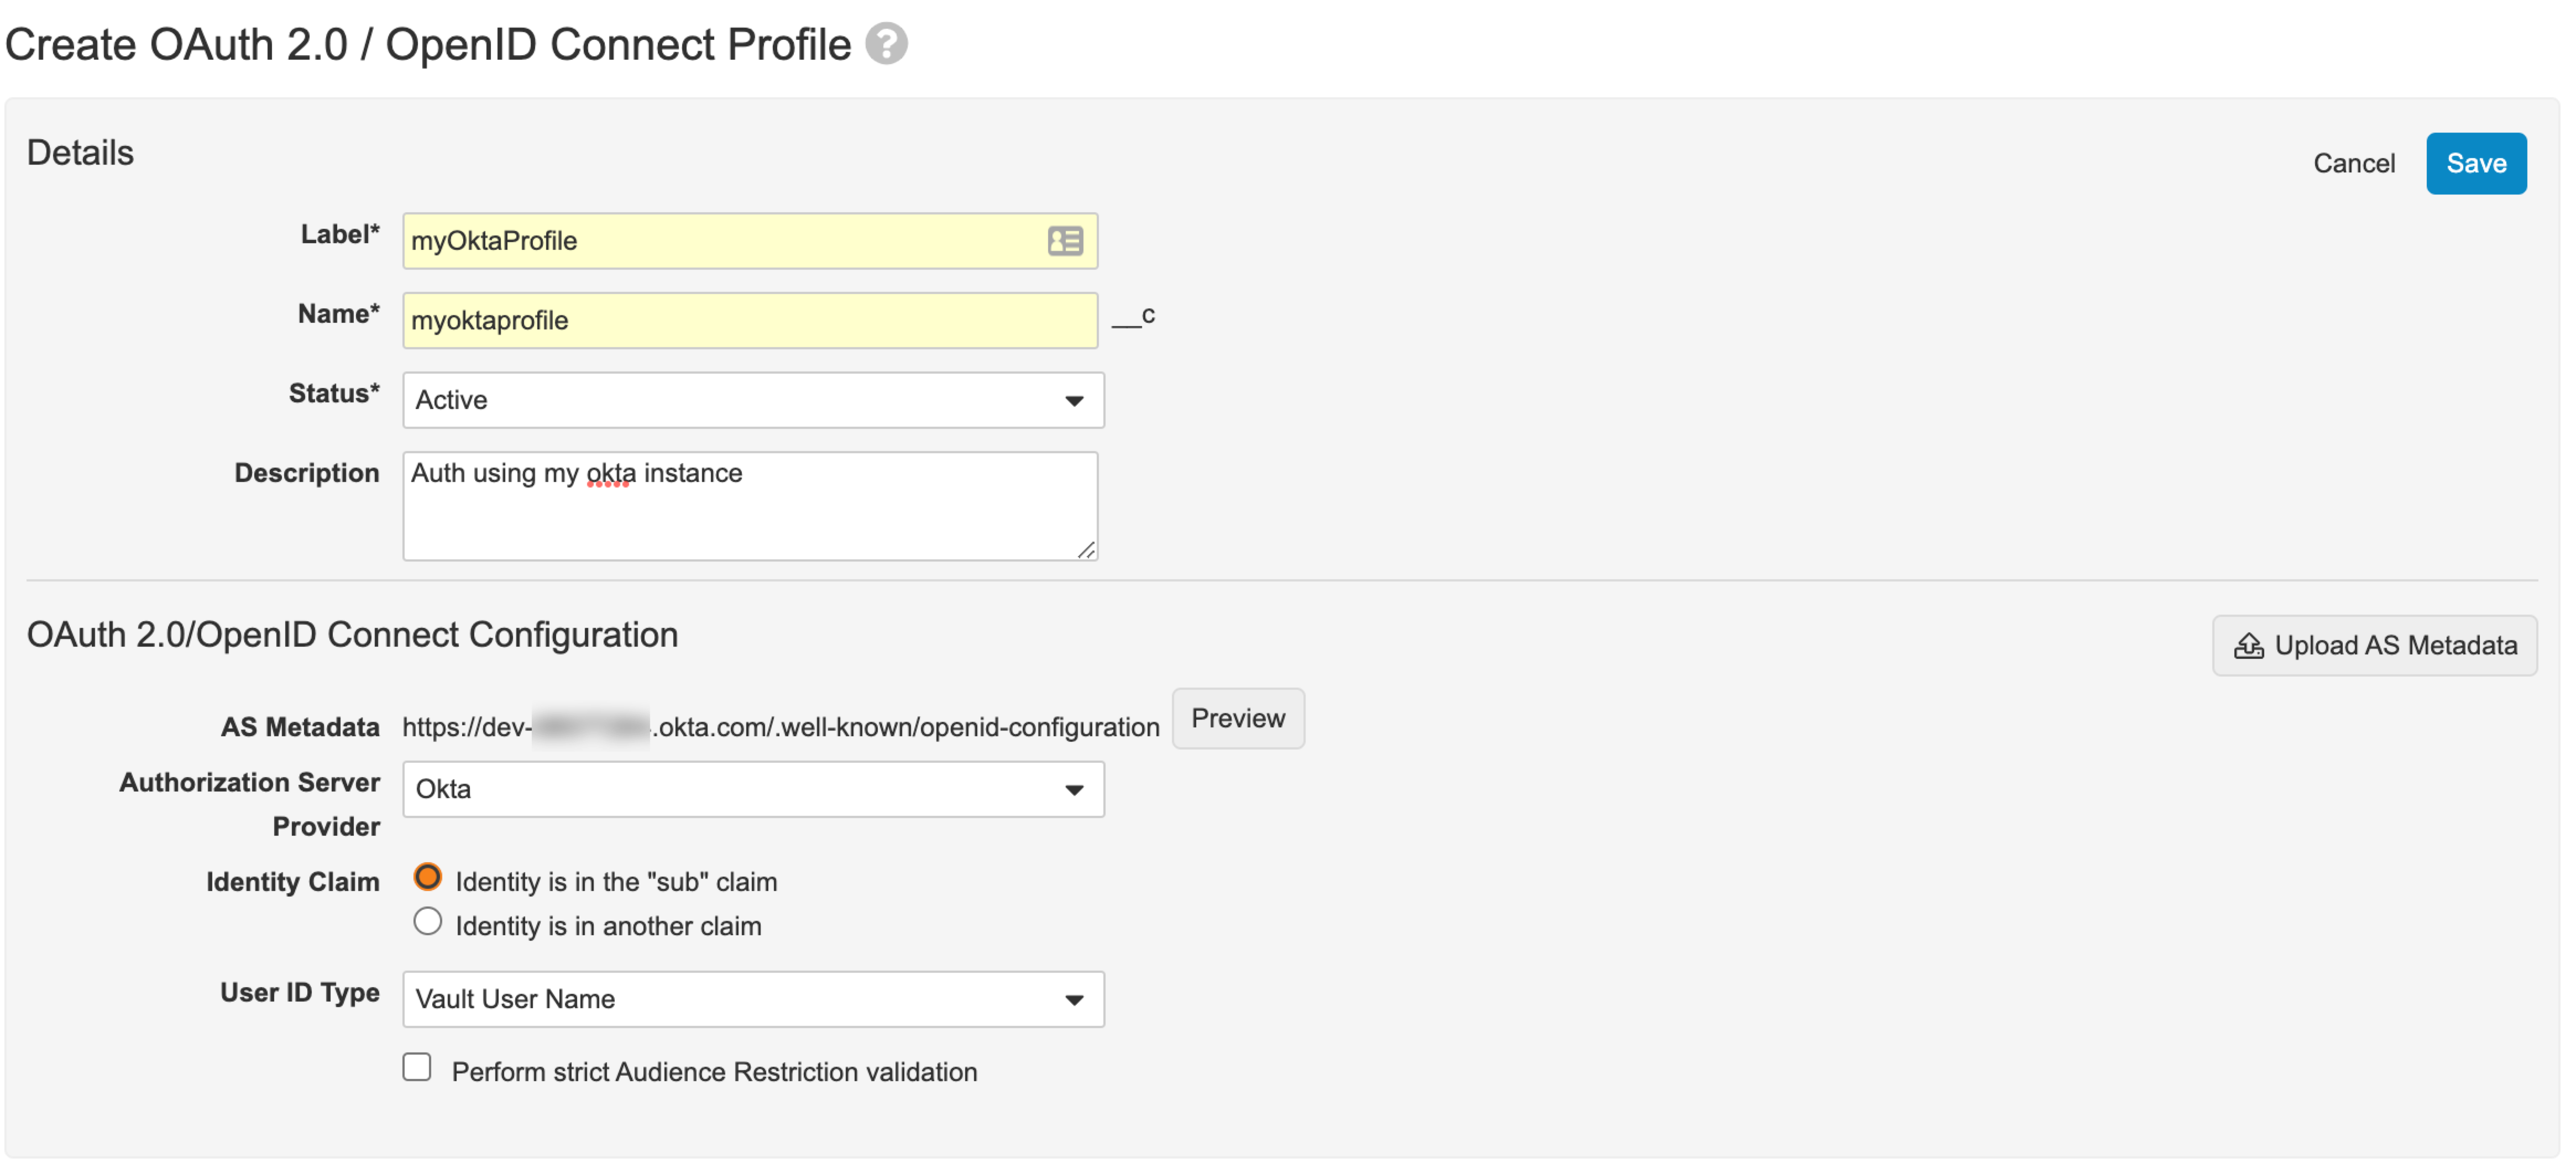
Click Create.
-
Configure your profile. Enter values for Label and Name, set Status to
Active, and set Authorization Server Provider to the provider you are using, or selectOtherif your provider is not in the list. You can also uncheck the Perform strict Audience Restriction validation checkbox. -
Enter information for AS Metadata. All OpenID Connect providers have a URL ending with
/.well-known/openid-configuration, which contains this metadata. For example:-
Okta:
https://{OKTA_INSTANCE}.okta.com/.well-known/openid-configuration -
Azure:
https://login.microsoftonline.com/{TENANT}/v2.0/.well-known/openid-configuration -
PingFederate:
https://{YOUR_INSTANCE}/.well-known/openid-configurationUse this metadata to configure AS Metadata by clicking the Upload AS Metadata button and selecting the Provide Authorization Server Metadata URL option. This enables you to paste the above URL into AS Metadata.
-
-
Click Save. Now, you can see the created profile.
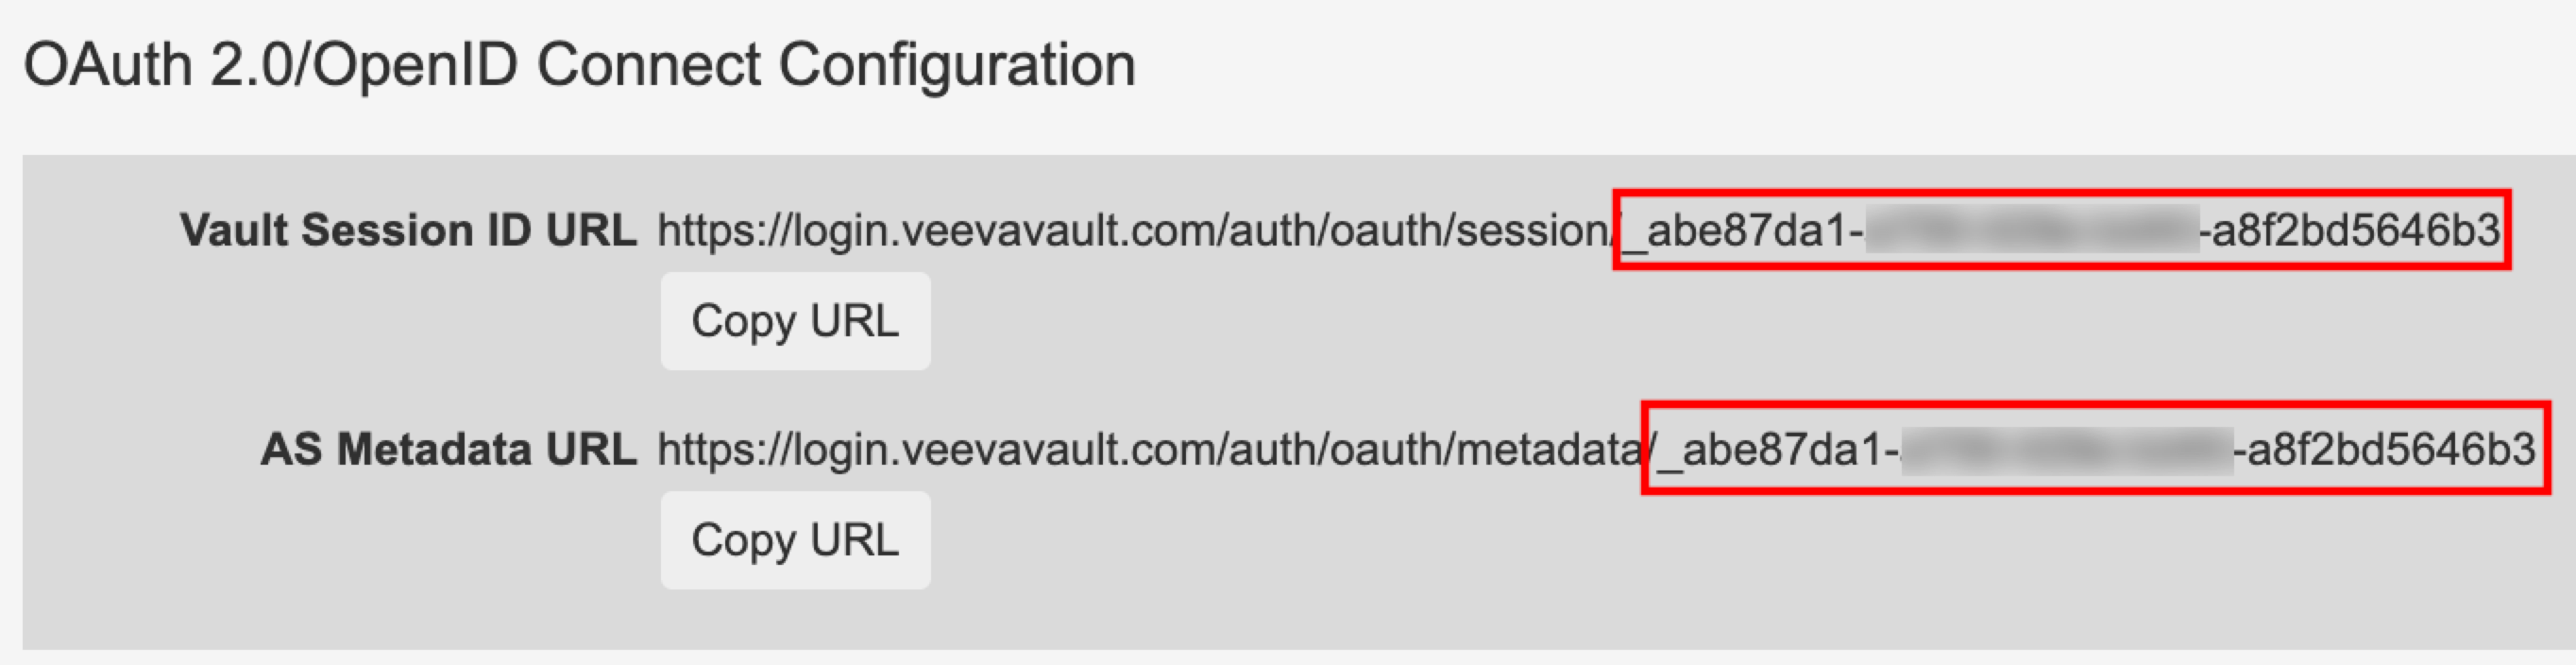
Note down the Vault Session ID URL for further use when you configure the connector. To fully configure Veeva with OpenID, you must provision users to use this new profile. Refer to the Provision Users to Use SSO for more information.
Now, you can configure Veeva Vault Connector with OAuth 2.0.
Enter the following information in the General tab of the Global Element Properties screen to configure OAuth 2.0 / Open ID connection:
| Field | Description |
|---|---|
Name |
Configuration name |
Vault URL |
Veeva Vault instance URL required for connection. |
Version |
Version for the Veeva Vault instance required. |
Client Id |
Client ID required to send with each request header to the Vault instance. |
OIDC Profile ID |
OIDC profile ID generated by Veeva when creating a new OIDC profile. To configure the OIDC profile ID, use the ID in your OIDC profile in Veeva. Your OIDC profile contains a Vault Session ID URL, for example, |
Consumer Key |
OAuth consumer key, as registered with the service provider. This is your IdP client ID, assuming you already have a client application registration created at the ID provider of your choice, for example, PoneOne or PingFederate. |
Consumer Secret |
OAuth consumer secret, as registered with the service provider. This is your IdP client secret, assuming you already have a client application registration created at the ID provider of your choice, for example, PoneOne or PingFederate. |
Authorization Url |
OAuth 2.0 authorization URL, such as |
Access Token Url |
OAuth 2.0 token URL, such as |
Scopes |
You can set up your OAuth 2.0 scopes as necessary, but the important ones |
Resource Owner Id |
Depending on your IdP configuration, you can leave it blank. |
Listener Config |
Create a new HTTP Listener or use an existing one if you have one, for example, |
Callback Path |
Callback path of your application. If you set it to |
Authorize Path |
Authorize path. You will navigate to this path when starting the OAuth 2.0 dance, for example, |
External Callback Url |
You can set this directly to |
Here is the XML for the OAuth 2.0 configuration for Veeva Vault Connector:
<configuration-properties file="application.properties" />

<http:listener-config name="HTTP_Listener_config" >
    <http:listener-connection host="localhost" port="${http.port}" >
    </http:listener-connection>
</http:listener-config>

<veevavault:config name="Veeva_Vault_Config">
    <veevavault:oauth2-oidc-connection vaultURL="https://${veeva.instance}.veevavault.com" clientId="${veeva.client.id}" oidcProfileId="${veeva.oidc.profile}">
        <veevavault:oauth-authorization-code consumerKey="${azure.client.id}" consumerSecret="${azure.client.secret}" authorizationUrl="https://login.microsoftonline.com/${azure.tenant}/oauth2/v2.0/authorize" accessTokenUrl="https://login.microsoftonline.com/${azure.tenant}/oauth2/v2.0/token" scopes="${azure.appid}/.default"/>
        <veevavault:oauth-callback-config listenerConfig="HTTP_Listener_config" callbackPath="callback" authorizePath="authorize" externalCallbackUrl="${oauth2.callback_uri}"/>
    </veevavault:oauth2-oidc-connection>
</veevavault:config>
The above example uses the Salesforce authentication provider and requires you to create an application.properties file in your resources folder with this format:
http.port = 8080
oauth2.callback_uri = http://localhost:8080/callback

veeva.instance = your-veeva-instance
veeva.client.id = your-veeva-client-id
veeva.oidc.profile = your-oidc-id

azure.tenant = azure-tenant-id
azure.appid = azure-app-id
azure.client.id = azure-oauth-client-id
azure.client.secret = azure-oauth-client-secret
Azure AD is a special case in which you must set the scope as {app_id}/.default. With other OAuth providers, you can use the predefined openid offline_access scopes unless other scopes are required.
|
View the App Log
To check for problems, you can view the app log as follows:
-
If you’re running the app from Anypoint Platform, the app log output goes to the Anypoint Studio console window.
-
If you’re running the app using Mule from the command line, the app log output goes to your operating system console.
Unless the log file path is customized in the app’s log file (log4j2.xml), you can also access the app log in the default location MULE_HOME/logs/<app-name>.log. You can configure the location of the log path in the app log file log4j2.xml.
Next Step
See Additional Configuration Information for more configuration steps.