Salesforce Data Cloud Setup Guide
The following provides guidance on Salesforce Data Cloud setup required for the Optimize Customer Experiences with Data Cloud use case. A few of these steps can be omitted if deploying the FINS Salesforce Data Cloud System API independently of the use case.
Data Cloud provisioning
If the Data Cloud instance is already provisioned, skip this section. If not follow the steps to provision:
-
Log in to your Data Cloud instance with the link provided in your admin email and use the credentials provided. If this was deployed in your existing Salesforce instance, please use your current Salesforce Admin password.
-
Click the Setup gear icon and then
Data Cloud Setup.-
If you don’t see this option, either refresh your page or log out and back in with your admin user credentials.
-
-
Click
Get Startedto provision the Data Cloud Instance and it can take a few minutes. Correct any issues reported and finish the setup. The Data Cloud instance is considered to be successfully set up if there is a green tick mark for all the steps and you do not need to do anything.
Create data connectors
Connectors are specialized data streams that communicate with external sources to transmit data into a Data Cloud data source object. Data Cloud has connectors for Marketing Cloud Email Studio, MobileConnect, MobilePush, Marketing Cloud Data Extensions, Salesforce CRM, Ingestion API, Interaction Studio, and for data outside Salesforce via cloud storage providers.
Use case requirements
The Optimize Customer Experiences with CDP use case uses the following connectors:
-
Salesforce CRM - to connect data from a Salesforce CRM instance to Data Cloud.
-
Marketing Cloud - to receive segmentation results for marketing purposes.
-
Ingestion API - to connect data from external source systems like Snowflake, Databricks, and Amazon S3 via MuleSoft’s Salesforce CDP connector.
| This use case assumes that the connected Salesforce CRM instance has already been configured to support the Customer Sync Process required by many of the accelerator’s use cases. In particular, it relies upon the existence of unique Global Party Identifiers for identity resolution purposes. Refer to the Salesforce Financial Services Cloud setup guide for more details. |
Salesforce CRM Connector
In Data Cloud, you can establish a connection to other Salesforce orgs built upon the CRM core. Follow the below steps to create one of these connections.
-
In Data Cloud, select the Setup gear icon and then
Data Cloud Setup. -
Select
Salesforce CRMfrom the left navigation underCONFIGURATION. -
To connect a Salesforce org to Data Cloud, click New.
-
Click the
Connectbutton beside the 'Connect Another Org' section to connect to an external Salesforce org (for example, Salesforce FSC Banking). -
Enter your user credentials to establish the connection with Data Cloud.
-
After you connect your Salesforce org , you can view the connection details under
Connectors.-
Connector Name: The name of the Salesforce org that is connected to Data Cloud.
-
Connector Type: Identifies the type of data connection as Salesforce CRM.
-
Status: Shows the org’s current status.
-
Org Id: The identifier of the connected org.
-
Updated: The date and timestamp of when the Salesforce org was connected to Data Cloud.
-
Once the connection is established, the Data Cloud admin can either use bundles that can automatically deploy data or set up their own data streams; we will walk through the latter approach, below.
For the Optimize Customer Experiences with CDP use case, hover over the Connector Name field of the new connection and click the pencil icon to change the name of the Connector to Salesforce FSC Banking. This is the name that will appear under the Salesforce Org dropdown while creating a new Data Stream.
Marketing Cloud Connector
A Marketing Cloud Connector is required in order to use Marketing Cloud as either a source of data or a target for segmentation results. Below is a brief summary of steps to follow - consult the online documentation for more details.
-
Select
Marketing Cloudfrom the left navigation menu in theData Cloud Setupapp. -
Enter the Credentials to authenticate your Marketing Cloud account. You can proceed with the next step in the setup only if the authentication is successful.
-
Data Source setup - this step is optional, and only needs to be set up if you are planning to ingest data from Marketing Cloud into Data Cloud. This step is not required for the Optimize Customer Experiences with CDP use case.
-
Select Business Units to activate - select the business units to publish segments to Marketing Cloud.
Ensure all configured items show a green circle before using the connector.
Ingestion API Connector
You can push data from an external system into Data Cloud via the Ingestion API. This RESTful API offers two interaction patterns: bulk and streaming. The streaming pattern accepts incremental updates to a data set as those changes are captured, while the bulk pattern accepts CSV files in cases where data syncs occur periodically. The same data stream can accept data from the streaming and the bulk interaction.
For the Optimize Customer Experiences with CDP use case, the external systems Snowflake, Databricks, and Amazon S3 contain data to be pushed to Data Cloud through MuleSoft’s Salesforce CDP connector using the Ingestion API. The schema file for the Ingestion API can be found in the FINS Salesforce CDP System API implementation template. This schema includes definitions for the following objects:
-
FinancialAccount
-
FinancialTransaction
-
ExternalFinancialAccount
-
WebEngagement
Download the template in order to access the schema file before proceeding with the creation of an Ingestion API in Salesfoce Data Cloud.
Create an Ingestion API Connector
Follow the steps below to setup and configure an ingestion API to push data from external systems.
-
In Data Cloud, select
CDP Setupfrom the Setup gear icon. -
Select
Ingestion APIfrom the left navigation underCONFIGURATION. -
Click
New, enter a name for the API source (for example, 'FINS_Banking-Data-Connector'), then clickSave. -
On the details page for the new connector, you must upload a schema file in OpenAPI (OAS) format with a
.yamlfile extension. The schema file describes how data transferred via the API is structured.
Note: Ingestion API schemas have set requirements - review the schema requirements below if having issues uploading the schema. -
Click
Upload Schemaand navigate to the location of the file you want to use. Select the file and click Open. For the Optimize Customer Experiences with CDP use case, the schema filemule-cdp-connector-schema.yamlis available undersrc/test/resources/cdp-schemaof the FINS Salesforce CDP System API implementation template. -
Preview all the detected objects and their attributes in your schema.
-
Click
Save.
The connector page should reflect the updated status. Once the schema file is uploaded, data streams can be created to ingest data from source systems via the new Ingestion API Connector.
Create Connected App for Data Cloud Ingestion API
Before you can send data into Data Cloud using Ingestion API via Mulesoft’s Salesforce CDP Connector, you must configure a Connected App. A brief summary of the steps to follow are given here - refer to the online documentation for more details on creating a connected app.
-
From the Setup app, navigate to the
Apps->App Managerpage. -
Click the
New Connected Appbutton in the top right. -
Enter a connected app name (for example, 'FINS Salesforce CDP System API').
-
Enter a valid contact email address.
-
Select the
Enable OAuth Settingsoption and enter 'http://localhost' as theCallback URL. -
Under the 'Selected OAuth Scopes' section, add the following scopes from the
Available OAuth Scopeslist:-
Manage Customer Data Platform Calculated Insight data (cdp_calculated_insight_api) -
Manage Customer Data Platform Identity Resolution (cdp_identityresolution_api) -
Manage Customer Data Platform Ingestion API data (cdp_ingest_api) -
Manage Customer Data Platform profile data (cdp_profile_api) -
Manage user data via APIs (api) -
Perform ANSI SQL queries on Customer Data Platform data (cdp_query_api) -
Perform requests on your behalf at any time (refresh_token, offline_access)
-
-
Click
Saveand thenDoneto create the connected app.
After creating the connected app, click the Manage Consumer Details button from the app detail page, confirm your identity, and then record the Consumer Key and Consumer Secret values: you will need these to configure the FINS Salesforce CDP System API implementation template for deployment. This application uses the MuleSoft Connector for Salesforce CDP, which provides customers a pipeline to send data into Data Cloud. Refer to the Salesforce CDP Connector documentation for additional details on configuration and available operations.
Schema requirements
To create an ingestion API source in Data Cloud, the schema file you upload must meet specific requirements:
-
Uploaded schemas have to be in valid OpenAPI format with a .yml or .yaml extension. OpenAPI version 3 is supported (3.0.0, 3.0.1, 3.0.2).
-
Objects cannot have nested objects.
-
Each schema must have at least one object. Each object must have at least one field.
-
Objects cannot have more than 1000 fields.
-
Objects cannot be longer than 80 characters.
-
Object names must contain only a-z, A-Z, 0-9, _, -. No unicode characters.
-
Field names must contain only a-z, A-Z, 0-9, _, -. No unicode characters.
-
Field names cannot be any of these reserved words: date_id, location_id, dat_account_currency, dat_exchange_rate, pacing_period, pacing_end_date, row_count, version. Field names cannot contain string __.
-
Field names cannot exceed 80 characters.
-
Fields meet the following type and format:
-
For text or boolean type: string
-
For number type: number
-
For date type: string; format: date-string
-
-
Object names cannot be duplicated; case-insensitive.
-
Objects cannot have duplicate field names; case-insensitive.
-
Date strings in your object payloads must be in ISO 8601 UTC Zulu with format
yyyy-MM-dd’T’HH:mm:ss.SSS’Z.
When updating your schema, be aware that:
-
Existing field data types cannot be changed.
-
Upon updating an object, all the existing fields for that object must be present.
-
Your updated schema file only includes changed objects, so you don’t have to provide a comprehensive list of objects each time.
-
A date field must be present for objects that are intended for profile or engagement category. Objects of type
otherdo not impose this same requirement.
Use this example schema for reference.
Create data streams
Data streams are the connections and associated data ingested into Customer Data Platform. Data Cloud includes many data streams that can operate on different refresh schedules. Check Data Stream Schedule in Data Cloud to know about how and when these data streams update.
Create Salesforce CRM data streams
To begin the flow of data from a Salesforce CRM data source (such as your Salesforce FSC Banking instance) into Data Cloud, you must create a data stream to ingest standard and custom objects and fields. Any Salesforce org built upon the CRM core can be connected.
Use case requirements
For the Optimize Customer Experiences with CDP use case, a separate data stream for each of the following objects must be created to pull required data from your Salesforce FSC instance:
| Object in Salesforce CRM | Name of the DataStream |
|---|---|
Account |
FINS_Banking-Account |
Contact |
FINS_Banking-Contact |
Here are the minimum set of fields to be selected for each object:
| Account | Contact |
|---|---|
Account Description |
Account ID |
Account ID |
Business Phone |
Account Name |
Contact Id |
Account Number |
Created Date |
Account Type |
|
Active Leads |
First Name |
Created Date |
Global Individual Id* |
Last Modified Date |
|
First Name |
Last Name |
Global Individual Id* |
|
Global Party Id* |
|
Last Modified Date |
|
Last Name |
|
Mailing City |
|
Mailing Country |
|
Mailing Latitude |
|
Mailing Longitude |
|
Mailing State/Province |
|
Mailing Street |
|
Mailing Zip/Postal Code |
|
Mobile |
|
Parent Account ID |
*These custom fields should have been added to the source Salesforce instance in support of the Customer Sync process.
Create CRM data streams
To create a data stream from a Salesforce CRM data source:
-
In Data Cloud, navigate to Data Streams and click
New. -
Select the
Salesforce CRMdata source and clickNext. -
To create your data stream, select a Salesforce org (if you have only one Salesforce org connected to Data Cloud, it will be selected by default.
-
Click the
All Objectsbutton, select the target object to sync (for example,Account), and clickNext. -
For
Category, select theProfileoption. -
Review the fields to include in your data stream. By default, all fields are preselected with the total number of fields available for the object is shown in parentheses.
-
Click
Nextand fill in the deployment details:-
Data Stream Name: Defaults to Object Label and Salesforce org ID, but can be edited.
-
Ongoing Refresh Settings: Frequency and timing of new data retrieval. The Frequency is hourly and is set automatically.
-
-
Click
Deployto create the Salesforce CRM data stream.
Repeat the above steps for each object to ingest from a Salesforce instance (Account and Contact).
| If you are prompted with an error stating those objects cannot be added, you might need to Enable Object and Field Permissions to Access Salesforce CRM in Data Cloud. See below for further details. |
Add formula fields
Once the data streams for standard objects have been created, we need to add a formula field to identify whether or not the associated party represents an Individual. This is required for proper identity resolution and segmentation for the Optimize Customer Experiences with CDP use case. Repeat the following steps for both data streams created above:
-
Click the data stream from the 'Data Streams' list view to bring up the details page.
-
Select the
New Formula Fieldaction from the top right action list. You may need to click the 'more' down arrow to find the action. -
Enter the following values:
-
Field Label:
PartyType -
Field API Name:
PartyType(should default automatically) -
Formula Return Type:
Text -
Transformation Formula:
IF(ISEMPTY(sourceField['Global_Individual_Idpc']), 'None', 'Individual')
Note: The name of the source field may beGlobal_Individual_Idcfor the 'Contact' object.
-
-
Use the
Testbutton to validate the formula output for both empty and non-empty values. -
Click
Saveto save the new formula field.
Update object permissions
If you encounter object access errors in Data Cloud when creating data streams, try adding permissions for the objects and their fields in the source Salesforce instance.
-
Login to the Salesforce org containing the objects and fields you want to ingest into Data Cloud
-
From the Setup page, enter 'Permission' in the Quick Find box and select
Permission Sets. -
Select the
Customer Data Platform Salesforce Connector Integrationpermission set.
Note: The permission set is available only after you connect your CRM org to Data Cloud. -
From Apps, select Object Settings.
-
Select the object to ingest into Data Cloud (for example,
Account). -
To change object permissions, click Edit.
-
Enable Read and View All permissions for the object and Read Access for each field. Use the table above for reference.
-
Click Save.
Repeat these steps for all objects and fields you want to ingest into Data Cloud. For the Optimize Customer Experiences with CDP use case, this includes the Account and Contact objects.
Create an Ingestion API data stream
If you have not already done so, create the required Ingestion API Connector. Once the connector is available, we can create data streams from the source objects consumed via the API.
Use case requirements
For the Optimize Customer Experiences with CDP use case, we create a data stream by selecting all the objects in the schema of Ingestion API. Below are the values that need to be used for creation of data stream.
| Source Object in Ingestion API | Category | Primary Key | Name of the DataStream |
|---|---|---|---|
ExternalFinancialAccount |
Profile |
individualId |
FINS_Banking-Data-Connector-ExternalFinancialAccount |
FinancialAccount |
Profile |
globalAccountId |
FINS_Banking-Data-Connector-FinancialAccount |
FinancialTransaction |
Profile |
globalTransactionId |
FINS_Banking-Data-Connector-FinancialTransaction |
WebEngagement |
Profile |
sessionId |
FINS_Banking-Data-Connector-WebEngagement |
Create Ingestion data stream
-
In Data Cloud, select Data Streams and click
New. -
Select
Ingestion APIand clickNext. -
Select the connector you configured earlier from the dropdown.
-
Select all the objects found in the schema as per the above table and click
Next. -
In the 'New Data Stream' dialog, use the details in above table to configure each object by selecting the object shown under
Objects to Configure:-
Primary Key: A true Primary Key needs to be leveraged for Data Cloud (example - globalAccountId for Financial Account). If one does not exist, you will need to create a Formula Field for the Primay Key.
-
Category: Choose the
Profileoption.
-
-
Click
Save. -
Once the dialog has closed, click
Next. -
On the final summary screen, review the list of data streams that Data Cloud created and click
Deploy.
Once deployed the view refreshes to show all recently viewed data streams. Map the data for the data stream before use. Wait up to one hour for your data to appear in your data stream.
Add formula fields
As for the standard objects, we need to add a formula field to each of the Ingestion API objects to identify whether or not the associated party represents an Individual. This is required for proper identity resolution and segmentation for the Optimize Customer Experiences with CDP use case. Repeat the following steps for each of the data streams created above:
-
Click the data stream from the 'Data Streams' list view to bring up the details page.
-
Select the
New Formula Fieldaction from the top right action list. You may need to click the 'more' down arrow to find the action. -
Enter the following values:
-
Field Label:
PartyType -
Field API Name:
PartyType(should default automatically) -
Formula Return Type:
Text -
Transformation Formula:
IF(ISEMPTY(sourceField['individualId']), 'None', 'Individual')
Note: UseprimaryAccountOwneras the source field for the 'FinancialAccount' object, andaccountOwnerIdfor the 'FinancialTransaction' object
-
-
Use the
Testbutton to validate the formula output for both empty and non-empty values. -
Click
Saveto save the new formula field.
| Formula fields for custom objects can either be defined at the time of data stream creation or added later. |
Data modeling and mapping
After creating your data streams, you must associate your Data Source Objects (DSOs) to Data Model Objects (DMOs). Only mapped fields and objects with relationships can be used for Segmentation and Activation.
Use case requirements
For the Optimize Customer Experiences with CDP use case, the following table lists the high-level Data Streams to Data Model Object mappings:
| Data Stream Name | Custom Data Model Object (DMO) | Standard Data Model Object (DMO) |
|---|---|---|
FINS_Banking-Account |
Account, Contact Point Address, Contact Point Email, Contact Point Phone, Individual, Party Identification |
|
FINS_Banking-Contact |
AccountContact, Contact Point Address, Contact Point Email, Contact Point Phone, Individual, Party Identification |
|
FINS_Banking-Data-Connector-ExternalFinancialAccount |
FINS_Banking_ExternalFinancialAccount |
Contact Point Email, Individual, Party Identification |
FINS_Banking-Data-Connector-FinancialAccount |
FINS_Banking_FinancialAccount |
Individual, Party Identification |
FINS_Banking-Data-Connector-FinancialTransaction |
FINS_Banking_FinancialTransaction |
Individual, Party Identification |
FINS_Banking-Data-Connector-WebEngagement |
FINS_Banking_WebEngagement |
Contact Point Email, Individual, Party Identification |
| The names given to DMO are critical as they are used for Calculated Insights, which in turn are used to create Segments in later steps. |
The default schemas for each object are given in the following sections. Notice the inclusion of the PartyType formula field.
Schema of FINS_Banking_ExternalFinancialAccount Custom DMO
| Field Name | Field API Name | Data Type | Primary Key |
|---|---|---|---|
accountStatus |
accountStatus__c |
Text |
|
accountType |
accountType__c |
Text |
|
ageOfAccount |
ageOfAccount__c |
Number |
|
averageDailyBalance |
averageDailyBalance__c |
Number |
|
emailAddress |
emailAddress__c |
Text |
|
individualId |
individualId__c |
Text |
Yes |
institutionName |
institutionName__c |
Text |
|
lengthOfTimeAsClient |
lengthOfTimeAsClient__c |
Number |
|
PartyType |
PartyType__c |
Text |
|
totalNumberOfAccounts |
totalNumberOfAccounts__c |
Number |
Schema of FINS_Banking_FinancialAccount Custom DMO
| Field Name | Field API Name | Data Type | Primary Key |
|---|---|---|---|
accountBalance |
accountBalance__c |
Number |
|
accountCurrency |
accountCurrency__c |
Text |
|
accountNumber |
accountNumber__c |
Text |
|
accountType |
accountType__c |
Text |
|
availableBalance |
availableBalance__c |
Number |
|
createdBy |
createdBy__c |
Text |
|
createdDate |
createdDate__c |
DateTime |
|
depositAccountType |
depositAccountType__c |
Text |
|
globalAccountId |
globalAccountId__c |
Text |
Yes |
id |
id__c |
Text |
|
institutionId |
institutionId__c |
Text |
|
isDeleted |
isDeleted__c |
Text |
|
loanDurationMonths |
loanDurationMonths__c |
Number |
|
name |
name__c |
Text |
|
openedDate |
openedDate__c |
DateTime |
|
PartyType |
PartyType__c |
Text |
|
primaryAccountOwner |
primaryAccountOwner__c |
Text |
|
taxIdentificationNumber |
taxIdentificationNumber__c |
Text |
|
updatedBy |
updatedBy__c |
Text |
|
updatedDate |
updatedDate__c |
DateTime |
Schema of FINS_Banking_FinancialTransaction Custom DMO
| Field Name | Field API Name | Data Type | Primary Key |
|---|---|---|---|
accountId |
accountId__c |
Text |
|
accountOwnerId |
accountOwnerId__c |
Text |
|
createdBy |
createdBy__c |
Text |
|
createdDate |
createdDate__c |
DateTime |
|
creditAccountId |
creditAccountId__c |
Text |
|
debitAccountId |
debitAccountId__c |
Text |
|
description |
description__c |
Text |
|
globalTransactionId |
globalTransactionId__c |
Text |
Yes |
id |
id__c |
Text |
|
isDeleted |
isDeleted__c |
Text |
|
isDisputed |
isDisputed__c |
Text |
|
name |
name__c |
Text |
|
PartyType |
PartyType__c |
Text |
|
transactionAmount |
transactionAmount__c |
Number |
|
transactionDate |
transactionDate__c |
DateTime |
|
transactionNumber |
transactionNumber__c |
Number |
|
transactionStatus |
transactionStatus__c |
Text |
|
transactionSubType |
transactionSubType__c |
Text |
|
transactionType |
transactionType__c |
Text |
|
updatedBy |
updatedBy__c |
Text |
|
updatedDate |
updatedDate__c |
DateTime |
Schema of FINS_Banking_WebEngagement Custom DMO
| Field Name | Field API Name | Data Type | Primary Key |
|---|---|---|---|
channelType |
channelType__c |
Text |
|
createdBy |
createdBy__c |
Text |
|
createdDate |
createdDate__c |
DateTime |
|
emailAddress |
emailAddress__c |
Text |
|
individualId |
individualId__c |
Text |
|
isDeleted |
isDeleted__c |
Text |
|
pagesPerSession |
pagesPerSession__c |
Number |
|
PartyType |
PartyType__c |
Text |
|
sessionId |
sessionId__c |
Text |
Primary Key |
timeBetweenChannels |
timeBetweenChannels__c |
Number |
|
timeInChannel |
timeInChannel__c |
Number |
|
updatedBy |
updatedBy__c |
Text |
|
updatedDate |
updatedDate__c |
DateTime |
Create the data mappings
When creating data mappings where a Custom Data Model Object (DMO) target is required, this should be done before adding the standard data model objects. Follow the appropriate set of steps below as per the table above. For example, the FINS_Banking-Data-Connector-FinancialTransaction data stream requires the Custom FINS_Banking_FinancialTransaction DMO as well as the Standard Individual and Party Identification DMOs.
When Custom DMO required
-
Click into the target data stream from the Data Streams view.
-
On the Data Stream detail page, click
Start Data Mapping. -
Ensure
Visual Viewis selected for mapping your data. -
Click
Select Objectsand select theCustom Data Modeltab. -
If the DMO required for the data stream already exists:
-
Select the object by clicking the plus sign. Ensure a green checkmark appears.
-
Click
Doneto generate the default mappings.
-
-
If the required DMO does not exist:
-
Click on the
New Custom Objectbox. -
Copy the DMO value from the above table into the Object Label field.
-
Set Object API Name to the same value if not defaulted.
-
Ensure
Profileis selected as the Object Category. -
Click
Saveto generate the default mappings.
-
-
Click
Save & Closeto return to the stream detail page. -
Click the
Review Mappingslink at the bottom of the 'Data Mapping' section. -
Click the pencil icon button beside the 'Data Model entities' group on the right.
-
Under the
Standard Data Modeltab, select the objects that need to be mapped (as per the table above) by clicking the plus sign button. -
Click
Doneto save the object selections. -
Continue to the Standard object mappings section below.
When Custom DMO not required
-
Click into the target data stream from the Data Streams view.
-
On the Data Stream detail page, click
Start Data Mapping. -
Ensure
Visual Viewis selected for mapping your data. -
Click
Select Objectsand select the `Standard Data Model Objects that need to be mapped (as per the table above) by clicking the plus sign button. -
Click
Doneto save the object selections and continue to the Standard object mappings section below.
Standard object mappings
The mappings for custom objects should automatically be generated when selected; the mappings for Standard objects, however, must be done manually. Follow these steps, using the data mapping tables below for reference.
-
Click into the target data stream from the Data Streams view.
-
Click the
Review Mappingslink at the bottom of the 'Data Mapping' section. -
On the Data Streams mapping canvas, you can see all fields in both your DSO and target DMO(s).
-
Map all fields from the DSO to the target DMO(s) as per the mapping tables below. To map one field to another, first expand the
Unmappedsection of the target DMO on the right. Click on a field in the DSO on the left and connect it to the DMO on the right by clicking on the target field. For example, click on thePartyTypefield in the DSO on the left and then click in on theParty Identification Typefield in theParty IdentificationDMO on the right. When you complete the mapping for a DMO, collapse theUnmappedsection to save space. -
Once the mappings have been completed for all DMOs, click the
Savebutton to save the changes. If you get an error related to primary keys, double-check your mappings. Ignore 'Identity Resolution' warnings for now. -
For each DMO mapped, click on the 'Link' icon to bring up the
Object relationshipsdialog for the DMO and ensure the relationships are seen as per the Data Relationships between DMOs table below. If not, click theNewbutton to add the required relationship. -
Click
SaveandCloseto record the mapping and relationship changes.
Repeat the above steps for all the Data Streams required for the use case. Note that there is no need to re-verify relationships between Standard DMOs once you have already confirmed them for a given object; relationships between Custom DMOs and Standard DMOs will usually need to be created manually.
Detailed data mappings
Below are the detailed Data Mappings between Data Streams and Standard DMOs.
FINS_Banking-Account Data Stream to Standard DMOs
| FINS_Banking-Account | Account | Contact Point Address | Contact Point Email | Contact Point Phone | Individual | Party Identification |
|---|---|---|---|---|---|---|
Account Description |
Account Description |
|||||
Account ID |
Account Id |
Contact Point Address Id |
Contact Point Email Id |
Contact Point Phone Id |
||
Account Name |
Account Name |
|||||
Account Number |
Account Number |
|||||
Account Type |
Account Type |
|||||
Active Leads |
||||||
Created Date |
Created Date |
|||||
Email Address |
||||||
First Name |
First Name |
|||||
Global Individual Id |
Individual Id |
|||||
Global Party Id |
Party |
Party |
Party |
Party |
Global Party |
Party Identification Id, Identification Number, Party |
Last Modified Date |
Last Modified Date |
|||||
Last Name |
Last Name |
|||||
Mailing City |
City |
|||||
Mailing Country |
Country |
|||||
Mailing Latitude |
Geo Latitude |
|||||
Mailing Longitude |
Geo Longitude |
|||||
Mailing State/Province |
State Province |
|||||
Mailing Street |
Address Line 1 |
|||||
Mailing Zip/Postal Code |
Postal Code |
|||||
Mobile |
Formatted E164 Phone Number |
|||||
Parent Account ID |
Parent Account |
|||||
PartyType |
Identification Name, Party Identification Type |
FINS_Banking-Contact Data Stream to Standard DMOs
| FINS_Banking-Contact | Account Contact | Contact Point Email | Contact Point Phone | Individual | Party Identification |
|---|---|---|---|---|---|
Account ID |
Account |
Contact Point Email Id |
Contact Point Phone Id |
||
Business Phone |
Business Phone |
Formatted E164 Phone Number |
|||
Contact Id |
Account Contact Id |
||||
Created Date |
Created Date |
||||
Email Address |
|||||
First Name |
First Name |
||||
Global Individual Id |
Individual |
Party |
Party |
Individual Id, Global Party |
Party Identification Id, Identification Number, Party |
Last Modified Date |
Last Modified Date |
Last Name |
|||
Last Name |
|||||
PartyType |
Identification Name, Party Identification Type |
FINS_Banking-Data-Connector-ExternalFinancialAccount Data stream to Standard DMOs
| FINS_Banking-Data-Connector-ExternalFinancialAccount | Contact Point Email | Individual | Party Identification |
|---|---|---|---|
accountStatus |
|||
accountType |
|||
ageOfAccount |
|||
averageDailyBalance |
|||
emailAddress |
Email Address |
||
individualId |
Contact Point Email Id, Party |
Global Party, Individual Id |
Identification Number, Party, Party Identification Id |
institutionName |
|||
lengthOfTimeAsClient |
|||
PartyType |
Identification Name, Party Identification Type |
||
totalNumberOfAccounts |
FINS_Banking-Data-Connector-FinancialAccount Data Stream to Standard DMOs
| FINS_Banking-Data-Connector-FinancialAccount | Individual | Party Identification |
|---|---|---|
accountBalance |
||
accountCurrency |
||
accountNumber |
||
accountType |
||
availableBalance |
||
createdBy |
||
createdDate |
||
depositAccountType |
||
globalAccountId |
||
institutionId |
||
isDeleted |
||
loanDurationMonths |
||
openedDate |
||
PartyType |
Identification Name, Party Identification Type |
|
primaryAccountOwner |
Global Party, Individual Id |
Identification Number, Party, Party Identification Id |
taxIdentificationNumber |
||
updatedBy |
||
updatedDate |
FINS_Banking-Data-Connector-FinancialTransaction Data Stream to Standard DMOs
| FINS_Banking-Data-Connector-FinancialTransaction | Individual | Party Identification |
|---|---|---|
accountId |
||
accountOwnerId |
Global Party, Individual Id |
Identification Number, Party, Party Identification Id |
createdBy |
||
createdDate |
||
creditAccountId |
||
debitAccountId |
||
description |
||
globalTransactionId |
||
id |
||
isDeleted |
||
isDisputed |
||
name |
||
PartyType |
Identification Name, Party Identification Type |
|
transactionAmount |
||
transactionDate |
||
transactionNumber |
||
transactionStatus |
||
transactionSubType |
||
transactionType |
||
updatedBy |
||
updatedDate |
FINS_Banking-Data-Connector-WebEngagement Data Stream to Standard DMOs
| FINS_Banking-Data-Connector-WebEngagement | Contact Point Email | Individual | Party Identification |
|---|---|---|---|
channelType |
|||
createdBy |
|||
createdDate |
|||
emailAddress |
Email Address |
||
individualId |
Contact Point Email Id, Party |
Global Party, Individual Id |
Identification Number, Party, Party Identification Id |
isDeleted |
|||
pagesPerSession |
|||
PartyType |
Identification Name, Party Identification Type |
||
sessionId |
|||
timeBetweenChannels |
|||
timeInChannel |
|||
updatedBy |
|||
updatedDate |
Data Relationships between DMOs
The following table shows the relationships from the primary DMOs mapped from Data Streams to other DMOs. For relationships that will need to be created, the source and target fields are shown in parentheses. Note that the relationships between Individual and other DMOs are listed from the perspective of the other DMOs only, since this object is not used as the source for a data stream.
| Object | Cardinality | Related Object |
|---|---|---|
Account |
N:1 |
Account |
Account |
N:1 |
Individual |
Account Contact |
N:1 |
Account |
Account Contact |
N:1 |
Contact Point Phone |
Account Contact |
N:1 |
Individual |
Contact Point Address |
N:1 |
Account |
Contact Point Address |
N:1 |
Individual |
Contact Point Email |
N:1 |
Account |
Contact Point Email |
N:1 |
Individual |
Contact Point Phone |
N:1 |
Account |
Contact Point Phone |
N:1 |
Individual |
FINS_Banking_ExternalFinancialAccount (individualId) |
N:1 |
Individual (id) |
FINS_Banking_FinancialAccount (primaryAccountOwner) |
N:1 |
Individual (id) |
FINS_Banking_FinancialTransaction (accountOwnerId) |
N:1 |
Individual (id) |
FINS_Banking_WebEngagement (individualId) |
N:1 |
Individual (id) |
Party Identification |
N:1 |
Individual |
Identity Resolution
Use Identity Resolution to match and reconcile data about people into a comprehensive view of your customer called a unified profile. Identity Resolution uses matching and reconciliation rulesets to link the most relevant data from all the associated profiles of each unified profile. Identity Resolution is powered by rulesets to create unified profiles in Data Cloud.
Creating Identity Resolution rulesets can only be done after entities have been mapped and relationships established. Refer to the following links for additional anformation relating to Identity Resolution:
Use case requirements
For the Optimize Customer Experiences with CDP use case, we will create Custom Match Rules leveraging the Identification Number field of the Party Identification Object for a match on Global Party Id, followed by the Normalized Email Address rule. For example:
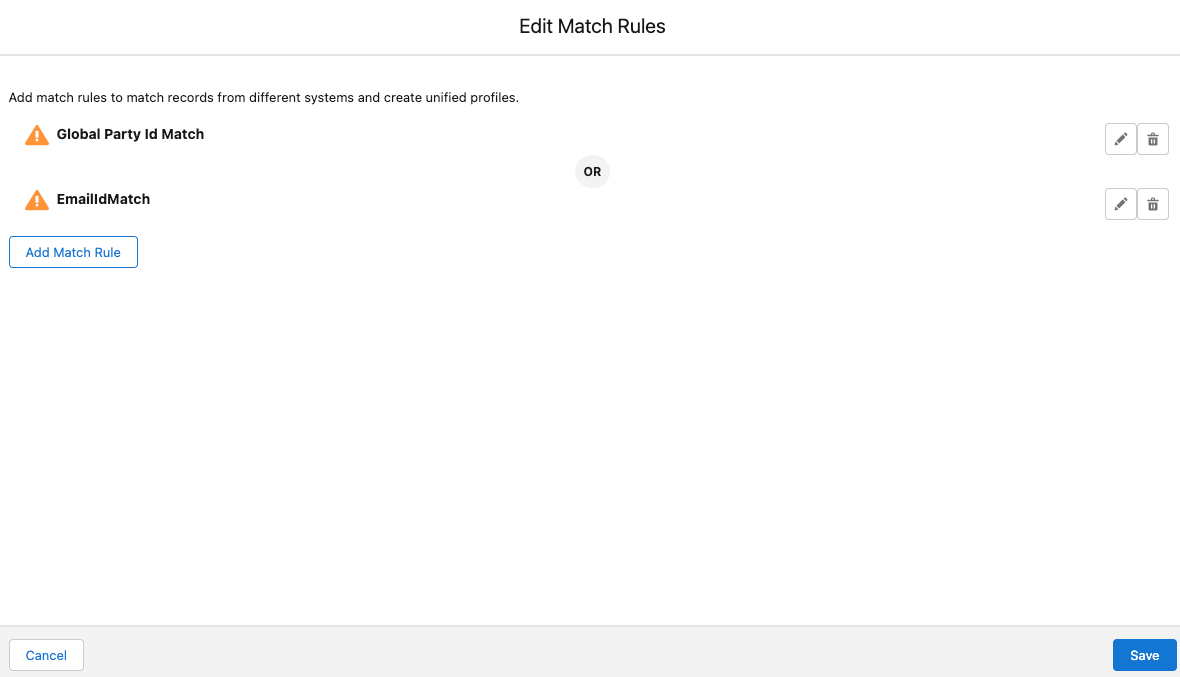
Here are the details of the custom match rule:
And here are the details of the email match rule:
Create Identity Resolution rules
Follow the steps below to create the required Identity Resolution rules, starting with the creation of the ruleset itself.
-
Go to the 'Identity Resolutions' tab in the main nav bar.
-
Click the
Newbutton in the upper right corner. -
Select
Individualas thePrimary Data Model Object. Do not add a Ruleset ID at this time. -
Click
Next. -
Enter a descriptive value for
Ruleset Name(for example, 'FINS_Ruleset') and provide a brief description (optional). -
Observe the list of
Ruleset Output Objectsand clickSaveto save the ruleset. -
From the ruleset details page, click the
Configurebutton on theRuleset Propertiestab. -
Click the Configure button next to
Match Rule 1to configure your Match Rules. -
Select the
Custom Ruleoption and clickNext. -
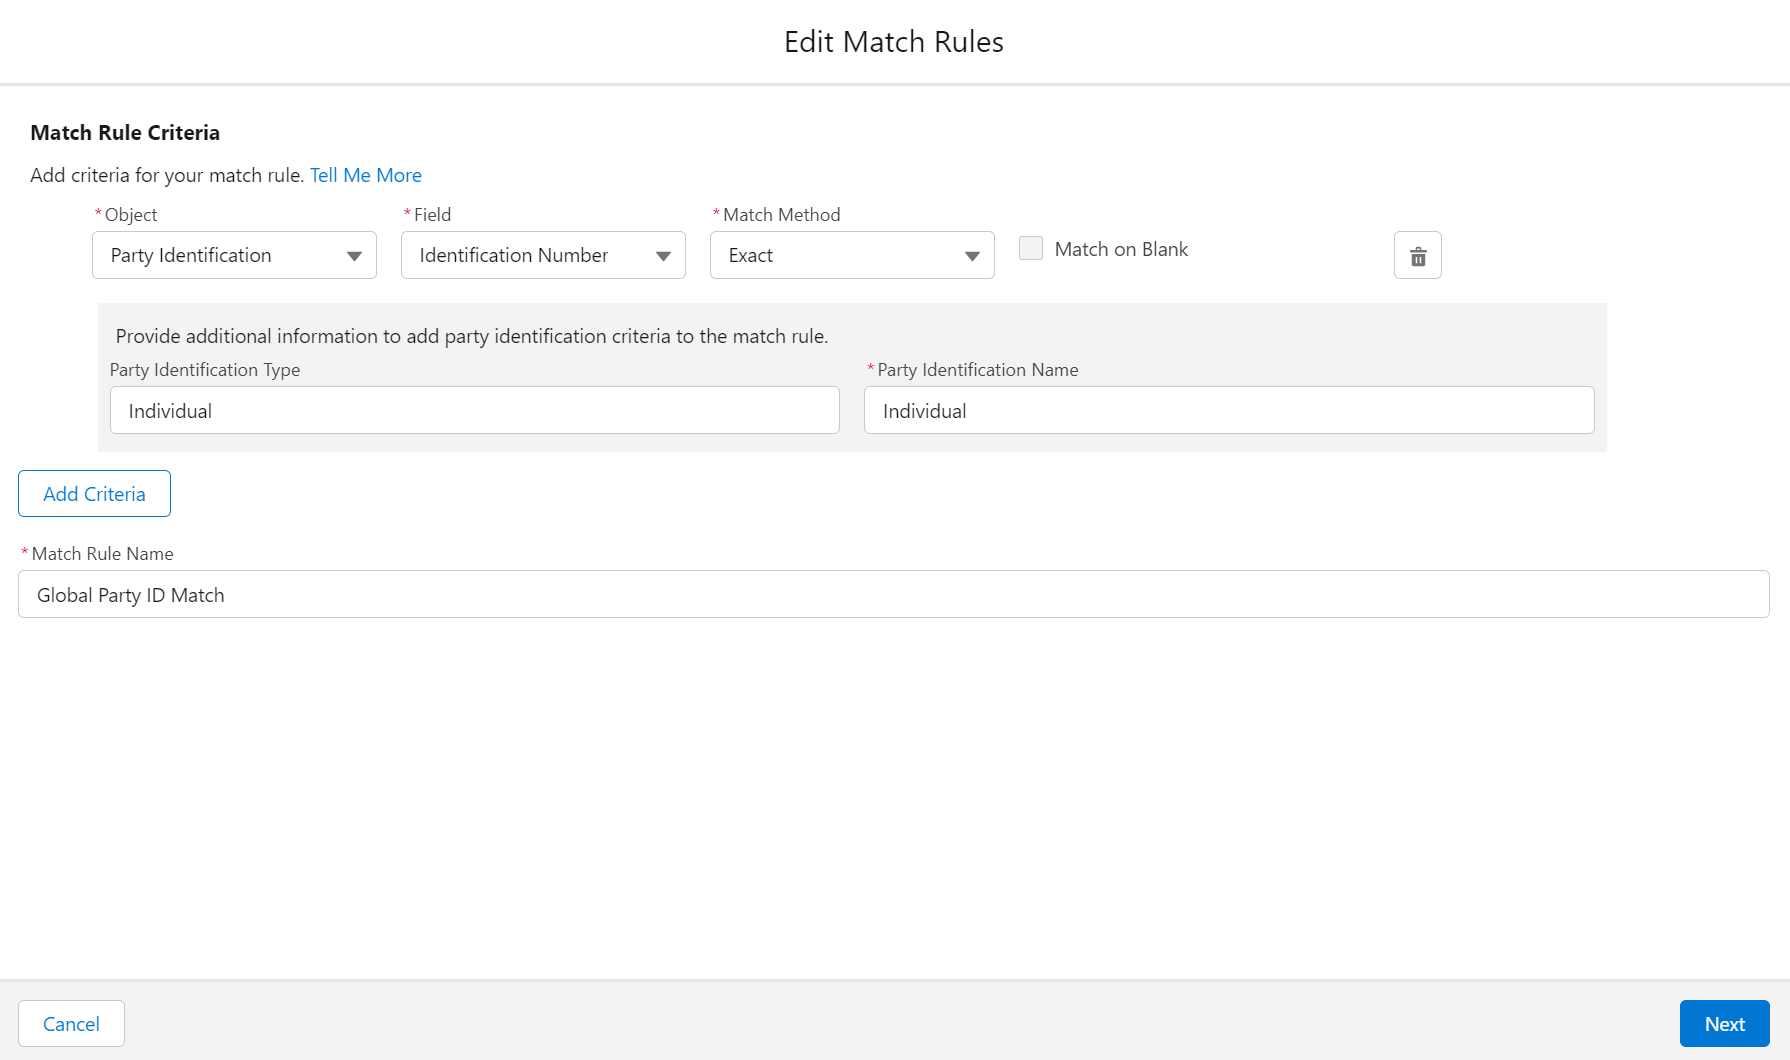
Create the 'Global Party ID Match' rule with the following values, as per the above diagram:
-
Object:
Party Identification -
Field:
Identification Number -
Match Method:
Exact -
Party Identification Type:
Individual -
Party Identification Name:
Individual -
Match Rule Name:
Global Party ID Match
-
-
Click
Nextto save the new rule and then clickAdd Match Ruleto create another custom rule. -
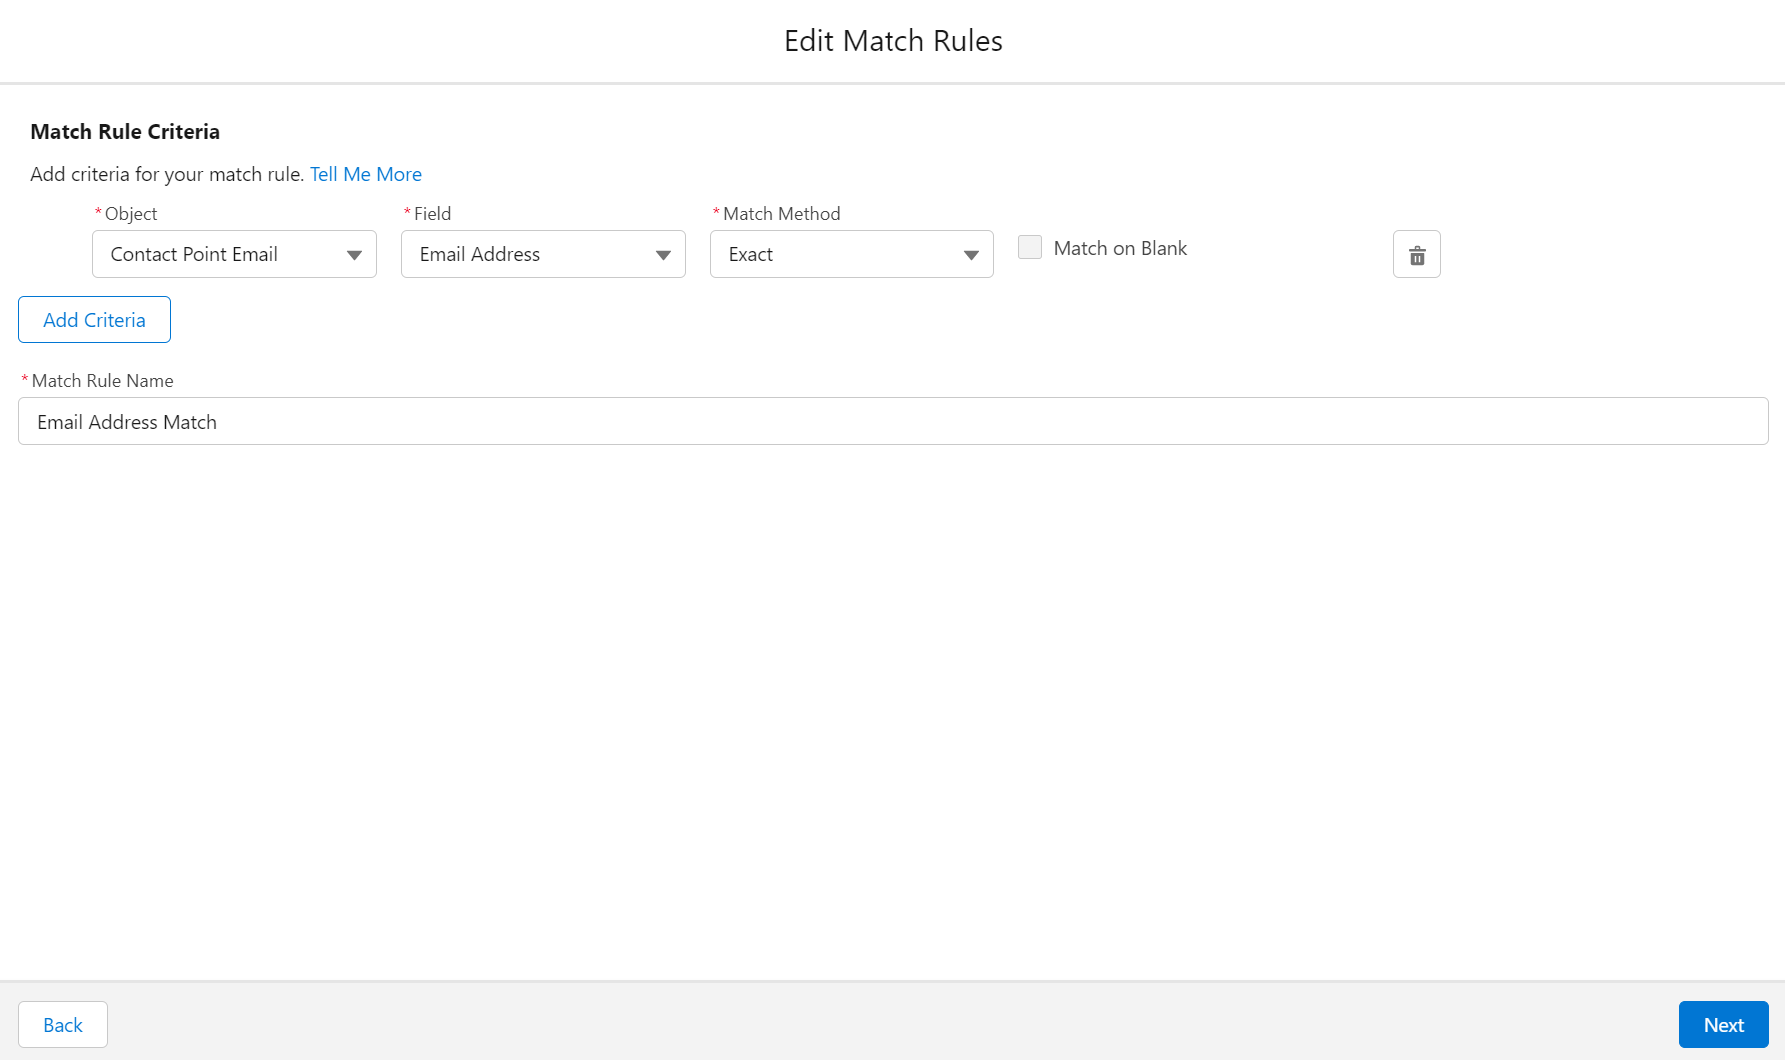
Use the following values for the 'Email Match' rule, as per the above diagram:
-
Object:
Contact Point Email -
Field:
Email Address -
Match Method:
Exact -
Match Rule Name:
Email Address Match
-
-
Click
Saveto save the new ruleset.
The new ruleset will be published after being saved. Once Data Cloud runs the profile reconciliation process, review the Resolution Summary information and the 'Processing History' tab to ensure the Identity Resolution rules are working correctly. You can also add applicable Individual Reconciliation Rules, if desired.
Calculated Insights
The Calculated Insights feature lets you define and calculate multi-dimensional metrics from your entire digital state stored in Data Cloud.
Calculated Insights can be built using the Calculated Insights Builder, ANSI SQL, Salesforce Package, or Streaming Insights. Details on all options and use cases can be found in the Data Cloud Help Documentation. Also check Processing Calculated Insights for the Calculated Insights schedule.
Once created, Calculated Insights are available in the Attribute Library. You can also confirm and validate Calculated Insights via Data Explorer.
Use case requirements
For the Optimize Customer Experiences with CDP use case, we will create Calculated Insights to gain visibility across our Financial Accounts (both internal and external) and Customer engagements in conjunction with data from the unified Customer profiles. The creation of the Calculated Insights detailed below is specific to meet the requirements of Segments mentioned for the use case.
Cross-selling money market accounts insight
For the Cross-selling money market account segment (created in later steps), we need to create two Calculated Insights:
-
Cross-sell Account Summary Metrics, which provides metrics on Account Balances, Age of the Accounts. -
Cross-sell Account Type Metrics, which provides metrics on Number of Accounts of specific Account Types.
To create these Calculated Insights, follow the steps below. Note: if you change the names of the insights you will also have to change the references when creating the segments, below.
Cross-sell Account Summary Metrics
-
Select the 'Calculated Insights' tab in the main nav bar
-
Click the
Newbutton to create a new entry. -
Select
Create with SQLand clickNext. -
Specify the
Calculated Insight Nameas 'Cross-sell Account Summary Metrics'. TheCalculated Insight API Namevalue should populate automatically. -
Enter a value for
Description, if desired. -
Copy and paste the following query into the
Expressionfield:SELECT INDV.si_individual_id__c AS individual_id__c, MAX(MONTHS_BETWEEN(CURRENT_DATE(),FINS_Banking_FinancialAccount__dlm.openedDate__c)) AS max_age__c, COUNT(FINS_Banking_FinancialAccount__dlm.globalAccountId__c) As count_of_accounts__c,SUM(FINS_Banking_FinancialAccount__dlm.accountBalance__c) as all_account_balances__c FROM FINS_Banking_FinancialAccount__dlm LEFT JOIN (SELECT ssot__Individual__dlm.ssot__Id__c AS si_individual_id__c, APPROX_COUNT_DISTINCT(ssot__Individual__dlm.ssot__Id__c) AS si_count__c FROM ssot__Individual__dlm GROUP BY ssot__Individual__dlm.ssot__Id__c) AS INDV ON FINS_Banking_FinancialAccount__dlm.primaryAccountOwner__c=INDV.si_individual_id__c WHERE ((FINS_Banking_FinancialAccount__dlm.depositAccountType__c='SAVINGS') or (FINS_Banking_FinancialAccount__dlm.depositAccountType__c='CHECKING')) GROUP BY individual_id__c -
Click
Save and Runto verify the entry. Review the details of the new insight.
Cross-sell Account Type Metrics
-
Return to the 'Calculated Insights' list view and click
Newto create another SQL insight. -
Specify the
Calculated Insight Nameas 'Cross-sell Account Type Metrics'. -
In the
Expressionfield, enter the below query:SELECT INDV.ss_individual_id__c AS individual_id__c, COUNT(FINS_Banking_FinancialAccount__dlm.depositAccountType__c) AS count_deposit_account_type__c, FINS_Banking_FinancialAccount__dlm.depositAccountType__c As deposit_account_type__c FROM FINS_Banking_FinancialAccount__dlm LEFT JOIN (SELECT ssot__Individual__dlm.ssot__Id__c AS ss_individual_id__c, APPROX_COUNT_DISTINCT(ssot__Individual__dlm.ssot__Id__c) AS ss_count__c FROM ssot__Individual__dlm GROUP BY ssot__Individual__dlm.ssot__Id__c) AS INDV ON FINS_Banking_FinancialAccount__dlm.primaryAccountOwner__c=INDV.ss_individual_id__c GROUP BY individual_id__c,deposit_account_type__c -
Click
Save and Runto verify the entry. Review the details of the new insight.
When completed you should see something like this in the Calculated Insights list view:

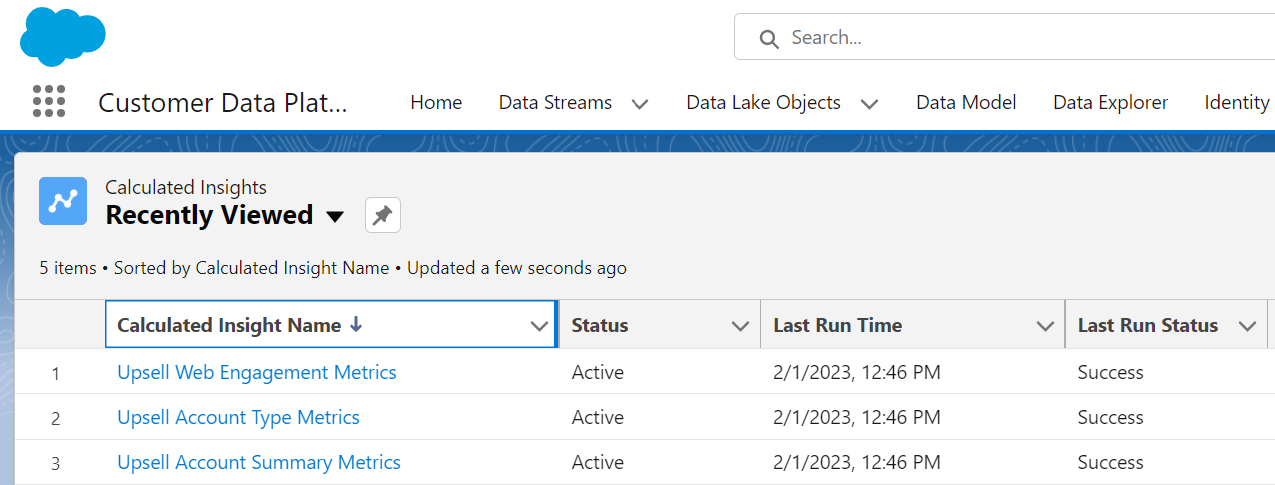
Upselling mortgage accounts insight
For the Upselling mortgage account segment (created in later steps), we need to create three Calculated Insights.
-
Upsell Account Summary Metrics, which provides metrics on Total Account Balances, Age of the Accounts. -
Upsell Account Type Metrics, which provides metrics on Number of Accounts of specific Account Types. -
Upsell Web Engagement Metrics, which provides metrics on the Web Engagement data of Customers.
To create your Calculated Insights, follow the steps below.
Upsell Account Summary Metrics
-
Select the 'Calculated Insights' tab in the main nav bar
-
Click the
Newbutton to create a new entry. -
Select
Create with SQLand clickNext. -
Specify the
Calculated Insight Nameas 'Upsell Account Summary Metrics'. TheCalculated Insight API Namevalue should populate automatically. -
Enter a value for
Description, if desired. -
Copy and paste the following query into the
Expressionfield:SELECT INDV.si_individual_id__c AS individual_id__c, (SUM(IFNULL(S.ext_o_daily_balance__c,S.inv_o_daily_bal__c))) AS total_balance__c, (MAX(IFNULL(S.ext_o_time_as_client__c,S.inv_o_acc_opened_date__c))) AS time_as_client__c FROM (SELECT FEA.ext_daily_balance__c AS ext_o_daily_balance__c,FEA.ext_indv__c AS ext_o_indv__c, FEA.ext_time_as_client__c AS ext_o_time_as_client__c, FA.inv_daily_bal__c AS inv_o_daily_bal__c, FA.int_indv__c AS int_o_indv__c, FA.int_acc_opened_date__c AS inv_o_acc_opened_date__c FROM (SELECT SUM(FINS_Banking_ExternalFinancialAccount__dlm.averageDailyBalance__c) AS ext_daily_balance__c, FINS_Banking_ExternalFinancialAccount__dlm.individualId__c AS ext_indv__c, (MAX(IFNULL(FINS_Banking_ExternalFinancialAccount__dlm.lengthOfTimeAsClient__c,0))*12) AS ext_time_as_client__c FROM FINS_Banking_ExternalFinancialAccount__dlm WHERE FINS_Banking_ExternalFinancialAccount__dlm.accountType__c='Savings' OR FINS_Banking_ExternalFinancialAccount__dlm.accountType__c='Checking' OR FINS_Banking_ExternalFinancialAccount__dlm.accountType__c='Money Market' GROUP BY FINS_Banking_ExternalFinancialAccount__dlm.individualId__c) AS FEA FULL JOIN (SELECT SUM(FINS_Banking_FinancialAccount__dlm.accountBalance__c) AS inv_daily_bal__c, FINS_Banking_FinancialAccount__dlm.primaryAccountOwner__c AS int_indv__c, (MONTHS_BETWEEN(CURRENT_DATE(),MAX(FINS_Banking_FinancialAccount__dlm.openedDate__c))) AS int_acc_opened_date__c FROM FINS_Banking_FinancialAccount__dlm WHERE FINS_Banking_FinancialAccount__dlm.depositAccountType__c IS NOT NULL GROUP BY FINS_Banking_FinancialAccount__dlm.primaryAccountOwner__c) AS FA ON FEA.ext_indv__c= FA.int_indv__c) AS S LEFT JOIN (SELECT ssot__Individual__dlm.ssot__Id__c AS si_individual_id__c, APPROX_COUNT_DISTINCT(ssot__Individual__dlm.ssot__Id__c) AS si_count__c FROM ssot__Individual__dlm GROUP BY ssot__Individual__dlm.ssot__Id__c) AS INDV ON IFNULL(S.ext_o_indv__c,S.int_o_indv__c)=INDV.si_individual_id__c group by individual_id__c -
Click
Save and Runto verify the entry. Review the details of the new insight.
Upsell Account Type Metrics
-
Return to the 'Calculated Insights' list view and click
Newto create another SQL insight. -
Specify the
Calculated Insight Nameas 'Upsell Account Type Metrics'. -
In the
Expressionfield, enter the below query:SELECT SUM(IFNULL(S.i_count_type__c ,S.e_count_type__c)) AS count__c, IFNULL(S.i_deposit_account_type__c,S.e_deposit_account_type__c) AS account_type__c,INDV.si_individual_id__c id__c FROM (SELECT FA.count_type__c AS i_count_type__c, FA.deposit_account_type__c as i_deposit_account_type__c, FA.individual_id__c AS i_individual_id__c,FEA.count_type__c AS e_count_type__c, FEA.deposit_account_type__c as e_deposit_account_type__c, FEA.individual_id__c AS e_individual_id__c FROM (SELECT IFNULL(COUNT(FINS_Banking_ExternalFinancialAccount__dlm.accountType__c),0) as count_type__c, SUBSTRING(UPPER(FINS_Banking_ExternalFinancialAccount__dlm.accountType__c),0,5) AS deposit_account_type__c, FINS_Banking_ExternalFinancialAccount__dlm.individualId__c AS individual_id__c FROM FINS_Banking_ExternalFinancialAccount__dlm group by SUBSTRING(UPPER(FINS_Banking_ExternalFinancialAccount__dlm.accountType__c),0,5),FINS_Banking_ExternalFinancialAccount__dlm.individualId__c) AS FEA FULL JOIN (SELECT IFNULL(COUNT(FINS_Banking_FinancialAccount__dlm.depositAccountType__c),0) AS count_type__c, SUBSTRING(UPPER(FINS_Banking_FinancialAccount__dlm.depositAccountType__c),0,5) AS deposit_account_type__c, FINS_Banking_FinancialAccount__dlm.primaryAccountOwner__c AS individual_id__c FROM FINS_Banking_FinancialAccount__dlm group by SUBSTRING(UPPER(FINS_Banking_FinancialAccount__dlm.depositAccountType__c),0,5), FINS_Banking_FinancialAccount__dlm.primaryAccountOwner__c) AS FA ON FEA.individual_id__c = FA.individual_id__c) AS S LEFT JOIN (SELECT ssot__Individual__dlm.ssot__Id__c AS si_individual_id__c , APPROX_COUNT_DISTINCT(ssot__Individual__dlm.ssot__Id__c) AS si_count__c FROM ssot__Individual__dlm GROUP BY ssot__Individual__dlm.ssot__Id__c) AS INDV ON S.i_individual_id__c=INDV.si_individual_id__c GROUP BY id__c, account_type__c -
Click
Save and Runto verify the entry. Review the details of the new insight.
Upsell Web Engagement Metrics
-
Return to the 'Calculated Insights' list view and click
Newto create another SQL insight. -
Specify the
Calculated Insight Nameas 'Upsell Web Engagement Metrics'. -
In the
Expressionfield, enter the below query:SELECT I.ss_individual_id__c AS individual_id__c, FINS_Banking_WebEngagement__dlm.channelType__c AS channel_type__c, SUM(FINS_Banking_WebEngagement__dlm.timeInChannel__c) AS total_time_spent__c, SUM(FINS_Banking_WebEngagement__dlm.pagesPerSession__c) AS total_pages_visited__c FROM FINS_Banking_WebEngagement__dlm LEFT JOIN (SELECT ssot__Individual__dlm.ssot__Id__c AS ss_individual_id__c, APPROX_COUNT_DISTINCT(ssot__Individual__dlm.ssot__Id__c) AS ss_count__c FROM ssot__Individual__dlm GROUP BY ssot__Individual__dlm.ssot__Id__c) AS I ON FINS_Banking_WebEngagement__dlm.individualId__c=I.ss_individual_id__c GROUP BY channel_type__c, individual_id__c -
Click
Save and Runto verify the entry. Review the details of the new insight.
When completed you should see something like this in the Calculated Insights list view:
Create and activate segments
Use segmentation to break down your data into useful segments to understand, target, and analyze your customers. You can create segments on any entities from your data model, and then publish them on a chosen schedule or as needed.
Use case requirements
For the Optimize Customer Experiences with CDP use case, we need to create Segments on Individual for both the Cross-selling and Upselling scenarios.
Cross-selling money market accounts segment
For this segment, we aggregrate data, using the Calculated Insights created earlier, and then filter the data using criteria defined for the use case. Create the segment as follows:
-
Select the 'Segments' tab in the main nav bar
-
Click the
Newbutton to create a new entry. -
Select
Individualas the object to segment on. -
Enter
Cross-selling money market accountas the segment name. -
Leave the
Publish Scheduleoption asDon’t refreshfor now and clickSave. -
Once the segment has been created you will see an entry for
Individualunder the 'Direct Attributes' section in the left navigation. Expand this entry to reveal all available attributes - including those from the Calculated Insights we created earlier. -
Select the
Cross-sell Account Summary Metricsentry under 'Calculated Insights', then drag and drop theall_account_balances__cattribute over to the main canvas area (where it shows 'Add another Attribute here'). -
For the Operator, select
Is Greater Than or Equal Toand key in3000for the Value. ClickDoneto save the condition. -
Next, drag the
max_age__cattribute over and drop it on the canvas as well. -
For the Operator, select
Is Greater Thanand key in12for the Value. ClickDoneto save. -
Press the back arrow button on the header of the insight attribute list to return to the full list, then select the
Cross-sell Account Type Metricsinsight. -
Add the
count_deposit_account_type__cattribute as another condition, withIs Greater Than or Equal Toas the Operator and1for the Value. -
Click the
Add Dimensionbutton to add a dimension for the attributedeposit_account_type__c, withContainsas the Operator andSAVINGSas the value. -
Click
Doneto save the new condition and its dimension. -
Finally, add the
count_deposit_account_type__cattribute again as a new condition withHas No Valueas the Operator. -
Add a dimension to this condition as well, with
deposit_account_type__cas the attribute,Containsas the Operator, andMONEY_MARKETas the Value. -
Click
Doneto save the new condition, then clickSaveto save the segment itself.
The completed segment should look something like this:

Once the segment has run successfully, and produces the expected results, remember to go back and update the segment to change the Publish Schedule to automatically run periodically. If you need to make further changes to the segment, it is best to disable the schedule first.
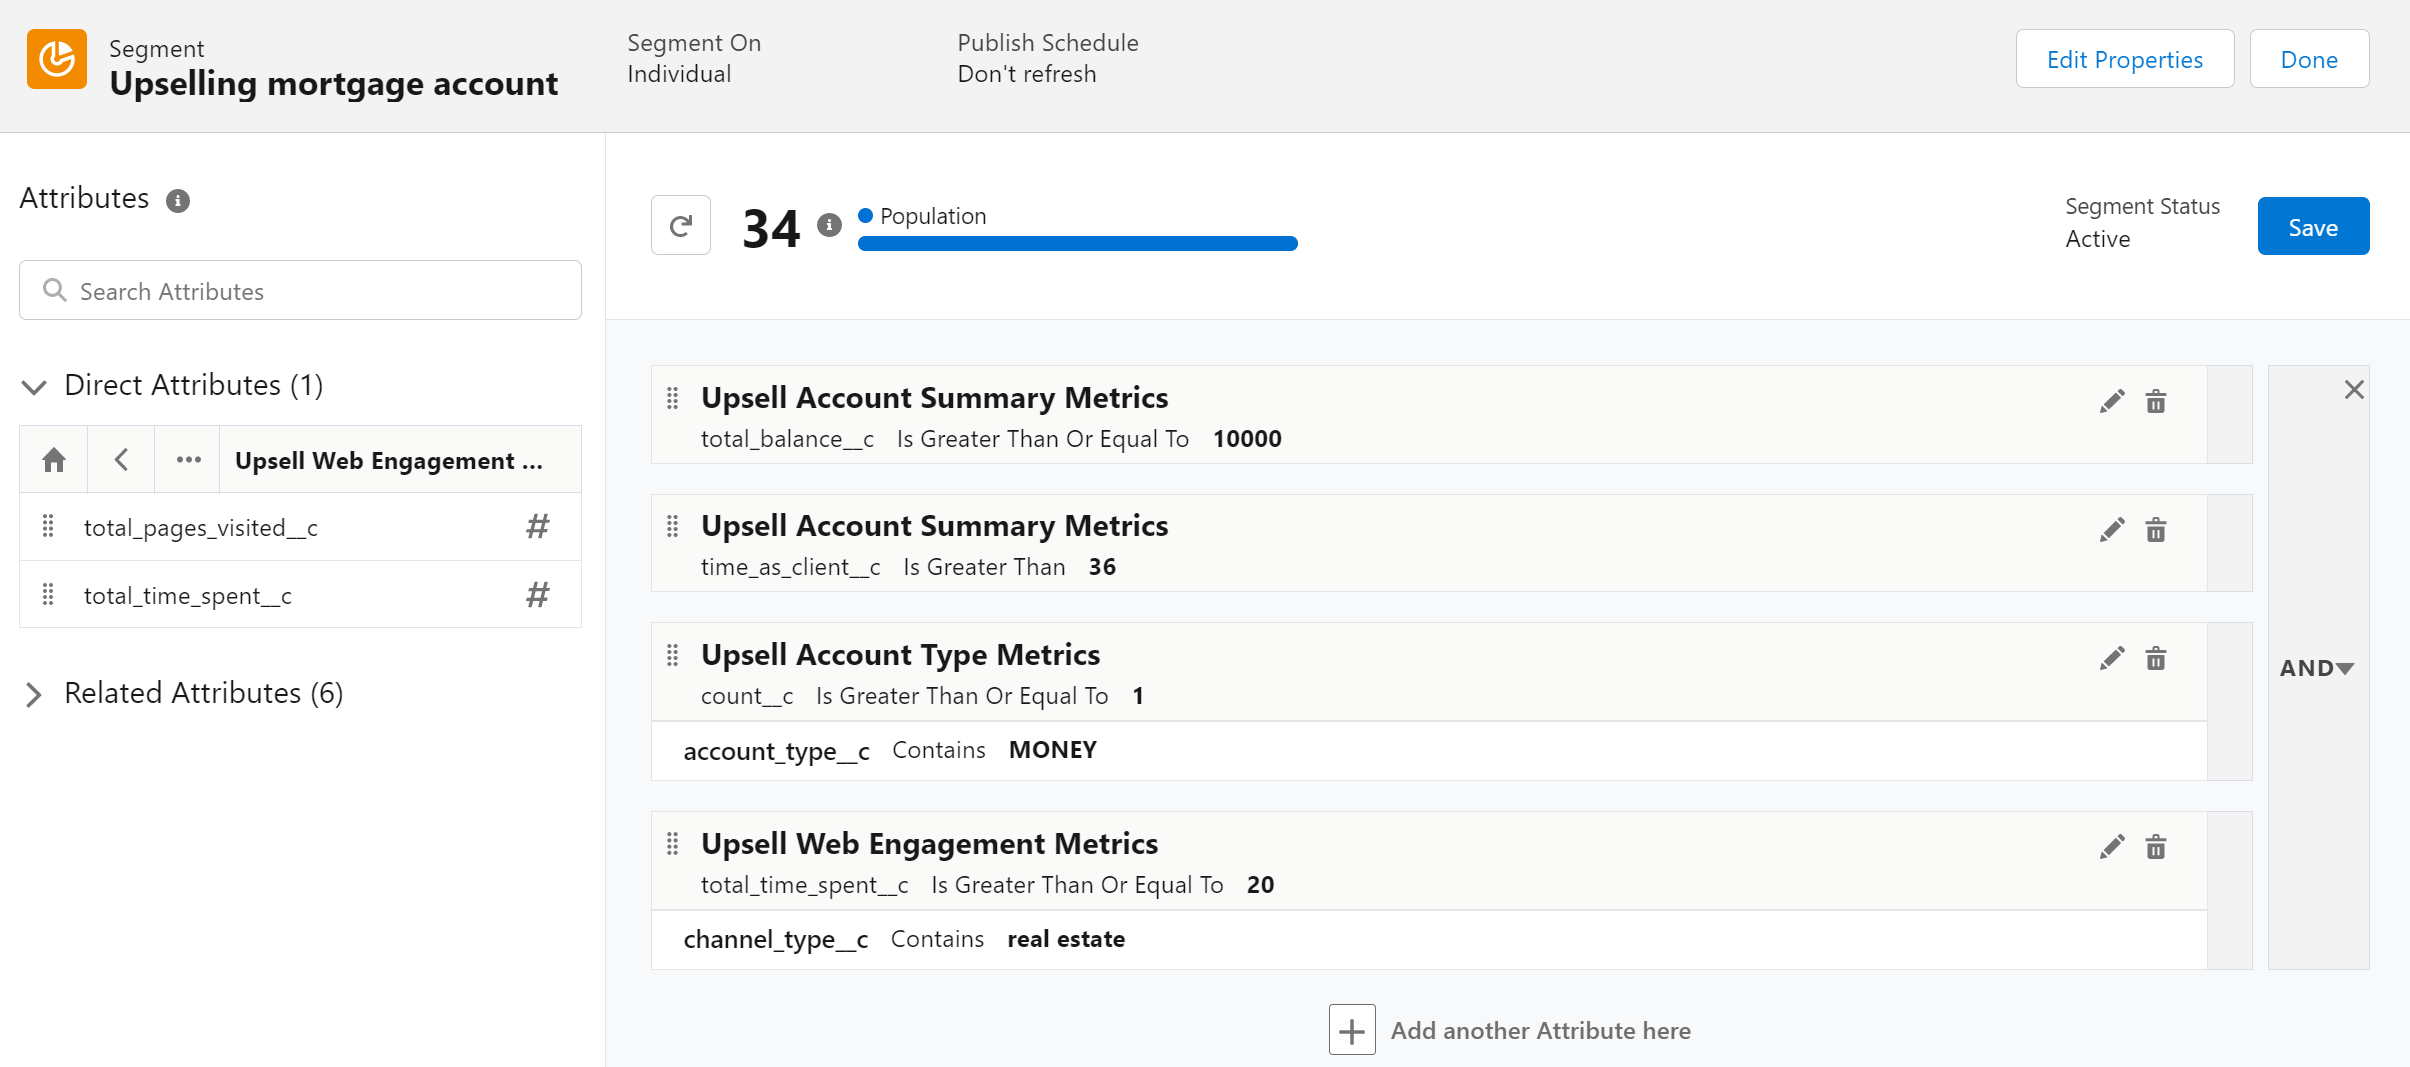
Upselling mortgage account segment
For this segment, we again aggregrate data using the Calculated Insights created earlier and then filter the data with the criteria required for the use case. For a more detailed set of steps required to create a segment, refer to the Cross-selling segment, above.
-
Click the
Newbutton from the 'Segments' list to create a new entry. -
Select
Individualas the object to segment on, enterUpselling mortgage accountas the segment name, and clickSave. -
Expand the list of attributes for the
Upsell Account Summary Metricscalculated insight. -
Add a condition for the attribute
total_balance__c, withIs Greater Than or Equal Toas the Operator and10000as the value. ClickDoneto save the condition. -
Add a condition for the
time_as_client__cattribute, with an Operator ofIs Greater Thanand and a value of36(for the age of the account in months). ClickDoneto save the condition. -
Switch the current attributes list to the
Upsell Account Summary Metricscalculated insight. -
Add a condition for the
count__cattribute, selectingIs Greater Than or Equal Toas the Operator and entering1as the Value. -
Click the
Add Dimensionbutton, selectaccount_type__cas the Attribute,Containsas the Operator, and enterMONEYas the Value. ClickDone. -
Finally, switch the current attributes list to the
Upsell Web Engagement Metricscalculated insight. -
Add a condition for
total_time_spent__c, with the OperatorIs Greater Than or Equal Toand the value20(for time spent in minutes). -
Add a dimension on
channel_type__c, withContainsas the Operator andreal estateas the Value. -
Click
Doneto save the new condition, then clickSaveto save the segment itself.
The completed segment should look something like this:
Again, remember to change the publish schedule once you are satisfied with the segmentation results.
Activation Targets
You create activation targets to build and activate data segments with Data Cloud. For the Optimize Customer Experiences with CDP use case, we will create an AWS S3 Activation Target and a Marketing Cloud Activation Target.
AWS S3 Activation Target
This activation target is used to publish segments to AWS S3. You will need to have your S3 access key and secret key on hand in order to create the activation target.
-
Select
Activation Targetsfrom the top navigation menu. -
Click the
Newbutton to create a new entry. -
Select the
aws | S3external platform and clickNext. -
Enter an easy to recognize but unique name (for example, 'Data Cloud Segmentation Results Bucket') and click
Next. -
Specify the S3 bucket name and parent folder provided by your admin for your activation target.
-
Enter the S3 access key and secret key for the bucket. The S3 credentials provided must have the following permissions: s3:PutObject, s3:GetObject, s3:ListBucket, s3:DeleteObject, s3:GetBucketLocation.
Note: To delete S3 access or secret keys, first delete the activation target. -
Select an export file format (for example, JSON).
-
Click
Saveto create the Activation Target.
When your AWS S3 Activation Target is created the following items are added to the bucket:
-
A metadata file that describes the segment definition.
-
Data files that contain the segment members with additional attributes.
-
A segment-data folder to indicate that writing output files to the folder has completed. If this file is missing, it indicates that either the files are being written or the data was only partially written and the producer failed.
After you create and activate segments to your AWS S3 target, a sub-folder called Salesforce-c360-Segments will automatically be created when the first segment is activated to Cloud File Storage. To access the segmentation data written to the bucket:
-
Login to aws and select the S3 service.
-
Navigate to the bucket you configured in the Activation Target.
-
Navigate to
/Salesforce_c360_Segmentsto view generated segments.
The actual segments will be created with prefixes of YYYY/MM/DD/HH/{first 100 characters of segment name}_{20 characters of activation name}_{timestamp in yyyyMMddHHmmsssSSS format}.
Marketing Cloud Activation Target
Create an activation target in Data Cloud to publish segments to Marketing Cloud business units. Be sure configure the Marketing Cloud connector as per the instructions above first, otherwise it will not show up as a target
-
Select
Activation Targetsfrom the top navigation menu. -
Click the
Newbutton to create a new entry. -
Select
Marketing Cloudas the target and clickNext. -
Enter an easy to recognize but unique name (for example, 'Data Cloud Segmentation Results MC').
IMPORTANT: Marketing Cloud activation target names cannot be more than 128 characters, start with an underscore, be all numbers, or include these characters:@ % ^ = < ' * + # $ / \ ! ? ( ) { } [ ] , . (space) -
Click
Next. -
To add or remove business units (BUs) to receive the published segments, click the arrows between the two columns. When an activation target has multiple BUs, the activation filters the contacts by the BUs. The segment activates as a Shared Data Extension (SDE) and not as a Data Extension (DE) to Marketing Cloud. If an activation target has multiple business units configured, modify the activation target configuration to include one business unit only.
-
Save your changes.
Your Marketing Cloud activation target is created.
Activation
Activation is the process that materializes and publishes a segment to activation platforms. An activation target is used to store authentication and authorization information for a given activation platform. You can publish your segments, including contact points and additional attributes, to the activation targets. After you create a segment in Data Cloud, you can publish a segment to an activation target.
Use case requirements
For the Optimize Customer Experiences with CDP use case, create Activations to both Activation Targets: AWS S3 and Marketing Cloud.
Cross-selling money market account/Upselling mortgage account
Below are the steps to create the Activation:
-
Select
Activation Targetsfrom the top navigation menu. -
Click the
Newbutton to create a new entry. -
Select the Segment (for example,
Cross-selling money market accountorUpselling mortgage account). -
Select one of the Activation Targets created earlier (AWS S3 or Marketing Cloud).
-
Select
Accountfrom the 'Activation Membership' dropdown. ClickNext. -
Select your contact points.
Note: Selecting contact points is optional for S3 activations. When contact points are mapped, select an existing path or click Edit. -
To activate additional attributes, click
Add Attributes. -
Drag the attributes
Account IdandAccount Nameto the canvas. ClickSave. -
From
Unified Individual <ruleset>, select theGlobal Partyfield and select the path that relates fromAccount. ClickNext. -
Enter a name and description for your activation.
IMPORTANT: You cannot include the following characters in the name field:+ ! @ # $ % ^ * ( ) = { } [ ] \ . < > / " : ? | , _ & -
Click
Save.
This completes the configuration of Data Cloud required for the Optimize Customer Experiences with CDP use case.