Publish and Consume Messages Within Flows Example
The following example illustrates how to configure the Anypoint Connector for JMS (JMS Connector) Publish consume operation to publish and consume messages within two flows, and uses a correlation ID to ensure that the incoming messages are replies to a specific outgoing message.
-
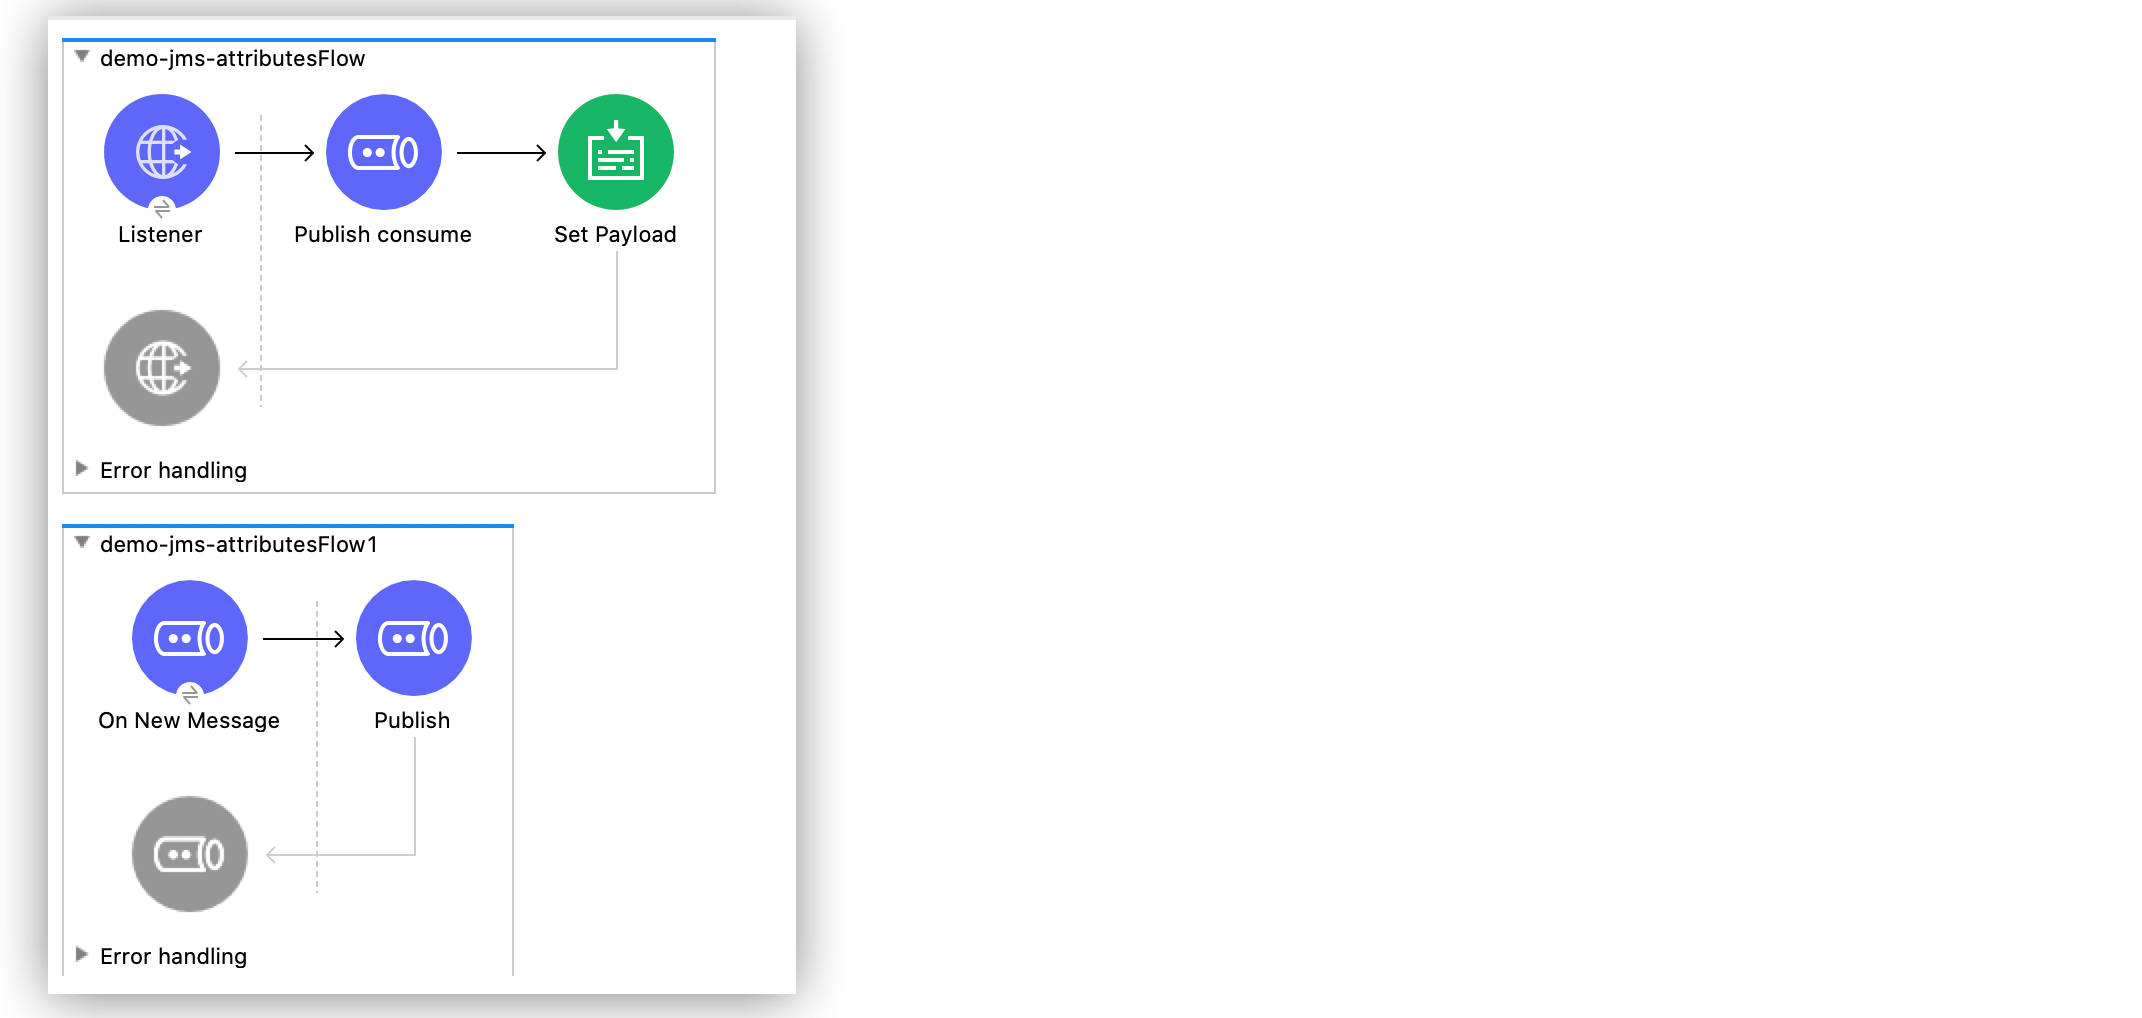
In the first flow, an HTTP Listener source initiates the flow by reading random content posted via HTTP.
-
The Publish consume operation publishes a message to a destination queue (
Q1), containing the content payload received from the HTTP Listener source. -
In the second flow, an On New Message source listens for the message sent to the queue
Q1set in the first flow. -
Still in the second flow, a Publish operation publishes the message in a new destination queue (
Q2) with a correlation ID attribute that correlates the request and reply messages within the two flows. -
Back in the first flow, the Publish consume operation consumes the message sent to the queue in
Q2that matches the correlation ID. -
Finally, in the first flow, a Set Payload component returns the value
It Works!.
To test this example, you must:
-
Have a Docker instance of ActiveMQ broker.
-
Create two queues,
Q1andQ2, using with the ActiveMQ broker. -
Create a Mule application that include two flows.
-
Run and test the application using
curlcommands.
To install a Docker instance of ActiveMQ broker and how to create the queues, follow their respective documentation guidelines.
Create the First Flow
To start creating your Mule application to publish and consume message, create the first flow:
-
In Studio, in the Mule Palette view, select HTTP > Listener.
-
Drag the HTTP Listener source to the Studio canvas.
-
On the HTTP Listener configuration screen, optionally change the value of the Display Name field.
-
Set the Path field to
/test -
Click the plus sign (+) next to the Connector configuration field to configure a global element that can be used by all instances of HTTP Listener in the app.
-
On the General tab, set the following parameters:
-
Host:
All Interfaces [0.0.0.0] (default) -
Port:
8081
-
-
Click OK.
-
Drag the Publish consume operation to the right of HTTP Listener.
-
Click the plus sign (+) next to the Connector configuration field to configure a global element that can be used by all instances of Publish consume in the app.
-
Set the Connection field to ActiveMQ Connection.
-
In the Required Libraries section, click Configure… to install the dependencies.
-
Set the Specification and Caching strategy fields to their default values.
-
Set both the Username and Password fields to
admin. -
Set Factory configuration to Edit inline.
-
Set the Broker url field to
tcp://localhost:61616. -
Click OK.
-
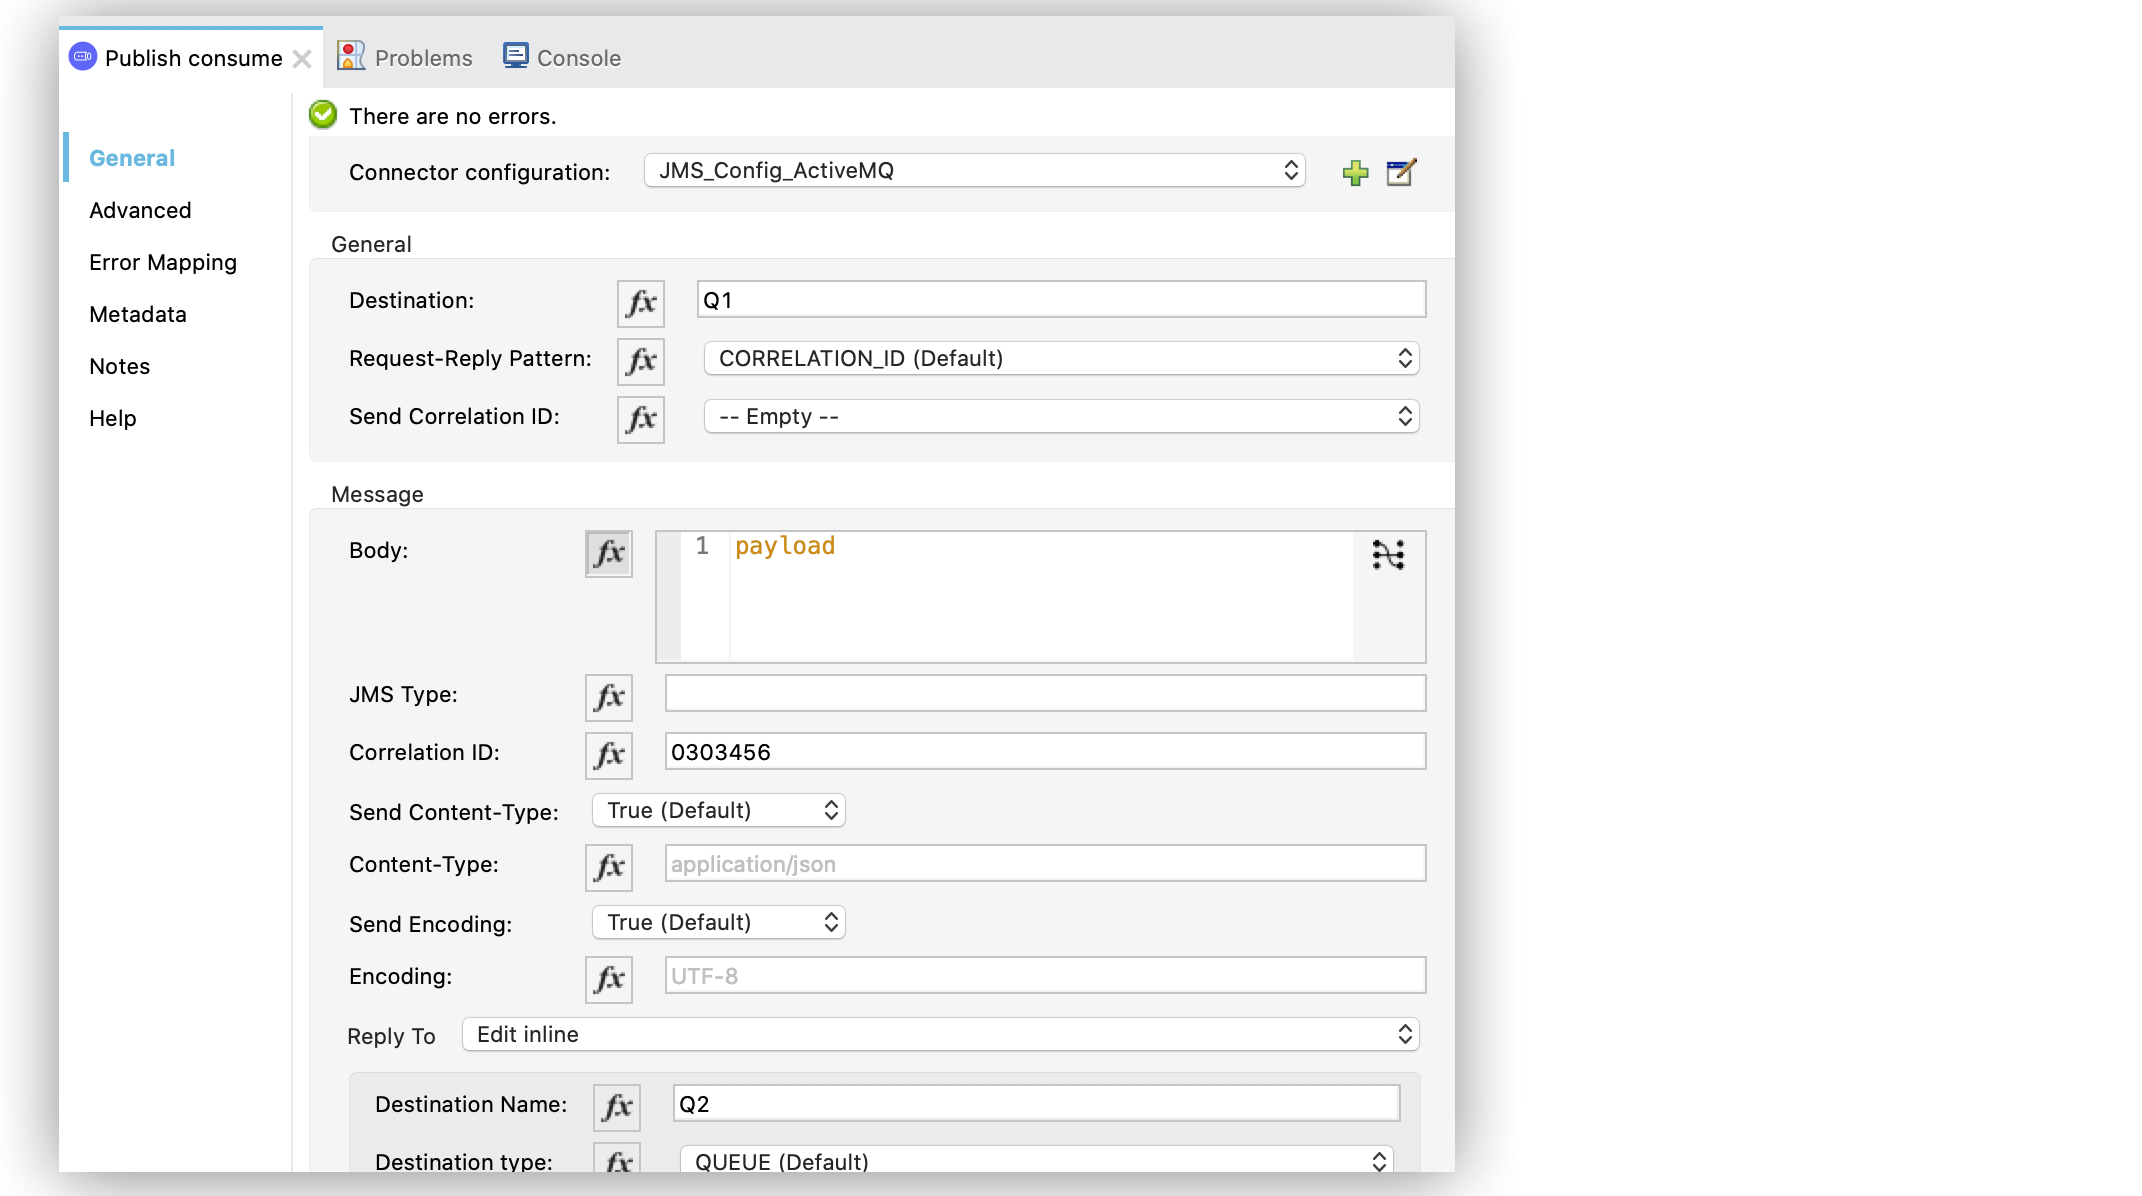
In the Publish consume > General section, set the Destination field to
Q1to create the first of the two queues, this one to publish the message that contains the payload of the HTTP Listener. -
For this example, in the Message section, set the Correlation ID to
0303456. -
Set the Reply To field to Edit inline.
-
Set the Destination Name field to
Q2to create the second destination queue, this one to consume the message sent by the Publish operation in the second flow. -
In the Consume Configuration section, set the Ack mode field to IMMEDIATE.
-
Drag a Set Payload component to the right of Publish consume.
-
Set the Value field to
It Works!.
Create the Second Flow
Continue creating the application by adding the second flow:
-
Drag a JMS On New Message source below the first flow.
-
Repeat Steps 9 through 16 of creating the first flow, to create a global element for the source.
-
In the On New Message configuration screen, set the Destination field to
Q1to indicate that the source is listening to the destination set in the Publish consume operation of the first flow. -
Drag the JMS Publish operation to the right of the source.
-
Set Connector configuration to the same configuration you set for the On New Message source.
-
Set the Destination field to
Q2, to indicate that the message is published to the destination queue of the Publish consume operation of the first flow. -
In the Message section, set the Correlation ID field to
attributes.headers.correlationIdto correlate the request and reply messages.
Run and Test Your Mule Application
After creating your Mule application, run and test it:
-
In Studio, save your Mule app.
-
Click the project name in Package Explorer and then click Run > Run As > Mule Application.
-
Open a browser and type
http://0.0.0.0:8081/test.
XML for Publishing and Consuming Within Flows
Paste this code into your Studio XML editor to quickly load the flow for this example into your Mule app:
<?xml version="1.0" encoding="UTF-8"?>

<mule xmlns:jms="http://www.mulesoft.org/schema/mule/jms" xmlns:http="http://www.mulesoft.org/schema/mule/http"
	xmlns="http://www.mulesoft.org/schema/mule/core"
	xmlns:doc="http://www.mulesoft.org/schema/mule/documentation" xmlns:xsi="http://www.w3.org/2001/XMLSchema-instance" xsi:schemaLocation="http://www.mulesoft.org/schema/mule/core http://www.mulesoft.org/schema/mule/core/current/mule.xsd
http://www.mulesoft.org/schema/mule/http http://www.mulesoft.org/schema/mule/http/current/mule-http.xsd
http://www.mulesoft.org/schema/mule/jms http://www.mulesoft.org/schema/mule/jms/current/mule-jms.xsd">
	<http:listener-config name="HTTP_Listener_config" >
		<http:listener-connection host="0.0.0.0" port="8081" />
	</http:listener-config>
	<jms:config name="JMS_Config_ActiveMQ" >
		<jms:active-mq-connection username="admin" password="admin">
			<jms:factory-configuration brokerUrl="tcp://localhost:61616"/>
		</jms:active-mq-connection>
	</jms:config>
	<jms:config name="JMS_Config_ActiveMQ_2" >
		<jms:active-mq-connection username="admin" password="ßadmin">
			<jms:factory-configuration brokerUrl="tcp://localhost:61616"/>
		</jms:active-mq-connection>
	</jms:config>

	<flow name="demo-jms-attributesFlow" >
		<http:listener config-ref="HTTP_Listener_config" path="/test"/>
		<jms:publish-consume destination="Q1" config-ref="JMS_Config_ActiveMQ">
			<jms:message correlationId="0303456" >
				<jms:reply-to destination="Q2" />
			</jms:message>
			<jms:consume-configuration ackMode="IMMEDIATE" />
		</jms:publish-consume>
		<set-payload value="It Works!" doc:name="Set Payload" />
	</flow>
	<flow name="demo-jms-attributesFlow1" >
		<jms:listener doc:name="On New Message" config-ref="JMS_Config_ActiveMQ_2" destination="Q1"/>
		<jms:publish doc:name="Publish" config-ref="JMS_Config_ActiveMQ_2" destination="Q2">
			<jms:message correlationId="#[attributes.headers.correlationId]" />
		</jms:publish>
	</flow>
</mule>