コネクタのインストールおよびテスト
| DevKit は、Studio 6 および Mule 3 とのみ互換性があります。Mule 4 Connector を作成するには、 「Mule SDK」ドキュメントを参照してください。 |
Anypoint DevKit プラグインを使用してプロジェクトをビルドしたら、他の操作を追加する前に、骨格となるコネクタを Anypoint Studio にインストールしてその基本的な機能を確認できます。このドキュメントでは、Anypoint Studio でコネクタをビルドし、インストールしてテストするために必要な手順について説明します。
この手順のステップは次のとおりです。
-
必要な @Connector アノテーションを設定します。
-
「put in barn」操作をコネクタに追加します。
-
「put in barn」操作をドキュメント化します。
-
コネクタプロジェクトをビルドして、Anypoint DevKit プラグインを使用してインストールします。
-
コネクタの基本的な機能をテストします。
前提条件
このドキュメントでは、『コネクタプロジェクトが作成』されていることを前提としています。
@Connector アノテーションパラメータの設定
Maven が生成したクラスの @Connector アノテーションには必須のパラメータ friendlyName があります。(以下の例を参照)。このパラメータは、コネクタの人間が解読できる名前を定義します。この名前はコネクタの表示ラベルとして Studio のパレットに表示されます。このパラメータがない場合、コネクタは Anypoint Studio のパレットに表示されません。
@Connector(name = "barn", schemaVersion = "1.0", friendlyName = "Barn")java操作の追加
コネクタプロジェクトを作成したら、すぐにビルドして Anypoint Studio にインストールしてテストできます。ただし、テストをより興味深いものにするために、ある動物を文字列として受け取り、同じ動物の名前の後ろに「has been placed in the barn (家畜小屋に入れられた)」を付けて返す操作をコネクタに追加できます。 以下の手順に従ってこの操作を追加します。
-
Anypoint Studio で、メインの Java ファイル
src/main/java/org.mule.modules.barn/BarnConnector.java を開きます。 -
次のコードをコネクタクラスに貼り付けます。
/** * Custom processor that places an animal in the barn. * * {@sample.xml ../../../doc/barn-connector.xml.sample barn:putInBarn} * * @param animal Name of the animal to be place in the barn * @return returns processed message */ @Processor public String putInBarn(String animal) { return animal + " has been placed in the barn"; }java識別子 name は予約されているため、パラメータとして使用できません。 -
クラス全体が次のように表示されることを確認します。
/** * (c) 2003-2014 MuleSoft, Inc. The software in this package is published * under the terms of the CPAL v1.0 license, a copy of which has been * included with this distribution in the LICENSE.md file. */ package org.mule.modules.barn; import org.mule.api.annotations.Config; import org.mule.api.annotations.Connector; import org.mule.api.annotations.Configurable; import org.mule.api.annotations.Processor; import org.mule.api.annotations.param.Default; /** * Anypoint Connector * * @author MuleSoft, Inc. */ @Connector(name="barn", schemaVersion="1.0", friendlyName="Barn") public class BarnConnector { /** * Configurable */ @Configurable @Default("value") private String myProperty; @Config ConnectorConfig config; /** * Custom processor * * {@sample.xml ../../../doc/barn-connector.xml.sample barn:my-processor} * * @param content Content to be processed * @return Some string */ @Processor public String myProcessor(String content) { /* * MESSAGE PROCESSOR CODE GOES HERE */ return content; } /** * Custom processor that places an animal in the barn. * * {@sample.xml ../../../doc/barn-connector.xml.sample barn:putInBarn} * * @param animal Name of the animal to be place in the barn * @return returns processed message */ @Processor public String putInBarn(String animal) { return animal + " has been placed in the barn"; } /** * Set property * * @param myProperty My property */ public void setMyProperty(String myProperty) { this.myProperty = myProperty; } /** * Get property */ public String getMyProperty() { return this.myProperty; } public ConnectorConfig getConnectorConfig() { return this.config; } public void setConnectorConfig(ConnectorConfig connectorConfig) { this.config = connectorConfig; } }java -
Anypoint Studio で、コード内の
ConnectorConfig を選択し、Mac では CMD キーを、Windows では Ctrl キーを押します。ConnectorConfig.java ファイルが開き、このコネクタの接続管理の実装を確認できます。
操作のドキュメント化
DevKit はすべてのプロジェクトの適切なドキュメントを適用するため、コネクタに追加したそれぞれの操作の使用例を少なくとも 1 つ挙げる必要があります。
-
Anypoint Studio で
doc/barn-connector.xml.sample ファイルを開き、次のスニペットを最後の部分に貼り付けます。<!-- BEGIN_INCLUDE(barn:putInBarn) --> <barn:put-in-barn animal="#[map-payload:animal]" /> <!-- END_INCLUDE(barn:putInBarn) -->xml -
ファイルの内容全体が次のように表示されるのを確認します。
<!-- BEGIN_INCLUDE(barn:myProcessor) --> <barn:my-processor content="#[map-payload:content]" /> <!-- END_INCLUDE(barn:myProcessor) --> <!-- BEGIN_INCLUDE(barn:putInBarn) --> <barn:put-in-barn animal="#[map-payload:animal]" /> <!-- END_INCLUDE(barn:putInBarn) -->xml
コネクタのビルドおよびインストール
この時点で、コネクタをビルドして初めて使用する準備は整いました。Anypoint Studio 用 DevKit プラグインにより、コネクタのビルド、テストの実行、Anypoint Studio で使用するためのパッケージ化のプロセスが自動化されます。
プロセスを開始してコネクタをコンパイルしてインストールするには、プロジェクトを右クリックして [Anypoint Connector] > [Install or Update (インストールまたは更新)] の順に選択します。
新しいコネクタを手動でインストールするには、コネクタプロジェクトディレクトリ内のコマンドコンソールから次のコマンドを実行します。
mvn clean packagetext
更新サイトからのインストール
|
[Install or Update (インストールまたは更新)] 機能により、Anypoint Studio でコネクタに対する自動更新が提案される場合があります。 |
コネクタをパッケージ化する方法についての詳細は、「リリースに向けたコネクタのパッケージ化」を参照してください。
コネクタのテスト
新しいコネクタが機能することを確認するには、Barn Connector を使用する Mule アプリケーションを作成して実行します。アプリケーションは、Studio ビジュアルエディタまたは XML エディタを使用して作成できます。
Studio Visual Editor
-
HTTP Connector および新しい Barn Connector を使用してシンプルなフローを作成します。HTTP エンドポイントで設定されているデフォルト値 (ポート:
8081、ホスト:localhost) を使用します。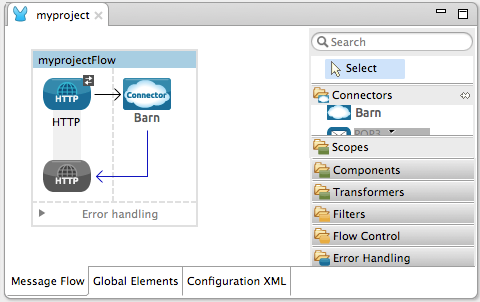
-
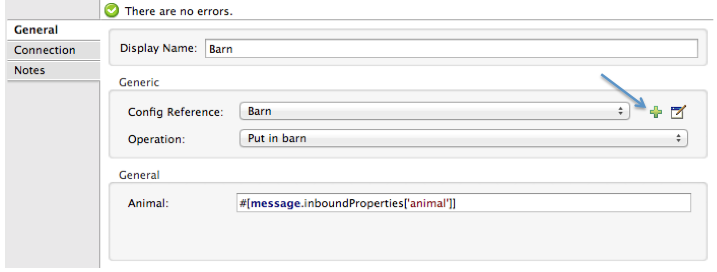
コネクタを選択して、プロパティエディタを開きます。Studio によってパラメータをエンドユーザが設定できるようになります。以下の表に従ってパラメータを設定します。

パラメータ 値 Display Name (表示名)
BarnConfig Reference (設定リファレンス)
See next step (次のステップを参照)
Operation (操作)
Put In Barn (家畜小屋に入れる)
Animal (動物)
#[message.inboundProperties['animal']] -
[Config Reference (設定リファレンス)] 項目の横にあるプラス記号をクリックし、使用するコネクタの新しいグローバル要素を作成します。
-
[My Property (私のプロパティ)]、[Username (ユーザ名)]、[Password (パスワード)] の各項目に、値として任意の文字列を入力し、[OK] をクリックします。
image::global-elements.png[] -
プロジェクトを保存し、Mule アプリケーションとして実行します (プロジェクト名を右クリックし、[Run As (別のユーザとして実行)] > [Mule Application (Mule アプリケーション)] を選択)。
-
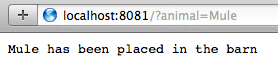
ブラウザで
http://localhost:8081/?animal=Mule に移動します。
-
アプリケーションがブラウザに応答を返します (下の画像を参照)。
XML
-
HTTP Connector および新しい
barn:config を使用してシンプルなフローを作成します。以下のコードサンプルに従って各要素のパラメータを設定します。<mule xmlns:barn="http://www.mulesoft.org/schema/mule/barn" xmlns:http="http://www.mulesoft.org/schema/mule/http" xmlns="http://www.mulesoft.org/schema/mule/core" xmlns:doc="http://www.mulesoft.org/schema/mule/documentation" xmlns:spring="http://www.springframework.org/schema/beans" xmlns:xsi="http://www.w3.org/2001/XMLSchema-instance" xsi:schemaLocation="http://www.springframework.org/schema/beans http://www.springframework.org/schema/beans/spring-beans-current.xsd http://www.mulesoft.org/schema/mule/core http://www.mulesoft.org/schema/mule/core/current/mule.xsd http://www.mulesoft.org/schema/mule/http http://www.mulesoft.org/schema/mule/http/current/mule-http.xsd http://www.mulesoft.org/schema/mule/barn http://www.mulesoft.org/schema/mule/barn/current/mule-barn.xsd"> <barn:config name="Barn" username="user" password="pass" myProperty="whatever you want" doc:name="Barn"> <barn:connection-pooling-profile initialisationPolicy="INITIALISE_ONE" exhaustedAction="WHEN_EXHAUSTED_GROW" /> </barn:config> <flow name="barntestFlow1" doc:name="barntestFlow1"> <http:inbound-endpoint exchange-pattern="request-response" host="localhost" port="8081" doc:name="HTTP" /> <barn:put-in-barn config-ref="Barn" animal="#[message.inboundProperties['animal']]" doc:name="Barn" /> </flow> </mule>xml -
プロジェクトを保存して実行します。
-
ブラウザで
http://localhost:8081/?animal=Mule に移動します。 -
アプリケーションがブラウザに応答を返します (下の画像を参照)。
関連情報
-
次のステップ: コネクタで『認証』を実装します。