Using Object Store v2
Anypoint Object Store v2 (Object Store v2) enables you to share data and states across Mule runtime workers within a single application.
Object Store v2 is enabled by default in Mule 4 and in Anypoint Platform EU Control Plane.
Components
Object Store v2 interacts with these components:
-
Anypoint Connector for Object Store (Object Store Connector)
Use Object Store Connector with Anypoint Studio to construct flows to write to and read from the object store.
Object Store Connector works with both Object Store version 1 and version 2.
To use Object Store v2 with Mule 4 apps, ensure that you select the correct object store configuration reference from the Object store menu.
-
REST API
The Object Store v2 API enables you to create and delete objects, set TTL (time to live) for objects, and set usage limits.
The Object Store v2 Stats API enables you to retrieve Object Store v2 usage statistics, such as how many API calls per month your organization makes to Object Store.
-
Anypoint Runtime Manager
When you enable Object Store v2, the Runtime Manager > Application Data option changes to Object Store. From the Object Store page, you can manage objects and their values in the object store.
Protect Object Store Data
Object Store v2 uses TLS for secure transport. Data at rest is stored using FIPS 140-2-compliant encryption standards. If you require a higher level of security, encrypt sensitive data before writing it to the object store.
Synchronize Access to Object Store v2
Using Object Store v2 with multi-worker CloudHub applications might result in data discrepancies or key clashes.
To avoid these issues, use a distributed key-value store as a lock to synchronize access to Object Store v2. For information about distributed locking in Mule runtime engine, see Distributed Locking.
Add Object Store Connector to Your Mule 4 Project
Install Object Store Connector to add it to a Mule project:
-
In Studio, create a Mule project.
-
In the Mule Palette view, click (X) Search in Exchange.
-
In Add Dependencies to Project, enter
Object Storein the search field. -
In Available modules, click ObjectStore Connector - Mule 4 and click Add.
-
Click Finish.
Use Object Store Connector in an Application
-
In Studio, create a simple flow such as:
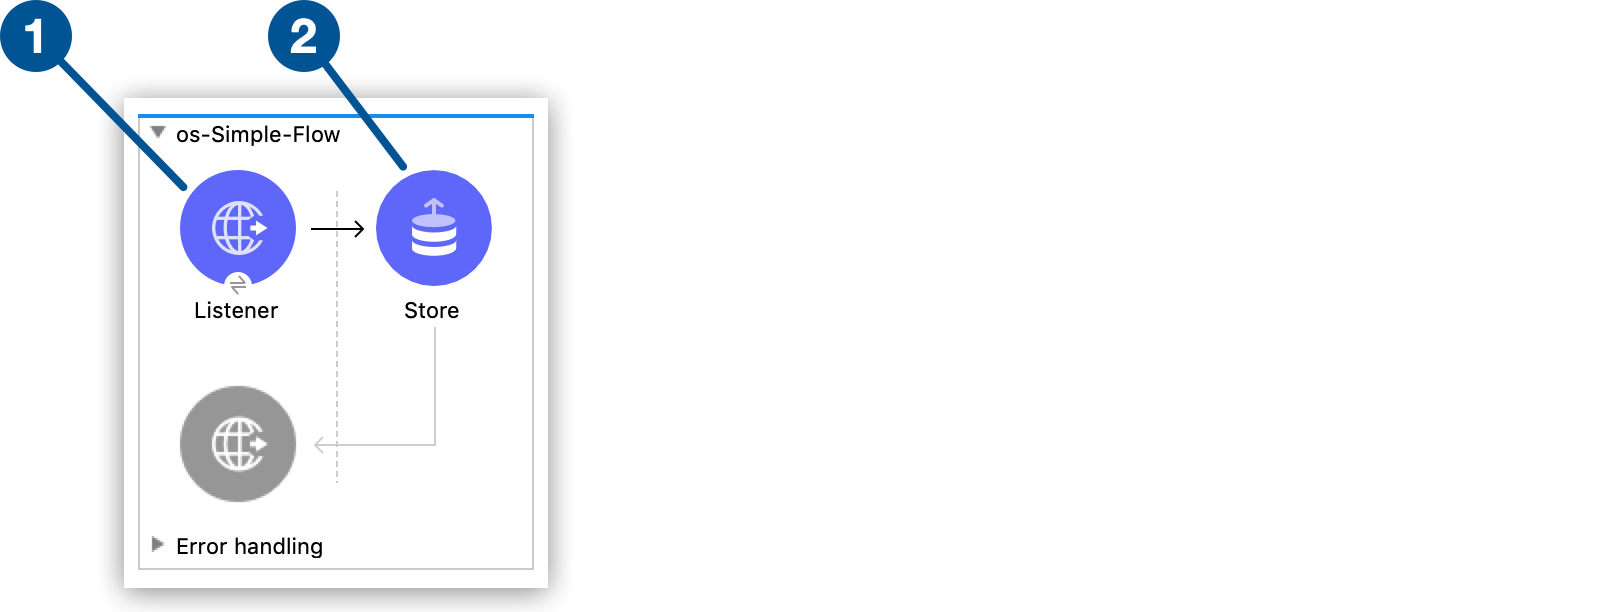
Connector
Parameters
HTTP Listener
Connector configuration =
HTTP_Listener_configPath =
/storeObject Store
Key =
#[payload.key]Value =
[payload.value]Object Store v2 for CloudHub doesn’t support using pipe (
|) characters in keys and converts any spaces to plus (+) characters.To use Object Store v2, ensure that the Persistent option is selected for the object store configuration reference in the Global Elements page. If the XML includes persistent="false", the app does not use Object Store v2. -
Save the application.
-
Right-click the application name in Package Explorer and select Anypoint Platform > Deploy to CloudHub.
-
If prompted, sign in to Anypoint Platform.
-
Click Deploy Application and click Open in Browser.
-
In Runtime Manager, click the Status column for your application.
-
In the details pane, copy the App url address.
Send Data to an Object Store
From a command line prompt, send JSON data to your Mule application using a curl command:
curl -X POST -H "Content-Type: application/json" -d '{ "key": "TestKey01", "value": "Testing" }' "http://app-url/store"
Change app-url to the name you copied from App url in Runtime Manager.
View Data in an Object Store
To view data in an object store:
-
In Runtime Manager, click the name of your application to view the dashboard.
-
Click Object Store in the navigation menu.
-
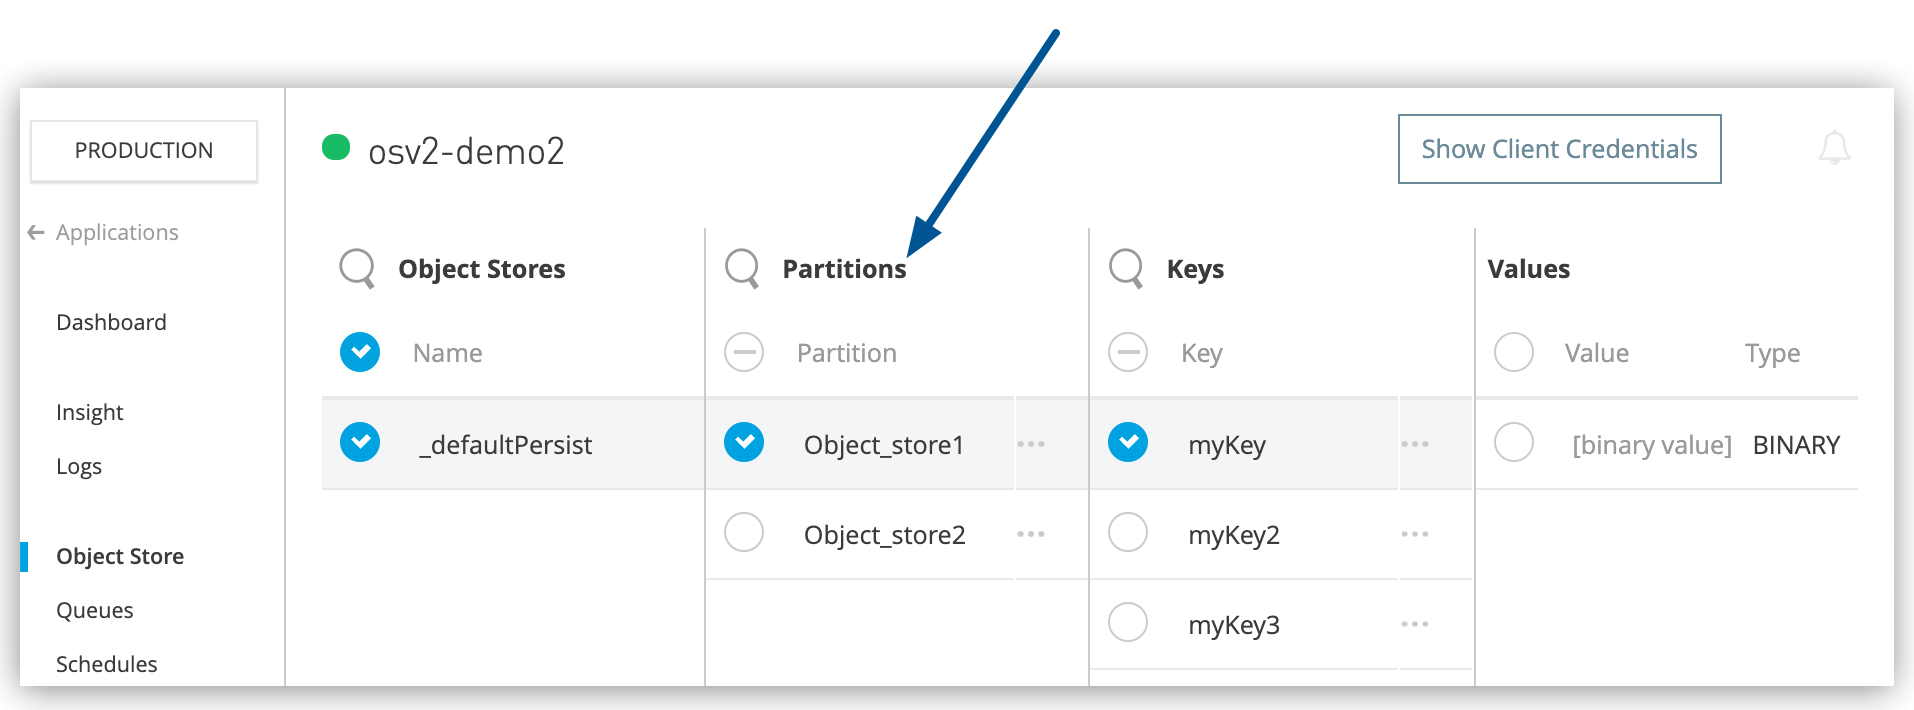
Click the object store, the partition, and then the key:
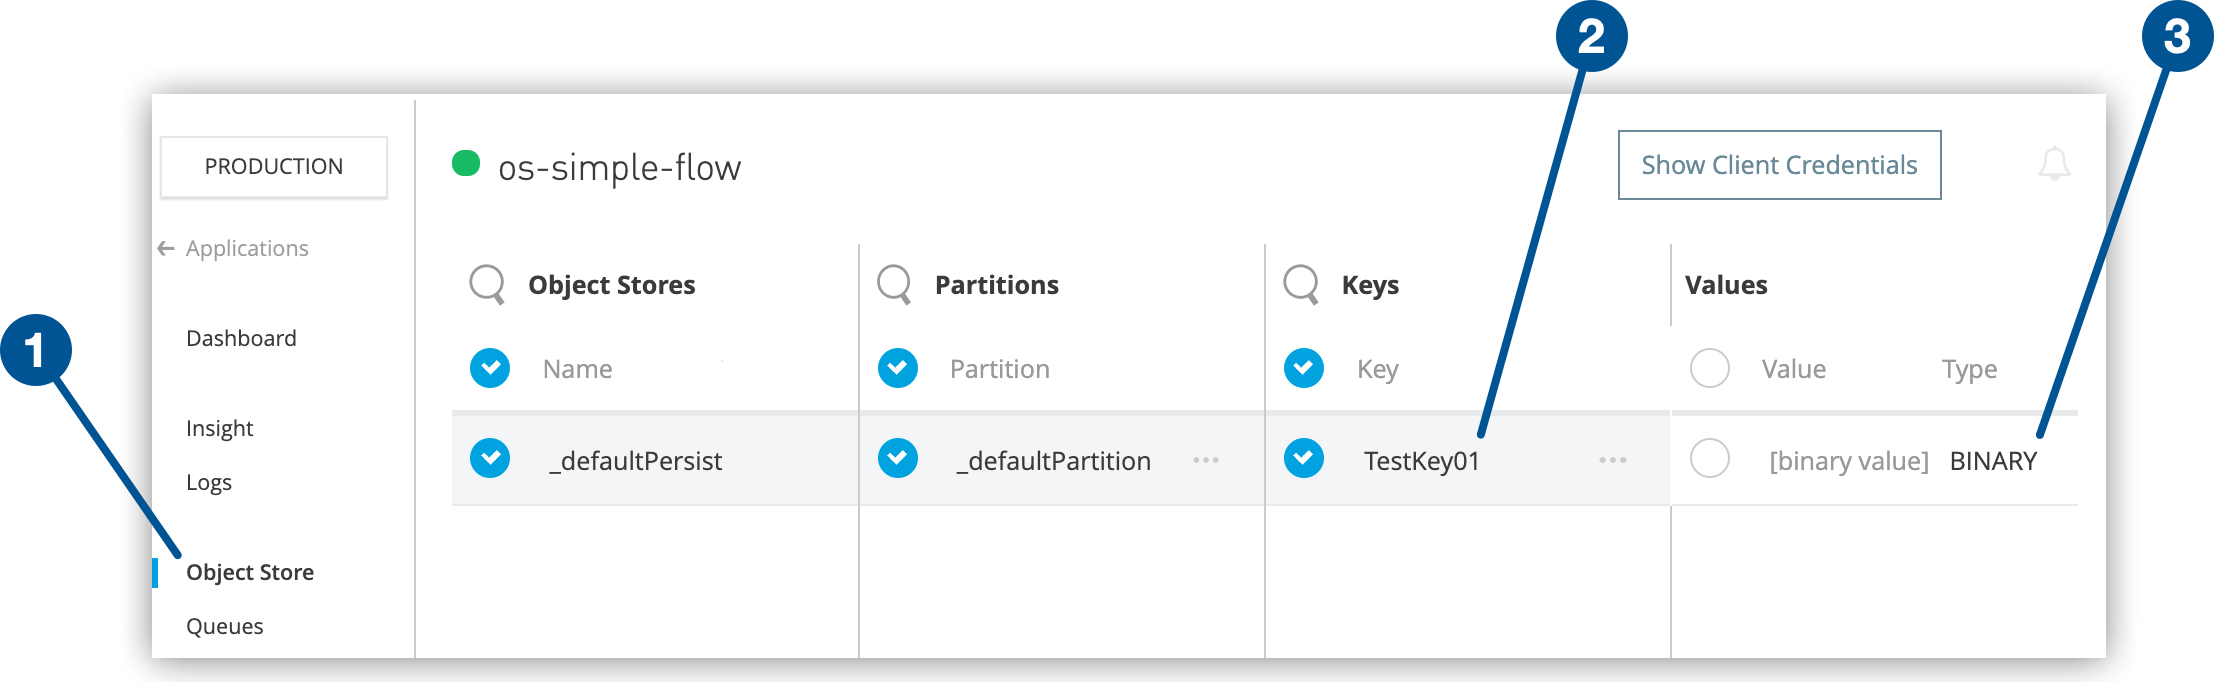
1 Object Store navigation menu 2 Selected key 3 Key data (binary value and type) The
TestKey01key that you sent fromcurlappears in the object store with the value[binary value] BINARY. The value is binary because Mule 4 wraps values in a Mule object, which causes them to be visible only as binary in Anypoint Platform. -
To delete a key, hover over a key name and click the trash can icon.
Similarly, you can delete a partition or the store itself by hovering over and clicking the trash can icon.
Do not delete object stores that are associated with a running app. To prevent errors, stop the app before deleting an object store.
The tutorial provides more detailed information about creating object stores in Mule 4 applications.
Configure a Custom Time to Live Period
A custom time to live (TTL) period applies to the partition defined in the object store configuration.
For information how rolling TTL behaves, see Rolling TTL.
To configure a custom TTL period for keys stored in the object store:
-
Create an app that uses Mule runtime engine version 4.2.1 or later.
-
Configure the object store in the app.
-
Select the Store operation in the flow and, in the properties window, click the green plus icon (+) for the Object store field:
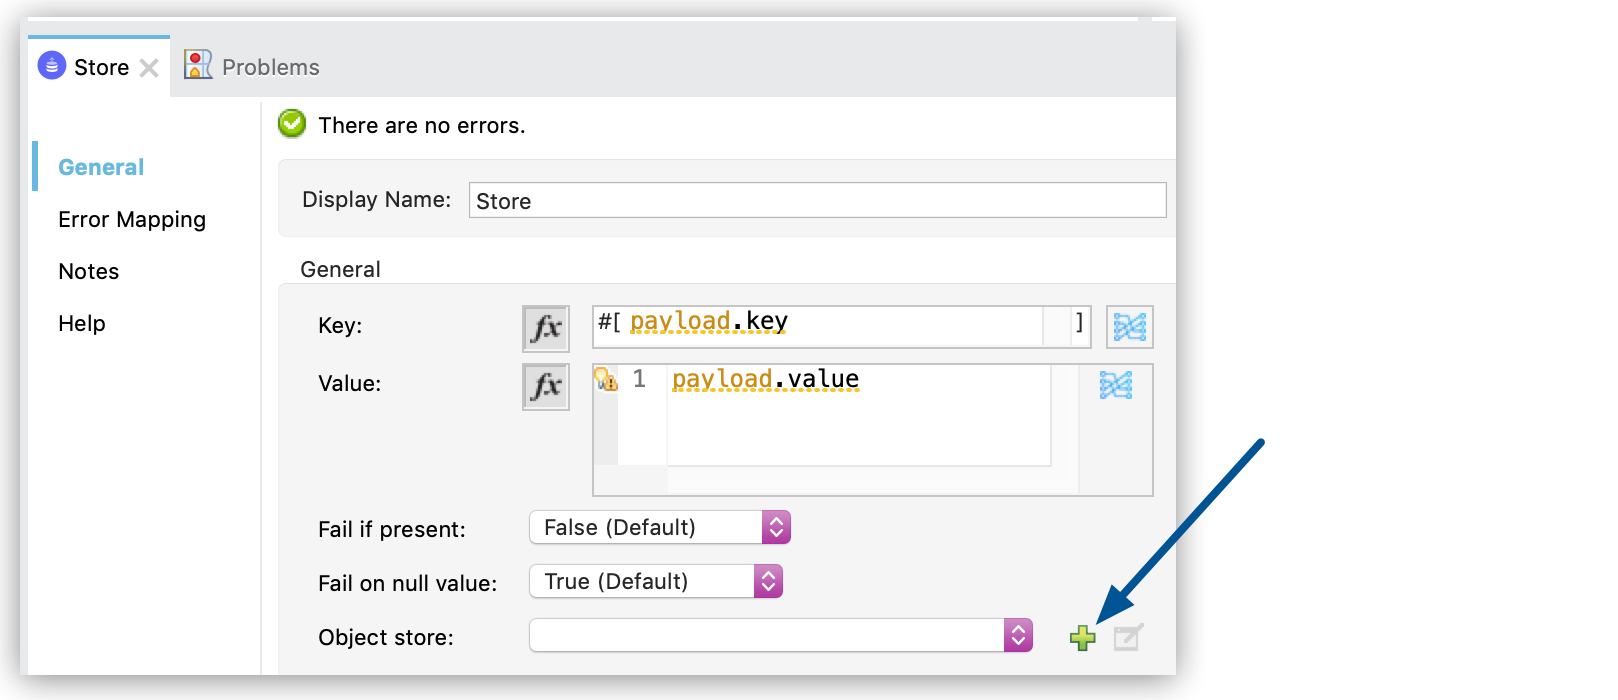
-
Configure the TTL entries in the Global Object Store Configuration window:
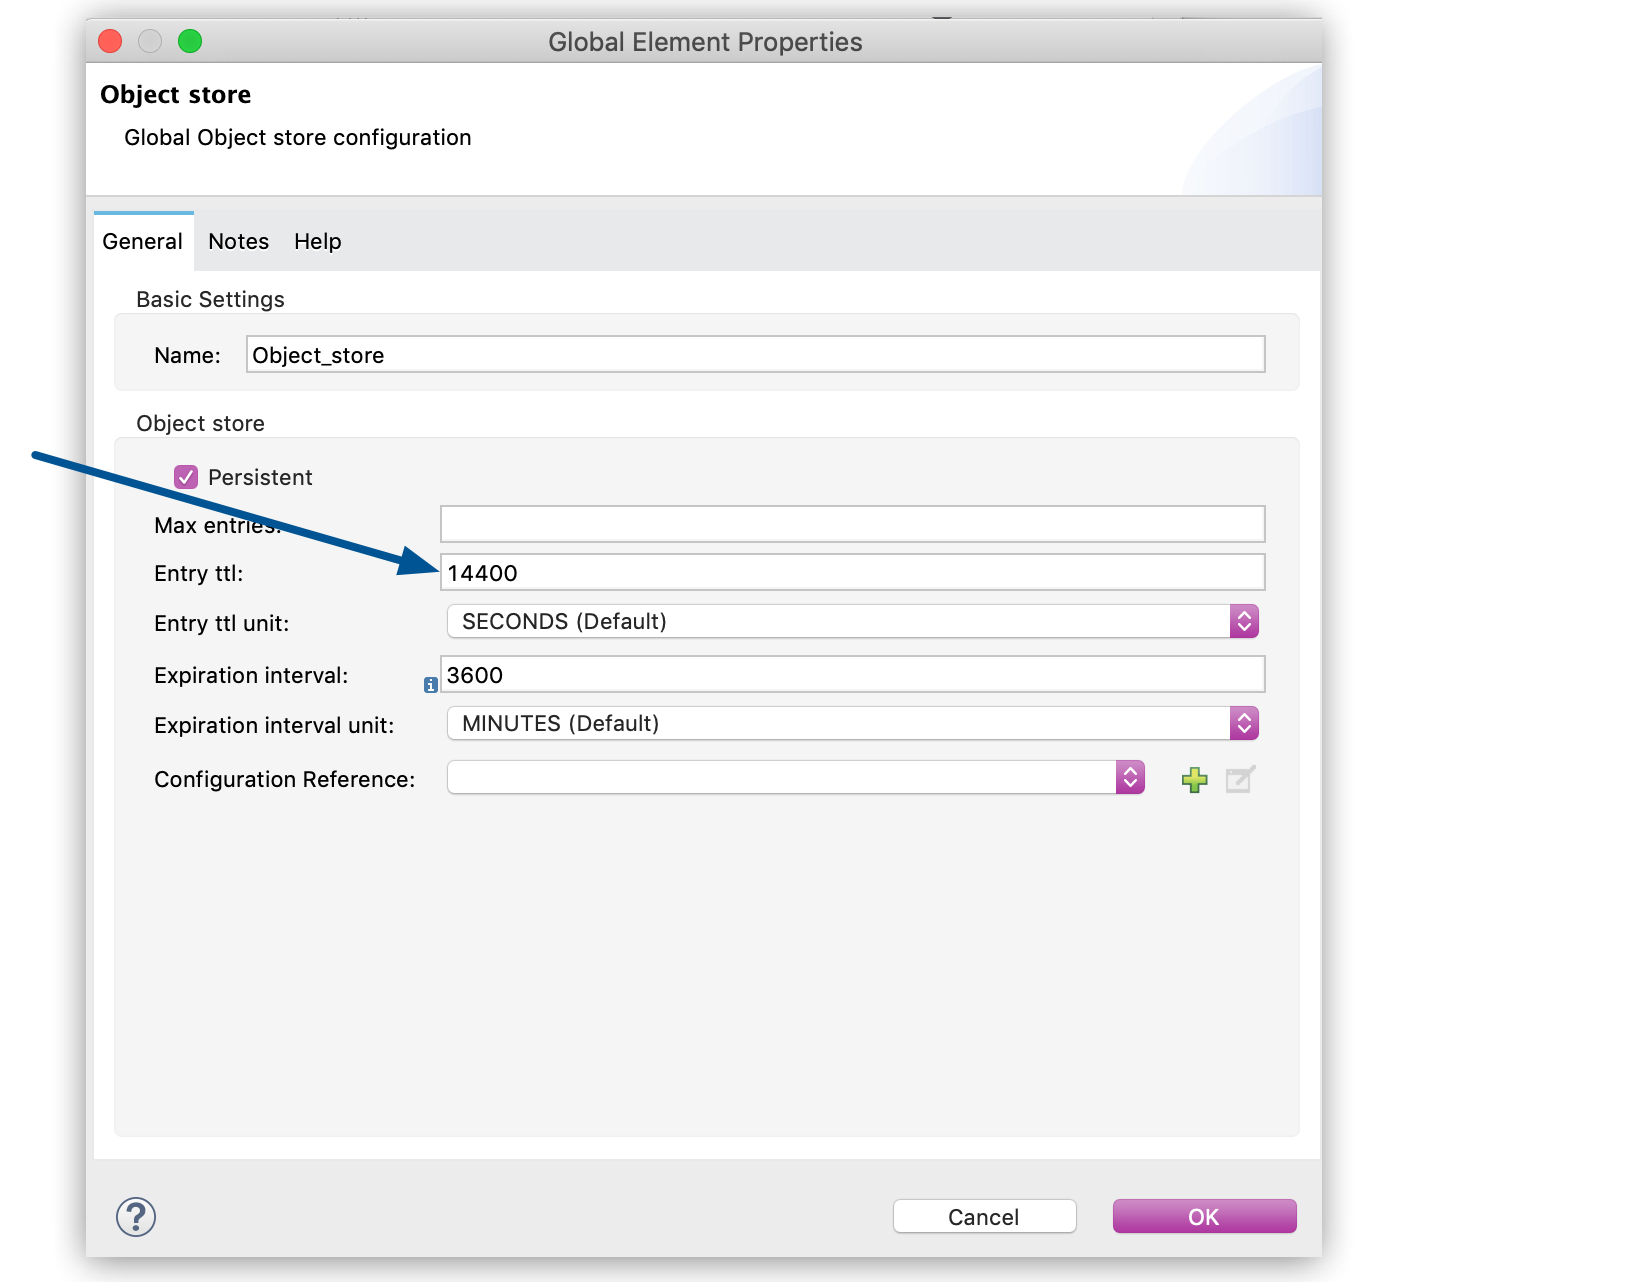
For Object Store v2, the Max entries field isn’t configurable. -
Entry ttl
For Mule 4.2.1 and later, enter a custom TTL value of 0 through 2592000 seconds (30 days).
If Entry ttl isn’t empty, the TTL is static.
If you leave this field empty, you enable rolling TTL; if you exceed 2592000 seconds, the TTL defaults to 2592000 seconds.
For Mule versions earlier than 4.2.1, leave this field empty to set the TTL to 2592000 seconds.
-
Entry ttl unit
Specify the TTL time interval, such as MINUTES.
-
Expiration interval
Specify how frequently to run the expiration thread.
Set this parameter to a positive value that is less than the Entry ttl value. If this field is blank or the value is less than or equal to zero, Object Store v2 ignores Entry ttl.
-
Expiration interval unit
Specify the expiration interval time unit, such as MINUTES.
-
-
Click OK to dismiss the window.
Create Object Store Partitions
You can use partitions to associate multiple object stores with an app.
To create partitions in Object Store v2:
-
Create an app and add a Store operation to the flow.
-
Configure the Store operation.
-
Configure the partitions:
-
In the properties window, click the green plus icon (+) for the Object store field:
-
In the Global Element Properties window, click the green plus icon (+) for Configuration Reference to create a global object store configuration:
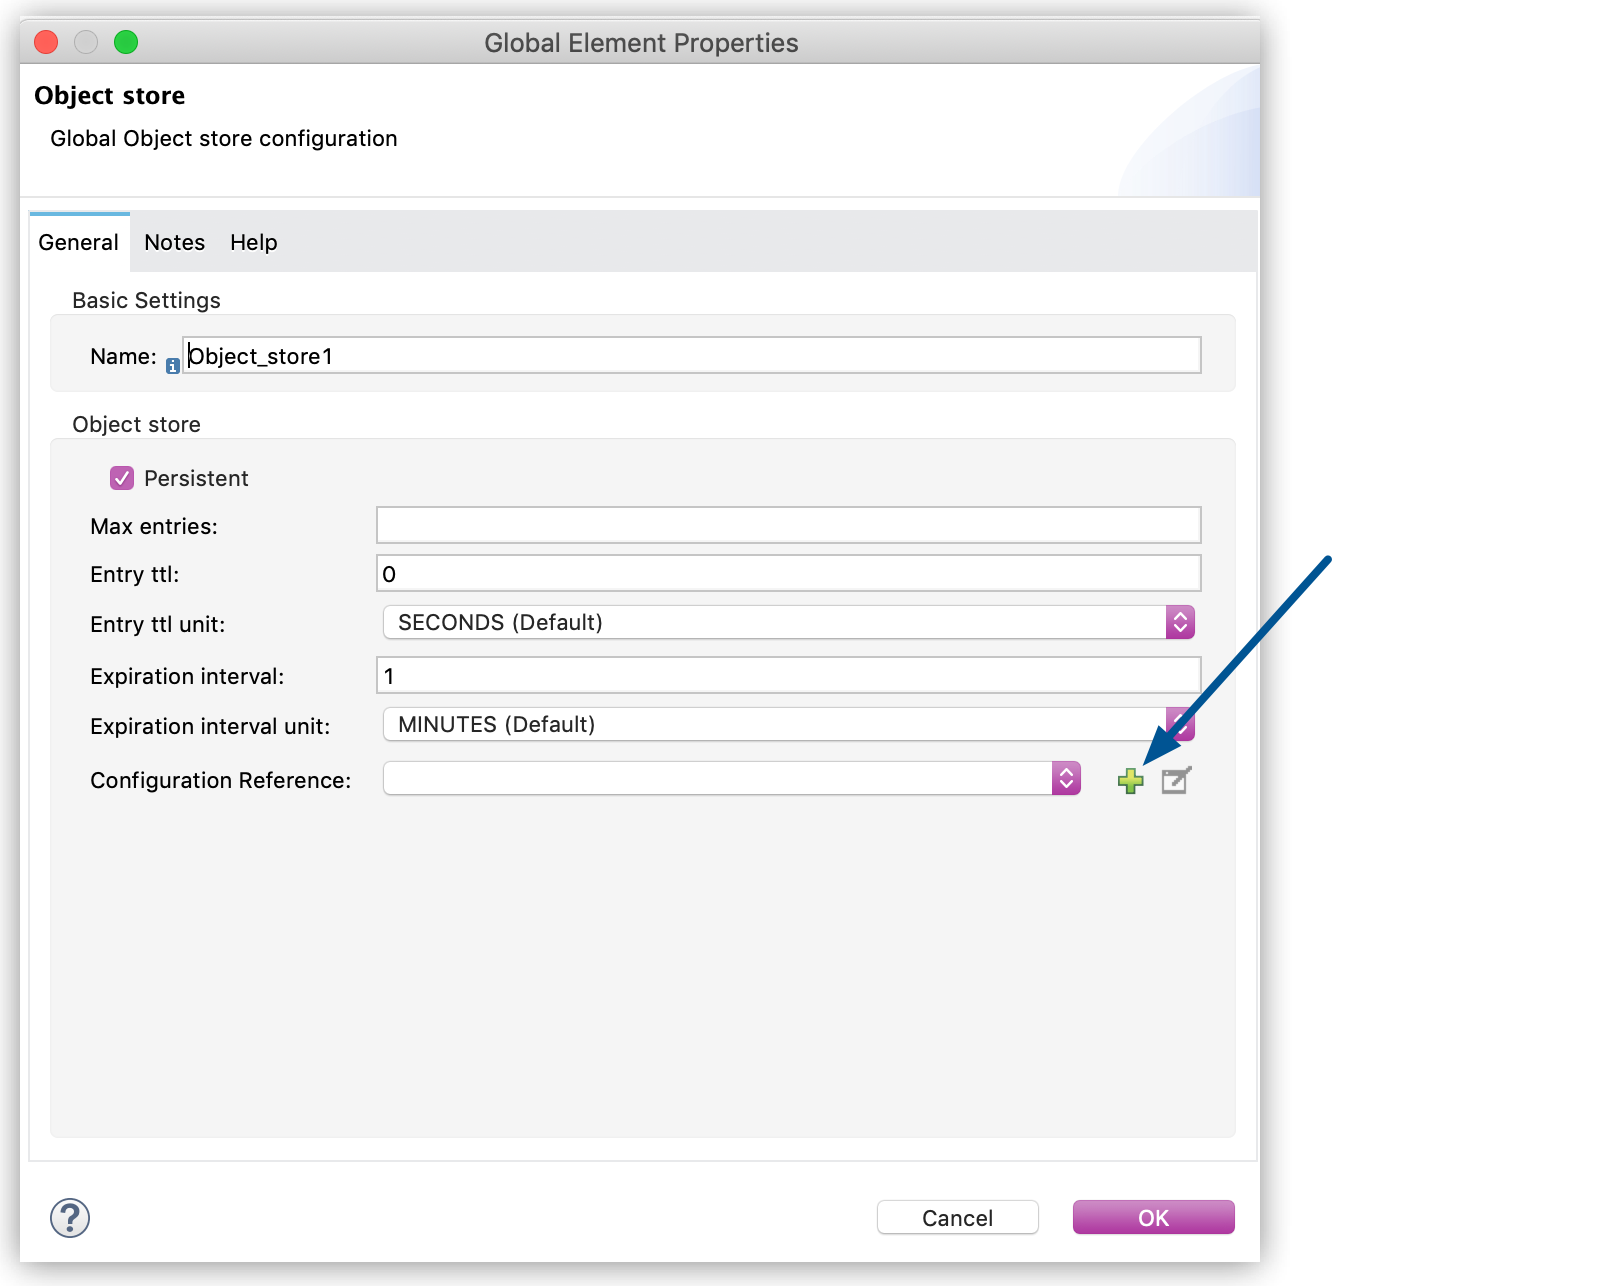
-
Name the object store configuration and click OK.
-
Ensure that the correct configuration reference is selected and click OK.
-
Ensure that the correct object store is selected and click OK.
-
-
Repeat Step 3 for each partition that you want to create.
-
Deploy the app to CloudHub and send a key-value pair to the object store.
-
In Runtime Manager, click Applications, select the app, and click Object Store in the left navigation pane.
-
Select the object store.
The partitions associated with the object store appear in the Object Store page:
Deploy App with Object Store v2 Using the Mule Maven Plugin
If you are using a Mule Maven plugin version between 3.3.3 and 3.4.0 to deploy your app to CloudHub:
-
Add the
<objectStoreV2>element to yourpom.xmlproject file:<cloudHubDeployment> ... <objectStoreV2>true</objectStoreV2> ... </cloudHubDeployment> -
Select Use Object Store v2 in the Deploy Application page in Runtime Manager.