Slack Connector 2.0 Examples
The following examples show how to create a public Slack channel, post a message to a channel, upload a file to a Slack channel using a file path, and upload file text content to a Slack channel.
These examples use variables for some field values. You can either:
-
Replace the variables with their values in the code.
-
Provide the values for each variable in a properties file and then refer to that file from the connector configuration.
If you don’t know how to use a properties file, see Configuring Property Placeholders.
Before you try the examples, access Anypoint Studio (Studio) and verify that the Mule Palette view displays entries for Slack Connector. If not, follow the instructions in Add the Connector to Your Mule Project.
Create a Channel
This example shows how to create a public Slack channel with a user-specified name.
The following screenshot shows the app flow for this example:
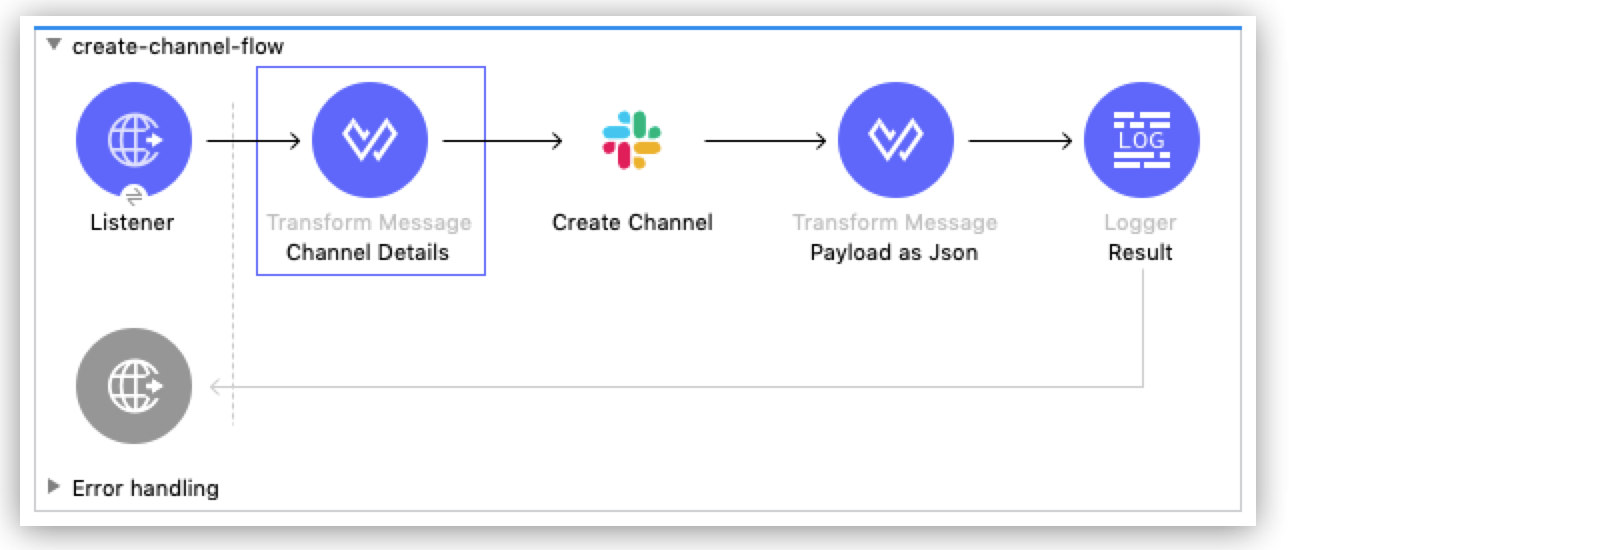
Implementing this example involves creating a new Mule project and configuring HTTP Listener, the Create Channel operation, two Transform Message components, and one Logger component.
Before You Begin
This example requires the channels:write scope in both the connection configuration and Slack application.
Configure HTTP Listener
Configure HTTP Listener to initiate a Mule flow when a call is made to the /create-channel path on localhost port 8081:
-
Create a new Mule project in Studio.
-
In Studio, click HTTP and drag the Listener operation to the canvas.
-
In the Listener properties window, click + next to the Connector configuration field to add a global element.
-
Accept the defaults.
-
In the Listener properties window, set the Path field value to
/create-channel.
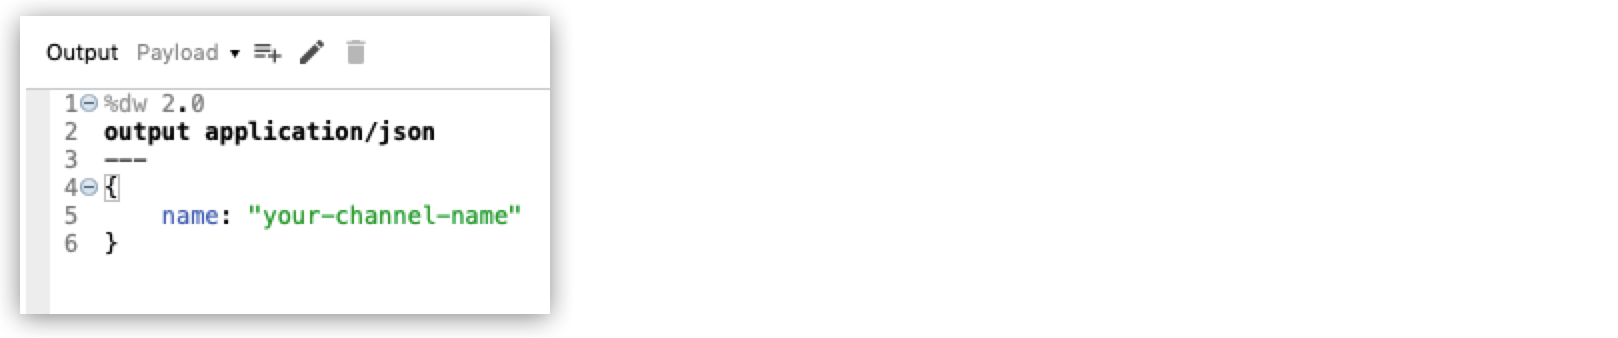
Add the First Transform Message Component
The initial Transform Message component takes the channel name as input and then converts the name to JSON format:
-
In the Mule Palette view, select Core and drag the Transform Message component to the right of Listener.
-
Change the name of the Transform Message component to
Channel Details. -
Click the Transform Message component, add the channel name to the output, and set the output format to
application/json:
Add the Create Channel Operation
The Create Channel operation connects with Slack and posts a request to the https://slack.com/api/conversations.create endpoint:
-
From the Mule Palette view, select Slack and drag the Create Channel operation to the right of Listener.
-
In the Search properties window, click + next to the Connector configuration field to add a global element.
-
Enter the following values:
Field Value Consumer Key
${consumer.key}Consumer Secret
${consumer.secret}Authorization url
https://slack.com/oauth/authorizeAccess token url
https://slack.com/api/oauth.accessScopes
channels:write groups:write im:write mpim:write users:read.emailListener config
HTTP_Listener-config -
In the Slack properties window, enter
payloadin the Conversationcreate content field.
Add the Second Transform Message Component
The second Transform Message component converts the result of the Create Channel operation to JSON format:
-
In the Mule Palette view, select Core and drag the Transform Message component to the right of Listener.
-
Change the name of the Transform Message component to
Payload as JSON. -
Click the Transform Message component and set the output to
application/json: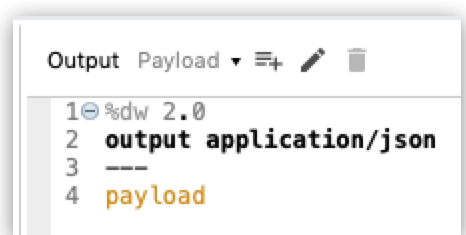 Figure 3. Second Transform Message Component for the Create Channel example
Add the Logger Component
The Logger component logs the query result to the console:
-
In the Mule Palette view, select Core and then select the Logger component.
-
Configure the Logger component.
-
Save the project.
Run the App
To run the app:
-
Start the Mule app.
-
To send a request, you must perform the OAuth dance. Open your browser and go to
http://localhost:8082/authorizeto enable access to the app. -
Send a POST request to
http://localhost:8081/account?name="your channel name".
XML Code for This Example
Paste this code into the Studio XML editor to quickly load the flow for this example into your Mule app:
<?xml version="1.0" encoding="UTF-8"?>
<mule xmlns:http="http://www.mulesoft.org/schema/mule/http" xmlns:ee="http://www.mulesoft.org/schema/mule/ee/core"
xmlns:slack="http://www.mulesoft.org/schema/mule/slack"
xmlns="http://www.mulesoft.org/schema/mule/core" xmlns:doc="http://www.mulesoft.org/schema/mule/documentation" xmlns:xsi="http://www.w3.org/2001/XMLSchema-instance" xsi:schemaLocation="http://www.mulesoft.org/schema/mule/core http://www.mulesoft.org/schema/mule/core/current/mule.xsd
http://www.mulesoft.org/schema/mule/slack http://www.mulesoft.org/schema/mule/slack/current/mule-slack.xsd
http://www.mulesoft.org/schema/mule/ee/core http://www.mulesoft.org/schema/mule/ee/core/current/mule-ee.xsd
http://www.mulesoft.org/schema/mule/http http://www.mulesoft.org/schema/mule/http/current/mule-http.xsd">
<slack:config name="Slack_Connector_Config" doc:name="Slack Connector Config" >
<slack:slack-auth-connection >
<slack:oauth-authorization-code consumerKey="${consumer.key}" consumerSecret="${consumer.secret}" scopes="channels:write groups:write im:write mpim:write users:read.email "/>
<slack:oauth-callback-config listenerConfig="HTTP_Listener_config" callbackPath="/callback" authorizePath="/authorize" externalCallbackUrl="http://localhost:8081/callback"/>
</slack:slack-auth-connection>
</slack:config>
<http:listener-config name="HTTP_Listener_config" doc:name="HTTP Listener config" >
<http:listener-connection host="0.0.0.0" port="8081" />
</http:listener-config>
<configuration-properties doc:name="Configuration properties" file="application.properties" />
<flow name="create-channel-flow" >
<http:listener doc:name="Listener" config-ref="HTTP_Listener_config" path="/create-channel"/>
<ee:transform doc:name="Channel Details" >
<ee:message >
<ee:set-payload ><![CDATA[%dw 2.0
output application/json
---
{
name: "your-channel-name"
}]]></ee:set-payload>
</ee:message>
</ee:transform>
<slack:create-conversationscreate doc:name="Create Channel" config-ref="Slack_Connector_Config"/>
<ee:transform doc:name="Payload as Json" >
<ee:message >
<ee:set-payload ><![CDATA[%dw 2.0
output application/json
---
payload]]></ee:set-payload>
</ee:message>
</ee:transform>
<logger level="INFO" doc:name="Result" message="#[payload]"/>
</flow>
<flow name="send-message-to-channel-flow" >
<http:listener doc:name="Listener" config-ref="HTTP_Listener_config" path="/send-message"/>
<ee:transform doc:name="Message Details" >
<ee:message >
<ee:set-payload ><![CDATA[%dw 2.0
output application/json
---
{
channel: "your-existing-channel",
text: "Your text goes here"
}]]></ee:set-payload>
</ee:message>
</ee:transform>
<slack:create-chatpost-message doc:name="Send Message" config-ref="Slack_Connector_Config"/>
<ee:transform doc:name="Payload as Json" >
<ee:message>
<ee:set-payload><![CDATA[%dw 2.0
output application/json
---
payload]]></ee:set-payload>
</ee:message>
</ee:transform>
<logger level="INFO" doc:name="Result" message="#[payload]"/>
</flow>
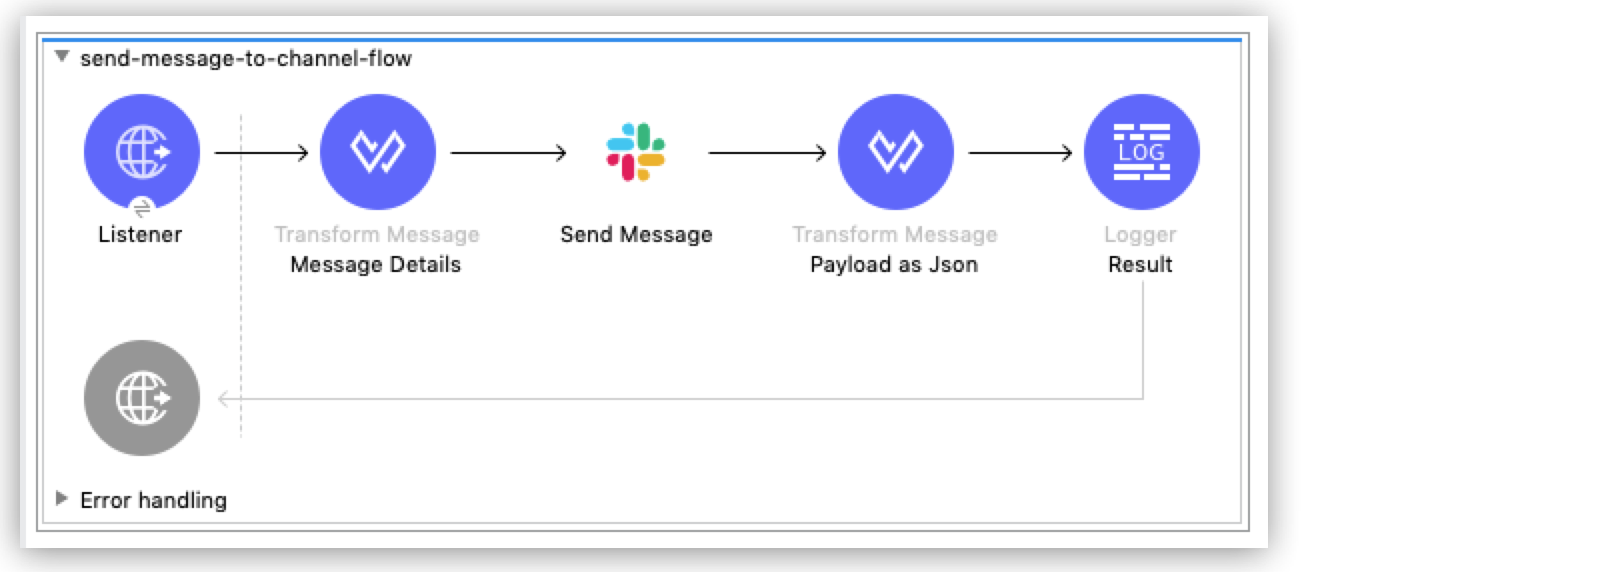
</mule>Post a Message to a Channel
This example shows how to post a message to a public, private, or direct message (IM) channel.
The following screenshot shows the app flow for this example:
Before You Begin
This example requires the following scopes in both the connection configuration and Slack application:
-
chat:write -
chat:write:user -
chat:write:bot
Components
This example uses the following components:
-
HTTP Listener
Initiates a Mule flow when a call is made to the
/send/messagepath on localhost port 8081 -
First Transform Message component
Specifies the target channel and provides the message content for the Send Message operation
-
Send Message operation
Connects with Slack and posts the message to the specified channel
-
Second Transform Message component
Outputs the results of the Send Message operation in JSON format
-
Logger
Logs the result of the Send Message operation to the console
XML Code for This Example
Paste this code into the Studio XML editor to quickly load the flow for this example into your Mule app:
<?xml version="1.0" encoding="UTF-8"?>
<mule xmlns:http="http://www.mulesoft.org/schema/mule/http" xmlns:ee="http://www.mulesoft.org/schema/mule/ee/core"
xmlns:slack="http://www.mulesoft.org/schema/mule/slack"
xmlns="http://www.mulesoft.org/schema/mule/core" xmlns:doc="http://www.mulesoft.org/schema/mule/documentation" xmlns:xsi="http://www.w3.org/2001/XMLSchema-instance" xsi:schemaLocation="http://www.mulesoft.org/schema/mule/core http://www.mulesoft.org/schema/mule/core/current/mule.xsd
http://www.mulesoft.org/schema/mule/slack http://www.mulesoft.org/schema/mule/slack/current/mule-slack.xsd
http://www.mulesoft.org/schema/mule/ee/core http://www.mulesoft.org/schema/mule/ee/core/current/mule-ee.xsd
http://www.mulesoft.org/schema/mule/http http://www.mulesoft.org/schema/mule/http/current/mule-http.xsd">
<slack:config name="Slack_Connector_Config" doc:name="Slack Connector Config" >
<slack:slack-auth-connection >
<slack:oauth-authorization-code consumerKey="${consumer.key}" consumerSecret="${consumer.secret}" scopes="channels:write groups:write im:write mpim:write users:read.email "/>
<slack:oauth-callback-config listenerConfig="HTTP_Listener_config" callbackPath="/callback" authorizePath="/authorize" externalCallbackUrl="http://localhost:8081/callback"/>
</slack:slack-auth-connection>
</slack:config>
<http:listener-config name="HTTP_Listener_config" doc:name="HTTP Listener config" >
<http:listener-connection host="0.0.0.0" port="8081" />
</http:listener-config>
<configuration-properties doc:name="Configuration properties" file="application.properties" />
<flow name="find-user-by-email-flow" >
<http:listener doc:name="Listener" config-ref="HTTP_Listener_config" path="find-by-email"/>
<slack:get-userslookup-by-email doc:name="Find User by Email" config-ref="Slack_Connector_Config" email="example@emailaddress.com"/>
<ee:transform doc:name="Payload as Json" >
<ee:message >
<ee:set-payload ><![CDATA[%dw 2.0
output application/json
---
payload]]></ee:set-payload>
</ee:message>
</ee:transform>
<logger level="INFO" doc:name="Lookup Result" message="#[payload]"/>
</flow>
<flow name="send-message-to-channel-flow" >
<http:listener doc:name="Listener" config-ref="HTTP_Listener_config" path="/send-message"/>
<ee:transform doc:name="Message Details" >
<ee:message >
<ee:set-payload ><![CDATA[%dw 2.0
output application/json
---
{
channel: "your-existing-channel",
text: "Your text goes here"
}]]></ee:set-payload>
</ee:message>
</ee:transform>
<slack:create-chatpost-message doc:name="Send Message" config-ref="Slack_Connector_Config"/>
<ee:transform doc:name="Payload as Json" >
<ee:message>
<ee:set-payload><![CDATA[%dw 2.0
output application/json
---
payload]]></ee:set-payload>
</ee:message>
</ee:transform>
<logger level="INFO" doc:name="Result" message="#[payload]"/>
</flow>
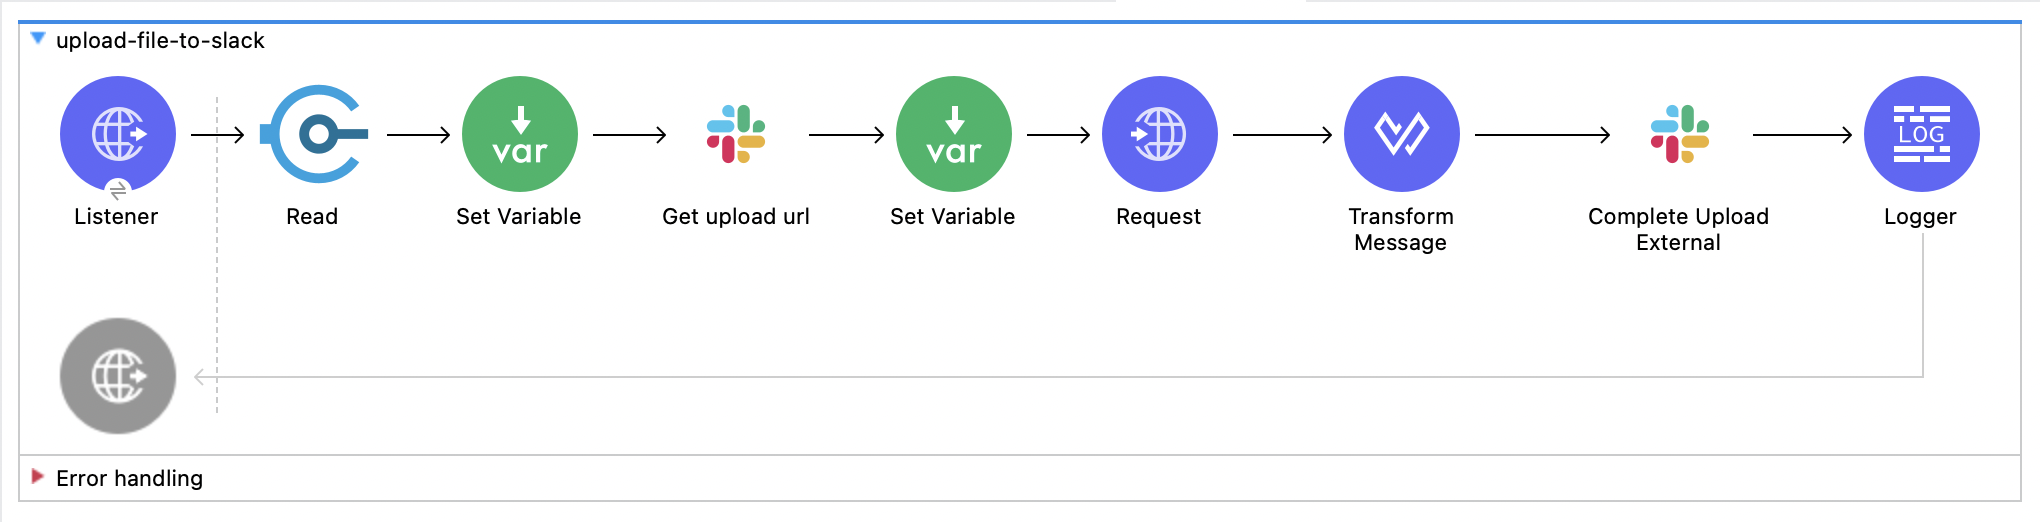
</mule>Upload a File to a Slack Channel (Using File Path)
This example shows how to upload a file to a public or private channel.
The following screenshot shows the app flow for this example:
Before You Begin
This example requires the following scopes in both the connection configuration and Slack application:
-
files:write -
files:write:user
Components
This example uses the following components:
-
HTTP Listener
Initiates a Mule flow when a call is made to the
/file-uploadpath on localhost port 8081 -
Read operation - File Connector
Reads a file from the specified file path
-
First Set Variable component
Stores the file content retrieved in the previous step into a variable named
fileContent -
Get upload url operation
Makes a GET request to Slack. It requires filename and length as mandatory fields, which are provided as
attributes.fileNameandattributes.size, obtained from the Read operation. -
Second Set Variable component
Stores
file_idretrieved from the Get upload url operation in a variable namedfileId -
Request operation - HTTP Connector
Makes a POST request to Slack using the file content retrieved from the Get upload url operation response. The URL is set to
[payload.upload_url], and the content is set to[vars.fileContent]. -
Transform Message
Forms files array using the
fileIdobtained from previous step -
Complete Upload External operation
Makes a POST request to Slack to complete the file upload process. It requires a files array as a mandatory parameter.
If Channel id is not provided, the file is uploaded to the Slack server and remains private. -
Logger
Logs the result of the Complete Upload External operation to the console
XML Code for This Example
Paste this code into the Studio XML editor to quickly load the flow for this example into your Mule app:
<?xml version="1.0" encoding="UTF-8"?>
<mule xmlns:file="http://www.mulesoft.org/schema/mule/file" xmlns:http="http://www.mulesoft.org/schema/mule/http"
xmlns:ee="http://www.mulesoft.org/schema/mule/ee/core"
xmlns:slack="http://www.mulesoft.org/schema/mule/slack" xmlns="http://www.mulesoft.org/schema/mule/core" xmlns:doc="http://www.mulesoft.org/schema/mule/documentation" xmlns:xsi="http://www.w3.org/2001/XMLSchema-instance" xsi:schemaLocation="http://www.mulesoft.org/schema/mule/core http://www.mulesoft.org/schema/mule/core/current/mule.xsd
http://www.mulesoft.org/schema/mule/slack http://www.mulesoft.org/schema/mule/slack/current/mule-slack.xsd
http://www.mulesoft.org/schema/mule/ee/core http://www.mulesoft.org/schema/mule/ee/core/current/mule-ee.xsd
http://www.mulesoft.org/schema/mule/http http://www.mulesoft.org/schema/mule/http/current/mule-http.xsd
http://www.mulesoft.org/schema/mule/file http://www.mulesoft.org/schema/mule/file/current/mule-file.xsd">
<slack:config name="Slack_Connector_Config" doc:name="Slack Connector Config" >
<slack:slack-auth-connection >
<slack:oauth-authorization-code consumerKey="${consumer.key}" consumerSecret="${consumer.secret}" scopes="channels:write groups:write im:write mpim:write users:read.email "/>
<slack:oauth-callback-config listenerConfig="HTTP_Listener_config" callbackPath="/callback" authorizePath="/authorize" externalCallbackUrl="http://localhost:8081/callback"/>
</slack:slack-auth-connection>
</slack:config>
<http:listener-config name="HTTP_Listener_config" doc:name="HTTP Listener config" doc:id="4e474318-0d25-4a26-b1d9-53f8b452c98f" >
<http:listener-connection host="0.0.0.0" port="8081" />
</http:listener-config>
<configuration-properties doc:name="Configuration properties" doc:id="8fd46949-d3c3-49e6-9314-1c7edaa76e96" file="application.properties" />
<file:config name="File_Config" doc:name="File Config" doc:id="56c48fe4-fd75-47d7-832e-e075cd7ef25f" >
<file:connection workingDir="/Users/Test/Downloads/" />
</file:config>
<flow name="upload-file-to-slack" doc:id="781e1b2a-120a-406b-a9d4-77d239eca9fe" >
<http:listener doc:name="Listener" doc:id="9f5150f9-d991-40d6-a69b-81ee6baf934f" config-ref="HTTP_Listener_config" path="/file-upload"/>
<file:read doc:name="Read" doc:id="3b7e29dc-e86b-4da8-8974-7d0e3cd426ca" config-ref="File_Config" path="/Users/Test/Downloads/file.json"/>
<set-variable doc:name="Set Variable" doc:id="46b7c90f-23a1-4950-8b22-6247225258a5" variableName="fileContent" value="#[payload]"/>
<slack:get-filesget-upload-urlexternal doc:name="Get upload url" doc:id="1479ee6f-46bc-4583-b4af-561a750cc7da" config-ref="Slack_Connector_Config" length="#[attributes.size]" filename="#[attributes.fileName]"/>
<set-variable value="#[payload.file_id]" doc:name="Set Variable" doc:id="530368e3-5691-4cca-82e1-af2214aac0f9" variableName="fileId"/>
<http:request method="POST" doc:name="Request" doc:id="0ac21f20-9351-4b17-83ec-0efc8448c124" url="#[payload.upload_url]" responseTimeout="#[900000]">
<http:body ><![CDATA[#[vars.fileContent]]]></http:body>
</http:request>
<ee:transform doc:name="Transform Message" doc:id="04f725ee-846e-49f9-90a7-94c33362b0c0" >
<ee:message >
<ee:set-payload ><![CDATA[%dw 2.0
output application/json
---
write(
[
{ id : vars.fileId }
],
"application/json"
)
]]></ee:set-payload>
</ee:message>
</ee:transform>
<slack:create-filescomplete-upload-external doc:name="Complete Upload External" doc:id="56fec9a8-d023-4bbb-a9ca-d5193fd4a1e0" config-ref="Slack_Connector_Config" channelId="${channel.id}" initialComment="Initial Comment" target="completeUploadExt">
<slack:files >
<slack:file value="#[payload]" />
</slack:files>
</slack:create-filescomplete-upload-external>
<logger level="INFO" doc:name="Logger" doc:id="38d1cd87-21f0-4f95-81c1-03806cd61d93" />
</flow>
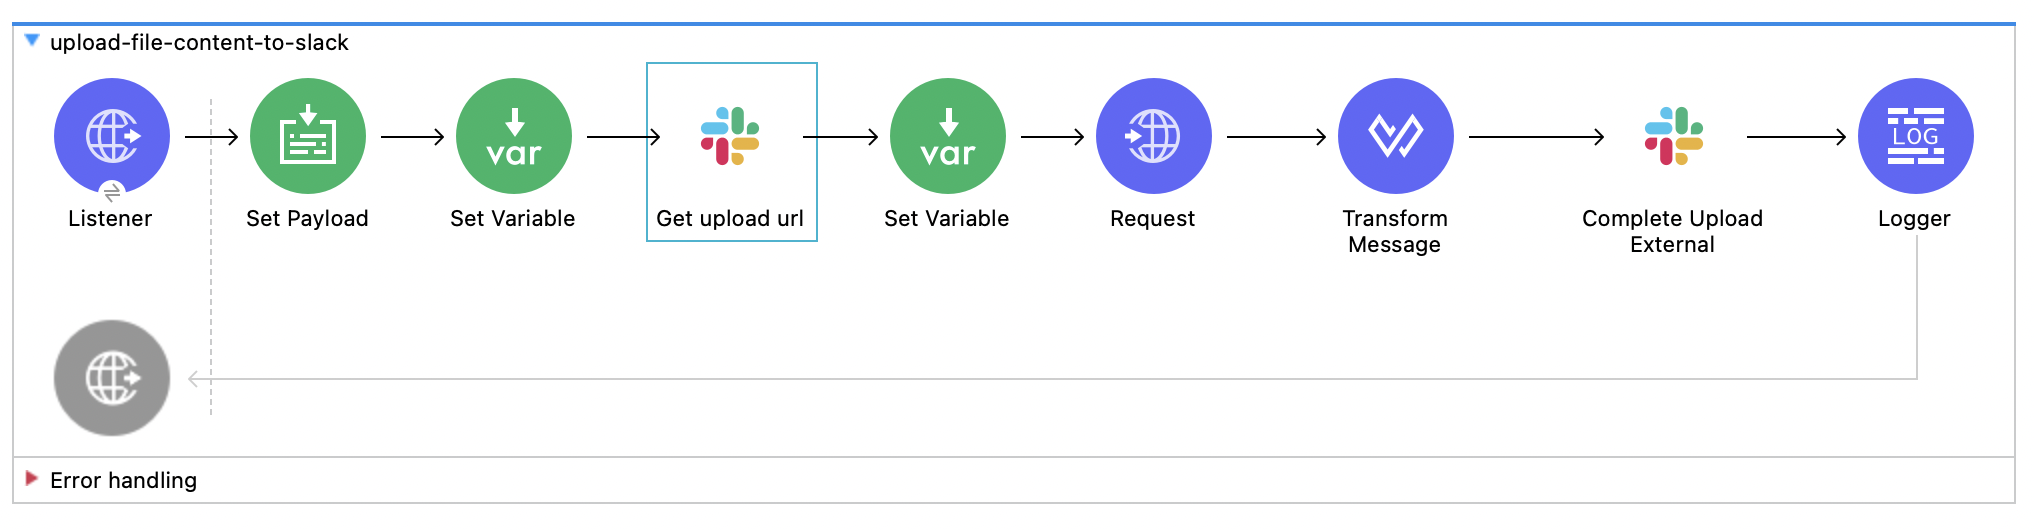
</mule>Upload File Text Content to a Slack Channel
This example shows how to upload file text content to a public or private channel.
The following screenshot shows the app flow for this example:
Before You Begin
This example requires the following scopes in both the connection configuration and Slack application:
-
files:write -
files:write:user
Components
This example uses the following components:
-
HTTP Listener
Initiates a Mule flow when a call is made to the
/file-uploadpath on localhost port 8081 -
Set Payload
Sets file text content to the payload
-
First Set Variable component
Stores the file text content payload to a variable named
UploadContent -
Get upload url operation
Makes a GET request to Slack. It requires filename and length as mandatory fields, which are provided as
attributes.fileNameandattributes.size -
Second Set Variable component
Stores
file_idretrieved from the Get upload url operation in a variable namedfileId -
Request operation - HTTP Connector
Makes a POST request to Slack using the file content retrieved from the Get upload url operation response. The URL is set to
[payload.upload_url], and the content is set to[vars.fileContent]. -
Transform Message
Forms files array using the
fileIdobtained from previous step -
Complete Upload External operation
Makes a POST request to Slack to complete the file upload process. It requires a files array as a mandatory parameter.
If Channel id is not provided, the file is uploaded to the Slack server and remains private. -
Logger
Logs the result of the Complete Upload External operation to the console
XML Code for This Example
Paste this code into the Studio XML editor to quickly load the flow for this example into your Mule app:
<?xml version="1.0" encoding="UTF-8"?>

<mule xmlns:file="http://www.mulesoft.org/schema/mule/file" xmlns:http="http://www.mulesoft.org/schema/mule/http"
	xmlns:ee="http://www.mulesoft.org/schema/mule/ee/core"
	xmlns:slack="http://www.mulesoft.org/schema/mule/slack" xmlns="http://www.mulesoft.org/schema/mule/core" xmlns:doc="http://www.mulesoft.org/schema/mule/documentation" xmlns:xsi="http://www.w3.org/2001/XMLSchema-instance" xsi:schemaLocation="http://www.mulesoft.org/schema/mule/core http://www.mulesoft.org/schema/mule/core/current/mule.xsd
http://www.mulesoft.org/schema/mule/slack http://www.mulesoft.org/schema/mule/slack/current/mule-slack.xsd
http://www.mulesoft.org/schema/mule/ee/core http://www.mulesoft.org/schema/mule/ee/core/current/mule-ee.xsd
http://www.mulesoft.org/schema/mule/http http://www.mulesoft.org/schema/mule/http/current/mule-http.xsd
http://www.mulesoft.org/schema/mule/file http://www.mulesoft.org/schema/mule/file/current/mule-file.xsd">
	<slack:config name="Slack_Connector_Config" doc:name="Slack Connector Config" >
		<slack:slack-auth-connection >
			<slack:oauth-authorization-code consumerKey="${consumer.key}" consumerSecret="${consumer.secret}" scopes="channels:write groups:write im:write mpim:write users:read.email "/>
			<slack:oauth-callback-config listenerConfig="HTTP_Listener_config" callbackPath="/callback" authorizePath="/authorize" externalCallbackUrl="http://localhost:8081/callback"/>
		</slack:slack-auth-connection>
	</slack:config>
	<http:listener-config name="HTTP_Listener_config1" doc:name="HTTP Listener config" doc:id="84e1326d-0ae0-4f90-b38e-ff630cb9f825" >
		<http:listener-connection host="0.0.0.0" port="8081" />
	</http:listener-config>
	<configuration-properties doc:name="Configuration properties" doc:id="0fcec471-c686-49c7-9cf6-a94b7561cd20" file="application.properties" />
	<file:config name="File_Config" doc:name="File Config" doc:id="d1713841-299b-4778-9f04-567c174701aa" >
		<file:connection workingDir="/Users/Test/Downloads" />
	</file:config>
	<flow name="upload-file-content-to-slack" doc:id="a3f1489d-581d-4773-afda-4796c31715da" >
	<http:listener doc:name="Listener" doc:id="ec5e3594-6e87-4a14-ba89-101b91f151ef" config-ref="HTTP_Listener_config1" path="/file-upload-content"/>
            <set-payload value='#["Content"]' doc:name="Set Payload" doc:id="b65bde4b-664b-4804-9917-bc93a53295d4" />
            <set-variable value="#[payload]" doc:name="Set Variable" doc:id="1d99cd3f-93bf-4d0c-82d7-2eb65715e9db" variableName="UploadContent"/>
		<slack:get-filesget-upload-urlexternal doc:name="Get upload url" doc:id="7d71fc2e-06f8-4b72-ac61-4094c115c1fe" config-ref="Slack_Connector_Config" length="#[sizeOf(vars.UploadContent)]" filename="testfile.txt"/>
            <set-variable value="#[payload.file_id]" doc:name="Set Variable" doc:id="216a7359-ce22-436f-bdbf-067511bded6f" variableName="fileId"/>
            <http:request method="POST" doc:name="Request" doc:id="3b68d9e7-90d5-4dcb-b7db-8708a396dd27" url="#[payload.upload_url]" responseTimeout="#[900000]">
			<http:body ><![CDATA[#[vars.UploadContent]]]></http:body>
            </http:request>
            <ee:transform doc:name="Transform Message" doc:id="cff36871-94ed-484e-929a-ae29b9964adc" >
                <ee:message >
                    <ee:set-payload ><![CDATA[%dw 2.0
output application/json
---
write(
    [
        { id : vars.fileId }
    ],
    "application/json"
)
]]></ee:set-payload>
                </ee:message>
            </ee:transform>
            <slack:create-filescomplete-upload-external doc:name="Complete Upload External" doc:id="1b08e782-4ce8-4c53-b266-9407d6dcca9c" config-ref="Slack_Connector_Config" channelId="${channel.id}" initialComment="Initial Comment" target="completeUploadExt">
			<slack:files />
            </slack:create-filescomplete-upload-external>
		<logger level="INFO" doc:name="Logger" doc:id="2b467bc3-97ac-4f8d-b941-b529ee30bea3" />
            </flow>
</mule>