Using Anypoint Studio to Configure MQTT Connector 1.0
Anypoint Studio (Studio) editors help you design and update your Mule applications, properties, and configuration files.
To add and configure a connector in Studio:
When you run the connector, you can view the app log to check for problems, as described in View the App Log.
If you are new to configuring connectors in Studio, see Using Anypoint Studio to Configure a Connector. If, after reading this topic, you need additional information about the connector fields, see the MQTT Connector Reference.
Create a Mule Project
In Studio, create a new Mule project in which to add and configure the connector:
-
In Studio, select File > New > Mule Project.
-
Enter a name for your Mule project and click Finish.
Add the Connector to Your Mule Project
Add Anypoint Connector for MQTT (MQTT Connector) to your Mule project to automatically populate the XML code with the connector’s namespace and schema location and to add the required dependencies to the project’s pom.xml file:
-
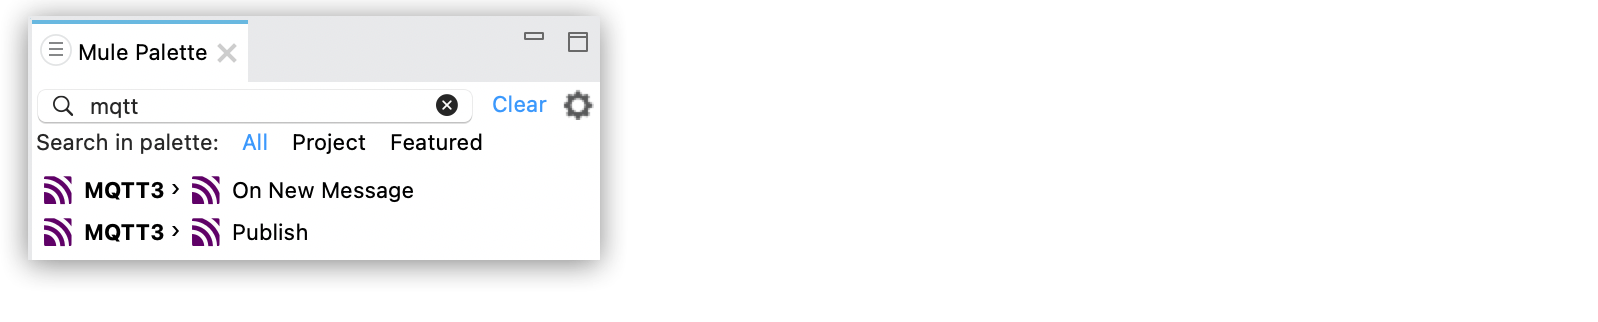
In the Mule Palette view, click (X) Search in Exchange.
-
In the Add Dependencies to Project window, type
mqttin the search field. -
Click MQTT 3 Connector in Available modules.
-
Click Add.
-
Click Finish.
Adding a connector to a Mule project in Studio does not make that connector available to other projects in your Studio workspace.
Configure a Source
A source initiates a flow when a specified condition is met. You can configure one of these input sources to use with MQTT Connector:
-
MQTT3 > On New Message
Initiates a flow by listening for incoming messages -
HTTP > Listener
Initiates a flow each time it receives a request on the configured host and port -
Scheduler
Initiates a flow when a time-based condition is met
For example, to configure an On New Message source, follow these steps:
-
In the Mule Palette view, select MQTT3 > On New Message.
-
Drag On New Message to the Studio canvas.
-
In the On New Message configuration screen, optionally change the value of the Display Name field.
-
Click the plus sign (+) next to the Connector configuration field to configure a global element that can be used by all instances of the source in the app.
-
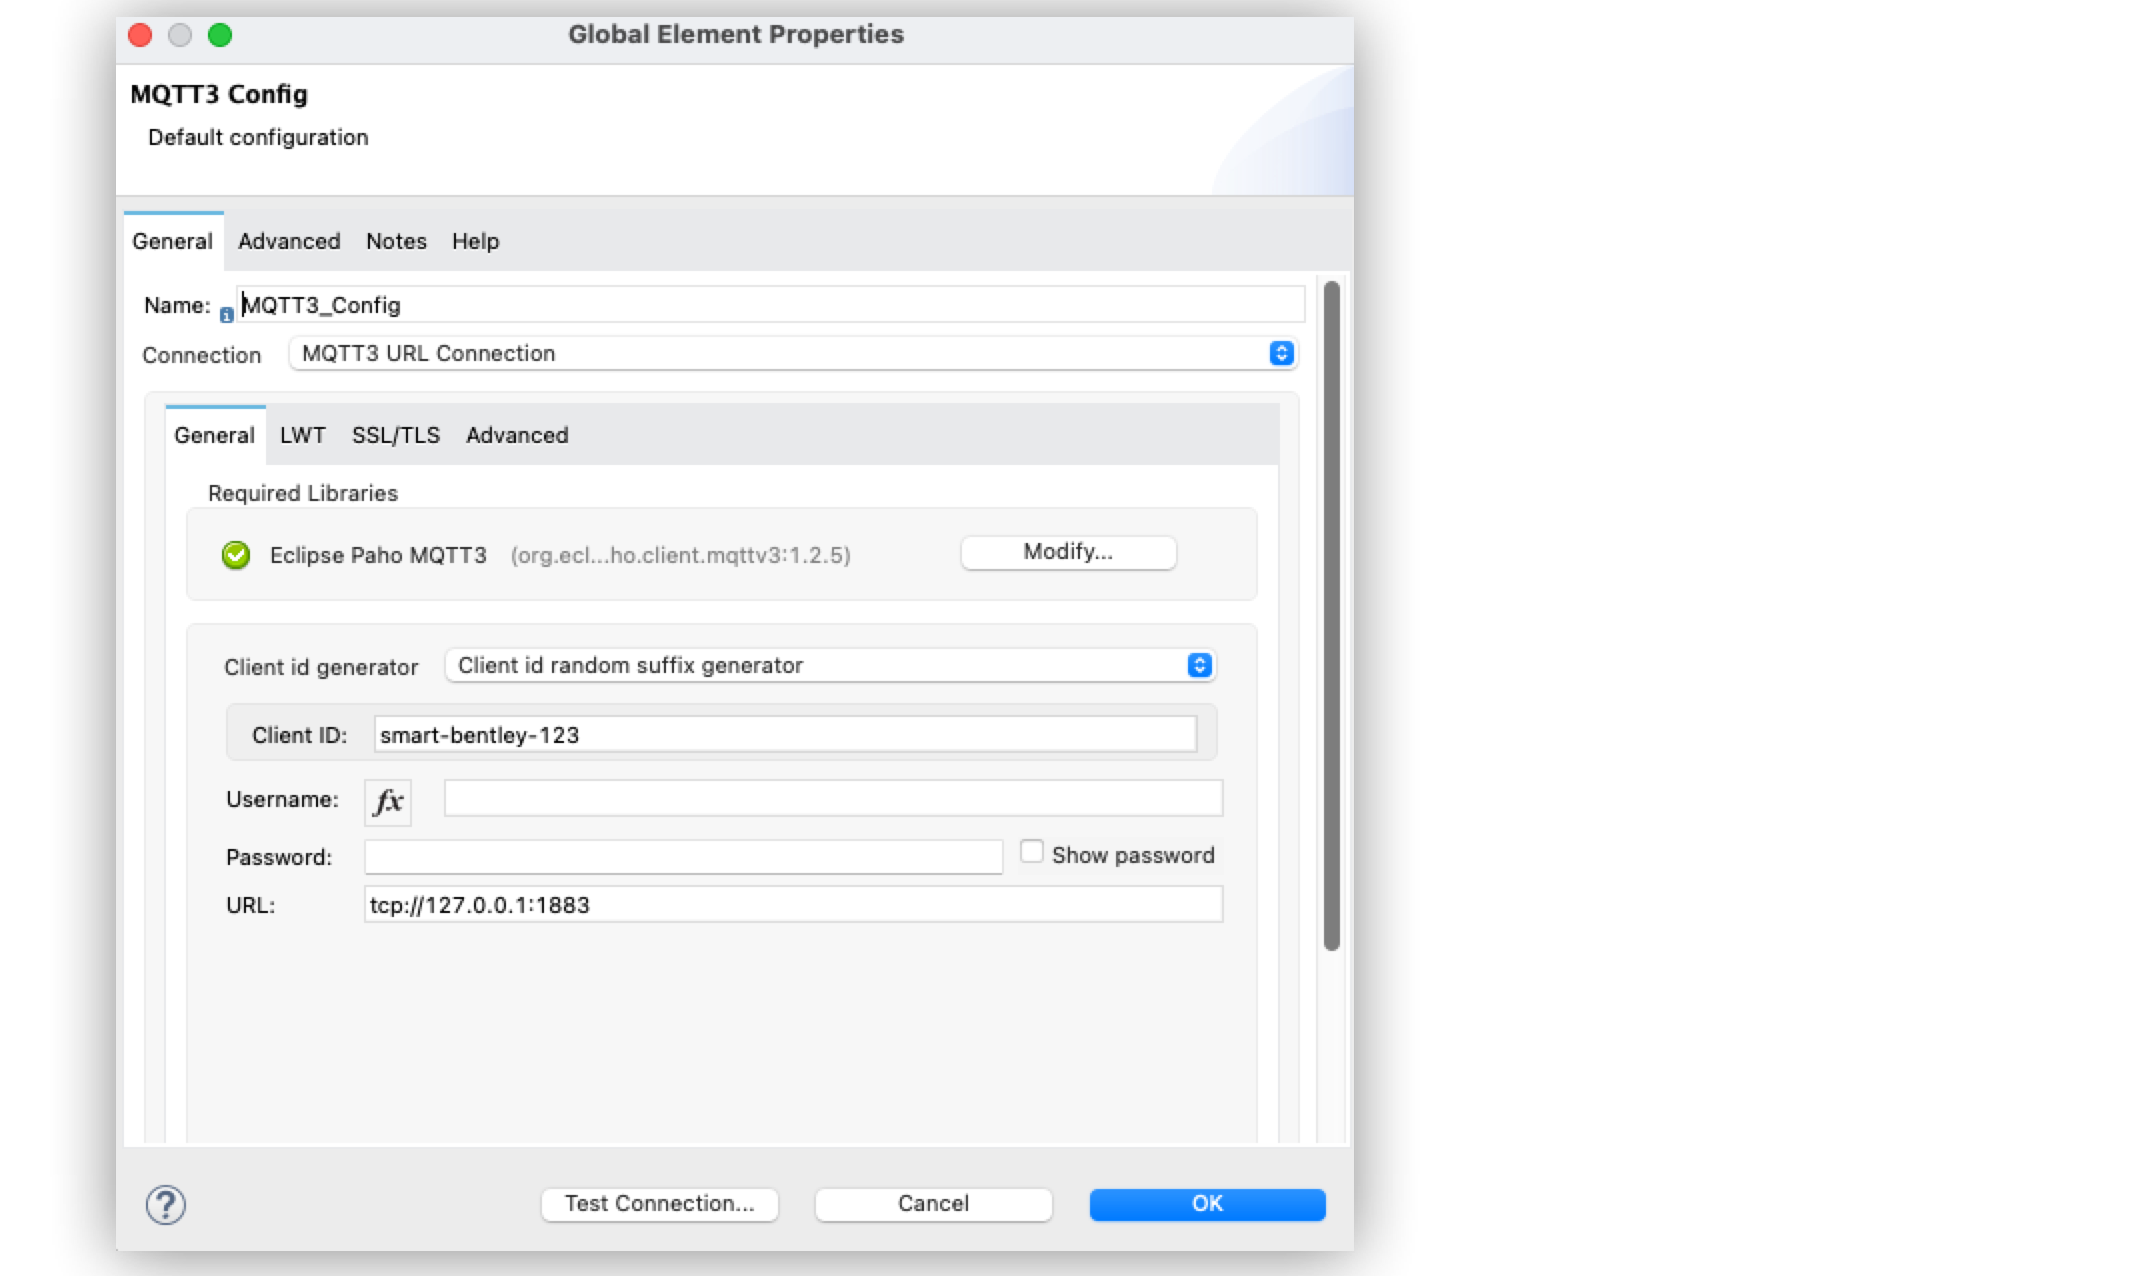
In the MQTT3 Config window, for Connection, select one of the connection types to provide to this configuration:
-
MQTT3 URL Connection
-
MQTT3 Fail-Over Connection
-
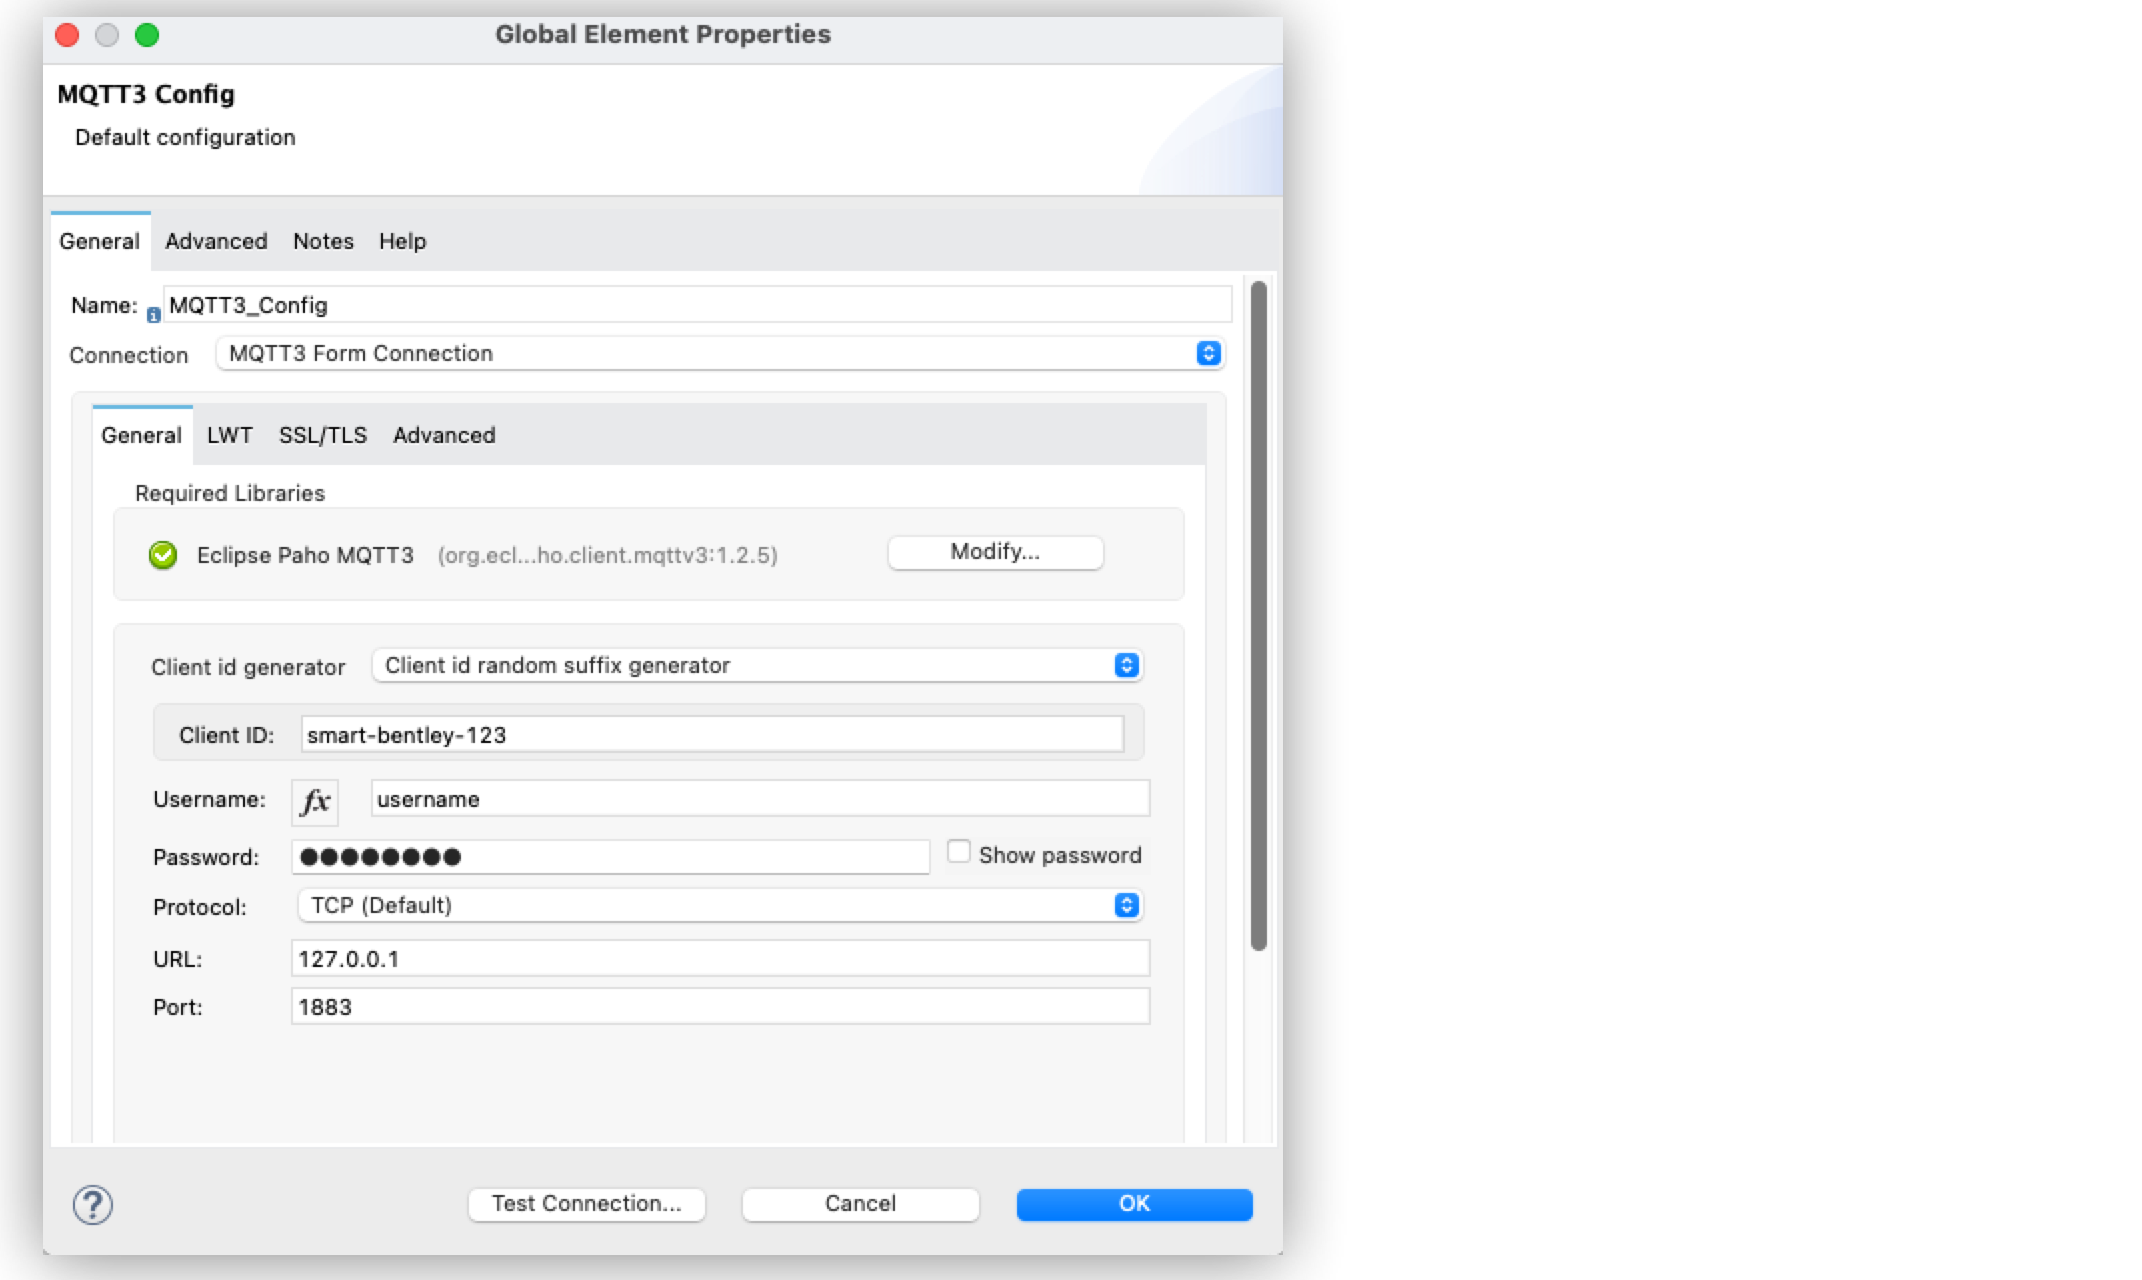
MQTT3 Form Connection
-
-
Specify a unique and intuitive Client ID to identify an MQTT connection to a broker.
-
On the General tab, also specify connection information such as required libraries for the broker.
-
On the LWT tab, optionally specify the Last Will and Testament message.
-
On the TLS/SSL tab, optionally specify a TLS configuration.
-
On the Advanced tab, optionally specify advanced connection options and reconnection strategy.
-
Click OK.
-
In the On New Message configuration screen, in Topics, select Edit inline to list the topics that the listener subscribes to.
-
Click the plus sign (+) to configure a topic.
-
In the Topic configuration screen, set Topic filter, which represents a single or multilevel subscription to a topic.
-
Set QoS to any of the following quality of service levels:
-
AT_MOST_ONCE
-
AT_LEAST_ONCE
-
EXACTLY_ONCE
-
-
Click Finish.
Add a Connector Operation to the Flow
When you add a connector operation to your flow, you immediately define a specific operation for that connector to perform.
To add an operation for MQTT Connector, follow these steps:
-
In the Mule Palette view, select MQTT3 and then select the desired operation.
-
Drag the operation onto the Studio canvas and to the right of the input source.
Configure a Global Element for the Connector
When you configure a connector, it’s best to configure a global element that all instances of that connector in the app can use. MQTT Connector comes with default values for both publishing and consuming messages. To use the connector, the only requirement is that you must configure which connection to use and that you specify a value for the client ID, which will uniquely identify that connection.
The client ID is mandatory because it identifies an MQTT connection to a broker. Define a meaningful name that uniquely identifies a client or device that connects to an MQTT broker and not a random string.
To configure the global element for MQTT Connector, follow these steps:
-
Select the operation in the Studio canvas.
-
In the configuration screen for the operation, click the plus sign (+) next to the Connector configuration field to access the global element configuration fields.
-
In the MQTT3 Config window, for Connection, select one of the connection types to provide to this configuration:
-
MQTT3 URL Connection
-
MQTT3 Fail-Over Connection
-
MQTT3 Form Connection
-
-
Specify a unique and intuitive Client ID to identify an MQTT connection to a broker, for example
smart-bentley-123. -
Specify the URL to connect to a broker, for example
tcp://127.0.0.1:1883. -
On the General tab, also specify connection information such as required libraries for the broker.
-
On the LWT tab, optionally specify the Last Will and Testament message.
-
On the SSL/TLS tab, optionally specify a TLS configuration.
-
On the Advanced tab, optionally specify advanced connection options and reconnection strategy.
-
Click OK to close the window.
In the Configuration XML editor, the <mqtt3:connection>, clientId, and url configurations look like this:
<mqtt3:config name="MQTT_Config">
<mqtt3:connection clientId="smart-bentley-123" url="tcp://127.0.0.1:1883" />
</mqtt3:config>xmlYou can also specify each URL field separately for the connection by configuring the MQTT3 Form Connection, which enables you to specify a protocol, host, and port to establish a connection with the broker:
-
In Studio, navigate to the Global Elements tab.
-
Click Create.
-
In the filter box, type
mqttand select MQTT3 Config. -
Click OK.
-
In the MQTT3 Config window, for Connection, select MQTT3 Form Connection.
-
Set the following fields:
-
Client id generator:
Client id random suffix generator -
Client ID:
smart-bentley-123 -
Username:
username -
Protocol: TCP (Default)
-
URL:
127.0.0.1 -
Port:
1883
-
-
Click OK.
In the Configuration XML editor, the <mqtt3:form-connection>, protocol, host, port, and clientId configurations look like this:
<mqtt3:config name="MQTT3_Config">
<mqtt3:form-connection username="username" password="testpass" host="127.0.0.1" >
<mqtt3:client-id-generator >
<mqtt3:client-id-random-suffix-generator clientId="smart-bentley-123" />
</mqtt3:client-id-generator>
</mqtt3:form-connection>
</mqtt3:config>xmlConfigure a Connection Protocol
MQTT supports protocols that you can use to connect to and exchange MQTT messages with the broker. You can configure any of the following protocols in the connection string of the connector configuration:
-
LOCAL
-
SSL
-
TCP (Default)
-
WS
-
WSS
Configure Credentials for Authentication
Authentication credentials are optional, but you can provide a username and a password if required.
In the following example, you configure the authentication by providing a basic username and password:
-
In Studio, navigate to the Global Elements tab.
-
Click Create.
-
In the filter box, type
mqttand select MQTT3 Config. -
Click OK.
-
In the MQTT3 Config window, for Connection, select MQTT3 URL Connection.
-
Set the following fields:
-
Client id generator:
Client id random suffix generator -
Client ID:
smart-bentley-123 -
Username:
username -
Password:
passtest -
URL:
tcp://127.0.0.1:1883"
-
-
Click OK.
In the Configuration XML editor, the <mqtt3:connection>, username, and password configurations look like this:
<mqtt3:config name="MQTT_Config">
<mqtt3:connection username="username" password="passtest" url='tcp://127.0.0.1:1883"' >
<mqtt3:client-id-generator >
<mqtt3:client-id-random-suffix-generator clientId="smart-bentley-123" />
</mqtt3:client-id-generator>
</mqtt3:connection>
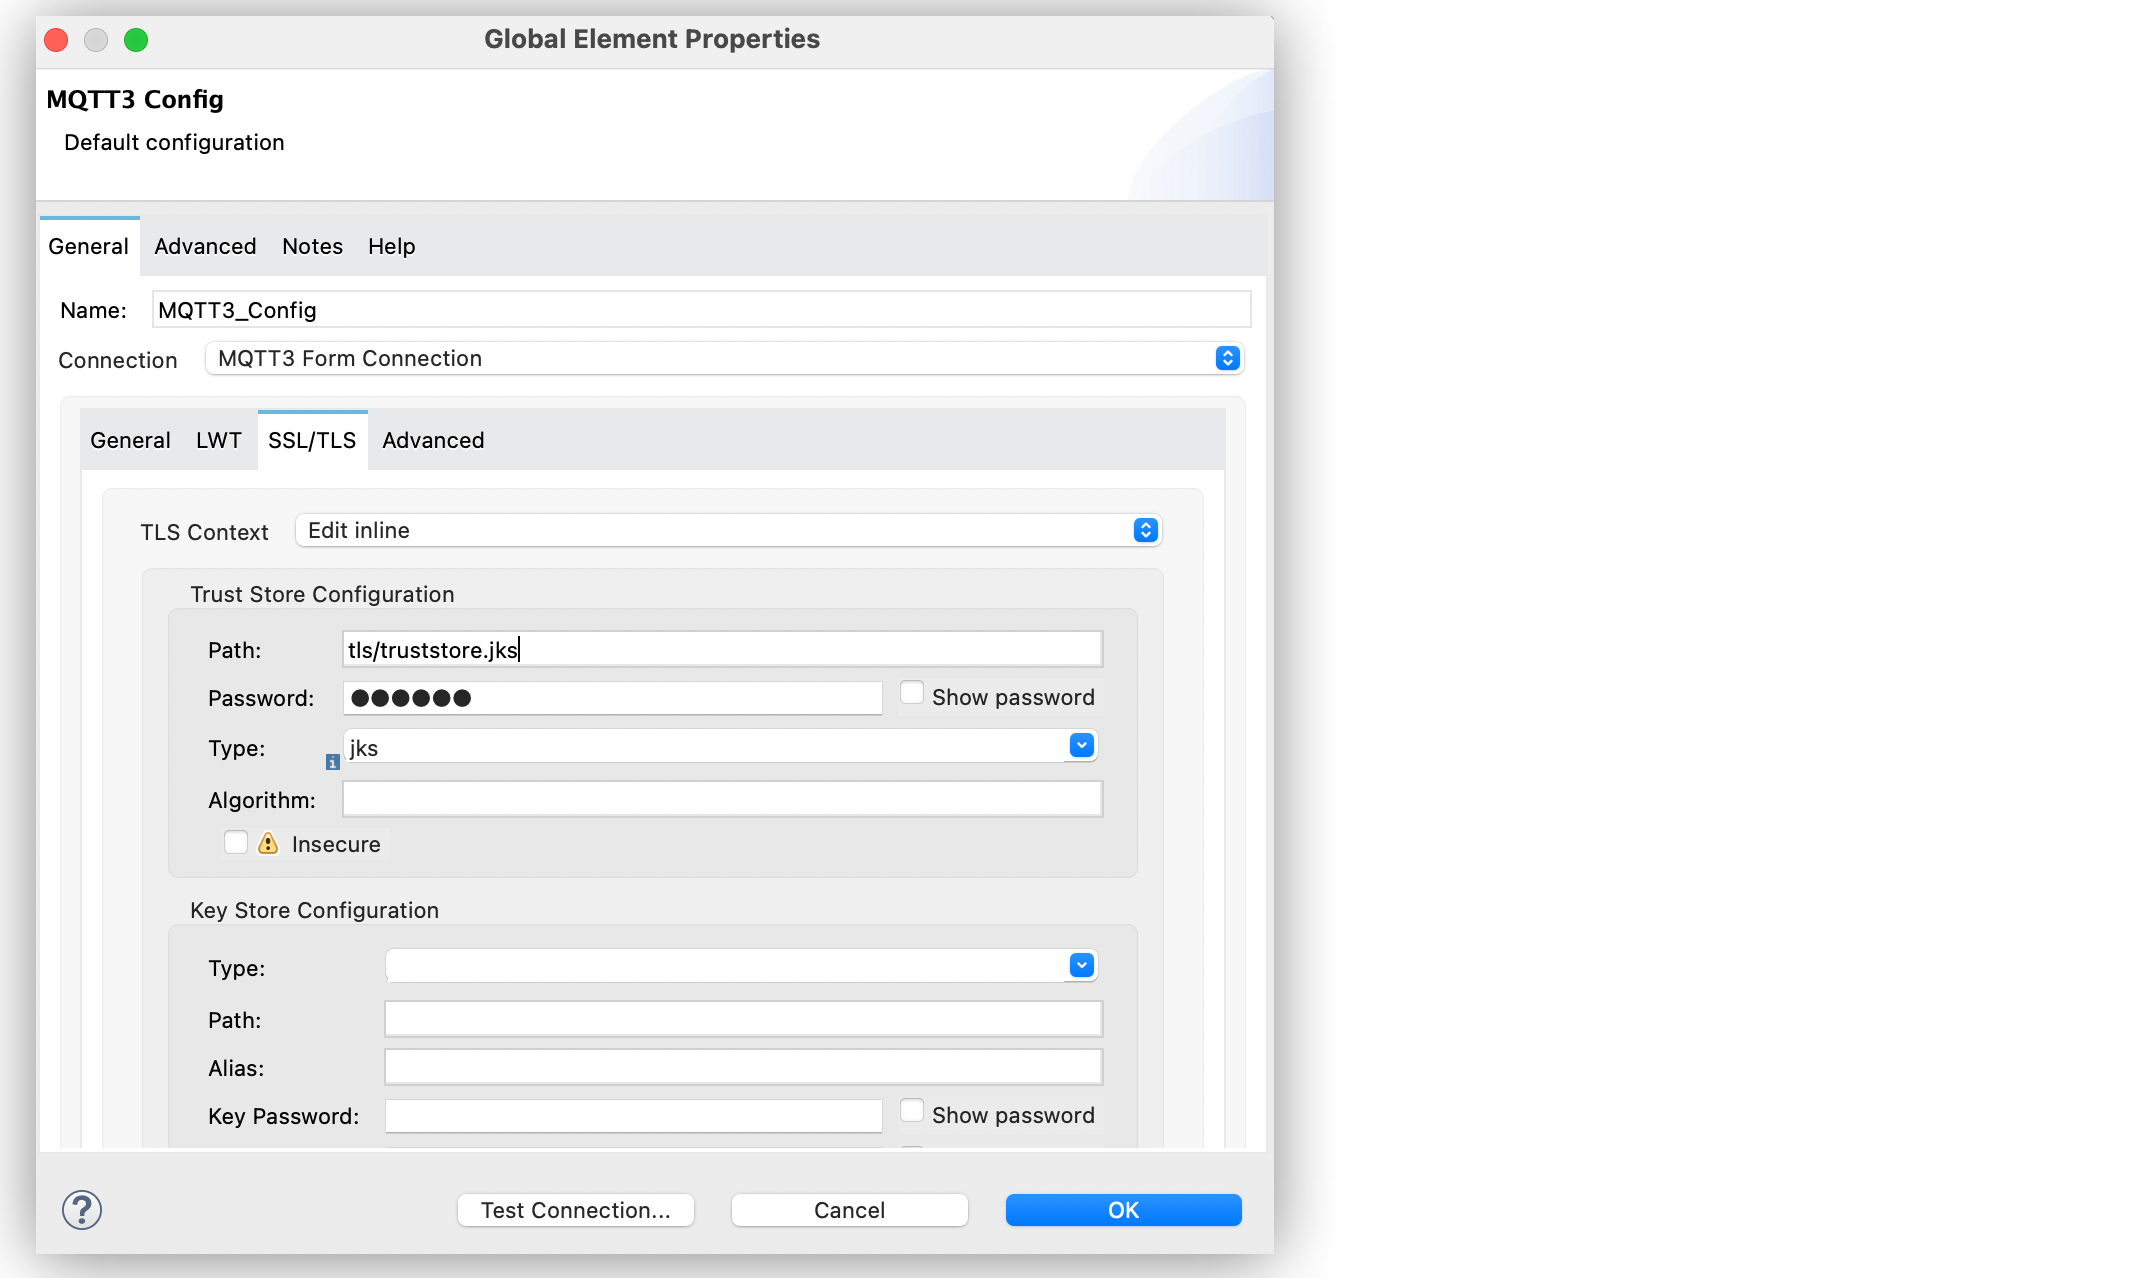
</mqtt3:config>xmlYou can also provide a client certificate to authenticate the connection by setting a TLS context:
-
In Studio, navigate to the Global Elements tab.
-
Select your MQTT3 Config and click Edit.
-
In MQTT3 Config, click SSL/TLS.
-
For TLS Context, select Edit inline.
-
In Trust Store Configuration, set the following fields:
-
Path:
tls/truststore.jks -
Password:
racing -
Type:
jks
-
-
Click OK.
In the Configuration XML editor, the <tls:context>,path, password, and type configurations look like this:
<mqtt3:config name="MQTT_TLS_Config">
<mqtt3:connection username="username" password="passtest" url='tcp://127.0.0.1:1883"' >
<tls:context >
<tls:trust-store path="tls/truststore.jks" password="racing" type="jks" />
</tls:context>
<mqtt3:client-id-generator >
<mqtt3:client-id-random-suffix-generator clientId="smart-bentley-123" />
</mqtt3:client-id-generator>
</mqtt3:connection>
</mqtt3:config>xmlConfigure a Failover Server List
There are certain deployment schemas that consist of multiple brokers working together to provide clients with several connection endpoints. When there is more than one available server that the client can connect to, there are two possible scenarios: either each MQTT server operates separately, or they might work together and share a state (cluster mode), in which case you might want to specify how the MQTT client behaves in the event of a reconnection.
When you provide a failover server list, the connector can iterate over the list until it successfully establishes a connection with one of the provided endpoints.
In the following example, you configure the failover server list for an MQTT3 Fail-Over Connection:
-
In Studio, navigate to the Global Elements tab.
-
Click Create.
-
In the filter box, type
mqttand select MQTT3 Config. -
Click OK.
-
In the MQTT3 Config window, for Connection, select MQTT3 Fail-Over Connection.
-
Set Client ID to
smart-bentley-123. -
In Fail over servers, click the plus sign (+).
-
Set the following fields:
-
Protocol: TCP (Default)
-
Host:
127.9.0.2 -
Port:
1883
-
-
Click Finish.
-
Repeat Steps 7 through 9 twice to add the other new host and port values.
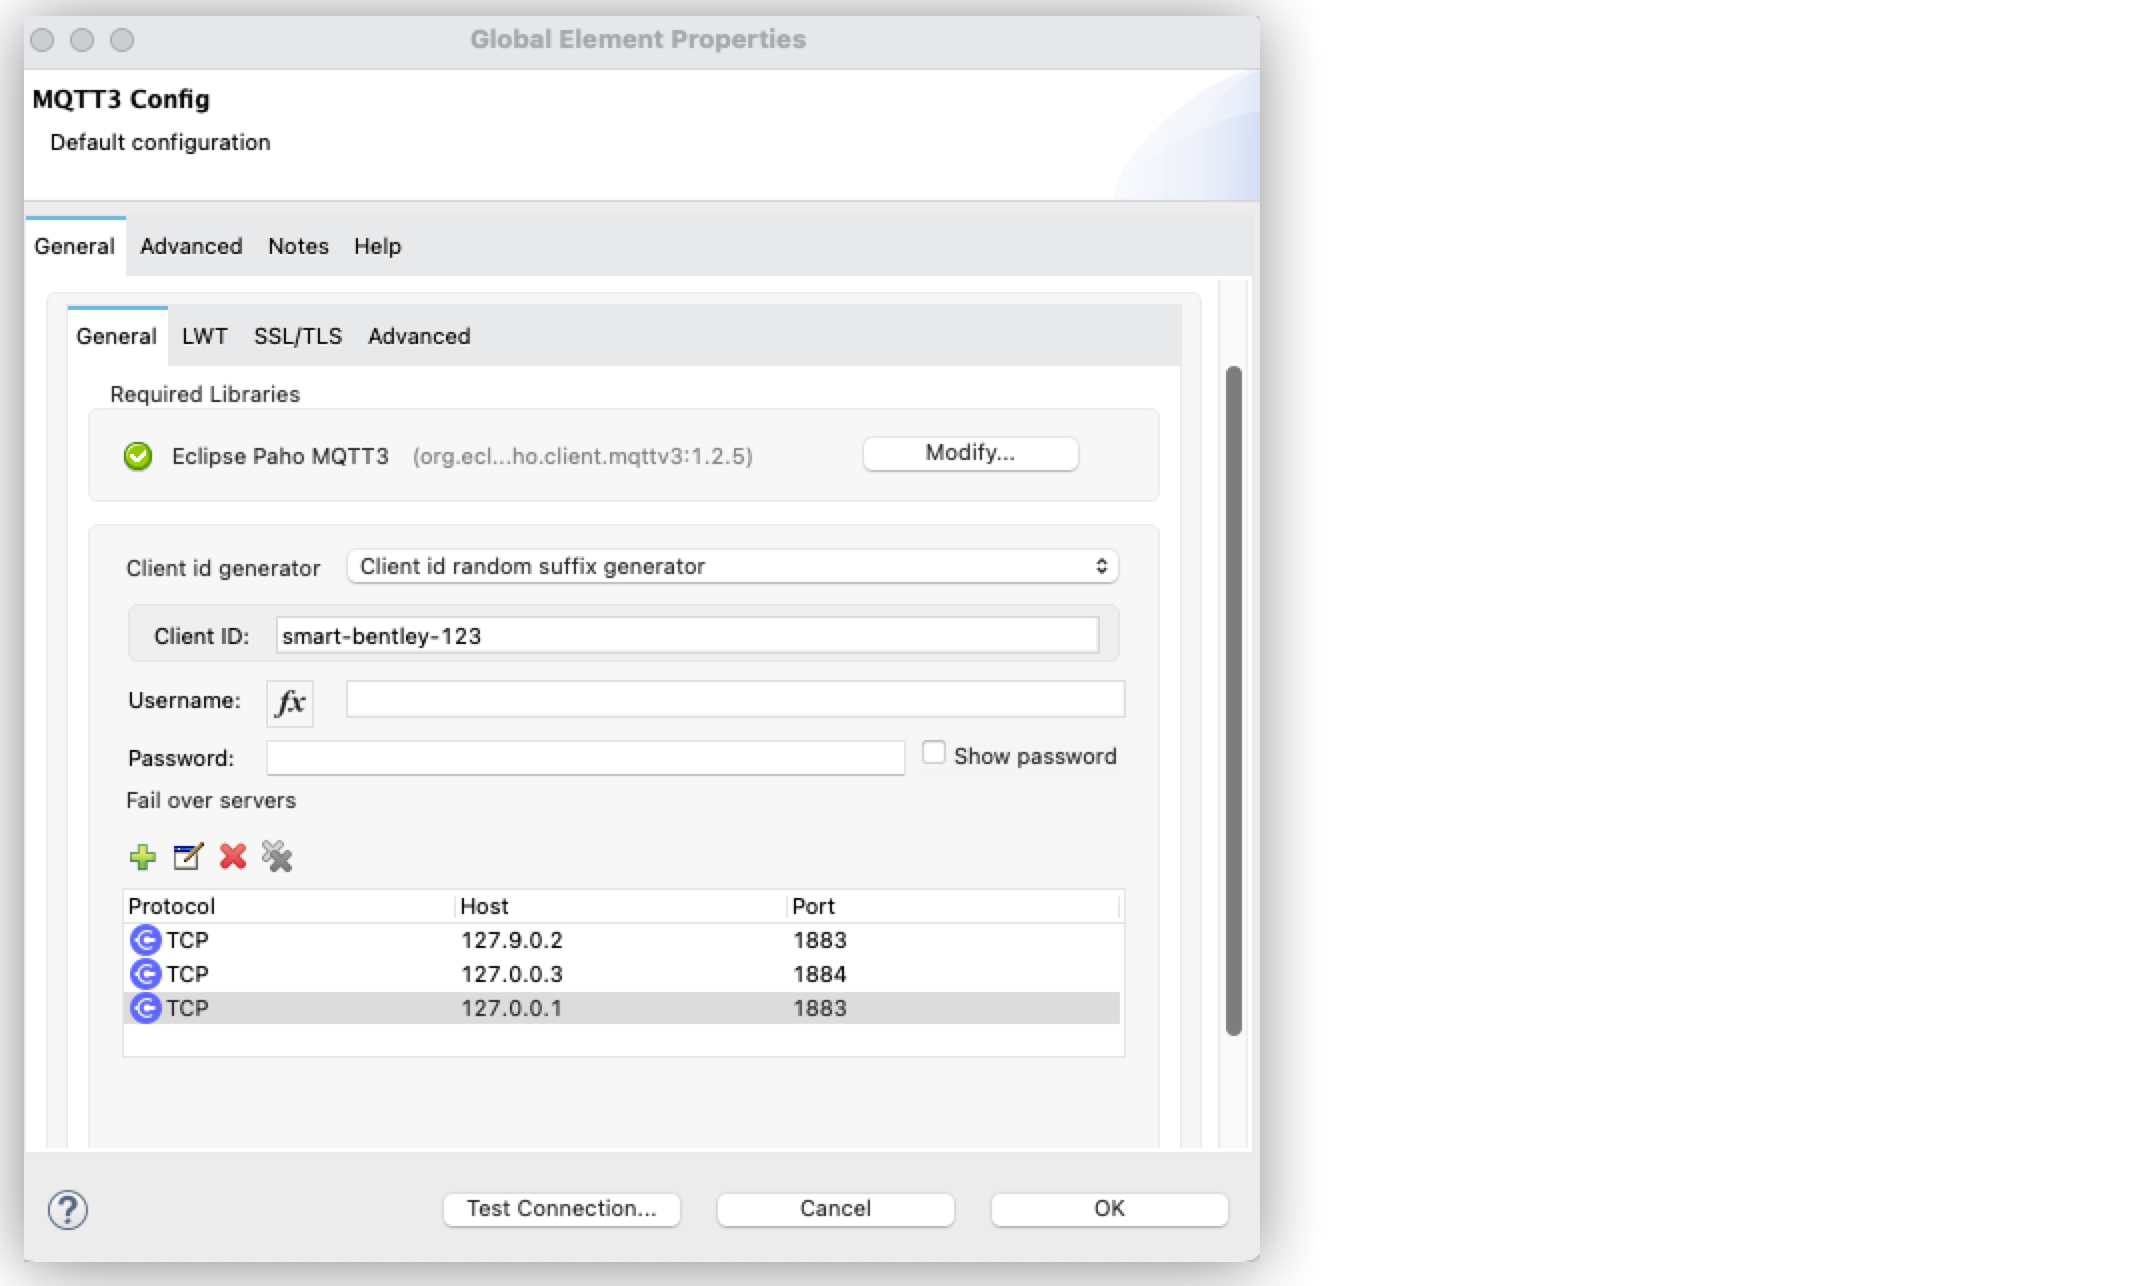
In the Configuration XML editor, the <mqtt3:fail-over-connection> and <mqtt3:fail-over-url configurations look like this:
<mqtt3:config name="MQTT_FailOver_Config">
<mqtt3:fail-over-connection clientIDGenerator="smart-bentley-123" >
<mqtt3:fail-over-servers >
<mqtt3:fail-over-url host="127.9.0.2" />
<mqtt3:fail-over-url host="127.0.0.3" port="1884" />
<mqtt3:fail-over-url host="127.0.0.1" />
</mqtt3:fail-over-servers>
</mqtt3:fail-over-connection>
</mqtt3:config>xmlConfigure the Clean Session Value
In the MQTT3 Config window, configure the Clean session field to False so the broker remembers the client the next time it connects. While the client is offline, all its subscriptions are saved, and Quality of Service (QoS) 1 and 2 messages that the client would want to receive are saved too, until the client reconnects.
Some brokers support the clustering of MQTT brokers in which the nodes share a state. In this case, setting the clean session flag to False is useful if the node the connector happens to go offline. This enables the client to reconnect to a different node that is aware of the client’s subscriptions so that any messages the connector might have missed while offline are delivered.
If the clean session is set to True (Default), then when the connector disconnects, for whatever reason, all its subscriptions are dropped and the connector has to resubscribe upon reconnection. All messages sent while offline are lost.
In the following example, you configure the clean session:
-
In Studio, navigate to the Global Elements tab.
-
Select your MQTT3 Config and click Edit.
-
In the MQTT3 Config window, on the Advanced tab for Connection, select MQTT3 URL Connection.
-
Set the following fields:
-
Clean session:
False
-
-
Click OK.

In the Configuration XML editor, the cleanSession configuration looks like this:
<mqtt3:config name="MQTT_Config">
<mqtt3:connection username="username" password="passtest" url='tcp://127.0.0.1:1883' >
<mqtt3:client-id-generator >
<mqtt3:client-id-random-suffix-generator clientId="smart-bentley-123" />
</mqtt3:client-id-generator>
<mqtt3:connection-options cleanSession="false" />
</mqtt3:connection>
</mqtt3:config>xmlEnable File Persistence
In the MQTT3 Config window, set the Enable file persistence field to True to enable the MQTT client to persist its state to a file that is used to store any outbound or inbound in-flight messages that the client might have with QoS ≥ 1. In contrast, if you set the field to False (Default), the client state is saved only in memory and in the event of a crash, the client cannot recover its state.
The enable file persistence feature does not use an object store. The file feature relies on the driver to use a file for persistent messages and can only be used in on-premise installations.
In the following example, you enable the file persistence:
-
In Studio, navigate to the Global Elements tab.
-
Select your MQTT3 Config and click Edit.
-
In the MQTT3 Config window, for Connection, select MQTT3 URL Connection.
-
On the Advanced tab, set the following fields:
-
Clean session: False
-
Enable file persistence: True
-
-
Set Datastore to
mqtt/storeto specify where you want the persistent store to be generated. -
Click OK.
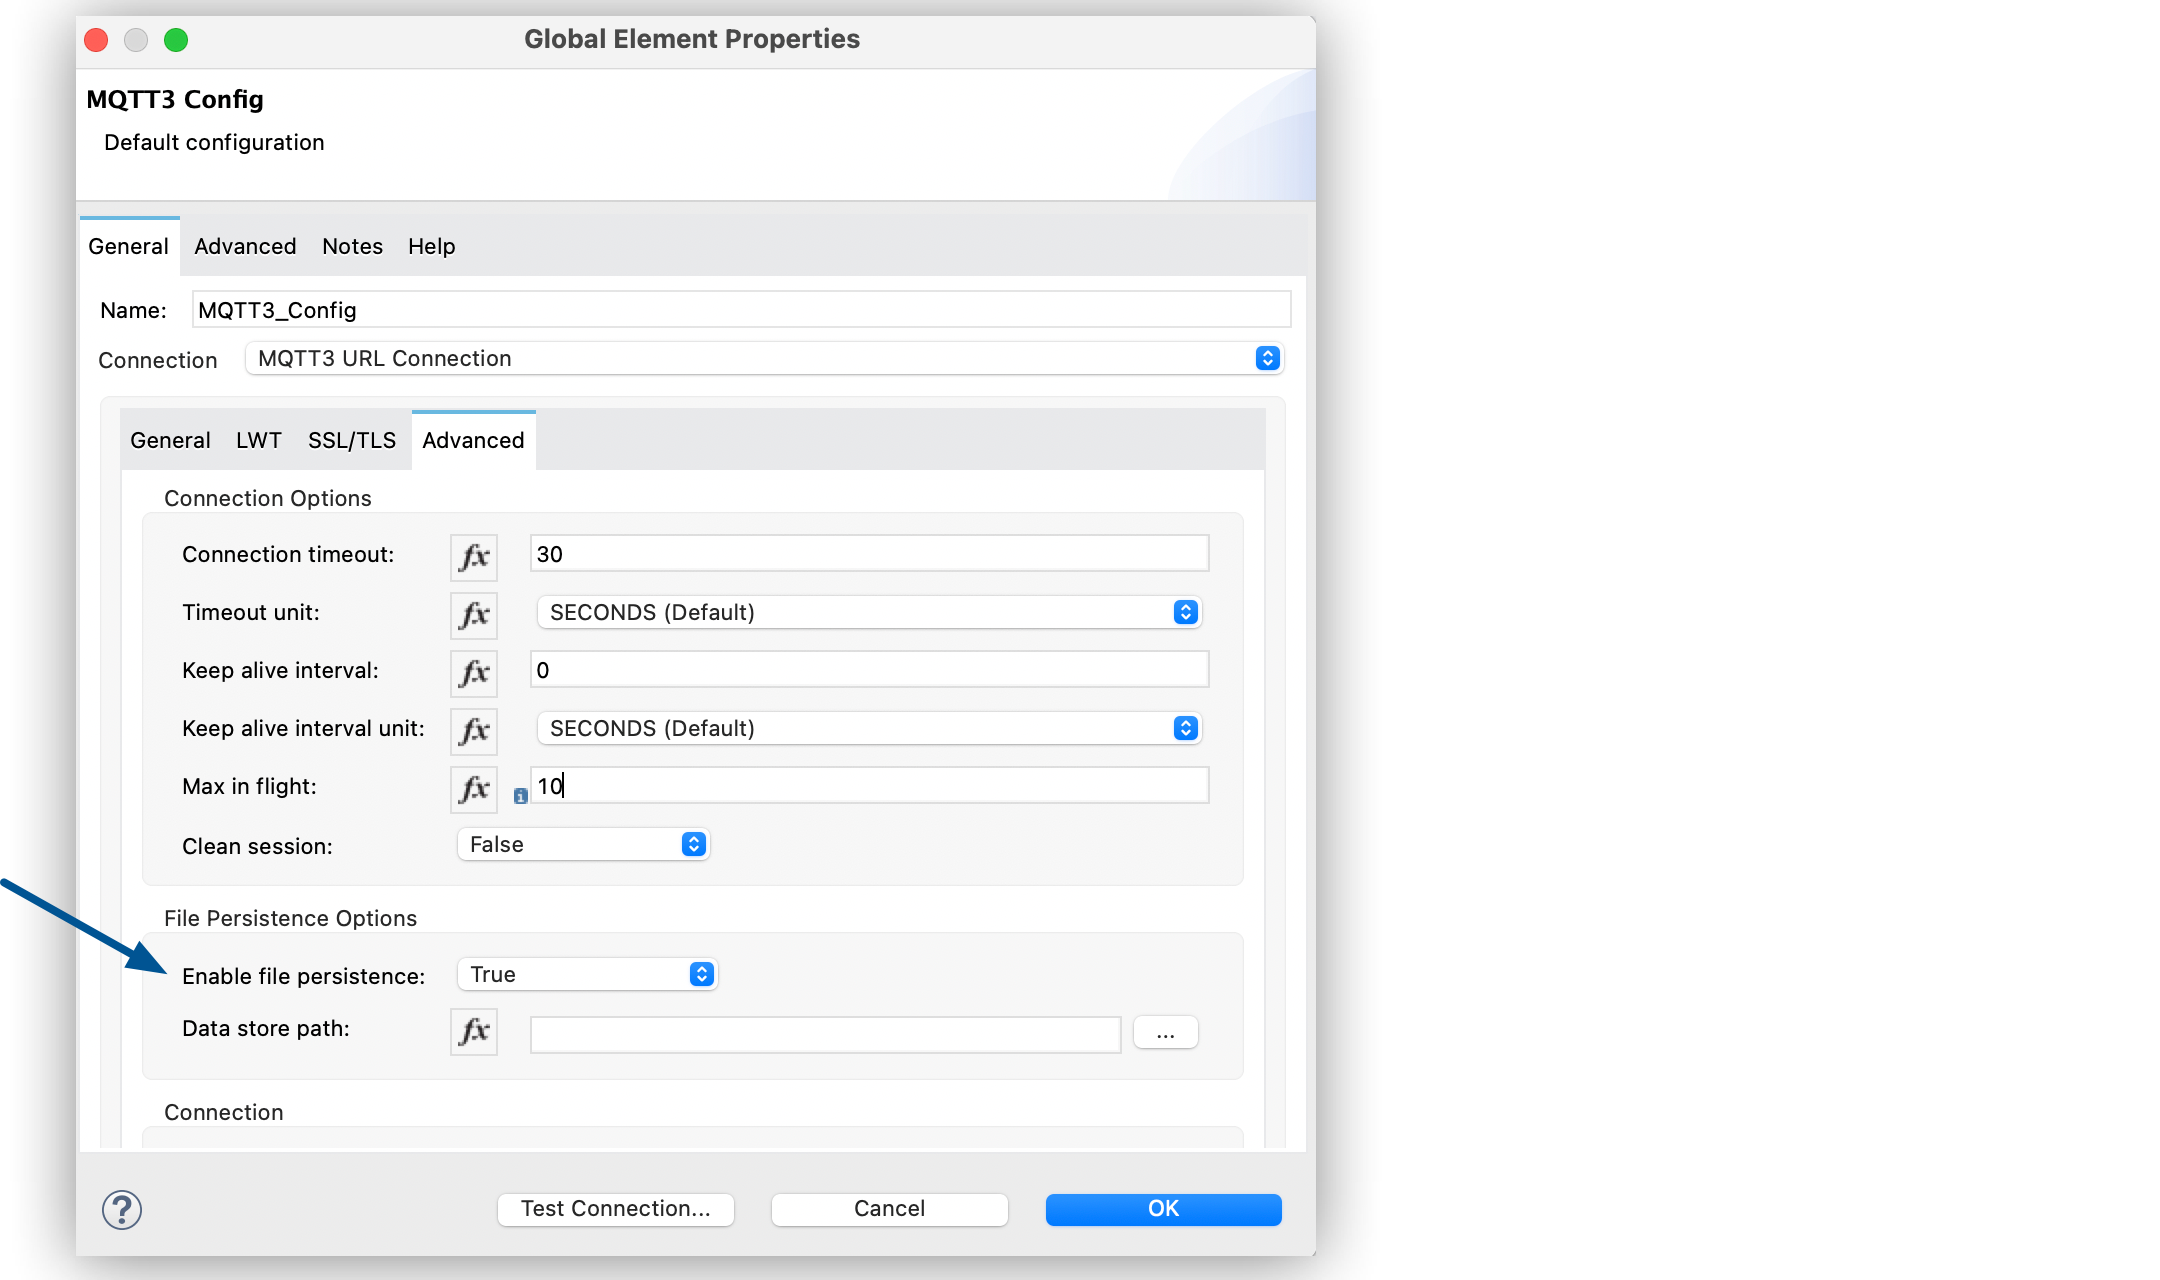
In the Configuration XML editor, the enableFilePersistence and dataStorePath configurations look like this:
<mqtt3:config name="MQTT_Config">
<mqtt3:connection username="username" password="passtest" url='tcp://127.0.0.1:1883' >
<mqtt3:client-id-generator >
<mqtt3:client-id-random-suffix-generator clientId="smart-bentley-123" />
</mqtt3:client-id-generator>
<mqtt3:connection-options cleanSession="false" />
<mqtt3:file-persistence-options enableFilePersistence="true" />
</mqtt3:connection>
</mqtt3:config>xml| If you set a dynamic client ID, MQTT Connector cannot recover the persisted files in the event of a crash. You must set a client ID that does not change in the event of an application restart after a crash. |
Configure Advanced Connection Options
MQTT Connector enables you to define multiple default parameters while consuming or publishing messages. This way, you can define a global default behavior for all the operations associated with the configurations.
In the following example, you configure the Keep alive internal and Keep alive internal unit fields to set the maximum period of time that the connection is kept alive without any messages being exchanged between the client and broker. You also configure the Max in flight field to indicate the maximum number of in-flight messages allowed:
-
In Studio, navigate to the Global Elements tab.
-
Select your MQTT3 Config and click Edit.
-
In the MQTT3 Config window, for Connection, select MQTT3 URL Connection.
-
Select the Advanced tab, set the following fields:
-
Keep alive internal:
60 -
Keep alive internal unit: SECONDS (Default)
-
Max in flight:
60
-
-
Click OK.
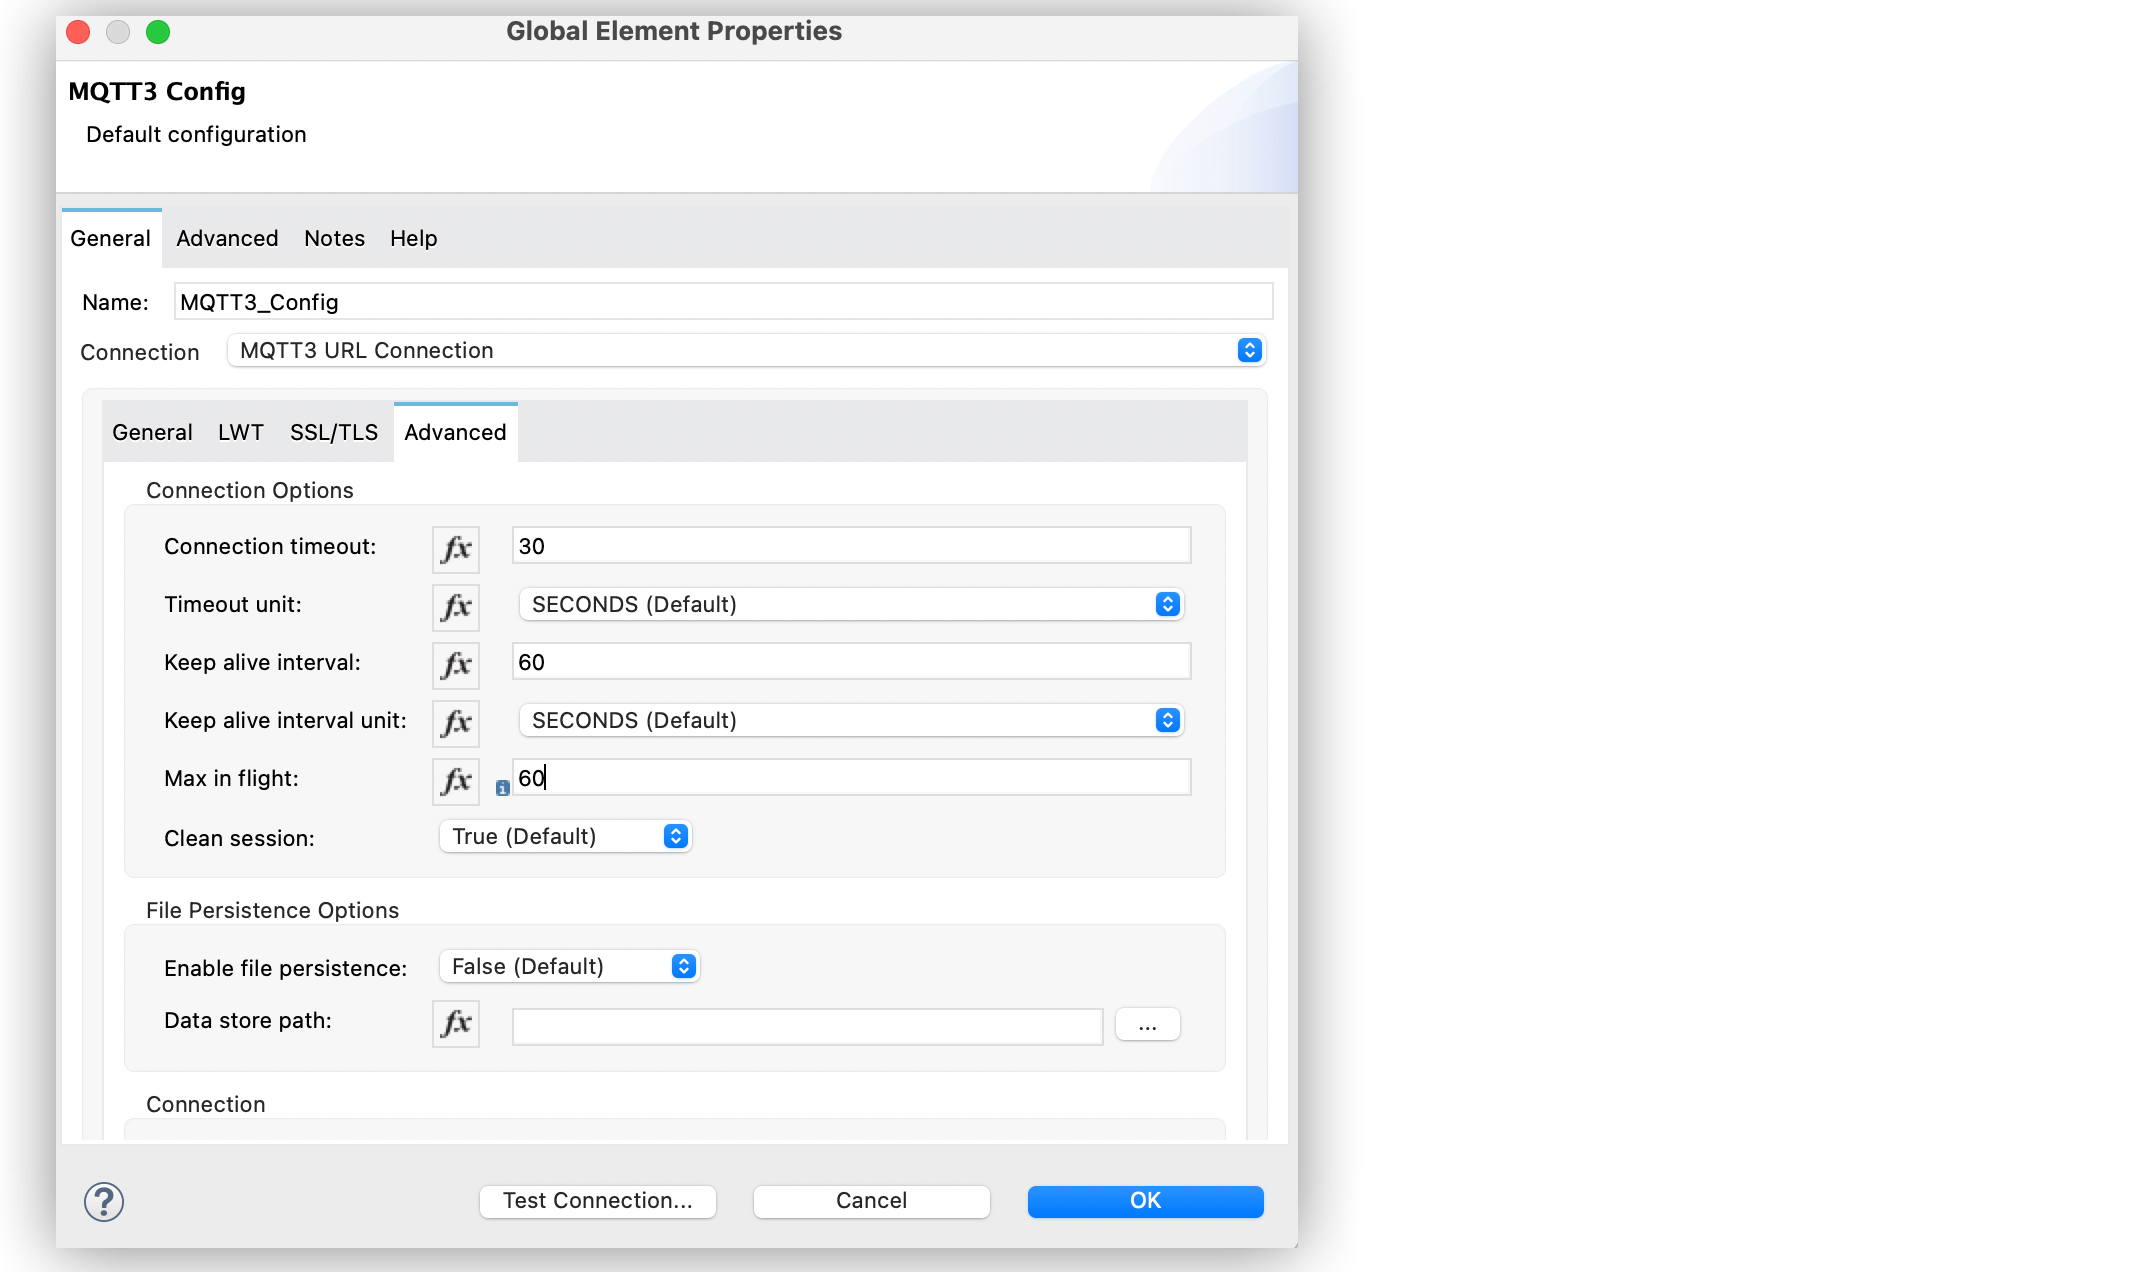
In the Configuration XML editor, the keepAliveInterval, keepAliveIntervalUnit, and maxInFlight configurations look like this:
<mqtt3:config name="MQTT_Config">
<mqtt3:connection username="username" password="passtest" url='tcp://127.0.0.1:1883' >
<mqtt3:client-id-generator >
<mqtt3:client-id-random-suffix-generator clientId="smart-bentley-123" />
</mqtt3:client-id-generator>
<mqtt3:connection-options keepAliveInterval="60" maxInFlight="60"/>
</mqtt3:connection>
</mqtt3:config>xmlView the App Log
To check for problems, you can view the app log as follows:
-
If you’re running the app from Anypoint Platform, the output is visible in the Anypoint Studio console window.
-
If you’re running the app using Mule from the command line, the app log is visible in your OS console.
Unless the log file path is customized in the app’s log file (log4j2.xml), you can also view the app log in the default location MULE_HOME/logs/<app-name>.log.