Expose Tokenization as a Service Directly to Mule Applications
If a lot of complex data processing must take place before traffic gets to the tokenization service, it makes sense to set up a Mule app to which the Runtime Fabric inbound load balancer can route traffic. In this scenario, the Mule app processes the data and sends the traffic to the tokenization service.
If you don’t need the Mule app to perform data processing, it can still expose the tokenization service as a passthrough.
Prerequisites
To configure and use the tokenization service, you must:
-
Grant tokenization permissions to have permission to manage tokenization services.
-
Install Runtime Fabric.
Anypoint Runtime Fabric is a container service that automates the deployment and orchestration of Mule apps and API gateways. -
Enable inbound traffic on Runtime Fabric.
Create an API from the Tokenization RAML
After you have the information you need to set up a routable tokenization service using an API gateway, create an API from the tokenization RAML.
-
Go to the public Anypoint Platform developer portal, and search for "Tokenization API."
-
Select Download > As RAML. The RAML is downloaded as a ZIP file.
-
Go to your Exchange portal, and click New asset.
-
Set the Name as
Tokenization APIand the Type asREST API - RAML. -
Select the ZIP file you downloaded, and click Publish.
-
In Anypoint Studio or Design Center, create an HTTP outbound connection based on the
Tokenization APIRAML.
The tokenization service in Runtime Fabric listens on port 3443 and is available through HTTPS only.
The hostname portion for the outbound URL is formed by taking the service name +-tokenizer. For example, if the tokenization service name is “mytoken1”, the outbound URL is:https://mytoken1-tokenizer:3443. -
Use a Dataweave transform step before the HTTP outbound connection to convert your input data into the
TokenizationServiceRequestdata type defined in theTokenization APIRAML.
The request is an array of items, and a single example is:{"format" : "ssnonly", "data" : "333-33-3333"}. The value offormatmatches a tokenization format that is defined on the service. Thedatavalue is what to tokenize or detokenize.The maximum number of items allowed in the array is 100. If the array contains more than 100 items, you must separate it into multiple requests to the tokenization service. -
Set the HTTP Listener in the Mule app to HTTPS.
-
Export the Mule app.
-
In Runtime Manager, deploy the application to Runtime Fabric.
You must select the Last mile security checkbox to enable TLS between the Runtime Fabric inbound load balancer and the Mule app. -
(Optional) For improved security and protection of the Mule app, add an authentication method.
Configure TLS
Because the tokenization service accepts only TLS traffic, you must enable TLS for the Mule HTTP outbound connection, and enable last-mile security when deploying the Mule app to Runtime Fabric so the inbound-load-balancer-to-Mule-app connection uses TLS.
The following is an example of how to configure TLS for Mule apps in Studio 7.3:
-
Go to Anypoint Studio, and open the project for your Mule app.
-
Go to
src/main/resourcesand add the keystore. In this example the keystore is namedtester.jks. -
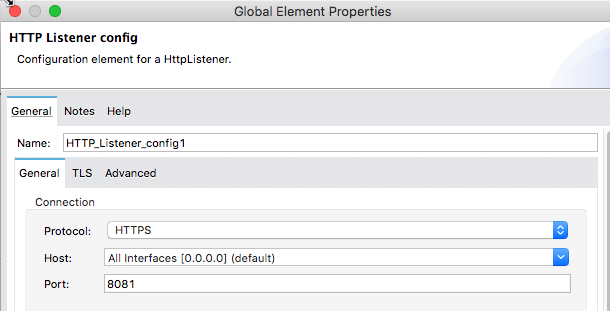
Add TLS to the listener side so you can later enable the Last Mile Security flag. To do this, first set the HTTPS flag.
-
Click the TLS tab to set the keystore information, then select the following:
-
From the TLS Configuration drop-down, select Edit inline.
-
In Trust Store Configuration, check the Insecure box.
-
In Key Store Configuration, enter the information for your keystore, and click OK.
In this example the trust store side is set to insecure and the keystore, alias, and password information has been added.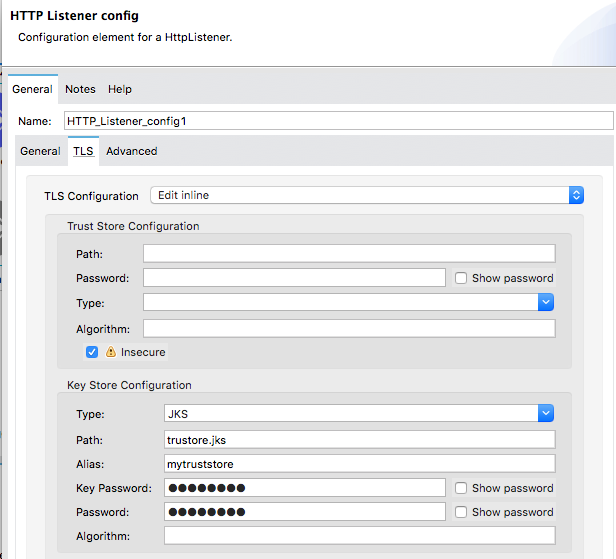
-
-
Edit the settings for the HTTP endpoint to enable TLS on the HTTP connection from Mule to the tokenization service.
== Deploy the App to Runtime Fabric
-
Save the application and export it.
-
In Anypoint Platform, go to Runtime Manager, and click Deploy Application.
-
In the Deploy Application page:
-
Enter an Application Name.
-
From the Deployment Target drop-down, select the Runtime Fabric to which to deploy the app.
-
Click Choose file to upload the application you exported.
-
Select the Runtime version for the Mule the app will run on, and configure your Replicas and Resource Allocation.
-
Click the Ingress tab, and select Enable LastMile Security option.
-
-
Click Deploy Application.