Send Emails with Email Connector Examples
Use Anypoint Connector for Email (Email Connector) to send messages over SMTP and SMTPS servers by using the Send operation. The following examples show how to configure Email Connector to send emails and attachments, in both Anypoint Studio and the XML editor:
-
Send Emails
Configure the Email Connector Send operation to send emails over an SMTPS server. -
Send an Attachment
Configure the File Connector Read operation to read a JSON file and the Email Connector Send operation to send the file as an attachment over an SMTP server. -
Send Multiple Attachments
Configure Set Variable components to define multiple media type attachments, and send these attachments using the Email Connector Send operation. Then log the result message using a Logger component.
Send Emails
The following example illustrates how to send emails over the SMTPS server. The flow initiates with a Scheduler component, and then the Send operation sends the email. The SMTPS connection type enables SSL or TLS encryption and sends encrypted messages over the secured version of the SMTP server.
The following screenshot shows the app flow for this example:

To create the flow:
-
Create a new Mule project in Studio.
-
In the Mule Palette view, select the Scheduler component and drag it onto the canvas.
This source initiates a flow when a time-based condition is met. -
Drag the Email Send operation to the right of the Scheduler source.
-
On the Send configuration screen, click the plus sign (+) next to the Connector configuration field to configure a global element for the operation.
-
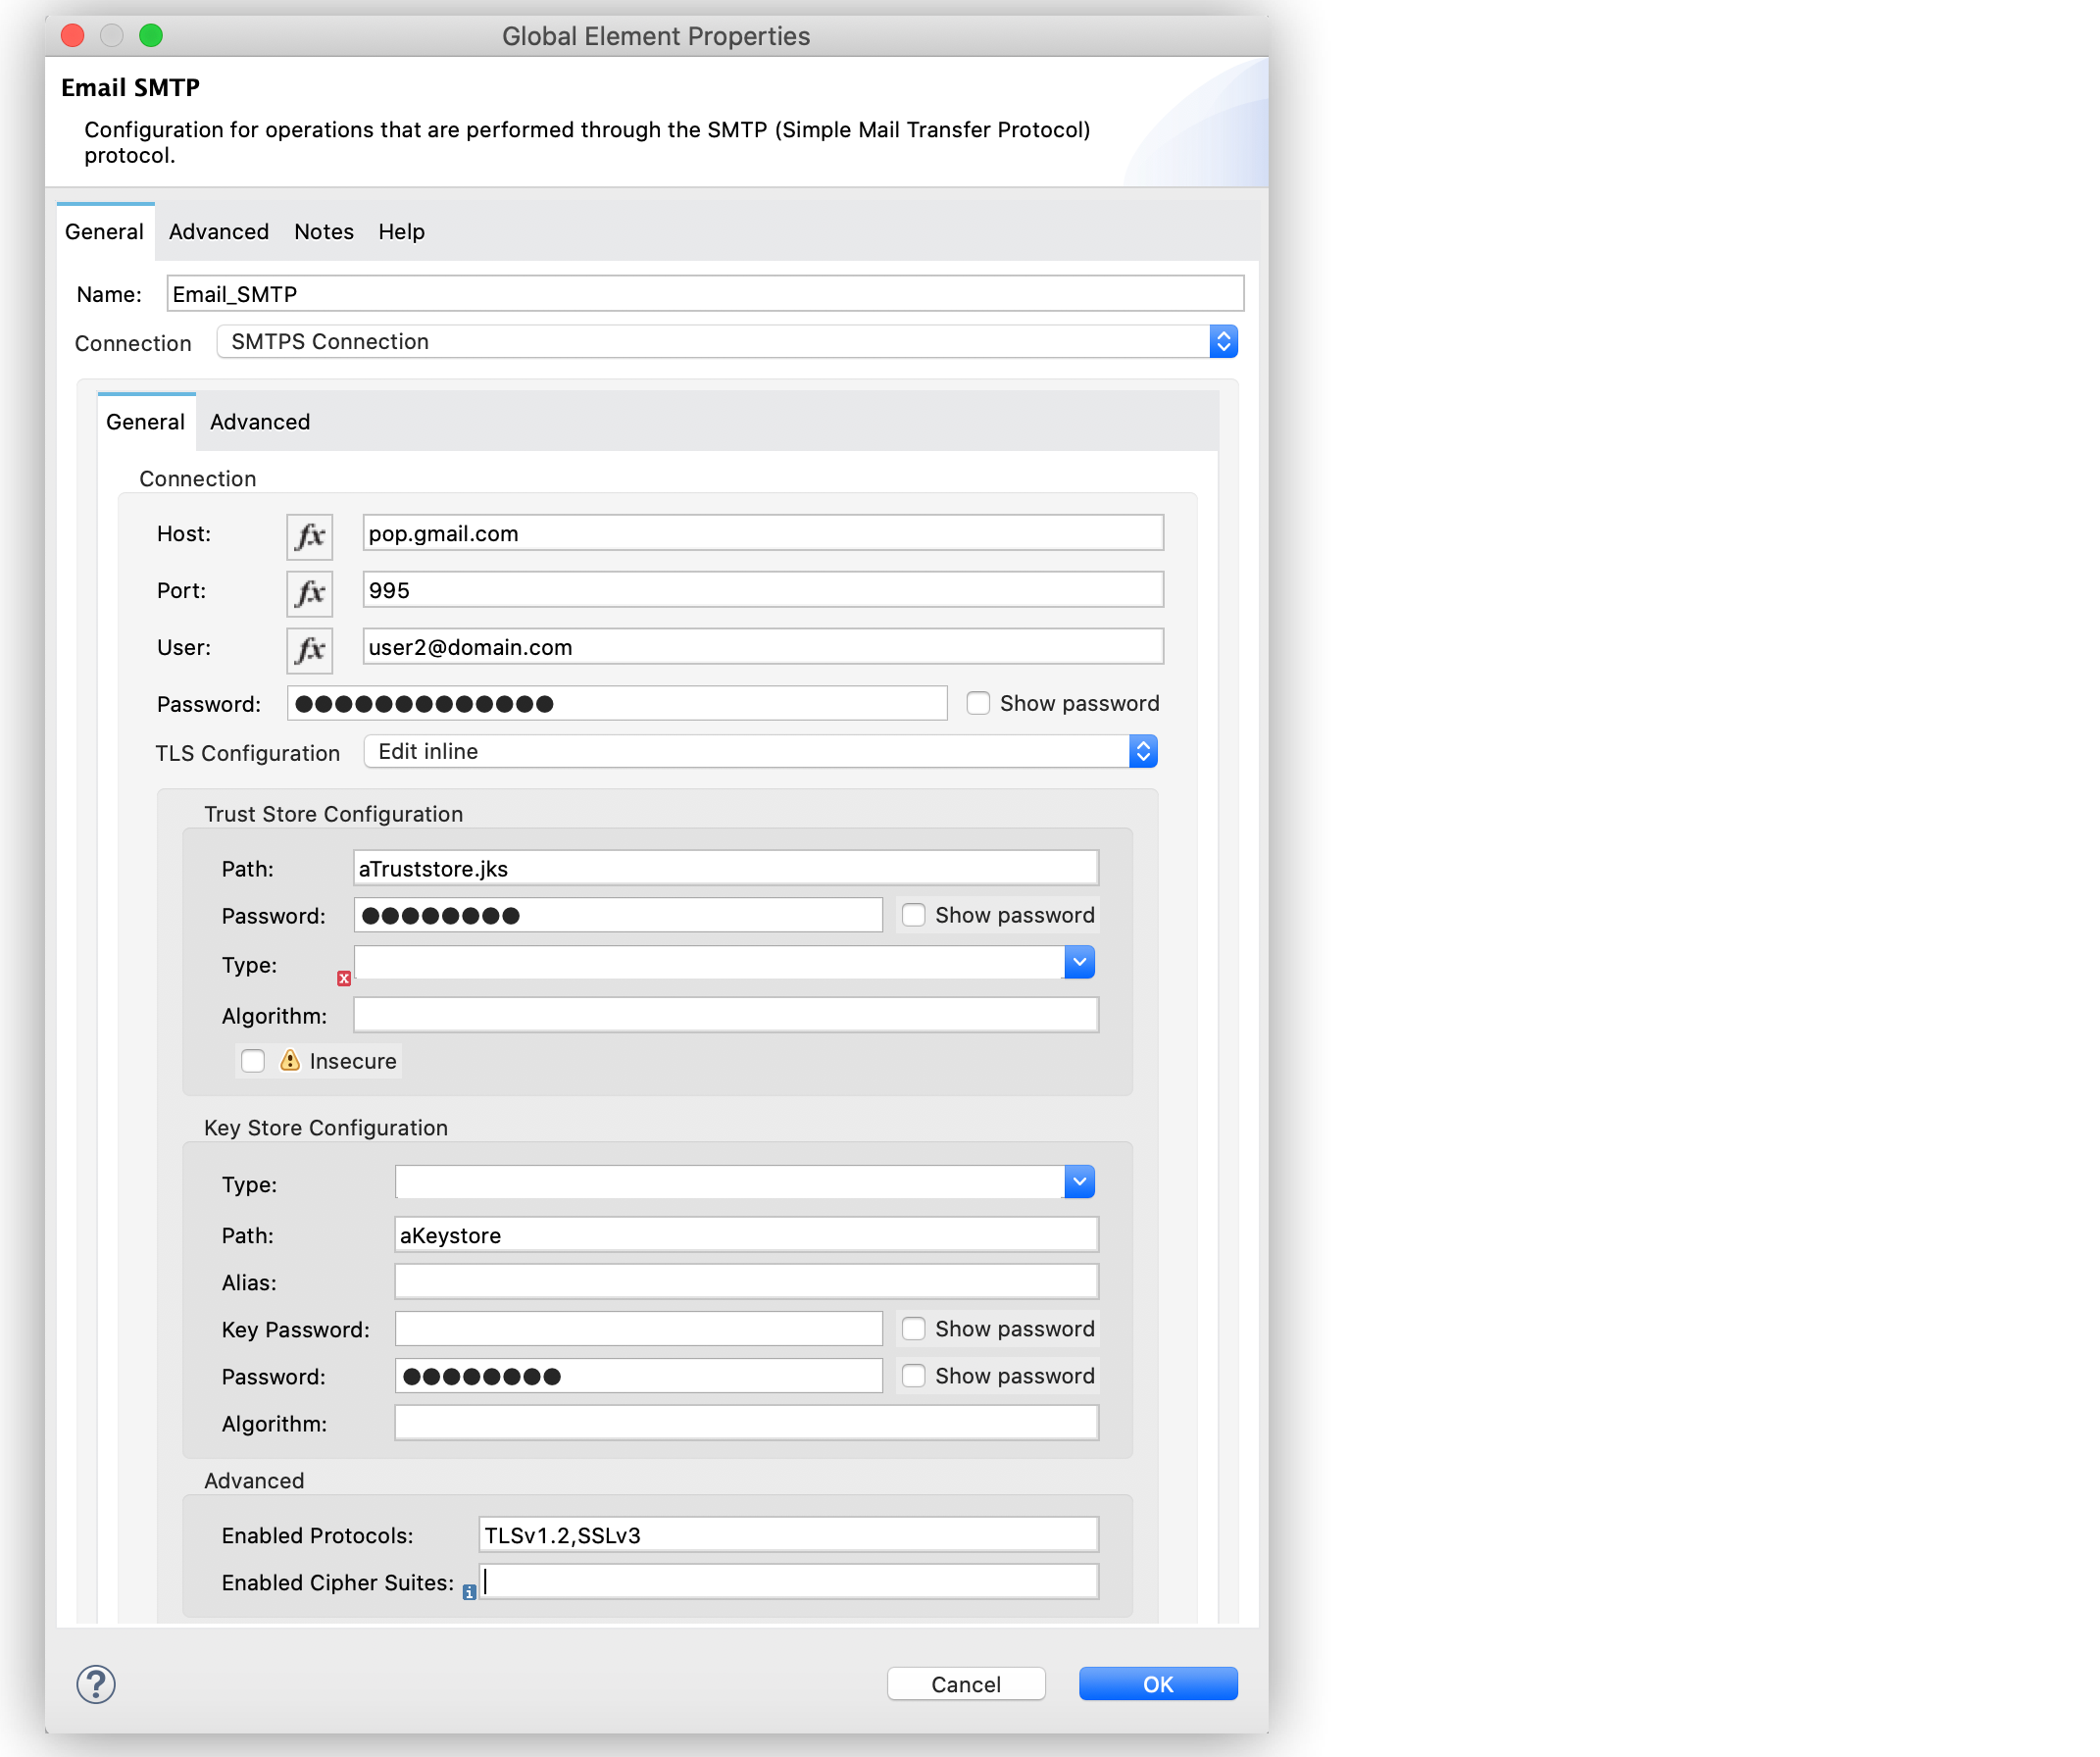
In the Connection field, select SMTPS Connection.
-
In the General tab, enter the following values:
-
Host
pop.gmail.com -
Port
995 -
User
user3@domain.com -
Password
passwordconnection
-
-
In the TLS Configuration section, select Edit inline.
-
In the Trust Store Configuration section, enter the following values:
-
Path
aTruststore.jks -
Password
passwordtrust
-
-
In the Key Store Configuration section, enter the following values:
-
Path
aKeystore -
Password
passwordkey
-
-
In the Advanced section, set Enabled Protocols to
TLSv1.2,SSLv3. -
Click OK to close the configuration window.
The following screenshot shows the Email SMTPS configuration:
-
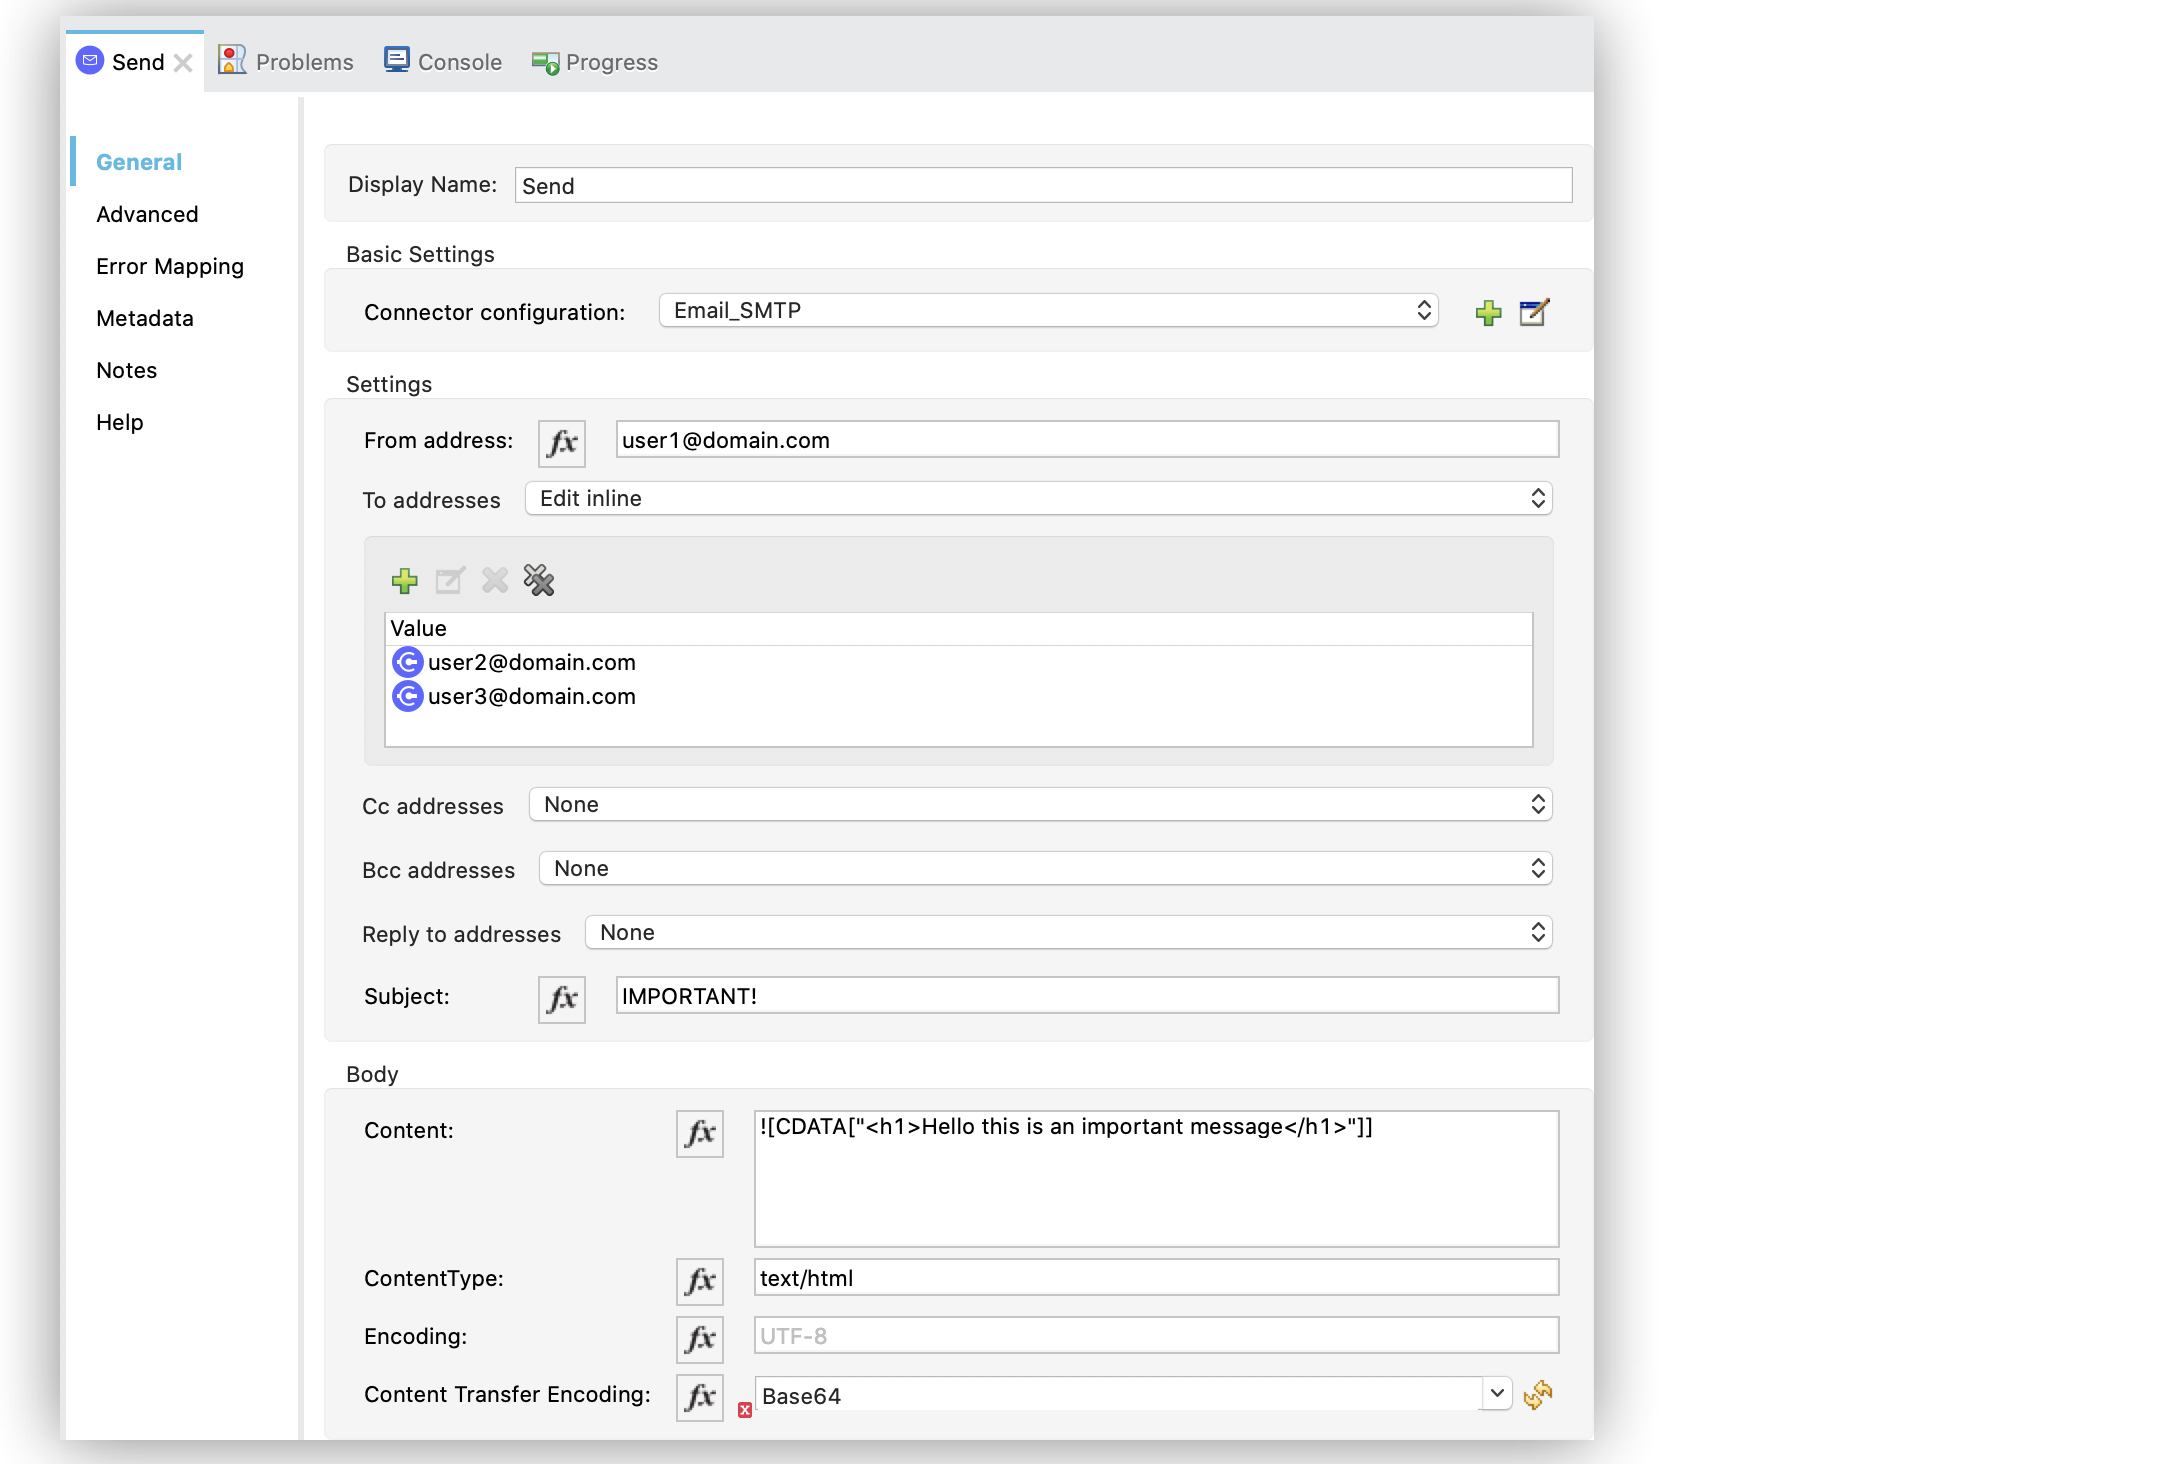
In the Send operation configuration screen, set the following values:
-
From address
user1@domain.com -
To addresses
Edit inline
-
-
Click the plus sign (+) to add new emails.
-
Set the Value field to
user2@domain.com. -
Repeat the previous two actions and add another email as
user3@domain.com. -
Set the Subject field to
IMPORTANT!. -
Set the Content field to
"<h1>Hello this is an important message</h1>"and the ContentType field totext/html.
If Content is not empty, the content of the message payload is used by default. If that payload is nottext, the operation fails with anEMAIL:SENDerror. -
Save and run the app.
The following screenshot shows the Send operation configuration:
XML for Sending Emails
Paste this code into the Studio XML editor to quickly load the flow for this example into your Mule app:
<?xml version="1.0" encoding="UTF-8"?>

<mule xmlns:tls="http://www.mulesoft.org/schema/mule/tls" xmlns:email="http://www.mulesoft.org/schema/mule/email"
	xmlns="http://www.mulesoft.org/schema/mule/core"
	xmlns:doc="http://www.mulesoft.org/schema/mule/documentation" xmlns:xsi="http://www.w3.org/2001/XMLSchema-instance" xsi:schemaLocation="http://www.mulesoft.org/schema/mule/core http://www.mulesoft.org/schema/mule/core/current/mule.xsd
http://www.mulesoft.org/schema/mule/email http://www.mulesoft.org/schema/mule/email/current/mule-email.xsd
http://www.mulesoft.org/schema/mule/tls http://www.mulesoft.org/schema/mule/tls/current/mule-tls.xsd">
	<email:smtp-config name="Email_SMTP" >
		<email:smtps-connection host="pop.gmail.com" port="995" user="user1@domain.com" password="passwordvalue" >
			<tls:context enabledProtocols="TLSv1.2,SSLv3" >
				<tls:trust-store path="aTruststore.jks" password="changeit" />
				<tls:key-store path="aKeystore" password="password" />
			</tls:context>
		</email:smtps-connection>
	</email:smtp-config>
	<flow name="emailconnectorFlow">
		<scheduler>
			<scheduling-strategy >
				<fixed-frequency />
			</scheduling-strategy>
		</scheduler>
		<email:send config-ref="Email_SMTP" fromAddress="user1@domain.com" subject="IMPORTANT!">
			<email:to-addresses >
				<email:to-address value="user3@domain.com" />
        <email:to-address value="user2@domain.com" />
			</email:to-addresses>
			<email:body contentType="text/html" >
				<email:content ><![CDATA["<h1>Hello this is an important message</h1>"]]></email:content>
			</email:body>
		</email:send>
	</flow>
</mule>
Send an Attachment
The following example illustrates how to send emails and attachments over the SMTP server. Use DataWeave to manage the attachments. The flow reads a JSON file using the File Connector Read operation and then uses the Email Connector Send operation to send the content of the file as an attachment:
The following screenshot shows the Anypoint Studio app flow for this example:

To create the flow:
-
Create a new Mule project in Studio.
-
In the Mule Palette view, select the Scheduler component and drag it onto the canvas.
The source initiates a flow when a time-based condition is met. -
Drag the File Connector Read operation to the right of the Scheduler component.
-
Set the File Path field to
file.json. -
Drag the Send operation to the right of the Read operation.
-
On the Send configuration screen, click the plus sign (+) next to the Connector configuration field to configure a global element for the operation.
-
In the Connection field, select SMTP Connection.
-
In the General tab, enter the following values:
-
Host
pop.gmail.com -
Port
995 -
User
user1@domain.com -
Password
password
-
-
Click OK.
-
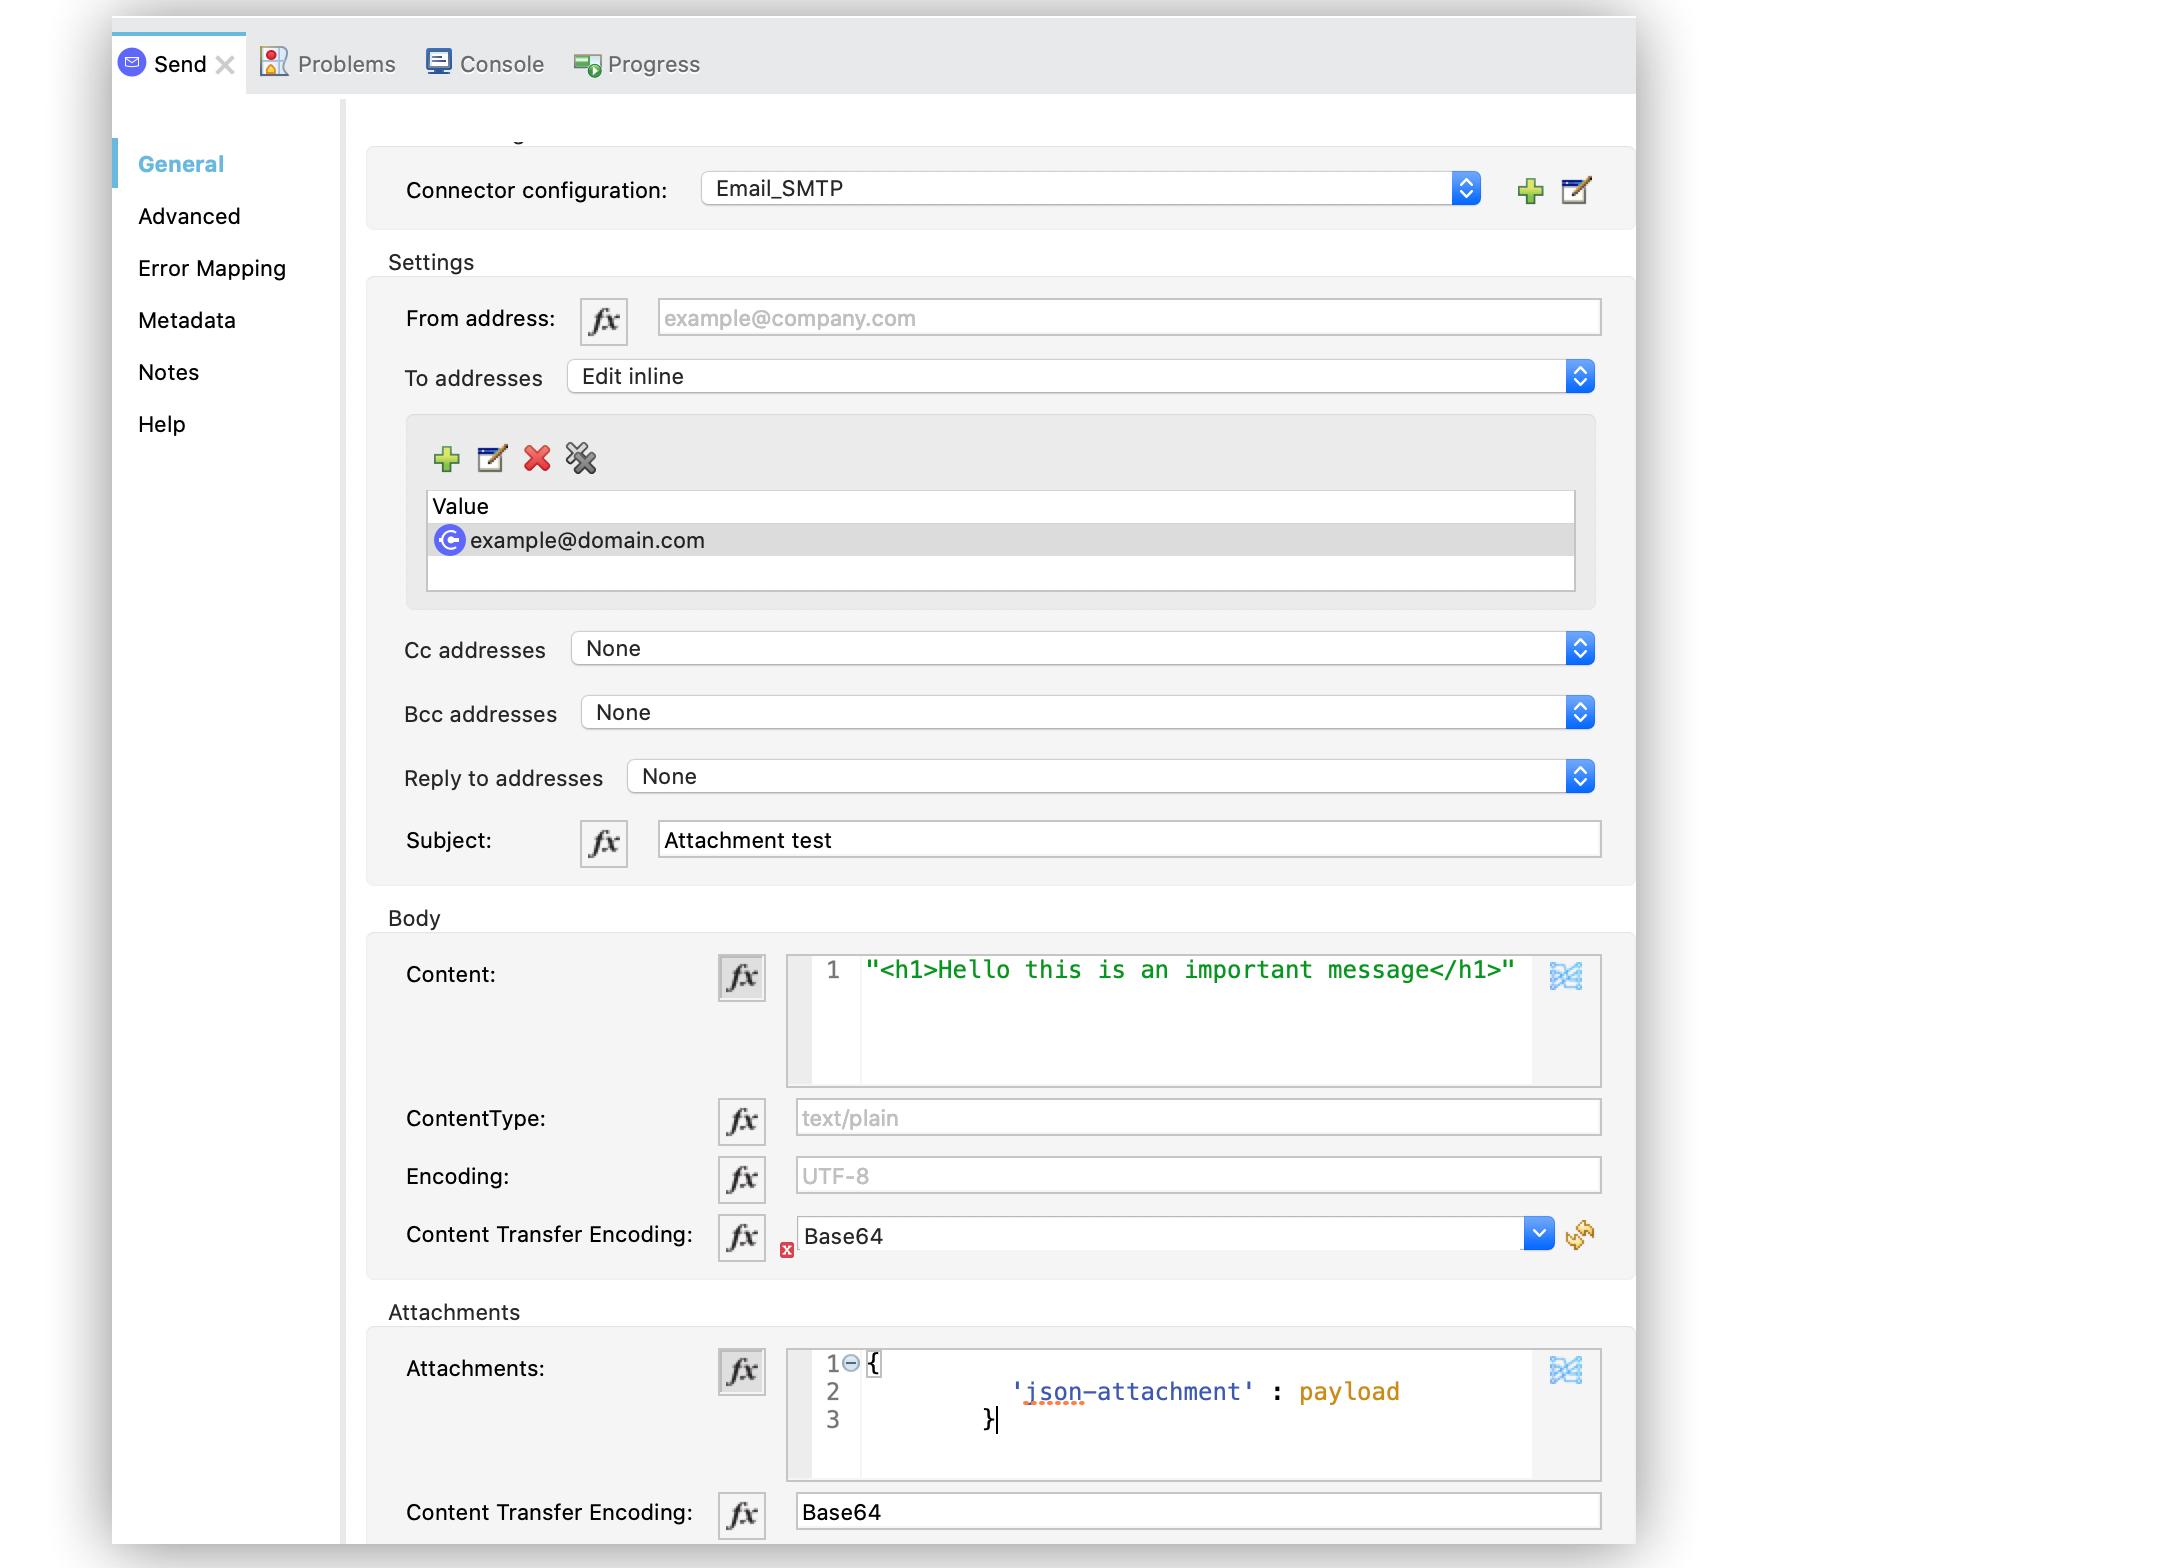
In the Send operation configuration screen, set the To addresses field to
Edit inline. -
Click the plus sign (+) to add a new email Value as
example@domain.com. -
Set the Subject field to
Attachment test. -
Set the Content field to
"<h1>Hello this is an important message</h1>". -
In the Attachments field, enter the following DataWeave expression as a new attachment element:
{
  'json-attachment' : payload
}
Note that
payloadis the content of the JSON file read by the File Connector Read operation. -
Save and run the app.
The following screenshot shows the Send operation configuration:
XML for Sending Attachments
Paste this code into the Studio XML editor to quickly load the flow for this example into your Mule app:
<?xml version="1.0" encoding="UTF-8"?>

<mule xmlns:email="http://www.mulesoft.org/schema/mule/email" xmlns:file="http://www.mulesoft.org/schema/mule/file"
	xmlns="http://www.mulesoft.org/schema/mule/core"
	xmlns:doc="http://www.mulesoft.org/schema/mule/documentation" xmlns:xsi="http://www.w3.org/2001/XMLSchema-instance" xsi:schemaLocation="http://www.mulesoft.org/schema/mule/core http://www.mulesoft.org/schema/mule/core/current/mule.xsd
http://www.mulesoft.org/schema/mule/file http://www.mulesoft.org/schema/mule/file/current/mule-file.xsd
http://www.mulesoft.org/schema/mule/email http://www.mulesoft.org/schema/mule/email/current/mule-email.xsd">
	<email:smtp-config name="Email_SMTP">
		<email:smtp-connection host="pop.gmail.com" port="995" user="user1@domain.com" password="password" />
	</email:smtp-config>
	<flow name="emailattachment">
		<scheduler doc:name="Scheduler">
			<scheduling-strategy >
				<fixed-frequency />
			</scheduling-strategy>
		</scheduler>
		<file:read path="/file.json"/>
		<email:send config-ref="config" subject="Attachment test">
            <email:to-addresses >
                <email:to-address value="example@domain.com" />
            </email:to-addresses>
            <email:body >
                <email:content ><![CDATA[#["<h1>Hello this is an important message</h1>"]]]></email:content>
            </email:body>
            <email:attachments >#[{
          'json-attachment' : "payload"
        }]</email:attachments>
        </email:send>
	</flow>
</mule>
Send Multiple Attachments
The following example illustrates how to send emails and multiple attachments over the SMTP server. The flow initiates with a Scheduler component. Then, Set Variable components define each attachment media type JSON, text and file. Subsequently, the Email Connector Send operation sends the attachments in the email, after which you the result message using a Logger component.
The following screenshot shows the Anypoint Studio app flow for this example:

To create the flow:
-
Create a new Mule project in Studio.
-
In the Mule Palette view, select the Scheduler component and drag it onto the canvas.
The source initiates a flow when a time-based condition is met and sends the emails. -
Drag a Set Variable component to the right of the Scheduler component.
-
In the Set Variable configuration screen, set the following parameters:
-
Name
json -
Value
output application/json --- {address: '221B Baker Street'} -
MIME Type
application/json
-
-
Drag another Set Variable component to the right of the first Set Variable component, and set the following parameters:
-
Name
textPlain -
Value
This is the email text attachment for John Watson -
MIME Type
text/plain
-
-
Drag another Set Variable component to the right of the second Set Variable component, and set the following parameters:
-
Name
octectStream -
Value
vars.textPlain -
MIME Type
application/octet-stream
-
-
Drag the Email Send operation to the right of the third Set Variable component.
-
On the Send configuration screen, click the plus sign (+) next to the Connector configuration field to configure a global element for the operation.
-
In the Connection field, select SMTP Connection.
-
In the General tab, enter the following values:
-
Host
pop.gmail.com -
Port
995 -
User
user1@domain.com -
Password
password
-
-
Click OK.
-
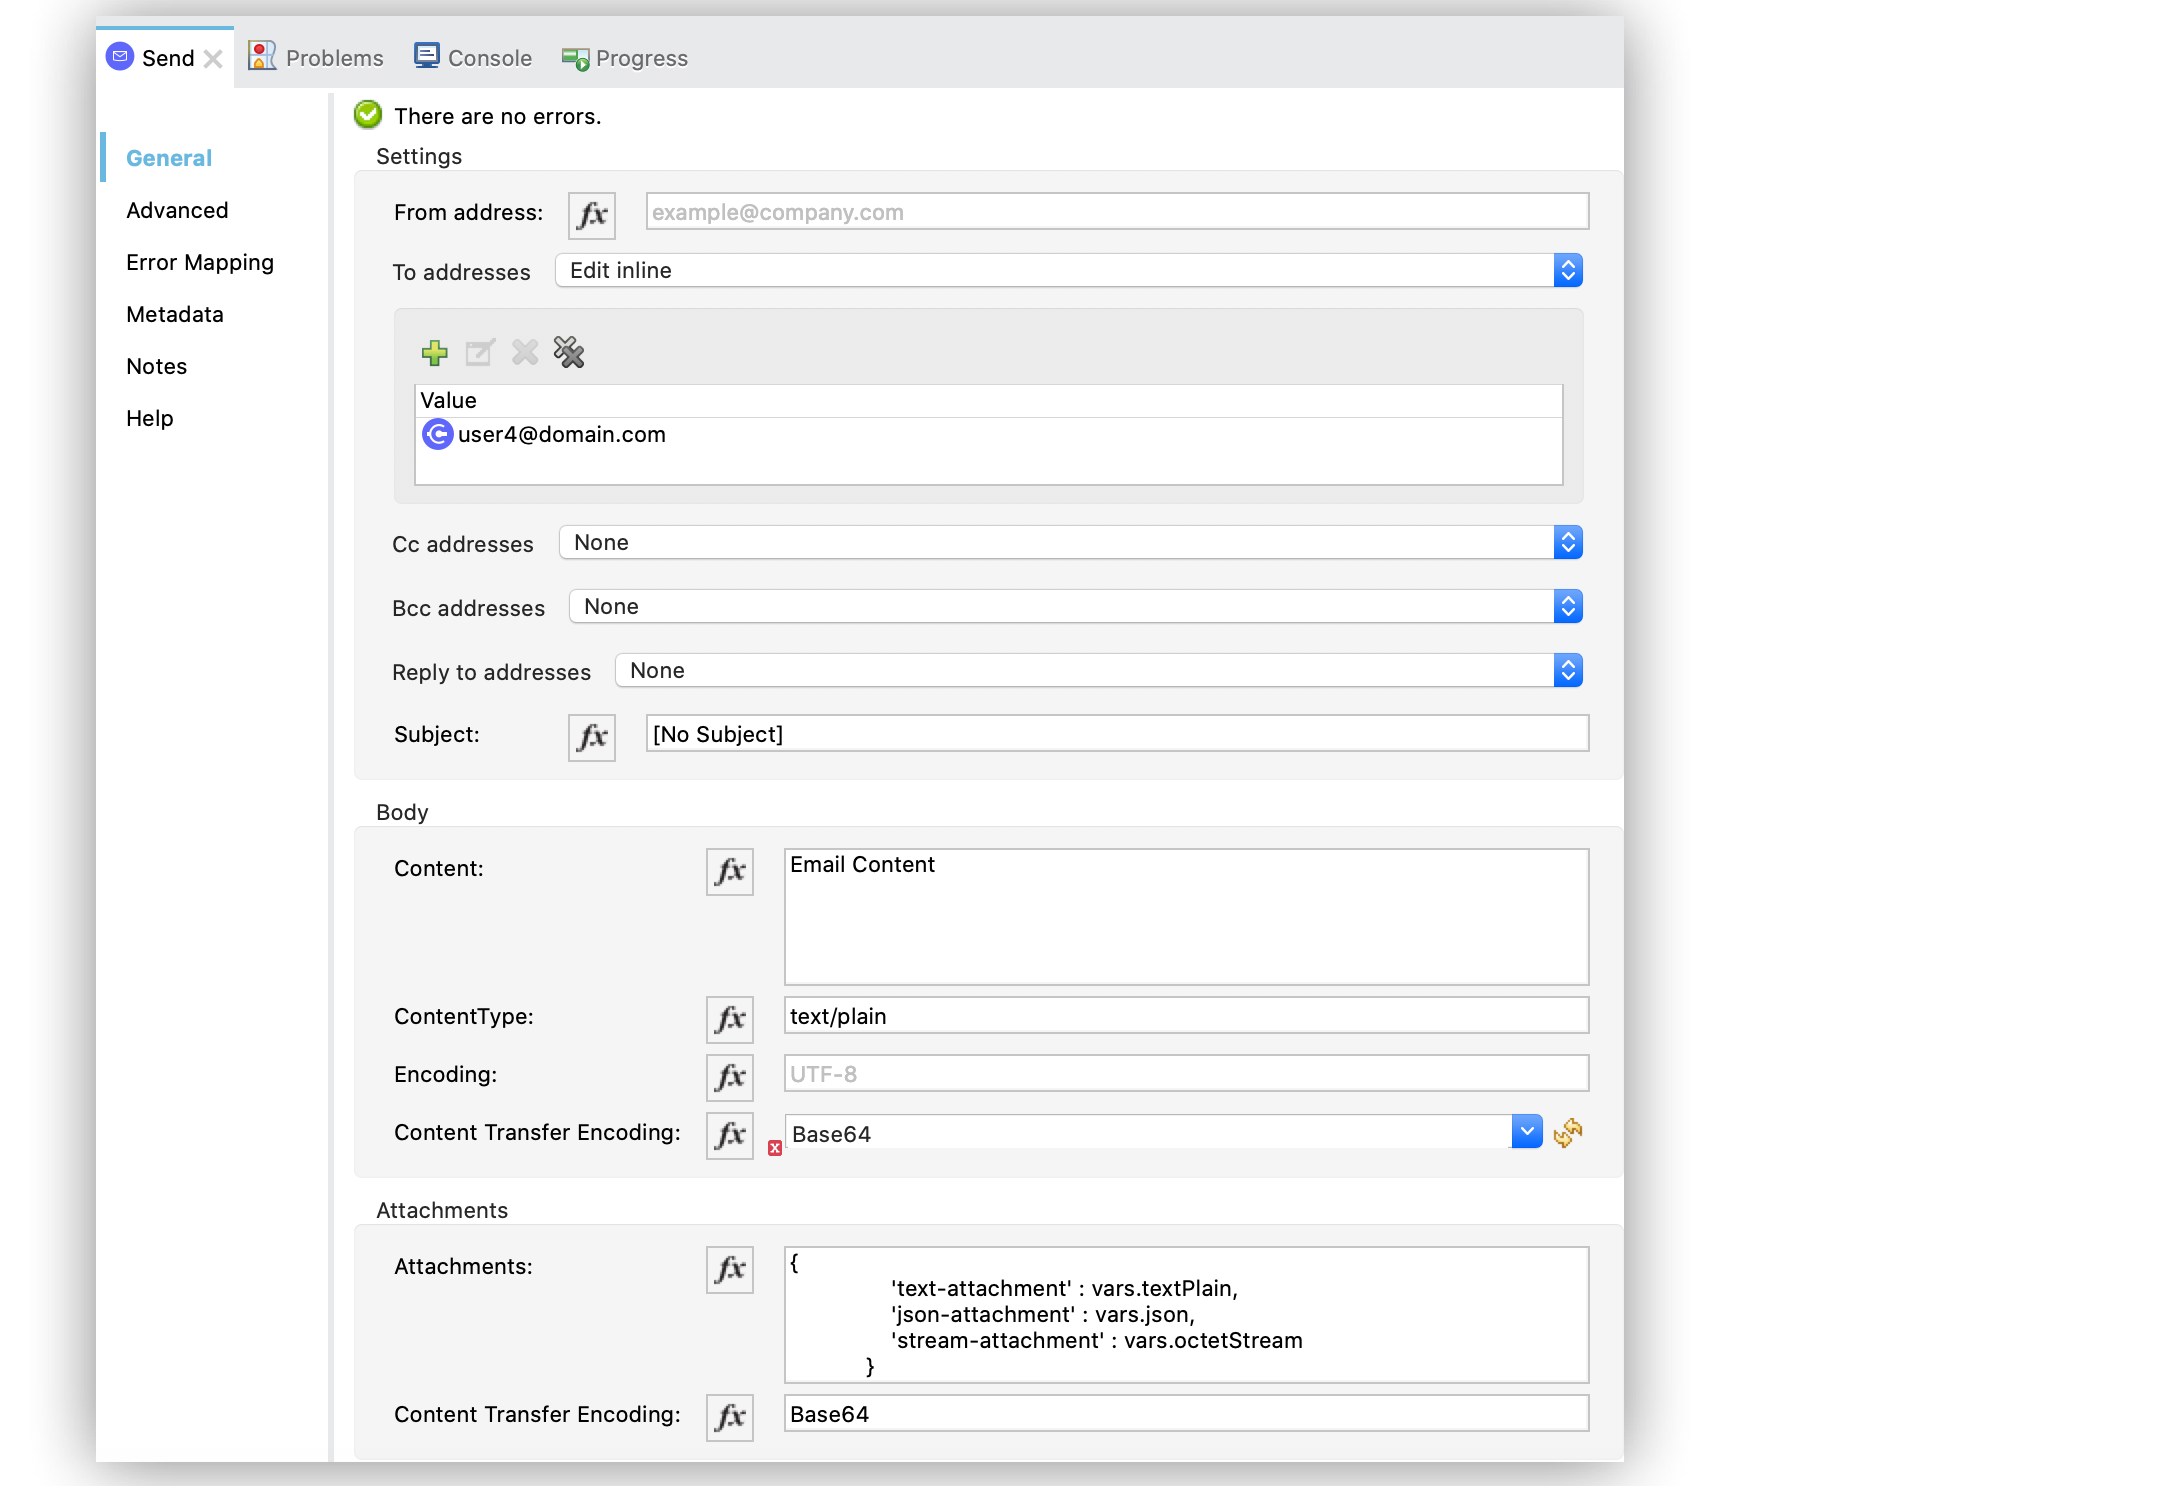
In the Send operation configuration screen, set the To addresses field to
Edit inline -
Click the plus sign (+) to add a new email Value as
user4@domain.com. -
Set the Content field to
Email Contentand the ContentType field totext/plain. -
In the Attachments field, enter the following DataWeave expression:
{ 'text-attachment' : vars.textPlain, 'json-attachment' : vars.json, 'stream-attachment' : vars.octetStream } -
Save and run the app.
The following screenshot shows the Send operation configuration:
XML for Sending Multiple Attachments
Paste this code into the Studio XML editor to quickly load the flow for this example into your Mule app:
<?xml version="1.0" encoding="UTF-8"?>

<mule xmlns:email="http://www.mulesoft.org/schema/mule/email"
	xmlns="http://www.mulesoft.org/schema/mule/core" xmlns:doc="http://www.mulesoft.org/schema/mule/documentation"
	xmlns:xsi="http://www.w3.org/2001/XMLSchema-instance"
	xsi:schemaLocation="
http://www.mulesoft.org/schema/mule/email http://www.mulesoft.org/schema/mule/email/current/mule-email.xsd http://www.mulesoft.org/schema/mule/core http://www.mulesoft.org/schema/mule/core/current/mule.xsd">
	<email:smtp-config name="Email_SMTP">
		<email:smtp-connection host="pop.gmail.com" port="995" user="user1@domain.com" password="password" />
	</email:smtp-config>
	<flow name="emailattachFlow">
		<scheduler>
			<scheduling-strategy >
				<fixed-frequency />
			</scheduling-strategy>
		</scheduler>
		<set-variable value="#[output application/json --- {address: '221B Baker Street'}]" variableName="json" mimeType="application/json"/>
        <set-variable value="This is the email text attachment for John Watson" variableName="textPlain" mimeType="text/plain"/>
        <set-variable value="#[vars.textPlain]" variableName="octetStream" mimeType="application/octet-stream"/>
        <email:send config-ref="config">
            <email:to-addresses >
                <email:to-address value="user4@domain.com" />
            </email:to-addresses>
            <email:body contentType="text/plain" >
                <email:content>Email Content</email:content>
            </email:body>
            <email:attachments>#[{
                'text-attachment' : vars.textPlain,
                'json-attachment' : vars.json,
                'stream-attachment' : vars.octetStream
            }]</email:attachments>
        </email:send>
		<logger level="INFO" doc:name="Logger" message="#['Message Id ' ++ correlationId as String]"/>
	</flow>

</mule>