
Using Anypoint Code Builder to Configure File Connector
To use Anypoint Code Builder to configure a connector or module, create a basic integration project in Anypoint Code Builder, add connectors and other components to your Mule application to process your business logic, and configure the attributes.
Before You Begin
Before creating an integration project, you must:
-
Set up and access the Anypoint Code Builder web or desktop IDE
-
Have credentials to access the connector’s API
-
Ensure that the Visual Studio Code Extension Pack for Java is installed.
To use this connector, you must be familiar with:
-
The connector’s API
-
Anypoint Connectors
-
Mule runtime engine (Mule)
Creating a New Integration Project
To create a new integration project:
-
In the activity bar of the IDE, click the
 (Anypoint Code Builder) icon.
 -
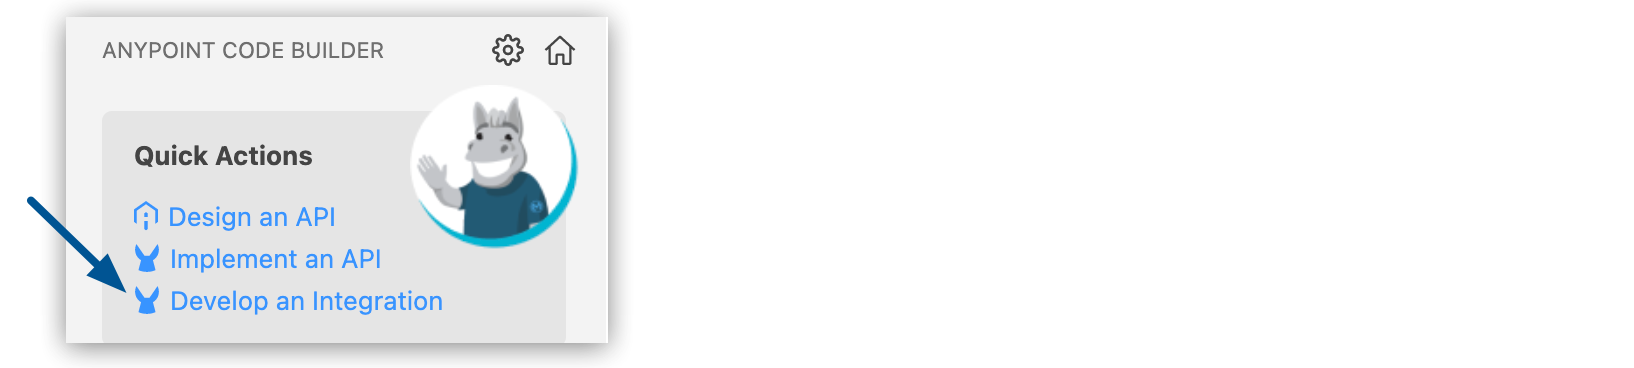
From Quick Actions, click Develop an Integration:
-
Complete the following in the Develop an Integration form:
Attribute Value Project Name
Unique name for your project.
This name is used as the title and name of the integration project file. For example, if the project name is "Salesforce Integration," the project file name is
salesforce-integration.Project Location
Your home directory or another directory you create. Click Browse to select a different directory for the integration project.
Don’t create the project within another project directory.
-
Select the type of project to create by selecting either the Empty Project or Template or Example card.
-
Select the Mule runtime and Java Version for your app.
-
Click Create Project.
Adding the Connector to Your Integration Project
Anypoint Connectors provide operations for retrieving, modifying, and sending data to and from systems.
In addition to the built-in connectors that Anypoint Code Builder provides, you can download many other connectors from Anypoint Exchange.
To import a connector from Exchange and add it to your configuration:
-
In the Explorer view, open the configuration XML file for your project, such as
my-project-name.xml. -
Click the
 (Show Mule graphical mode) icon in the activity bar to open the canvas UI if it doesn’t open automatically.
 -
Add the connector the same way you added other components from the canvas UI:
-
In the canvas UI, click the
 (Add component) icon.
 -
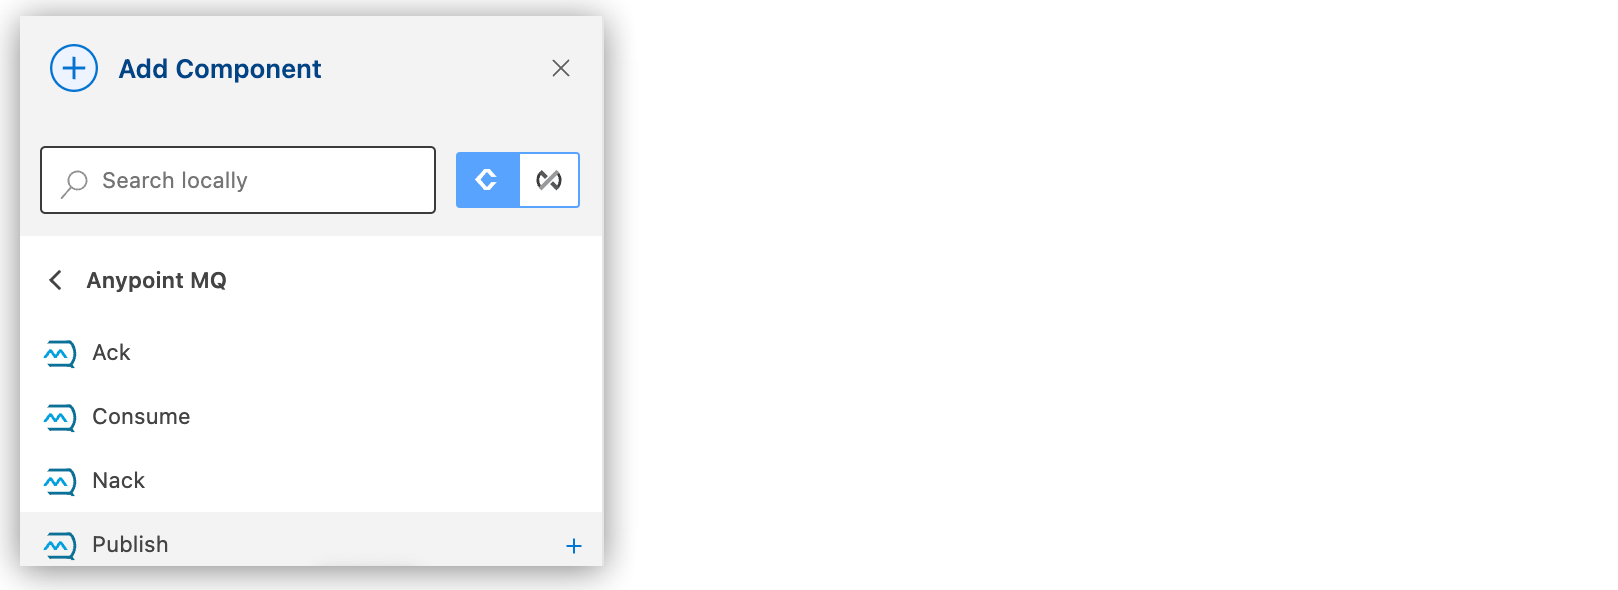
In the Add Component panel, click Connectors.
-
Click the connector name and then click the operation to add, such as Publish:
If the connector is not available locally, click the
 (Search in Exchange) toggle: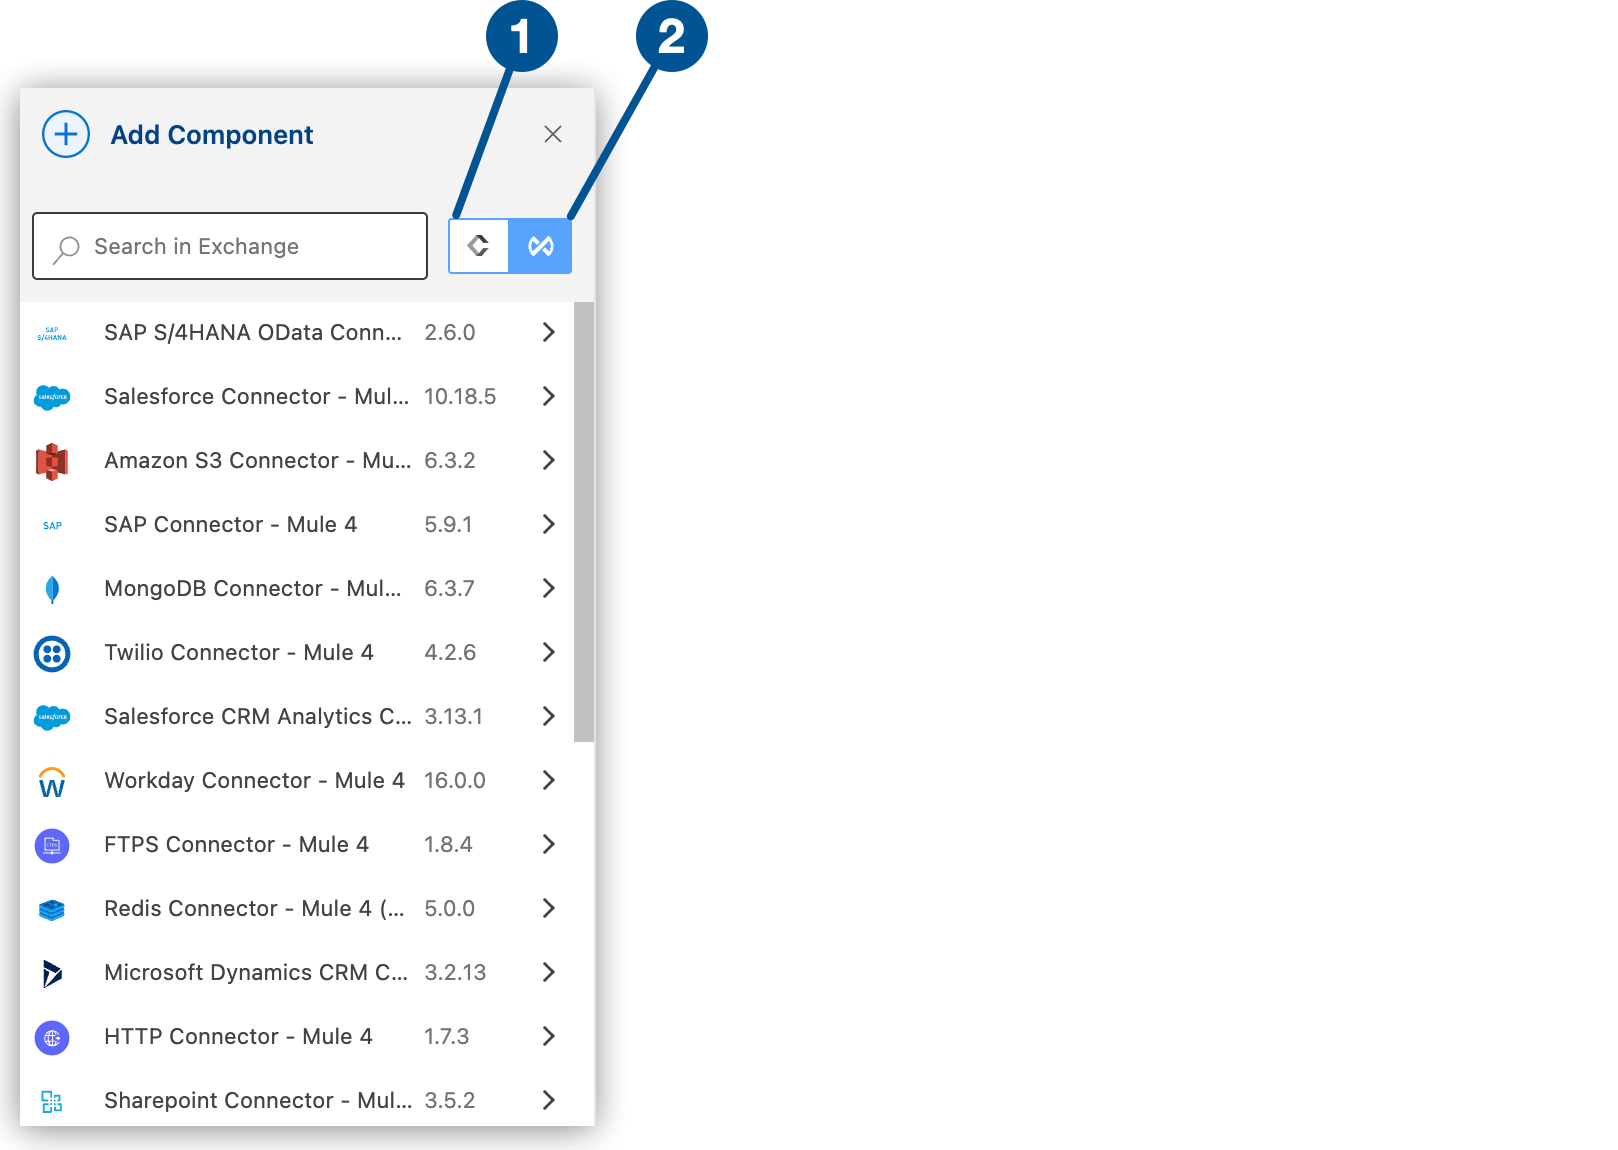
1 Search locally 2 Search in Exchange -
Select the connector to add to your project.
-
Select the operation from the Add Component panel.
-
Adding a connector to an integration project does not make that connector available to other projects in your Anypoint Code Builder workspace.
Configuring the Trigger For the Flow
A trigger (source) initiates a flow when a specified condition is met. You can configure one of these triggers to use with File Connector:
-
On New or Upated File
Triggers a flow for a newly created or modified file
-
HTTP > Listener
Initiates a flow each time it receives a request on the configured host and port
-
Scheduler
Initiates a flow when a time-based condition is met
For more information, see Scheduler (<scheduler/>).
For example, to configure the On New or Updated trigger:
-
Add the On New or Updated operation to the canvas UI.
-
Click the On New or Updated operation on the canvas UI.
-
In the General tab, configure the following attributes:
Attribute Description Required Directory
Directory where polled files are located.
No
Recursive
If selected, uses files contained in sub-directories.
No
Matcher
Matcher used to filter events on files that don’t meet the matcher’s criteria.
No
Watermark mode
If selected, picks only files that were created or updated after the last poll was executed.
Options include:
-
DISABLED
-
MODIFIED_TIMESTAMP
-
CREATED_TIMESTAMP
No
Time between size check
Wait time, in milliseconds, between size checks to determine if a file is ready to read. This allows a file write to complete before processing. Mule runtime performs two size checks and waits the specified amount of time between calls. If both checks return the same value, the file is ready to read.
No
Time between size check unit
Time unit for Time between size check.
No
Scheduling strategy
Triggers the flow’s execution based on a time-based condition. This field is not currently enabled in the configuration UI. Configure it in the XML editor. See Configuring the Scheduling Strategy in XML.
Yes
Post processing action
Auto delete
If selected, deletes each processed file after it’s processed, which causes all files obtained in the next poll to be treated as new files.
No
Move to directory
Directory path to which to send each processed file after it processes. This is an alternative to Auto delete if you don’t want to delete the file.
No
Rename to
Renames a file to this value when it is moved. This attribute works in tandem with Move to directory. The connector retains the original file name if you don’t configure this field.
No
Apply post action when failed
If selected, applies any of the post actions (Auto delete and Move to directory) in case the file processing fails. If you de-select this option, no failed files are moved or deleted.
No
Overwrite
Overwrites the target file when the destination file has the same name.
No
-
Adding Components to Your Project
Add components to your integration project to build a flow:
-
In the Explorer view, open the XML file for your project, such as
my-project-name.xml. -
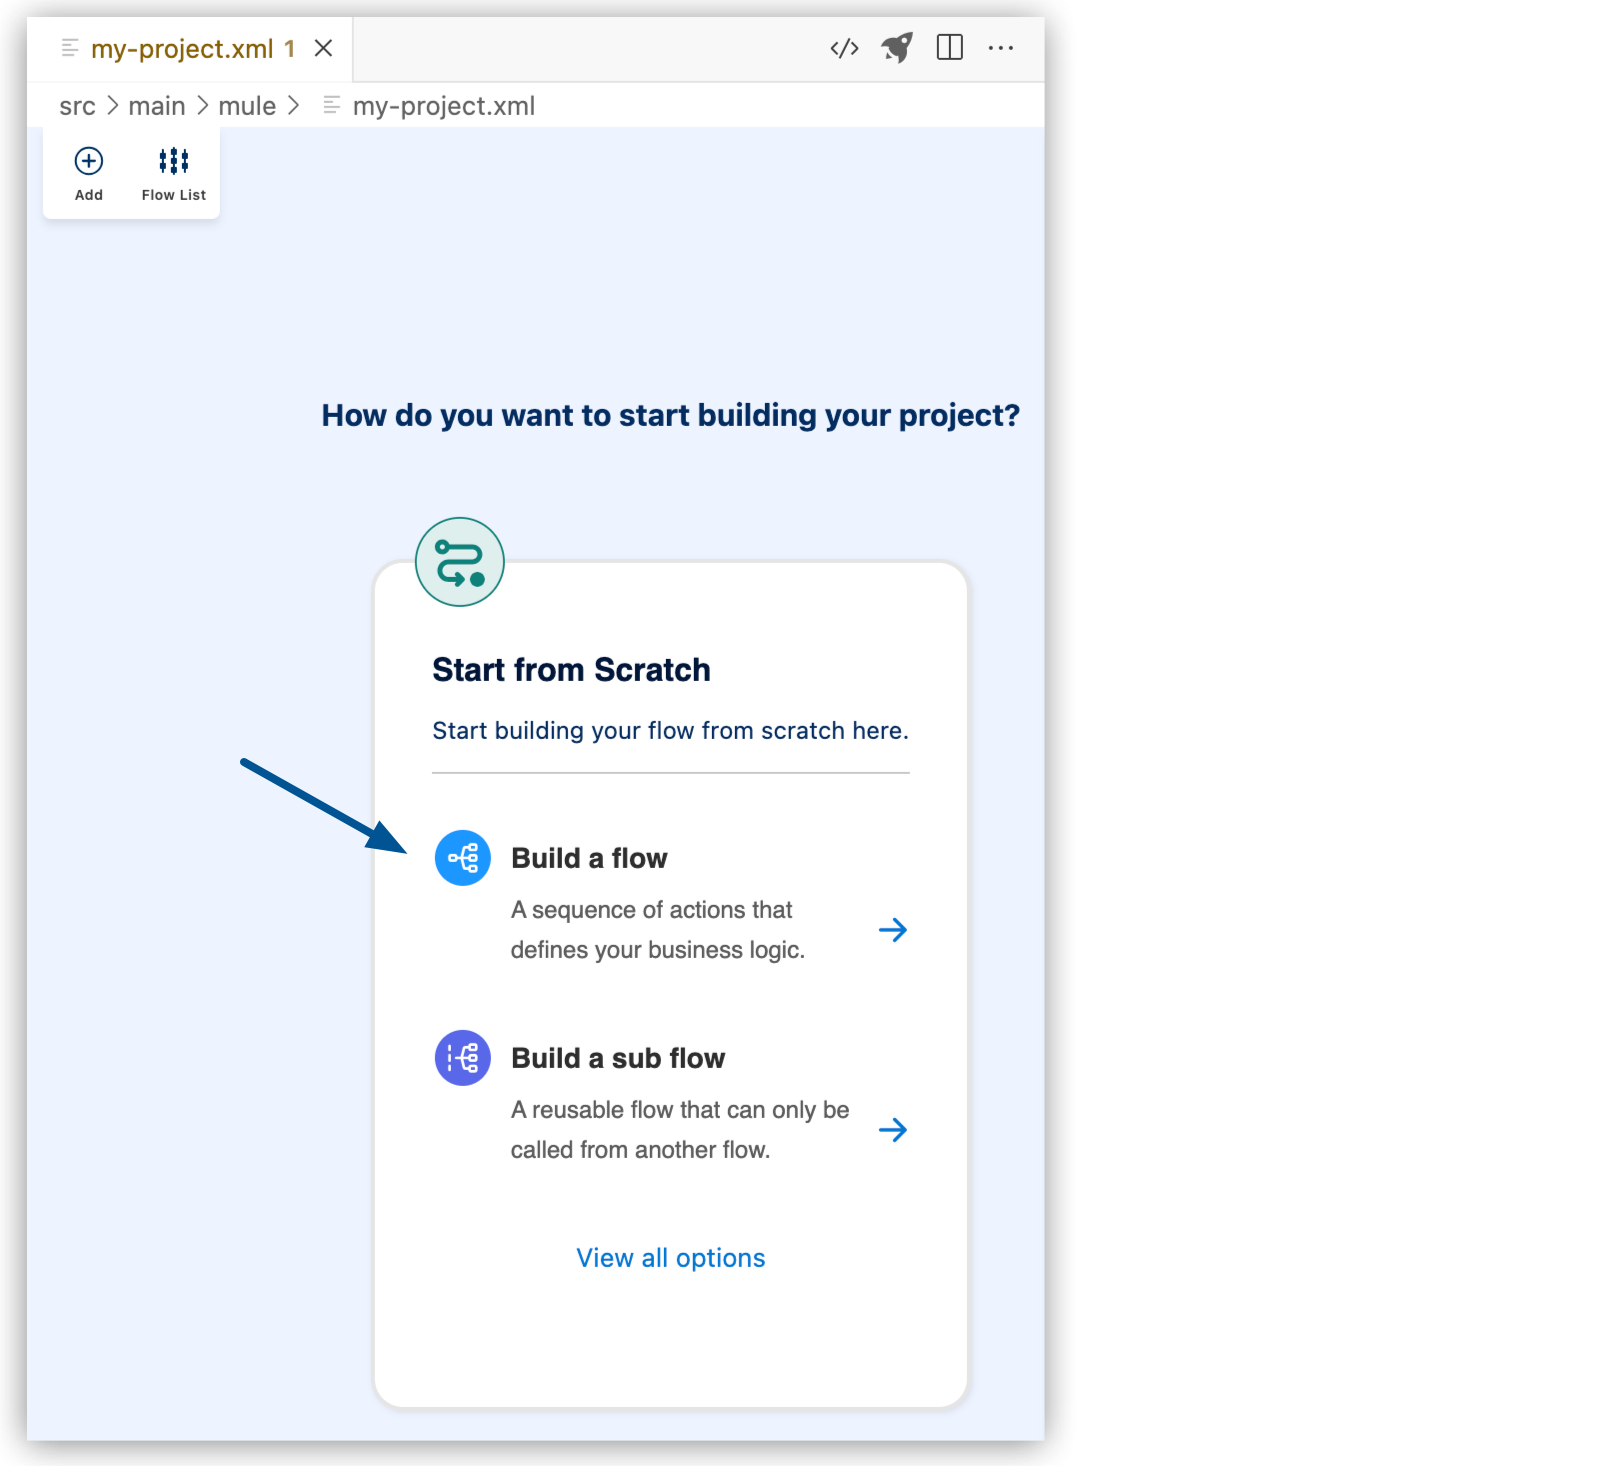
Select Build a Flow from the start card to create an empty flow:
-
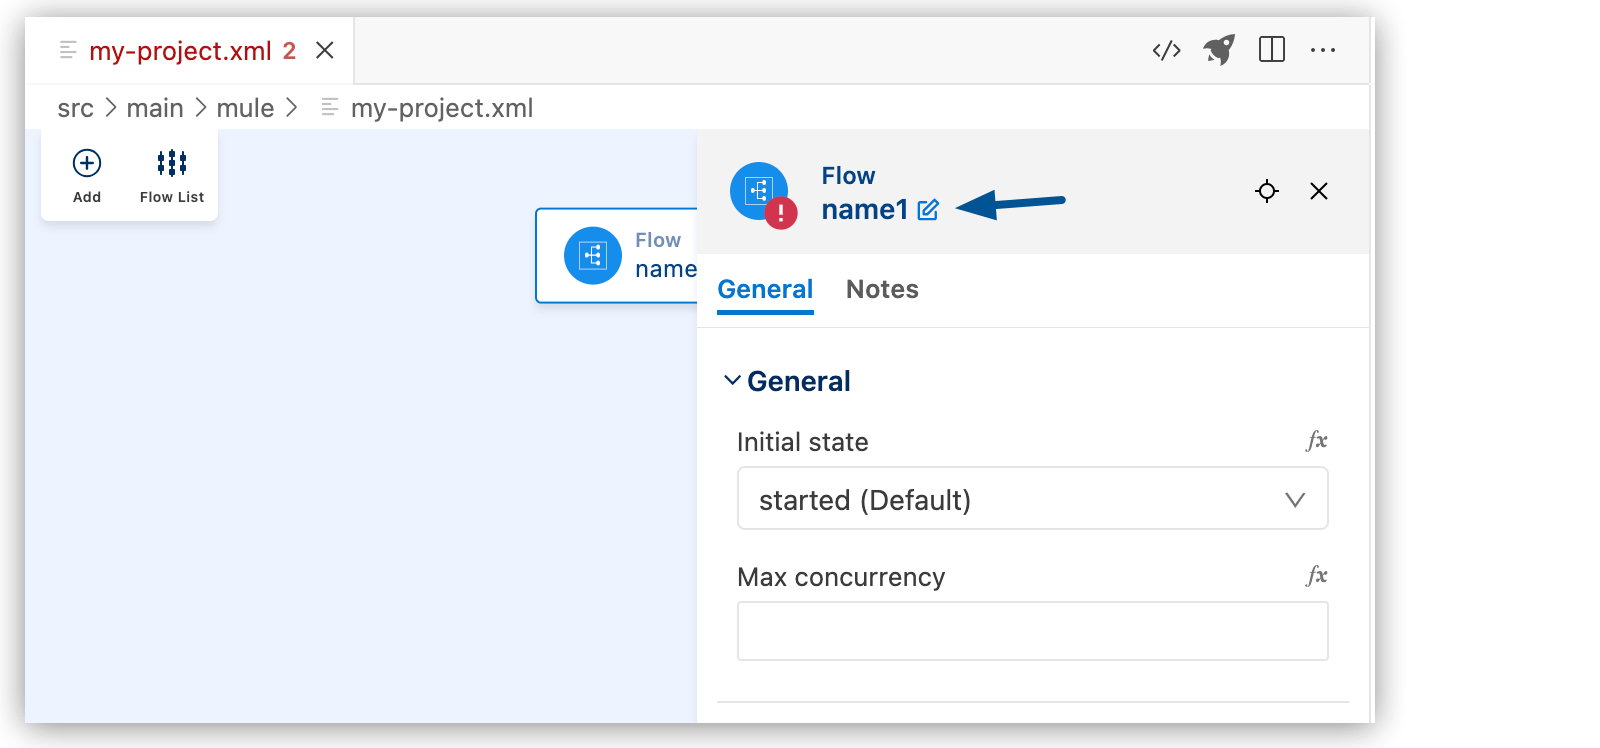
Change the name of the flow:
-
Click Flow.
-
Click the edit icon.
-
Enter the flow name, and click the checkmark.
-
In the canvas UI, click the
(Add component) icon. -
In the Add Component panel, search for and select your component from the results. The following example shows the Listener component from the HTTP search results:
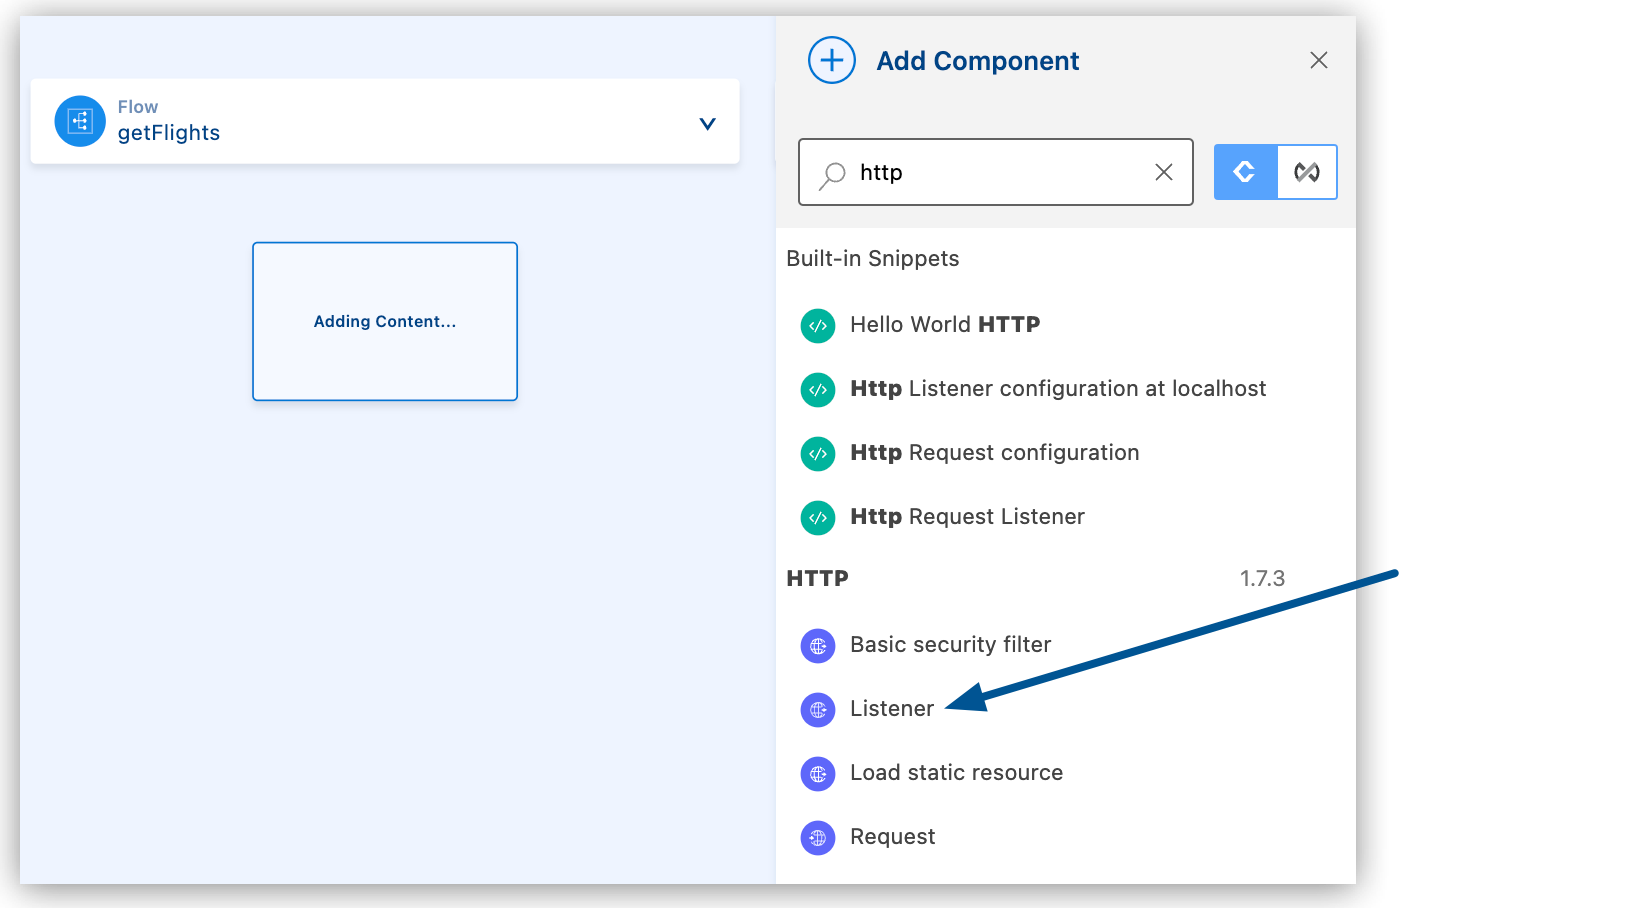
The configuration XML file now includes the XML for the HTTP Listener into the
<flow/>element, for example:<flow name="getFlights" > <http:listener path="" config-ref="" doc:name="Listener" doc:id="ojzfry" /> </flow>
-
Adding a Global Configuration
Add another component, this time using the XML configuration menu. For example, add the <http:listener-config/> component from a snippet.
For more information about snippets, see Configuring Components.
-
In the configuration XML, place your cursor before the
<flow/>element and typehttp.Ensure that the cursor is not inside the
<flow/>element. -
Type
http, and select thehttp:listener-configsnippet: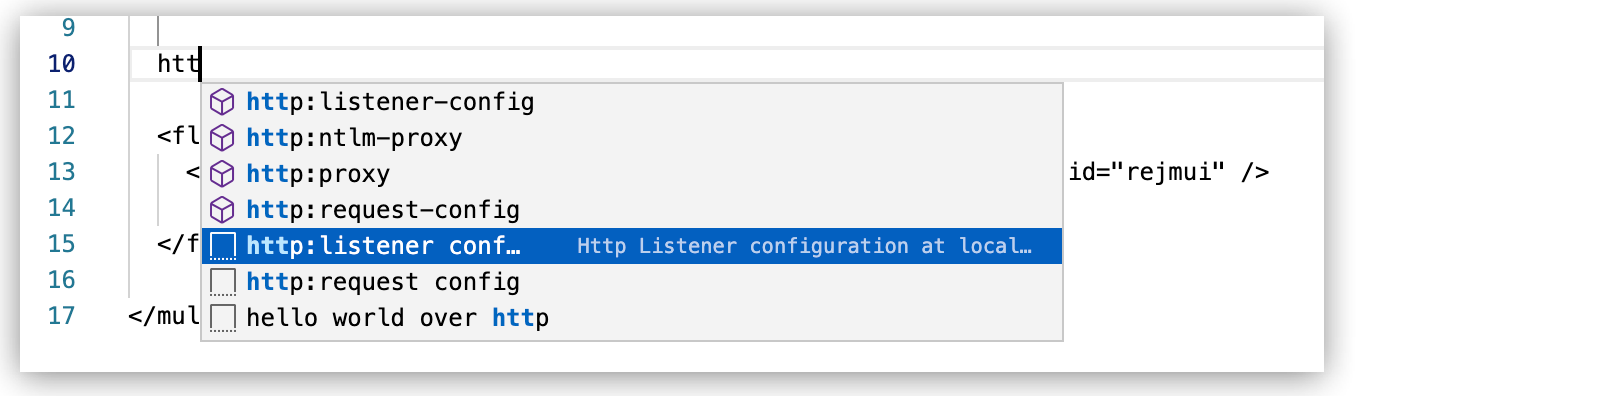
The snippet adds the following code:
<http:listener-config name="HTTP_Listener_config" >
  <http:listener-connection host="0.0.0.0" port="8081" />
</http:listener-config>
Configuring Component Attributes
After you add components to your integration project, configure the attributes in the component UI, or configure the attributes directly in the XML code editor.
Connector XML tags start with a namespace followed by an operation, following the syntax namespace:operation, such as <db:select/> for a Select operation in Anypoint Connector for Database (Database Connector).
You can use autocomplete from an expression (fx) field for a component to select DataWeave functions from the Core module and other values accepted in this field.
Configuring the Copy Operation
The Copy operation copies the file or directory specified in Source Path into the Target Path. The source path can be either a file or directory. If Source Path points to a directory, then the directory is copied recursively.
-
Click the Copy operation on the canvas UI to configure the following attributes in the General tab:
Attribute Description Required Source path
Path to the file or directory to perform the operation on.
Yes
Target path
Path to the directory to place the file in.
Yes
Create parent directories
If selected, a parent folder is created if the target path or its parent don’t exist. If unselected, a
FILE:ILLEGAL_PATHerror is thrown when you try to perform the operation.No
Overwrite
If selected, overwrites the target file if a file already exists. If Overwrite isn’t selected, a
FILE:FILE_ALREADY_EXISTSerror is thrown when you try to perform the operation.No
Rename to
New name for the file. If a new name isn’t provided, the original file name is kept.
No
-
Click the Advanced tab to configure the following attributes:
Attribute Description Required Error Mappings
Creates custom error types that you map to Mule error types. The mappings can help you further differentiate and group errors in your app. This attribute is not currently enabled in the configuration UI. Configure it in the XML editor. See Mule Errors.
No
Connection
Reconnection strategy
When an operation in a Mule application fails to connect to an external server, the default behavior is for the operation to fail immediately and return a connectivity error. You can modify the default behavior by configuring the reconnection strategy for the operation. This attribute is not currently enabled in the configuration UI. Configure it in the XML editor. See Reconnect and Reconnect Forever, and Configuring the Reconnection Strategy in XML.
No
Configuring the Create Directory Operation
The Create Directory operation creates a directory in the specified Directory path.
-
Click the Create Directory operation on the canvas UI to configure the following attributes in the General tab:
Attribute Description Required Directory path
New directory’s path name, for example
~/newFolder.Yes
-
Click the Advanced tab to configure the following attributes:
Attribute Description Required Error Mappings
Creates custom error types that you map to Mule error types. The mappings can help you further differentiate and group errors in your app. This attribute is not currently enabled in the configuration UI. Configure it in the XML editor. See Mule Errors.
No
Connection
Reconnection strategy
When an operation in a Mule application fails to connect to an external server, the default behavior is for the operation to fail immediately and return a connectivity error. You can modify the default behavior by configuring the reconnection strategy for the operation. This attribute is not currently enabled in the configuration UI. Configure it in the XML editor. See Reconnect and Reconnect Forever, and Configuring the Reconnection Strategy in XML.
No
Configuring the Delete Operation
The Delete operation deletes the file specified in the Directory path, as long as the file isn’t locked. This operation doesn’t delete directories.
-
Click the Delete operation on the canvas UI to configure the following attributes in the General tab:
Attribute Description Required Directory path
Path to the file to delete.
Yes
-
Click the Advanced tab to configure the following attributes:
Attribute Description Required Error Mappings
Creates custom error types that you map to Mule error types. The mappings can help you further differentiate and group errors in your app. This attribute is not currently enabled in the configuration UI. Configure it in the XML editor. See Mule Errors.
No
Connection
Reconnection strategy
When an operation in a Mule application fails to connect to an external server, the default behavior is for the operation to fail immediately and return a connectivity error. You can modify the default behavior by configuring the reconnection strategy for the operation. This attribute is not currently enabled in the configuration UI. Configure it in the XML editor. See Reconnect and Reconnect Forever, and Configuring the Reconnection Strategy in XML.
No
Configuring the List Operation
Use the List operation to list all files in the specified Directory path.
-
Click the List operation on the canvas UI to configure the following attributes in the General tab:
Attribute Description Required Directory path
Path to the directory with the files to list.
Yes
Recursive
If selected, the contents of sub-directories are also listed in the output.
No
File Matching Rules
Filters files based on the matching criteria that you use for accepting or rejecting a file. For an example of file matching rules, see Filter Files by Matching Criteria.
No
-
Click the Advanced tab to configure the following attributes:
Attribute Description Required Time between size check
Wait time, in milliseconds, between size checks to determine if a file is ready to read. This allows a file write to complete before processing. Mule runtime performs two size checks and waits the specified amount of time between calls. If both checks return the same value, the file is ready to read.
No
Time between size check unit
Time unit for Time between size check.
No
Subset
Limits and sorts the number of files returned.
No
Streaming strategy
Configures the way data streams are consumed in Mule apps. This attribute is not currently enabled in the configuration UI. Configure it in the XML editor. See Configuring the Streaming Strategy in XML.
No
Target Variable
Name of the variable on which the operation’s output is placed.
No
Target Value
Expression that’s evaluated against the operation’s output. The outcome of this expression is stored in the target variable.
No
Error Mappings
Creates custom error types that you map to Mule error types. The mappings can help you further differentiate and group errors in your app. This attribute is not currently enabled in the configuration UI. Configure it in the XML editor. See Mule Errors.
No
Reconnection strategy
When an operation in a Mule application fails to connect to an external server, the default behavior is for the operation to fail immediately and return a connectivity error. You can modify the default behavior by configuring the reconnection strategy for the operation. This attribute is not currently enabled in the configuration UI. Configure it in the XML editor. See Reconnect and Reconnect Forever, and Configuring the Reconnection Strategy in XML.
No
Configuring the Move Operation
The Move operation moves the file or directory from the Source path to the Target Path. If the Source path points to a directory, then the directory is moved recursively.
-
Click the Move operation on the canvas UI to configure the following attributes in the General tab:
Attribute Description Required Source path
Path to the file or directory to perform the operation on.
Yes
Target path
Path to the directory to place the file in.
Yes
Create parent directories
If selected, a parent folder is created if the target path or its parent don’t exist. If unselected, a
FILE:ILLEGAL_PATHerror is thrown when you try to perform the operation.No
Overwrite
If selected, overwrites the target file if a file already exists. If Overwrite isn’t selected, a
FILE:FILE_ALREADY_EXISTSerror is thrown when you try to perform the operation.No
Rename to
New name for the file. If a new name isn’t provided, the original file name is kept.
No
-
Click the Advanced tab to configure the following attributes:
Attribute Description Required Error Mappings
Creates custom error types that you map to Mule error types. The mappings can help you further differentiate and group errors in your app. This attribute is not currently enabled in the configuration UI. Configure it in the XML editor. See Mule Errors.
No
Connection
Reconnection strategy
When an operation in a Mule application fails to connect to an external server, the default behavior is for the operation to fail immediately and return a connectivity error. You can modify the default behavior by configuring the reconnection strategy for the operation. This attribute is not currently enabled in the configuration UI. Configure it in the XML editor. See Reconnect and Reconnect Forever, and Configuring the Reconnection Strategy in XML.
No
Configuring the Read Operation
The Read operation reads the contents and metadata of a file at the specified path and returns a message whose payload is an input stream containing the file’s contents. The metadata is represented as a LocalFileAttributes object that’s expressed as message attributes (Message#getAttributes()).
The file’s MIME type is based on the file’s extension. You can force the output encoding and MIME type by using the optional Output MIME type and Output encoding parameters.
-
Click the Read operation on the canvas UI to configure the following attributes in the General tab:
Attribute Description Required File Path
Path to the file to read.
Yes
-
Click the Advanced tab to configure the following attributes:
Attribute Description Required Lock
If selected, places a file system-level lock on the file until the input stream that the operation returns is closed or fully consumed. The lock is provided by the host file system, so its behavior might change depending on the mounted drive and the operation system on which Mule runtime is running.
No
Time between size check
Wait time, in milliseconds, between size checks to determine if a file is ready to read. This allows a file write to complete before processing. Mule runtime performs two size checks and waits the specified amount of time between calls. If both checks return the same value, the file is ready to read.
No
Time between size check unit
Time unit for Time between size check.
No
Output MIME type
MIME type of the payload that this operation outputs.
No
Parameters
One or more key-value pairs to append to the value of the Output MIME type attribute. Multiple key-value pairs are allowed. These key-value pairs enable you to store data in a variable so that any component in the flow can use it.
No
Output encoding
Encoding of the payload that this component outputs.
No
Streaming Strategy
Configure the way data streams are consumed in Mule apps. This attribute is not currently enabled in the configuration UI. Configure it in the XML editor. See Configuring the Streaming Strategy in XML.
No
Target Variable
Name of the variable on which the operation’s output is placed.
No
Target Value
Expression that’s evaluated against the operation’s output. The outcome of this expression is stored in the target variable.
No
Error Mappings
Creates custom error types that you map to Mule error types. The mappings can help you further differentiate and group errors in your app. This attribute is not currently enabled in the configuration UI. Configure it in the XML editor. See Mule Errors.
No
Reconnection strategy
When an operation in a Mule application fails to connect to an external server, the default behavior is for the operation to fail immediately and return a connectivity error. You can modify the default behavior by configuring the reconnection strategy for the operation. This attribute is not currently enabled in the configuration UI. Configure it in the XML editor. See Reconnect and Reconnect Forever, and Configuring the Reconnection Strategy in XML.
No
Configuring the Rename Operation
The Rename operation renames the file specified in the Path field to the name provided in the to parameter. If the to parameter contains path separators, a FILE:ILLEGAL_PATH is thrown.
-
Click the Rename operation on the canvas UI to configure the following attributes in the General tab:
Attribute Description Required Path
Path to the file to rename.
Yes
New Name
New name for the file.
Yes
Overwrite
If selected, overwrites the target file if a file already exists with the name you specified in New Name.
No
-
Click the Advanced tab to configure the following attributes:
Attribute Description Required Error Mappings
Creates custom error types that you map to Mule error types. The mappings can help you further differentiate and group errors in your app. This attribute is not currently enabled in the configuration UI. Configure it in the XML editor. See Mule Errors.
No
Connection
Reconnection strategy
When an operation in a Mule application fails to connect to an external server, the default behavior is for the operation to fail immediately and return a connectivity error. You can modify the default behavior by configuring the reconnection strategy for the operation. This attribute is not currently enabled in the configuration UI. Configure it in the XML editor. See Reconnect and Reconnect Forever, and Configuring the Reconnection Strategy in XML.
No
Configuring the Write Operation
The Write operation writes content into the file specified in Path.
-
Click the Write operation on the canvas UI to configure the following attributes in the General tab:
Attribute Description Required Path
Path to the directory that contains the file to write content to.
Yes
Content
Content to write to the file. Defaults to the Content payload.
No
Create parent directories
If selected, a parent folder is created if the target path or its parent don’t exist. If unselected, a
FILE:ILLEGAL_PATHerror is thrown when you try to perform the operation.No
Write Mode
What to do if the file already exists. The options include:
-
OVERWRITE (Default)
-
APPEND
-
CREATE_NEW
No
-
-
Click the Advanced tab to configure the following attributes:
Attribute Description Required Error Mappings
Creates custom error types that you map to Mule error types. The mappings can help you further differentiate and group errors in your app. This attribute is not currently enabled in the configuration UI. Configure it in the XML editor. See Mule Errors.
No
Connection
Reconnection strategy
When an operation in a Mule application fails to connect to an external server, the default behavior is for the operation to fail immediately and return a connectivity error. You can modify the default behavior by configuring the reconnection strategy for the operation. This attribute is not currently enabled in the configuration UI. Configure it in the XML editor. See Reconnect and Reconnect Forever, and Configuring the Reconnection Strategy in XML.
No
-
Select Lock to place a file-system-level lock on the file until the input stream that the operation returns is closed or fully consumed.
Configuring the Scheduling Strategy in XML
Fixed Frequency
This is an example of the fixed frequency scheduling strategy XML using the default values:
<flow name="db-connector-acbFlow" doc:id="1c863ef7-d9e6-48ab-be8e-f1465d2b619d" >
	<db:listener doc:name="On Table Row" doc:id="81d4cf34-bb0d-497c-bc3f-316f4e79ad85" >
		<scheduling-strategy >
			<fixed-frequency frequency="1000" startDelay="0" timeUnit="MILLISECONDS"/>
		</scheduling-strategy>
	</db:listener>
</flow>
Cron
For more complex scheduling strategies, you can use a cron expression:
<flow name="db-connector-acbFlow" doc:id="1c863ef7-d9e6-48ab-be8e-f1465d2b619d" >
	<db:listener doc:name="On Table Row" doc:id="81d4cf34-bb0d-497c-bc3f-316f4e79ad85" >
    <scheduling-strategy>
      <cron expression="0 0 12 * * ?" timeZone="America/Los_Angeles"/>
    </scheduling-strategy>
  </db:listener>
</flow>
Configuring the Reconnection Strategy in XML
The following is an XML example of a standard reconnection strategy setting the count of reconnection attempts before failing to 5 and setting failsDeployment to true, which causes the application deployment to fail if the connection test fails. Because a frequency is not specified, the retry interval is the default of every 2000 ms:
<db:config name="Database_Config" doc:name="Database Config" doc:id="79ae8d0f-e0af-4901-961d-b80befbf3f86" >
	<db:data-source-connection >
		<reconnection failsDeployment="true" >
           <reconnect count="5"/>
        </reconnection>
	</db:data-source-connection>
</db:config>
The following is an XML example of a reconnect forever strategy where the connector attempts to reconnect every 4000 ms for as long as the application runs:
<db:config name="Database_Config1" doc:name="Database Config" doc:id="c0aaf1dd-ab6e-49ee-9e4d-8b5799945cc9">
    <db:data-source-connection>
        <reconnection failsDeployment="true">
            <reconnection>
                <reconnect-forever frequency="4000"/>
            </reconnection>
        </reconnection>
    </db:data-source-connection>
</db:config>
Configuring the Streaming Strategy in XML
You can configure how Mule handles data streams with streaming strategies.
File-Stored Repeatable Stream
The following is an XML example of reading a file that is configured with a 1 MB buffer:
<file:read path="bigFile.json">
  <repeatable-file-store-stream
    inMemorySize="1"
    bufferUnit="MB"/>
</file:read>
If you consistently process a file that’s no larger than 10 KB, you can save memory by reducing the inMemorySize attribute:
<file:read path="smallFile.json">
  <repeatable-file-store-stream
    inMemorySize="10"
    bufferUnit="KB"/>
 </file:read>
In-Memory Repeatable Stream
The following XML example shows an in-memory repeatable stream with a 512 KB initial size, which grows at a rate of 256 KB and allows up to 2000 KB (2 MB) of content in memory:
<file:read path="exampleFile.json">
  <repeatable-in-memory-stream
    initialBufferSize="512"
    bufferSizeIncrement="256"
    maxInMemorySize="2000"
    bufferUnit="KB"/>
</file:read>