Rate Limiting
Rate Limiting Policy
Policy name |
|
Summary |
Monitors access to an API by defining the maximum number of requests processed within a period of time |
Category |
Quality of Service |
First Mule version available |
v4.1.0 |
Returned Status Codes |
400 - Quota exceeded by WSDL APIs that use SOAP v1.2 (Mule only). Requests are blocked until the current window completes its processing. |
429 - Quota exceeded, requests are blocked until the current window finishes |
|
500 - Quota exceeded by WSDL APIs that use SOAP v1.1 (Mule only). Requests are blocked until the current window completes its processing. |
Summary
The Rate Limiting policy enables you to control the incoming traffic to an API by limiting the number of requests that the API can receive within a given period of time. After the limit is reached, the policy rejects all requests, thereby avoiding any additional load on the backend API.
When you configure the Rate Limiting policy, you can specify any number of pairs of quota (number of requests) and time window (time period) values.
Configuring Policy Parameters
Mule Gateway
When you apply the Rate Limiting policy to your API from the UI, you can configure the following parameters:
| Parameter | Description | Example |
|---|---|---|
Identifier |
The selector key using a DataWeave or regular String |
|
Number of Reqs |
The quota available per window |
A positive number |
Time Period |
The amount of time for which the quota is to be applied |
A positive number |
Time Unit |
The time in milliseconds, seconds, minutes, or hours |
Minutes |
Distributed |
When using interconnected runtimes with this flag enabled, quota will be shared among all nodes. |
checked or unchecked |
Expose Headers |
The option that defines whether to expose the x-ratelimit headers as part of the response |
checked or unchecked |
How This Policy Works
The Rate Limiting policy monitors the number of requests made in the current window (the available quota), allowing the requests to reach the backend only if the available quota is greater than zero.
You can configure the policy for multiple groups of requests by using identifiers in the policy configuration. Each group has a separate available quota for its window.
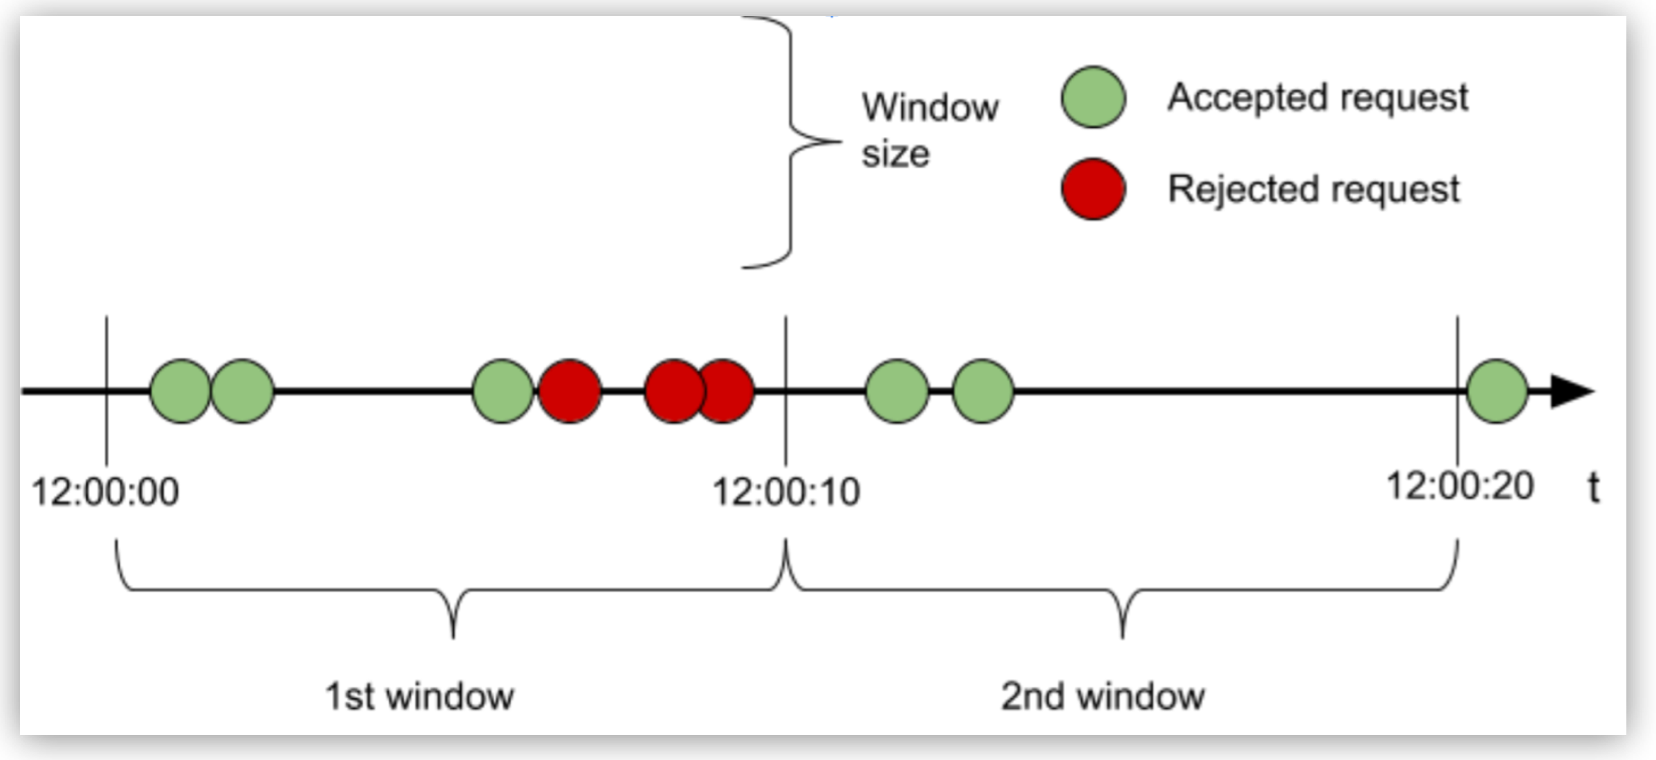
To understand how the Rate Limiting policy works, consider an example in which the configuration of 3 requests every 10 seconds allows or restricts incoming requests, based on the quota available in that window:

In the first window, because the quota is reached with the third request, all subsequent requests are rejected until the window closes. In the second window, only two of the three requests are processed and the quota remaining is dropped after the window time has elapsed.
An accepted request passes through the API to the backend. Conversely, a rejected request displays 429 status for HTTP (or either 400 or 500 if the API is WSDL) and does not reach the backend.
A rejected request on the other hand, displays a “429 status for HTTP, ” (or either 400 or 500 if the API is WSDL) and does not reach the backend.
Examples
Consider the previously described configuration of 3 requests every 10 seconds and how it works when the Rate Limiting policy is configured for clusters and uses identifiers.
Configuring Identifiers by Using Regular Strings
When you use the UI to add identifiers to the policy configuration, you can define groups of requests. The configured limits apply independently to each group. You can also use the identifier #[attributes.method] for one bucket per HTTP method in your Rate Limiting policy configuration.
An Identifier in the UI is a non-obligatory parameter. By default, the Identifier has no value. Based on whether you accept the default or provide a value, the policy performs in the following ways:
-
Not configured (default)
The Rate Limiting quota applies to every request per bucket or group.
-
Configured for an obligatory HTTP header
Each header has its own quota. Header values are case-sensitive. Quotas are created using the lazy creation strategy.
-
Configured for a non-obligatory HTTP header
Custom header, payload, query parameter, or expression values each have their own quotas.
The identifier, if not sent in the request, defaults to an empty value, having its own quota. This behavior allows the Rate Limiting policy to be applied to an API consumed by uncontrolled clients, and at the same time accommodates special buckets for the clients sending the identifier.
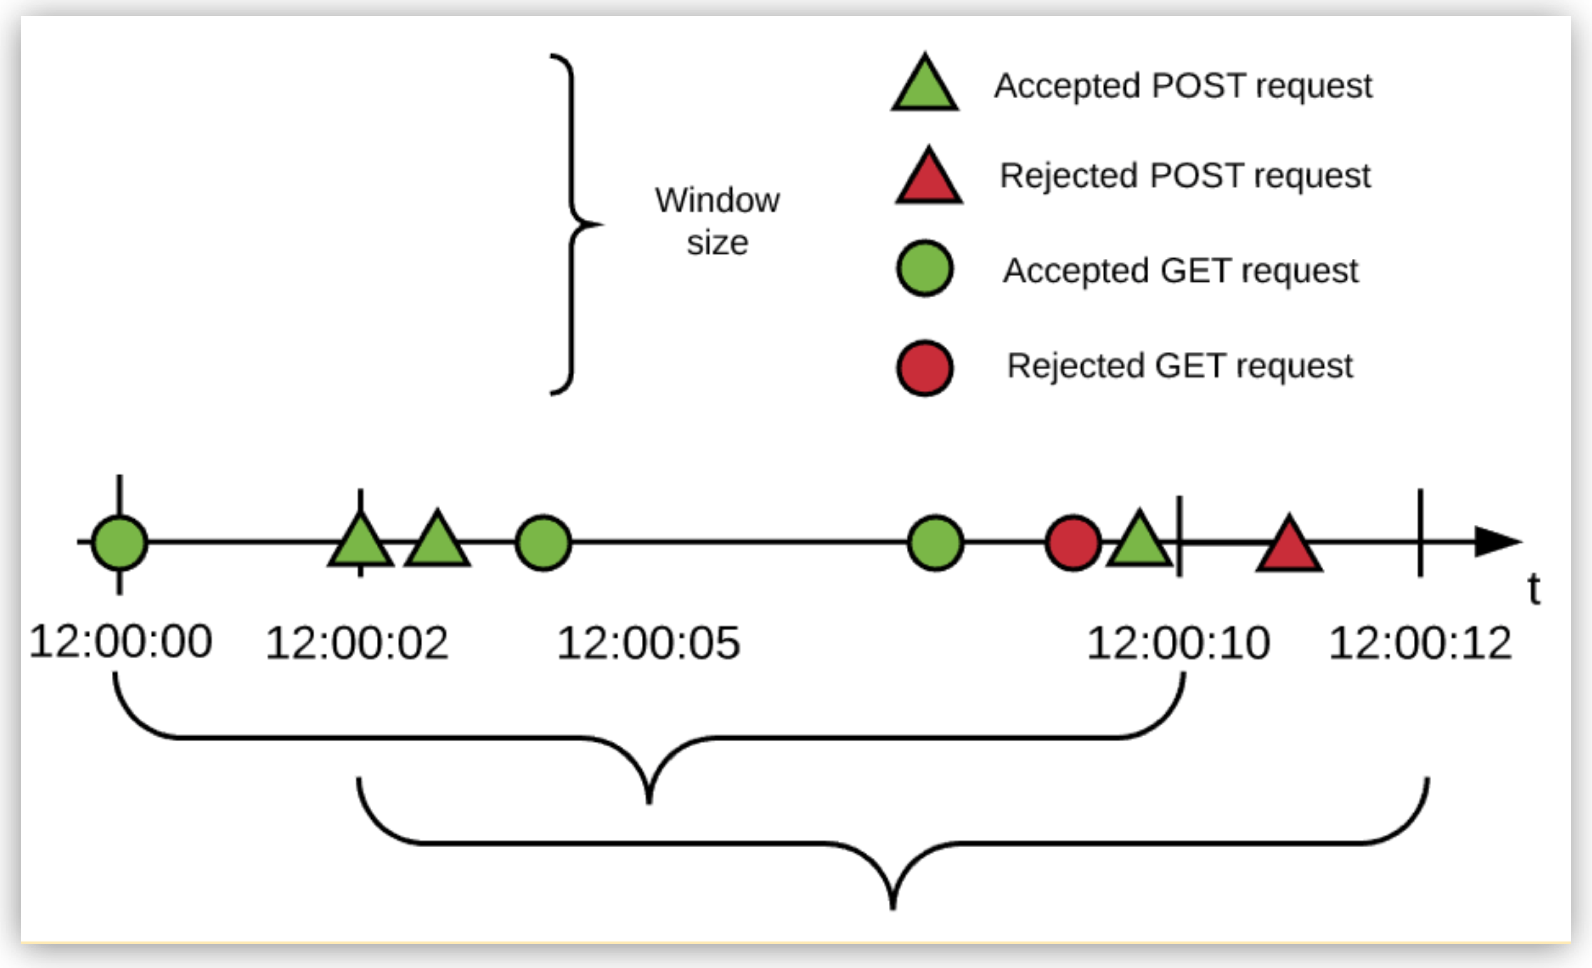
The following example shows the order of events that occur over a period of time using the identifier #[attributes.method] for a limit of 3 requests every 10 seconds:

In the example:
-
Every HTTP method is allowed 3 requests every 10 seconds (in this example, only GET and POST requests are made to the API).
-
The Rate Limiting policy works in a fixed-window fashion.
For more information, see the fixed-window size bracket in the diagram.
-
The window start times are independent.
-
The engine uses a lazy creation strategy that spools a rate-limiting algorithm whenever the first request for a method is received.
Configuring Identifiers by Using DataWeave Expressions
The rate-limiting engine, which is HTTP agnostic, depends solely on the resolution of the DataWeave expression. You can alter the Identifier expression in the UI to cover complex rate-limiting scenarios.
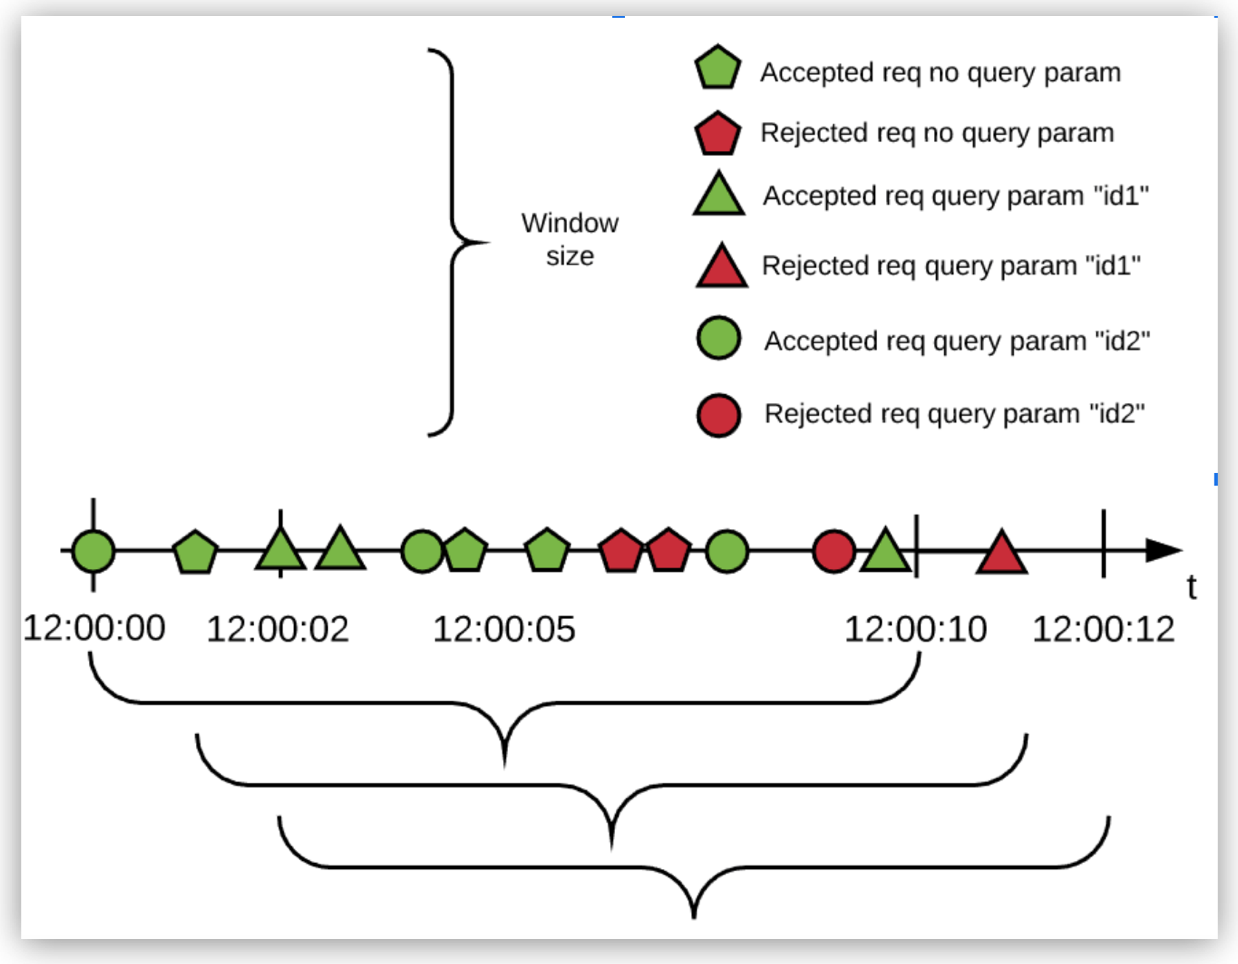
For example, you can configure a Rate Limiting policy with an identifier that uses one bucket for all Class A and Class C LAN requests and another bucket for everything else. The following image illustrates the second bucket in the previous sentence, which corresponds to 3 requests per 10 seconds quota with the DataWeave expression #[attributes.queryParam[‘customIdentifier’]] as the policy identifier:

In the example:
-
All requests without the identifier are resolved to the empty identifier and therefore use a single rate-limiting algorithm.
-
Each different identifier uses a different bucket, each bucket with its own independent quota.
This configuration creates a false or a true bucket that corresponds to the locality of the IP that made the request. The false and true values correspond to the domain of boolean values and not HTTP.
Nevertheless, the policy works correctly because the engine treats the resolved expression as a String. In this case, the value is automatically cast from Boolean to String. You can explicitly define casting in DataWeave by adding output text/plain --- to your script.
|
The HTTP RFC header names are case-insensitive. Anypoint Connector for MuleSoft HTTP changes header names to lowercase characters. However, the DataWeave key is case-sensitive. Therefore, when creating the |
Configuring Unbound Identifier Sets
Every identifier result has one algorithm. You must carefully create a DataWeave expression that does not return an unbound or a very large co-domain, which requires hosting the same number of algorithms in memory (at least a request for every possible identifier has to be made, because algorithms are created using the lazy creation strategy).
For example, suppose the DataWeave expression uses the IP address as the identifier in a Mule runtime engine instance that is public to the internet. If every public IPv4 IP on the internet makes a request to this Mule instance, there will be 3,706,452,992 algorithms running in a single Mule instance.
At an average of 250 bytes per algorithm, this amounts to approximately 1 terabyte in rate-limit algorithms. Therefore, use a DataWeave expression that resolves to a finite number of identifier to keep the resulting set as small as possible.
Configuring the Policy for Clusters (Mule only)
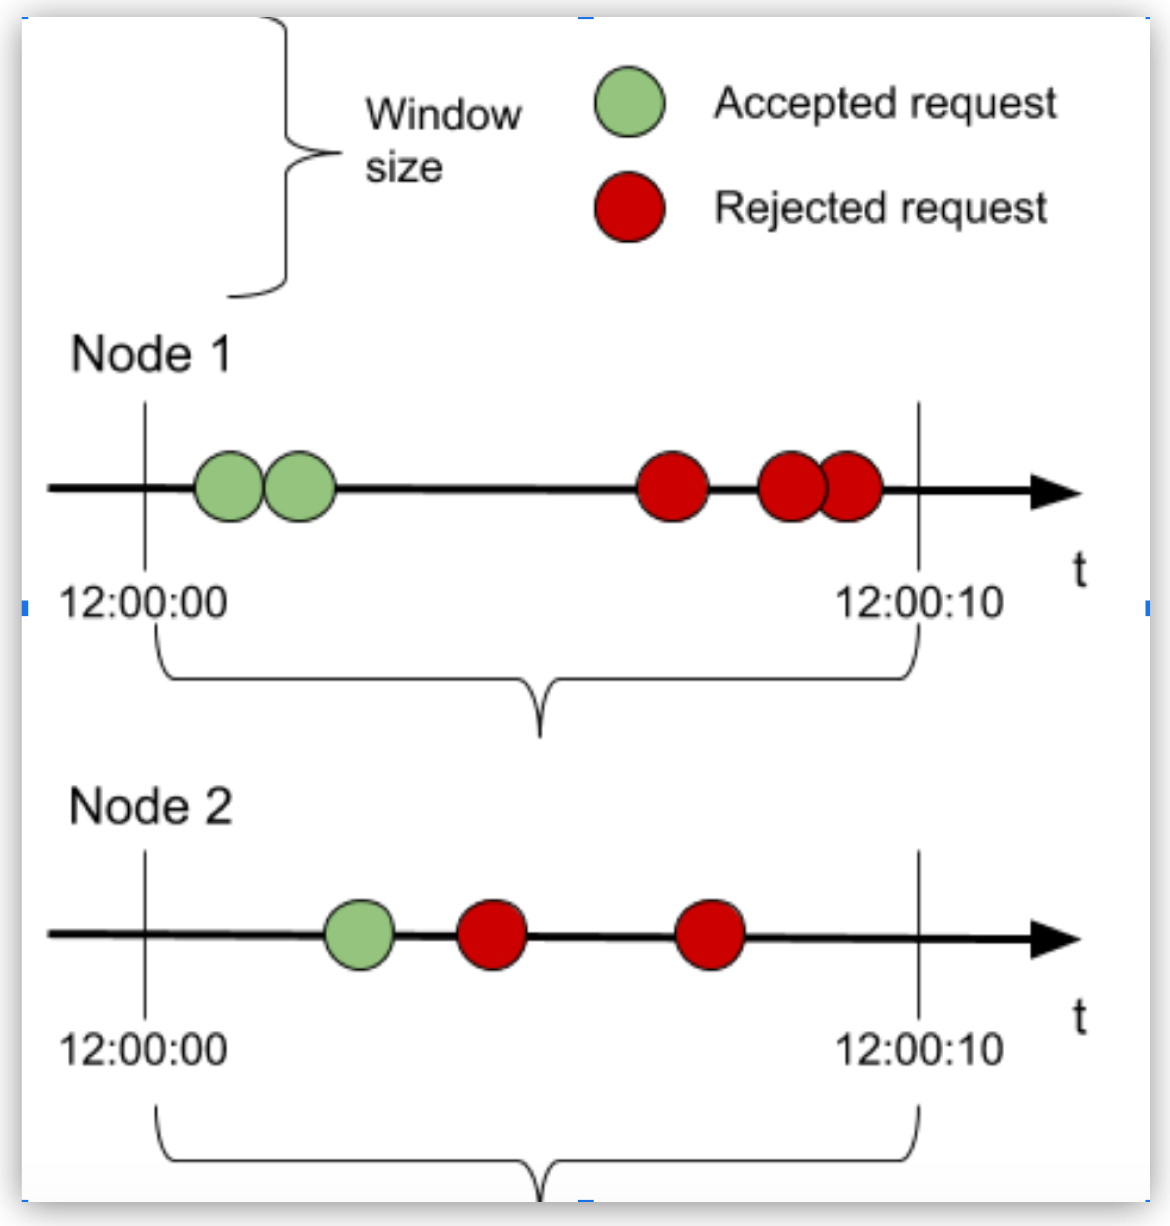
Consider the same configuration example of 3 requests and a window that starts exactly at 12:00:00, is reset every 10 seconds, and has a 2-node Mule cluster. Both nodes start and end their windows at the same time, and the cluster allows 3 requests per window in total:

Because the policy is clusterized, the whole cluster accepts three requests. If the clusterizable policy is turned off, the Mule cluster can accept six requests per window: that is, three requests per node.
To avoid distributed counters negatively impacting performance due to node synchronization needs, the policy uses caching mechanisms to predict the behavior and maximize throughput. However, some scenarios nevertheless result in higher latency, so be careful in your use of clusterizable configuration.
| To configure the Rate Limiting policy for clusters, the Mule runtime engine instance must be running as part of a Mule cluster. |
Configuring Your Rate Limiting Policy
When you configure your Rate Limiting policy, you must consider certain aspects of your environment to help you derive the most value from the policy.
Choosing Between a Cluster or a Standalone Configuration
You might have decentralized processing in your environment, with the following setup:
-
You have more than one servers for the same API.
-
Each server has its own backend.
-
The number of requests that can be served is limited only by the backend.
-
You require the fastest response time.
In such a scenario, you do not need to run the policy in a clustered setup. Simply set the policy limits of the policy lower than the backend capacity of the weakest of the nodes. Additionally, a load balancer might be useful in case a node goes down.
Alternatively, you might have centralized processing in your environment, with the following setup:
-
You have more than one servers for the same API.
-
You have a single backend to which all of the proxies connect.
-
You have a load balancer in front of the proxies
In such a scenario, you do not need a cluster. However, you must then configure the policy to have a value lower than the maximum capacity of the backend.
If your environment does not include load balancers, use a cluster instead of a standalone instance to be certain that your nodes can manage varying levels of traffic. The Rate Limiting policy is designed to work under both balanced and unbalanced workloads. Because the backend does not receive any extra requests, its maximum capacity is not exceeded.
Choosing Window Sizes for Cluster Nodes
Configure your environment to use processing windows longer than one minute, to prevent the latency potential caused by information sharing among nodes in a cluster.
This configuration recommendation applies to both Rate Limiting and Rate Limiting-SLA policies in a cluster scenario.
Choosing Persistence for Your Rate Limiting Policy (Mule only)
You can configure your Rate Limiting policy to use windows that persist as long as days, months, and years. For example, suppose you want to allow your user to consume 1 million requests per year, but you cannot ensure that the node will be up the entire period or will need maintenance, which may result in restarting Mule runtime engine.
The algorithm has been running for several months, so the client will lose critical information. Persistence solves this problem by periodically saving the current policy state. In case of a redeployment or a restart, the algorithms are recreated from the last known persisted state or started from a clean state.
Although persistence is enabled by default, you can turn it off by setting the following property to false:
throttling.persistence_enabled
You can also tweak the persistence frequency rate, which has a default of 10 seconds:
throttling.persistent_data_update_freq
|
Persistence is not available on CloudHub. Persistence provided by ObjectStore v2 on CloudHub 2.0 is not supported. |
FAQ
When does the window start?
The window starts with the first request after the policy is successfully applied.
What type of window does the algorithm use?
It uses a fixed window.
What happens when the quota is exhausted?
The algorithm is created on demand, when the first request is received. This event fixes the time window. Each request consumes the request quota from the current window until the time expires.
When the request quota is exhausted, the Rate Limiting policy rejects the request. When the time window closes, the request quota is reset and a new window of the same fixed size starts.
What happens if I define multiple limits?
The policy creates one algorithm for each Limit with the request quota per time window configuration. Therefore, when multiple limits are configured, every algorithm must have its own available quota within the current window for the request to be accepted.
What does each response header mean?
Each response header has information about the current state of the request:
-
X-Ratelimit-Remaining: The amount of available quota
-
X-Ratelimit-Limit: The maximum available requests per window
-
X-Ratelimit-Reset: The remaining time, in milliseconds, until a new window starts
By default, the X-RateLimit headers are disabled in the response. You can enable these headers by selecting Expose Headers when you configure the policy.
When should I use Rate Limiting instead of Rate-Limiting SLA or Spike Control?
Use Rate Limiting and Rate-Limiting SLA policies for accountability and to enforce a hard limit to a group (using the identifier in Rate Limiting) or to a client application (using Rate-Limiting SLA). If you want to protect your backend, use the Spike Control policy instead.


